This article github warehouse address: https://github.com/Rynxiao/webpack-tutorial It contains all the code for this tutorial.
If you think this article is well written, please give this warehouse a star: -D.
1. Introduction
1.1 What is webpack?
webpack is a module bundler.
webpack takes modules with dependencies and generates static assets representing those modules.
A simple summary is that webpack is a module packaging tool that handles dependencies between modules and generates static resources of corresponding modules.
1.2 What can webpack do?
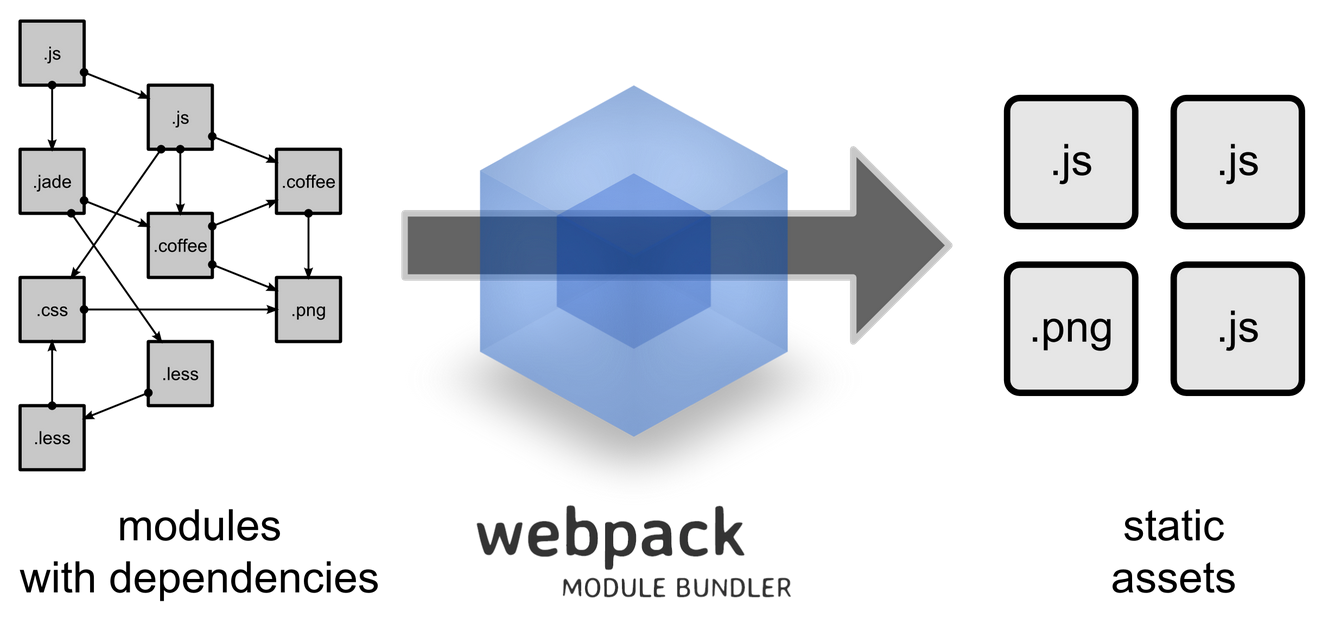
Several messages are clearly reflected in the figure:
- webpack treats all static files in a project as a module
- There are some column dependencies between modules
- Multi-page static resource generation (generating multiple static files after packaging, involving code splitting)
2. webpack installation
-
Global installation (for global invocation: such as webpack --config webpack.config.js)
npm install -g webpack Project Installation
```javascript
npm install webpack
// Processing calls similar to the following
import webpack from "webpack";
var webpack = require("webpack");
```
It is recommended that Taobao's npm image be installed, so that downloading npm package will be much faster.
// Mode I
npm install xx --registry=https://registry.npm.taobao.org/

// Mode 2: Install npm tools provided by Taobao
npm install -g cnpm
cnpm install xx

// Mode 3
// In the user's home directory, find the. npmrc file, with the following configuration
registry=https://registry.npm.taobao.org/
3. Basic configuration of webpack
Create a configuration file (webpack.config.js, which is executed by default when the webpack command is executed)
module.export = {
    entry : 'app.js',
    output : {
        path : 'assets/',
        filename : '[name].bundle.js'
    },
    module : {
        loaders : [
            // Parsing js or jsx modules using babel-loader
            { test : /\.js|\.jsx$/, loader : 'babel' },
            // Using css-loader to parse CSS module
            { test : /\.css$/, loader : 'style!css' },
            // or another way
            { test : /\.css$/, loader : ['style', 'css'] }
        ]
    }
};
Note 1: webpack.config.js defaults to output a webpack configuration file, which is the same as CLI calls, but more simple
Explanation 2: Executing webpack command can run configuration, prerequisite, global installation of webpack, project installation of each module loader
Illustration 3: entry corresponds to the entry js file that needs to be packaged, output corresponds to the output directory and file name, and loaders in module corresponds to the loaders needed to parse each module.
A simple example
basic/app.js
require('./app.css');
document.getElementById('container').textContent = 'APP';
basic/app.css
* {
    margin: 0;
    padding: 0;
}
#container {
    margin: 50px auto;
    width: 50%;
    height: 200px;
    line-height: 200px;
    border-radius: 5px;
    box-shadow: 0 0 .5em #000;
    text-align: center;
    font-size: 40px;
    font-weight: bold;
}
basic/webpack.config.js
/**
 * webpack Packing configuration files
 */

module.exports = {
    // If you have multiple entry js and need to be packaged in a file, you can write this
    // entry : ['./app1.js', './app2.js']
    entry : './app.js',
    output : {
        path : './assets/',
        filename : '[name].bundle.js'
    },
    module : {
        loaders : [
            { test : /\.js$/, loader : 'babel' },
            { test : /\.css$/, loader : 'style!css' }
        ]
    }
};
basic/index.html
<!DOCTYPE html>
<html lang="en">
<head>
    <meta charset="UTF-8">
    <title>basic webpack</title>
</head>
<body>
    <div id="container"></div>
    <script src="./assets/main.bundle.js"></script>
</body>
</html>
Execute webpack in the basic folder with the following packaging information
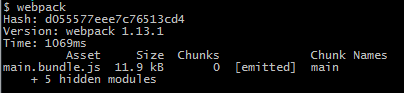
Generate the main.bundle.js file with the chunk name main and also the default chunk name generated by webpack
## 4. Splitting of points commonly used in webapck
### 4.1 entry correlation
4.1.1 web pack multi-entry configuration
In the simple configuration of the above example, there is only one entry file, so what should be done if multiple packages need to be loaded for a page or when multiple pages want to introduce the corresponding packages at the same time?
entry : {
    app1 : './app1.js',
    app2 : './app2.js'
}
Execute webpack in the multi-entry folder with the following packaging information
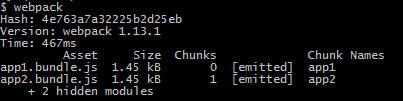
You can see that two entry files and their corresponding chunk names were generated.
### 4.2 output correlation
4.2.1 output.publicPath
output: {
    path: "/home/proj/cdn/assets/[hash]",
    publicPath: "http://cdn.example.com/assets/[hash]/"
}
To quote an official website:
The publicPath specifies the public URL address of the output files when referenced in a browser. For loaders that embed <script> or <link> tags or reference assets like images, publicPath is used as the href or url() to the file when it's different then their location on disk (as specified by path).
PucPath specifies the address you use in your browser to refer to your static file. It will include your image, script, and style loading address, which is commonly used for online publishing and CDN deployment.
For example, there are the following configurations:
var path = require('path');
var HtmlWebpackPlugin =  require('html-webpack-plugin');

module.exports = {
    entry : './app.js',
    output : {
        path : './assets/',
        filename : '[name].bundle.js',
        publicPath : 'http://rynxiao.com/assets/'
    },
    module : {
        loaders : [
            { test : /\.js$/, loader : 'babel' },
            { test : /\.css$/, loader : 'style!css' }
        ]
    },
    plugins : [
        new HtmlWebpackPlugin({
            filename: './index-release.html',
            template: path.resolve('index.template'),
            inject: 'body'
        })
    ]
};
Among them, I set publicPath to http://rynxiao.com/assets/, which set some things to the plug-in, which will be discussed below. In a word, the plug-in's function is to generate the home page file when it is published online, where the path referenced in script will be replaced. As follows:

4.2.2 output.chunkFilename
In addition to the main module, each file may generate many additional blocks, such as code segmentation in the module. The chunk Filename contains the following file generation rules:
[id] is replaced by the ID of the corresponding block.
[name] is replaced by the name of the corresponding block (or by id if the block has no name).
[hash] will be replaced by file hash.
[chunkhash] is replaced by a block file hash.
For example, I set the following settings in output:
output : {
    path : './assets/',
    filename : '[name].[hash].bundle.js',
    chunkFilename: "chunk/[chunkhash].chunk.js"
}
At the same time, I modified the file in basic/app.js.
require('./app.css');

require.ensure('./main.js', function(require) {
    require('./chunk.js');
});

document.getElementById("container").textContent = "APP";
The corresponding chunk.js generates a chunk file with chunkhash, as shown below:

This is especially useful when making version numbers for files. How to replace hash at that time is discussed below.
4.2.3 output.library
This configuration is used when publishing as a library. The name of the configuration is the name of the library, which can usually be used with library Target. For example, I add this configuration to basic/webpack.config.js:
output : {
    // ...
    library : 'testLibrary'
    // ...
}
Then the main.bundle.js actually generated will default with the following code:
var testLibrary = (//The code generated by previous packaging;
// This allows you to use the variable `testLibrary'directly when introducing the library directly.

4.2.4 output.libraryTarget
It specifies which way to export your library, such as amd/cmd / or direct variables, including the following
"Var" - Output in direct variables (default library mode) var Library = xxx (default)
"This" - Output this["Library"] = xxx by setting the properties of this
"commonjs" - Output exports["Library"] = xxx by setting the properties of exports
"commonjs2" - Output module.exports = xxx by setting the properties of module.exports
"amd" - output in amd mode
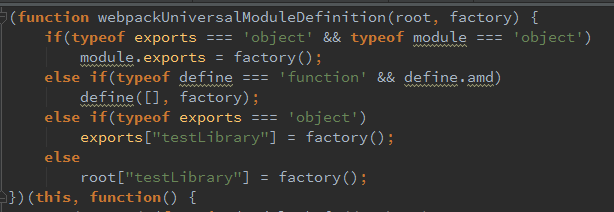
"umd" - combined with commonjs2/amd/root
For example, I output in umd mode, as shown in the figure:
### 4.3 module correlation
4.3.1 loader!
require("!style!css!less!bootstrap/less/bootstrap.less");
// => the file "bootstrap.less" in the folder "less" in the "bootstrap"
// module (that is installed from github to "node_modules") is
// transformed by the "less-loader". The result is transformed by the
// "css-loader" and then by the "style-loader".
// If configuration has some transforms bound to the file, they will not be applied.
Streaming calls on behalf of loaders, such as:
{ test : /\.css|\.less$/, loader : 'style!css!less' }
This means using less loader to interpret less files, then using css loader to parse less parsed files, and so on.
include and exclude in 4.3.2 loaders
include denotes the files or directories that must be included, while exclude denotes the directories that need to be excluded.
For example, if we want to exclude the node_modules directory in our configuration, we can write as follows
{
    test : /\.js$/,
    loader : 'babel',
    exclude : nodeModuleDir
}
Official Recommendation: Include is preferred, and include is best in the file directory
4.3.3 module.noParse
Modules that use noParse will not be parsed by loaders, so we can use this configuration to improve performance when the library we use is too large and does not contain require, define, or similar keywords (because the module loads are not parsed, so they will report errors).
For example, add no-parse.js to the basic / directory
var cheerio = require('cheerio');

module.exports = function() {
    console.log(cheerio);
}
The following configuration is added to webpack.config.js:
module : {
    loaders : [
        { test : /\.js$/, loader : 'babel' },
        { test : /\.css$/, loader : 'style!css' }
    ],
    noParse : /no-parse.js/
}
When the index.html is opened in the browser after the packaging is executed, an error requires is not defined

4.4 resolve correlation
4.4.1 resolve.alias
Setting aliases for modules allows developers to specify reference paths for some modules. For libraries that are often import ed or require d, such as react, it's better to specify their location directly, so webpack saves a lot of time searching for hard drives.
For example, we modify the relevant content in basic/app.js:
var moment = require("moment");

document.getElementById("container").textContent = moment().locale('zh-cn').format('LLLL');
Load a class library of operation time to display the current time. Using webpack --profile --colors --display-modules to execute the configuration file, the following results are obtained:
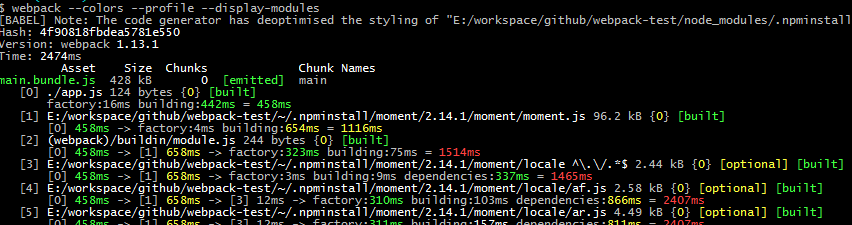
It will be found that packaging generates 104 hidden files, half of which are dealing with moment class libraries, such as looking for moment dependent class libraries and so on.
Add the following configuration to basic/webpack.config.js, and then execute the configuration file
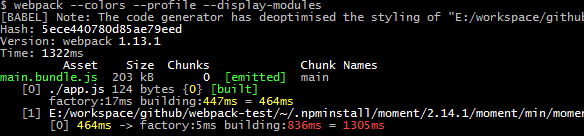
resolve : {
    alias : {
        moment : 'moment/min/moment-with-locales.min.js'
    }
}

Has it been found that the packaging time has been greatly shortened and only two hidden files have been generated?
Use with module.noParse
module.noParse see the explanation above.
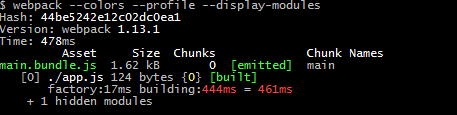
noParse: [/moment-with-locales/]
After packaging, the effect is as follows:
Did you find that the packing time has been further shortened?
Use with externals
externals see the following explanation
Webpack is so powerful that scripts packaged with it can run in a variety of environments. Web environment is only its default one, but also the most commonly used one. Considering that there are many public CDN services on the Web, how can we use Webpack in conjunction with public CDN? The approach is to declare an external dependency using externals.
externals: {
    moment: true
}
Of course, you need to add a line to the HTML code.
<script src="//apps.bdimg.com/libs/moment/2.8.3/moment-with-locales.min.js"></script>
After packaging, the effect is as follows:
4.4.2 resolve.extensions
resolve : {
    extensions: ["", ".webpack.js", ".web.js", ".js", ".less"]
}
The purpose of this configuration is to automatically add file extensions, such as the following code:
require('style.less');

var app = require('./app.js');
Then with this configuration, you can write as follows:
require('style');

var app = require('./app');
4.5 externals
When we want to require some other libraries or API s in the project, but do not want the source code of these libraries to be built into the runtime file, this is necessary in practical development. At this point, we can solve this problem by configuring externals parameters:
//webpack.config.js
module.exports = {
    externals: {
      'react': 'React'
    },
    //...
}
The key of the externals object is used for require, such as require('react'), and the value of the object represents how to access the object in global (that is, window), which is window.React.
Similarly, jQuery can be written as follows:'jquery':'jQuery', then require('jquery').
Pay attention to introducing order in HTML.
<script src="react.min.js" />
<script src="bundle.js" />
4.6 devtool
Provides some ways to make code debugging more convenient, because the packaged code is merged after the code, not conducive to error removal and positioning. There are several ways to do this. See Official Website devtool
For example, I added the following configuration to basic/app.js:
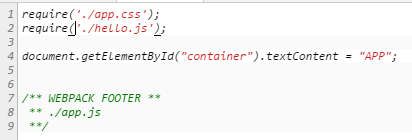
require('./app.css');

// Add hello.js. Obviously, there will be no hello.js file in the folder. There will be an error here.
require('./hello.js');

document.getElementById("container").textContent = "APP";
Execute the file and then run index.html. The error results are as follows:

The hint given is line 48 of main.bundle.js. Click in to see the error report as follows:

You can't see exactly where your program went wrong from here, and there are still a few lines here. When a file has thousands of lines, you will have a longer time to locate the bug.
Add the devtool file configuration as follows:
module.exports = {
    devtool: 'eval-source-map',
    // ....
};
Execute the file and then run index.html. The error results are as follows:

We found that app.js was located directly, and we reported an error in the second line. Click to see the error in the second line as follows:
The location of the problem is clear at a glance.
5. Common skills of webpack
### 5.1 Code Block Partitioning
5.1.1 Commonjs uses require.ensure to generate chunk blocks
require.ensure(dependencies, callback);

//static imports
import _ from 'lodash'

// dynamic imports
require.ensure([], function(require) {
  let contacts = require('./contacts')
})
This point has been demonstrated in output.chunkFileName and can be viewed.
5.1.2 AMD uses require to generate chunk blocks
require(["module-a", "module-b"], function(a, b) {
    // ...
});
5.1.3 Package project APP code separately from public library files
We added the following code in basic/app.js
var $ = require('juqery'),
    _ = require('underscore');

//.....
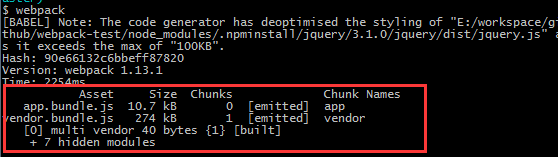
Then we add vendor to the configuration file and rename the generated vendor block using a code-separated plug-in
var webpack = require("webpack");

module.exports = {
    entry: {
        app: "./app.js",
        vendor: ["jquery", "underscore", ...],
    },
    output: {
        filename: "bundle.js"
    },
    plugins: [
        new webpack.optimize.CommonsChunkPlugin(/* chunkName= */"vendor", /* filename= */"vendor.bundle.js")
    ]
};
Run the configuration file as follows:
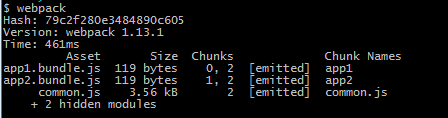
5.1.4 Extraction of Public Parts of Multi-entry Files
We re-create a folder called common, with the following files:
// common/app1.js

console.log("APP1");
// common/app2.js

console.log("APP2");
There will be a lot of common code in app1.bundle.js and app2.bundle.js generated after packaging, and we can extract it.
// common/webpack.config.js

/**
 * webpack Packing configuration files
 * Extracting common part js
 */

var webpack = require('webpack');

module.exports = {
    entry : {
        app1 : './app1.js',
        app2 : './app2.js'
    },
    output : {
        path : './assets/',
        filename : '[name].bundle.js'
    },
    module : {
        loaders : [
            { test : /\.js$/, loader : 'babel' },
            { test : /\.css$/, loader : 'style!css' }
        ]
    },
    plugins : [
        new webpack.optimize.CommonsChunkPlugin("common.js")
    ]
};
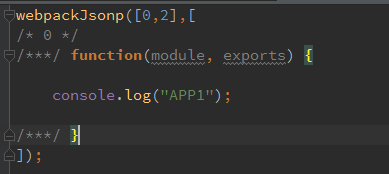
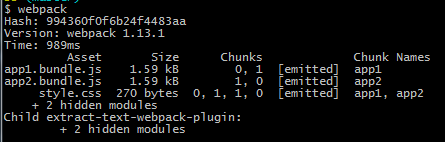
The extracted common JS is common.js, as shown in the figure
Looking at app1.bundle.js, we found that the packaged content is basically the code we wrote in the module, and the public part has been put forward in common.js.
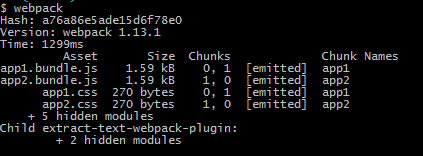
5.1.5 Extracts css files and packages them into css bundle s
By default, importing style files with require('style.css') will generate < style > tags directly in < head > of index.html, which belongs to inline. If we want to extract these CSS files, we can follow the following configuration.
// extract-css/app1.js
require('./app1.css');
document.getElementById("container").textContent = "APP";

// extract-css/app2.js
require('./app2.css');
document.getElementById("container").textContent = "APP1 APP2";

// extract-css/app1.css
* {
    margin: 0;
    padding: 0;
}
#container {
    margin: 50px auto;
    width: 50%;
    height: 200px;
    line-height: 200px;
    border-radius: 5px;
    box-shadow: 0 0 .5em #000;
    text-align: center;
    font-size: 40px;
    font-weight: bold;
}

// extract-css/app2.css
#container {
    background-color: #f0f0f0;
}

// extract-css/webpack.config.js
/**
 * webpack Packing configuration files
 * Extract Common Styles (no chunk)
 */

var webpack = require('webpack');
var ExtractTextPlugin = require("extract-text-webpack-plugin");

module.exports = {
    entry : {
        app1 : './app1.js',
        app2 : './app1.js'
    },
    output : {
        path : './assets/',
        filename : '[name].bundle.js'
    },
    module : {
        loaders : [
            { test : /\.js$/, loader : 'babel' },
            { test : /\.css$/, loader : ExtractTextPlugin.extract("style-loader", "css-loader") }
        ]
    },
    plugins : [
        new ExtractTextPlugin("[name].css")
    ]
};
The results are as follows:
If you include a chunk file and because of the style file in the chunk file, the style file will be embedded in js
css merged into a file
// ...
module.exports = {
    // ...
    plugins: [
        new ExtractTextPlugin("style.css", {
            allChunks: true
        })
    ]
}
The effect is as follows:
If you include a chunk file, and because of the style file in the chunk file, the style file will not be embedded in js, but will be output directly to style.css
Use with Commons Chunk Plugin
// ...
module.exports = {
    // ...
    plugins: [
        new webpack.optimize.CommonsChunkPlugin("commons", "commons.js"),
        new ExtractTextPlugin("[name].css")
    ]
}
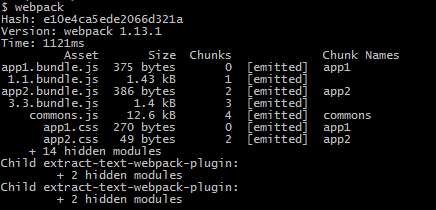
The results are as follows:
5.2 How to edit a document
In order to prevent browsers from caching static resources and changing file versions when publishing online, two approaches are provided here:
5.2.1 Use the Html Web pack Plugin plug-in
// version/webpack.config.js

/**
 * webpack Packing configuration files
 * Documents are typed and published online
 */

var path = require('path');
var HtmlWebpackPlugin =  require('html-webpack-plugin');

module.exports = {
    entry : './app.js',
    output : {
        path : './assets/',
        filename : '[name].[hash].bundle.js',
        publicPath : 'http://rynxiao.com/assets/'
    },
    module : {
        loaders : [
            { test : /\.js$/, loader : 'babel' },
            { test : /\.css$/, loader : 'style!css' }
        ]
    },
    plugins : [
        new HtmlWebpackPlugin({
            filename: './index-release.html',
            template: path.resolve('index.template'),
            inject: 'body'
        })
    ]
};
The results are as follows:

After each packaging, the file hash is generated, which achieves version control.
5.2.2 Custom Plug-ins Add Versions to Files
// version/webpack.config.version.js

/**
 * webpack Packing configuration files
 * Document editing, online publishing, custom plug-in mode
 */

var path = require('path');
var fs = require('fs');
var cheerio = require('cheerio');

module.exports = {
    entry : './app.js',
    output : {
        path : './assets/',
        filename : '[name].[hash].bundle.js',
        publicPath : 'http://rynxiao.com/assets/'
    },
    module : {
        loaders : [
            { test : /\.js$/, loader : 'babel' },
            { test : /\.css$/, loader : 'style!css' }
        ]
    },
    plugins : [
        function() {
            this.plugin("done", function(stats) {
                fs.writeFileSync(
                    path.join(__dirname, "stats.json"),
                    JSON.stringify(stats.toJson())
                );
                fs.readFile('./index.html', function(err, data) {
                    var $ = cheerio.load(data.toString());
                   $('script[src*=assets]').attr('src','http://rynxiao.com/assets/main.'
                            + stats.hash +'.bundle.js');
                    fs.writeFile('./index.html', $.html(), function(err) {
                        !err && console.log('Set has success: '+ stats.hash)
                    })
                })
            });
        }
    ]
};
The effect is as follows:

The same effect can be achieved, but stats can only get hash value for the time being, because we can only consider version control on hash, for example, we can build hash directory and so on.
5.3 shim
For example, we use the Pen module, which relies on a window.jQuery, but the jQuery I have in hand is Common JS grammar, and the Pen object is generated and bound to the global, but I need to obtain variables through require('pen'). Ultimately, Shim processing provides direct support:
Practice 1:
{test: require.resolve('jquery'), loader: 'expose?jQuery'}, // Output jQuery to global
{test: require.resolve('pen'), loader: 'exports?window.Pen'}    // Introduce Pen as a module
Practice 2:
new webpack.ProvidePlugin({
    $: "jquery",
    jQuery: "jquery",
    "window.jQuery": "jquery"
})
This plugin makes a module available as variable in every module.
The module is required only if you use the variable.
Example: Make $ and jQuery available in every module without writing require("jquery").
5.4 How to write a loader
Loader supports chain execution. For example, the loader for processing sass files can be composed of sass-loader, css-loader, style-loader. Compoiler executes it from right to left. The first Loader will get the original content to be processed. The result after the last Loader is sent back to the next one, and the last Loader will process the result with String or Buffer. The form is returned to compiler. Of course, it is also hoped that each loader will only do what it is supposed to do, pure things, and not want a basket of functions to be integrated into a Loader.
The official website gives two ways of writing:
// Identity loader
module.exports = function(source) {
  return source;
};
// Identity loader with SourceMap support
module.exports = function(source, map) {
  this.callback(null, source, map);
};
The first is based on return return because it is the Loader of the synchronous class and the only content returned. If you write that loader is dependent, you can also quote in the header, for example:
// Module dependencies.
var fs = require("fs");
module.exports = function(source) {
  return source;
};
The second is to expect chain calls between multiple loaders to pass the results returned by the previous loader to the next loader.
case
For example, if I want to develop an es6-loader for file processing that ends with a. ES6 filename, we can write this
// loader/es6-loader.js
// Of course, if I don't want to pass what this loader returns here to the next laoder, then I
// You can return source directly at the end
// After this change, I can throw it directly to babel-loader for processing.
module.exports = function(source, map) {
    // Receive es6 endings and make source changes
    source = "console.log('I changed in loader');"
    // Print the parameters passed in
    console.log("param", this.query);
    // ... We can do some other logical processing.
    this.callback(null, source, map);
};

// loader/loader1.es6
let a = 1;
console.log(a);

// loader/app.js
// Transfer parameters to loader
require('./es6-loader?param1=p1!./loader1.es6');
document.getElementById("container").textContent = "APP";
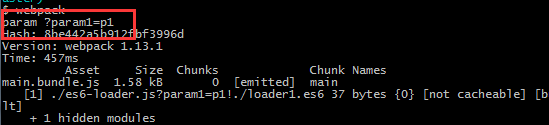
Executing the webpack packaging command prints the value of param in the console, as shown in Figure 1:
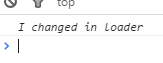
After execution, open index.html and print "I changed in loader" on the console instead of 1
Advanced
Read the following article How to Develop a Web Pack Loader
5.4 How to write a plugin
Basic structure of plug-ins
A plug-in is an instantiatable object, and an application method must be bound to its prototype. This method is called by Webpack compiler when the plug-in is installed.
function HelloWorldPlugin(options) {
    // Setup the plugin instance with options...
}

HelloWorldPlugin.prototype.apply = function(compiler) {
    compiler.plugin('done', function() {
        console.log('Hello World!');
    });
};

module.exports = HelloWorldPlugin;
Install a plug-in and add it to the plugins array in the configuration.
var HelloWorldPlugin = require('hello-world');

var webpackConfig = {
// ... config settings here ...
    plugins: [
        new HelloWorldPlugin({options: true})
    ]
};
The execution effect is as follows:

Here is only a simple introduction, usually do not need to write their own plug-ins, if you want to further understand, you can see the official website example.
5.5 Layout a local server
// 1. Global installation of webpack-dev-server
cnpm install -g webpack-dev-server

// 2. Set up a file startup directory and run it
webpack-dev-server --content-base basic/

// 3. Enter localhost:8080 in the browser
5.6 thermal replacement
// auto-refresh/app.js
document.getElementById("container").textContent = "APP APP HOT ";
console.log("OK");

// auto-refresh/server.js
var webpack = require('webpack');
var config = require('./webpack.config.js');
var WebpackDevServer = require("webpack-dev-server");

var compiler = webpack(config);
new WebpackDevServer(webpack(config), {
    publicPath: config.output.publicPath,
    hot: true,
    noInfo: false,
    historyApiFallback: true
}).listen(8080, 'localhost', function (err, result) {
    if (err) {
        console.log(err);
    }
    console.log('Listening at localhost:3000');
});

// auto-refresh/webpack.config.js
/**
 * webpack Packing configuration files
 */

var webpack = require('webpack');

module.exports = {
    entry : [
        'webpack-dev-server/client?http://127.0.0.1:8080', // WebpackDevServer host and port
        'webpack/hot/only-dev-server',
        './app.js'
    ],
    output : {
        path : './assets/',
        filename : '[name].bundle.js',
        publicPath : './assets/'
    },
    module : {
        loaders : [
            { test : /\.js$/, loader : 'react-hot!babel' },
            { test : /\.css$/, loader : 'style!css' }
        ]
    },
    plugins : [
        new webpack.HotModuleReplacementPlugin(),
        new webpack.NoErrorsPlugin(),
        new webpack.DefinePlugin({
            'process.env.NODE_ENV': '"development"'
        }),
    ]
};

// auto-refresh/index.html
<!DOCTYPE html>
<html lang="en">
<head>
    <meta charset="UTF-8">
    <title>basic webpack</title>
</head>
<body>
    <div id="container"></div>
    <script src="./assets/main.bundle.js"></script>
</body>
</html>

// Function
node server.js

// Browser input: localhost:8080
5.7 Let wepack.config.js support es6 writing
// 1. Install babel-core, babel-preset-es2015 and babel-loader

// 2. Configuration of the. babelrc file in the project root directory
{
  "presets": ["es2015"]
}

// 3. Rename webpack.config.js as webpack.config.babel.js

// 4. Run webpack --config webpack.config.babel.js

// Note that node version 5.0 and babel-core version 6 require this configuration
This is a Webpack support, but it's not mentioned at all in the documentation (it should be added right away). As long as you name the configuration file webpack.config.[loader].js, the Webpack will use the corresponding loader to transform the configuration file once. So to use this method, you need to install two packages, babel-loader and babel-core. Remember that you don't need a complete Babel package.
Other approaches (unsuccessful)
1.In the above scheme, you can run directly without renaming. webpack,But today's trial has been unsuccessful.
2.{
    test : /\.js|jsx$/,
    loader : 'babel',
    query: {
          //Add two presents and use both presets to process js or jsx files
          presets: ['es2015', 'react']
    }
}
6. Related links
Writing Webpack Configuration Files with ES6
One Hour Pack Church: Introduction Guide to webpack
Front-end modularization tool-webpack
How to develop a Webpack Loader (1)
Optimization of Web pack usage