Learning React, has been using the original scaffolding, create-react-app, but used for so long, psychological inevitably is not taste, after all, I have been a little knowledge of webpack, so I spent a day, read a lot of blogs, but most blogs are not unified, so I have not built up for half a day, and then I read the official website step by step to build, step by step to understand, After all, the React environment has been built, and many pits have been trampled on the way. Write down the configuration here, hoping that those who pass by will not encounter these pits.
Getting started
Open your terminal and create a new folder. You can name this folder at will. Initialize the project by yarn init command after entering the folder. Yarn init, like npm init, will give you a hint as long as you don't stop pressing Enter or configure it as you wish.
mkdir webpack
cd webpack
npm init
When the npm init command is completed, you can see that your folder (in this case,'hello-world-react') has a new file package.json
Installing and configuring Webpack
npm install --save-dev webpack
Now that we have installed webpack, we need a configuration file to tell webpack what to do. Create a new file webpack.config.js in the project folder and open it with your favorite editor.
Create a webpack.config.js in the webpack directory
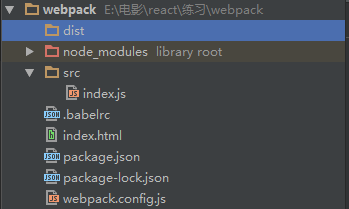
mkdir webpack.config.jsThe structure catalogue is as follows:
Configure webpack.config.js
 var path=require('path');
  module.exports={
       entry:'./src/index.js',
       output:{
         path:path.resolve('dist'),
         filename:'[hash].bundle.js'
} - Entry: Specify the entry file and specify the output location in src
- output: Specifies where to store packaged files
Among them, [hash] refers to the hash value.
babel settings
npm install babel-loader babel-core babel-preset-es2015 babel-preset-react --devSince the installation of the Babel we need, babel-preset-es2015 and babel-preset-react, presets are the plug-ins of babel, which will tell Babel what parts need to be converted into native javascript.
Then we need to set up babel, which can be set by adding a. babelrc
It can also be modified by package.json
Add the following
   /*
    ./.babelrc
*/
{
    "presets":[
        "es2015", "react"
    ]
}
When webpack calls babel-loader, it knows what to do with the file.
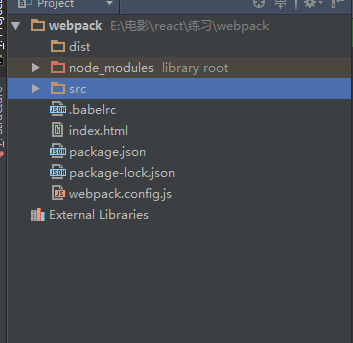
The current structure catalogue is as follows:
Next, write down the code and try to run it.
Edit index.js
/*
    ./src/index.js

*/
console.log('Successful operation!!')
Edit index.html
<!--
      index.html

-->
<!DOCTYPE html>
<html>
  <head>
    <meta charset="utf-8">
    <title>React App Setup</title>
  </head>
  <body>
    <div id="root">

    </div>
  </body>
</html>
Add "build" to script in package.json: "webpack"
For example, the current picture: 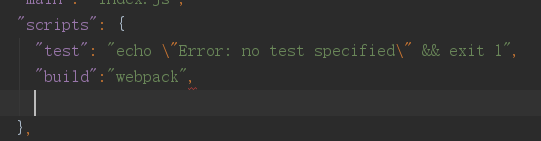
Then execute the packager npm run build to verify the success
Html-Webpack-Plugin
One way to add the packaged code to our HTML file is to manually insert a script tag and specify the location of the packaged file to the src attribute. A better way is to help us do this automatically through a plug-in called html-webpack-plugin. This plug-in provides a simple way to generate from our HTML file template. To be the HTML file we ultimately need. We just need to care about the HTML file template, and then we can insert script through some simple configurations.
Simply put, you can add packaged js files to html
First we need to execute the following commands in the file
npm install html-webpack-pluginAdd settings to webpack.config.js
The final configuration is as follows:
   var path=require('path');
   var HtmlWebpackPulgin =require('html-webpack-plugin');
   var CleanWebpackPulgin=require('clean-webpack-plugin');
   module.exports={
       entry:'./src/index.js',
       output:{
         path:path.resolve('dist'),
         filename:'[hash].bundle.js'
       },
       module:{
           rules:[
               { test: /\.js$/, loader: 'babel-loader', exclude: /node_modules/ },
               { test: /\.jsx$/, loader: 'babel-loader', exclude: /node_modules/ }
               ]
       },

       plugins:[
           new CleanWebpackPulgin(['dist']),
           new HtmlWebpackPulgin({
               title:'first',
               template:'index.html',
               filename:'index.html'
           })

       ]

   };
Continue adding settings in the original webpack.config.js
"start":"webpack-dev-server"And execute npm run start
Then open the browser and access it http://localhost:8080/ Open the console and you should see the output "Hey guys and ladies!!". Use localhost:8080 because webpack-dev-server started a development server. Note that webpack-dev-server will run when we execute npm run start.
The next step is to install React dependencies
npm install react react-dom --saveNext we create index.js and App.js in the folder
The project structure is as follows: 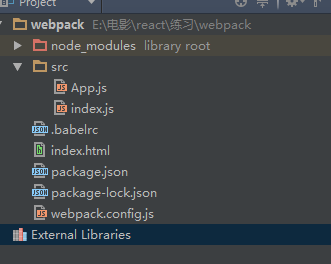
Next edit App.js
  //     src/App.js
import React from 'react';

export default class App extends React.Component {
    render() {
        return (
            <div style={{textAlign: 'center' ,color:'red'}}>
                <h1>Successful operation React</h1>
            </div>);
    }
}
Then render the components of the page onto the page.
import React from 'react';
import ReactDOM from 'react-dom';
import App from './components/App.jsx';

ReactDOM.render(<App />, document.getElementById('root'));
Execute NPM run start
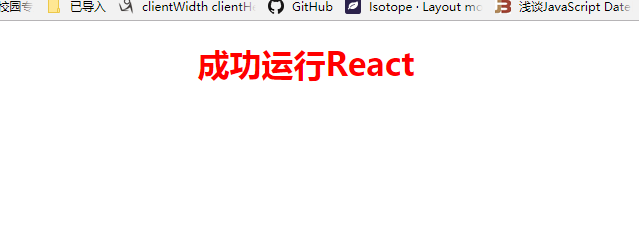
This shows that the operation was successful.
If you've done this, you've already achieved half of your success. The other half is the css configuration, and the translation configuration of img images. Here I'll attach the configuration of the official website, as long as it's in the original wepback.config.js.
Configuration is OK.
Load css npm install --save-dev style-loader css-loader
 module: {
    rules: [
       {
         test: /\.css$/,
         use: [
           'style-loader',
           'css-loader'
         ]
       }
     ]
   }
Loading pictures
npm install --save-dev file-loader module: {
rules: [
{
test: /\.(png|svg|jpg|gif)$/,
use: [
'file-loader'
]
}
]
}
};Load custom fonts
  module: {
      rules: [

       {
         test: /\.(woff|woff2|eot|ttf|otf)$/,
         use: [
           'file-loader'
         ]
       }
      ]
    }
  };
Loading data
Useful resources that can be loaded include data such as JSON files, CSV, TSV, and XML.
npm install --save-dev csv-loader xml-loader {
test: /\.(csv|tsv)$/,
use: [
'csv-loader'
]
},
{
test: /\.xml$/,
use: [
'xml-loader'
]
}In this way, even if the basic construction of the React is completed.
Attach the final webpack.config.js
const path = require('path');
const HtmlWebpackPlugin = require('html-webpack-plugin');
const CleanWepackPlugin =require('clean-webpack-plugin');
module.exports = {
entry: './src/index.js',
output: {
path: path.resolve('./dist'),
filename: '[hash].bundle.js'
},
devtool: 'inline-source-map',
module: {
rules: [
{
test: /\.css$/,
use: [
'style-loader',
'css-loader'
]
},
{
test: /\.js$/,
loader: 'babel-loader',
exclude: /node_modules/
},
{
test: /\.jsx$/,
loader: 'babel-loader',
exclude: /node_modules/
},
{
test:/\.(png|svg|jpg|gif)$/,
use:[
'file-loader'
]
},
{
test: /\.(woff|woff2|eot|ttf|otf)$/,
use: [
'file-loader'
]
},
  {
         test: /\.(csv|tsv)$/,
         use: [
           'csv-loader'
         ]
       },
       {
         test: /\.xml$/,
         use: [
           'xml-loader'
         ]
       }
],
},
plugins: [
new CleanWepackPlugin(['dist']),
new HtmlWebpackPlugin({
template: 'index.html',
filename: 'index.html',
inject: 'body'
})
]
};If there are any questions, or if the implementation is unsuccessful, you can leave a message.