How to use webpack in a project
Simple babel and webpack have been configured in the project to run npm directly run start
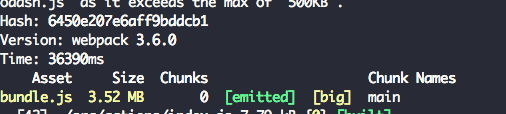
At this point, you will find that the bundle.js is so large that it is certainly unacceptable, so the main purpose of the next chapter is to split individual files.
Optimize projects for multiple files.
Separation code
Let's consider the caching mechanism first. For libraries that depend on our code, we seldom take the initiative to upgrade, but our own code is changing all the time.
So we can consider separating the dependent libraries from our own code, so that users can avoid repeated downloads and unchanged ones when they use the application the next time.
Code, then, to extract the dependent code, we need to change some of the code of the lower entry and exit.
// This is under dependencies in packet.json
const VENOR = ["faker",
  "lodash",
  "react",
  "react-dom",
  "react-input-range",
  "react-redux",
  "redux",
  "redux-form",
  "redux-thunk"
]

module.exports = {
// We used single file entry before.
// entry also supports multiple file entries. Now we have two entries
// One is our own code, and the other is the code that depends on libraries.
  entry: {
  // Bundles and vendor s are self-naming and map to [name]
    bundle: './src/index.js',
    vendor: VENOR
  },
  output: {
    path: path.join(__dirname, 'dist'),
    filename: '[name].js'
  },
  // ...
 }
Now let's build it and see if there are any surprises.
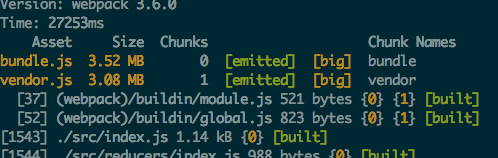

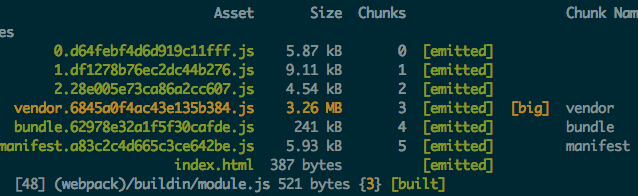
It's really a surprise. Why hasn't the bundle file size changed at all? This is because the bundle also introduces code that depends on libraries, and the steps just taken do not extract it.
The code introduced in bundle s, let's learn how to extract common code.
Extracting Common Code
In this section, we use the Commons Chunk Plugin plug-in that comes with webpack.
module.exports = {
//...
output: {
path: path.join(__dirname, 'dist'),
// Since we want the cache to take effect, we should modify the file name every time we change the code
// [chunkhash] automatically replaces the hash based on whether the file has changed or not
filename: '[name].[chunkhash].js'
},
plugins: [
new webpack.optimize.CommonsChunkPlugin({
// vendor has the same meaning as before.
// The manifest file extracts the things that change every time you pack them, ensuring that the code that has not changed does not need to be repackaged.This will speed up packing. names: ['vendor', 'manifest'],
// Use with manifest file
minChunks: Infinity
})
]
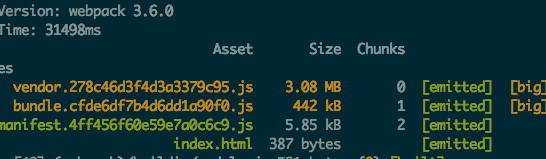
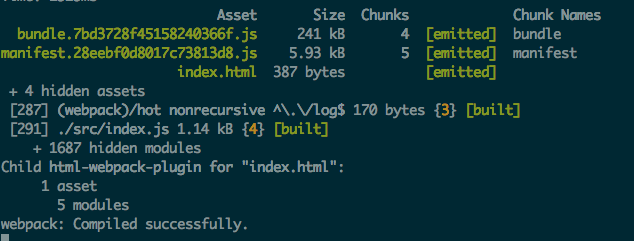
};When we re build, we find that the bundle file has significantly reduced its size.
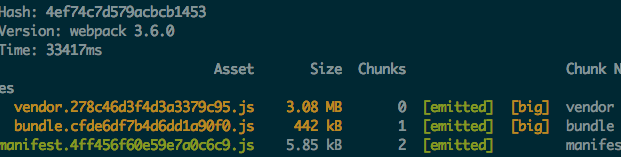
But when we use hash to ensure caching, we find that every build generates different files, and then we introduce another plug-in to help us.
Delete unnecessary files.
npm install --save-dev clean-webpack-plugin
Then modify the configuration file
module.exports = {
//...
  plugins: [
  // Delete only bundle s and manifest files under the dist folder
    new CleanWebpackPlugin(['dist/bundle.*.js','dist/manifest.*.js'], {
    // Print log
      verbose: true,
      // Delete files
      dry: false
    }),
  ]
};
Then when you build, you will find that the above files have been deleted.
Because we have packaged the files into three JS now, and maybe more in the future. Every time we add JS files, we need to add tags manually in HTML.
Now we can do this automatically through a plug-in.
npm install html-webpack-plugin --save-dev
Then modify the configuration file
module.exports = {
//...
  plugins: [
  // Here we use the previous HTML files as templates
  // Note that in the previous HTML file, be sure to delete the JS file that was introduced before.
    new HtmlWebpackPlugin({
      template: 'index.html'
    })
  ]
};
Executing the build operation will find that HTML files are generated at the same time, and JS files have been automatically introduced.
On-demand loading code
In this section, we will learn how to load code on demand. Before that, I found that I forgot to add router to the library. You can join this library.
If you re build the library, you will find that the bundle is less than 300KB.
Now our bundle file contains all our own code. But when a user visits our home page, we don't need to load it at all.
This optimization can be accomplished by asynchronous loading of routing for code other than the home page.
Now modify src/router.js
// Note that in the latest version of V4 routing, the mode of on-demand loading has been changed. If V4 is installed, you can go to the official website to learn by yourself.
import React from 'react';
import { Router, Route, IndexRoute, hashHistory } from 'react-router';

import Home from './components/Home';
import ArtistMain from './components/artists/ArtistMain';

const rootRoute = {
  component: Home,
  path: '/',
  indexRoute: { component: ArtistMain },
  childRoutes: [
    {
      path: 'artists/new',
      getComponent(location, cb) {
        System.import('./components/artists/ArtistCreate')
          .then(module => cb(null, module.default))
      }
    },
    {
      path: 'artists/:id/edit',
      getComponent(location, cb) {
        System.import('./components/artists/ArtistEdit')
          .then(module => cb(null, module.default))
      }
    },
    {
      path: 'artists/:id',
      getComponent(location, cb) {
        System.import('./components/artists/ArtistDetail')
          .then(module => cb(null, module.default))
      }
    }
  ]
}

const Routes = () => {
  return (
    <Router history={hashHistory} routes={rootRoute} />
  );
};

export default Routes;
Then execute the build command, and you can see that our bundle file has slimmed down again, and several new files have been added.
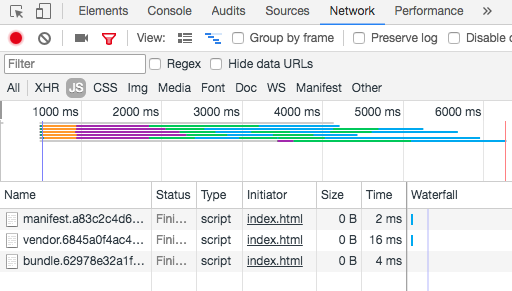
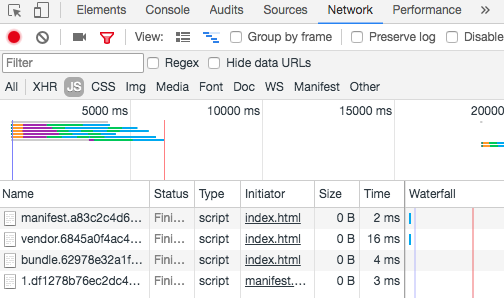
Open the HTML file in the browser, and when you click Route Jump, you can see a JS file loaded in the Network column of the developer's tool.
home page
After clicking Random Artist in the upper right corner
auto refresh
Every code update requires a sequential build, and it's a bit cumbersome to wait. This section describes how to use the automatic refresh function.
First install the plug-in
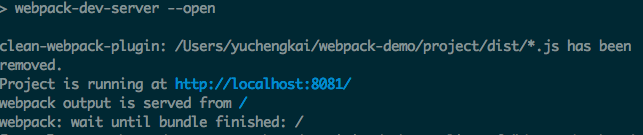
npm i --save-dev webpack-dev-server
Then modify the package. JSON file
"scripts": {
    "build": "webpack",
    "dev": "webpack-dev-server --open"
  },
Now execute npm directly
Rudev can find that the browser automatically opens an empty page and adds new output to the command line.
After waiting for compilation to complete, modify JS or CSS files, you can find that webpack automatically completes compilation for us, and only updates the code that needs to be updated.
But every time you refresh the page, it's not very friendly to debug, so hot replacement of modules is needed. But because React is used in the project,
And Vue or other frameworks have their own set of hot-loader s, so I've skipped it here, and those who are interested can learn it by themselves.
Generating production environment code
Now we can integrate what we learned before with some new plug-ins to build production environment code.
npm i --save-dev url-loader optimize-css-assets-webpack-plugin file-loaderextract-text-webpack-plugin
Modify the webpack configuration
var webpack = require('webpack');
var path = require('path');
var HtmlWebpackPlugin = require('html-webpack-plugin')
var CleanWebpackPlugin = require('clean-webpack-plugin')
var ExtractTextPlugin = require('extract-text-webpack-plugin')
var OptimizeCSSPlugin = require('optimize-css-assets-webpack-plugin')

const VENOR = ["faker",
  "lodash",
  "react",
  "react-dom",
  "react-input-range",
  "react-redux",
  "redux",
  "redux-form",
  "redux-thunk",
  "react-router"
]

module.exports = {
  entry: {
    bundle: './src/index.js',
    vendor: VENOR
  },
  // If you want to modify the webpack-dev-server configuration, modify it in this object
  devServer: {
    port: 8081
  },
  output: {
    path: path.join(__dirname, 'dist'),
    filename: '[name].[chunkhash].js'
  },
  module: {
    rules: [{
        test: /\.js$/,
        use: 'babel-loader'
      },
      {
        test: /\.(png|jpe?g|gif|svg)(\?.*)?$/,
        use: [{
            loader: 'url-loader',
            options: {
                limit: 10000,
                name: 'images/[name].[hash:7].[ext]'
            }
        }]
    },
    {
        test: /\.css$/,
        loader: ExtractTextPlugin.extract({
            fallback: 'style-loader',
            use: [{
            // In fact, you can use postcss to process CSS code first.
                loader: 'css-loader'
            }]
        })
    },
    ]
  },
  plugins: [
    new webpack.optimize.CommonsChunkPlugin({
      name: ['vendor', 'manifest'],
      minChunks: Infinity
    }),
    new CleanWebpackPlugin(['dist/*.js'], {
      verbose: true,
      dry: false
    }),
    new HtmlWebpackPlugin({
      template: 'index.html'
    }),
    // Generating global variables
    new webpack.DefinePlugin({
      "process.env.NODE_ENV": JSON.stringify("process.env.NODE_ENV")
    }),
    // Separating CSS code
    new ExtractTextPlugin("css/[name].[contenthash].css"),
    // Compressing extracted CSS and resolving the problem of JS duplication separated from ExtractTextPlugin
    new OptimizeCSSPlugin({
      cssProcessorOptions: {
        safe: true
      }
    }),
    // Compressing JS code
    new webpack.optimize.UglifyJsPlugin({
      compress: {
        warnings: false
      }
    })
  ]
};
Modify the package.json file
"scripts": {
    "build": "NODE_ENV=production webpack -p",
    "dev": "webpack-dev-server --open"
  }
Implementation of npm
run build
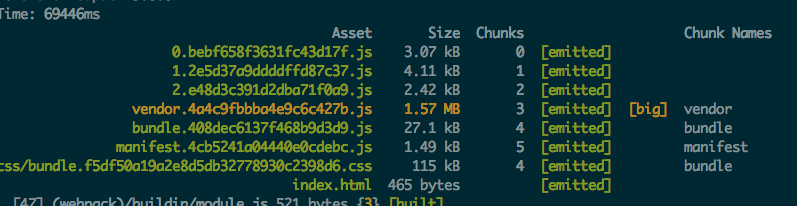
You can see that after so many steps, we have reduced the bundle to 27.1KB, and we can use common libraries like vendor.
CDN way outside the chain in.
supplement
There are some practical tips on Web pack configuration that are not mentioned above, but are mentioned here in a unified way.
module.exports = {
  resolve: {
  // File extension, indicating that no suffix is required for each file
    extensions: ['.js', '.css', '.json'],
 // Path aliases, such as css pointing to static/css paths
    alias: {
      '@': resolve('src'),
      'css': resolve('static/css')
    }
  },
  // To generate source-map for interruption points, there are several options
  devtool: '#cheap-module-eval-source-map',
}