Webpack practice: multi entry project packaging & code splitting practice sharing
preface
Today, let's share with you the multi portal configuration of webpack. stay Webpack: getting started As mentioned in, webpack can start from the entry module, automatically analyze the static and dynamic dependencies between different modules (supporting multiple modular specifications at the same time), and package the final version code of the project into a single JS file, so as to reduce the number of files that need to be introduced when the front-end project is actually online and running; At the same time, packaging the statically dependent file module into a single JS file is also helpful for code optimization and separation from the dynamically introduced script.
Multi entry: multi page, cross end
However, in general, we usually only configure a single entry file, which is the charm of SPA projects. However, in real large-scale projects, we can't really package all modules of the whole website together. Sometimes we need to distinguish pages according to different entrances; At the same time, for projects that support multiple ends, we also need to establish independent entry scripts and pages for different deployment targets.
Whether it is a multi page project or a cross end project mentioned above (many mobile end pages only support the form of multi pages when running), in fact, it is an embodiment of a multi entry project. Most of the main modules of the website itself can be shared, but different configurations and dependency bindings need to be made for different portals (cross end and multi page).
At this time, we need to use webpack to provide our multi entry configuration mode, and webpack will resolve dependencies and package for us from different entries. Let's take a look at how to configure webpack in actual operation.
text
1. Single entry configuration
At the beginning, we first configure a single entry project that is the same as the original SPA
1.1 installation dependency
The first step is to initialize the npm project and install the required dependencies
- Initialize project
$ mkdir webpack_multiple_entry
$ cd webpack_multiple_entry
$ yarn init -y
- Installation dependency
$ yarn add webpack webpack-cli -D  # webpack core dependency
$ yarn add html-webpack-plugin clean-webpack-plugin -D  # Necessary plug-ins
$ yarn add progress-bar-webpack-plugin webpack-manifest-plugin -D  # Other optional plug-ins
1.2 single entry configuration file
The next step is to write our configuration file
- webpack.single.config.js
const path = require('path')

const { CleanWebpackPlugin } = require('clean-webpack-plugin')
const HtmlWebpackPlugin = require('html-webpack-plugin')
const { WebpackManifestPlugin } = require('webpack-manifest-plugin')
const ProgressBarWebpackPlugin = require('progress-bar-webpack-plugin')

module.exports = {
  mode: 'production',
  entry: path.join(__dirname, 'src/entryA.js'),
  output: {
    path: path.join(__dirname, 'dist'),
    filename: '[name]-[chunkhash].js',
  },
  plugins: [
    new CleanWebpackPlugin(),
    new WebpackManifestPlugin(),
    new ProgressBarWebpackPlugin(),
    new HtmlWebpackPlugin({
      template: `public/entryA.html`,
      filename: `entryA.html`,
      title: `Webpack Single entry configuration - entryA`,
    }),
  ],
}
We use Src / entrya JS as the entry, output the compilation results to the dist directory, and pass in the configuration object in HtmlWebpackPlugin
1.3 basic project code
The html template and basic code files used in the configuration file are given below. The first is the html template file
- /public/entryA.html
<!DOCTYPE html>
<html lang="en">
  <head>
    <meta charset="UTF-8" />
    <meta http-equiv="X-UA-Compatible" content="IE=edge" />
    <meta name="viewport" content="width=device-width, initial-scale=1.0" />
    <title><%= htmlWebpackPlugin.options.title %></title>
  </head>
  <body>
    <h1>Webpack Multiple Entry - Entry A</h1>
  </body>
</html>
Next is the script content
- /src/entryA.js
import { group } from './modules/utils'
import { a } from './modules/a'
import { b } from './modules/b'

group('entryA', () => { a(); b() })
- /src/modules/a.js
import { log } from './utils'

export function a() { log('invoke function a from src/modules/a.js') }
- /src/modules/b.js
import { log } from './utils'

export function b() { log('invoke function b from src/modules/b.js') }
Are very simple code, just a moment
1.4 initial packaging & viewing operation results
Now let's configure the yarn command and run the package
{
    // ...
    "scripts": {
        "build-single": "webpack --config webpack.single.config.js",
    }
    // ...
}
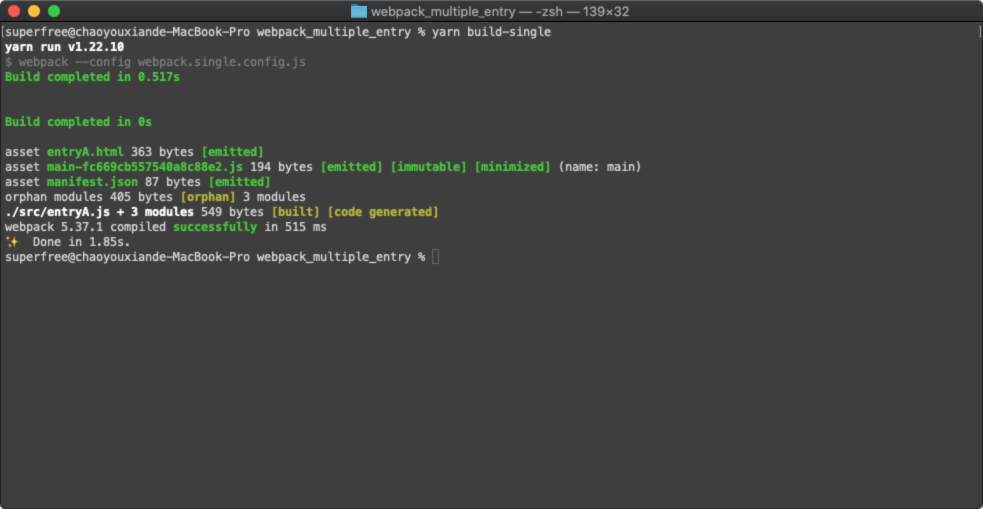
And open the html file of the packaging results to view the running results
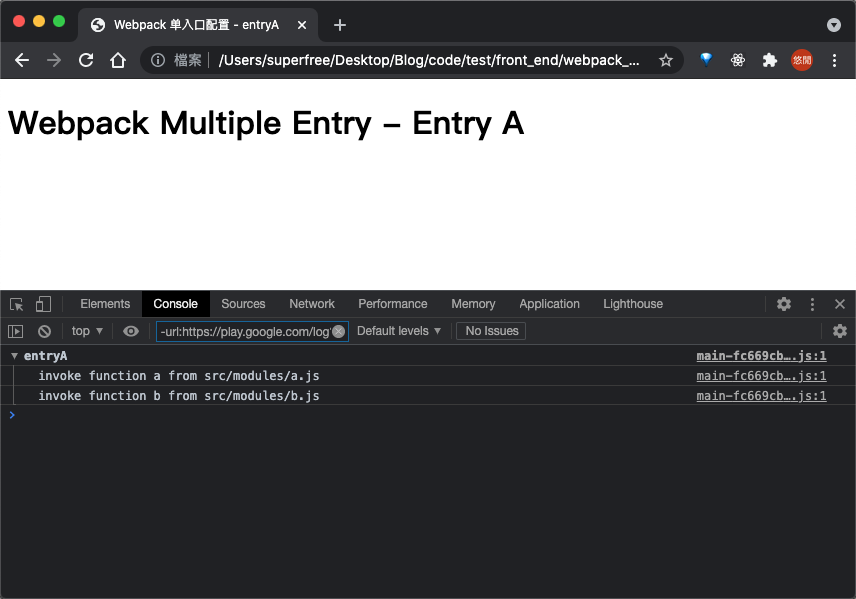
At this time, we can see these files in the output results of the project:

2. Multi entry configuration
After we have established the single entry module (entryA module), let's enter the focus of this article: multi entry file configuration
2.1 project expansion
First, let's assume that the project has been expanded to a certain extent
2.1.1 core module expansion
First, a new c.js module is added
- /src/modules/c.js
import { log } from './utils'

export function c() { log('invoke function c from src/modules/c.js') }
2.1.2 add other entry modules
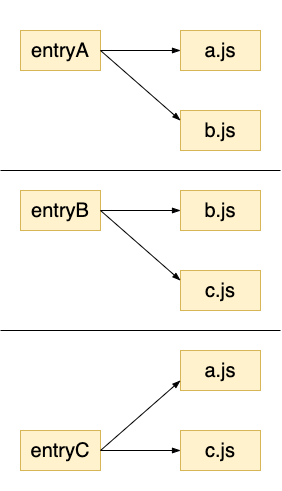
Next, let's assume that the project needs two new entry modules to deal with different project entries (multi page and cross end), namely entryB and entryC
- /src/entryB.js
import { group } from './modules/utils'
import { b } from './modules/b'
import { c } from './modules/c'

group('entryB', () => { b(); c() })
- /src/entryC.js
import { group } from './modules/utils'
import { a } from './modules/a'
import { c } from './modules/c'

group('entryC', () => { a(); c() })
In other words, the dependencies of the whole project are shown in the figure below
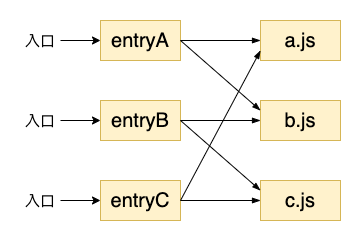
For different entries, the dependent modules that need to be packaged are also different
2.1.3 add other entry templates
Of course, in addition to the JS module as the entry, each entry also needs an independent html template
- /public/entryB.html
<!DOCTYPE html>
<html lang="en">
  <head>
    <meta charset="UTF-8" />
    <meta http-equiv="X-UA-Compatible" content="IE=edge" />
    <meta name="viewport" content="width=device-width, initial-scale=1.0" />
    <title><%= htmlWebpackPlugin.options.title %></title>
  </head>
  <body>
    <h1>Webpack Multiple Entry - Entry B</h1>
  </body>
</html>
- /public/entryC.html
<!DOCTYPE html>
<html lang="en">
  <head>
    <meta charset="UTF-8" />
    <meta http-equiv="X-UA-Compatible" content="IE=edge" />
    <meta name="viewport" content="width=device-width, initial-scale=1.0" />
    <title><%= htmlWebpackPlugin.options.title %></title>
  </head>
  <body>
    <h1>Webpack Multiple Entry - Entry C</h1>
  </body>
</html>
2.2 modify configuration
Next, we will transform the project into multi entry by modifying the entry attribute in the webpack configuration item
- webpack.multiple.config.js
const path = require('path')

const { CleanWebpackPlugin } = require('clean-webpack-plugin')
const HtmlWebpackPlugin = require('html-webpack-plugin')
const { WebpackManifestPlugin } = require('webpack-manifest-plugin')
const ProgressBarWebpackPlugin = require('progress-bar-webpack-plugin')

module.exports = {
  mode: 'production',
  entry: {
    entryA: path.join(__dirname, 'src/entryA.js'),
    entryB: path.join(__dirname, 'src/entryB.js'),
    entryC: path.join(__dirname, 'src/entryC.js'),
  },
  output: {
    path: path.resolve(__dirname, 'dist'),
    filename: '[name]-[chunkhash].js',
  },
  plugins: [
    new CleanWebpackPlugin(),
    new WebpackManifestPlugin(),
    new ProgressBarWebpackPlugin(),
    new HtmlWebpackPlugin({
      template: 'public/entryA.html',
      filename: 'entryA.html',
      title: 'Webpack Multi entry configuration - entryA',
      chunks: ['entryA'],
    }),
    new HtmlWebpackPlugin({
      template: 'public/entryB.html',
      filename: 'entryB.html',
      title: 'Webpack Multi entry configuration - entryB',
      chunks: ['entryB'],
    }),
    new HtmlWebpackPlugin({
      template: 'public/entryC.html',
      filename: 'entryC.html',
      title: 'Webpack Multi entry configuration - entryC',
      chunks: ['entryC'],
    }),
  ],
}
Simply put, we change the entry configuration item into an object. Each key value pair represents the name of an entry and the path of the entry module (chunkNmae: chunkEntry); Then configure multiple instances of HtmlWebpackPlugin to create different html templates for different entries (specify dependent modules through chunks)
However, the above repeated code is not acceptable. Simplify the writing slightly
const chunks = ['entryA', 'entryB', 'entryC']

module.exports = {
  mode: 'production',
  entry: {
    entryA: path.join(__dirname, 'src/entryA.js'),
    entryB: path.join(__dirname, 'src/entryB.js'),
    entryC: path.join(__dirname, 'src/entryC.js'),
  },
  output: {
    path: path.resolve(__dirname, 'dist'),
    filename: '[name]-[chunkhash].js',
  },
  plugins: [
    // others
    ...chunks.map(
      (name) =>
        new HtmlWebpackPlugin({
          template: `public/${name}.html`,
          filename: `${name}.html`,
          title: `Webpack Multi entry configuration - ${name}`,
          chunks: [name],
        })
    ),
  ],
}
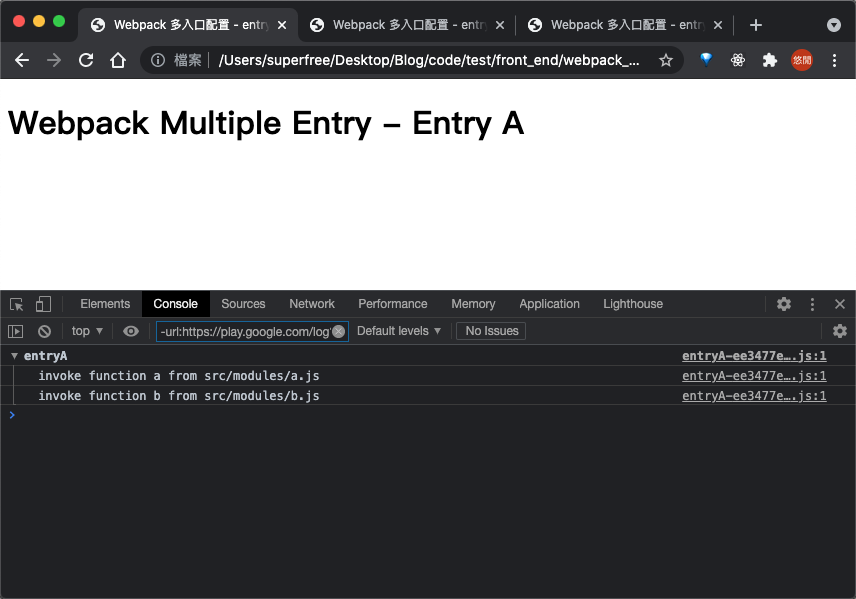
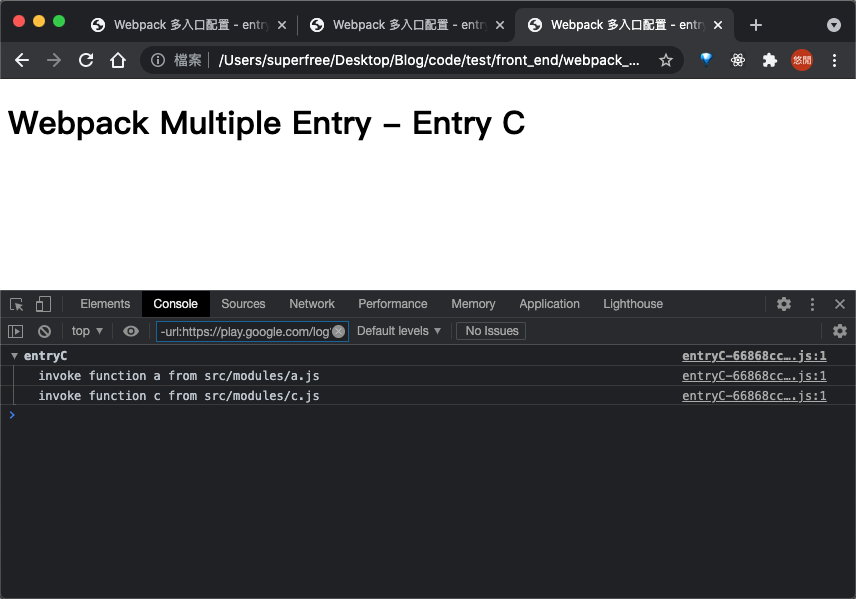
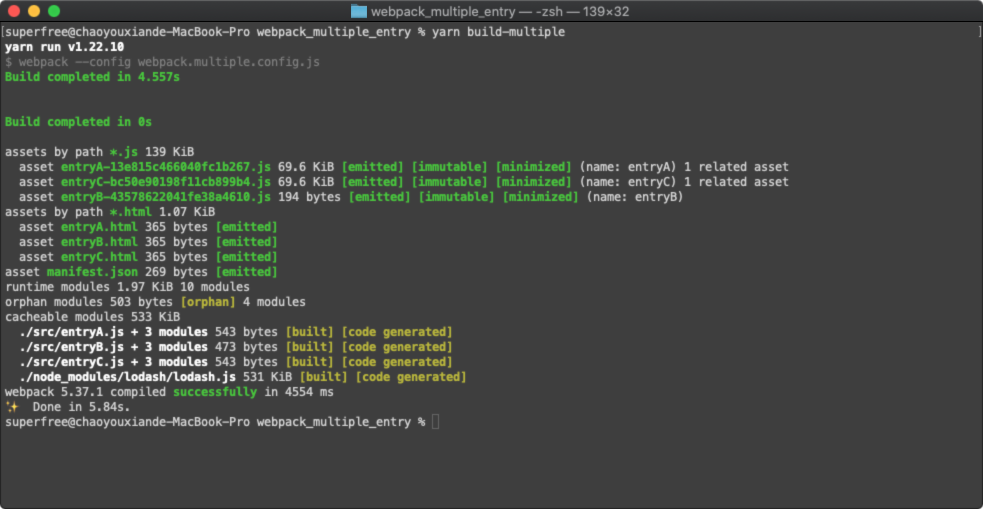
2.3 package and run multi module projects
Then you can package (I'll omit the definition of the startup command)
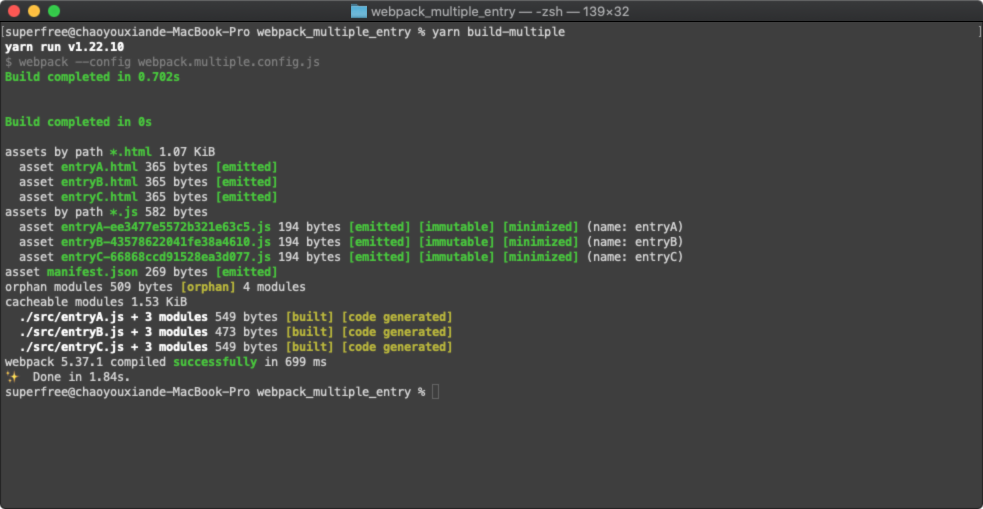
Then open each page separately to view the running results

At this time, the packaging output directory is as follows
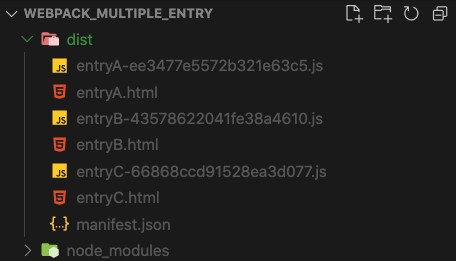
We can see that each entry generates its own html template and its corresponding entry module
3. Code splitting
Previously, we created three entries. In fact, we can see the following entries of each module after packaging
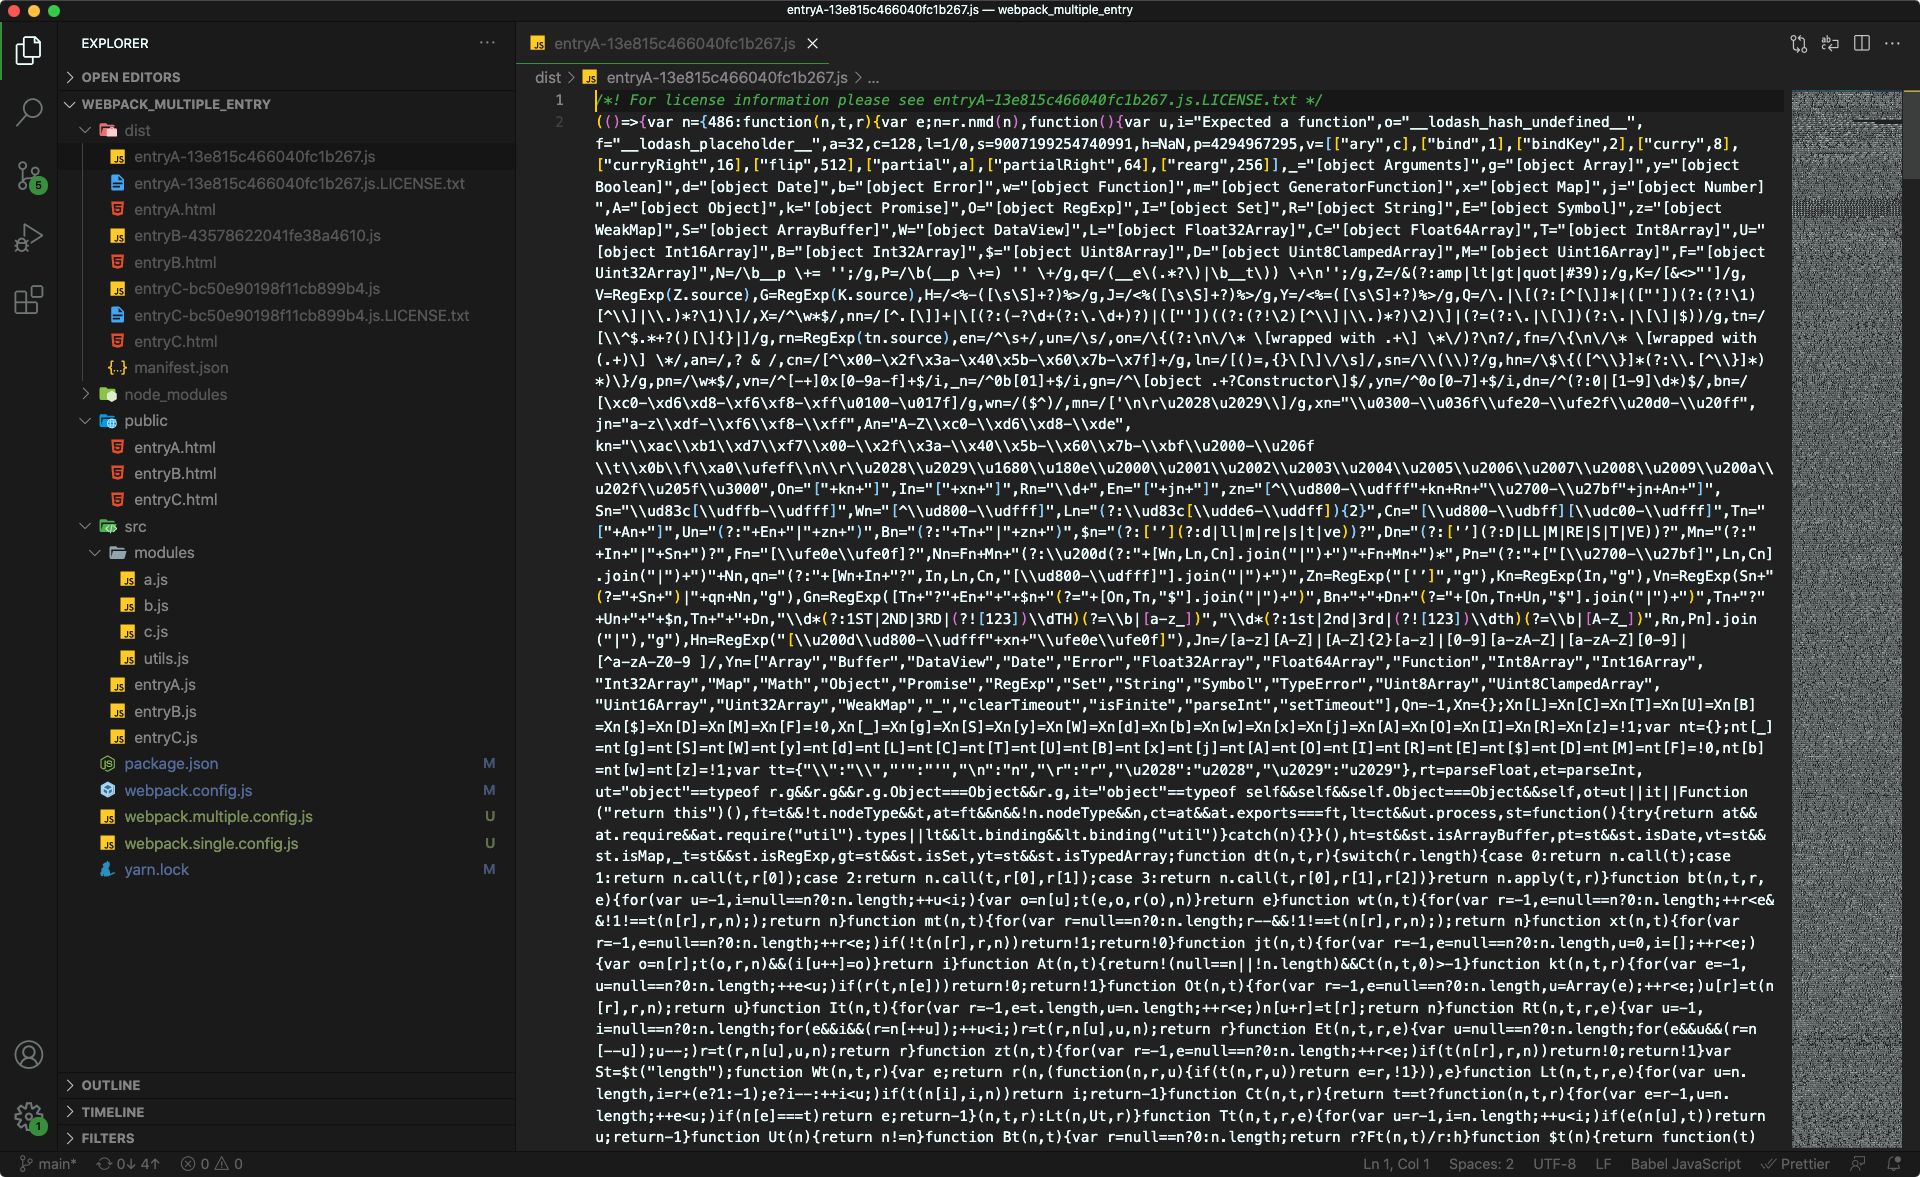
- entryA-xxx.js
;(() => {
  'use strict'
  const o = console.log
  var n
  ;(n = () => {
    o('invoke function a from src/modules/a.js'),
      o('invoke function b from src/modules/b.js')
  }),
    console.group('entryA'),
    n(),
    console.groupEnd()
})()
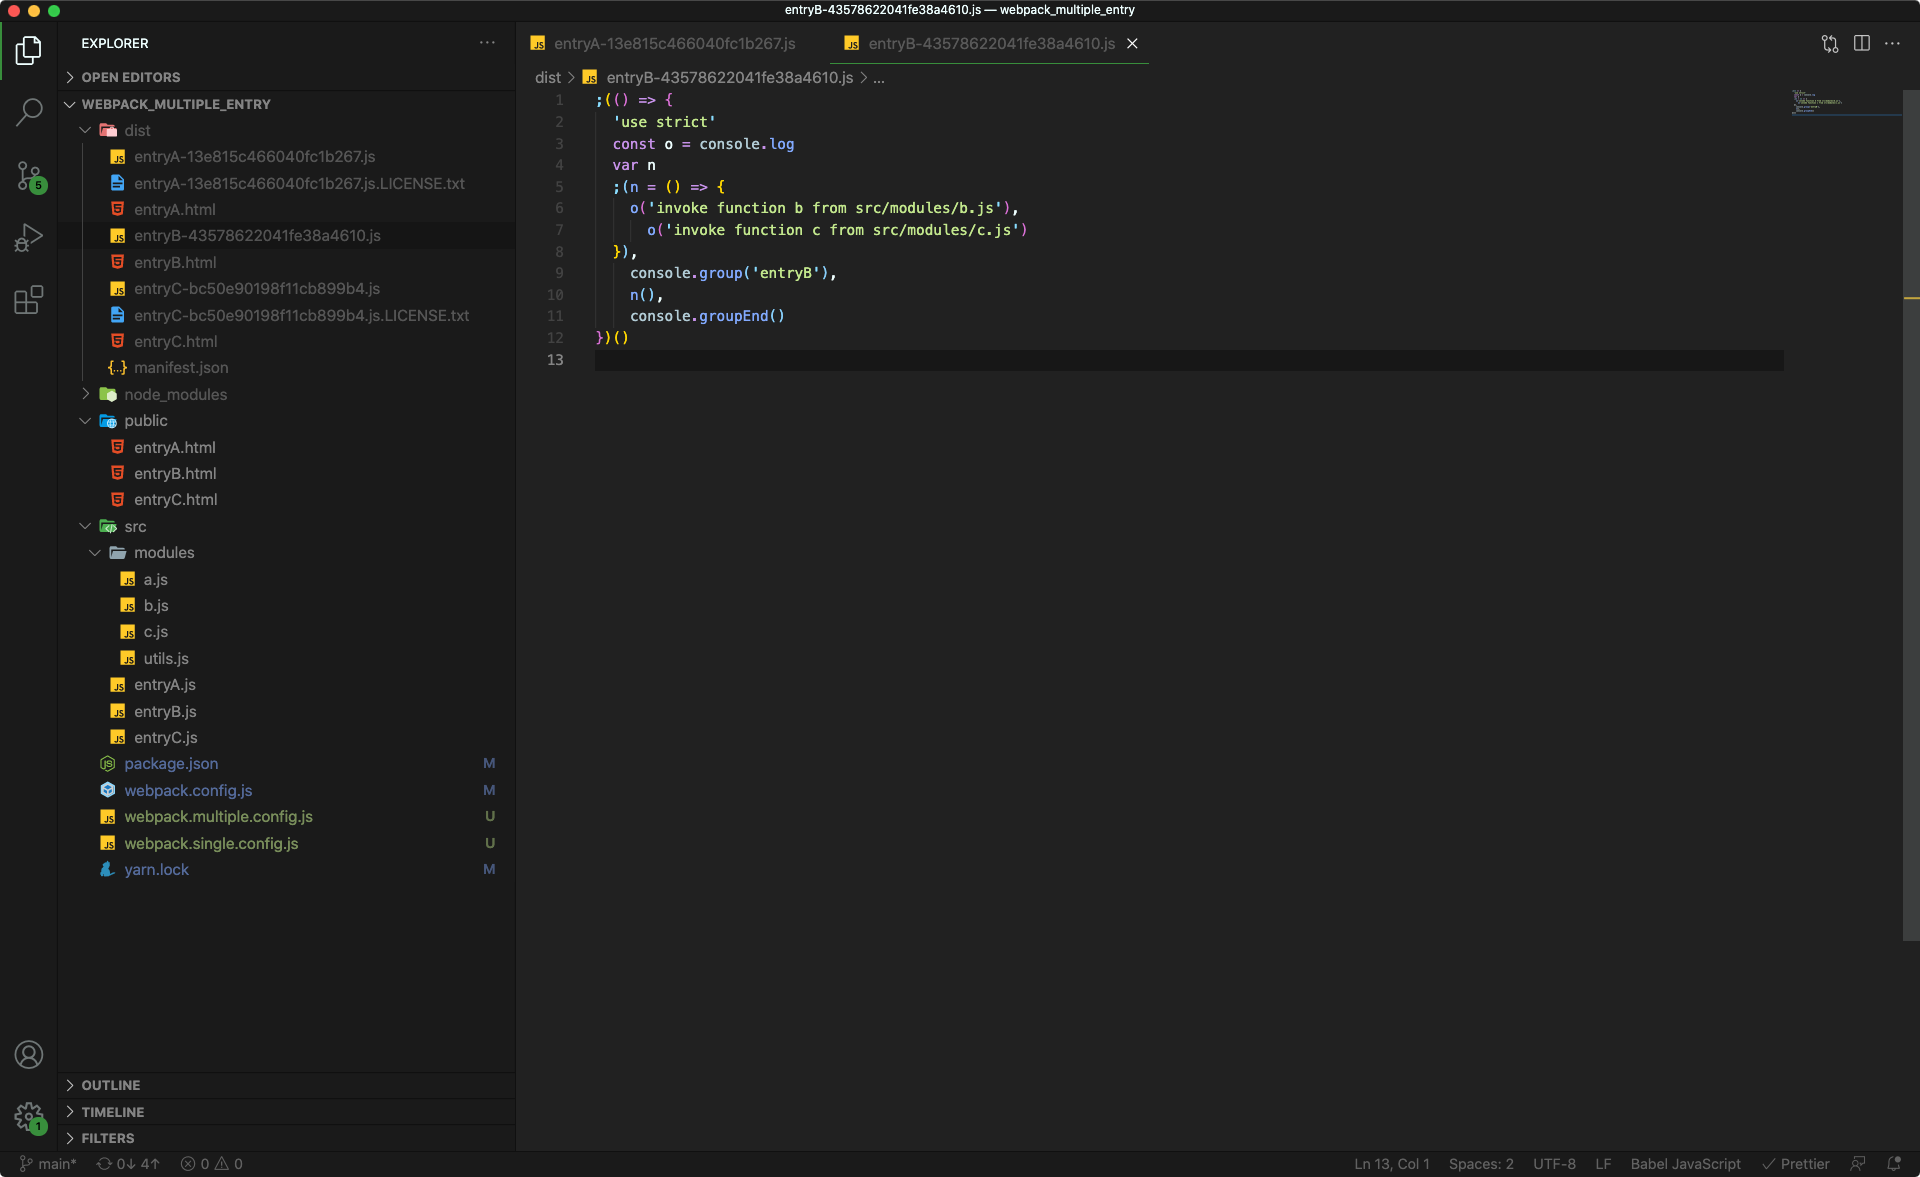
- entryB-xxx.js
;(() => {
  'use strict'
  const o = console.log
  var n
  ;(n = () => {
    o('invoke function b from src/modules/b.js'),
      o('invoke function c from src/modules/c.js')
  }),
    console.group('entryB'),
    n(),
    console.groupEnd()
})()
- entryC-xxx.js
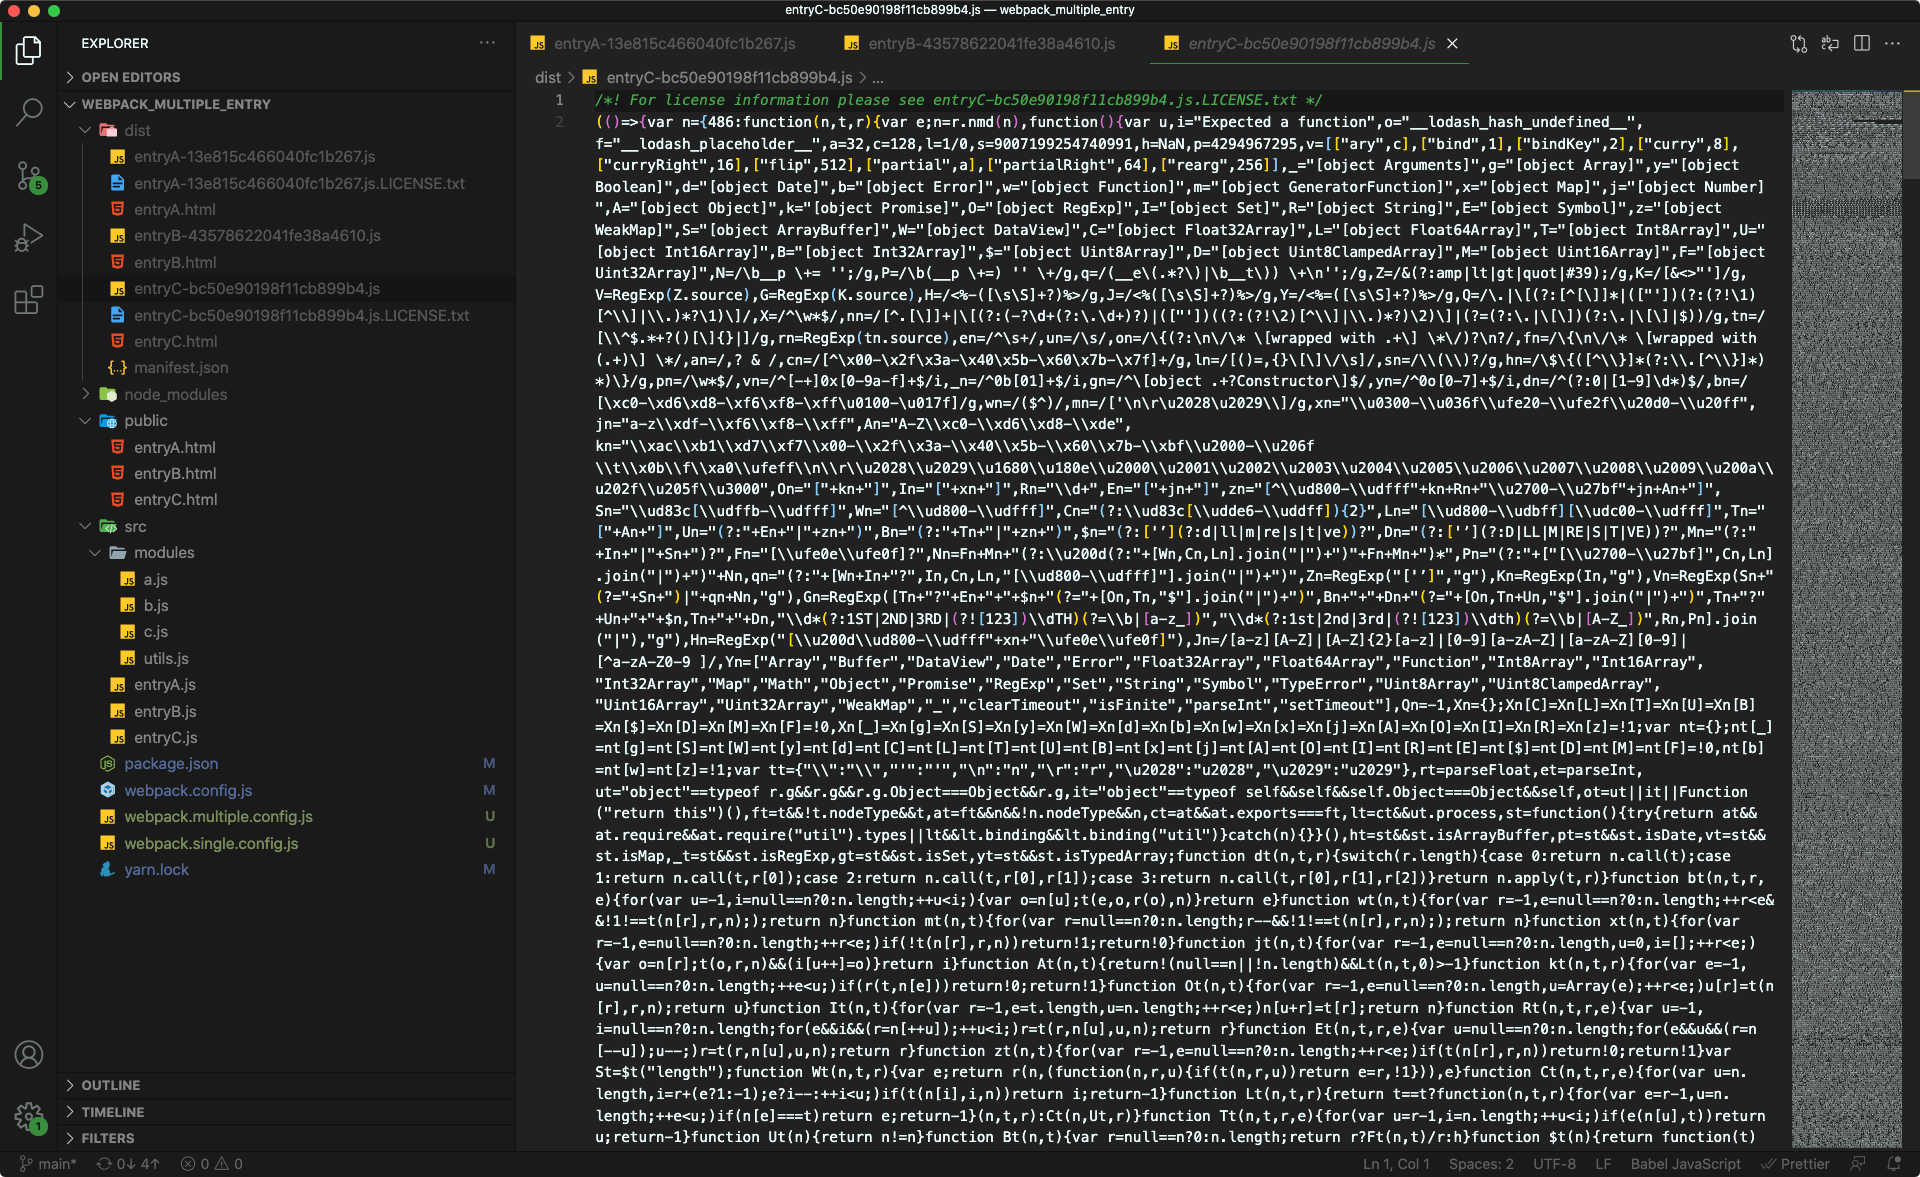
;(() => {
  'use strict'
  const o = console.log
  var n
  ;(n = () => {
    o('invoke function a from src/modules/a.js'),
      o('invoke function c from src/modules/c.js')
  }),
    console.group('entryC'),
    n(),
    console.groupEnd()
})()
We can see that in fact, a.js, b.js and c.js modules are repeatedly packaged into the entry modules corresponding to the three entries. It is acceptable when the amount of code is small. However, when we refer to some third-party modules with a large amount of code, repeated packaging will be a waste.
3.1 introduction of lodash as a large file example of a third-party library
Therefore, let's introduce lodash library as a large third-party library and add packaging as an example
Install dependencies first
$ yarn add lodash
Next, we modify the a.js module and introduce the lodash library into it
- /src/modules/a.js
import { log } from './utils'
import _ from 'lodash'

log(`load module a with lodash ${_.VERSION}`)

export function a() { log('invoke function a from src/modules/a.js') }
3.2 check lodash packaging again
Next, we directly use the previously configured commands for packaging
From the packaging log, we can see that the module size of entryA and entryC has soared to nearly 70KB, because in fact lodash has been compiled into two modules at the same time. Let's take a look at the packaging results
We can see that in addition to entryB, entryA and entryC have a lot more code, which is exactly what lodash looks like after it is packaged
3.3 packaging optimization using splitChunks code segmentation
However, this is not desirable. The lodash code does not need to be copied once, as long as the two related pages are correctly introduced. At this time, we can use the split chunks configuration option of webpack (essentially a built-in plug-in) to enable code segmentation for packaging optimization
In fact, in the environment of webpack4 +, the packaged code will be split by default. However, the following conditions need to be met
- Shared code block or node_ Code blocks in modules, and the volume must exceed 30KB
- No more than 5 parallel requests are loaded on demand
- The number of parallel initial pages loaded shall not exceed 3
At present, the experience of the latter two conditions is relatively small. The main core condition is the first: the code volume needs to exceed 30KB, which is why lodash needs to be introduced in this test
Next, let's modify the configuration of webpack and add the optimization scheme of code separation
- webpack.config.js
const path = require('path')

const { CleanWebpackPlugin } = require('clean-webpack-plugin')
const HtmlWebpackPlugin = require('html-webpack-plugin')
const { WebpackManifestPlugin } = require('webpack-manifest-plugin')
const ProgressBarWebpackPlugin = require('progress-bar-webpack-plugin')

const chunks = ['entryA', 'entryB', 'entryC']

module.exports = {
  mode: 'production',
  entry: {
    entryA: path.join(__dirname, 'src/entryA.js'),
    entryB: path.join(__dirname, 'src/entryB.js'),
    entryC: path.join(__dirname, 'src/entryC.js'),
  },
  output: {
    path: path.resolve(__dirname, 'dist'),
    filename: '[name]-[chunkhash].js',
  },
  plugins: [
    new CleanWebpackPlugin(),
    new WebpackManifestPlugin(),
    new ProgressBarWebpackPlugin(),
    ...chunks.map(
      (name) =>
        new HtmlWebpackPlugin({
          template: `public/${name}.html`,
          filename: `${name}.html`,
          title: `Webpack Multi entry configuration - ${name}`,
          chunks: [name],
        })
    ),
  ],
  optimization: {
    splitChunks: {
      chunks: 'all',
    },
  },
}
Let's explain the configuration item of the last piece first
module.exports = {
  // ...
  optimization: {
    splitChunks: {
      chunks: 'all',
    },
  },
}
splitChunks is the key name of the configuration item of the built-in plug-in. It has many configuration options about code separation. At present, we see one
chunks have several optional values
- Async (default): only modules loaded asynchronously are split
- initial: split only from the entry module
- All: all that meet the conditions (the three default conditions mentioned above) must be split
That is to say, the reason why lodash copied a copy of the example in Section 3.2 is that it is a synchronous module
3.4 packaging after code segmentation
Let's take a look at the packaging after code segmentation
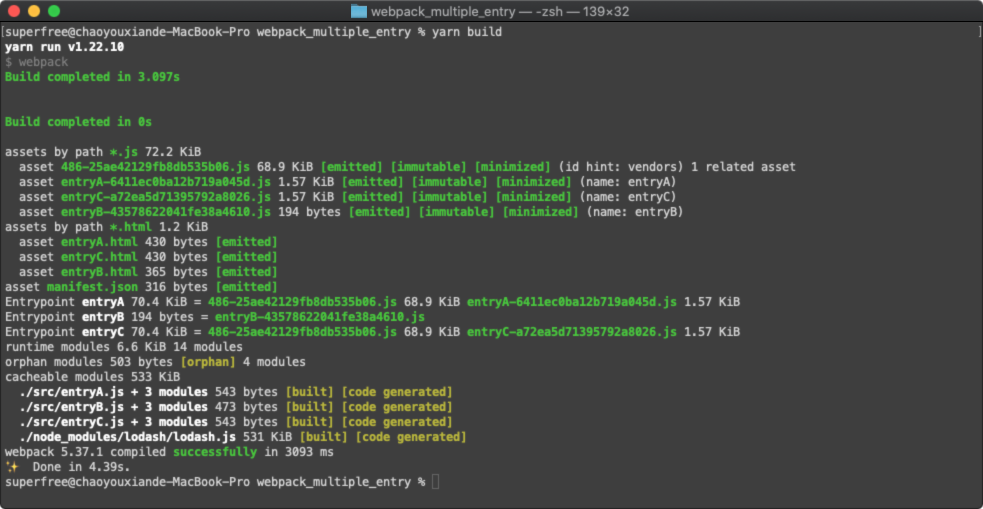
We can see that the volume of entryA and entryC has shrunk a lot, and then a new module 486xxx appears. You can guess that this is the chunk after our lodash module is packaged. The following is the result of the packaged directory
At the same time, we can see the modules that different entries depend on from the packaged html file
- /dist/entryA.html
<!DOCTYPE html>
<html lang="en">
  <head>
    <meta charset="UTF-8" />
    <meta http-equiv="X-UA-Compatible" content="IE=edge" />
    <meta name="viewport" content="width=device-width,initial-scale=1" />
    <title>Webpack Multi entry configuration - entryA</title>
    <script defer="defer" src="486-25ae42129fb8db535b06.js"></script>
    <script defer="defer" src="entryA-6411ec0ba12b719a045d.js"></script>
  </head>
  <body>
    <h1>Webpack Multiple Entry - Entry A</h1>
  </body>
</html>
- /dist/entryB.html
<!DOCTYPE html>
<html lang="en">
  <head>
    <meta charset="UTF-8" />
    <meta http-equiv="X-UA-Compatible" content="IE=edge" />
    <meta name="viewport" content="width=device-width,initial-scale=1" />
    <title>Webpack Multi entry configuration - entryB</title>
    <script defer="defer" src="entryB-43578622041fe38a4610.js"></script>
  </head>
  <body>
    <h1>Webpack Multiple Entry - Entry B</h1>
  </body>
</html>
- /dist/entryC.html
<!DOCTYPE html>
<html lang="en">
  <head>
    <meta charset="UTF-8" />
    <meta http-equiv="X-UA-Compatible" content="IE=edge" />
    <meta name="viewport" content="width=device-width,initial-scale=1" />
    <title>Webpack Multi entry configuration - entryC</title>
    <script defer="defer" src="486-25ae42129fb8db535b06.js"></script>
    <script defer="defer" src="entryC-a72ea5d71395792a8026.js"></script>
  </head>
  <body>
    <h1>Webpack Multiple Entry - Entry C</h1>
  </body>
</html>
We see that the 486xxx chunk introduced by entryA and entryC seems to be in line with our guess that it is the lodash packaging result. Let's take a look at the page result output
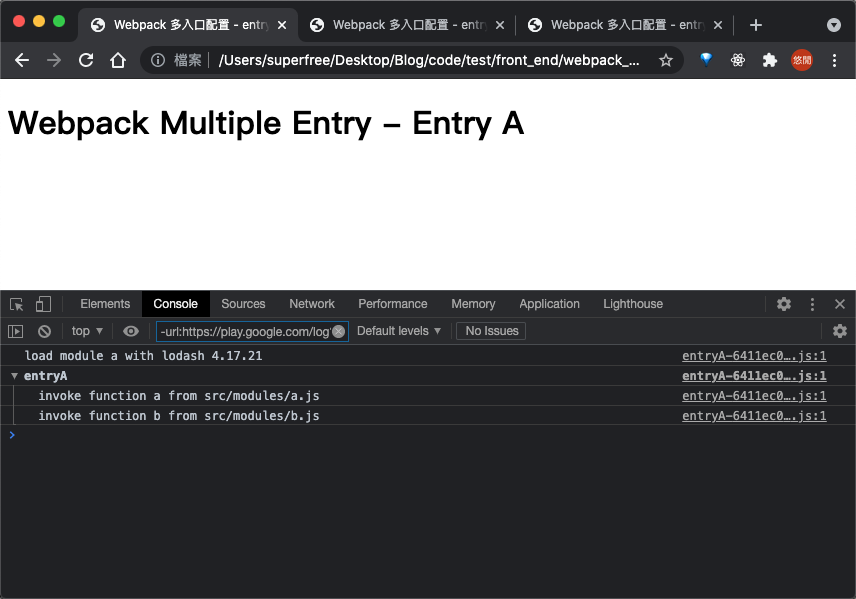
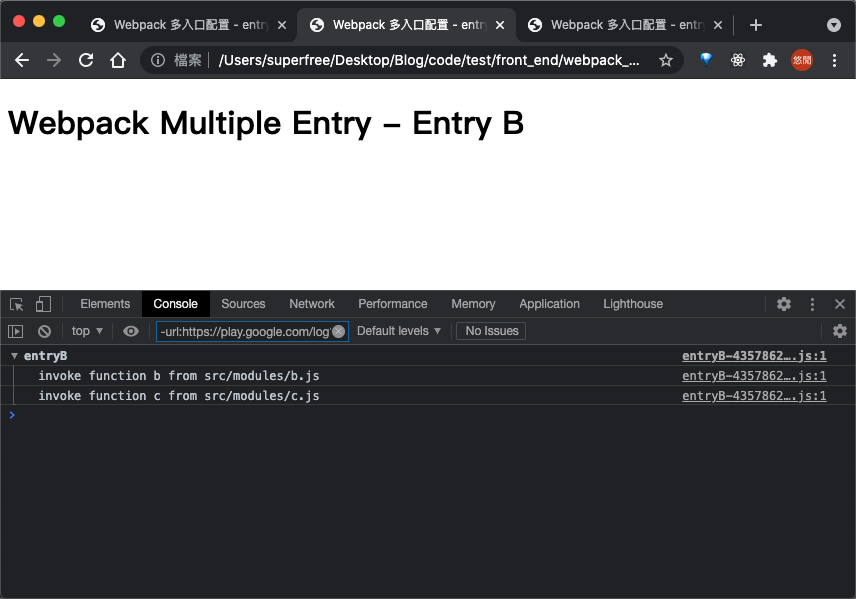
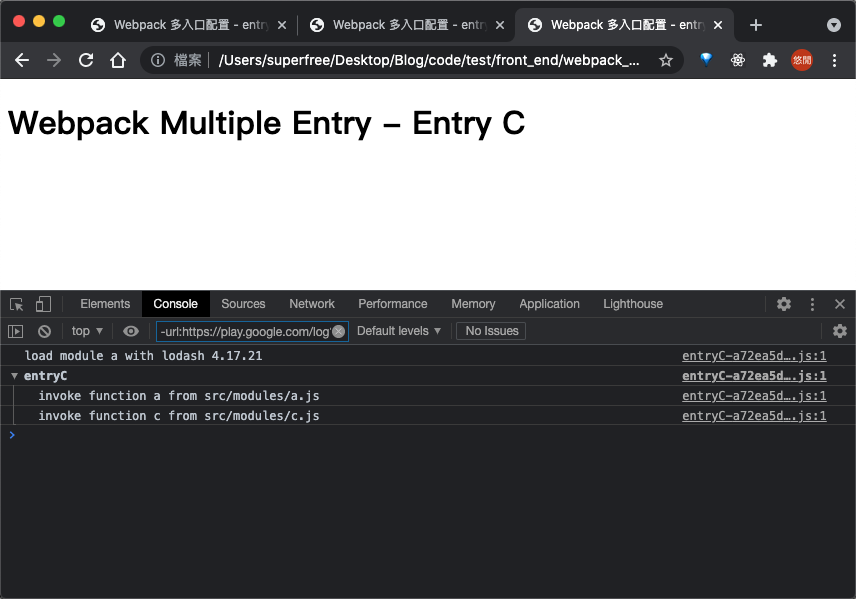
We can see that entryA and entryC do print the version of lodash additionally
3.5 module dependency under code segmentation
Finally, we give a module dependency under the packaging optimization of code segmentation
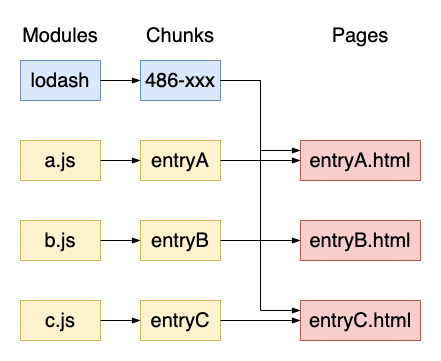
Webpck will split the code according to our dependencies. First split / merge the original modules into chunks. Finally, the page only needs to introduce the necessary chunks.
epilogue
The above is the actual combat sharing of webpack multi entry project packaging. There is still a lot of room for the development of webpack applications. The multi portal configuration introduced in this article is suitable for medium and large-scale projects. Multi portal can also be separated after the code volume reaches a certain demand in the middle of the project and the function is followed up. For your reference ~
Other resources
Reference connection
| Title | Link |
|---|---|
| Hands on Webpack multi entry configuration practice | https://segmentfault.com/a/1190000020351701 |
| How to configure multi entry and multi exit packaging in webpack | https://blog.csdn.net/weixin_39162041/article/details/104429517?utm_source=app&app_version=4.7.1 |
| [webpack learning series] bundle splitting, code splitting | https://www.jianshu.com/p/3c998c6d9f1e |
| Explain the splitting of splitchunksPlugin code package of webpack4 | https://www.jb51.net/article/151976.htm |
| webpack4 series of tutorials (6): using SplitChunksPlugin to split code | https://www.jianshu.com/p/2cc8457f1a10 |
| Understand webpack4 Splitchunks | https://www.cnblogs.com/kwzm/p/10314827.html |
| webpack4 optimization. Points for attention of splitchunks | https://blog.csdn.net/sunq1982/article/details/81511848 |
| What are module s, chunk s and bundle s in webpack? | https://zhuanlan.zhihu.com/p/98677441 |
| What is the difference between module, chunk and bundle in webpack? | https://www.cnblogs.com/skychx/p/webpack-module-chunk-bundle.html |
| Summary and classification of webpack plug-ins | https://segmentfault.com/a/1190000016816813?utm_source=tag-newest#articleHeader3 |
| List and instructions of common plug-ins for webpack4 | https://segmentfault.com/a/1190000015355816 |
Complete code example
https://github.com/superfreeeee/Blog-code/tree/main/front_end/webpack/webpack_multiple_entry