1. Create applet and select cloud development
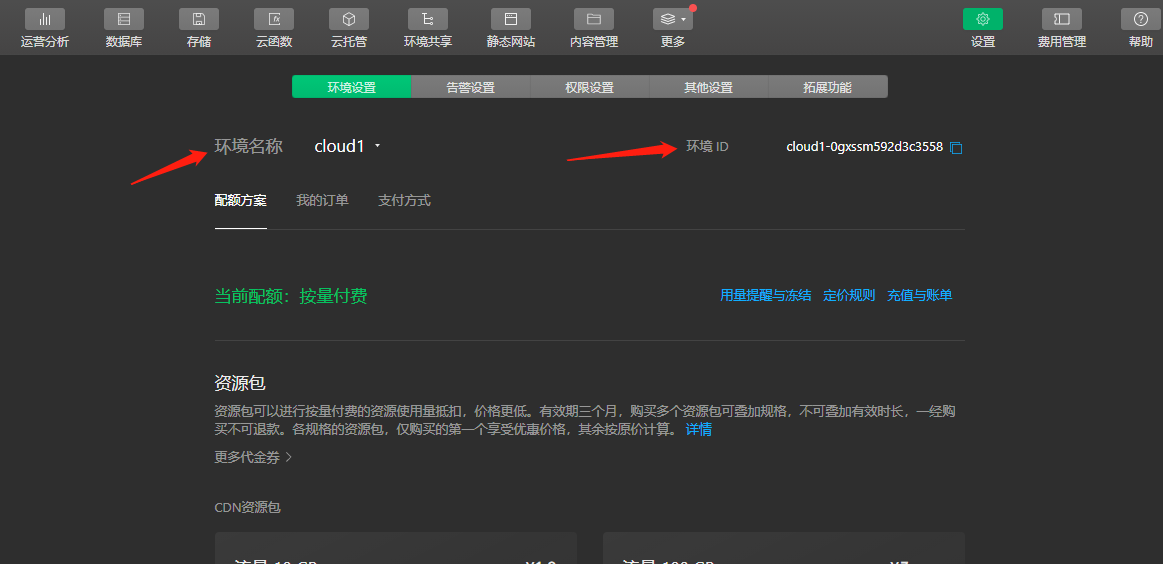
Corresponding environment
On app Configure environment Id in JS
//app.js
App({
  onLaunch: function () {
    if (!wx.cloud) {
      console.error('Please use 2.2.3 Or above to use cloud capabilities')
    } else {
      wx.cloud.init({
        // env Parameter Description:
        //   The env parameter determines which cloud environment resources will be requested by default for the next cloud development call (wx.cloud.xxx) initiated by the applet
        //   Please fill in the environment ID here. You can open the cloud console to view the environment ID
        //   If it is not filled in, the default environment (the first created environment) will be used
         env: 'cloud1-0gxssm592d3c3558',
        traceUser: true,
      })
    }

    this.globalData = {}
  }
})
Get cloud function of openId
const cloud = require('wx-server-sdk')

cloud.init({
  env: cloud.DYNAMIC_CURRENT_ENV
})

// Get openId cloud function entry function
exports.main = async (event, context) => {
  // Get basic information
  const wxContext = cloud.getWXContext()

  return {
    openid: wxContext.OPENID,
    appid: wxContext.APPID,
    unionid: wxContext.UNIONID,
  }
}
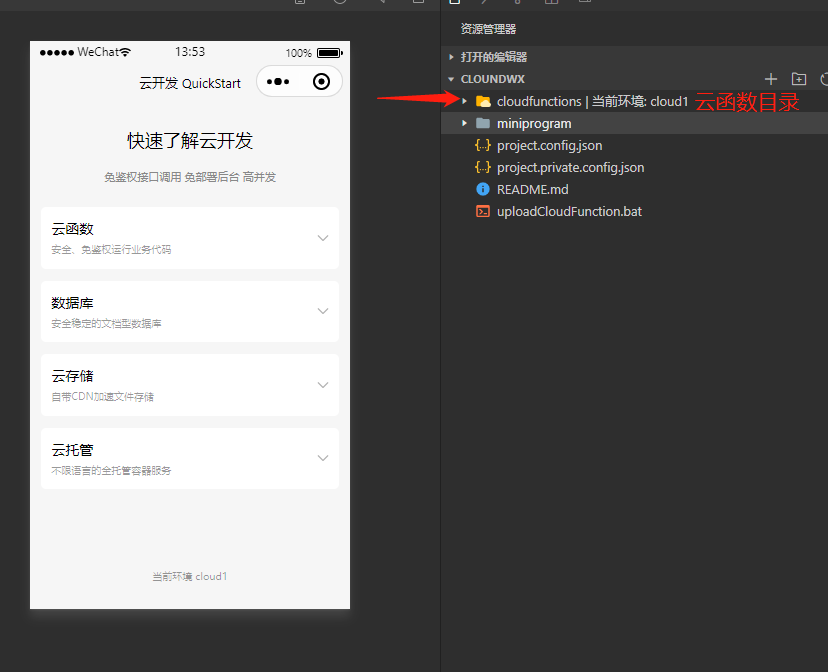
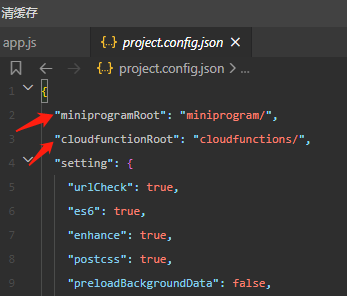
project. The config file defines the cloud function and the file name of the project directory, which are modified together when modifying
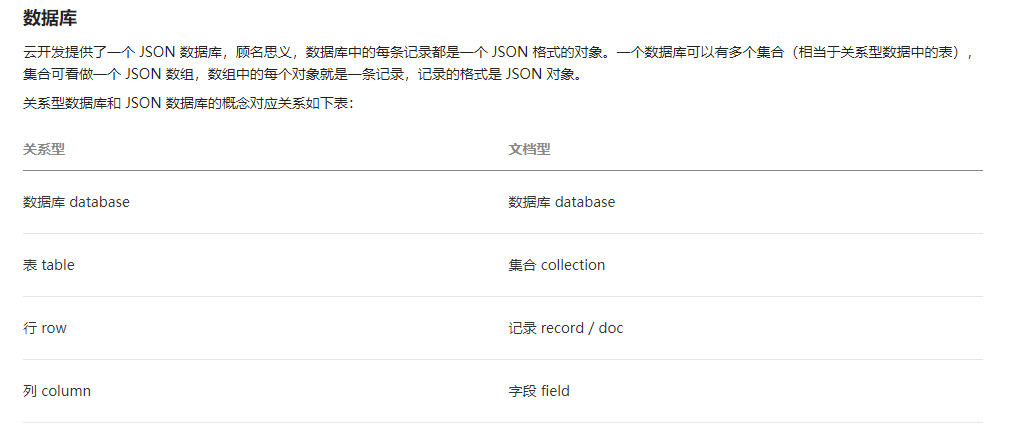
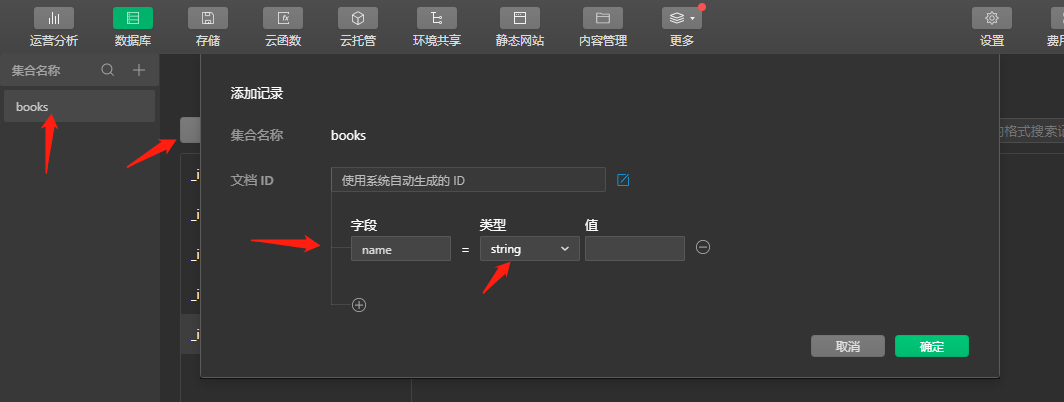
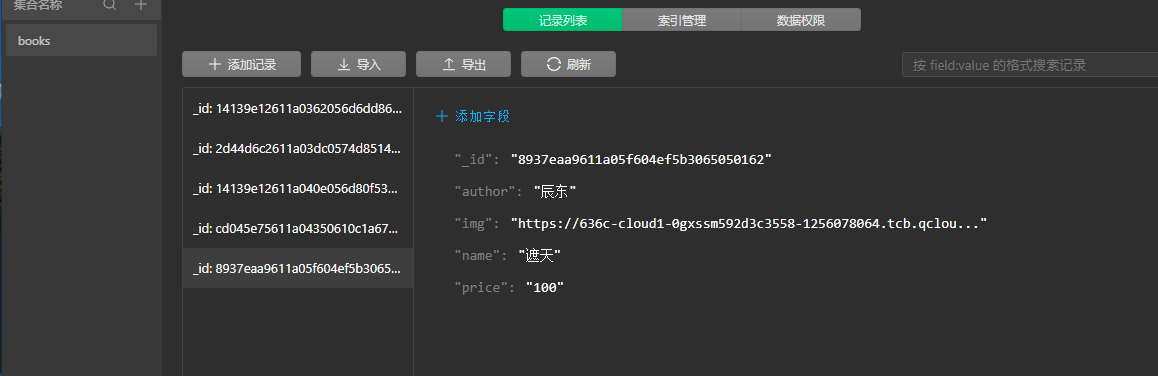
2. Database
New database

New data
2-1. Query
1. Query all
index.js
const db = wx.cloud.database()
Page({
  data: {
    books:[]
  },
  onLoad (options) {
    db.collection('books').get().then(res=>{
      this.setData({
        books:res.data
      })
    })
  },
})
index.html
<!--index.wxml-->
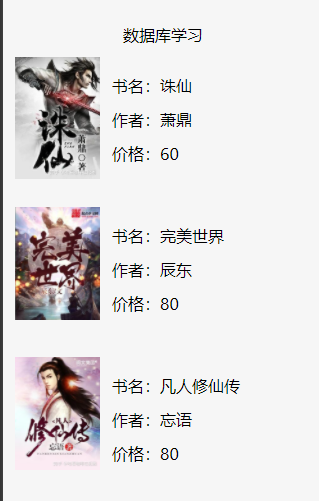
<view class="container">
<view class="title">Database learning</view>
<view wx:for="{{books}}" wx:key='_id' class="book_item">
<image class="book_img" mode="widthFix" src="{{item.img}}"></image>
<view class="book_info">
<view>title:{{item.name}}</view>
<view>Author:{{item.author}}</view>
<view>Price:{{item.price}}</view>
</view>
</view>
</view>
The where method can specify query criteria (query data with a price of 80)
db.collection('books').where({
price:80
}).get().then(res=>{
this.setData({
books:res.data
})
})
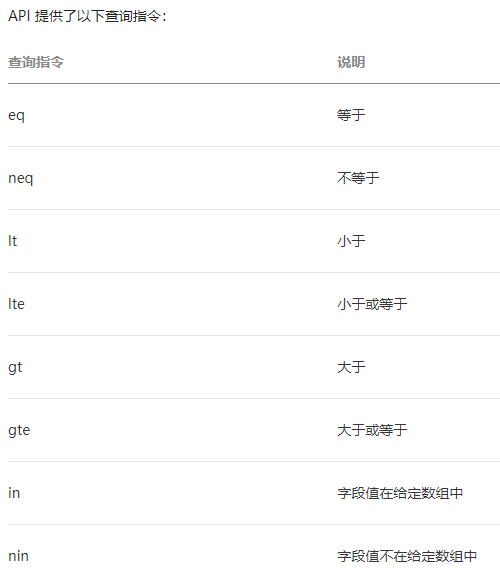
2. Query instructions: all instructions are exposed in dB On the command object
 onLoad (options) {
    const _ = db.command
    db.collection('books').where({
      // The gt method is used to specify a greater than condition, where gt(80) is a condition greater than 80
      price: _.gt(80)
    })
    .get().then(res=>{
          this.setData({
            books:res.data
          })
        })
    },
##3. Logical instructions and, or
 const _ = db.command
    db.collection('books').where({
        and Method to specify a "And" Conditions, which means that they need to be met at the same time _.gt(30) and _.lt(80) Two conditions
      //price:  _.gt(30).and(_.lt(90))
      // The or method is used to specify an or condition, which means that eq(0) or eq(90)
      price:  _.eq(60).or(_.eq(90))
    })
    .get().then(res=>{
          this.setData({
            books:res.data
          })
        })
    },
2-2. Update
Local update
updateBook(){
      db.collection('books').doc('8937eaa9611a05f604ef5b3065050162').update({
        // Data passes in data that needs to be updated locally
        data: {
          // Indicates that the done field is set to true
          price: 120
        },
        success: function(res) {
          console.log(res,'to update')
          this.getBooks()
        }
      })
    }
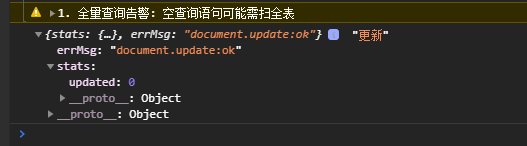
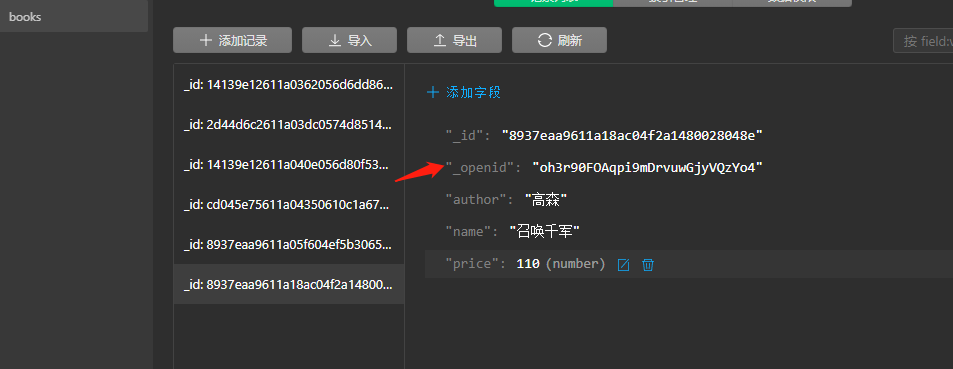
Update failed: because the data was manually added on the cloud development console, there was no update_ openid field, carried by the data created by the applet method_ openid, which can be changed
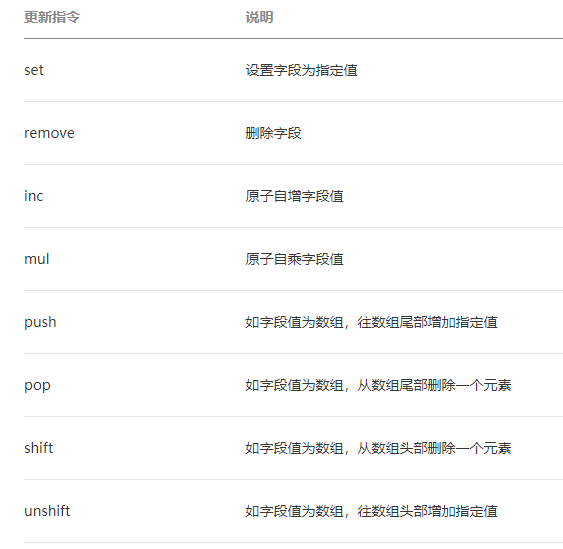
In addition to updating the field with the specified value, the database API also provides a series of update instructions for performing more complex update operations. The update instructions can be passed through dB Command get:
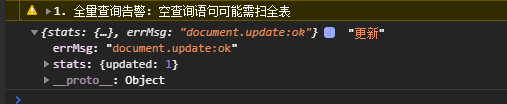
Example: add 10 to the price of the new data on the applet side
updateBook(){
    const _ = db.command
    db.collection('books').doc('8937eaa9611a18ac04f2a1480028048e').update({
        // Data passes in data that needs to be updated locally
        data: {
          // Means to add 10 to the price
          price:_.inc(10)
        }
      }).then(res=>{
        console.log(res,'to update');
        this.getBooks()
      })
  },

Replace update: if you need to replace and update a record, you can use the set method on the record. Replace update means to replace the specified record with the incoming object:
 updateBook(){
    db.collection('books').doc('8937eaa9611a18ac04f2a1480028048e').set({
        // Data incoming data to be updated
        data: {
          price:150,
          name:'A thought of eternity',
          author:'Bai Xiaochun'
        }
      }).then(res=>{
        console.log(res,'to update');
        this.getBooks()
      })
  },

2-3. Add
 <view>title:<input  bindinput='addBookName' /></view>
  <view>Author:<input bindinput='addBookAuthor' /></view>
  <view>Price:<input bindinput='addBookPrice' /></view>
  <button type="primary" bindtap="addBook">newly added</button>
 addBookName(e){
    console.log(e.detail.value,'title');
    this.setData({
      bookName:e.detail.value
    })
  },
  addBookAuthor(e){
    this.setData({
      bookAuthor:e.detail.value
    })
  },
  addBookPrice(e){
    this.setData({
      bookPrice:e.detail.value
    })
  },
  addBook(){
    db.collection('books').add({
      // The data field represents the JSON data to be added
      data: {
       name:this.data.bookName,
       price:parseInt(this.data.bookPrice),
       author:this.data.bookAuthor,
      }
    })
    .then(res => {
      console.log(res,'newly added')
    })
  }
New data with_ openid, you can test and modify
 <button type="primary" bindtap="updateBook">to update</button>
 updateBook(){
      db.collection('books').doc('8937eaa9611a18ac04f2a1480028048e').update({
        // Data passes in data that needs to be updated locally
        data: {
          // Indicates that the done field is set to true
          price: 120
        }
      }).then(res=>{
        console.log(res,'to update');
        this.getBooks()
      })
  },
2-4. Delete
Delete a record remove
Delete the data manually added on the cloud development console (no _openid)
 deleteBook(){
    db.collection('books').doc('14139e12611a040e056d80f5374d86d1').remove().then(res=>{
      console.log(res,'delete');
      this.getBooks()
    })
  },

Replace the data created on the applet side
 deleteBook(){
    db.collection('books').doc('8937eaa9611a18ac04f2a1480028048e').remove().then(res=>{
      console.log(res,'delete');
      this.getBooks()
    })
  },

Delete multiple records (you can select multiple records to delete through the where statement, and only the records with permission to delete will be deleted)
deleteBook(){
    db.collection('books').where({
      price: 150
    }).remove().then(res=>{
      console.log(res,'delete');
      this.getBooks()
    })
  },

Directly operate the database, only one is deleted, and the cloud function can delete multiple
Complete example
const db = wx.cloud.database()  //Get reference to database
const _ = db.command     //Get database query and update instructions
db.collection("china")  //Get the reference of the collection china
  .where({              //Query condition instruction where
    gdp: _.gt(3000)     //Query filter criteria, gt indicates that the field must be greater than the specified value.
  })
  .field({             //What fields are displayed
    _id:false,         //Default display_ id, this is hidden
    city: true,
    province: true,
    gdp:true
  })
  .orderBy('gdp', 'desc')  //Sort by, descending
  .skip(0)                 //How many records are skipped (commonly used for paging). 0 means that it is not skipped here
  .limit(10)               //Limit the number of records displayed, here is 10

  .get()                   //Get the collection data filtered according to the query criteria
  .then(res => {
    console.log(res.data)
  })
  .catch(err => {
    console.error(err)
  })
3. Store
3-1. Upload files
Upload pictures
uploadFile(){
wx.chooseImage({
success (res) {
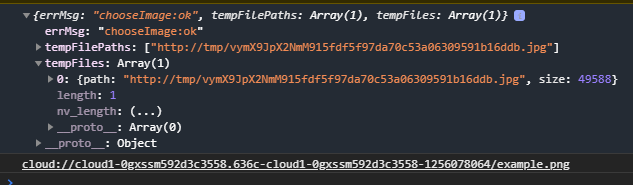
console.log(res)
const tempFilePaths = res.tempFilePaths;
wx.cloud.uploadFile({
cloudPath: 'example.png', // Path uploaded to the cloud
filePath: tempFilePaths[0], // Applet temporary file path
success: res => {
// Return file ID
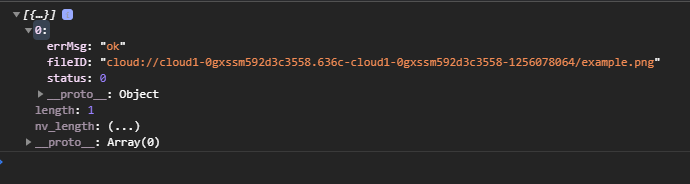
console.log(res.fileID)
},
fail: console.error
})
}
})
}

Upload the picture and display it (obtain the temporary path according to the file ID)
 uploadFile(){
    wx.chooseImage({
      success: (res) =>{
        const tempFilePaths = res.tempFilePaths;
        wx.cloud.uploadFile({
          cloudPath: 'example.png', // Path uploaded to the cloud
          filePath: tempFilePaths[0], // Applet temporary file path
          success: res => {
            // Return file ID
            wx.cloud.getTempFileURL({
              fileList: [res.fileID],
              success: res => {
                // fileList is an array of objects with the following structure
                // [{
                //    fileID: 'cloud://xxx.png ', / / file ID
                //    tempFileURL: '', / / temporary file network link
                //    maxAge: 120 * 60 * 1000, / / expiration date
                // }]
                console.log(res.fileList[0].tempFileURL)
                this.setData({
                  imgUrl:res.fileList[0].tempFileURL
                })
                console.log(this.data.imgUrl)
              },
              fail: console.error
            })

          },
          fail: console.error
        })
      }
    })
  }```
Upload video
```javascript
  uploadFile(){
    wx.chooseVideo({
      sourceType: ['album','camera'],
      maxDuration: 60,
      camera: 'back',
      success:(res)=> {
        wx.showLoading({
          title: 'Uploading',
        })
        console.log(res.tempFilePath)
        wx.cloud.uploadFile({
          cloudPath: 'video.mp4', // Path uploaded to the cloud
          filePath: res.tempFilePath, // Applet temporary file path
          success: res => {
            // Return file ID
            console.log(res.fileID)
            wx.cloud.getTempFileURL({
              fileList: [res.fileID],
              success: res => {
                // fileList is an array of objects with the following structure
                // [{
                //    fileID: 'cloud://xxx.png ', / / file ID
                //    tempFileURL: '', / / temporary file network link
                //    maxAge: 120 * 60 * 1000, / / expiration date
                // }]
                console.log(res.fileList)
                this.setData({
                  videoSrc:res.fileList[0].tempFileURL
                })
                wx.hideLoading()
              },
              fail: console.error
            })
          },
          fail: console.error
        })
      }
    })
  }
Upload file
uploadFile(){
    wx.chooseMessageFile({
      count: 1,
      type: 'file',
      success: (res)=> {
        // tempFilePath can display pictures as src attribute of img tag
        const tempFilePaths = res.tempFiles
        console.log(tempFilePaths,'Return path')
        wx.cloud.uploadFile({
          cloudPath: 'example.pdf', // Path uploaded to the cloud
          filePath: tempFilePaths[0].path, // Applet temporary file path
          success: res => {
            // Return file ID
            console.log(res.fileID)
          },
          fail: console.error
        })
      }
    })
  },
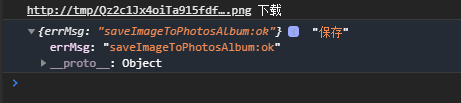
Download pictures
 downloadFile(){
    wx.cloud.downloadFile({
      fileID: 'cloud://cloud1-0gxssm592d3c3558.636c-cloud1-0gxssm592d3c3558-1256078064/example.png ', / / file ID
      success: res => {
        // Return temporary file path
        console.log(res.tempFilePath,'download')
        wx.saveImageToPhotosAlbum({
          filePath:res.tempFilePath,
          success:(res)=> {
            console.log(res,'preservation')
          }
        })
      },
      fail: console.error
    })
  }
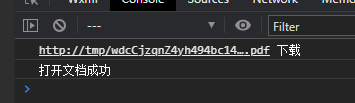
Download the file and open it
downloadFile(){
    wx.cloud.downloadFile({
      fileID: 'cloud://cloud1-0gxssm592d3c3558.636c-cloud1-0gxssm592d3c3558-1256078064/example.pdf ', / / file ID
      success: res => {
        // Return temporary file path
        console.log(res.tempFilePath,'download')
        wx.openDocument({
          filePath: res.tempFilePath,
          success: (res)=> {
            console.log('The document was opened successfully')
          }
        })
      },
      fail: console.error
    })
  },
Delete file
deleteFile(){
wx.cloud.deleteFile({
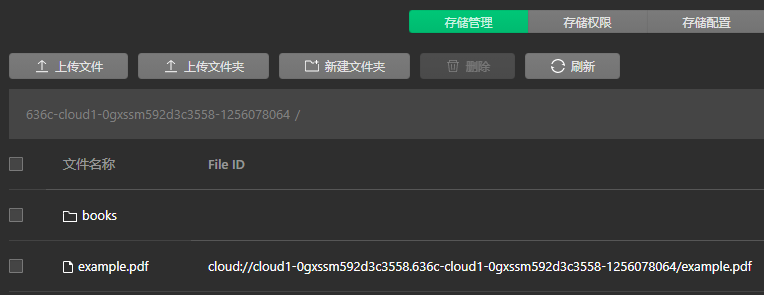
fileList: ['cloud://cloud1-0gxssm592d3c3558.636c-cloud1-0gxssm592d3c3558-1256078064/example.png'],
success: res => {
// handle success
console.log(res.fileList)
},
fail: console.error
})
}
4. Cloud function
4-1. Create a new cloud function
Right click the cloud function root directory, and in the right-click menu, you can select Create a new node JS cloud function add
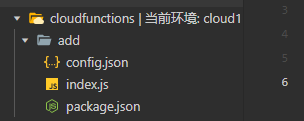
add. JS (cloud function)
// Cloud function entry file
const cloud = require('wx-server-sdk')
cloud.init({
  env:'cloud1-0gxssm592d3c3558'
})
// Cloud function entry function
exports.main = async (event, context) => {
  return event.a + event.b
}
Calling cloud function in page js
// pages/cloundfn/cloundfn.js
Page({
  data:{
    sum:0,
  },
  onLoad(options) {
    wx.cloud.callFunction({
      // Cloud function name
      name: 'add',
      // Parameters passed to the cloud function
      data: {
        a: 1,
        b: 2,
      },
    })
    .then(res => {
      console.log(res.result) // 3
      this.setData({
        sum:res.result
      })
    })
    .catch(console.error)
  },
})
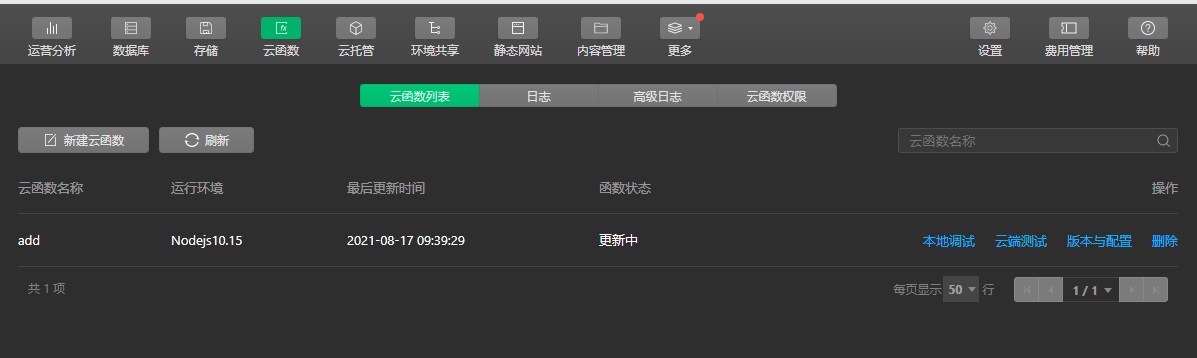
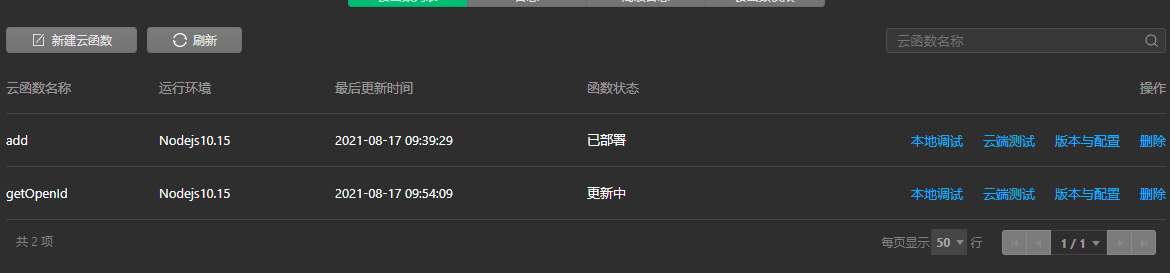
Right click the cloud function and click upload and deploy (cloud installation depends on node_modules, which are not uploaded)
Then you can see the uploaded cloud functions on the cloud development console
Click local test to pop up the cloud function local test pop-up box. Click the right to open the local test and install node_modules dependency. Recompile the page code to see the return value
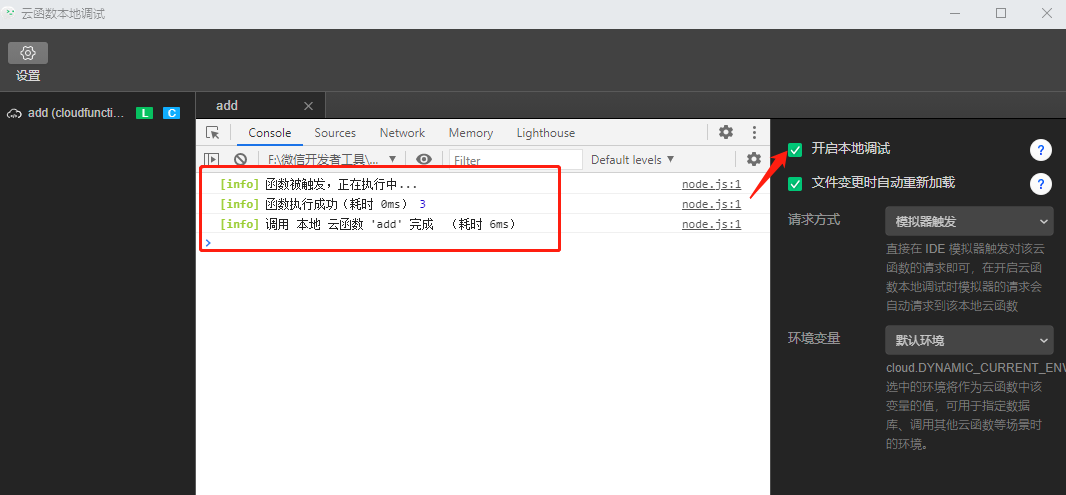
Show returned results

4-2. Obtain applet user information through cloud function
<button type="primary" bindtap="getUserInfo">Get user information</button>
getUserInfo(){
    wx.cloud.callFunction({
      // Cloud function name
      name: 'getOpenId',
    })
    .then(res => {
      console.log(res,'User information') //
      this.setData({
        openId:res.result.OPENID,
        appId:res.result.APPID,
      })
    })
    .catch(console.error)
  }
Create a new getOpenId cloud function, right-click to upload and deploy
Local test
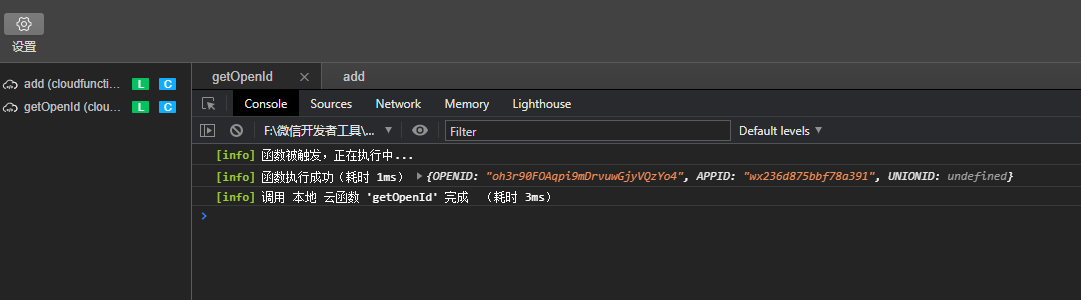
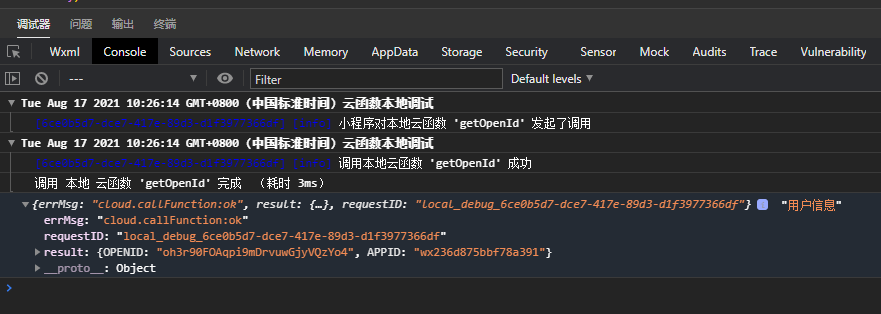
Debugger return
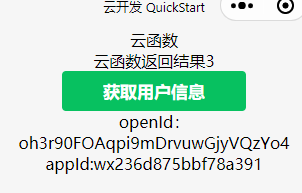
Page display
4-3. Cloud function call database
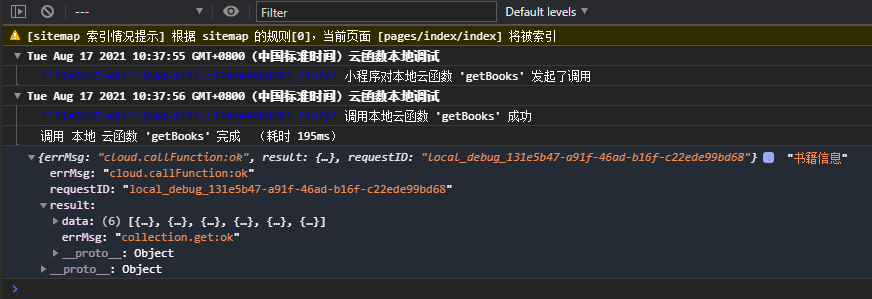
1. Cloud function to get the list of books
Get data from page js
  onLoad (options) {
   this.getBooks()
  },
  getBooks(){
    wx.cloud.callFunction({
      // Cloud function name
      name: 'getBooks',
    })
    .then(res => {
      console.log(res,'Book information') //
      this.setData({
        books:res.result.data
      })
    })
    .catch(console.error)
  },
Create a new getBooks cloud function, upload and deploy it
const cloud = require('wx-server-sdk')
cloud.init({
  env: cloud.DYNAMIC_CURRENT_ENV
})
const db = cloud.database()
exports.main = async (event, context) => {
  // The get method on the collection will return a Promise, so the cloud function will return the result after the database asynchronously fetches the data
  return db.collection('books').get()
}

Local debugging
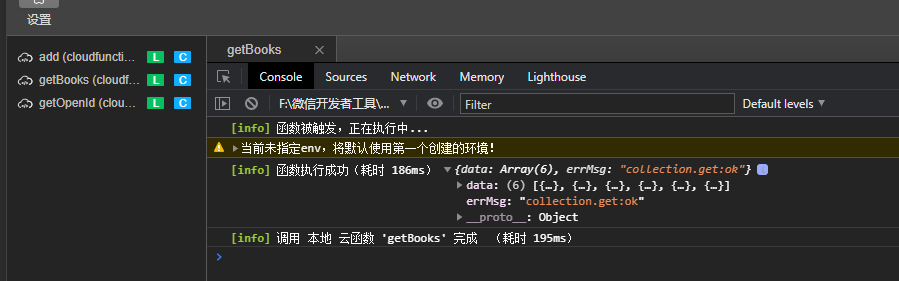
Debugger output
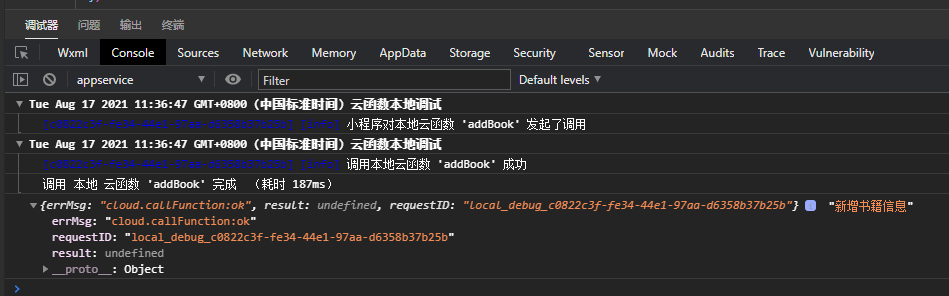
2. New books on cloud functions
Page js method
 addBook(){
    wx.cloud.callFunction({
      // Cloud function name
      name: 'addBook',
      data:{
        name:this.data.bookName,
        price:parseInt(this.data.bookPrice),
        author:this.data.bookAuthor,
      }
    })
    .then(res => {
      console.log(res,'New book information') //
    })
    .catch(console.error)
  }
New book cloud function
// Cloud function entry file
const cloud = require('wx-server-sdk')
cloud.init({
  env: cloud.DYNAMIC_CURRENT_ENV
})
const db = cloud.database()
// Cloud function entry function
exports.main = async (event, context) => {
  const {name,price,author} = event
  console.log(name,price,author,'Transmitted data')
  return db.collection('books').add({
    // The data field represents the JSON data to be added
    data: {
     name,
     price,
     author,
    }
  })
  .then(res => {
    console.log(res,'newly added')
  })

}
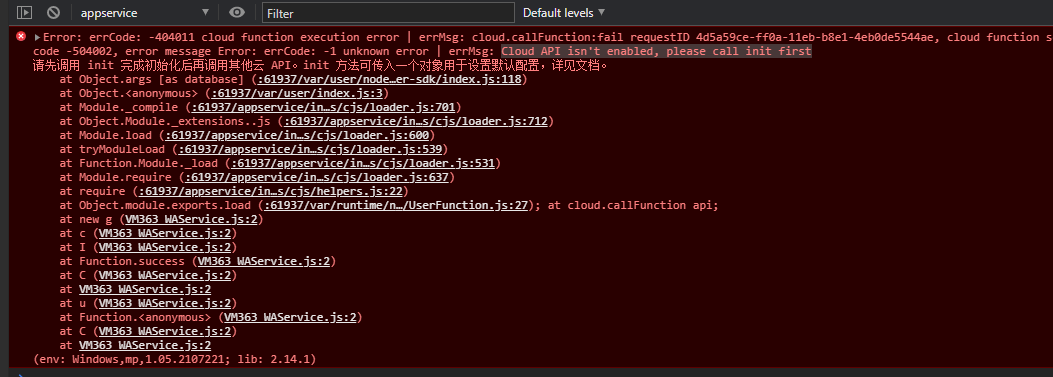
be careful
cloud.init({
  env: cloud.DYNAMIC_CURRENT_ENV
})
To be in
const db = cloud.database()
Initialize before, otherwise an error will be reported
result:
Cloud function local debugging pop-up
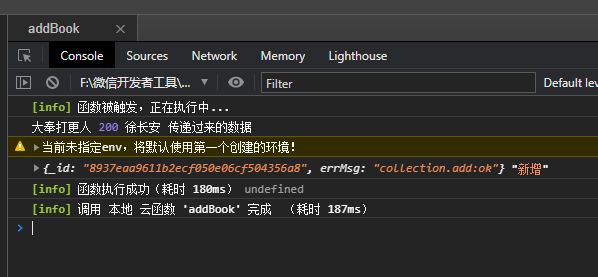
Debugger:
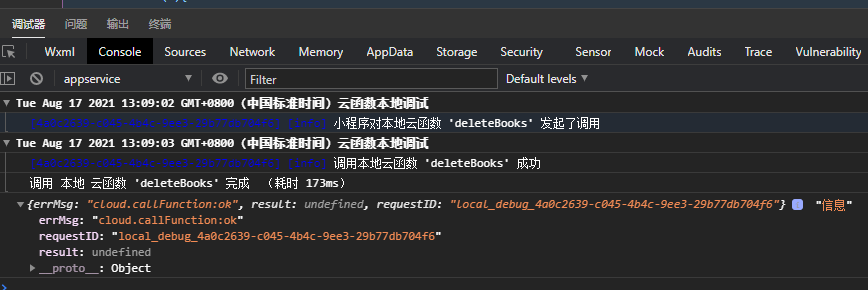
3. Cloud function delete books
Create a new cloud function for deleteBooks
// Cloud function entry file
const cloud = require('wx-server-sdk')
cloud.init({
  env: cloud.DYNAMIC_CURRENT_ENV
})
const db = cloud.database()
// Cloud function entry function
exports.main = async (event, context) => {
  //Delete data with price of 150
  return  db.collection('books').where({
    price: 150
  }).remove()
  .then(res => {
    console.log(res,'delete')
  })
}
Page method call:
deleteBook(){
    wx.cloud.callFunction({
      // Cloud function name
      name: 'deleteBooks',
    })
    .then(res => {
      console.log(res,'information') //
    })
    .catch(console.error)
  },
Cloud function local debugging return
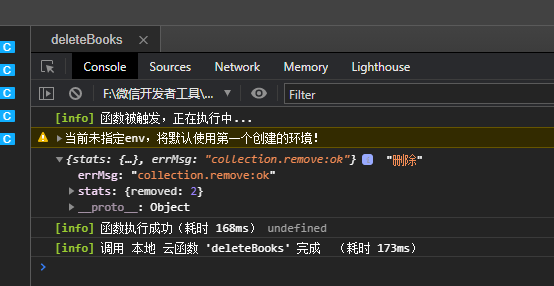
Debugger return
4. Call storage in cloud function
Suppose we want to upload a picture file (demo.jpg) contained in the cloud function Directory:
const cloud = require('wx-server-sdk')
const fs = require('fs')
const path = require('path')

cloud.init({
  env: cloud.DYNAMIC_CURRENT_ENV
})

exports.main = async (event, context) => {
  const fileStream = fs.createReadStream(path.join(__dirname, 'demo.jpg'))
  return await cloud.uploadFile({
    cloudPath: 'demo.jpg',
    fileContent: fileStream,
  })
}
In the cloud function__ The value of dirname is the directory where the cloud function code is located
5. Calling other cloud functions in cloud function "
const cloud = require('wx-server-sdk')

cloud.init({
  env: cloud.DYNAMIC_CURRENT_ENV
})

exports.main = async (event, context) => {
  return await cloud.callFunction({
    name: 'sum',
    data: {
      x: 1,
      y: 2,
    }
  })
}