1, The essence of a container is a process
A container is like a container you ran to before virtual machine An application in, such as running a java program. In the container, the main process is the java process running your Java program, and other processes are around the main process. If the main process fails, the container fails.
2, The following resources are isolated in the container
mnt: storage
net: network
pid: process
User: user
uts: host name, domain name, etc
ipc: communication between processes
cgroups: isolate resources, such as CPU and Memory
If you feel a little strange about these features, it's normal. We can create a container, log in to the container, view the corresponding indicators, and feel the isolation of the container from various resources.
We open two windows and execute the following command in window 1:
docker run -it --name centos1 centos:7 /bin/sh
Execute the following command in window 2:
docker run -it --name centos2 centos:7 /bin/sh
1. Store
Add a file hello in the first container and view the file:
sh-4.2# ls
anaconda-post.log  bin	dev  etc  home	lib  lib64  media  mnt	opt  proc  root  run  sbin  srv  sys  tmp  usr	var
sh-4.2# touch hello
sh-4.2# ls
anaconda-post.log  bin	dev  etc  hello  home  lib  lib64  media  mnt  opt  proc  root	run  sbin  srv	sys  tmp  usr  var
In the second container, view the file structure:
sh-4.2# ls
anaconda-post.log  bin	dev  etc  home	lib  lib64  media  mnt	opt  proc  root  run  sbin  srv  sys  tmp  usr	var
2. Network
Use the docker inspect command to view the IP of the two containers. As shown below, the IP of the first container is 172.17.0.2.
➜  ~ docker inspect centos1 | grep IPAddress
            "SecondaryIPAddresses": null,
            "IPAddress": "172.17.0.2",
                    "IPAddress": "172.17.0.2",
View the IP of the second container through the command, which is 172.17.0.3. Isolated from the first container.
➜  ~ docker inspect centos2 | grep IPAddress
            "SecondaryIPAddresses": null,
            "IPAddress": "172.17.0.3",
                    "IPAddress": "172.17.0.3",
3,user
We use the command useradd to add a user jxl in the first container, and use the su command to switch to user jxl, as shown below:
sh-4.2# useradd jxl
sh-4.2# su jxl
[jxl@92b722a79582 /]$ whoami
jxl
In the second container, we switch to the user jxl, and the result indicates that there is no such user.
sh-4.2# su jxl
su: user jxl does not exist
4,uts
Query in the first container host name Word:
[jxl@92b722a79582 /]$ hostname
92b722a79582
Query the host name in the second container:
sh-4.2# hostname
6da17ebcfb66
The host names of the two containers are managed independently.
5,pid
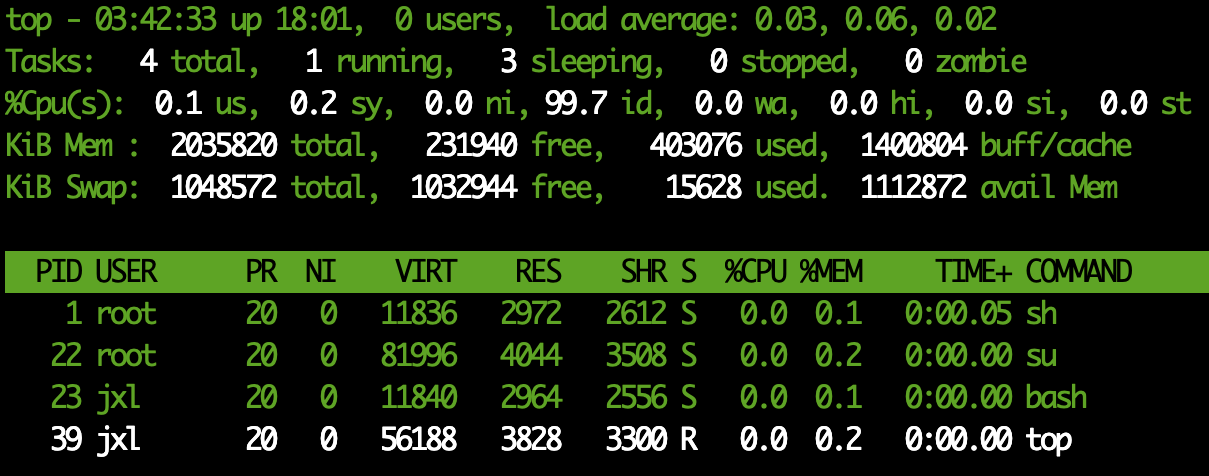
In our opinion, the processes in the container are all in their own containers. The following figure is a screenshot of the top command of the first container:

The following is a screenshot of the top command of the second container:

Process 1 in the two containers is our sh command line process. Although it has the same process number, it is in their respective containers.
6,CGroups
Cggroups is used to isolate resources used by processes, such as CPU , memory, etc.
The following resource information is available under the / sys/fs/cgroup / Directory:
[root@kubernetes-master01 cgroup]# ll
 Total consumption 0
drwxr-xr-x. 5 root root  0 3 June 16-18:10 blkio
lrwxrwxrwx. 1 root root 11 3 June 16-18:10 cpu -> cpu,cpuacct
lrwxrwxrwx. 1 root root 11 3 June 16-18:10 cpuacct -> cpu,cpuacct
drwxr-xr-x. 6 root root  0 3 June 16-18:10 cpu,cpuacct
drwxr-xr-x. 4 root root  0 3 June 16-18:10 cpuset
drwxr-xr-x. 5 root root  0 3 June 16-18:10 devices
drwxr-xr-x. 4 root root  0 3 June 16-18:10 freezer
drwxr-xr-x. 4 root root  0 3 June 16-18:10 hugetlb
drwxr-xr-x. 5 root root  0 3 June 16-18:10 memory
lrwxrwxrwx. 1 root root 16 3 June 16-18:10 net_cls -> net_cls,net_prio
drwxr-xr-x. 4 root root  0 3 June 16-18:10 net_cls,net_prio
lrwxrwxrwx. 1 root root 16 3 June 16-18:10 net_prio -> net_cls,net_prio
drwxr-xr-x. 4 root root  0 3 June 16-18:10 perf_event
drwxr-xr-x. 5 root root  0 3 June 16-18:10 pids
drwxr-xr-x. 5 root root  0 3 June 16-18:10 systemd
We enter the cpu directory, create a directory test, and check the automatically created files in test:
[root@kubernetes-master01 test]# pwd
/sys/fs/cgroup/cpu/test
[root@kubernetes-master01 test]# ll
 Total consumption 0
-rw-r--r--. 1 root root 0 4 June 14:41 cgroup.clone_children
--w--w--w-. 1 root root 0 4 June 14:41 cgroup.event_control
-rw-r--r--. 1 root root 0 4 June 14:41 cgroup.procs
-r--r--r--. 1 root root 0 4 June 14:41 cpuacct.stat
-rw-r--r--. 1 root root 0 4 June 14:41 cpuacct.usage
-r--r--r--. 1 root root 0 4 June 14:41 cpuacct.usage_percpu
-rw-r--r--. 1 root root 0 4 June 14:41 cpu.cfs_period_us
-rw-r--r--. 1 root root 0 4 June 14:41 cpu.cfs_quota_us
-rw-r--r--. 1 root root 0 4 June 14:41 cpu.rt_period_us
-rw-r--r--. 1 root root 0 4 June 14:41 cpu.rt_runtime_us
-rw-r--r--. 1 root root 0 4 June 14:41 cpu.shares
-r--r--r--. 1 root root 0 4 June 14:41 cpu.stat
-rw-r--r--. 1 root root 0 4 June 14:41 notify_on_release
-rw-r--r--. 1 root root 0 4 June 14:41 tasks
Let's look at the default CPU limit, CPU cfs_ quota_ The value of us is - 1 and there is no limit:
[root@kubernetes-master01 test]# cat cpu.cfs_period_us
100000
[root@kubernetes-master01 test]# cat cpu.cfs_quota_us
-1
We can modify the CPU cfs_ quota_ The value of us is 80000, that is, 80000 / 100000 is equal to 80% of the CPU.
The process number we need to limit can be filled in the tasks file:
echo 60068 > tasks
This limits the CPU of thread 60068 to a maximum of 80%.