Next: Interviewer: you said that you are proficient in Docker. Let's talk about Dockerfile in detail
1, Communication between containers
1. One way communication
1.1 what do you mean
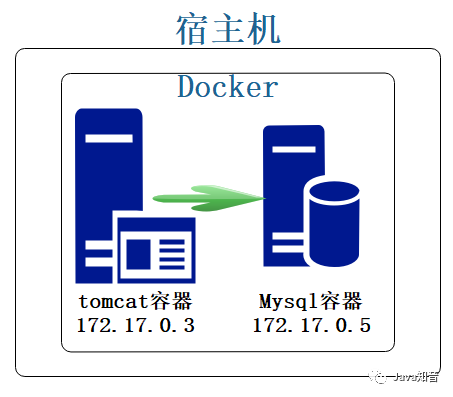
mysql and tomcat are two independent containers, but tomcat needs to communicate with mysql, and mysql does not need to communicate with tomcat at all, which is called one-way communication between containers.
1.2 how to communicate
To talk about communication, we need to talk about ip, because we don't know that ip can't communicate. In the simplest example, if you want to connect to mysql database with jdbc, you also need to configure the ip address of mysql. There is no exception between containers, which are all completed by virtual ip.
What is virtual ip?
Virtual ip: after the container is created, a unique ip will be generated. This ip can't be directly accessed by the outside world. It is only used for communication and interaction between containers. This is virtual ip.
The virtual ip between containers is interoperable.
What is the meaning of correspondence? We all know what we rely on for correspondence. We should not grasp the actual combat?
1.3 practical demonstration
1.3.1. Create a tomcat container
docker run -d --name mytomcat tomcat
# --Name can be seen in docker ps. the last column is name
docker ps
Knowledge points appear!!! --name is god horse ghost? Let's take a look at the following scenario
Why does alicloud database / redis and other services you buy directly in the company give you a database domain name instead of ip? Because ip can be changed. For example, if your business system writes ip dead, then the intranet ip of others will be changed. The business system of your useful database will be changed accordingly. Once and for all, if the domain name is used, the underlying ip changes and then maps to the new domain name, without affecting the business system.
--Name is to configure the name of the docker to map with the virtual ip. Because the ip is always changing, other containers need to change each time. Once and for all. When creating a container, you can specify it through -- name xxx.
1.3.2 create mysql container
I didn't pull the mysql image, so I used centos to simulate the database. The main thing is to see if I can ping the connection, which means I can communicate.
docker run -d --name database -it centos /bin/bash
1.3.3 small test
We need to enter the container of mytomcat and Ping the ip of the database to see if it is OK. How to check the virtual ip of the container?
# This is another knowledge point
docker inspect container id
# For example: (9bf58b4014dd is the container id of our database)
docker inspect 9bf58b4014dd
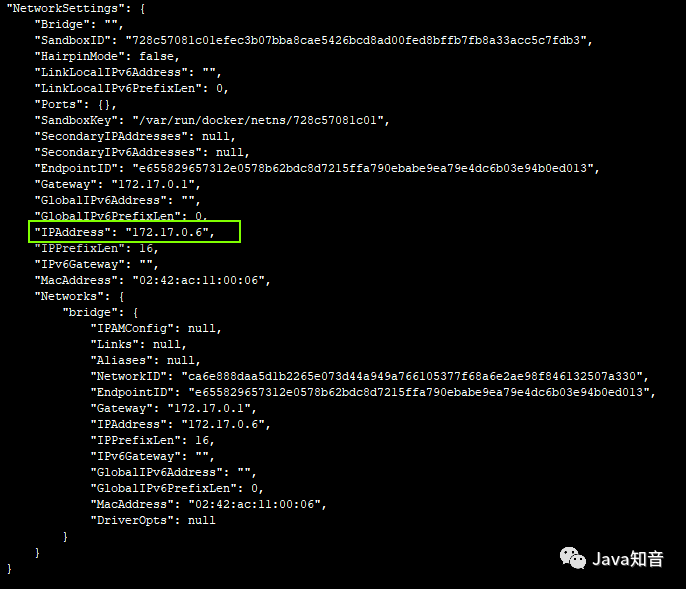
Now that you know the ip address of the database, go to our mytomcat container to ping
docker exec -it mytomcat /bin/bash
ping 172.17.0.6
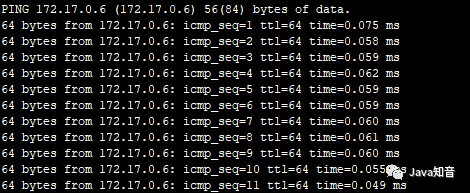
Perfect!
Wait a minute. It seems that it's not perfect. We've given the database the name database. Let's Ping the database as soon as possible. As a result, it doesn't work at all. That's because you have a name and no mapping. How to map? When mytomcat starts the container, you can specify a -- link parameter.
# Force delete old
docker rm -f mytomcat
# Create a new container, and use -- link to specify the "domain name" of the configuration database we want to connect
docker run -d --name mytomcat --link database tomcat
# Enter the mytomcat container
docker exec -it mytomcat /bin/bash
# ping
ping database
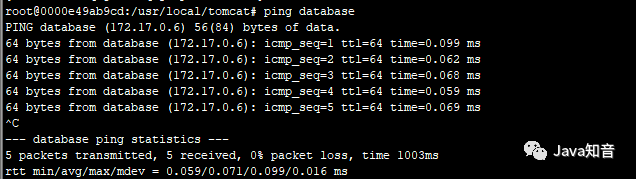
This time is really perfect ~!
1.4 summary
-
Container simple virtual ip is interoperable
-
Use -- name and -- link to complete the custom "domain name" to replace the changeable ip
2. Two way communication
There are many ways, and bridge is generally adopted. Because the space is too long, Google yourself. The key point is to understand what the communication between containers means and how to do it. For example, the above -- link is also one way.
2, Data sharing between containers
1. Scene
A business scenario that requires data sharing between the host and the container. For example, Mysql
For example, during cluster deployment, our application needs to be deployed to 10 docker containers. For example, if you want to change the content of a file, you need to repack it and deploy it 10 times. We can mount the application we need to deploy to the host, so we can change it. For example, the static html file starts 10 containers on the host computer. At this time, we need to modify the text (modify html). We need to modify the html in 10 containers, which is too cumbersome. Therefore, we can mount this html to the host computer, and the container can directly use the file attached to the host computer.
Another example: Mysql data directory configurable file (some advanced configuration or optimized configuration must use one), which can also be used in this scenario.
2. Grammar
# grammar
docker run -v Host path:Container mount path image name
# For example, he will mount all directories under / home / main / program to / usr/local/tomcat/webapps of the container
docker run -v /home/main/programe:/usr/local/tomcat/webapps tomcat
3. Actual combat
3.1 preparation
Create the following file in the following directory and write Hello Volumn~
/home/main/docker/webapps/volumn-test/index.html
3.2 operation
Simply follow the above syntax to mount the directory under / home/main/docker/webapps to the directory inside / usr/local/tomcat/webapps
docker run --name t2 -d -p 8200:8080 -v /home/main/docker/webapps:/usr/local/tomcat/webapps tomcat
3.3 verification
Let's go into the container first
docker exec -it t2 /bin/bash
Then check whether there are directories and files that we mount under / usr/local/tomcat/webapps
root@4be396ff443b:/usr/local/tomcat/webapps# ls -R volumn-test/
volumn-test/:
index.html
Finally, let's visit to see the effect
[root@izm5 volumn-test]# curl 'localhost:8200/volumn-test/index.html'
Hello Volumn~~
We modify the index.html Modify the content of to Hello Volumn~~ How are you? Then visit again to see the effect:
This is modified under the host / home / main / docker / webapps / column test index.html , is not inside the container.
[root@izm5 volumn-test]# curl 'localhost:8200/volumn-test/index.html'
Hello Volumn~~ How are you?
Perfectly, the container works without perception.
3.4 benefits
I started a container example. How many more starts? Then the product needs to modify the copy, so you log in each container to modify it? Or repackage and restart all containers? It's a bit of a fuss. Isn't it fragrant to use - v command to mount and realize data sharing between host and container?
4. New questions
If there are too many containers, you need to - V every time you start the container xxx:xxx It's also easy to write incorrectly. It's not good to write a wrong letter. In addition, if the host changes its address, it also needs to change the docker run-v parameters of the container in batches. Too many machines are not conducive to maintenance.
5. Problem solving
Shared containers are born!
5.1 shared container concept
If there are too many containers, write - V every time xxx:xxx , which is too complex and prone to errors. At this time, you can create a shared container through docker create, and then you can specify the name of the created shared container through -- volumes from when you start it. That is to say, you can set - V above xxx:xxx This string is managed in one place. When the container is started, it can directly refer to this unified configuration for unified management.
5.2 grammar
#Create shared container syntax, just create is not start. The last / bin/true is a placeholder. It's useless.
docker create --name shared container name - v host path: path of Mount in container image name / bin/true
 #Use the shared container mount point by -- volumes from shared container name when starting the container
 Docker run -- volumes from shared container name -- name xxx -d image name
5.3 actual combat
# Create a shared container
docker create --name webpage -v /home/main/docker/webapps:/usr/local/tomcat/webapps tomcat /bin/true
# Take a shared container configuration to start the container
docker run -p 8300:8080 --volumes-from webpage --name t3 -d tomcat
# At startup
docker run -p 8400:8080 --volumes-from webpage --name t4 -d tomcat
5.4 validation & benefits
Validation is the same as the first - v method. The content is modified and the container is not aware.
The advantages over the first approach are:
-
Don't write - V every time xxx:xxx This long string of English letters is not only disgusting but also prone to mistakes.
-
Change the path, just one place.
3, DockerCompose
1. What's the use
For example, if we want to deploy a Java Web application, we usually need three containers: nginx container, tomcat container and mysql container. It's the most basic, maybe more complex. Do the operation and maintenance personnel need to launch these three containers independently each time to support our web application? It's a little complicated.
Docker compose is to simplify this process. It is equivalent to a script, which is used to manage and start these three containers in a unified way. Save operation and maintenance time and avoid error rate. In other words, when multiple applications work together to accomplish one thing, it is very easy to use, otherwise, the Dockerfile will be finished directly.
2. Install DockerCompose
Linux based installation.
Refer to the official installation documentation: https://docs.docker.com/compose/install/
The execution of the following two orders is complete:
sudo curl -L "https://github.com/docker/compose/releases/download/1.25.5/docker-compose-$(uname -s)-$(uname -m)" -o /usr/local/bin/docker-compose

sudo chmod +x /usr/local/bin/docker-compose
If the first command is very slow, you can use the following command instead. After all, it is a foreign website
> curl -L https://get.daocloud.io/docker/compose/releases/download/1.25.5/docker-compose-`uname -s`-`uname -m` > /usr/local/bin/docker-compose
Verify after installation:
docker-compose --version
3. Let's have a real experience
First, let's feel the power of docker compose and deploy WordPress to play. Baidu, who doesn't know what WordPress is, is an open source blog.
Why deploy WordPress? Because it's also the official WordPress . learn from official documents
Official document installation of WordPress tutorial: https://docs.docker.com/compose/wordpress/
(1) Create the following directory
/home/main/docker/WordPress
(2) Establish docker-compose.yml file
cd /home/main/docker/WordPress
vi docker-compose.yml
(3) At docker-compose.yml It says
version: '3.3'

services:
   db:
     image: mysql:5.7
     volumes:
       - db_data:/var/lib/mysql
     restart: always
     environment:
       MYSQL_ROOT_PASSWORD: somewordpress
       MYSQL_DATABASE: wordpress
       MYSQL_USER: wordpress
       MYSQL_PASSWORD: wordpress

   wordpress:
     depends_on:
       - db
     image: wordpress:latest
     ports:
       - "8000:80"
     restart: always
     environment:
       WORDPRESS_DB_HOST: db:3306
       WORDPRESS_DB_USER: wordpress
       WORDPRESS_DB_PASSWORD: wordpress
       WORDPRESS_DB_NAME: wordpress
volumes:
    db_data: {}
Can't understand? Normal, it doesn't matter. This is the famous docker compose, which is a script file with. yml as the suffix end. He can automatically help us deploy our configured containers, such as mysql container and wordpress container. We can also see that the port is 8000, which is enough. Go ahead!
(4) Execute script
# Enter your docker first- compose.yml Directory
cd /home/main/docker/WordPress
# Execute script
docker-compose up -d
(5) Result analysis
[root@izm5e3qug7oee4q1y4opibz WordPress]# docker-compose up -d
Creating network "wordpress_default" with the default driver
Creating volume "wordpress_db_data" with default driver
Pulling db (mysql:5.7)...
5.7: Pulling from library/mysql
afb6ec6fdc1c: Pull complete
....
0bdc5971ba40: Pull complete
Digest: sha256:d16d9ef7a4ecb29efcd1ba46d5a82bda3c28bd18c0f1e3b86ba54816211e1ac4
Status: Downloaded newer image for mysql:5.7
Pulling wordpress (wordpress:latest)...
latest: Pulling from library/wordpress
afb6ec6fdc1c: Already exists
3d895574014b: Pull complete
...
Digest: sha256:0b452b7b45fa770f12e864720abb01bef506f4abe273669402434e94323c97d7
Status: Downloaded newer image for wordpress:latest
Creating wordpress_db_1 ... done
Creating wordpress_wordpress_1 ... done
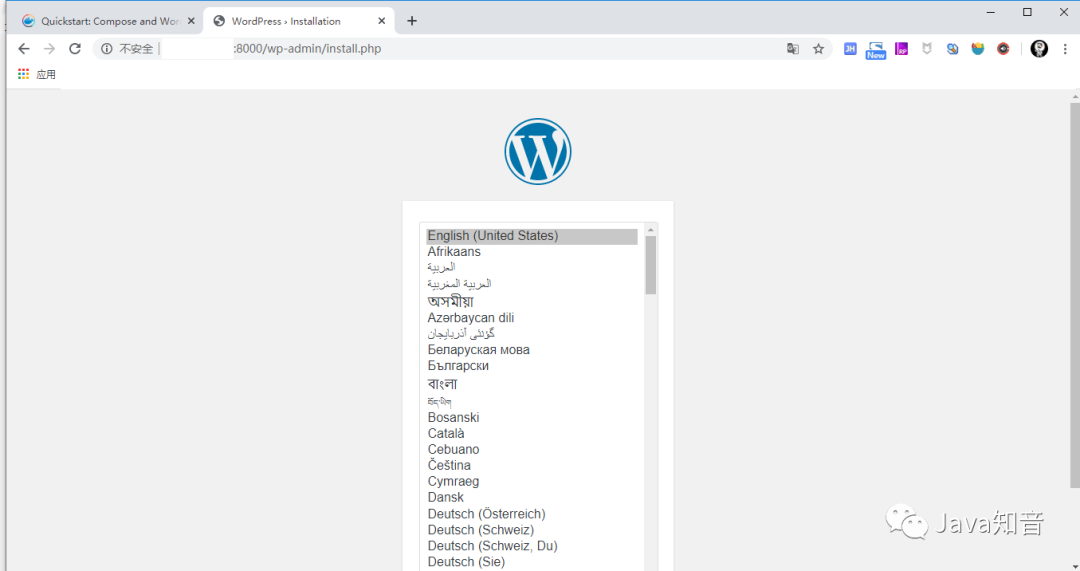
You can see pulling db, pulling wordpress, and done. About the mysql database that we need to create wordpress and wordpress. Visit 8000 port, success!
4. Different from Dockerfile
The communication between Dockerfile containers needs -- link or bridge mode, and DockerCompose is fully automatic. In other words, a single container must have a Dockerfile, but multiple containers need to interact and depend on each other. Use DockerCompose to manage those scattered dockerfiles in a unified way to achieve an integrated script for automatic deployment.
5. Actual combat
5.1 requirement description
In practice, a spring boot project, a spring boot jar package depends on mysql database. We use docker compose to complete the automatic deployment.
5.2 preparations
5.2.1 prepare the following documents
[root@izm5e3qug7oee4q1y4opibz docker-compose-app]# pwd
/home/main/docker/docker-compose-app
[root@izm5e3qug7oee4q1y4opibz docker-compose-app]# ls -l
total 12
drwxr-xr-x 2 root root 4096 May 24 12:20 app
drwxr-xr-x 2 root root 4096 May 24 12:20 db
-rw-r--r-- 1 root root  335 May 24 12:20 docker-compose.yml
5.2.2,app
Inside are the jar package of our springboot and the Dockerfile file for making the image.
[root@izm5e3qug7oee4q1y4opibz docker-compose-app]# ll app/
total 23492
-rw-r--r-- 1 root root     1071 May 24 12:19 application-dev.yml
-rw-r--r-- 1 root root     1457 May 24 12:19 application.yml
-rw-r--r-- 1 root root 24042957 May 24 12:20 bsbdj.jar
-rw-r--r-- 1 root root      154 May 24 12:20 Dockerfile
Take a look at application-dev.yml The configuration of is mainly based on the database configuration
spring:
  datasource:
    driver-class-name: com.mysql.jdbc.Driver
    url: jdbc:mysql://db:3306/bsbdj?useUnicode=true
    username: root
    password: root
    tomcat:
      init-s-q-l: SET NAMES utf8mb4 COLLATE utf8mb4_unicode_ci
server:
  port: 80
Here we find that the database configuration is db:3306. This is not the normal ip / domain name of Shenma. This is the MySQL container name. So this service depends on MySQL service, so our main purpose is to use DockerCompose to automatically deploy and initialize SQL operations from Dockerfile files of multiple containers for dynamic operations.
5.2.3,db
The sql file of the database required by the jar package and the Dockerfile file for making the image.
[root@izm5e3qug7oee4q1y4opibz docker-compose-app]# ll db/
total 35612
-rw-r--r-- 1 root root       69 May 24 12:20 Dockerfile
-rw-r--r-- 1 root root 36460577 May 24 12:20 init-db.sql
5.3. Start actual combat
5.3.1. Dockerfile of app
FROM openjdk:8u222-jre
WORKDIR /usr/local/bsbdj
ADD bsbdj.jar .
ADD application.yml .
ADD application-dev.yml .
EXPOSE 80
CMD ["java","-jar","bsbdj.jar"]
5.3.2. Dockerfile of db
FROM mysql:5.7
WORKDIR /docker-entrypoint-initdb.d
ADD init-db.sql .
Here's a detail: why enter the docker-entrypoint-initdb.d directory in ADD sql? Because this directory is a backdoor, the sql files in this directory will be executed automatically. How do I know? The official told me:
https://hub.docker.com/_/mysql

5.3.3 final Boss: docker-compose.yml
Now our application's Dockerfile and the database Dockerfile that our application depends on are ready. The last final yml configuration file is left
# Current most stable version: 3.3,So 3.3 Just do it.
version: '3.3'
services:
  ## The service name is db, remember our application-dev.yml Configuration of? The database configuration is db, which corresponds to here.
  db:
    # The directory to which the Dockerfile file belongs.
    build: ./db/
    # always: restart automatically in case of downtime. It's very powerful.
    restart: always
    # Environment variable, similar to the - e parameter
    environment:
      MYSQL_ROOT_PASSWORD: root
  # Service name is app
  app:
    # The directory to which the Dockerfile file belongs. If the app depends on db, you need to put the db service configuration in front of the app.
    build: ./app/
    # Depend on the above db service
    depends_on:
      - db
    # The port of both the host and the container is 80. The Dockerfile of the above app exposes port 80, so the container here is 80
    ports:
      - "80:80"
    restart: always
5.3.4 startup
# -d for background start
docker-compose up -d
Start result:
[root@izm5e3qug7oee4q1y4opibz docker-compose-app]# docker-compose up -d
Creating network "docker-compose-app_default" with the default driver
Building db
Step 1/3 : FROM mysql:5.7
 ---> a4fdfd462add
Step 2/3 : WORKDIR /docker-entrypoint-initdb.d
 ---> Running in d1ff6e4bb5a8
Removing intermediate container d1ff6e4bb5a8
 ---> d29a05c5bfcb
Step 3/3 : ADD init-db.sql .
 ---> 6ae6d9eb35ca

Successfully built 6ae6d9eb35ca
Successfully tagged docker-compose-app_db:latest
WARNING: Image for service db was built because it did not already exist. To rebuild this image you must use `docker-compose build` or `docker-compose up --build`.
Building app
Step 1/7 : FROM openjdk:8u222-jre
8u222-jre: Pulling from library/openjdk
9a0b0ce99936: Pull complete
db3b6004c61a: Pull complete
f8f075920295: Pull complete
4901756f2337: Pull complete
9cfcf0e1f584: Pull complete
d6307286bdcd: Pull complete
Digest: sha256:3d3df6a0e485f9c38236eaa795fc4d2e8b8d0f9305051c1e4f7fbca71129b06a
Status: Downloaded newer image for openjdk:8u222-jre
 ---> 25073ded58d2
Step 2/7 : WORKDIR /usr/local/bsbdj
 ---> Running in df4a4c352e71
Removing intermediate container df4a4c352e71
 ---> 0d88b2f13319
Step 3/7 : ADD bsbdj.jar .
 ---> aabaa119855d
Step 4/7 : ADD application.yml .
 ---> 7e1f7b4614cc
Step 5/7 : ADD application-dev.yml .
 ---> a8d36115592f
Step 6/7 : EXPOSE 80
 ---> Running in 26b44c9d57ef
Removing intermediate container 26b44c9d57ef
 ---> fd36f3cdd115
Step 7/7 : CMD ["java","-jar","bsbdj.jar"]
 ---> Running in 64bdeff2f1ce
Removing intermediate container 64bdeff2f1ce
 ---> 77d18bae9bbc

Successfully built 77d18bae9bbc
Successfully tagged docker-compose-app_app:latest
Creating docker-compose-app_db_1 ... done
Creating docker-compose-app_app_1 ... done
You can see that the mysql image was built for us first, and then bsbdj.jar Mirror image of. Finally, CMD ["Java", "- jar" is executed“ bsbdj.jar "], these processes are fully automated.
View container
docker-compose ps
result:
[root@izm5e3qug7oee4q1y4opibz docker-compose-app]# docker-compose ps
          Name                       Command             State          Ports
------------------------------------------------------------------------------------
docker-compose-app_app_1   java -jar bsbdj.jar           Up      0.0.0.0:80->80/tcp
docker-compose-app_db_1    docker-entrypoint.sh mysqld   Up      3306/tcp, 33060/tcp
Then visit http://ip:80 to see the effect.
6. Supplement
Docker compose other commands can be viewed with docker compose -- help. Besides the difference between docker compose and Dockerfile, it can be roughly understood that Dockerfile is a script for a single container, and docker compose is an automatic script for multiple dockerfiles. It helps us deal with the dependency between containers and other operations that need human intervention.
4, Q & A in the previous period
Previous review: Interviewer: you said that you are proficient in Docker. Let's talk about Dockerfile in detail
1. Can add command extract zip format? How to create a multi module image?
ADD command can't unzip zip. Test it yourself. Can extract: tar, gzip, bzip2, etc.
Multiple modules happen to be the leading role of today's docker compose. You can write a Dockerfile for each module, and then use docker compose to manage these dependent modules.
If it is a cluster, k8s and docker warm are preferred. After all, the fatal disadvantage of docker compose is only on a single machine.
2. Why do I need Dockerfile with docker commit?
docker commit is a black box operation. After a period of time, I don't know how the image is made or what is installed. However, with the image built by Dockerfile, we can clearly know which layer there is and what each layer is. It is easy to modify and maintain.