[CSDN editor's note] when transplanting from Angular to React, the amount of code is reduced by 20%. What's going on? Let's follow the author to see!
Translator Wan Yue editor song Tongtong
Produced by | CSDN (ID: CSDNnews)
I developed a product called Anita. I chose Angular because I had used it to develop a form generator before. However, with many years of experience in React development, I soon realized that the development speed of Angular was very slow. So I decided to migrate the code from Angular to React.
The whole project took less than 10 days, and I finished it in my spare time. I think it's worth the effort, because although the functions of the code base are exactly the same, the amount of code has been reduced by 20%.
Next, let's look at some statistics generated by VS Code Counter.
The statistical results of Angular code base are as follows:
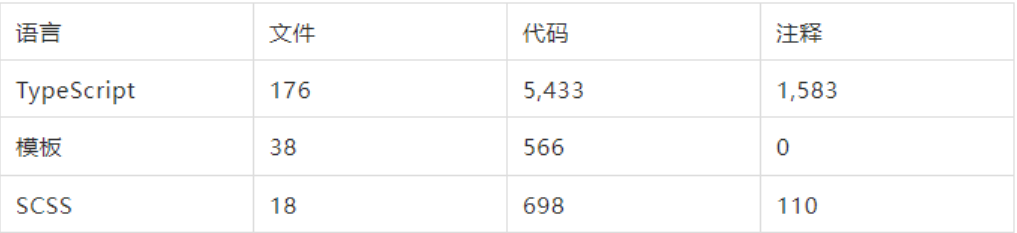
Not SCSS, The total number of lines of code (including templates) for the Angular application is 5999. I count templates as code because Angular follows MVVM (model, view, view controller) mode, which means that templates will be compiled into JavaScript code. Briefly, in Angular, templates are HTML blocks with special syntax, which can support some Angular functions, such as for loops.
The statistical results of React code base are as follows:
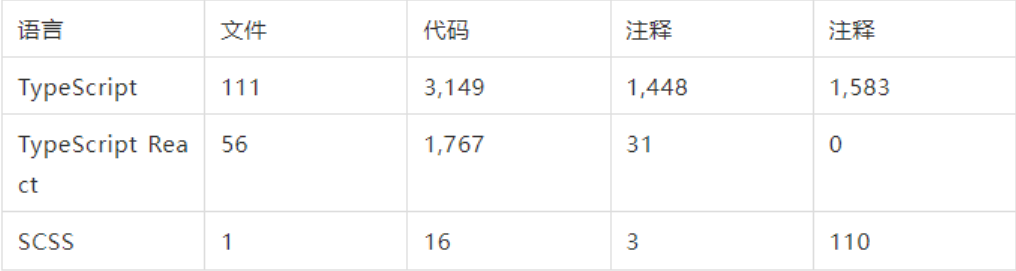
Therefore, the total number of lines of code (including templates) for the React application is 4916.
Let's calculate:
-
Angular total lines of code: 5999
-
Total lines of React Code: 4916
-
Difference: - 1083 (- 19.8443%)
This is a huge improvement. In fact, the application of Angular uses a UI library called Nepal, while in React, the whole UI is customized with TailwindCSS, that is, in React, many DOM elements are designed to render elements generated by importing only one line in Angular. If this factor is taken into account, the amount of code will be reduced more significantly.
Although everyone's statistical results will be different, we can see from the above results that the reduction of code volume is very significant. Because the two code bases are developed by me, the design choices and styles are very similar. I believe this result well shows the difference between angular and React. Angular code base is larger and more complex; The React code base is smaller and simpler.
preparation
In order to transform the Angular application into a new React application, the quickest and simplest way is to use create React app.
Because we want to keep the offline function of Angular application and want to use TypeScript, the command to create React application is:
npx create-react-app anita-react--template cra-template-pwa-typescript
Next, run yarn start to check the results:

The only disadvantage of create react app is that it adds a lot of code for new projects. Let's delete useless code.
We don't need App components and related files. In addition, index Tsx can also be cleaned up:
 import React from 'react';
   import ReactDOM from 'react-dom';
   import './index.css';
   import * as serviceWorkerRegistration from'./serviceWorkerRegistration';
   ReactDOM.render(
     <React.StrictMode>
       "Hello World"
     </React.StrictMode>,
     document.getElementById('root')
   );
   serviceWorkerRegistration.register();
Delete the following files:
-
App.csss
-
App.test.tsx
-
App.tsx
In an Angular project, all static files are usually in the app/src/assets folder. In React, the assets folder is usually placed in the public folder. So let's move the assets folder. Saving the assets folder in src is a little unreasonable, because it does not contain source files, but static files provided to users, so React is more reasonable.
Next, let's update the index in the public folder HTML and manifest JSON, add application icon, title and description. We can also delete some initial files generated by create react app
-
public/favicon.ico
-
public/logo192.png
-
public/logo512.png
Next, let's take a look at the code base.
Import to path
In the Angular project, we use the absolute path to simplify the import and use the custom prefix @ anita/client.
For example, we use the following statement:
import { MyModule } from'@anita/client/my.module
instead of:
import { AppModule } from'../../../my.module'
To do this, we need to properly configure tsconfig paths in JSON.
"CompilerOptions": {
   ...
   "paths": {
     "@anita/client/*": [
       "src/app/*"
     ]
   }
   ...
}
When developing Angular applications, the advantage of this import method is that it can avoid a large number of disorderly imports. As the size of the code base increases, the relative import path becomes very long. For example,... /... /... /... /... / my module. TS is a long navigation path. In contrast, @ Anita / client / my Module is shorter and easier to read.
In addition, no matter where the files are located in the project tree structure, their absolute path is the same, because the absolute path is relative to the root directory of the code base.
In the process of porting all code to React, this import strategy is very convenient, because we can transfer all code to a new project, and then use replace all to update all imports at one time.
Therefore, React applications must also use absolute paths.
In React, we cannot use tsconfig Use paths in JSON. However, we can use baseUrl, which allows us to import files according to the absolute path (relative to the root directory). Our project selects the src folder:
"CompilerOptions": {
   ...
   "baseUrl": "src"
   ...
}
With this configuration, we can import files according to the absolute path. So/ src/app/app. The component becomes app / APP component.
In this way, when porting code, we can simply replace all @ Anita / clients with app s. As long as the folder hierarchy remains unchanged, all imports will be completed smoothly.
Next, let's take a look at the project structure.
Project structure
To simplify the conversion from Angular to React, we retained a similar folder hierarchy. In this way, we can put all the code directly into the React project.
The structure of Angular application is as follows:
-
src/app/
Data: contains the data model.
libs: contains libraries that are not specific to Angular.
Ng services: includes Angular services.
UI: contains the Angular UI elements, as well as some Angular services and pipelines required by the UI.
React has a simpler structure:
-
src/app/
Anita routes: contains the routes of the application. Because these are no longer Angular services, we can put them in this folder.
Data: contains the data model, which is the same as the Angular application.
libs: contains libraries used in Angular applications, which can be transplanted directly to React or modified with a small amount.
UI React components: contains React components.
Setting UI: from Nepal to TailwindCSS
When building the Angular UI, I used Nepal (a customizable Angular UI Library). Nepal is a great tool, but it is only applicable to Angular. It is a little overqualified to use it in React.
I believe tailwind CSS is a better choice for my project. This is an excellent CSS framework, including flex, pt-4, text center and rotate-90, which can be combined directly in HTML.
Installing tailwind CSS in React is also very simple. Please refer to the official documentation for specific instructions( https://tailwindcss.com/docs/guides/create-react-app ).
Tailwind CSS is used on the home page of my application website, so the same style can be adopted in the whole application. What we need to do is in tailwind config. JS defines several colors used by the project:
const colors =require('tailwindcss/colors')
module.exports = {
 // Purges the final stylesheet of unused/un-optimized selectors, keepingonly what is used in the app.
 purge: ['./src/**/*.{js,jsx,ts,tsx}', './public/index.html'],
 darkMode: false,
 theme: {
   colors: {
     transparent: 'transparent',
     current: 'currentColor',
     black: colors.black,
     white: colors.white,
     rose: colors.rose,
     pink: colors.pink,
     fuchsia: colors.fuchsia,
     purple: colors.purple,
     violet: colors.violet,
     indigo: colors.indigo,
     blue: colors.blue,
     'prussian-blue': {
       DEFAULT: '#002346',
       '50': '#2D96FF',
       '100': '#1389FF',
       '200': '#006FDF',
       '300': '#0056AC',
       '400': '#003C79',
       '500': '#002346',
       '600': '#002346',
       '700': '#000f20',
       '800': '#000e1f',
       '900': '#000d1b'
     },
     sky: colors.sky,
     cyan: colors.cyan,
     teal: colors.teal,
     emerald: colors.emerald,
     green: colors.green,
     lime: colors.lime,
     yellow: colors.yellow,
     amber: colors.amber,
     orange: colors.orange,
     red: colors.red,
     warmGray: colors.warmGray,
     trueGray: colors.trueGray,
     gray: colors.gray,
     coolGray: colors.coolGray,
     blueGray: colors.blueGray
   }
 },
 variants: {
   extend: {},
 },
 plugins: [
   require('@tailwindcss/forms')
 ],
}
Next, let's create some layouts with tailwind CSS. Since the main interface of my application is a management panel, let's start here.
Let's look at the index A very basic management panel is implemented in TSX:
ReactDOM.render(
 <React.StrictMode>
   <div className="bg-prussian-blue-400 text-gray-100 flexjustify-between">
     <div className="flex-grow relative flex items-center lg:w-autolg:static pl-5">
       <a className="text-lg font-bold leading-relaxed inline-blockmr-4 py-2 whitespace-no-wrap uppercase text-white" href="/">
         <img src="/assets/logo/logo_square.svg" style={{ height:'30px', width: 'auto' }} alt="Anita" />
       </a>
       <a className="text-md font-bold leading-relaxed inline-blockmr-4 py-2 whitespace-no-wrap uppercase text-white" href="/">
         Anita
       </a>
     </div>

     <button className="mobile-menu-button p-4 focus:outline-nonefocus:bg-gray-700">
       <svg className="h-5 w-5"xmlns="http://www.w3.org/2000/svg" fill="none"viewBox="0 0 24 24" stroke="currentColor">
         <path strokeLinecap="round" strokeLinejoin="round"strokeWidth="2" d="M4 6h16M4 12h16M4 18h16" />
       </svg>
     </button>
   </div>
   <div className="relative min-h-screen md:flex">

     <div className="sidebar bg-gray-200 text-prussian-blue-500 w-64space-y-6 py-7 px-2 absolute inset-y-0 left-0 transform -translate-x-fullmd:relative md:translate-x-0 transition duration-200 ease-in-out">
       <nav>
         <a href="https://anita-app.com" className="blockpy-2.5 px-4 rounded transition duration-200 hover:bg-prussian-blue-600hover:text-white">
            Menu item 1
         </a>
         <a href="https://anita-app.com" className="blockpy-2.5 px-4 rounded transition duration-200 hover:bg-prussian-blue-600hover:text-white">
            Menu item 2
         </a>
         <ahref="https://anita-app.com" className="block py-2.5 px-4rounded transition duration-200 hover:bg-prussian-blue-600hover:text-white">
            Menu item 3
         </a>
         <a href="https://anita-app.com" className="blockpy-2.5 px-4 rounded transition duration-200 hover:bg-prussian-blue-600hover:text-white">
            Menu item 4
         </a>
       </nav>
     </div>

     <div className="flex-1 p-10">
       Content
     </div>

   </div>
 </React.StrictMode>,
 document.getElementById('root')
);
Next, let's test TailwindCSS and page layout:
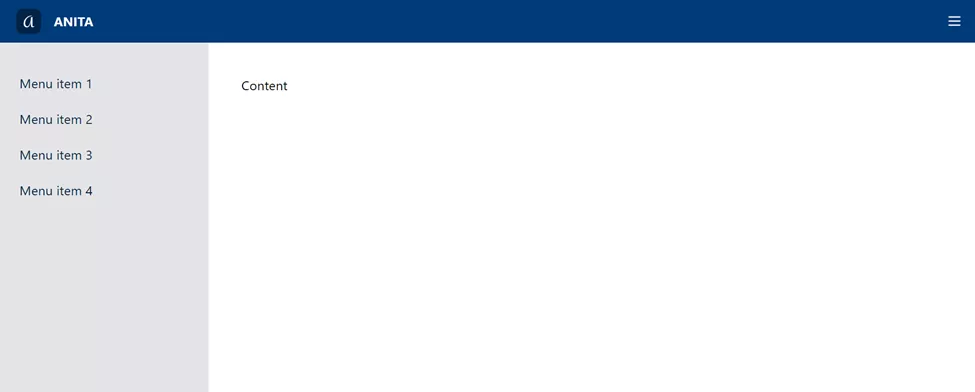
Good. Let's add some components.
We can divide the page into three areas:
-
Header
-
Sidebar
-
Content
Each area is a React component and can be imported into the container component AdminLayout:
export const AdminLayout = () => (
 <div>
   <Header />

   <div className="relative admin-container md:flex">

     <Sidebar>
       <nav>
         <a href="https://anita-app.com" className="blockpy-2.5 px-4 rounded transition duration-200 hover:bg-prussian-blue-600hover:text-white">
            Menu item 1
         </a>
         <a href="https://anita-app.com" className="blockpy-2.5 px-4 rounded transition duration-200 hover:bg-prussian-blue-600hover:text-white">
            Menu item 2
         </a>
         <a href="https://anita-app.com" className="blockpy-2.5 px-4 rounded transition duration-200 hover:bg-prussian-blue-600 hover:text-white">
            Menu item 3
         </a>
         <a href="https://anita-app.com" className="blockpy-2.5 px-4 rounded transition duration-200 hover:bg-prussian-blue-600hover:text-white">
            Menu item 4
         </a>
       </nav>
      </Sidebar>

     <Content>
       Hello world!<br />
     </Content>

   </div>
 </div>
);
The placeholder text is temporarily retained and the actual content will be added later. Later, we will also realize the opening and closing function of the side toolbar. Next, let's deal with state management.
Migrate state management from NgRx to Redux
In the Angular application, I use NgRx, which is a reactive state management library developed for the Angular application inspired by Redux. I also decided to use NgRx because it is very similar to Redux.
Therefore, it is very convenient to migrate the state management code from Angular to React. We just need to change the code calling NgRx store to calling Redux. However, this modification is generally not easy, because NgRx in Angular is loaded as a singleton service. Singleton services must be initialized by Angular, so their instances can only be used in Angular elements, such as services and components.
Based on years of experience, I came up with a wonderful way to solve this problem. We can initialize the NgRx store in a custom service and pass the initialized store reference to a constant, which can be imported to any location of the Angular application.
The Angular service must be initialized in the class using the @ Injectable decorator, as follows:
export const stateData = {
 ngRxStore: undefined
};

@Injectable({
 providedIn: 'root'
})
export class StateDataService {
 constructor(
   private store: Store<ReducerTypes>
) {
   this.initRedux();
 }

 // This is the "dirty" trick
 public initRedux(): void {
   stateData.ngRxStore = this.store;
 }
}
Here are two points to note:
-
private store: the Store initializes NgRx according to the logic of managing the Angular singleton service.
-
stateData is an object used to save the initialized NgRxstore.
In JavaScript, assigning an object to another variable with "=" does not create a new object. The operator "=" assigns a variable to a reference to an existing object in memory. This is how we use statedata ngRxStore = this. The reason for the store. We assign the store to statedata ngRxStore. Since this is only a reference to the original object, access statedata The properties of ngrxstore, such as dispatch, actually access the NgRx singleton service initialized by Angular.
Next, we can import stateData from any file and access the store through it without initialization. We can access the store from any setting of the application without injecting NgRx store into the constructor. In this way, most of the code can maintain normal TypeScript/JavaScript instead of Angular services. Most of the code in my application is in the libs folder, not the ng services folder.
According to previous experience, this technique is very effective and convenient to use here, because we can transfer all non Angular code to React. In the React application, all we need to do is import the Redux store and put statedata Replace ngrxstore with this store. For example, for the CurrentProjectSetter class in Src / APP / LIBS / Project helpers / Project handlers, we can use statedata ngRxStore. Replace dispatch with store dispatch. The rest of the code remains unchanged.
However, first we must initialize redux in the React application. Next, let's add redux and React redux to the React project:
yarn add react-redux redux
Then enter:
yarn add @types/react-redux --dev
The conversion from NgRx to Redux reducer is simple:
const projectState: SystemData =undefined;
const _projectReducer =createReducer(projectState,
 on(REDUCER_ACTIONS.setCurrentProject, (state, data) => {
   return data.payload;
 })
);
export function projectReducer(state:SystemData, action: typeof REDUCER_ACTIONS.setCurrentProject): any {
 return _projectReducer(state, action);
}
The resulting React code is as follows:
const projectState: SystemData =undefined;
export const projectReducer = (state:SystemData = projectState, action: Action<REDUX_ACTIONS>): SystemData=> {
 switch (action.type) {
   case REDUX_ACTIONS.setCurrentProject:
     return action.payload
   default:
     return state;
 }
}
After transplanting all reducer s, we can create a react Redux store:
const REDUCERS = {
 project: projectReducer,
 projects: projectsReducer,
 sectionsForChildOfSelector: sectionsForChildOfSelectorReducer
};
const combinedReducers =combineReducers(REDUCERS)
export const store =createStore(combinedReducers);
Next, we can reference the exported constant store in the React application.
route
In Angular, we use @ angular/router to handle Routing:
export const routes: Routes = [

 { path: 'private', redirectTo: 'private/projects/list', pathMatch:'full' },
 { path: 'private', children:
     [
         {
           path: '', component:AdminComponent, children: [

              { path: 'projects', redirectTo:'projects/list', pathMatch: 'full' },
              { path: 'projects', children: [
                  { path: 'list', component:ProjectsListComponent, canActivate: [ProjectsGuardService] },
                  ...
                ]
              },
              { path: 'project', redirectTo:'projects/list', pathMatch: 'full' },
              { path: 'project', canActivate:[ProjectGuardService], children: [
                  { path: '', redirectTo:'projects/list', pathMatch: 'full' },
                  { path:`:${URL_PARAMS.projectId}`, redirectTo: ':projectId/info', pathMatch: 'full' },
                  { path:`:${URL_PARAMS.projectId}/info`, component: ProjectInfoComponent },
                  ...
                ]
              }
            ]
         }
     ]
 },

 { path: '', redirectTo: 'private/projects/list', pathMatch: 'full' },

 { path: '**', redirectTo: 'private/projects/list', pathMatch: 'full' }

];
In React, we use React Router to handle routing. At present, React Router is the most popular routing library.
First, we need to install react router.
yarn add react-router-dom
Since my application is hosted on GitHub Pages, we need to use HashRouter (not BrowserRouter). In this way, the prefix of the route is "#".
Since all views are rendered in the same place, the content area of the AdminLayout component is where we render the route.
For ease of reading, all routes are defined in a separate React component, anitarutes.
import { HashRouter as Router } from'react-router-dom';
export const AdminLayout = () => (
 <Router>
   <Header />
   <div className="relative admin-container flex">
     <Sidebar>
       <SidebarMenu />
     </Sidebar>
     <Content>
       <AnitaRoutes />
     </Content>
   </div>
 </Router>
);
Anitarutes contains all route definitions:
import { Navigate, Route, Routes } from'react-router-dom';
export const AnitaRoutes = () => (
 <Routes>
   <Route path={ANITA_URLS.projectsList} element={<ProjectsList/>} />
   <Route path={ANITA_URLS.projectAdd} element={<AddEditProject/>} />
   <Route path={ANITA_URLS.projectEdit} element={<AddEditProject/>} />
   <Route path={ANITA_URLS.projectsNone} element={<ProjectsNone/>} />
   <Route path={ANITA_URLS.projectDetails} element={<ProjectDetails/>} />
   <Route path={ANITA_URLS.projectSectionElesList}element={<SectionElementsList />} />
   <Route path={ANITA_URLS.projectSectionEleDetails}element={<SectionElementDetails />} />
   <Route path={ANITA_URLS.projectSectionAddEle}element={<AddEditSectionElement />} />
   <Route path={ANITA_URLS.projectSectionEditEle}element={<AddEditSectionElement />} />
   <Route path="*" element={<Navigateto={ANITA_URLS.projectsList} />}
   />
 </Routes>
)
Note that all routes are defined in the constant Anita_ In the URL. This is because we want to keep the code as clean as possible, and also want to simplify the definition of routing as much as possible.
export const ANITA_URLS = {
// PROJECTS
projectsNone: '/projects/none',
projectsList: '/projects/list',
projectAdd:`/projects/${EDITOR_MODE.add}`,
projectEdit:`/projects/${EDITOR_MODE.edit}/:${URL_PARAMS.projectId}`,
// PROJECT
projectDetails:`/project/:${URL_PARAMS.projectId}/info`,
projectSectionElesList:`/project/:${URL_PARAMS.projectId}/list/:${URL_PARAMS.sectionId}`,
projectSectionAddEle:`/project/:${URL_PARAMS.projectId}/:${URL_PARAMS.sectionId}/${EDITOR_MODE.add}`,
projectSectionEditEle:`/project/:${URL_PARAMS.projectId}/:${URL_PARAMS.sectionId}/${EDITOR_MODE.edit}/:${URL_PARAMS.elementId}`,
projectSectionEleDetails:`/project/:${URL_PARAMS.projectId}/:${URL_PARAMS.sectionId}/details/:${URL_PARAMS.elementId}`,
As you can see, some routes are in other constant URLs_ Params and editor_ Defined in mode. This method can avoid input errors and keep all routes consistent in the whole application.
These two constants are very simple:
export const URL_PARAMS = {
 projectId: 'projectId',
 sectionId: 'sectionId',
 elementId: 'elementId',
 parentId = 'parentId'
}

export const EDITOR_MODE = {
 add: 'add',
 edit: 'edit',
}
For example, route projectSectionEditEle:
/project/:${URL_PARAMS.projectId}/:${URL_PARAMS.sectionId}/${EDITOR_MODE.edit}/:${URL_PARAMS.elementId}
Converted to:
/project/:projectId/:sectionId/edit/:elementId
Next, we just need to generate the link of the route. We can use a function to populate all the parameters of the route. Specify a URL and a set of parameters and values, and the function can automatically fill in all parameters and generate the correct URL:
export function urlParamFiller(url:string, paramsToFill: Array<{ name: URL_PARAMS; value: string }>): string{

 let result = url;

 paramsToFill.forEach(params => {
   result = result.replace(new RegExp(`:${params.name}`, 'g'),params.value) }
 );

 return result;

}
We don't need to worry about the order of parameters, because the urlParamFiller function will replace all parameters in the route.
We can use this function to generate links to routes, such as links to the project details page:
<Link
 to={urlParamFiller(ANITA_URLS.projectDetails, [{ name:URL_PARAMS.projectId, value: project.id }])}
 className="px-4 py-3 text-white inline-flex items-centerleading-none text-sm bg-prussian-blue-400 hover:bg-prussian-blue-500rounded"
 >
 <i className="bi-info-circle mr-2"></i>Projectdetails
</Link>
This example also shows that it is easier to build applications using React than Angular. Our route is just a constant connection string, which can generate links through the above functions. To avoid human error, we use the urlParamFiller function to populate the parameters of the route. Although nested routes can be used if necessary, we do not need to specify the hierarchy of routes here. We can simply use the connection string to delegate the task of generating the complete URL to urlParamFiller, and then we can navigate to any page we want to go.
Build user interface
Unfortunately, it is not so easy to transplant the UI construction from Angular to React, because the UI libraries we use are very different.
In Angular, we use Nepal, a UI Library Based on Bootstrap 4, which contains a large number of predefined UI components. In React, we choose to use tailwind CSS, which provides many components that can be used to create beautiful UI, but this library does not come with any predefined components. So we have to build it manually.
In short, we need to build the UI of the whole application from scratch.
In this process, we need to pay attention to a problem: we don't need to borrow a lot of code from the Angular component. There is a very important best practice: separate the UI and code as much as possible. Therefore, when creating a new UI component, we should try to keep the logical processing in the application code rather than the UI component. Whether it is Angular or React, I saved the code in the folder src/app/libs. We can import libs classes and functions needed to run the application in the component.
Compared with Angular and React, we will also notice that the Angular version is more complex because it has more template code.
Next, let's look at a simple Angular component, AddBtnComponent, which consists of three files:
- add-btn.component.ts: the component itself.
- add-btn.component.html: the HTML template for the component.
- add-btn.component.scss: the style of the component.
add-btn.component.ts
 import ...

@Component({
 selector: 'app-add-btn',
 templateUrl: './add-btn.component.html',
 styleUrls: ['./add-btn.component.scss']
})
export class AddBtnComponent {

 @Input()
 public url: string;

 @Input()
 public icon = 'plus-outline';

 @Input()
 public element: SectionElement;

 constructor(
   private router: Router
 ) { }

 public navigate(): void {
   this.router.navigateByUrl(this.url, {
     state: { element: this.element }
   });

 }

}
add-btn.component.html
<button *ngIf="url"nbButton shape="round" status="primary"size="giant" class="position-absolute shadow"(click)="navigate()">
 <nb-icon [icon]="icon"></nb-icon> <!-- Nebularicon element -->
</button>
add-btn.component.scss: omitted.
In React, you only need a file add edit element button component. Tsx, and only 6 lines of code:
export const AddEditElementButton = ({icon, url }) => (
   <Link to={url} className="absolute bottom-5 right-7 md:bottom-7md:right-10 bg-prussian-blue-400 text-white text-xl shadow-xl rounded-3xl h-14w-14 flex items-center justify-center">
     <i className={icon}></i>
   </Link>
 )
Since Hooks is introduced in React 16.8, the boilerplate code is almost zero.
You can choose your favorite frame according to your preferences. In my experience, writing applications using React is faster and easier to maintain.
Final result
Transplanting from Angular to React is a very interesting attempt and a great learning experience.
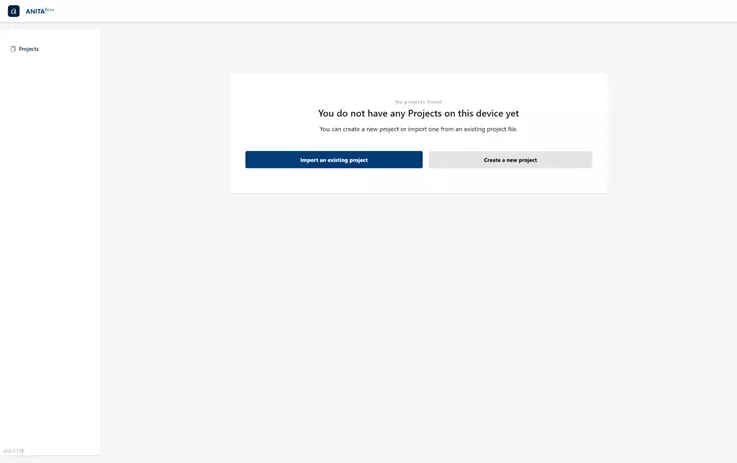
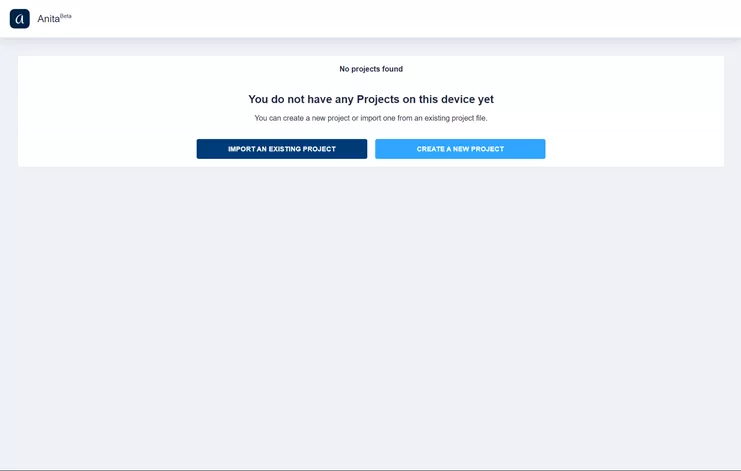
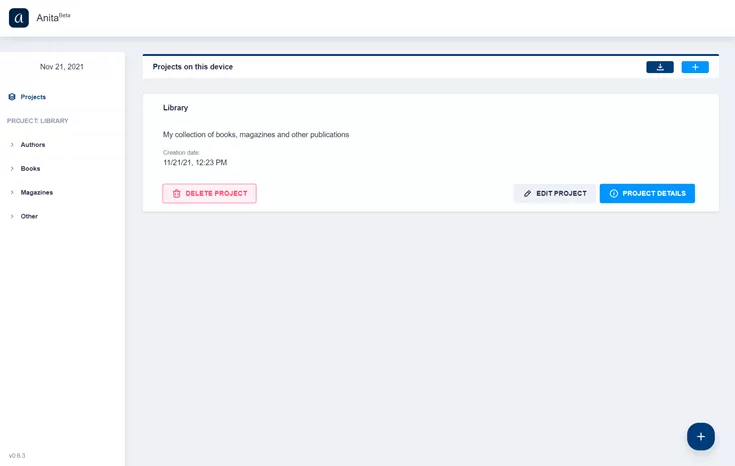
Here are some screenshots of the final application:
1. On the initial page, the project has not been established:
2. Example project:

For comparison, let's take a look at Angular.
1. On the initial page, the project has not been established:
2. Example project:
Original address: https://anita-app.com/blog/articles/porting-anita-from-angular-to-react-resulted-in-20-less-code.html