Late at night: where? I use the local environment pytest to take you to play custom operators
module1:
Multi play Python debugging framework pytest
Beginner's introduction
Hello everyone, the python general testing framework is unittest+HTMLTestRunner. I have seen the pytest document during this period and found that this framework and rich plugins are very easy to use, so let's learn about pytest
[external chain picture transfer failed. The source station may have anti-theft chain mechanism. It is recommended to save the picture and upload it directly (img-djj2egar-1642483999727)( https://gitee.com/qmckw/pic/raw/master/PicGO-updata-img/6536777-74124be4a6b0a5fe.png )]
pytest is a very mature and fully functional Python testing framework, which mainly has the following characteristics:
- Simple, flexible and easy to use
- Support parameterization
- It can support simple unit testing and complex function testing. It can also be used for selenium/appnium and other automated testing and interface automated testing (pytest+requests)
- Pytest has many third-party plug-ins and can customize extensions, such as pytest selenium (integrated selenium), pytest html (perfect html test report generation), pytest rerunfailures (repeated execution of failure case s), pytest xdist (multi CPU distribution), etc
- skip and xfail processing of test cases
- It can be well integrated with jenkins
- report framework - allure also supports pytest
Install pytest:
pip install -U pytest
Verify installed version:
pytest --version
Examples in pytest documentation:
Example 1:
First, we find a directory, create a new folder Pytest, and then create a new test_sample.py, enter the following.
import pytest

# content of test_sample.py
def func(x):
    return x + 1
def test_answer():
    assert func(3) == 5

As shown in the figure above, enter cmd in the directory bar (you can also run it directly in the IDE):

Enter, open the command line and enter "pytest".
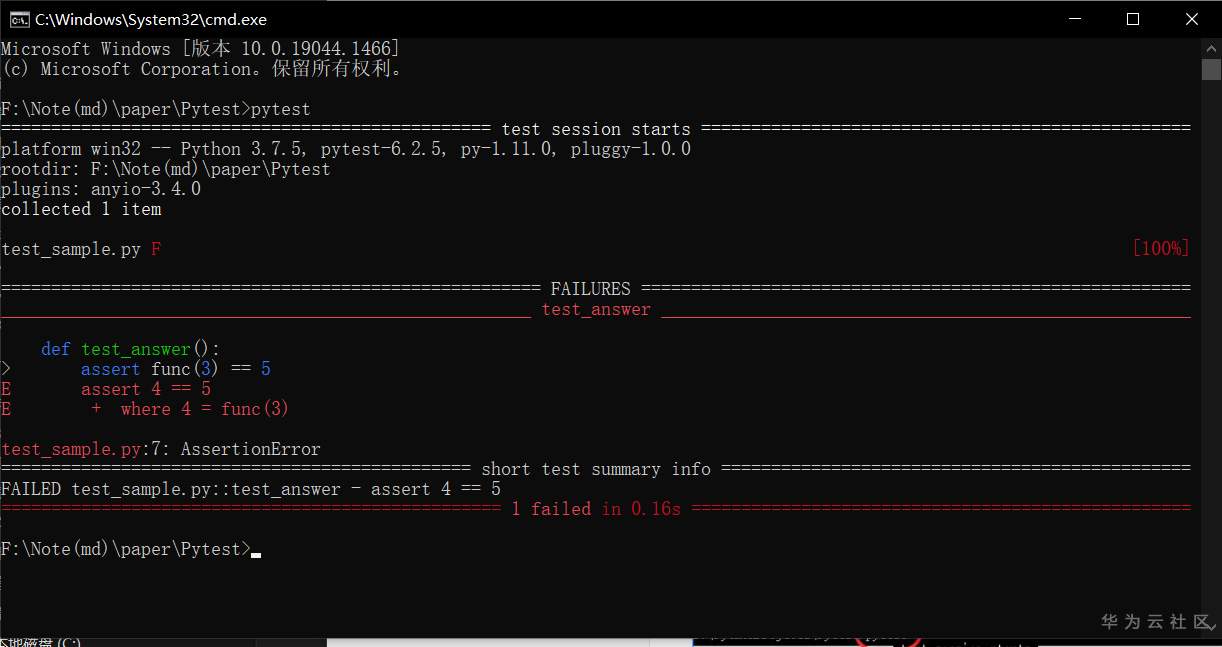
pytest returns an error report because func(3) does not return 5.
Example 2:
When we need to write multiple test samples, we can put them into a test class, create a new directory test, and create a new test under the directory_ class. Py, enter the following:
class TestClass:
    def test_one(self):
        x = "this"
        assert 'h' in x

    def test_two(self):
        x = "hello"
        assert hasattr(x, 'check')
pytest -q test_class.py
result:
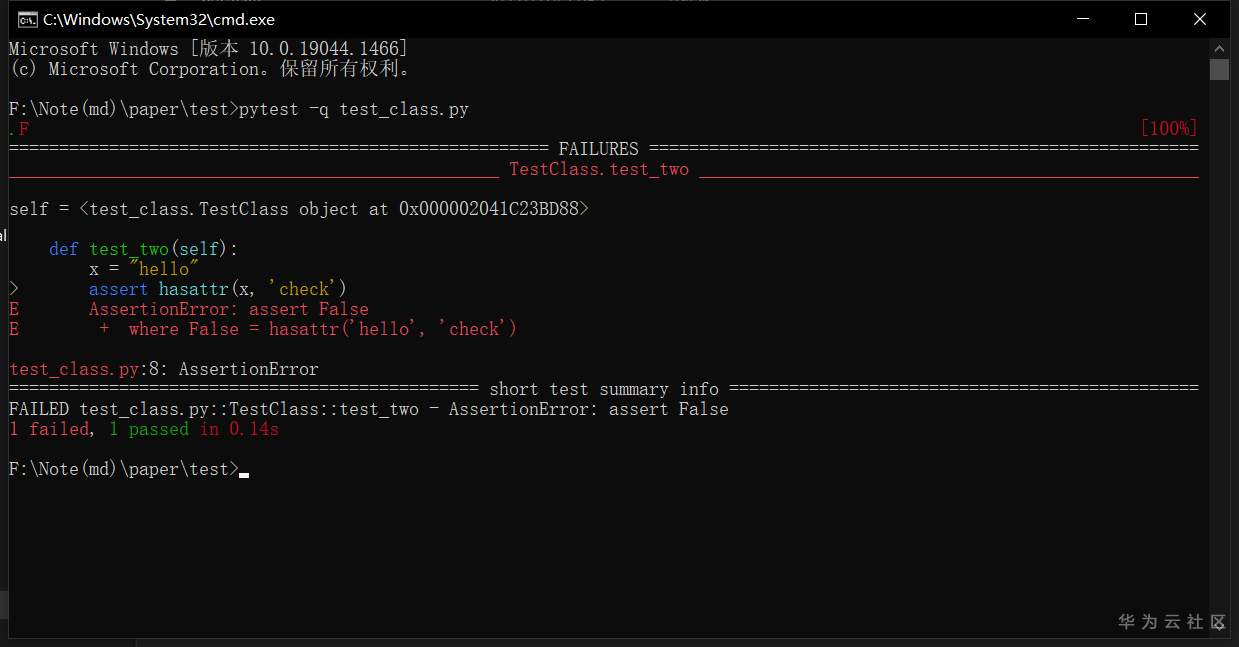
It can be seen from the test results that the test executed two test samples, one failed and the other succeeded. Similarly, we also see the details of the failure example and the intermediate results during execution- q is - quiet, which is used to reduce verbosity. Specifically, it no longer displays the version information of pytest.
How to write a pytest test sample
Through the above two examples, we find that writing pytest test test samples is very simple. We only need to follow the following rules:
- Test file to test_ Start (or end with _test)
- Test class starts with test and cannot have init method
- Test function with test_ start
- Assertions can be made using the basic assert
Operation mode
A variety of operation modes of pytest make testing and debugging more convenient. Here are five common modes. It should be noted that there are naming requirements for the files running the test, otherwise additional command line instructions are required. The pytest command will find all test *. In the current directory and its subdirectories Py or*_ test.py format files and methods or class es starting with test, otherwise you will be prompted that you can't find a running case.
1. Generate test report (htmlReport) after running
To install pytest HTML:
pip install -U pytest-html
Operation mode:
pytest --html=report.html
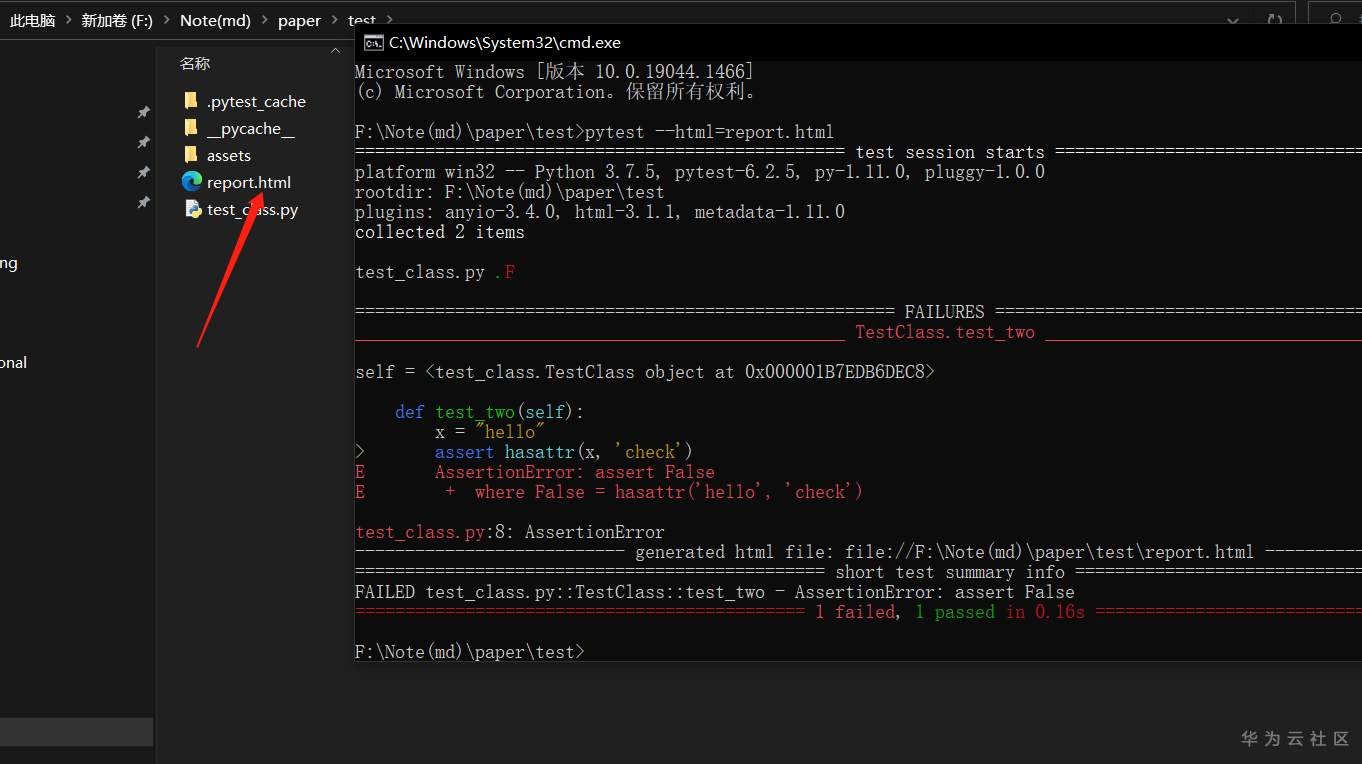
We can see that html files are generated in the directory. Click to see:
Report effect:
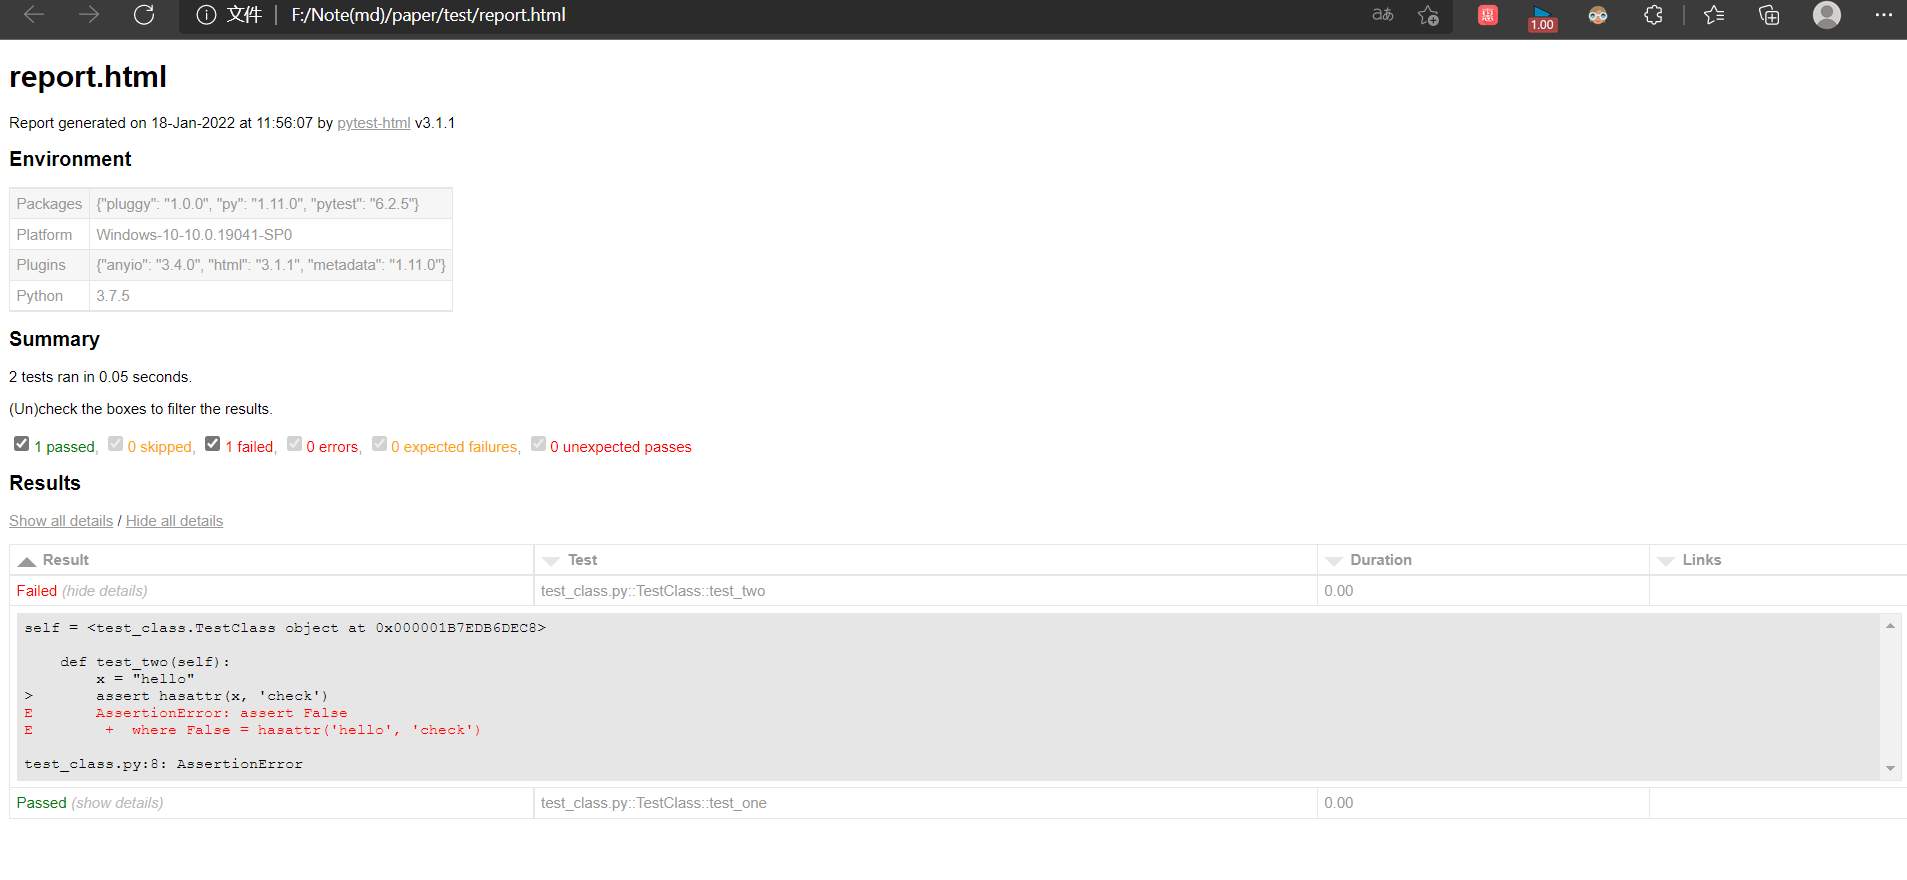
We can see the error report with very neat layout. In the above report, we can clearly see the test results and error causes, and it is easy to locate problems.
2. Run the specified case
When we write more cases, it is undoubtedly a waste of time if we have to run them all every time. It is very convenient to run them by specifying cases.
Test case, create a new test2 directory, and create a new test under the directory_ se. Py file:
class TestClassOne(object):
    def test_one(self):
        x = "this"
        assert 't'in x

    def test_two(self):
        x = "hello"
        assert hasattr(x, 'check')


class TestClassTwo(object):
    def test_one(self):
        x = "iphone"
        assert 'p'in x

    def test_two(self):
        x = "apple"
        assert hasattr(x, 'check')
Operation mode:
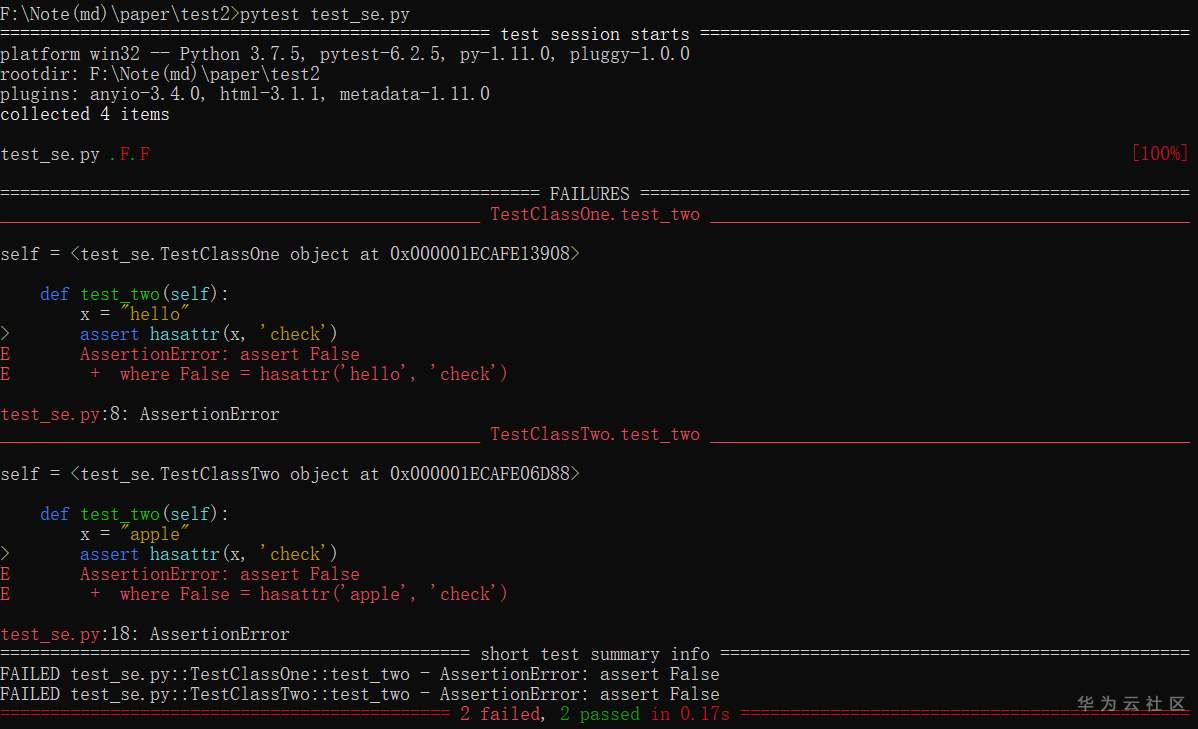
Mode 1: run test directly_ se. All cases in py file:
pytest test_se.py
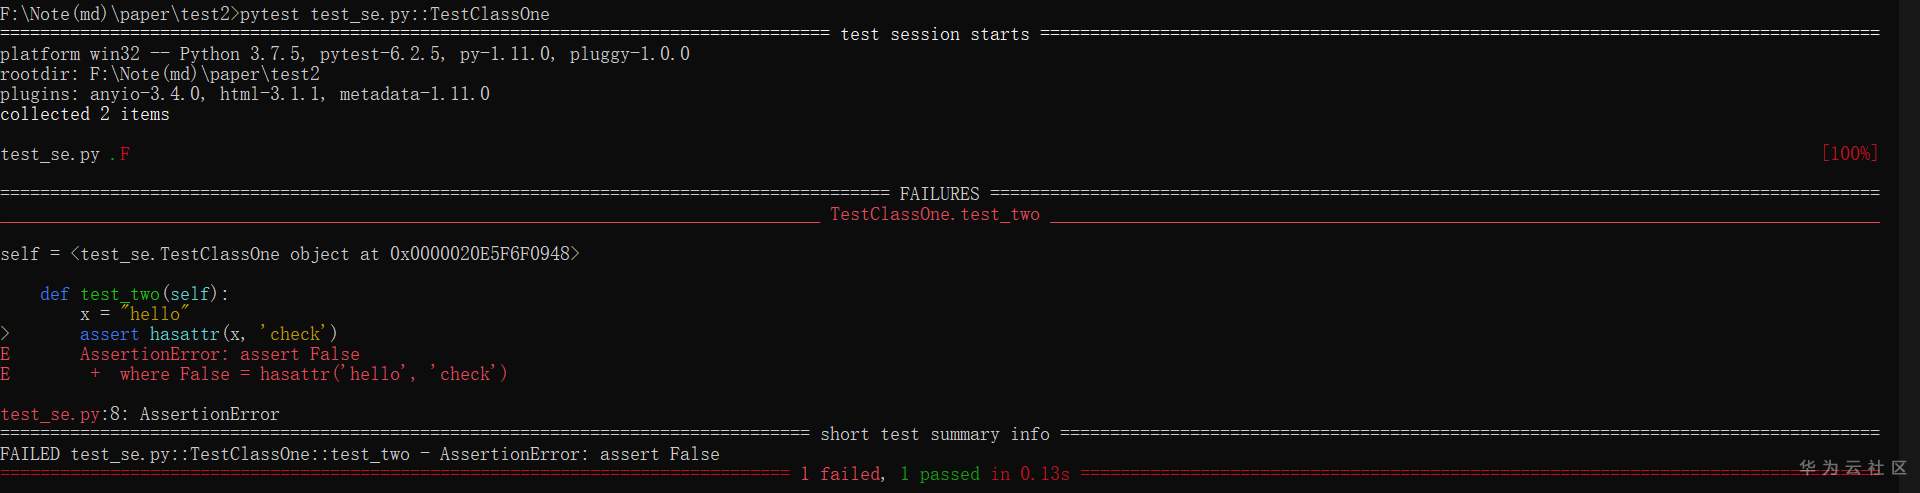
Mode 2: run test_ se. Two cases under the TestClassOne class in the. Py file:
pytest test_se.py::TestClassOne
Mode 3: run test_ se. TestClassTwo in the. Py file is the test under this class_ one:
pytest test_se.py::TestClassTwo::test_one
Note: when defining a class, it needs to start with T, otherwise pytest will not run the class.

We can see that the time of the three is decreasing.
3. Multi process running cases
When there are a lot of cases, the running time will also become very long. If you want to shorten the running time of the script, you can run it with multiple processes.
To install pytest xdist:
pip install -U pytest-xdist
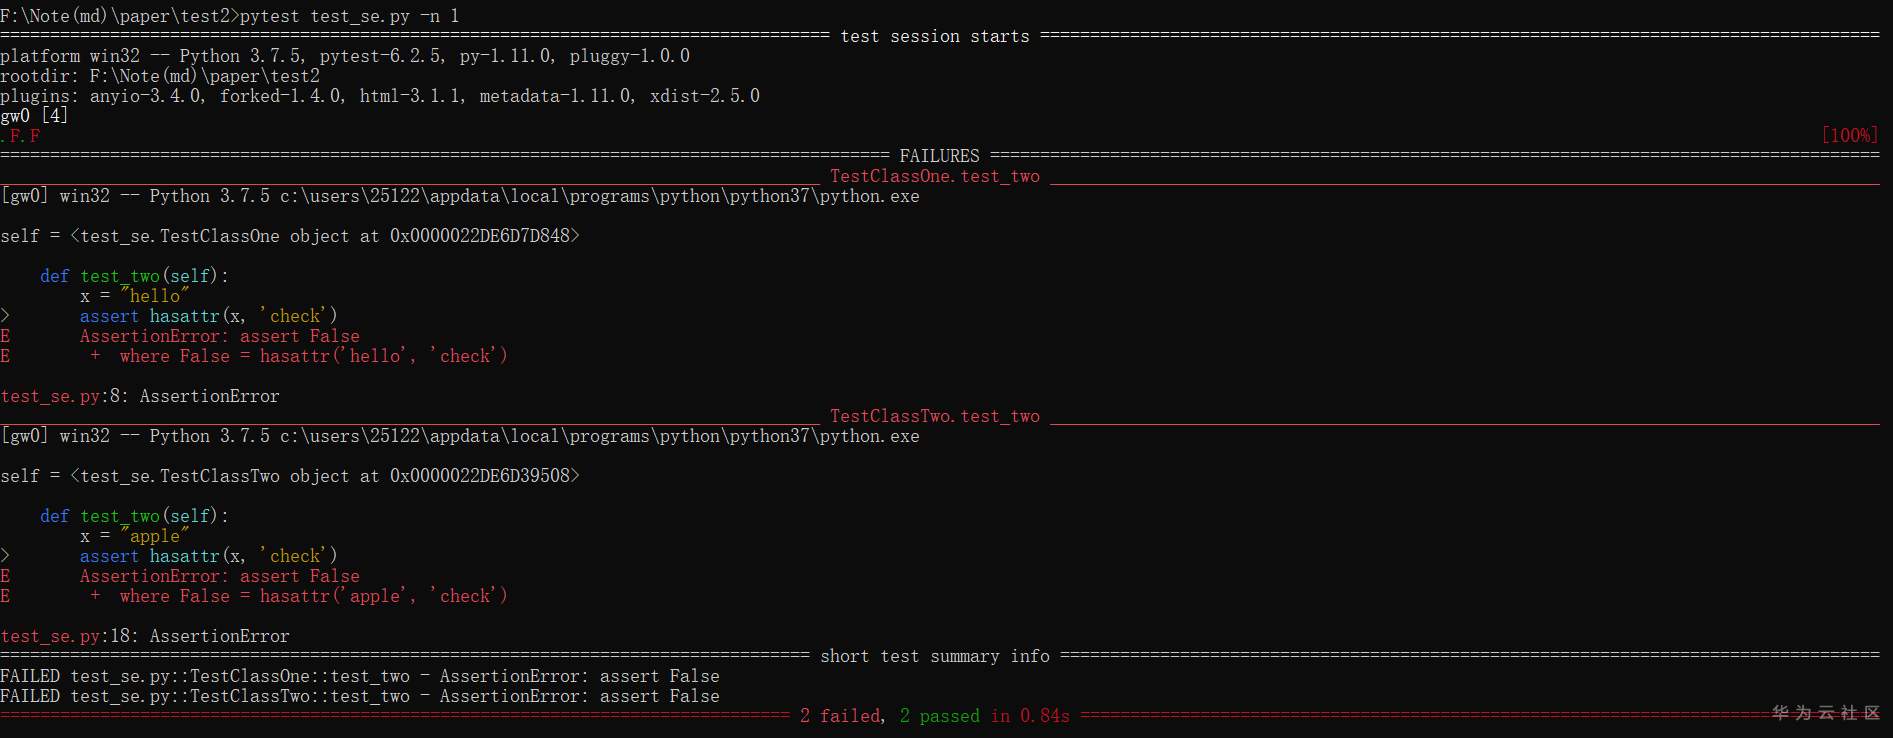
Operation mode:
pytest test_se.py -n NUM
Where NUM is the number of concurrent processes.
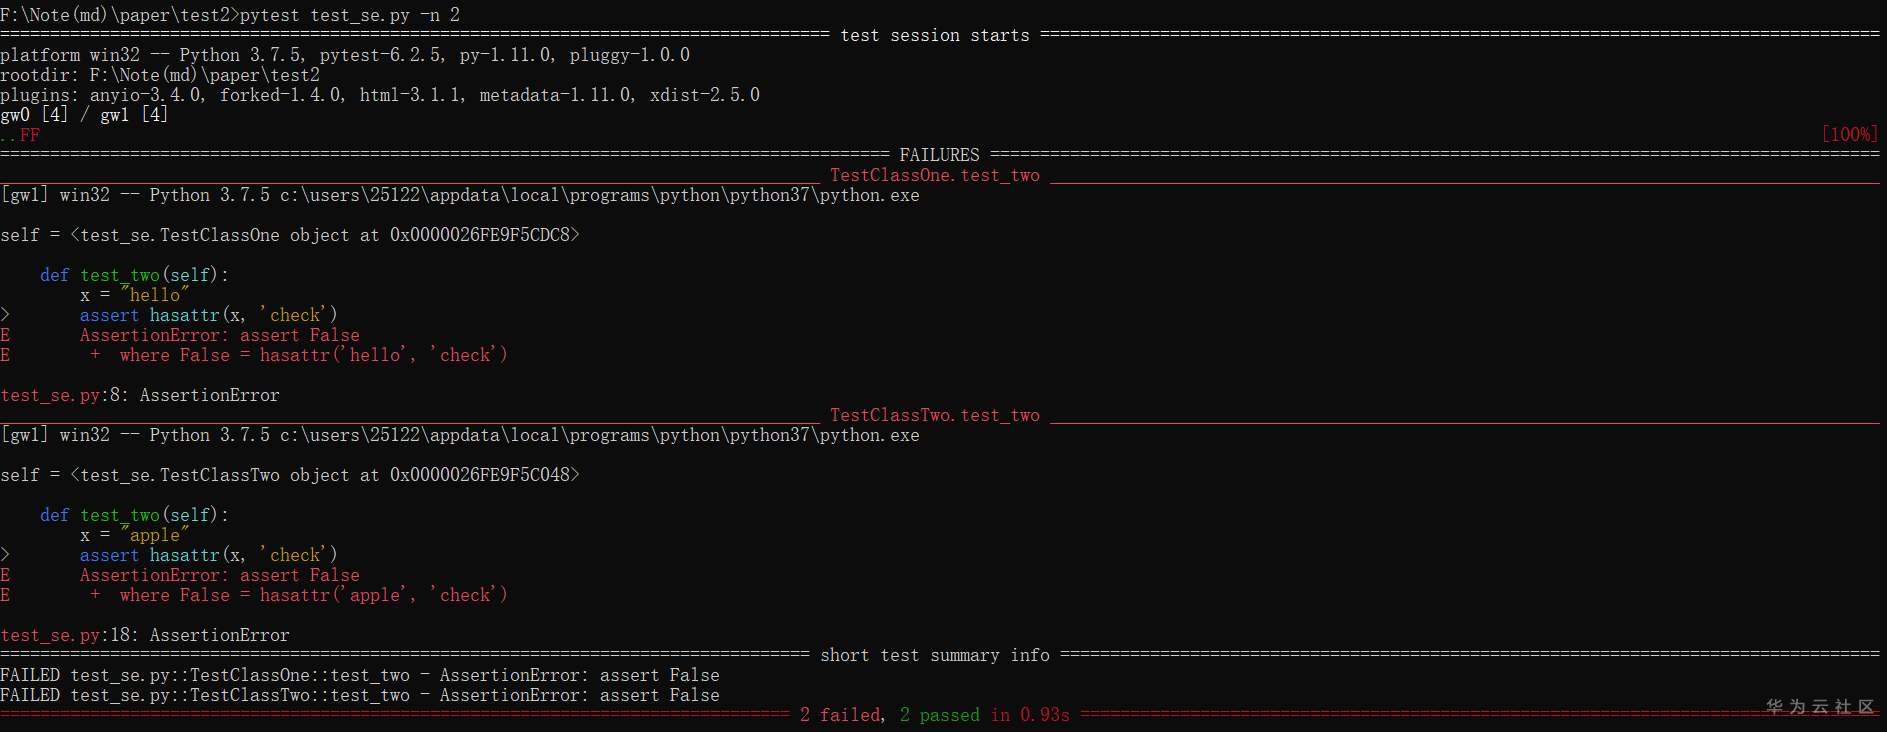
At the beginning, we spent 0.93s on two processes, 0.83s on one process and more than ten seconds on one hundred processes. When we test a small amount of code, multi process has no advantage.
4. Retry running cases
During the interface test, we may encounter 503 or short-term network fluctuations, resulting in the failure of case operation, which is not the result we expect. At this time, we can solve it by running cases again.
Install pytest rerunfailures:
pip install -U pytest-rerunfailures
Operation mode:
pytest test_se.py --reruns NUM
NUM fill in the number of retries.

5. Display print content
When running the test script, in order to debug or print some content, we will add some print content to the code, but these contents will not be displayed when running pytest. If you bring - s, you can display it.
Operation mode:
pytest test_se.py -s
In addition, various running modes of pytest can be superimposed. For example, if you want to run four processes at the same time and want to print the content of print. You can use:
pytest test_se.py -s -n 4
module2:
pytest takes you to play with mindspot custom operator
For pre knowledge of operators, please read the reference documents on the official website: Mindspire operator
When the built-in operators are not enough to meet the requirements when developing the network, you can easily and quickly expand the custom operators on the CPU side by using mindspire's Python API and C++ API.
The custom operator is divided into three steps
- Operator primitive: defines the front-end interface prototype of the operator in the network, which is also the basic unit of the network model. It mainly includes operator name, attribute (optional), input / output name, output shape reasoning method, output dtype reasoning method and other information.
- Operator implementation: use the C++ API provided by the framework to realize the internal calculation logic of the operator in combination with the specific characteristics of the operator.
- Operator information: describes the basic information of CPU operators, such as operator name, supported input and output types, etc. It is the basis for back-end operator selection and mapping.
Let's take the user-defined transfer operator as an example to introduce the user-defined operator and test with pytest.
Registration operator primitive
The primitive of an operator is a subclass inherited from PrimitiveWithInfer, and its type name is the operator name.
The CPU operator primitive is defined in the mindspot / OPS / operations path. Select the appropriate file according to the operator type. The interface is defined as follows:
- Properties are defined by constructors__ init__ Input parameter definition for. The operator of this case has no init attribute, so__ init__ No additional input parameters.
- The name of the input and output is through init_prim_io_names function definition.
- Output Tensor's shape and dtype (data type) objects. You can refer to my article article )Check in__ infer__ Function.
Taking the transfer operator primitive as an example, the following example code is given, where the decorator syntax is used.
The parameter "perm" in the transfer operator primitive is passed in as input, but the tuple type "perm" is actually considered as an attribute of the operator during parsing.
from mindspore.ops import PrimitiveWithInfer

class Transpose(PrimitiveWithInfer):
    """
    The definition of the Transpose primitive.
    """
    @prim_attr_register
    def __init__(self):
        """Initialize Transpose"""
        self.init_prim_io_names(inputs=['x', 'perm'], outputs=['output'])
    def __infer__(self, x, perm):
        x_shape = x['shape']
        p_value = perm['value']
        if len(x_shape) != len(p_value):
            raise ValueError('The dimension of x and perm must be equal.')
        out_shapes = []
        for i in p_value:
            out_shapes.append(x_shape[i])
        out = {'shape': tuple(out_shapes),
               'dtype': x['dtype'],
               'value': None}
        return out
Implement CPU operator and registration operator information (here is for simple understanding only, see the official website for details)
Implement CPU operator
Usually, for the implementation of a CPU operator, you need to write a header file and a source file. The file path is mindstock / ccsrc / backend / kernel_ Compiler / CPU, if the logical implementation of the operator is by calling the third-party library MKL-DNN, it will be placed in the subdirectory mkldnn. For details, please refer to oneMKL and oneDNN .
The header file of the operator includes the registration information of the operator and the declaration of the class. The operator class inherits from the CPUKernel parent class and overloads the InitKernel and Launch member functions.
The source file of the operator is the implementation of the class, which mainly overloads the InitKernel and Launch functions. The functions in the AnfRuntimeAlgorithm class in InitKernel implement various operations on operator nodes, shape_ Represents the shape, axis of the first input of the operator_ Represents the attribute perm of the operator.
For details of the AnfRuntimeAlgorithm class, please refer to the mindspire source code mindspore/ccsrc/backend/session/anf_runtime_algorithm.h Statement under.
The Launch function in the source file first obtains the address of each input and output in turn, and then according to axis_ Transform the dimension and assign the value to the space pointed to by the output address.
The implementation process is not described in detail here.
Registration operator information
Operator information is the key information to guide the implementation of back-end selection operator, Ms_ REG_ CPU_ The first parameter in kernel is the name of the registered operator, which is consistent with the operator name in the primitive. The second parameter successively indicates the type of each input and output, and the last parameter is the class name implemented by the operator. The registration code of the transfer operator is as follows:
MS_REG_CPU_KERNEL(Transpose, KernelAttr().AddInputAttr(kNumberTypeFloat32).AddOutputAttr(kNumberTypeFloat32),
                  TransposeCPUFwdKernel);
The number and order of input and output information defined in operator information, the number and order of input and output information in operator implementation, and the number and order of input and output name list in operator primitive shall be completely consistent.
Compile mindspire
After writing the custom CPU operator, you need to recompile and install mindcore. Please refer to Installation documentation.
Use custom CPU operators and test with pytest
After compilation and installation, the custom CPU operator can be directly used by importing primitives. The following takes the single operator network test of transfer as an example.
In test_ transpose. The network is defined in the. Py file.
import numpy as np
import mindspore.nn as nn
import mindspore.context as context
from mindspore import Tensor
import mindspore.ops as ops

context.set_context(mode=context.GRAPH_MODE, device_target="CPU")

class Net(nn.Cell):
    def __init__(self):
        super(Net, self).__init__()
        self.transpose = ops.Transpose()

    def construct(self, data):
        return self.transpose(data, (1, 0))

def test_net():
    x = np.arange(2 * 3).reshape(2, 3).astype(np.float32)
    transpose = Net()
    output = transpose(Tensor(x))
    print("output: ", output)
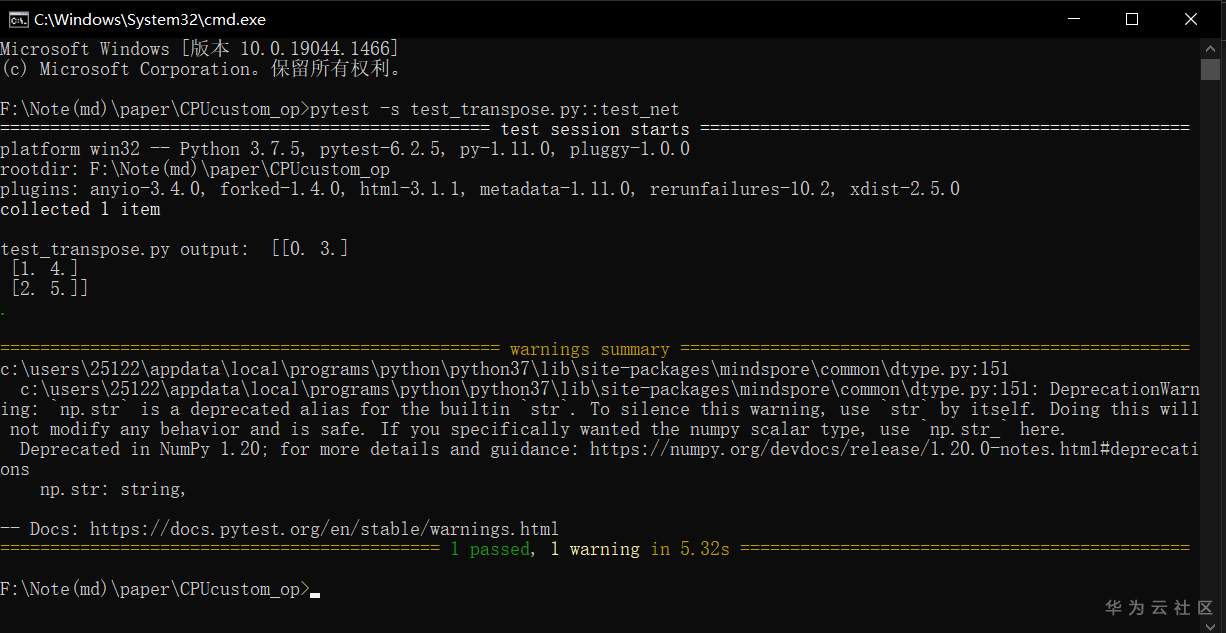
Execute the use case (here we can see that using pytest is to test a function in one of the classes, and all of them start with test_. You can go back to the usage of pytest above to review):
pytest -s test_transpose.py::test_net
Execution results:
output: [[0, 3]
        [1, 4]
        [2, 5]]
We output the report as html:
pytest --html=report.html -s test_transpose.py::test_net
You can View html reports.
Define operator back propagation function
If the operator wants to support automatic differentiation, its back propagation function (bprop) needs to be defined in its primitive. You need to describe in bprop the reverse computing logic that uses forward input, forward output, and output gradients to get input gradients. Reverse calculation logic can be composed of built-in operators or custom reverse operators.
The following points should be paid attention to when defining the operator back propagation function:
- The input parameter order of bprop function is agreed as positive input, positive output and output gradient. If the operator is a multi output operator, the forward output and output gradient will be provided in the form of tuples.
- The return value form of bprop function is agreed to be a tuple composed of input gradients, and the order of elements in the tuple is consistent with the order of forward input parameters. Even if there is only one input gradient, the return value must be in the form of tuples.
For example, the reverse primitive of transfer is:
import mindspore as ms
import mindspore.ops as ops
from mindspore.ops._grad.grad_base import bprop_getters
fill = ops.Fill()
invert_permutation = ops.InvertPermutation()
transpose = ops.Transpose()
@bprop_getters.register(ops.Transpose)
def get_bprop_transpose(self):
    """Generate bprop for Transpose"""

    def bprop(x, perm, out, dout):
        return transpose(dout, invert_permutation(perm)), fill(ms.int32, (len(perm), ), 0)

    return bprop
- The InvertPermutation operator is used in the reverse operator of transfer. Like the development of transfer operator, this operator needs complete processes such as operator primitive, registration and implementation.
In test_ transpose. Add the following content to the PY file to define the reverse use case.
import mindspore.ops as ops
class Grad(nn.Cell):
    def __init__(self, network):
        super(Grad, self).__init__()
        self.grad = ops.GradOperation(sens_param=True)
        self.network = network

    def construct(self, input_data, sens):
        gout = self.grad(self.network)(input_data, sens)
        return gout

def test_grad_net():
    x = np.arange(2 * 3).reshape(2, 3).astype(np.float32)
    sens = np.arange(2 * 3).reshape(3, 2).astype(np.float32)
    grad = Grad(Net())
    dx = grad(Tensor(x), Tensor(sens))
    print("dx: ", dx.asnumpy())
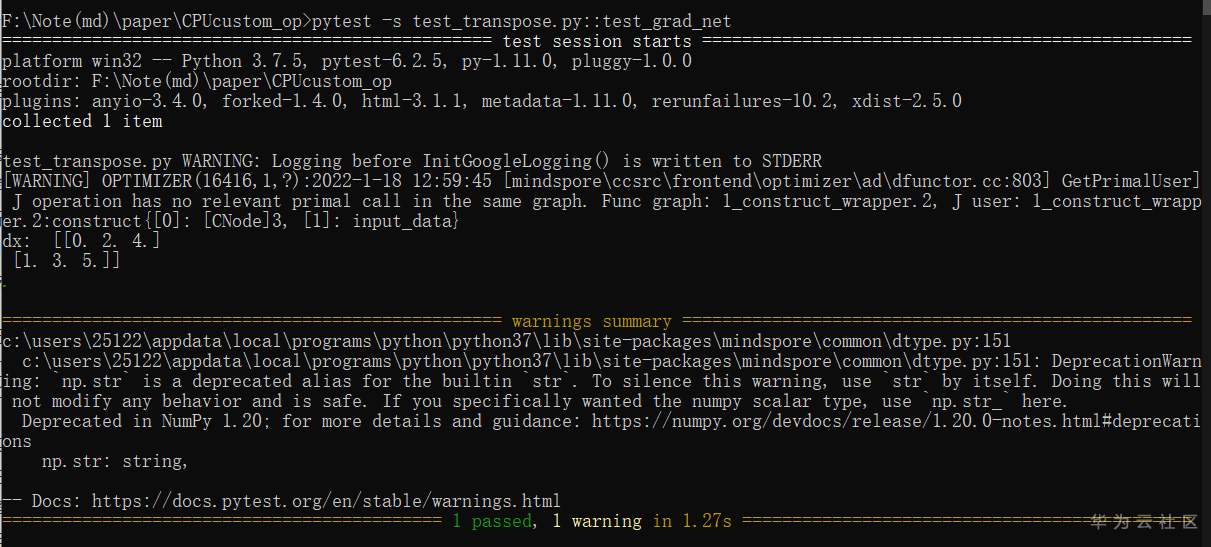
Execution case:
pytest -s test_transpose.py::test_grad_net
Execution results:
dx:  [[0. 2. 4.]
     [1. 3. 5.]]
open source
qmckw/CPUcustom_opByPytest (gitee.com)
reference material
pytest documentation
Easy to use Pytest unit test framework (51 test world 49 (2) - 44)
Pytest study notes
pytest unit test framework