As we all know, Python, as a new generation of popular programming language, has powerful functions. But what are the specific aspects? Perhaps many young friends who have just started learning will have such doubts.
So today, let's introduce how to remove the watermark of PDF (picture) with Python. The idea is simple and the code is simple.
First, consider how Python removes the watermark of the image, and then reuse the idea to PDF.

It is obvious from the above figure that the watermark color is generally light in order not to affect the reading of the text. Therefore, we can use the feature of color difference to remove the watermark. That is: use Python to read the color of the picture and turn the light color part white.
Python standard library PIL can obtain the color of pictures. Python 2 comes with the system. Python 3 needs to be installed by itself. Python 3.8 I use needs to be installed by executing the following commands
pip install pillow
After installation, read the picture and obtain the size (width and height) of the picture
from PIL import Image

img = Image.open('watermark_pic.png')
width, height = img.size
Before moving on to the next step, briefly introduce the knowledge about color in the computer. The three primary colors of optics are red, green and blue (RGB), that is, they are three basic colors that cannot be decomposed. Other colors can be mixed by these three colors. When the three colors are mixed in equal proportion, they are white and black without light.
In the computer, RGB color can be represented by three bytes, and the maximum value that can be represented by one byte is 255. Therefore, (255, 0, 0) represents red, (0, 255, 0) represents green, and (0, 0, 255) represents blue. Accordingly, (255, 255, 255) represents white, and (0, 0, 0) represents black. Any combination from (0, 0, 0) ~ (255, 255, 255) can represent a different color.
Next, we can read the RGB of the picture through the following code
for i in range(width):
    for j in range(height):
        pos = (i, j)
        print(img.getpixel(pos)[:3])
The color of each position in the picture is represented by a quad. The first three bits are RGB and the fourth bit is Alpha channel. We don't need to care.
With RGB, we can modify it.
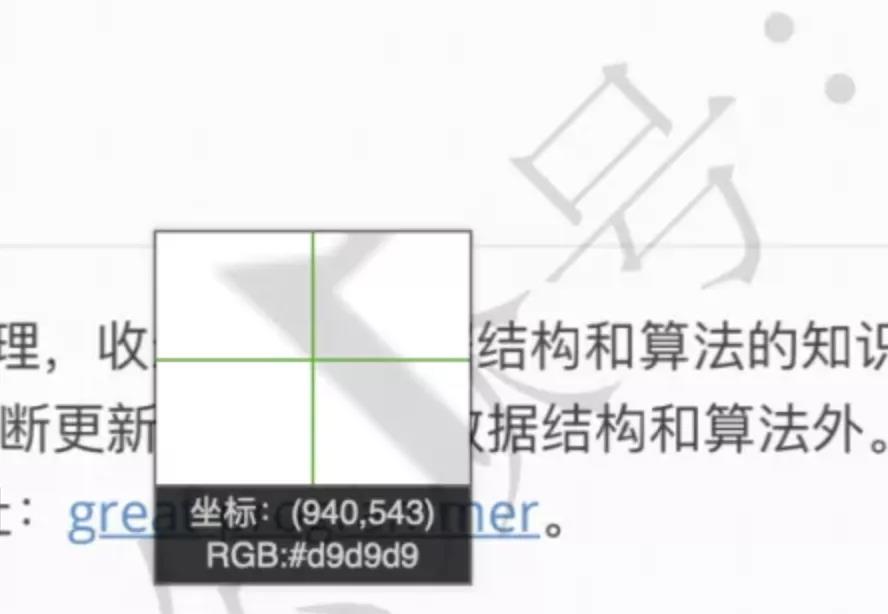
It can be seen from the figure that the RGB of the watermark is #d9d9d9, which is expressed in hexadecimal, which is actually (217, 217, 217).
The closer these three color values are to 255, the lighter the color. When they all become 255, they become white. So as long as the RGB is greater than 217, we can fill it in white. That is, the sum of RGB three digits is greater than or equal to 651.
if sum(img.getpixel(pos)[:3]) >= 651:
    img.putpixel(pos, (255, 255, 255))
The complete code is as follows:
from PIL import Image

img = Image.open('watermark_pic.png')
width, height = img.size

for i in range(width):
    for j in range(height):
        pos = (i, j)
        if sum(img.getpixel(pos)[:3]) >= 651:
            img.putpixel(pos, (255, 255, 255))

img.save('watermark_removed_pic.png')
With the above foundation, it is simple to remove the PDF watermark. The idea is to convert each page of PDF into a picture, then modify the RGB of the watermark, and finally output the picture.
Install pymupdf library to operate PDF
pip install pymupdf
Read PDF and transfer pictures
import fitz


doc = fitz.open("Data structures and algorithms manual@Official account code.pdf")

for page in doc:
    pix = page.get_pixmap()
The PDF has 480 pages in total, so you need to traverse each page and obtain the corresponding picture pix of each page. The pix object is similar to the img object we saw above. You can read and modify its RGB.
page.get_pixmap() is irreversible, that is, it can realize the conversion from PDF to image, but the modified image RGB cannot be applied to PDF and can only be output as image.
The modified watermark RGB is the same as just now. The difference is that RGB here is a triple without Alpha channel. The code is as follows:
from itertools import product

for pos in product(range(pix.width), range(pix.height)):
    if sum(pix.pixel(pos[0], pos[1])) >= 651:
        pix.set_pixel(pos[0], pos[1], (255, 255, 255))
The complete code is as follows:
from itertools import product
import fitz


doc = fitz.open("Data structures and algorithms manual@Official account code.pdf")

page_no = 0
for page in doc:
    pix = page.get_pixmap()

    for pos in product(range(pix.width), range(pix.height)):
        if sum(pix.pixel(pos[0], pos[1])) >= 651:
            pix.set_pixel(pos[0], pos[1], (255, 255, 255))

    pix.pil_save(f"pdf_pics/page_{page_no}.png", dpi=(30000, 30000))

    print(f'The first {page_no} Page removal complete')
    page_no += 1
This scheme has disadvantages. First, the output is not in PDF format; Second, the output picture is fuzzy, and the follow-up needs to be optimized. It is best to modify the PDF directly.
You can pay attention to the complete code first, and then send me the source code to share with you.
Continue to share Python basics and tools in the future. Welcome to pay attention.