preface
An old project of the company didn't do the verification before code submission. After I got it, I thought about the old project and didn't have time to help it with these. Anyway, I just changed a little something; Try to follow its code style and submit it after writing;
Until one day, another person joined in. Good guy, something happened directly.
Many files are submitted together, and then the commit MSG is not standardized, the code indentation is not standardized, and the line feed character is inconsistent. There are many useless code in it, which is extremely poor in readability;

When you fetch the code one day, you find that many files are like this 👆 Are you broken?
But the problem has to be solved in the end; The best way to treat sewage is to start from the place where sewage can be produced. Let me add it. 🥰
Next, I will take you to complete the simplest code specification verification through husky+eslint, then gradually optimize it, and finally realize a strong restriction through husky+eslint + lint stage + commitlint + prettier. Finally, cooperate with commitizen to implement the customized submission template and restriction rules through commitlint config CZ + CZ customizable to realize the final project submission restriction specification of the team.
eslint+prettier
Here I have adapted a set of eslit rules for the project, and the code submitted according to this set of rules will not conflict.
Eslint and prettier should have been used in ordinary projects and should be familiar with them. There will be no space here. (if you want to see it, you can talk to me privately. I can write a separate article on the themes of eslint and prettier)
🦄 In this article, we mainly explain how to verify and repair the non-standard code and submission information before git submits code changes when the team works together, and limit the non-standard submission.
husky
First of all, husky should be introduced. We must have husky for engineering. It can help us stop the attack of the little cute. No, it is to add git hooks to our project
Specific method
First, we install husky into the development dependency
npm i husky -D
# or
yarn add husky -D
be careful
The version I currently install is husky@7.0.4 , because husky@6.0.0 After that, I made breaking change, so the method of setting hooks before version 6.0.0 is no longer applicable. Here we only introduce the latest method.
After installation, we need to create one in the current project husky directory and specify that this directory is the directory where git hooks is located.
Use the following command to quickly create 👇
#--The no install parameter indicates that npx is forced to use nodes in the project_ husky dependency package under modules directory
npx --no-install husky install
In order to allow others to automatically create dependencies after installing them in this project Husky directory and specify this directory as the directory where git hooks is located. We need to Add a script "prepare" in JSON: "husky install"
Use the following command to quickly add 👇
npm set-script prepare "husky install"
The prepare script will be automatically executed after npm i or other yarn or yarn add. In other words, after we install the dependency, we will automatically execute the husky install command to create it automatically Husky directory and specify that this directory is the directory where git hooks is located.
Use the following command to quickly create 👇
npx --no-instal husky add .husky/pre-commit "npm run [The order you want to execute]"
When finished, you can see A new pre commit file is added in husky directory, which contains 👇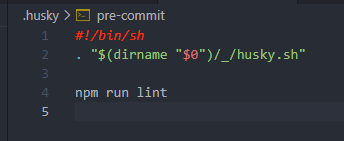
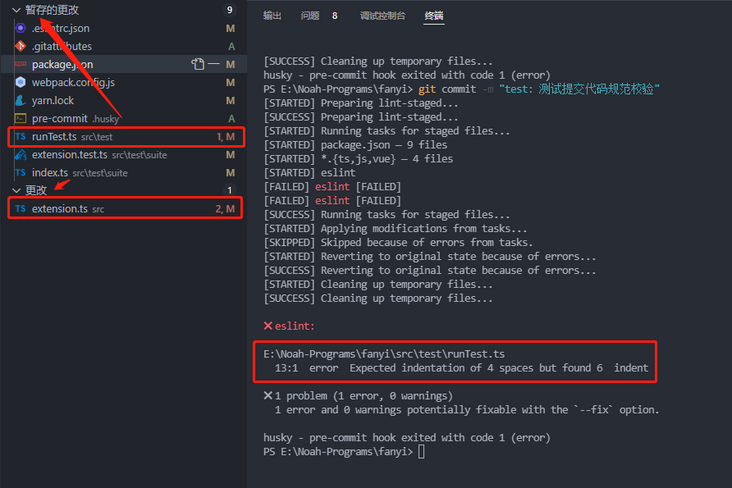
Here I use npm run lint, so that we can cooperate with Eslint's code verification to limit the submission of non-standard code
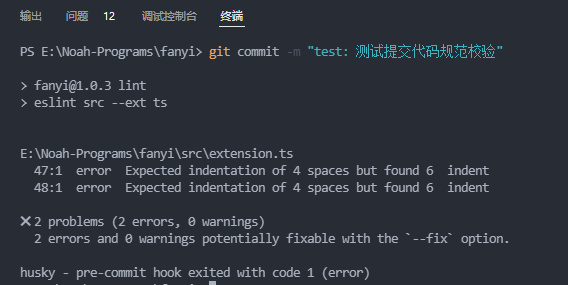
It can be seen that codes that do not comply with the Eslint verification rules cannot be submitted;
Of course, the error reporting problem here is only caused by non-standard indentation. Similar problems include quotation marks, semicolons at the end of sentences, line breaks and so on Can be automatically repaired through the parameter of eslint - fix, so that simple code style problems that can be automatically repaired can be commit ted before submission. Complicated situations still need to be handled manually.
When it comes to line breaks, we need to understand that on Windows, the default is carriage return line feed (CRLF), while on Linux/MacOS, it is line feed (LF).
We can try to format the file with the original line feed character crlf as line feed character lf, and then execute git add The situation.
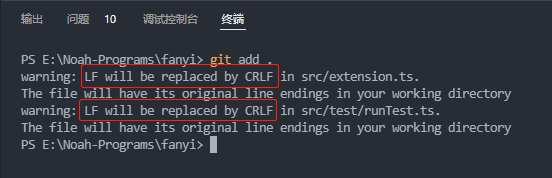
You can see that the final LF line feed is still converted by CRLF;
If you can't collaborate across platforms (both on Mac/Linux or Windows), you just need to use git config core Autocrlf false to prevent this from happening.
To be on the safe side, you need to build a new one gitattributes file (mainly used to define the attributes of each file to facilitate git's unified management.), Set eol(end of line) to the specified line feed character (lf/crlf). Here I put all files ** The newline character is set to LF, and some non text files are marked (excluding them). You can also set the corresponding attribute = > *. For each file type js eol=lf,*. ts eol=lf...
*.* eol=lf
*.jpg -text
*.png -text
  ...
# perhaps 👇

*.js eol=lf
*.ts eol=lf
*.json eol=lf
  ...
The contents of the document are as follows 👇
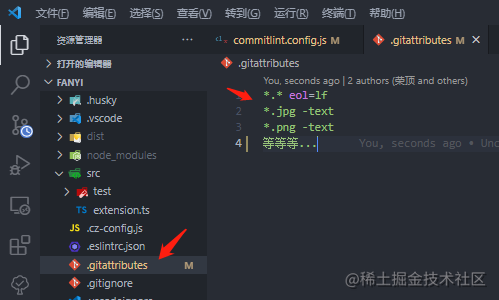
In this way, no matter what platform we develop on, the line feed character of the file is unified as LF.
You can see the use Execute git add after the gitattributes configuration file. All files that do not specify line breaks will be automatically replaced with the line breaks you specify. For example, if I specify lf here, then git add After, files that do not wrap with LF will be converted to LF, and warning: CRLF will be replaced by LF in xxxx/filename will be output on the terminal, as shown in the figure 👇

. gitattributes has many uses. You can see the details 👉 gitattributes.
🥰 So far, the simplest code style restriction method has been implemented.
Now that you have done it, you must make a complete and easy-to-use set. Let's continue to improve other functions~
lint-staged
What is lint staged? As the name suggests, this tool is only used to check git temporary storage files, that is, in your git add file1, 2, 3 A tool for running lint in the staging area file after.
It is not necessary to lint all files when submitting one or two files at a time. We only lint the code to be submitted, which can reduce a lot of unnecessary time overhead. (if you have to lint all the files every time you modify a file, this tool is meaningless to you. husky is enough 🤐)
usage method
We will The code previously written in husky / pre commit is changed to 👇
#!/bin/sh
. "$(dirname "$0")/_/husky.sh"
- npm run lint
+ npx --no-install lint-staged
Then in package The following code is added to JSON. The lint staged object is configured in the way of key value pairs. The key name is a single file or a file type you want to process. Multiple types can be written in {} and separated by commas; The key value is an array of commands to be executed when lint is in the array.
{
  "lint-staged": {
    "*.{ts,js,vue}": ["eslint", "echo 'no problem!'"]
  }
}
After adding the above code, we passed the test and changed the indentation of two files to non-compliance with the specification. Then, after temporarily storing one of the files, we ran git commit and found that there was only lint error message of one file and no error message of the other file.
When all staging codes meet the specification 👇, Will be submitted through verification.
✔ Preparing lint-staged...
✔ Hiding unstaged changes to partially staged files...
✔ Running tasks for staged files...
✔ Restoring unstaged changes to partially staged files...
✔ Cleaning up temporary files...
commitizen
Commitizen is a tool for writing commit messages that meet the above criteria. Through it, you can write a standard Commit Message interactively.

If only used in this warehouse 👇
npm install commitizen -D
If you want to use commitizen to help you commit the whole situation
npm install commitizen -g
After installation, we generally adopt the submission specification in the format of Angular Commit message (of course, it can also be customized, which will be discussed later ~), and run the following command to generate a Commit message in the format of Angular Commit message.
If your project uses npm 👇
# If your project uses npm
npx --no-install commitizen init cz-conventional-changelog --save-dev --save-exact
If your project uses yarn 👇
# If your project uses yarn
npx --no-install commitizen init cz-conventional-changelog --save-dev --save-exact
After running the above command, it will install CZ conventional changelog adapter module for your project The key of commitizen is added to the root directory of the file and added to package JSON
Can be found in package JSON, the following contents are automatically added 👇
{
  ...
  "config": {
    "commitizen": {
      "path": "./node_modules/cz-conventional-changelog"
    }
  }
  ...
}
After completion, use the command yarn cz. If you are a globally installed commit, you can directly git cz. You can write a commit messag e interactively and submit it
Limit commitlint
Since commit is not mandatory and can still be submitted through git commit, we must verify the commit messag before submitting through cz or git commit. Commit is not allowed if it does not meet the specifications
First, we need to install commitlint, commitlint / config conventional
yarn add @commitlint/cli @commitlint/config-conventional -D
Use the following command to quickly create a commit MSG hook for git hooks 👇
In this way, the commitlint will verify the commit message every time it commits
npx --no-instal husky add .husky/commit-msg 'npx --no-install commitlint --edit "$1"'
Then we create a commitlint configuration file to the project root directory 👇
echo "module.exports = {extends: ['@commitlint/config-conventional']}" > commitlint.config.jsThe above will generate commitlint in the project directory config. JS, the code is as follows. It will inherit the Commit message specification in @ commitlint / config conventional. ("feat", "fix", "perf", "refactor"...)
module.exports = {
  extends: ["@commitlint/config-conventional"],
};
Then we test at the terminal
echo 'feat: bar' | npx --no-install commitlint
If the above error occurs after you execute the above command line.
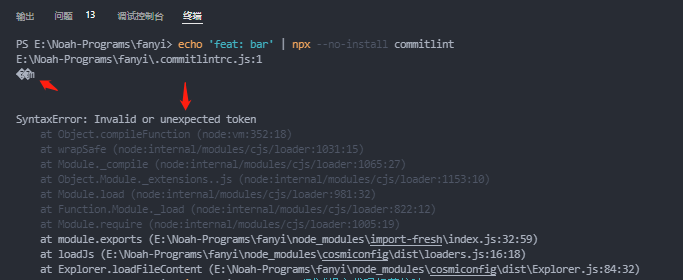
Change the file to the format of UTF-8; This problem has been solved at present 👉 Issues Many people have met (me too) 😂).
The simplest way is to open the file with Notepad, select Save as, and then change the character code to UTF-8 in the lower right corner of the pop-up window (when Windows users run echo "XXX" > xx.js, the file code may be UTF-16 LE). After changing, change the original commitlint config. JS file can be replaced.
After solving the above problems, we can test it again. We can see that the commit MSG that does not meet the specification will lead to an error, so we can't commit, indicating that our commit link has taken effect~ 👏👏👏
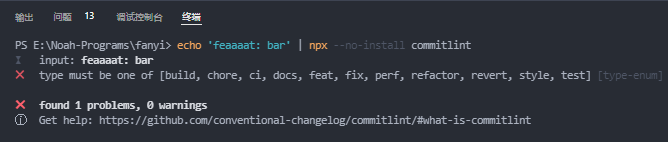
At this point, the verification of commit MSG has also been completed ✔
If you want to customize the interactive text of commitlint (without feat, fix... Many people like to add an emoji Emoji before the commit message), of course.
We need to install CZ customizable to implement the custom commit message rules, and install the corresponding commitlint config CZ to support the verification (read the rules directly from the custom file)
Run the following command 👇
yarn add commitlint-config-cz cz-customizable -D
In the project root directory, create a cz-config.js file and copy it cz-config-EXAMPLE.js The contents of the. Then change it to the rules you want.
Of course, you can also use what I wrote:
module.exports = {
  types: [
    { value: "feat", name: "feat: A new feature" },
    { value: "fix", name: "fix: Fix one Bug" },
    { value: "docs", name: "docs: Only documents are changed" },
    { value: "style", name: "style: Code style,Format repair" },
    { value: "refactor", name: "refactor: Code refactoring, attention and feat,fix Distinguish" },
    { value: "perf", name: "perf: Code optimization,improve performance" },
    { value: "test", name: "test: test" },
    { alue: "chore", name: "chore: Change build process or auxiliary tools" },
    { value: "revert", name: "revert: Code fallback" },
    { value: "init", name: "init: Project initialization" },
    { value: "build", name: "build: Change project build or external dependencies" },
    { value: "WIP", name: "WIP: Work in progress" },
  ],
  scopes: [],
  allowTicketNumber: false,
  isTicketNumberRequired: false,
  ticketNumberPrefix: "TICKET-",
  ticketNumberRegExp: "\\d{1,5}",
  // it needs to match the value for field type. Eg.: 'fix'
  /*
  scopeOverrides: {
    fix: [
      {name: 'merge'},
      {name: 'style'},
      {name: 'e2eTest'},
      {name: 'unitTest'}
    ]
  },
  */
  // override the messages, defaults are as follows
  messages: {
    type: "Select one of your submission types:",
    scope: "Select one scope (Optional):",
    // used if allowCustomScopes is true
    customScope: "Denote the SCOPE of this change:",
    subject: "Brief description(Up to 40 words):",
    body: 'Long description, use"|"Line feed(Optional): \n',
    breaking: "Non compatibility description (Optional):\n",
    footer: "Associated closed issue,For example:#12, #34 (optional): \ n ",
    confirmCommit: "Confirm submission?",
  },
  allowCustomScopes: true,
  allowBreakingChanges: ["feat", "fix"],
  // skip any questions you want
  skipQuestions: ["scope", "body", "breaking"],
  // limit subject length
  subjectLimit: 100,
  // breaklineChar: '|', // It is supported for fields body and footer.
  // footerPrefix : 'ISSUES CLOSED:'
  // askForBreakingChangeFirst : true, // default is false
};
Finished creating cz-config.js file, we need to go back to package In the JSON file, set config commitizen. Change the path to "node_modules / CZ customizable", if your cz-config. If the JS file is in the project root directory, the following can not be configured. Commitlint config CZ will automatically look for it in the project root directory: cz-config.js or config/cz-config.js
...
{
  "config": {
    "commitizen": {
      "path": "node_modules/cz-customizable"
    },
    // If you are cz-config. If the JS file is in the project root directory, you can not configure the following one. Commitlint config CZ will automatically find it in the project root directory: cz-config.js or config/cz-config.js
    "cz-customizable": {
      "config": "Your file path/xxxconfig.js"
    }
  }
}
...
For more advanced usage of commitlint config CZ, see 👉 commitlint-config-cz
Finally, we will create the commitlint config. JS 👇
module.exports = {
- extends: ["@commitlint/config-conventional"],
+ extends: ["cz"],
};
Or you can do it at commitlint config. Add custom rules manually in JS 👇, He will override the rules in extensions
module.exports = {
  extends: ["@commitlint/config-conventional","cz"],
  rules: {
    "type-enum": [
      2,
      "always",
      [
        "init",
        "build",
        "ci",
        "chore",
        "docs",
        "feat",
        "fix",
        "perf",
        "refactor",
        "revert",
        "style",
        "test",
      ],
    ],
  },
};
Here, the verification of the custom commit message is ok ✅
last
Reminder: the code style and rules of the project should be formulated with the team~
So far, in the project of team collaboration, the submission that does not meet the specifications is strangled in the cradle. No matter whether we are writing code or submitting code, we'd better be standardized. While not causing trouble to ourselves, we won't bring trouble to others or the company. This is the whole content of this article ~ if it helps you, remember to praise and encourage~
I am Rongding, a front-end developer for happy programming 🥰
If you also love front-end related technology! Scan QR code ~ join the front-end Superman technology exchange group 🦄

Reply [add group], will pull you into the learning exchange group and make progress with other front-end lovers!
Reply to [books] and get a large number of front-end pdf books.
The circle of friends holds book delivery activities from time to time. Come on, come on!