Previous analysis has said that Windows Manager Service is only responsible for Window management, not for View drawing and layer mixing. This article will analyze how WMS manages windows in the end. When I first came into contact with Android, I felt that Activity seemed to be the encapsulated Window of Google. As long as APP started the new activity reasonably, it opened the new Window. This understanding is not wrong. Activity can really be regarded as a kind of encapsulation of Window and View, but from the source code, Activity is different from Windows. This article mainly from the Window adding process to connect three parts in series: APP end, WMS end and Surface Flinger end. It mainly talks about several aspects.
- Classification of windows: differences between corresponding windows such as Activity, Dialog, PopupWindow, Toast, etc.
- Relationships among Windows, IWindow, Windows State, Windows Token, AppToken, etc.
- Window Addition and Surface Application and Binder Delivery
Classification of windows
In Android system, PopupWindow, Dialog, Activity, Toast and so on have the concept of window, but they are different. Android divides windows into three categories: application window, sub-window and system window. Among them, Activity and Dialog belong to application window, Popup Windows belong to sub-window, and must be attached to other non-sub-windows to exist, while Toast belongs to system window, Dialog may be more special, from the performance of bias to sub-windows, must be attached to Activity to exist, but in nature, it is still application window, with its own Windows Token, between different windows. The relationship will be analyzed in more detail later. Here is a concept.
Window Addition
Activity is not the only way to display View. Activity is not the best example when analyzing the process of adding windows. Activity also involves the knowledge of AMS. We don't need Activity here, but use a floating view to analyze the addition of windows. The code goes below:
private void addTextViewWindow(Context context){

    TextView mview=new TextView(context);
    ...<!--Set the color style-->
    <!--Key point 1-->
    WindowManager mWindowManager = (WindowManager) context.getApplicationContext().getSystemService(Context.WINDOW_SERVICE);
    WindowManager.LayoutParams wmParams = new WindowManager.LayoutParams();
    <!--Key point 2-->
    wmParams.type = WindowManager.LayoutParams.TYPE_TOAST;
    wmParams.format = PixelFormat.RGBA_8888;
    wmParams.width = 800;
    wmParams.height = 800;
    <!--Key point 3-->
    mWindowManager.addView(mview, wmParams);
}
There are three key points. Key point 1: Obtain the proxy object of Windows Manager Service service, but for Application, what you get is actually an encapsulated proxy object, an instance of Windows Manager Impl, and the source code of Application's getSystemContext Service () is actually in xtImpl: if you are interested, you can see the creation of Context at the start of APP:
    @Override
    public Object getSystemService(String name) {
        return SystemServiceRegistry.getSystemService(this, name);
    }
The SystemService Registry class encapsulates proxies for some services in static fields and methods, including Windows Manager Service.
    public static Object getSystemService(ContextImpl ctx, String name) {
        ServiceFetcher<?> fetcher = SYSTEM_SERVICE_FETCHERS.get(name);
        return fetcher != null ? fetcher.getService(ctx) : null;
    }

    static {
             ...
             registerService(Context.WINDOW_SERVICE, WindowManager.class,
                new CachedServiceFetcher<WindowManager>() {
            @Override
            public WindowManager createService(ContextImpl ctx) {
                return new WindowManagerImpl(ctx.getDisplay());
            }});
            ...
    }
So context.getApplicationContext().getSystemService() can ultimately be simplified to new Windows Manager Impl (ctx. getDisplay (). Look at the construction method of Windows Manager Impl. It has two implementation methods. Actually, there is a difference between Activity and Application. This is analyzed later:
public WindowManagerImpl(Display display) {
    this(display, null);
}

private WindowManagerImpl(Display display, Window parentWindow) {
    mDisplay = display;
    mParentWindow = parentWindow;
}
For Application, we use a parametric construction method, so its mParentWindow=null, which will be useful later. Here, we get the WMS proxy encapsulation class through getService. Then we look at the second point, Windows Manager. LayoutParams, which mainly looks at a type parameter, which determines the type of window. Here we define a Toast window, which belongs to the system window and does not need it. It's easier to analyze things like parent window and child window. Finally, look at key point 3 and add View to WMS using the addView method of Windows Manager Impl.
 @Override
public void addView(@NonNull View view, @NonNull ViewGroup.LayoutParams params) {
    applyDefaultToken(params);
    mGlobal.addView(view, params, mDisplay, mParentWindow);
}
However, it is clear that Windows Manager Impl ultimately delegates mGlobal to do this. Windows Manager Global is a simple process with only one process:
private final WindowManagerGlobal mGlobal = WindowManagerGlobal.getInstance();
Next, look at the addView of Windows Manager Global. For adding system windows, this will simplify the code, regardless of the logic of sub-windows and so on.
public void addView(View view, ViewGroup.LayoutParams params,
        Display display, Window parentWindow) {

    final WindowManager.LayoutParams wparams = (WindowManager.LayoutParams) params;
        <!--Key point 1-->
        root = new ViewRootImpl(view.getContext(), display);
        view.setLayoutParams(wparams);
        mViews.add(view);
        mRoots.add(root);
        mParams.add(wparams);
    }
   <!--Key point 2-->
    try {
        root.setView(view, wparams, panelParentView);
    }
     ...  }
First look at key point 1. When adding View to WMS, Windows Manager Global first creates a new ViewRootImpl for View. ViewRootImpl can be seen as a link between Windows and View, such as adding View to WMS, handling touch events incoming from WMS, notifying WMS to update Window size, etc. Meanwhile, ViewRootImpl also encapsulates the drawing and updating methods of View. See how ViewRootImpl adds views to WMS through setView:
 public void setView(View view, WindowManager.LayoutParams attrs, View panelParentView) {
        synchronized (this) {
            if (mView == null) {
                mView = view;
                  ...
                    <!--Key point 1 -->
                // Schedule the first layout -before- adding to the window
                // manager, to make sure we do the relayout before receiving
                // any other events from the system.
                requestLayout();
                if ((mWindowAttributes.inputFeatures
                        & WindowManager.LayoutParams.INPUT_FEATURE_NO_INPUT_CHANNEL) == 0) {
                    mInputChannel = new InputChannel();
                }
                try {
                    <!--Key point 2 -->
                    res = mWindowSession.addToDisplay(mWindow, mSeq, mWindowAttributes,
                            getHostVisibility(), mDisplay.getDisplayId(),
                            mAttachInfo.mContentInsets, mAttachInfo.mStableInsets,
                            mAttachInfo.mOutsets, mInputChannel);
                } catch (RemoteException e) {
               ...
First look at key point 1, here is a relayout to occupy a position, in fact, relying on Handler to send a Message first, before all the messages sent by WMS, the layout is drawn first, then all kinds of events transmitted by WMS, such as touch events, after all, the layout and location of each View must be handled well first, in order to accurately handle the events transmitted by WMS. Then look at Key Point 2. This is where we really add windows. Although Key Point 1 is executed first, it uses Handler to send messages. Its Runable must be executed after Key Point 2. Then look at Key Point 2. There is an important object mWindows Session and mWindow, both of which were created during the instantiation of ViewRootImpl:
public ViewRootImpl(Context context, Display display) {
    mContext = context;
    mWindowSession = WindowManagerGlobal.getWindowSession();
    mWindow = new W(this);
MWindows Session is a Binder service agent obtained through Windows Manager Global. get Windows Session, and is the channel through which App sends messages to WMS. In contrast, mWindow is a W extends IWindow.Stub Binder service object. In fact, it can be seen as a window object on the App side. Its main function is to transmit messages to WMS and as a channel for WMS to send messages to the APP side. There are a lot of scenarios in Android system that are C S for each other. Then look at the specific operation of mWindows Session acquisition: first, get the agent of WMS through get Windows Manager Service, then open a Session on the server through the agent of WMS, and obtain the agent of the Session on the APP side:
 public static IWindowSession getWindowSession() {
    synchronized (WindowManagerGlobal.class) {
        if (sWindowSession == null) {
            try {
                InputMethodManager imm = InputMethodManager.getInstance();
                <!--Key point 1-->
                IWindowManager windowManager = getWindowManagerService();
                <!--Key point 2-->
                sWindowSession = windowManager.openSession(***)
                ...
        return sWindowSession;
    }
}
Key Point 1: First of all, remember that sWindows Session is a singleton object, and then you can simplify the getWindows Manager Service function into the following code. In fact, it is to obtain the agent of Windows Manager Service. The previous Windows Manager Impl is a shell, or interface encapsulation, but it does not really get the agent of WMS:
IWindowManager.Stub.asInterface(ServiceManager.getService("window"))
Looking at the key point 2: sWindows Session = Windows Manager. openSession, which is driven by binder, notifies WMS to call back openSession, opens a Session and returns it to the APP side. Session extends I Windows Session. Stub, obviously, is also a Stub side of Binder communication, encapsulating the operation of each Session session.
@Override
public IWindowSession openSession(IWindowSessionCallback callback, IInputMethodClient client,
        IInputContext inputContext) {
    if (client == null) throw new IllegalArgumentException("null client");
    if (inputContext == null) throw new IllegalArgumentException("null inputContext");
    Session session = new Session(this, callback, client, inputContext);
    return session;
}
To see how to get Session, here's how to use Session to add a window: actually calling Session.java's addToDisplayWithoutInputChannel function
@Override
public int addToDisplay(IWindow window, int seq, WindowManager.LayoutParams attrs,
        int viewVisibility, int displayId, Rect outContentInsets, Rect outStableInsets,
        Rect outOutsets, InputChannel outInputChannel) {
    return mService.addWindow(this, window, seq, attrs, viewVisibility, displayId,
            outContentInsets, outStableInsets, outOutsets, outInputChannel);
}
However, it invokes WMS addWindow in turn, around such a large circle, and the APP side I Windows Session is still singular, why not use WMS directly to deal with it? Doubt what addWindows does in WMS, just like its name, is responsible for adding a window. The code is simplified as follows:
public int addWindow(Session session, IWindow client, int seq,
            WindowManager.LayoutParams attrs, int viewVisibility, int displayId,
            Rect outContentInsets, Rect outStableInsets, Rect outOutsets,
            InputChannel outInputChannel) {
        ...
        synchronized(mWindowMap) {
        ...
        <!--Key point 1 cannot be added repeatedly-->
            if (mWindowMap.containsKey(client.asBinder())) {
                return WindowManagerGlobal.ADD_DUPLICATE_ADD;
            }
        <!--Key Point 2 Processing of child window type 1, must have parent window 2, parent window cannot be child window type-->
            if (type >= FIRST_SUB_WINDOW && type <= LAST_SUB_WINDOW) {
                parentWindow = windowForClientLocked(null, attrs.token, false);
                if (parentWindow == null) {
                    return WindowManagerGlobal.ADD_BAD_SUBWINDOW_TOKEN;
                }
                if (parentWindow.mAttrs.type >= FIRST_SUB_WINDOW
                        && parentWindow.mAttrs.type <= LAST_SUB_WINDOW) {
                    return WindowManagerGlobal.ADD_BAD_SUBWINDOW_TOKEN;
                }}
           ...
           boolean addToken = false;
            <!--Key Point 3 Basis IWindow Obtain WindowToken WindowToken It is the basis of window grouping. Each window must have one grouping.-->
            WindowToken token = mTokenMap.get(attrs.token);
          <!--Key point 4 for Toast Class System Window attrs.token It can be seen as null, If no other similar system window is currently available, token We still can't get it. We still need to go through the new process.-->
            if (token == null) {
            ...
                token = new WindowToken(this, attrs.token, -1, false);
                addToken = true;
            }
            ...
             <!--Key Point 5 New Construction WindowState,WindowState A one-to-one relationship with windows can be seen as WMS The abstract entity with windows-->
            WindowState win = new WindowState(this, session, client, token,
                    attachedWindow, appOp[0], seq, attrs, viewVisibility, displayContent);
            ...
            if (addToken) {
                mTokenMap.put(attrs.token, token);
            }
            win.attach();
            mWindowMap.put(client.asBinder(), win);
            ...
           <!--Key point 6-->
          addWindowToListInOrderLocked(win, true);
        return res;
    }
There are several concepts that need to be understood first:
- IWindow: An Abstract instance of WMS exposed by the APP side window is instantiated in ViewRootImpl, which corresponds to ViewRootImpl one by one. It is also a Binder channel for WMS to send messages to the APP side.
- Windows State: The token of WMS end window, which corresponds to IWindow, or one to one, is an important basis of WMS management window.
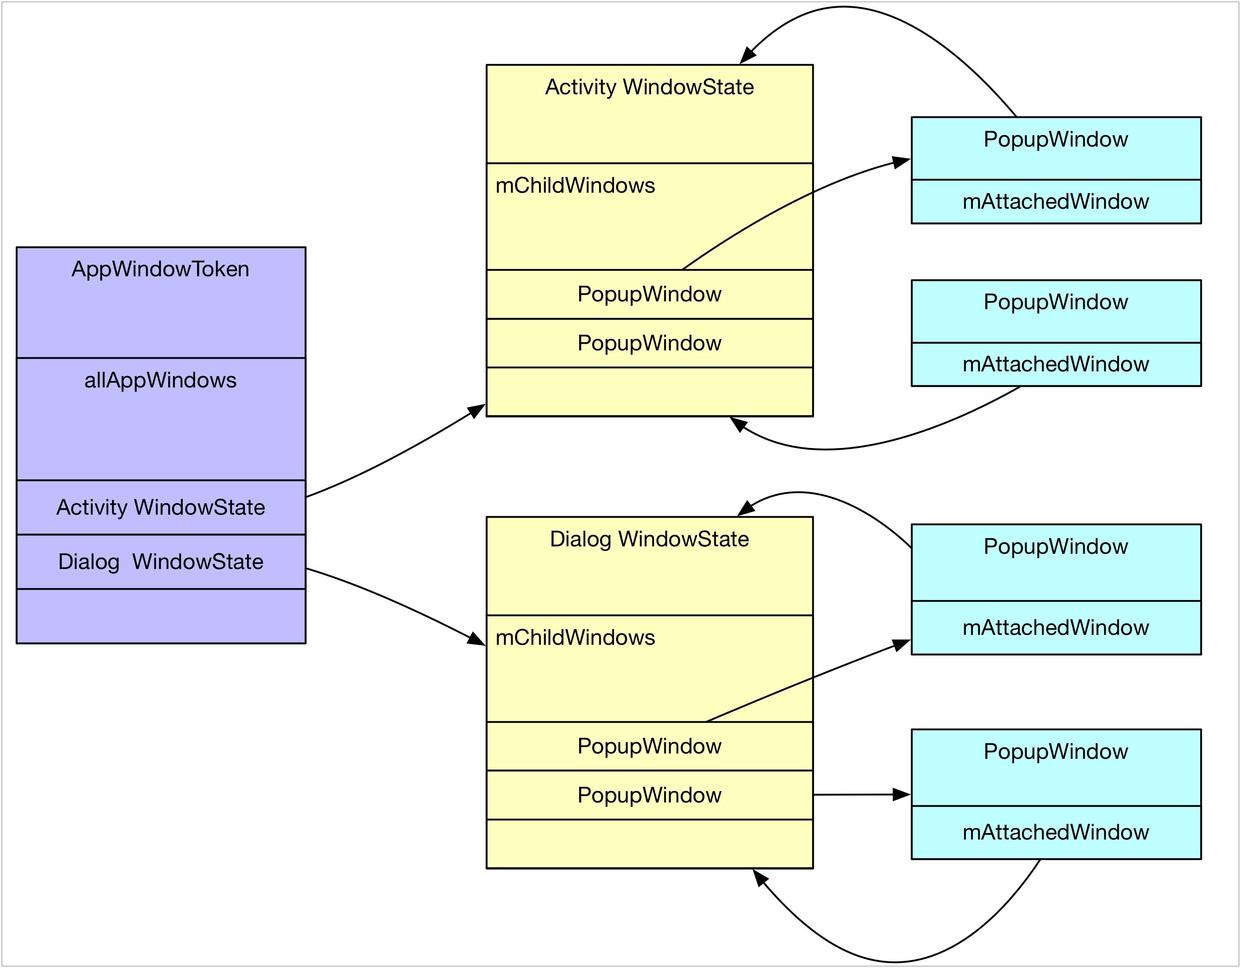
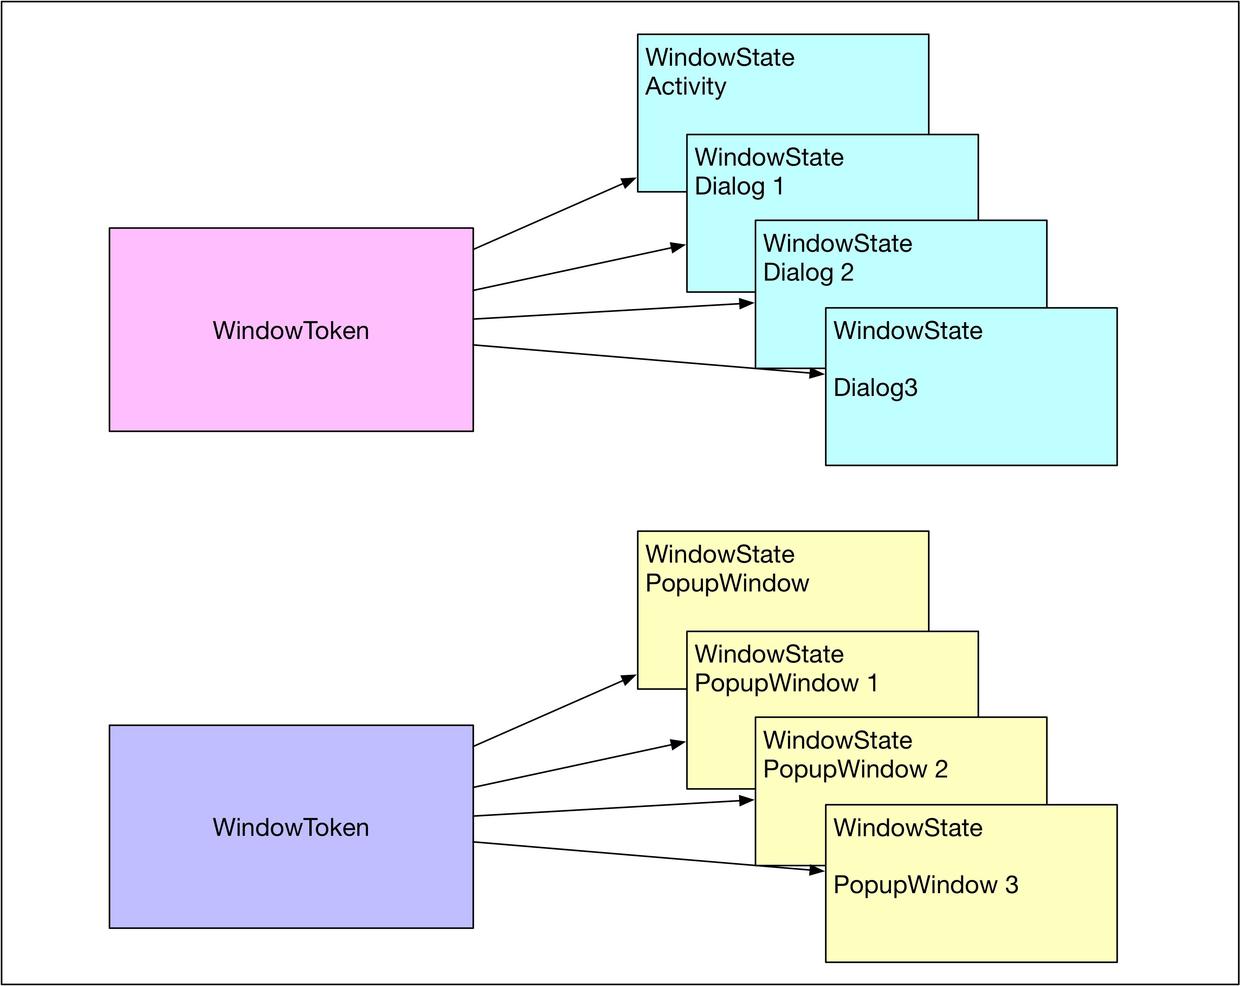
- Windows Token: The token of a window can also be regarded as the basis of window grouping. On the WMS side, the data structure corresponding to the grouping is Windows Token (window token). On the WMS side, the corresponding data structure to the grouping is Windows Token (window token). On the other hand, the corresponding data structure to each window in the group is Windows State (AppWindows Token, Windows Token). Activity corresponds to Dialog (AppWindows Token, PopW Token). Indow corresponds to a common Windows Token.
- AppToken: Actually, the IApplication Token. Stub appToken agent in Activity Record and the token in Activity Client Record can be regarded as the abstraction of Activity in other services (non-AMS).
Then key point 1: A window can not be added twice. IWindow is a Binder agent. On the WMS side, a window can only have an IWindow agent, which is guaranteed by the Binder communication mechanism. This object can not be added twice, otherwise it will report an error. Key point 2, if it is a child window, the parent window must be added, because we analyze the system Toast window, you can not care about it first; Key point 3, Windows Manager. LayoutParams has a token field, which indicates the grouping properties of the window, such as Activity and its Dialog is reused with an AppToken, PopupWindow in Activity reuses an IWindow. The W-type Token is actually the IWindow created in Activity's ViewRootImpl. For the Toast class system window we add now, attrs.token is not set. That is null. In fact, attrs.token of all Toast class system windows can be regarded as null, even if it is not null, it will be forced to set as null in WMS. So the Toast system window must reuse a Windows Token. It can also be said that all Toast system windows are located in the same grouping. This is also because this type of system window is too common, and for all processes, it is faster to manage with a Windows Token directly. After all, it is also an overhead to quickly create and release Windows Token. Assuming that when we add a system window, there is no system window display, and we can not get a Windows Token with key=null, we need to create a new Windows Token and add it to the global Token Map. The key point 5 is actually an abstract instance of the new window on the WMS side: Windows State, which corresponds to the window one by one, and records the parameters, Z order, state of the window in detail. Information, new construction will only be put into the global Map, but also will be attached to the corresponding Windows Token grouping, where the APP side to the WMS registration window process is finished, but only completed the first half, WMS also needs to apply for Surface to Surface Flinger, to complete the real allocation window. Before applying for Surface to Surface Flinger, the WMS side needs to obtain the agent of SF. After the creation of the Windows State object, it will use the win.attach() function to establish the link of Surface Flinger for the current APP application:
void attach() {
    if (WindowManagerService.localLOGV) Slog.v(
    mSession.windowAddedLocked();
}

void windowAddedLocked() {
    if (mSurfaceSession == null) {
       // New Surface Session
        mSurfaceSession = new SurfaceSession();
        mService.mSessions.add(this);
       ...
    }
    mNumWindow++;
}
It can be seen that Surface Session is simple for Session, that is to say, it corresponds to APP's Session one by one. Surface Flinger's agent in Surface Session is Surface ComposerClient, which is implemented as follows:
    public SurfaceSession() {
        mNativeClient = nativeCreate();
    }

    static jlong nativeCreate(JNIEnv* env, jclass clazz) {
        SurfaceComposerClient* client = new SurfaceComposerClient();
        client->incStrong((void*)nativeCreate);
        return reinterpret_cast<jlong>(client);
    }
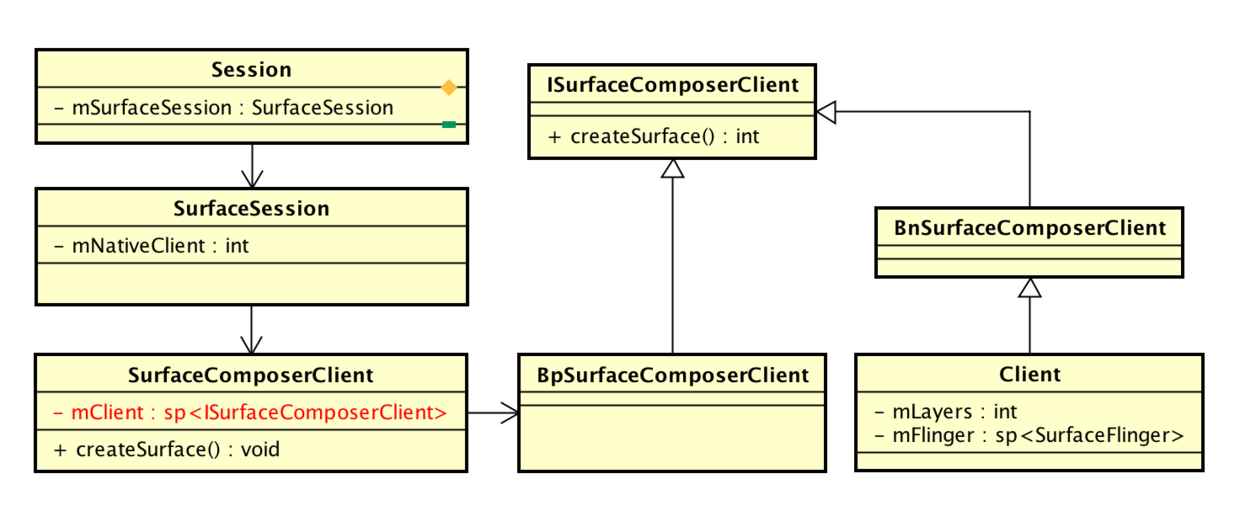
Session is one-to-one correspondence with the APP process. It will further establish Surface Session session for the current process. It can be understood as follows: Session is the communication channel between APP and WMS, Surface Session is the communication channel that WMS applies to Surface Flinger for APP, and Surface Session is also one-to-one correspondence with APP. Since Surface Flinger is the messenger of communication, Surface Session should be The agent holding Surface Flinger is actually the ISurface Composer Client mClient object in Surface ComposerClient. It is Surface Flinger encapsulating a proxy for each APP, that is, ** process <-> Session <-> Surface Session <-> Surface Composer Client <-> ISurface Composer Client (BpSurface Composer Client)** which is a line, why not directly with Surface Flinger? What about communication? Perhaps it is more convenient for Surface Flinger to manage Surface for each APP. The models of these four classes are as follows:
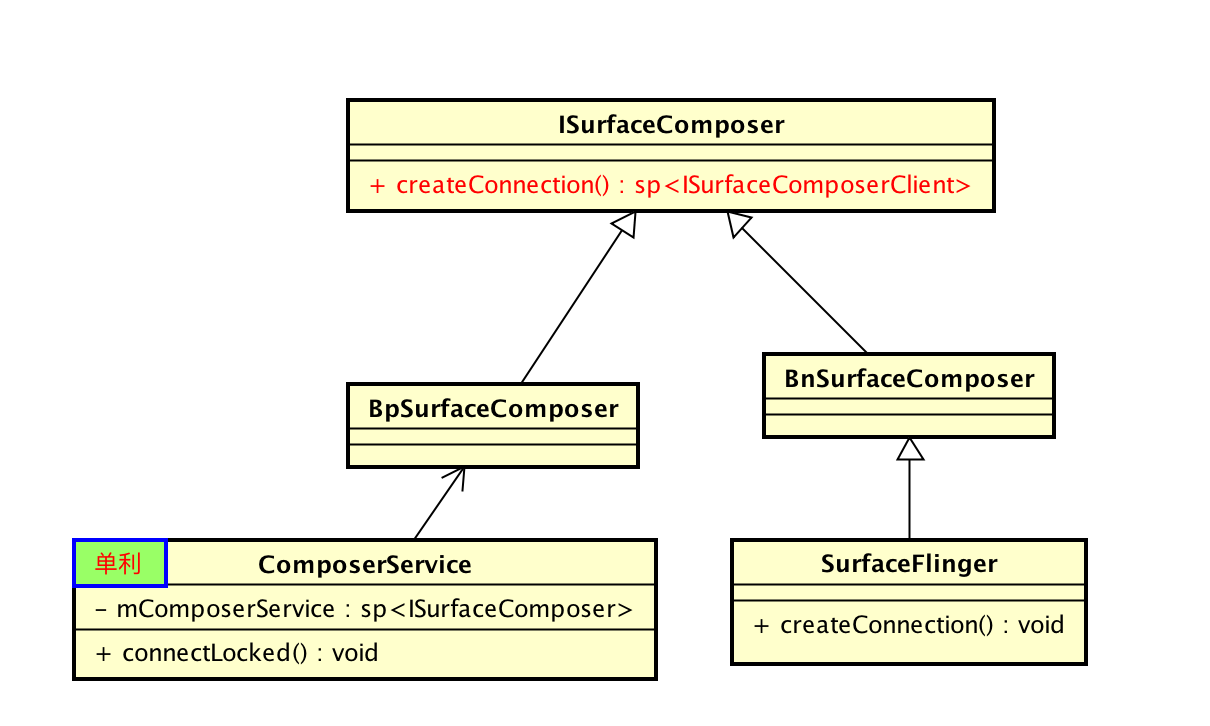
As for how ISurface ComposerClient (BpSurface ComposerClient) was created step by step, in fact, it uses a simple object such as ComposerService to apply for an ISurface ComposerClient object for each APP at the WMS end, which is represented as BpSurface ComposerClient at the WMS end and BnSurface ComposerClient at the Surface Flinger end. The specific code is as follows:
SurfaceComposerClient::SurfaceComposerClient()
    : mStatus(NO_INIT), mComposer(Composer::getInstance())
{
}
// Monopoly, so only for the first time.
void SurfaceComposerClient::onFirstRef() {
    sp<ISurfaceComposer> sm(ComposerService::getComposerService());
    if (sm != 0) {
        sp<ISurfaceComposerClient> conn = sm->createConnection();
        if (conn != 0) {
            mClient = conn;
            mStatus = NO_ERROR;
        }
    }
}

sp<ISurfaceComposerClient> SurfaceFlinger::createConnection()
{
    sp<ISurfaceComposerClient> bclient;
    sp<Client> client(new Client(this));
    status_t err = client->initCheck();
    if (err == NO_ERROR) {
        bclient = client;
    }
    return bclient;
}
Just now, I finished the first half, mainly for window management of WMS, and the second half is about Surface allocation. Remember that ViewRootImpl had two steps in setView before? Although calling requestLayout first executes, it can be seen that requestLayout is executed after adding Windows because of its internal use of Handler to send messages to delay execution. So here's how to allocate Surface after adding windows. In the call of requestLayout function, a small means of Hanlder is used, that is, adding a Barr by postSyncBarrier. The function of this baffle is to block the execution of common synchronous messages. Before the baffle is revoked, only asynchronous messages will be executed. RequLayout first adds a baffle Barrier, and then inserts an asynchronous task mTraversal Runnable. Its main function is to ensure that mTraversal Runnable is executed before all synchronous messages and that View is drawn. Top priority. The concrete realization is as follows:
void scheduleTraversals() {
    if (!mTraversalScheduled) {
        mTraversalScheduled = true;

            <!--Key Point 1 Adding Plug-->
        mTraversalBarrier = mHandler.getLooper().getQueue().postSyncBarrier();
        <!--Key Point 2 Adding Asynchronous Message Tasks-->
        mChoreographer.postCallback(
                Choreographer.CALLBACK_TRAVERSAL, mTraversalRunnable, null);
        ...
The main function of the mTraversal Runnable task is: if Surface is not allocated, then request to allocate Surface, and measure, layout, drawing. The main body of its execution is actually the performance Traversals () function, which contains most of the logic of the APP View drawing. The performance Traversals function is very long. Here only a brief look at a few points, in fact, the key point is 1:relayout Window:
private void performTraversals() {
            final View host = mView;
             ...
    if (mFirst || windowShouldResize || insetsChanged ||
            viewVisibilityChanged || params != null) {
            <!--Key Point 1 Application Surface Or reset the parameters-->
            relayoutResult = relayoutWindow(params, viewVisibility, insetsPending);
          <!--Key Point 2 Measurement-->
                performMeasure(childWidthMeasureSpec, childHeightMeasureSpec);
            }
          <!--Key Point 3 Layout-->
                performLayout(lp, desiredWindowWidth, desiredWindowHeight);
           <!--Key Point 4 Update window-->
              try {
                mWindowSession.setInsets(mWindow, insets.mTouchableInsets,
                        contentInsets, visibleInsets, touchableRegion);
            ...
          <!--Key Point 5 Drawing-->
           performDraw();
           ...
       }
Relayout Windows mainly applies to WMS through mWindows Session. relayout or updates Surface as follows. Here we only care about an important parameter mSurface. In Binder communication, mSurface is an out-type parameter, that is, the content inside Surface needs to be filled by WMS and sent back to APP:
   private int relayoutWindow(WindowManager.LayoutParams params, int viewVisibility,
            boolean insetsPending) throws RemoteException {
       ...
        int relayoutResult = mWindowSession.relayout(
                mWindow, mSeq, params, ...  mSurface);
        ...
        return relayoutResult;
    }
See how relayout wants Surface Flinger to apply for Surface. We know that each window has a Windows State corresponding to it, and each window has its own animation, such as entrance/factory animation, and Windows State Animator is the animation of Windows State. Why mention Windows State Animator, because Windows State Animator is the animation of Windows State Animator?
 public int relayoutWindow(Session session, IWindow client, int seq,... Surface outSurface) {
         WindowState win = windowForClientLocked(session, client, false);
        WindowStateAnimator winAnimator = win.mWinAnimator;
         <!--Key point 1 -->
           SurfaceControl surfaceControl = winAnimator.createSurfaceLocked();
           if (surfaceControl != null) {
         <!--Key point 2 -->
             outSurface.copyFrom(surfaceControl);
                } else {
                    outSurface.release();
                }
Here we just look at Surface creation code. First, we find Windows State through Windows ForClient Locked, and create a Surface Control by using Windows State Animator members. Surface Control calls the native function nativeCreate(session, name, w, h, format, flags) to create Surface.
static jlong nativeCreate(JNIEnv* env, jclass clazz, jobject sessionObj,
        jstring nameStr, jint w, jint h, jint format, jint flags) {
    ScopedUtfChars name(env, nameStr);
    <!--Key point 1-->
    sp<SurfaceComposerClient> client(android_view_SurfaceSession_getClient(env, sessionObj));
    <!--Key point 2-->
    sp<SurfaceControl> surface = client->createSurface(
            String8(name.c_str()), w, h, format, flags);
    surface->incStrong((void *)nativeCreate);
    return reinterpret_cast<jlong>(surface.get());
}
Key point 1 is to fetch the SurfaceComposerClient object from the SurfaceSession object and then call SurfaceComposerClient's createSurface method to further create SurfaceControl.
sp<SurfaceControl> SurfaceComposerClient::createSurface(
        const String8& name,
        uint32_t w,
        uint32_t h,
        PixelFormat format,
        uint32_t flags)
{
    sp<SurfaceControl> sur;
    if (mStatus == NO_ERROR) {
        sp<IBinder> handle;
        sp<IGraphicBufferProducer> gbp;
        <!--Key Point 1 Gets Key Information of Layer handle, gbp-->
        status_t err = mClient->createSurface(name, w, h, format, flags,
                &handle, &gbp);
         <!--Key Point 2 is created based on the key information of the returned layer SurfaceControl object-->
        if (err == NO_ERROR) {
            sur = new SurfaceControl(this, handle, gbp);
        }
    }
    return sur;
}
Let's first look at mClient - > createSurface. Surface ComposerClient's mClient is actually a BpSurface ComposerClient object. It's a proxy of Surface Flinger Client on WMS. So the code for creating Surface is still in the Client object on Surface Flinger server. There are two key variables SP < IBr > handle and SP < IGraphic Buffer Producer > gbp. The former is marked as Surface Flinger Client. The layer on eFlinger side, which is used to create Graphic Buffer, is both IBinder type and object that needs to be filled by Surface Flinger. These two are the most critical information corresponding to a layer:
status_t Client::createSurface(
        const String8& name,
        uint32_t w, uint32_t h, PixelFormat format, uint32_t flags,
        sp<IBinder>* handle,
        sp<IGraphicBufferProducer>* gbp){
    ...
    <!--Key point 2 is not created directly here, but by sending a MessageCreateLayer news-->
    sp<MessageBase> msg = new MessageCreateLayer(mFlinger.get(),
            name, this, w, h, format, flags, handle, gbp);
    mFlinger->postMessageSync(msg);
    return static_cast<MessageCreateLayer*>( msg.get() )->getResult();
}
Client does not directly create a new layer, but sends a Message Create Layer message to Surface Flinger to inform Surface Flinger service to execute. Its handler code is as follows:
 class MessageCreateLayer : public MessageBase {
        SurfaceFlinger* flinger;
        Client* client;
            virtual bool handler() {
            result = flinger->createLayer(name, client, w, h, format, flags,
                    handle, gbp);
            return true;
        }
    };
In fact, it's called Surface Flinger's createLayer to create a layer, and here is the real layer to create:
status_t SurfaceFlinger::createLayer(
        const String8& name,
        const sp<Client>& client,
        uint32_t w, uint32_t h, PixelFormat format, uint32_t flags,
        sp<IBinder>* handle, sp<IGraphicBufferProducer>* gbp)
{
    if (int32_t(w|h) < 0) {
        return BAD_VALUE;
    }

    status_t result = NO_ERROR;

    sp<Layer> layer;
  <!--Key Point 1 New Different Layers-->
    switch (flags & ISurfaceComposerClient::eFXSurfaceMask) {
        case ISurfaceComposerClient::eFXSurfaceNormal:
            result = createNormalLayer(client,
                    name, w, h, flags, format,
                    handle, gbp, &layer);
            break;
        case ISurfaceComposerClient::eFXSurfaceDim:
            result = createDimLayer(client,
                    name, w, h, flags,
                    handle, gbp, &layer);
            break;
        default:
            result = BAD_VALUE;
            break;
    }

    if (result != NO_ERROR) {
        return result;
    }
   ...
}
Surface Flinger will create different types of layers according to different window parameters. Here we just look at the layers in the normal style of createNormal Layer.
status_t SurfaceFlinger::createNormalLayer(const sp<Client>& client,
        const String8& name, uint32_t w, uint32_t h, uint32_t flags, PixelFormat& format,
        sp<IBinder>* handle, sp<IGraphicBufferProducer>* gbp, sp<Layer>* outLayer)
{
    // initialize the surfaces
    switch (format) {
    case PIXEL_FORMAT_TRANSPARENT:
    case PIXEL_FORMAT_TRANSLUCENT:
        format = PIXEL_FORMAT_RGBA_8888;
        break;
    case PIXEL_FORMAT_OPAQUE:
        format = PIXEL_FORMAT_RGBX_8888;
        break;
    }
    <!--Key point 1 -->
    *outLayer = new Layer(this, client, name, w, h, flags);
    status_t err = (*outLayer)->setBuffers(w, h, format, flags);
    <!--Key point 2-->
    if (err == NO_ERROR) {
        *handle = (*outLayer)->getHandle();
        *gbp = (*outLayer)->getProducer();
    }
  return err;
}
You can see that Layer finally corresponds to Layer. A new Layer object will be created here. Layer contains Handle and Producer objects corresponding to this layer. Handle can be regarded as the unique logo of Surface, but it does not seem to have much effect. At most, it is a logo, which will be useful for future cleaning. In contrast, GBP = (* outLayer) - > getProducer () is more important. It is actually a BufferQueueProducer object, which is related to the allocation of shared memory. Later, it will be specially analyzed. Here we stop. Finally, we get a layer object. After that, we will sort out how to build the layer:
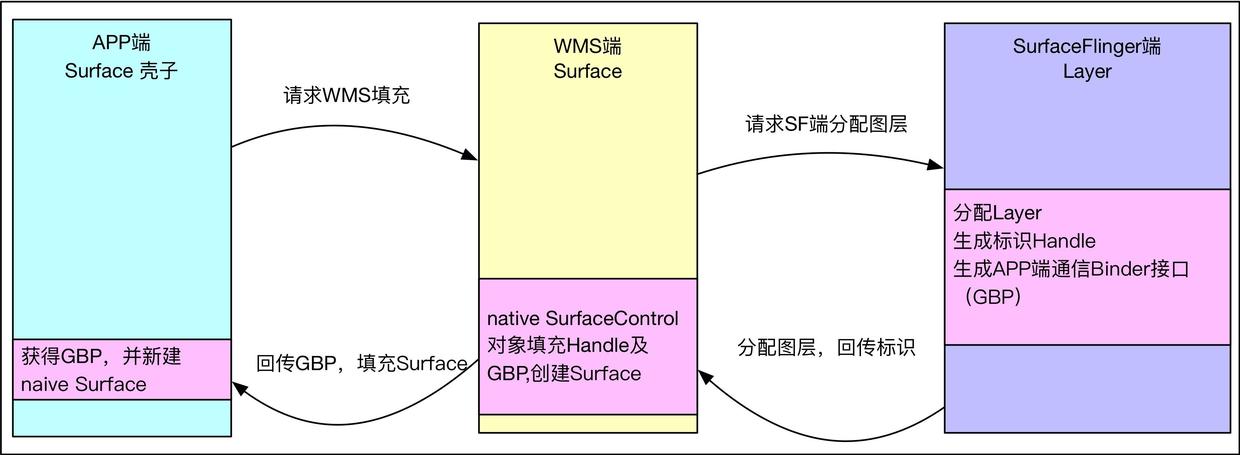
- First, the APP side creates a new container shell with Surface layer.
- APP passes the Surface shell to WMS via Binder communication.
- WMS applies to Surface Flinger for a real layer to fill Surface.
- Surface Flinger receives a WMS request to assign a true layer to Surface on the APP side
- Transfer layer-related key information Handle and Producer to WMS
After Layer is established, Surface Flinger passes layer identification information Handle and Producer to WMS. WMS uses these two to create a Surface Control object, and then creates Surface with the object. The specific code is as follows:
void getSurface(Surface outSurface) {
    outSurface.copyFrom(mSurfaceControl);
}

public void copyFrom(SurfaceControl other) {
long surfaceControlPtr = other.mNativeObject;
long newNativeObject = nativeCreateFromSurfaceControl(surfaceControlPtr);
synchronized (mLock) {
    setNativeObjectLocked(newNativeObject);
}
}
You can see that the copy function of Surface is actually to modify the pointer value of Surface native object directly. The native Surface object contains the mGraphicBufferProducer object, which is very important and will be passed to the APP side.
static jlong nativeCreateFromSurfaceControl(JNIEnv* env, jclass clazz,
        jlong surfaceControlNativeObj) {

    sp<SurfaceControl> ctrl(reinterpret_cast<SurfaceControl *>(surfaceControlNativeObj));
    sp<Surface> surface(ctrl->getSurface());
    if (surface != NULL) {
        surface->incStrong(&sRefBaseOwner);
    }
    return reinterpret_cast<jlong>(surface.get());
}

sp<Surface> SurfaceControl::getSurface() const
{
    Mutex::Autolock _l(mLock);
    if (mSurfaceData == 0) {
        mSurfaceData = new Surface(mGraphicBufferProducer, false);
    }
    return mSurfaceData;
}
Here, the WMS Surface is created and filled, and Surface actually corresponds to the Surface Control of WMS. When the APP side needs to be manipulated at the layer level, it actually depends on Surface Control. After the creation of Surface of WMS, it needs to be transferred to the APP side. After that, the APP side gains the ability to communicate directly with Surface Flinger, such as drawing and UI updating, how to transfer it. What about it? We know Surface implements the Parcel interface, so we can transfer serialized data. In fact, if you look at Surface nativeReadFromParcel, you can see how to transfer it. Use readStrongBinder to get the handle of IGraphic Buffer Producer object, and then convert it into IGraphic Buffer Producer proxy, which is actually BpGraphic Buffer Producer, and then use BpGraphic Buffer Producer Producer. Build Surface so that Surface on the APP side is filled up and can communicate with Surface Flinger:
static jlong nativeReadFromParcel(JNIEnv* env, jclass clazz,
        jlong nativeObject, jobject parcelObj) {
    Parcel* parcel = parcelForJavaObject(env, parcelObj);
    if (parcel == NULL) {
        doThrowNPE(env);
        return 0;
    }
     sp<Surface> self(reinterpret_cast<Surface *>(nativeObject));
    sp<IBinder> binder(parcel->readStrongBinder());
    if (self != NULL
            && (IInterface::asBinder(self->getIGraphicBufferProducer()) == binder)) {
        return jlong(self.get());
    }
    sp<Surface> sur;
    sp<IGraphicBufferProducer> gbp(interface_cast<IGraphicBufferProducer>(binder));
    if (gbp != NULL) {
        sur = new Surface(gbp, true);
        sur->incStrong(&sRefBaseOwner);
    }

    if (self != NULL) {
        self->decStrong(&sRefBaseOwner);
    }

    return jlong(sur.get());
}
So far, the process of App <-> WMS <-> WMS communication application for Surface has run out.
summary
The process of adding windows is simplified as follows, while the grouping management of windows is ignored.
- APP goes to WMS registration window first
- WMS End Registration Window
- APP creates a new Surface shell and requests WMS to fill Surface
- WMS requests Surface Flinger to assign window layers
- Surface Flinger assigns Layer and sends the result back to WMS
- WMS fills window information into Surface and transmits it to APP
- The APP side obtains filling information and the ability to communicate with Surface Flinger
Author: Little Snail Reading
Links to the original text: Windows Addition Process for Windows Manager Service Window Management
For reference only, correction is welcome.