Hello, I'm Charlie ~
Facebook was renamed meta, which suddenly ignited the concept of metauniverse.
Today I will implement a simple Mini metauniverse in Python.
The code is concise and easy to understand. You can not only learn Python knowledge, but also understand the concept of metauniverse in practice.
What are you waiting for? Let's start now!
Mini metauniverse
What is the meta universe?
Different people have different understandings and understandings, and the most consensus is:
The meta universe is an access point where everyone can become an element and interact with each other.
So what are the functions of our meta universe?
First, there must be accessible functions.
Then they can exchange information with each other. For example, a sends a message to b, and b can send a message to A. at the same time, it can broadcast the message, that is, members can send private messages and group chat.
In addition, members in the meta universe can receive the dynamics of the meta universe, such as new people joining or someone leaving. If they are tired of playing, they can leave the meta universe.
The final effect is like this:

effect
Design
How to build an access point
It may be difficult to think directly. To put it another way, the access point is actually the server.
As long as we surf the Internet, we communicate with the server all the time.
Then choose the simplest TCP server. The core of TCP server is to maintain the state of socket and send or obtain information.
python's socket library provides many convenient methods to help us build.
The core code is as follows:
import socket

socket = socket.socket(socket.AF_INET, socket.SOCK_STREAM)
socket.bind((ip, port))
socket.listen()

data = socket.recv(1024)
...
Create a socket, let it listen to an ip and port owned by the machine, and then read the sent data from the socket.
How to build a client
The client is a tool to facilitate users to link to the meta universe. Here, it is a tool that can link to the server. The server is a TCP server. Naturally, the client needs to link to the TCP server.
python has also been prepared for us. It can be done in a few lines of code. The core code is as follows:
import socket

client = socket.socket(socket.AF_INET,socket.SOCK_STREAM)
client.connect((ip, port))

data = client.recv(1024)
...
The code is very similar to the server. It does not link the ip and ip port of a server in the past.
How to build business logic
First, the server needs to manage the accessed users.
Then, when the user message is received, it is judged whether to forward it to other users, broadcast or respond.
In this way, a message format needs to be constructed to represent the type or purpose of user messages.
We use the format of @ username , to distinguish whether messages are sent to special users or to groups.
In addition, in order to complete the registration function, we need to define another command format for setting the user name. We can use the format of {name:username} as the command for setting the user name.
structure
With the preliminary design, we can further build our code.
Server
The server needs to respond to multiple links at the same time, including new link creation, message and link disconnection, etc.
In order not to block the server, we use non blocking links. When the link is accessed, we store the link, and then use the select tool to wait for the link with a message.
This function has been implemented by some people. simpletcp[1] only needs a little change.
The received message, the link is established, and the link is closed into a callback method, so that the business logic can be written externally.
core business
Here is the core code:
# Create a server link
self._socket = socket.socket(socket.AF_INET, socket.SOCK_STREAM)
self._socket.setblocking(0)
self._socket.bind((self.ip, self.port))
self._socket.listen(self._max_connections)

# Store established links
readers = [self._socket]
# Store client ip and port
IPs = dict()

# The exit flag is used to shut down the server
self._stop = False

# Server main loop
while readers and not self._stop:
    # Use select to select some links with new messages from the established links
    read, _, err = select.select(readers, [], readers)

    for sock in read:
        if sock is self._socket:
            # New links established

            # Get the socket, ip and port of the new link
            client_socket, client_ip = self._socket.accept()

            # Make the link non blocking
            client_socket.setblocking(0)
            # Add to listening queue
            readers.append(client_socket)
            # Store ip information
            IPs[client_socket] = client_ip

            # Call the establish link callback function
            self.onCreateConn(self, client_socket, client_ip)
        else:
            # Got a new message
            try:
                # Get message
                data = sock.recv(self.recv_bytes)
            except socket.error as e:
                if e.errno == errno.ECONNRESET:
                    # Indicates that the link has exited
                    data = None
                else:
                    raise e
            if data:
                # Call the received message callback function
                self.onReceiveMsg(self, sock, IPs[sock], data)
            else:
                # Remove the listening queue when the link exits
                readers.remove(sock)
                sock.close()

                # Call the link close callback function
                self.onCloseConn(self, sock, IPs[sock])
    # Processing links with errors
    for sock in err:
        # Remove listening queue
        readers.remove(sock)
        sock.close()

        # Call the link close callback function
self.onCloseConn(self, sock, IPs[sock])- First, use socket to establish a server link, which is the same as the original socket core code
- The difference is that links are set to be non blocking, so that multiple links can be monitored at the same time through select without blocking the server. You can see [2] here about select
- In the main loop, filter out the links with messages, judge whether to establish links or send messages, and call different callback functions
- Finally, handle the exception
event processing
Now, through the callback function, you can write the business. Look at the code between them.
This paragraph is the processing when establishing a link:
def onCreateConn(server, sock, ip):
    cid = f'{ip[0]}_{ip[1]}'
    clients[cid] = {'cid': cid, 'sock': sock, 'name': None}
sock.send("You've connected to the metauniverse. Tell me your code,The input format is name:lily.".encode('utf-8'))- Firstly, the client id, namely cid, is calculated, which is composed of ip and port
- clients is a dictionary that uses cid as the key and stores cid, links, and names
- Once the link is established, send a greeting to the link and ask it to set its own name
Then there is the callback function for receiving messages. This is relatively complex, mainly because there are more processing situations:
def onReceiveMsg(server, sock, ip, data):
    cid = f'{ip[0]}_{ip[1]}'
    data = data.decode('utf-8')
    print(f"Data received: {data}")
    _from = clients[cid]
    if data.startswith('name:'):
        # Set name
        name = data[5:].strip()
        if not name:
            sock.send(f"You can't set an empty name, or others won't find you".encode('utf-8'))
        elif not checkname(name, cid):
            sock.send(f"This name{name}It has been used. Please try another one".encode('utf-8'))
        else:
            if not _from['name']:
                sock.send(f"{name} Nice to meet you. Now you can enjoy the meta universe".encode('utf-8'))
                msg = f"new blood{name} Joined the metauniverse, and TA Let's talk".encode('utf-8')
                sendMsg(msg, _from)
            else:
                sock.send(f"Name change complete".encode('utf-8'))
                msg = f"{_from['name']} Change name to {name},and TA Let's talk".encode('utf-8')
                sendMsg(msg, _from)
            _from['name'] = name

    elif '@' in data:
        # private letter
        targets = re.findall(r'@(.+?) ', data)
        print(targets)
        msg = f"{_from['name']}: {data}".encode('utf-8')
        sendMsg(msg, _from, targets)
    else:
        # Group letter
        msg = f"{_from['name']}: {data}".encode('utf-8')
sendMsg(msg, _from)- The code is divided into two parts. The front of if is to process the received message and convert bytes into strings; If starts processing specific messages
- If you receive a message beginning with {Name:, it means that you need to set the user name, including judging duplication and sending messages to other members
- If there is @ in the received message, it means that you are sending a private message. First pick up the users to be sent, and then send the message to the corresponding users
- If there is no special mark, it means mass sending
- sendMsg is used to send messages and receive three parameters. The first is the message, the second is the sender, and the third is the receiver name array
When the link is closed, you need to handle the closed callback function:
def onCloseConn(server, sock, ip):
    cid = f'{ip[0]}_{ip[1]}'
    name = clients[cid]['name']
    if name:
        msg = f"{name} Disappeared from the meta universe".encode('utf-8')
        sendMsg(msg, clients[cid])
del clients[cid]- When the message of link disconnection is received, the message is synthesized and sent to other users
- Then delete it from the client cache
client
The client needs to solve two problems. The first is to process the received message, and the second is to allow user input.
We will receive the message as a thread and the user input as the main loop.
receive messages
First look at the code of the received message:
def receive(client):
    while True:
        try:
            s_info = client.recv(1024)  # Accept the message from the server and decode it
            if not s_info:
                print(f"{bcolors.WARNING}Server link broken{bcolors.ENDC}")
                break
            print(f"{bcolors.OKCYAN}New message:{bcolors.ENDC}\n", bcolors.OKGREEN + s_info.decode('utf-8')+ bcolors.ENDC)
        except Exception:
            print(f"{bcolors.WARNING}Server link broken{bcolors.ENDC}")
            break
        if close:
break- This is the code used in the thread to receive a client link as a parameter
- In the loop, we continuously get information from the link. If there is no message, the recv method will block until a new message comes
- After receiving the message, write the message to the console
- bcolors} provides some color markers to display messages in different colors
- close is a global flag. If the client needs to exit, it will be set to True to end the thread
Input processing
Let's take another look at the input control program:
while True:
    pass
    value = input("")
    value = value.strip()

    if value == ':start':
        if thread:
            print(f"{bcolors.OKBLUE}You are already in the metauniverse{bcolors.ENDC}")
        else:
            client = createClient(ip, 5000)
            thread = Thread(target=receive, args=(client,))
            thread.start()
            print(f"{bcolors.OKBLUE}You have entered the meta universe{bcolors.ENDC}")
    elif value == ':quit' or value == ':stop':
        if thread:
            client.close()
            close = True
            print(f"{bcolors.OKBLUE}Exiting{bcolors.ENDC}")
            thread.join()
            print(f"{bcolors.OKBLUE}The universe has exited{bcolors.ENDC}")
            thread = None
        if value == ':quit':
            print(f"{bcolors.OKBLUE}Exit program{bcolors.ENDC}")
            break
        pass
    elif value == ':help':
        help()
    else:
        if client:
            # Chat mode
            client.send(value.encode('utf-8'))
        else:
            print(f'{bcolors.WARNING}You haven't connected to metauniverse yet. Please enter it first :start Access{bcolors.ENDC}')
client.close()- It is mainly used to respond to different commands, such as: start indicates that a link needs to be established, and: quit indicates exit, etc
- The command is preceded by: to distinguish it from general messages. If: is not included, it is considered to be sending a message
start-up
After completing the overall coding, you can start. The final code consists of three parts.
The first part is the server-side core code, which is stored in simpletcp Py.
The second part is the server-side business code, which is stored in MetaServer Py.
The third part is the client code, which is stored in metaclient Py.
In addition, some auxiliary processing is required, such as sendMsg method for sending messages, color processing method, etc. you can download the source code of this article for details.
Enter the code directory, start the command line, and execute Python MetaServer Py, enter the command start:
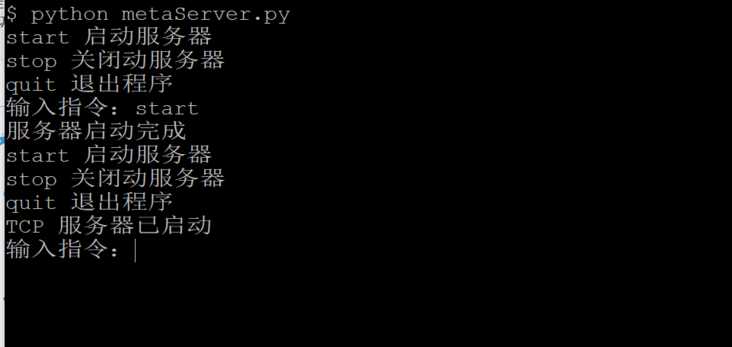
Then open a command line and execute Python metaclient Py, enter the instruction: start to access the metauniverse:
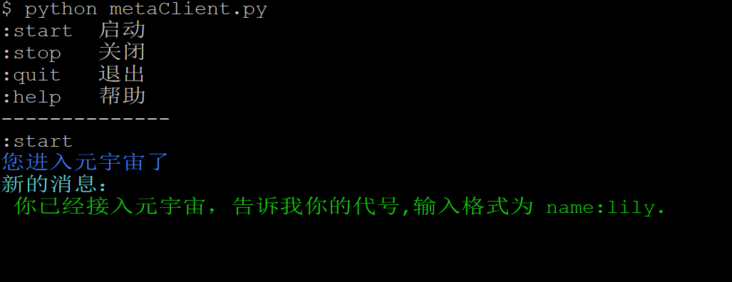
Set your own name:
If new members join, they will be reminded by messages and can play some interaction: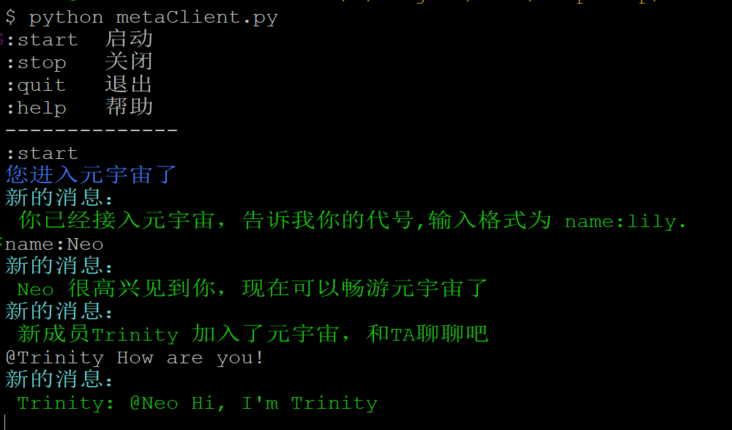
How about fun? A meta universe has been formed. Let other partners join in and try it quickly.
summary
Metauniverse is a very hot concept now, but it is still built based on existing technology. Metauniverse provides people with an imagination space to live in a virtual magical world. In fact, since the Internet, we have gradually lived in the metauniverse.
Today, we use the basic TCP technology to build our own meta universe chat room. Although the function is far from the imagined meta universe, the main functions have taken shape.
If you are interested, you can also add more fun functions on this basis, such as friends, groups, message records, etc. while understanding in depth, you can make this meta universe more fun.