Nginx download address: http://nginx.org/en/download.html
MySQL download address: https://dev.mysql.com/downloads/mysql/
PHP download address: https://windows.php.net/download/
Step 1: download the required installation package
Create a new folder containing the above three compressed packages, and create three directories to extract them

Step 2: install MySQL
Create a new my INI file. The contents of the file are as follows. Pay attention to the configuration of basedir and datadir;
The path of basedir is the installation path of mysql; The path of datadir is the mysql installation path, and then splice "/ / Data";
[mysqld]
# Set 3306 port
port=3306
# Set mysql installation directory
basedir=C:\Users\Administrator.WIN-0V4JM73DDV1\Desktop\WebDev\mysql-8.0.25-winx64   # Remember to use double slashes here. I will make mistakes here with single slashes, but there are some single slashes in other people's tutorials. Try it yourself
# Set the storage directory of mysql database data
datadir=C:\Users\Administrator.WIN-0V4JM73DDV1\Desktop\WebDev\mysql-8.0.25-winx64\\Data   # Ibid
bind-address=0.0.0.0
# Maximum connections allowed
max_connections=200
# Number of connection failures allowed. This is to prevent someone from trying to attack the database system from the host
max_connect_errors=10
# The character set used by the server is UTF8 by default
character-set-server=utf8
# The default storage engine that will be used when creating new tables
default-storage-engine=INNODB
# The "mysql_native_password" plug-in authentication is used by default
default_authentication_plugin=mysql_native_password
[mysql]
# Set the default character set of mysql client
default-character-set=utf8
[client]
# Set the default port used by mysql client when connecting to the server
port=3306
default-character-set=utf8
After the above configuration is completed, configure the environment variables
"My computer" – > right click and select Properties – > "advanced system settings" – > "environment variables";
New variable name: MYSQL_PATH, variable value: C: \ users \ administrator Win-0v4jm73ddv1 \ desktop \ webdev \ mysql-8.0.25-winx64 (MySQL installation path), and then confirm;
Add at the end of the Path variable: ";% MYSQL_PATH%\bin; "; then determine;
Install mysql
Open cmd as an administrator and enter the bin directory under the mysql installation directory;
Execution: mysqld --initialize --console
After execution, the initial password of the root account will be displayed: root@localhost : the following "> 6u_e9i;, PE =" is; The initial password should be recorded before changing the password again.
Install mysql service
Execute the command in the bin directory under the mysql installation directory: mysqld --install
Prompt after successful installation: Service successfully installed
Configure mysql
Execute in the bin directory of mysql installation directory: mysqld --initialize – secure, and then execute after entering: mysqld --initialize
At this time, a Data file will be generated in the mysql installation directory;
Modify initial password
Start mysql service: net start mysql (supplement: service stop command: net stop mysql)
Execute the command in the bin directory under the mysql installation directory: mysql -u root -p
At this time, you will be prompted to enter the password, enter the initial password recorded above, and press enter directly; Show welcome, indicating successful login.
View all databases: show databases;
Enter mysql database: use mysql;
View all tables in mysql database: show tables;
View the user's host, user and password: select host,user,authentication_string from user;
Execute and modify the password of root user: update user set authentication_string = '123' where user = 'root';
mysql8 version, password with authentication_string instead, so set authentication_string password is OK. Here I set my new password to "123", and I can also set the password I want to set according to my own needs;
After executing the command, Query OK is returned, indicating that the new password is set successfully;
Step 3: install Nginx
Download nginx
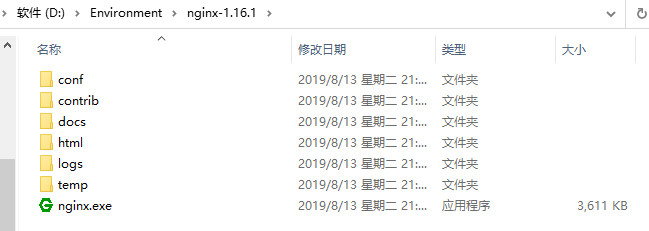
http://nginx.org/en/download.html Download a stable version. Take nginx/Windows-1.18.1 as an example, Download nginx-1.18.1 directly zip. After downloading, unzip as follows:
start nginx
There are many ways to start nginx
(1) Double click nginx Exe, a black pop-up window flashes after double clicking
(2) Open the cmd command window, switch to the nginx decompression directory, and enter the command nginx Exe, press enter
Check whether nginx starts successfully
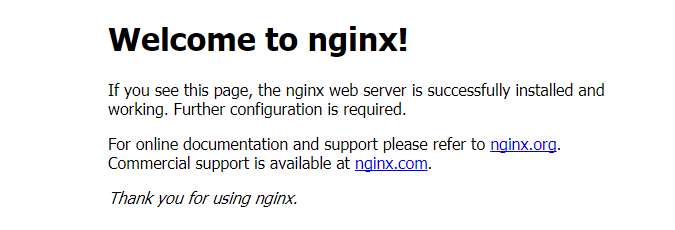
Enter the web address directly in the browser address bar http://localhost:80 Press enter and the following page appears, indicating that the startup is successful!
Listening configuration
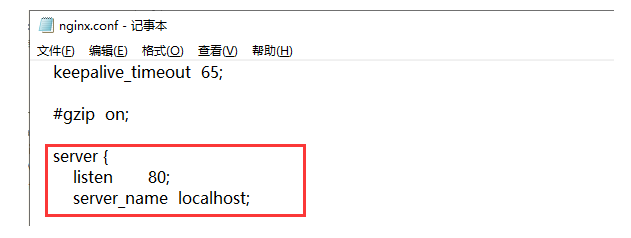
The configuration file of nginx is nginx in the conf directory Conf, the default configured nginx listens to port 80. If port 80 is occupied, it can be modified to an unoccupied port.
When we modify the configuration file of nginx, nginx Conf, you do not need to close nginx and restart nginx. You only need to execute the command nginx -s reload to make the changes take effect
Close nginx
If you use the cmd command window to start nginx, closing the cmd window cannot end the nginx process. You can use two methods to close nginx
(1) Enter the nginx command nginx - s stop or nginx - s quit
(2) Use taskkill / F / T / im nginx exe
- taskkill is used to terminate the process,
- /f is mandatory termination
- /t terminates the specified process and any child processes started from it.
- /im indicates the specified process name
Step 4: install PHP
The installation of PHP only needs to download and unzip to the corresponding directory.
Step 5: configure Nginx
Change the Nginx configuration file conf
#user  nobody;
worker_processes  1;

#error_log  logs/error.log;
#error_log  logs/error.log  notice;
#error_log  logs/error.log  info;

#pid        logs/nginx.pid;


events {
    worker_connections  1024;
}


http {
    include       mime.types;
    default_type  application/octet-stream;

    #log_format  main  '$remote_addr - $remote_user [$time_local] "$request" '
    #                  '$status $body_bytes_sent "$http_referer" '
    #                  '"$http_user_agent" "$http_x_forwarded_for"';

    #access_log  logs/access.log  main;

    sendfile        on;
    #tcp_nopush     on;

    #keepalive_timeout  0;
    keepalive_timeout  65;

    #gzip  on;
    include "conf.d/*.conf";
    server {
        listen       80;
        server_name  localhost;

        #charset koi8-r;

        #access_log  logs/host.access.log  main;

        location / {
            root   html;
            index  index.html index.htm;
        }

        #error_page  404              /404.html;

        # redirect server error pages to the static page /50x.html
        #
        error_page   500 502 503 504  /50x.html;
        location = /50x.html {
            root   html;
        }

        # proxy the PHP scripts to Apache listening on 127.0.0.1:80
        #
        #location ~ \.php$ {
        #    proxy_pass   http://127.0.0.1;
        #}

        # pass the PHP scripts to FastCGI server listening on 127.0.0.1:9000
        #
        #location ~ \.php$ {
        #    root           html;
        #    fastcgi_pass   127.0.0.1:9000;
        #    fastcgi_index  index.php;
        #    fastcgi_param  SCRIPT_FILENAME  /scripts$fastcgi_script_name;
        #    include        fastcgi_params;
        #}

        # deny access to .htaccess files, if Apache's document root
        # concurs with nginx's one
        #
        #location ~ /\.ht {
        #    deny  all;
        #}
    }


    # another virtual host using mix of IP-, name-, and port-based configuration
    #
    #server {
    #    listen       8000;
    #    listen       somename:8080;
    #    server_name  somename  alias  another.alias;

    #    location / {
    #        root   html;
    #        index  index.html index.htm;
    #    }
    #}


    # HTTPS server
    #
    #server {
    #    listen       443 ssl;
    #    server_name  localhost;

    #    ssl_certificate      cert.pem;
    #    ssl_certificate_key  cert.key;

    #    ssl_session_cache    shared:SSL:1m;
    #    ssl_session_timeout  5m;

    #    ssl_ciphers  HIGH:!aNULL:!MD5;
    #    ssl_prefer_server_ciphers  on;

    #    location / {
    #        root   html;
    #        index  index.html index.htm;
    #    }
    #}

}
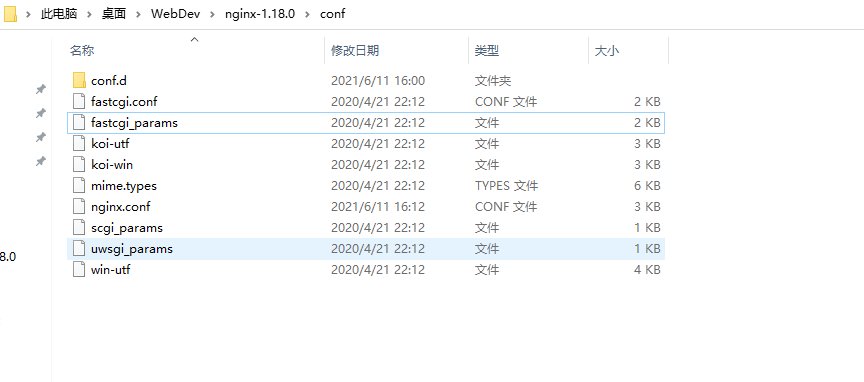
Create a new folder called conf.d under the conf folder, and add a file default. Under the conf. folder conf
default. The contents of conf are as follows
server {
        listen       80;
        server_name  localhost;
        root C:\Users\Administrator.WIN-0V4JM73DDV1\Desktop\WebDev\wwwroot;

        #charset koi8-r;

        #access_log  logs/host.access.log  main;

        location / {

            index  index.html index.htm;
        }

        #error_page  404              /404.html;

        # redirect server error pages to the static page /50x.html
        #
        error_page   500 502 503 504  /50x.html;
        location = /50x.html {
            root   html;
        }

        # proxy the PHP scripts to Apache listening on 127.0.0.1:80
        #
        #location ~ \.php$ {
        #    proxy_pass   http://127.0.0.1;
        #}

        # pass the PHP scripts to FastCGI server listening on 127.0.0.1:9000
        #
        location ~ \.php$ {
            fastcgi_pass   127.0.0.1:9000;
            fastcgi_index  index.php;
            fastcgi_param  SCRIPT_FILENAME  /scripts$fastcgi_script_name;
            include        fastcgi_params;
        }

        # deny access to .htaccess files, if Apache's document root
        # concurs with nginx's one
        #
        #location ~ /\.ht {
        #    deny  all;
        #}
    }
Under the same level directory of Nginx, add a folder named wwwroot and create a new HTML file named index html

Step 6: configuration completed
We visit the localhost address and display hello world, indicating that the environment has been built successfully!