WPF Native binding and command Function Guide
Now, when it comes to WPF It seems that we have forgotten how to use WPF without MVVM, framework (such as Prism) and so on. Of course, we don't use the framework and MVVM here. We don't use WPF as we use Winform. Instead, we need to go back to the source and re recognize the nature of WPF binding and command Elegant demeanor.
1, Use of bindings
Target: the foreground page gets the value of the background property by binding.
This goal is actually divided into two parts: first, the foreground obtains the property value of the background; second, the property value can be reflected in time after it changes.
To achieve the first part of the goal, you only need to add a line of code to the constructor in the background of the form:
this.DataContext = this;
This line of code is critical. In MVVM mode, page and ViewModel association are realized by specifying the DataContext of page class as the corresponding ViewModel object.
Next, let's talk about how to achieve the second part of the goal, that is, it can be reflected in time after the attribute changes, including the automatic change of the foreground display after the background attribute changes, and the content modified by the foreground, and the value of the background attribute changes with it. As we all know, this is binding. To implement this function, a property change notification interface, InotifyPropertyChanged, needs to be implemented by related classes. For the specific evolution process, please refer to the article on the Internet . NET 4.5 (C ා): evolution of INotifyPropertyChanged execution: BindableBase type from expression tree to caller information | Mgen >The final result is given directly here.
First of all, it is necessary to implement InotifyPropertyChanged. If you want to bind other classes, let the class implement it. If you do related functions directly in the background of the window, the final window class looks like this:
public partial class MainWindow : Window, INotifyPropertyChanged
Then add an event and two methods:
public event PropertyChangedEventHandler PropertyChanged;

protected void OnPropertyChanged([CallerMemberName] string propertyName = null)
{
    var eventHandler = this.PropertyChanged;
    eventHandler?.Invoke(this, new PropertyChangedEventArgs(propertyName));
}

protected bool SetProperty<T>(ref T storage, T value, [CallerMemberName] String propertyName = null)
{
    if (Equals(storage, value)) return false;

    storage = value;
    this.OnPropertyChanged(propertyName);
    return true;
}
Finally, you need to provide the binding properties, which can be written as follows:
private string _UserName = "wlh";
public string UserName
{
    get => _UserName;
    set => SetProperty(ref _UserName, value);
}
The foreground binding is simple:
<TextBox Text="{Binding UserName, Mode=TwoWay}"></TextBox>
2, Command ICommand
The major difference between WPF and Winform is that user interaction, data changes, etc. in Winform, programmers need to handle them manually, bit by bit, and in WPF, data is bound, and interaction is passed through commands, so many things can be handled automatically by WPF. In fact, Winform is event driven, while WPF is data-driven. Therefore, in Winform, the commonly used button click events and other events are not used much in WPF, but commands.
The command is also bound. First, let's look at the foreground:
<TextBox Text="{Binding UserName, Mode=TwoWay}"></TextBox>
As for how to write backstage, don't worry, pass< [WPF] ICommand We know that we need an auxiliary class first:
public class RelayCommand : ICommand
{
    private readonly Predicate<object> _CanExecute;
    private readonly Action<object> _Execute;

    public RelayCommand(Predicate<object> canExecute, Action<object> execute)
    {
        this._CanExecute = canExecute;
        this._Execute = execute;
    }

    public event EventHandler CanExecuteChanged
    {
        add => CommandManager.RequerySuggested += value;
        remove => CommandManager.RequerySuggested -= value;
    }

    public bool CanExecute(object parameter)
    {
        return _CanExecute(parameter);
    }

    public void Execute(object parameter)
    {
        _Execute(parameter);
    }
}
It can be seen that there are two main methods in ICommand, one is CanExecute() to check whether the command is available, and the other is Execute() to check whether the command is actually working.
Then add a "do something" command in the background, that is, the new RelayCommand type above:
private ICommand _DoSomething;
public ICommand DoSomethingCommand
{
    get
    {
        return _DoSomething ??= new RelayCommand(
            o => _CanDoSomething(o),
            o => { _DoSomethingMethod(o); });
    }
}

private readonly Predicate<object> _CanDoSomething = o => true;

// It can be assigned later to avoid access to properties in the method body;
private readonly Action<object> _DoSomethingMethod = o =>
{
    // do something
};
These can also be further simplified as:
public ICommand DoSomethingCommand { get; set; }

/// <summary>
/// Command method assignment (called in construction method)
/// </summary>
private void SetCommandMethod()
{
    DoSomethingCommand ??= new RelayCommand(o => true, async o =>
    {
        // do something
    });
}
Finally, take a look at the actual business code of the corresponding foreground "GetTokenCommand" command:
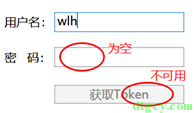
public ICommand GetTokenCommand { get; set; }

/// <summary>
/// Command method assignment (Call in constructor)
/// </summary>
private void SetCommandMethod()
{
    GetTokenCommand ??= new RelayCommand(o => !(string.IsNullOrEmpty(UserName) || string.IsNullOrEmpty(Password)), async o =>
    {
        var req = new ReqGetToken()
        {
            userName = UserName,
            password = Password,
        };

        var res = await GetToken(req);
        if (res.Code)
        {
            Token = res.Token;
        }
    });
}
It can be seen that in the part of checking whether the command is available, it does not directly return true like the template code, but judges according to the actual situation. This effect is that when the conditions are not met, the relevant controls in the foreground are automatically disabled:
Finally, after we write like this, it is very close to MVVM mode. As long as we move all the code in the background to another class, and then re specify the DataContext of the page, we can realize the separation of page display and business logic.