Author: osmanthus New Year cake, no reprint without permission!
Continuous updating
preface
The project is written in C and C + +. It involves many knowledge points and has not been written yet. It is a good project to expand our horizons! In the future, relevant teaching videos will be placed at the end of the article. Please pay attention.
Chapter 1 environment construction
Note: I rent Alibaba cloud servers. In fact, I can also use local virtual machines, combined with https://blog.csdn.net/qq_43647359/article/details/105645615 (installation, use and pit stepping process of FastDFS) and a video of station B https://www.bilibili.com/video/BV1gh411m7tG?p=6 (FastDFS distributed file system tutorial) you can run Tracker and Storage together
Until this point
fdfs_monitor /etc/fdfs/client.conf %Return to client storage Information about

Chapter 2 upload test and self writing API
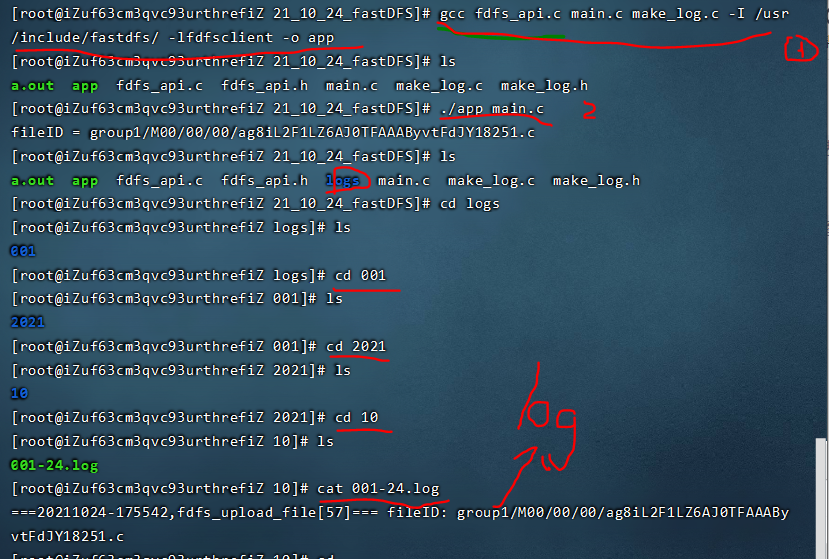
2.1 upload test
fdfs_upload_file /etc/fdfs/client.conf capture.PNG
/*By starting the client, the will be captured png file, upload to storage
 Note that the current path contains captures PNG
fastdfs Will pass the algorithm, will capture PNG is converted to a unique file name. As shown below*/
Although this operation seems like a chicken rib, if everyone has a fastDFS, it can be uploaded collectively. Perhaps Baidu netdisk client itself integrates the function of fastDFS, just as a client!
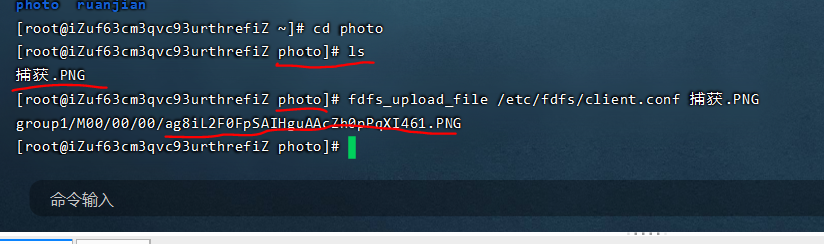
Check where our files have been uploaded. You can find that they are automatically saved for us in this location. You can also find that the storage path is very similar to the name of the previous figure.
2.2 self writing API
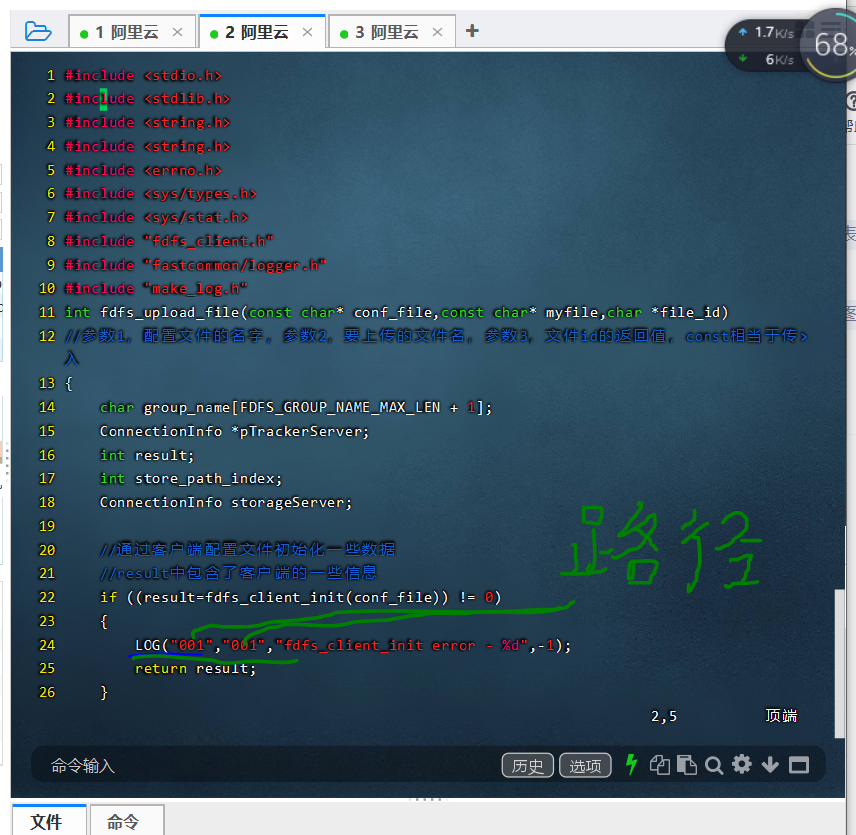
At this time, we need to do one thing, that is, encapsulate an API for file upload, and then call it with the main function. Of course, some header files are built in fast DFS, mainly including the following modules, fdfs_api.h,fdfs_api.c,main.c
The code is as follows:
//fdfs_api.h
 1 #ifndef _FDFS_API_H
 2 #define _FDFS_API_H
 3 int fdfs_upload_file(const char* conf_file,const char* myfile,char* file_id);
 //Function declaration
 4 #endif
//fdfs_api.c
1 #include <stdio.h>
  2 #include <stdlib.h>
  3 #include <string.h>
  4 #include <string.h>
  5 #include <errno.h>
  6 #include <sys/types.h>
  7 #include <sys/stat.h>
  8 #include "fdfs_client.h"
  9 #include "fastcommon/logger.h"
 10
 11 int fdfs_upload_file(const char* conf_file,const char* myfile,char *file_id)
 13 {
 14     char group_name[FDFS_GROUP_NAME_MAX_LEN + 1];
 15     ConnectionInfo *pTrackerServer;
 16     int result;
 17     int store_path_index;
 18     ConnectionInfo storageServer;
 19
 20     //Initialize some data through the client configuration file
 21     //The result contains some information about the client
 22     if ((result=fdfs_client_init(conf_file)) != 0)
 23     {
 24         return result;
 25     }
 26     // Connect the tracker tracker with the data read from the configuration file
 27     // The tracker can be accessed through the obtained address
 28     pTrackerServer = tracker_get_connection();
 29     //If the tracker is not connected
 30     if (pTrackerServer == NULL)
 31     {
 32         fdfs_client_destroy();  //Release client
 33         return errno != 0 ? errno : ECONNREFUSED;
 34     }
 35
 36     *group_name = '\0';
 37
 38     //Get the storage node information through the tracker
 39     if ((result=tracker_query_storage_store(pTrackerServer, \
 40                     &storageServer, group_name, &store_path_index)) != 0)
 41     {
 42         fdfs_client_destroy();
 43         fprintf(stderr, "tracker_query_storage fail, " \
 44             "error no: %d, error info: %s\n", \
 45             result, STRERROR(result));
 46         return result;
 47     }
 48
 49     //File upload
 50     result = storage_upload_by_filename1(pTrackerServer, \
 51             &storageServer, store_path_index, \
 52             myfile, NULL, \
 53             NULL, 0, group_name, file_id);
 54     if (result == 0)
 55     {
 56         printf("%s\n", file_id);
 57     }
 58     else
 59     {
 60         fprintf(stderr, "upload file fail, " \
 61             "error no: %d, error info: %s\n", \
 62             result, STRERROR(result));
 63     }
 64
 65     tracker_close_connection_ex(pTrackerServer, true);
 66     fdfs_client_destroy();
 67
 68     return result;
 69 }
 70
//main.c
  1 #include<stdio.h>
  2 #include<stdlib.h>
  3 #include<unistd.h>
  4 #include"fdfs_api.h"
  5
  6 int main(int argc,char* argv[])
  7 {
  8     char fileid[1024]={0};
  9     //Call the function in the header file on line 4. Parameter 1 is the name of the configuration file,
        //Parameter 2 is the file name you want to upload, which is passed in through the main function at startup,
        //Parameter 3 is a return value. We defined an array in advance to receive
 10     fdfs_upload_file("/etc/fdfs/client.conf",argv[1],fileid);
 11     printf("fileID = %s\n",fileid);
 12 }
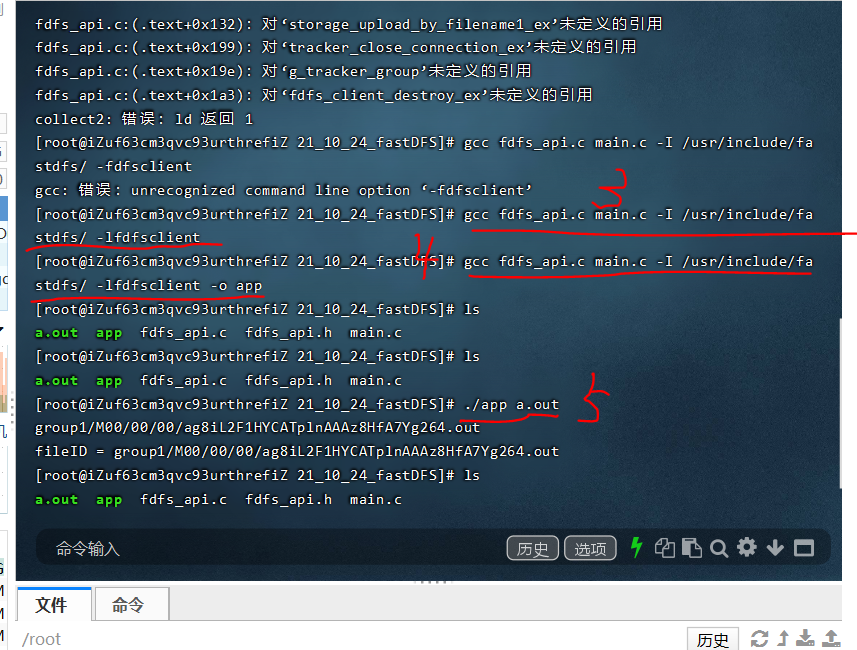
During compilation, when we enter: gcc fdfs_api.c main.c FDFS will appear_ client. h: There is no error in that file or directory because we do not have the path associated with these header files. At this time, we include this directory gcc fdfs_api.c main.c -I /usr/include/fastdfs /, and some functions cannot be defined. This is because we lack dynamic libraries and need to specify dynamic libraries. Enter GCC FDFS again_ api. c main. C - I / usr / include / fastdfs / - lfdfsclient, no error will be reported. At this point, we enter gcc fdfs_api.c main.c -I /usr/include/fastdfs/ -lfdfsclient -o app, used to obtain an app executable.
Next, execute the executable
./app a.out //a.out is the parameter 2 we want to input, that is, the file name to upload
The process in the previous paragraph is as follows: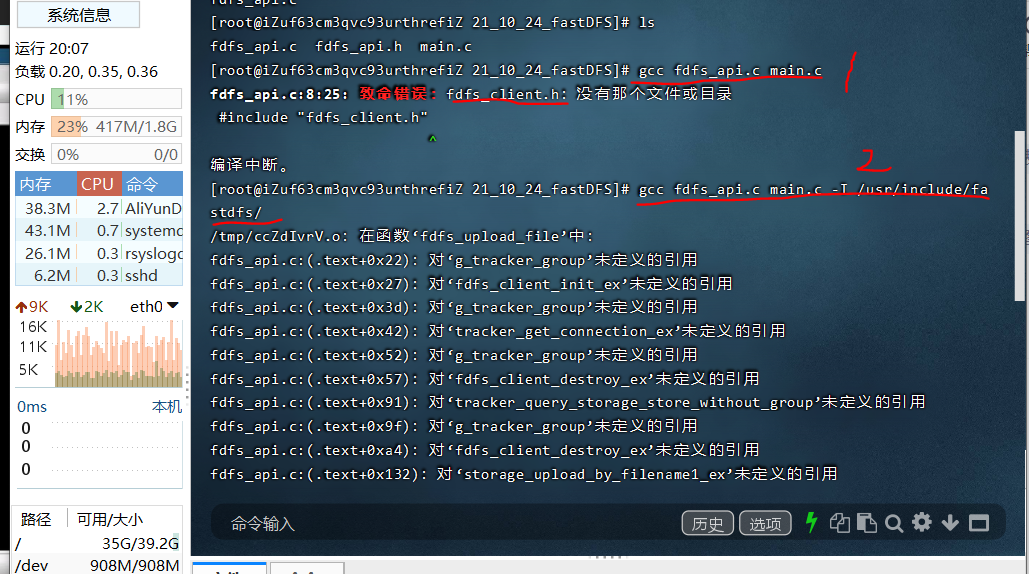
2.3 update log files while uploading
You can see that in the above figure, the console outputs two lines of information. In fact, we sometimes don't need it. If there are records in the log file after each upload, isn't it more convenient for us to look in the log when we want to see it! The following is an API for log logging c file, one h file.
//make_log.h
#ifndef  _MAKE_LOG_H_
#define  _MAKE_LOG_H
#include "pthread.h"

int out_put_file(char *path, char *buf);
int make_path(char *path, char *module_name, char *proc_name);
int dumpmsg_to_file(char *module_name, char *proc_name, const char *filename,
                        int line, const char *funcname, char *fmt, ...);
#ifndef _LOG
#define LOG(module_name, proc_name, x...) \
        do{ \
                dumpmsg_to_file(module_name, proc_name, __FILE__, __LINE__, __FUNCTION__, ##x);\
        }while(0)
#else
#define LOG(module_name, proc_name, x...)
#endif

extern pthread_mutex_t ca_log_lock;

#endif
//make_log.c
#include<string.h>
#include"make_log.h"
#include<pthread.h>
{
        char mesg[4096]={0};
        char buf[4096]={0};
            char filepath[1024] = {0};
        time_t t=0;
        //struct file_path *path;
        //path = (struct file_path*)paths;
        now = localtime(&t);
        va_end(ap);
        make_path(filepath, module_name, proc_name);

        pthread_mutex_lock(&ca_log_lock);
            out_put_file(filepath, buf);
        pthread_mutex_unlock(&ca_log_lock);

        return 0;
}

//Write content
int out_put_file(char *path, char *buf)
{
    fd = open(path, O_RDWR | O_CREAT | O_APPEND, 0777);

            fprintf(stderr, "write error!\n");
            //write(fd, "\n", 1);
    }

        return 0;
}
//Create directory
int make_path(char *path, char *module_name, char *proc_name)
        char y_dir[1024] = {0};
        char m_dir[1024] = {0};
        char d_dir[1024] = {0};
        time(&t);
        now = localtime(&t);

        sprintf(third_dir, "%s/%s", second_dir, module_name);
        sprintf(y_dir, "%s/%04d/", third_dir, now -> tm_year + 1900);
        sprintf(m_dir, "%s/%02d/", y_dir, now -> tm_mon + 1);
        sprintf(d_dir,"%s/%02d/", m_dir, now -> tm_mday);

        if(access(top_dir, 0) == -1) {
                if(mkdir(top_dir, 0777) == -1) {
                        fprintf(stderr, "create %s failed!\n", top_dir);
                } else if(mkdir(second_dir, 0777) == -1) {
                        fprintf(stderr, "%s:create %s failed!\n", top_dir, second_dir);
                } else if(mkdir(third_dir, 0777) == -1) {
                        fprintf(stderr, "%s:create %s failed!\n", top_dir, third_dir);
                } else if(mkdir(y_dir, 0777) == -1) {
                }
        } else if(access(second_dir, 0) == -1) {
                if(mkdir(second_dir, 0777) == -1) {
                        fprintf(stderr, "create %s failed!\n", second_dir);
                } else if(mkdir(third_dir, 0777) == -1) {
                        fprintf(stderr, "%s:create %s failed!\n", second_dir, third_dir);
                } else if(mkdir(y_dir, 0777) == -1) {
                        fprintf(stderr, "%s:create %s failed!\n", second_dir, y_dir);
                } else if(mkdir(m_dir, 0777) == -1) {
                        fprintf(stderr, "%s:create %s failed!\n", second_dir, m_dir);
                }
        } else if(access(third_dir, 0) == -1) {
                if(mkdir(third_dir, 0777) == -1) {
                        fprintf(stderr, "create %s failed!\n", third_dir);
                } else if(mkdir(y_dir, 0777) == -1) {
                        fprintf(stderr, "%s:create %s failed!\n", third_dir, y_dir);
                } else if(mkdir(m_dir, 0777) == -1) {
                        fprintf(stderr, "%s:create %s failed!\n", third_dir, m_dir);
                }
        } else if (access(y_dir, 0) == -1) {
                if(mkdir(y_dir, 0777) == -1) {
                        fprintf(stderr, "create %s failed!\n", y_dir);
                } else if(mkdir(m_dir, 0777) == -1) {
                        fprintf(stderr, "%s:create %s failed!\n", y_dir, m_dir);
                }

        } else if (access(m_dir, 0) == -1) {
                if(mkdir(m_dir, 0777)) {
                        fprintf(stderr, "create %s failed!\n", m_dir);
                }
        }
        //printf("path:%s\n", path);
        return 0;
   }
In the function of uploading files, we add the information of successful upload and failed upload to the log. The first two parameters of log are only pathnames
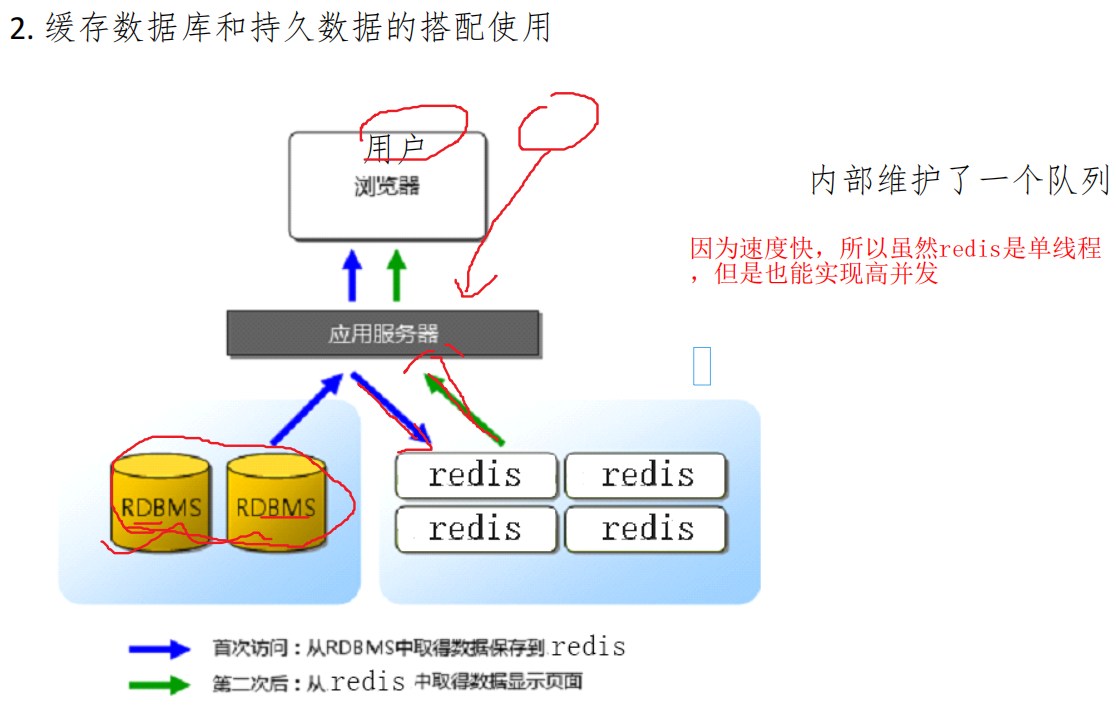
Chapter 3 redis database
3.1 introduction

3.2 installation
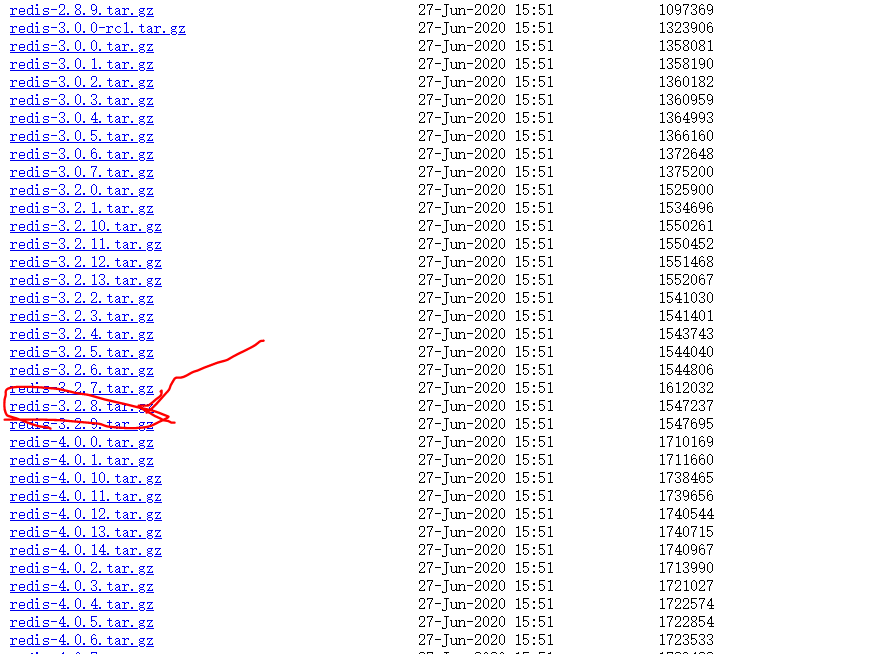
Enter the official website: http://redis.io , Download 3.2 Version 8 has been released to version 6.0 +. Because we are learning, we don't need such a high version.

After downloading, upload it to the corresponding folder of the ECS through the final shell, and then execute the following commands to decompress and install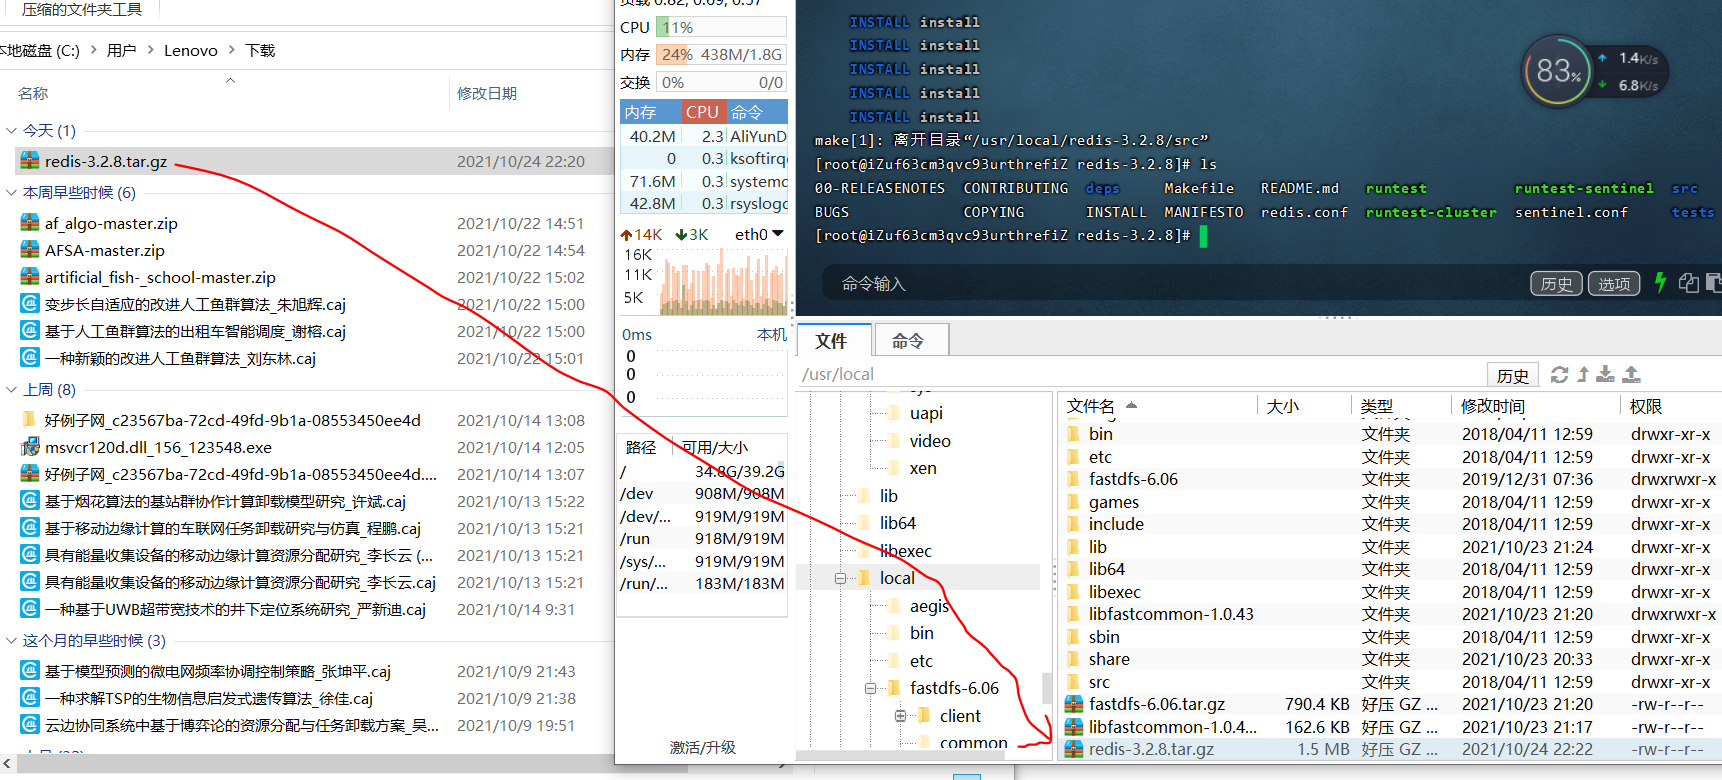
tar -zxvf redis-3.2.8.tar.gz  decompression
cd redis-3.2.8
make
sudo make install
In the process of making, I found something very interesting:
Redis startup command: redis server

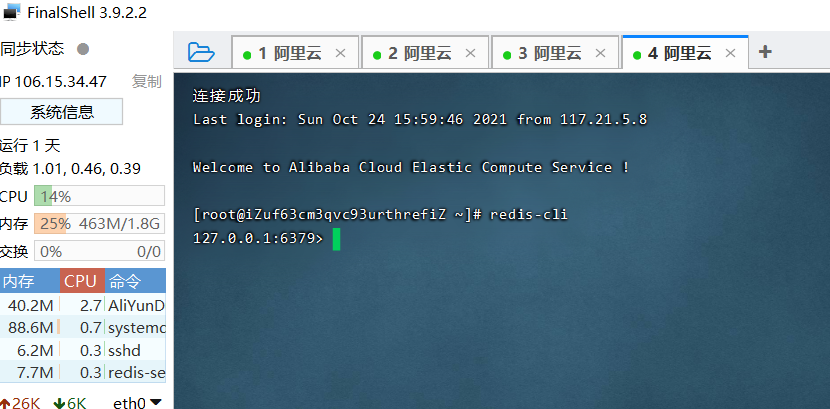
Reopen a window and enter the redis cli command to link redis, because the window that originally started the redis service will be blocked.
Use the set key value and mset key value commands to create single key value pairs and batch key value pairs. The key * command can view all keys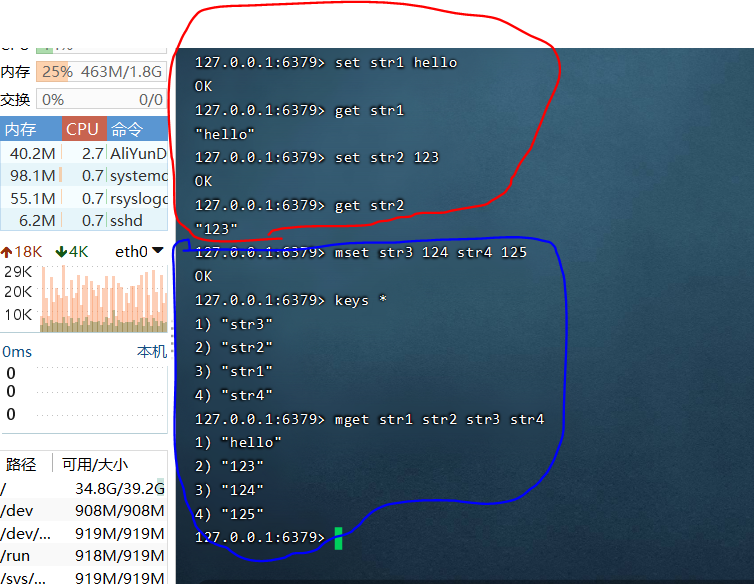
Some redis commands can also add, subtract (only numeric values) and splice the stored key value pairs. Please refer to the corresponding commands for details.
3.3 modifying configuration files
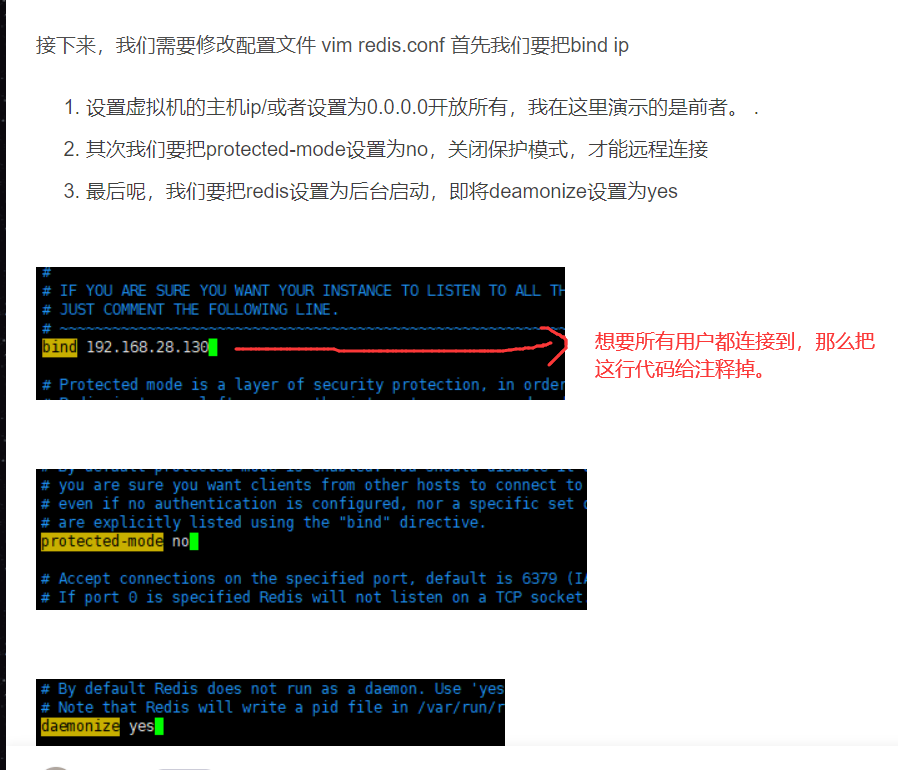
By modifying redis Conf file, which can generate log file and allow other computers to connect to this database.
3.4 Redis Desktop Manager
Redis is used in the project. I want to query the data in redis and always want to find a visualization tool. Today I found Redis Desktop Manager and tried it. It's very easy to use. Download link: http://www.xue51.com/soft/5385.html (don't go to this link to download it. It's poisonous. Let's give the effect picture under normal conditions first)
Pay attention to modifying redis For some things in conf, you should also pay attention to opening the corresponding ports of the ECS, otherwise you can't connect with this software.
After everything is configured, you can test it. You can see the changes of the database by modifying the database in the cloud and then refreshing the redis management tool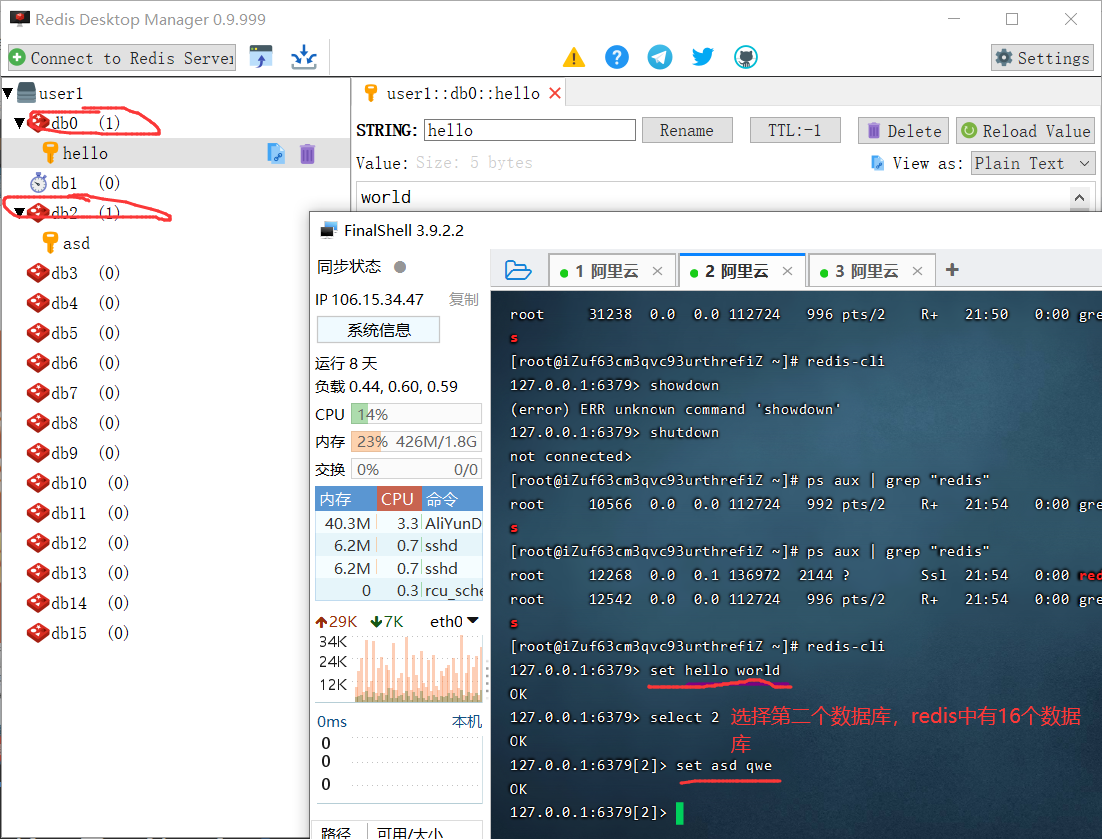
3.5 poisoning experience
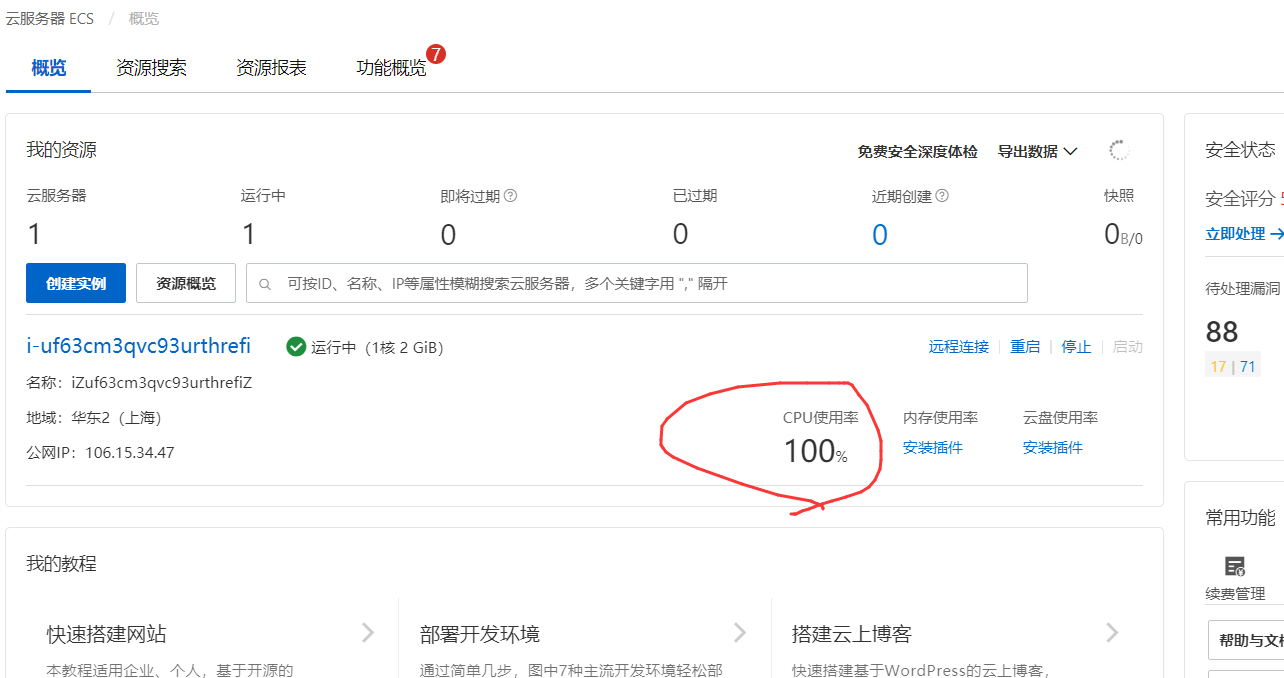
I really want to beat it. The software downloaded from this website is poisonous, which makes my ECS CPU share 100%. I went to the Internet and found the virus crypto and pnscan,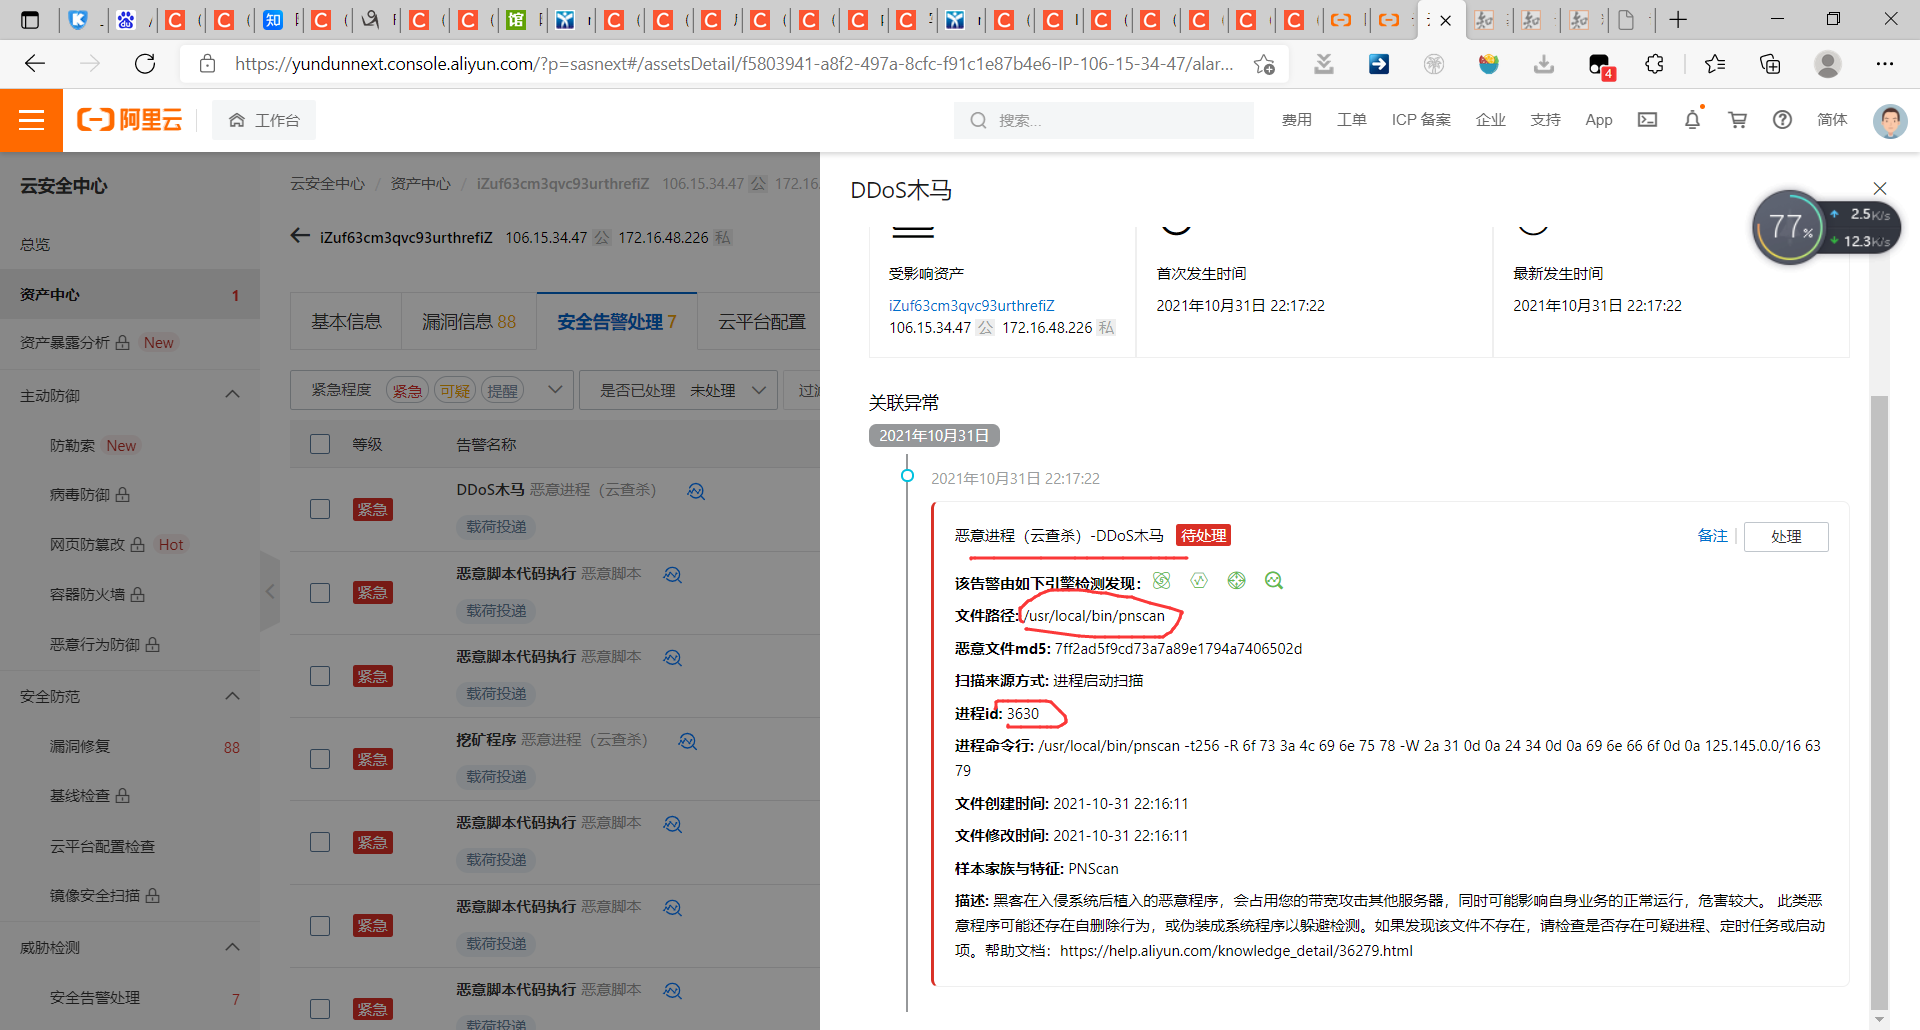
3.6 repair Trojan horse
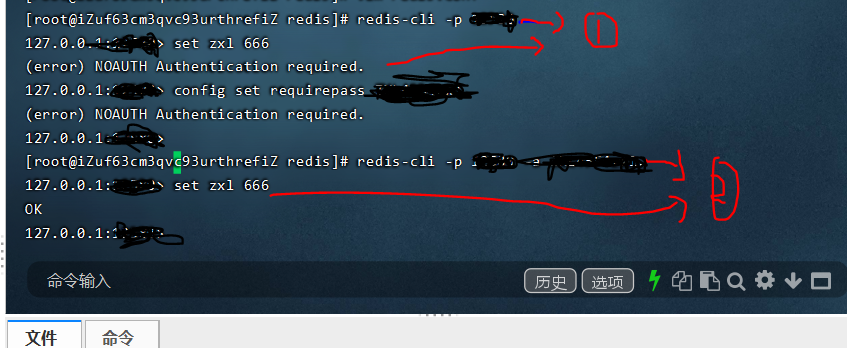
Later, Baidu said that it was infected with the pnscan mining worm. Because my ECS is not configured with anything, the repair operation is very complicated. It simply resets the server. Later, it specially resets redis The allow other users to connect in conf is changed to only allow access at this level, the redis cli password is specially added, and the redis port number is also changed. I don't believe it will be infected in the future.
On redis Add requirepass * * * at any place in conf. * * * refers to the password you want to set and the startup password of redis. It can be seen from the figure below that you can connect only through the port number, but you can't use the command. Therefore, when logging in, we not only need to specify the port number with - p, but also need to add the login password with - a
ps aux | grep redis-server //View redis process
Chapter 4 MYSQL installation
4.1 MYSQL Download
First of all, the installation process is still a little complicated, but follow this step, it won't be wrong. It is recommended to install 5.7 Version 20 of MYSQL. Problems with the higher version of MYSAL are not easy to solve (there are not many users).
Step 1: download from the official website https://downloads.mysql.com/archives/community/ , you can also directly Baidu, enter the MYSQL home page, and then find the community version at the bottom.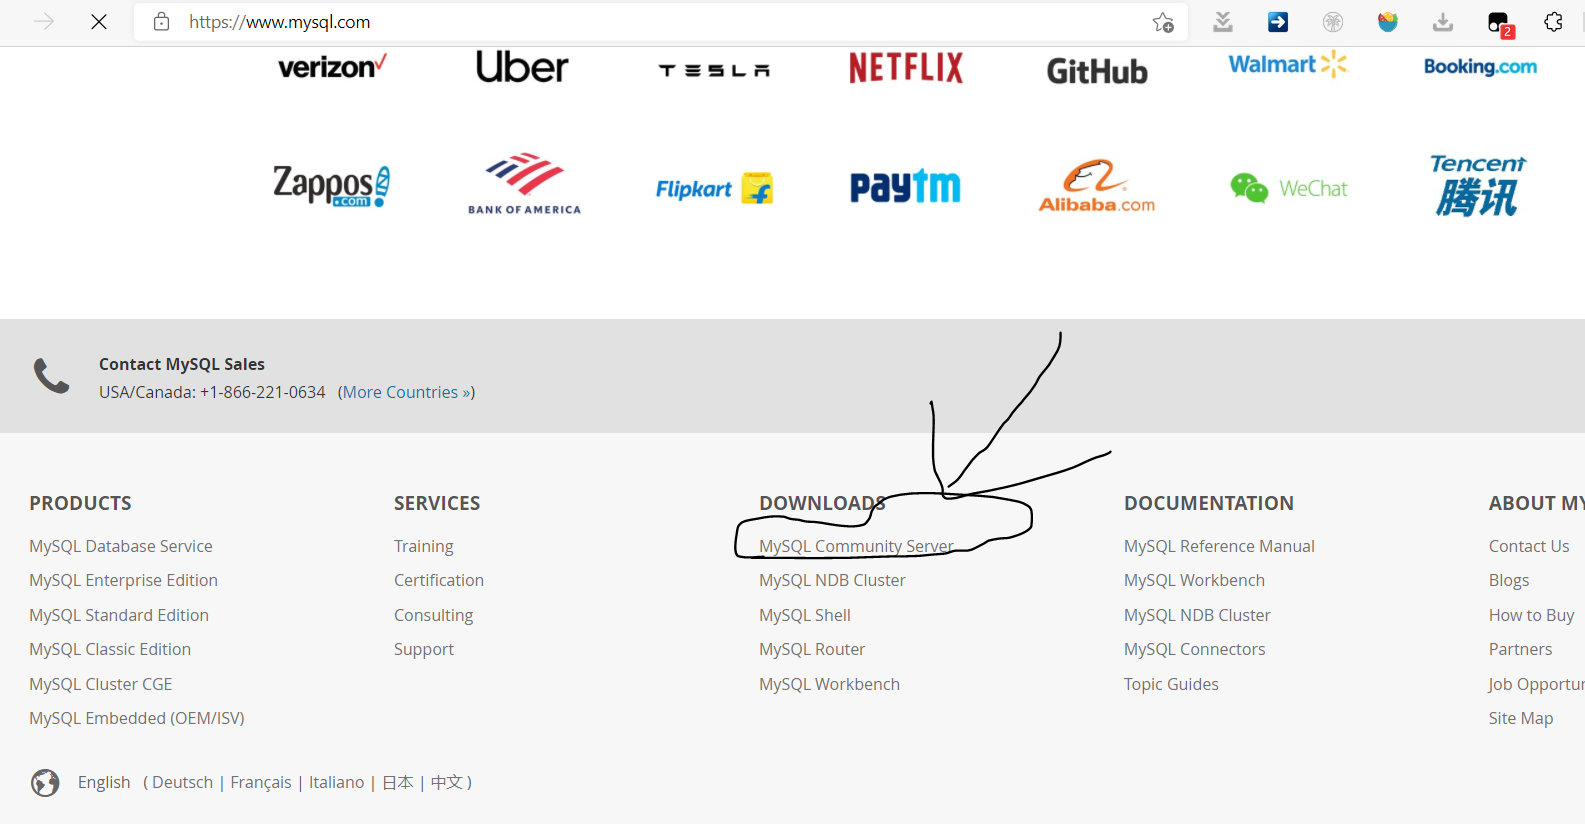
Step 2: enter the historical version and select 5.7 20 and red hat system, and then click the first download, the first installation is the most complete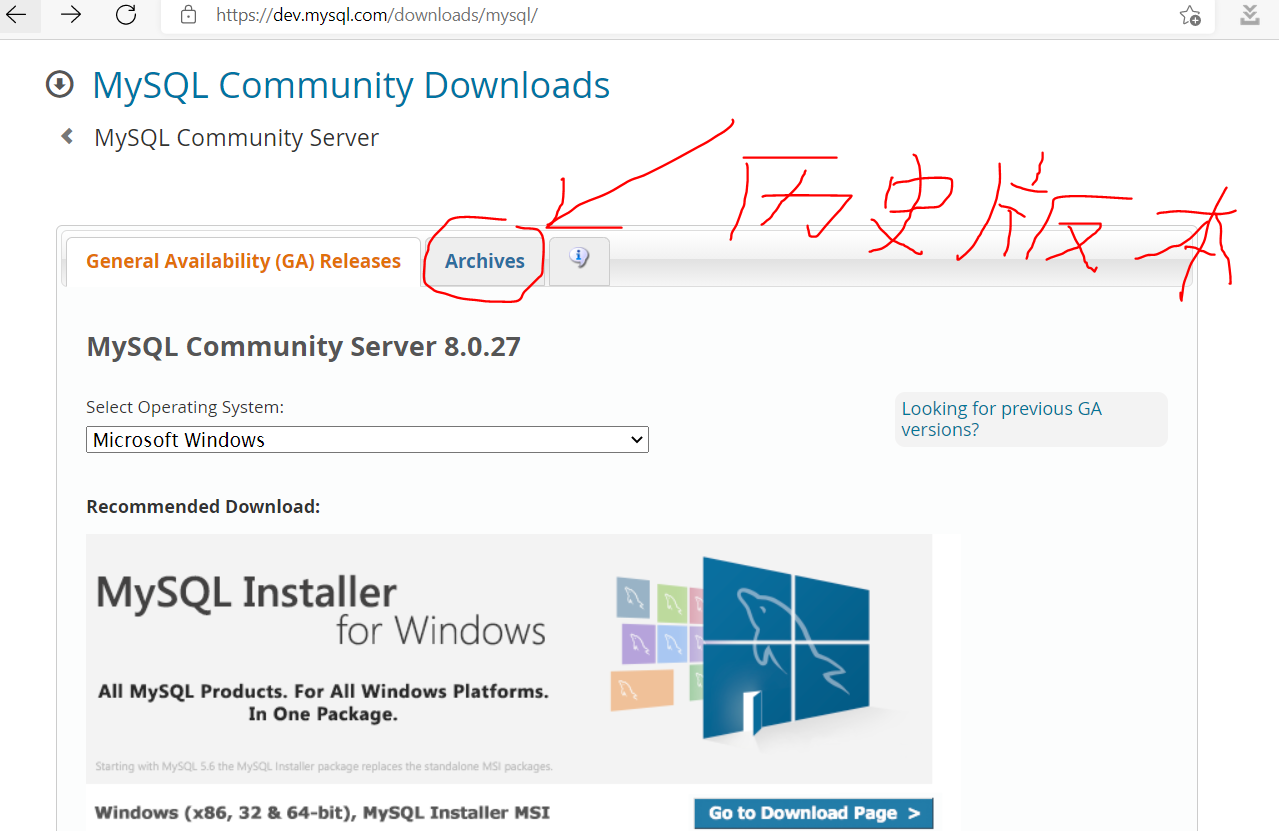

4.2 MYSQL installation
Step 3: after downloading the installation package, upload it to the ECS through the finalshell management tool. Like other software, we installed it in the usr/local / directory
Step 4: to install, you must first extract the to a directory and use tar – xvf package name – C directory name
Execute the following commands in sequence:
mkdir mysql
tar -xvf mysql-5.7.20-1.el7.x86_64.rpm-bundle.tar -C mysql
cd mysql
After entering the directory, you will see the following files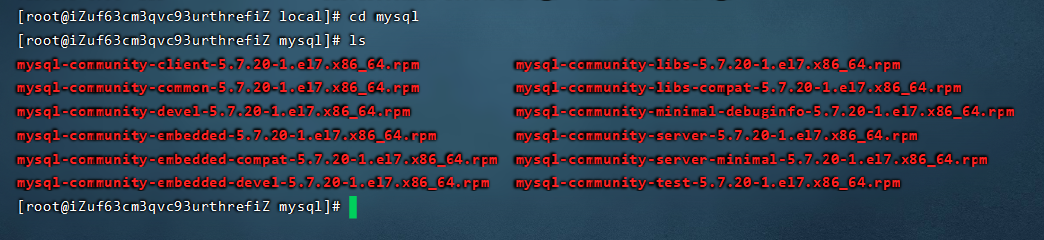
In addition to the server and client, there are also some dependency libraries and expansion packages in this package. We just need to install the server and client. However, the installation of these packages has dependencies, and the software installation will report errors before the dependent packages are installed, so they are generally installed in the following order:
sudo rpm -ivh mysql-community-common-5.7.20-1.el7.x86_64.rpm
sudo rpm -ivh mysql-community-libs-5.7.20-1.el7.x86_64.rpm
sudo rpm -ivh mysql-community-client-5.7.20-1.el7.x86_64.rpm
sudo rpm -ivh mysql-community-server-5.7.20-1.el7.x86_64.rpm
sudo rpm -ivh mysql-community-devel-5.7.20-1.el7.x86_64.rpm
-
An error may be reported during the execution of the above command: MariaDB LIBS is replaced by mysql-community-libs-8.0 13-1. el7. x86_ 64 replaced,
One command: remove MySQL LIBS using Yum or up2date, that is, clear the previously installed dependencies. Refer to https://blog.csdn.net/ypp91zr/article/details/84801204 -
MySQL community client (x86-64) > = 5.7 9 was mysql-community-server-5.7 30-1. E64 required error.
This problem may be caused by deleting mariadb before installing MYSQL, resulting in some dependencies not being found. Reinstall mariadb through the following instructions. Refer to https://blog.csdn.net/weixin_44311939/article/details/106189130
yum install mariadb-server mariadb
systemctl start mariadb
systemctl enable mariadb
-
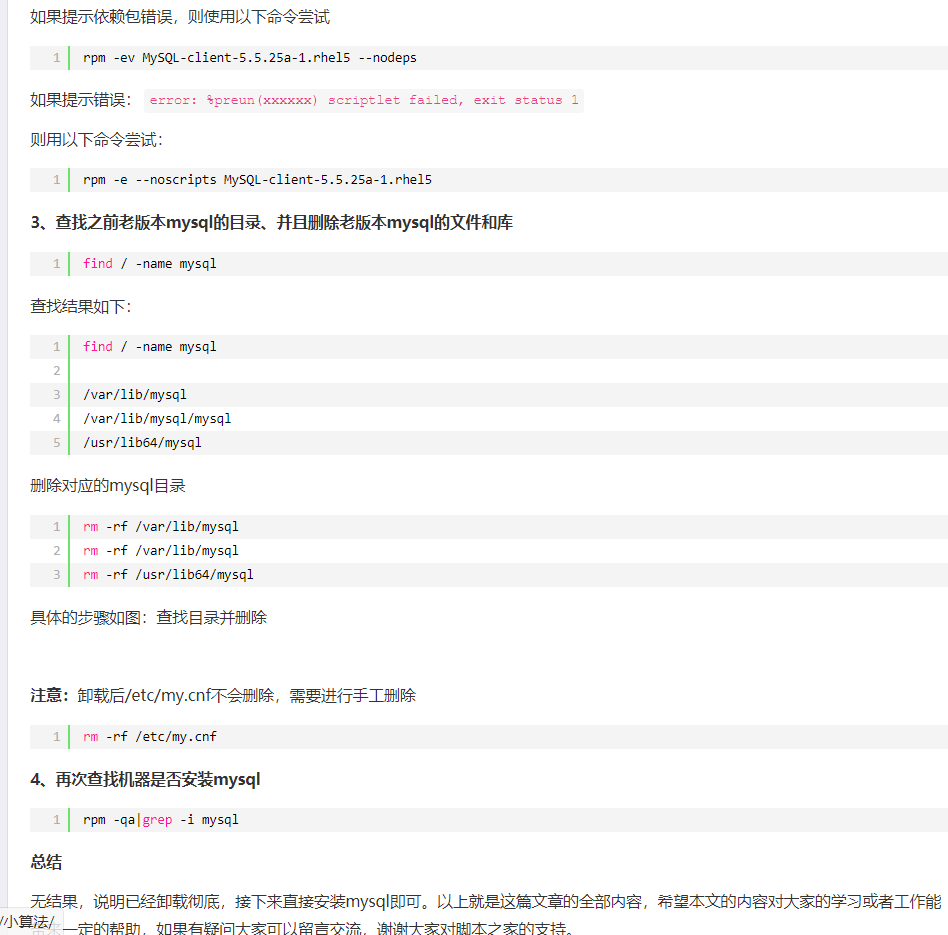
Finally, there is another way to solve this problem. Uninstall the newly installed software, use the following command to check the current installation of mysql and find out whether mysql has been installed before. Refer to https://www.cnblogs.com/nicknailo/articles/8563456.html
-
rpm -qa|grep -i mysql will display the previously installed:
MySQL-client-5.5.25a-1.rhel5
MySQL-server-5.5.25a-1.rhel5
- Stop the MySQL service, delete the previously installed mysql, and delete the command: rpm -e – nodeps package name
- rpm -ev MySQL-client-5.5.25a-1.rhel5
rpm -ev MySQL-server-5.5.25a-1.rhel5
Step 5: after installation, start mysql. The start command is sudo service mysqld start. At this time, you can use ps – ef | grep mysqld to see the MySQL daemon mysqld

4.3 MYSQL login and password modification
Step 6: login: mysql The default password of mysql in 5.7 is different from that in the past. The root password in the default mysql will be written to the log file. We need to find the default password from the log file and log in.
cd /var/log/    //Enter the log file directory
vim mysqld.log  //View default password
You can see the default password as shown in the figure,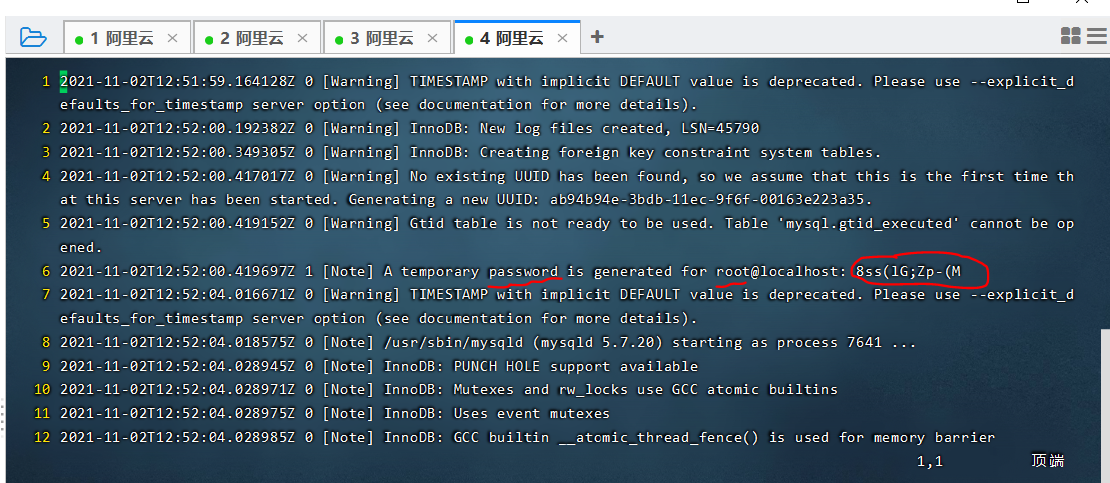
Enter the mysql – uroot – p password to log in
Step 7: change the password
Method 1: if you are not connected, you can modify it directly, but you will be prompted with a warning, because it is not safe to modify the password through network transmission
mysqladmin -u root -p password "Password to modify"

Enter password: [[enter original password]
Method 2: log in to mysql system
 mysql -uroot -p
 Enter password: [[enter original password]
 mysql>use mysql;
 mysql> update user set password=passworD("Password to modify") where user='root';
 mysql> exit;
At this point, it is over. You can verify whether it is successful through mysql -uroot -p and then enter the password you just modified.
4.4 MYSQL setup remote access (navigate)
Connect to MYSQL, and then enter the following command to open the remote connection
mysql>GRANT ALL PRIVILEGES ON *.* TO 'root'@'%' IDENTIFIED BY 'Login password' WITH GRANT OPTION;

flush privileges   //Similar to refresh operation
Open Navicat software to connect
Connection succeeded
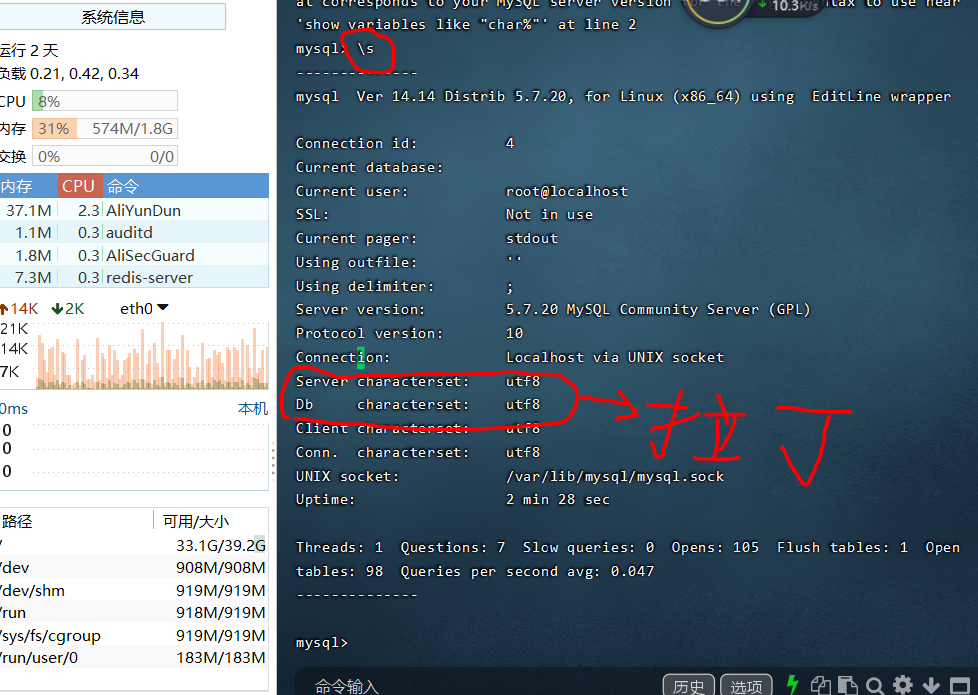
4.5 MYSQL modify character encoding
After connecting to the mysql database, we can view the current character set. The command is \ s, as shown in the following figure: at the beginning, the two circled in the figure are Latin, and we need to change it to utf8.
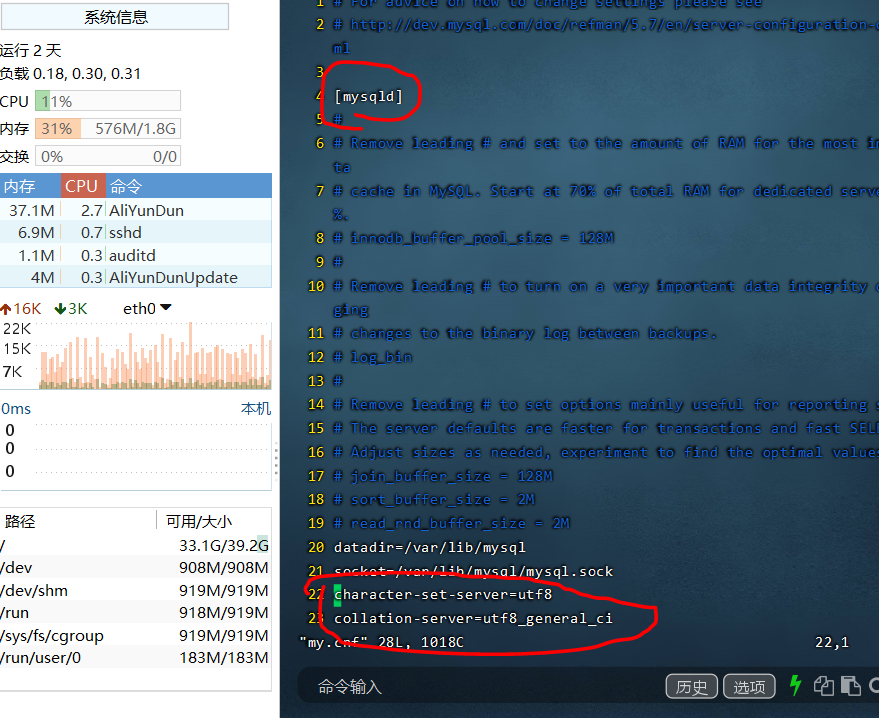
The change method is as follows: open my CNF configuration file. The configuration file is in / etc / MySQL / my CNF, some are directly in the / etc directory.
cd /etc/
vim my.conf
 Add these two lines of code to[mysqld]Below
character-set-server=utf8
collation-server=utf8_general_ci
After saving the file, restart mysql with the following command
service mysqld stop    stop it
service mysqld start   restart
Connect mysql again and enter \ s to query whether the modification is successful.
Chapter 5 shell script
Shell scripts are usually written in sh is the suffix, for example, via VIM test The sh command creates a script called test. Some commands are usually written in shell scripts.
For example, in test Write the following two lines of commands in Sh
ls -l  Displays information about all directory files in the current folder
echo "Hello"
Save and exit/ test. The SH command can execute shell scripts. It is worth noting that we need to give test before entering the command The SH file must have certain permissions, otherwise it cannot run
chmod u+x  file name.sh
 Or use
chmod 777  file name.sh
Then enter/ test. The SH command can be executed. (supplementary: the sh test.sh command can also be executed.) the effect is as follows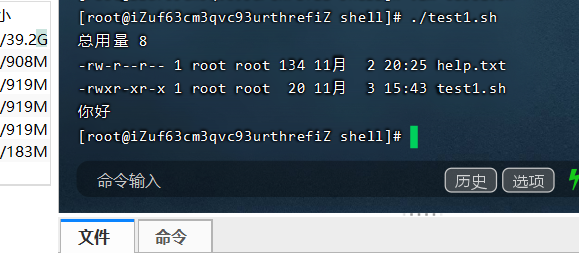
Chapter 6 Nginx deployment
6.1 Nginx download and installation
nginx download address: http://nginx.org/download/nginx-1.19.4.tar.gz After downloading, send it to the / usr/local / folder of the ECS
cd /usr/local/src

tar zxvf nginx-1.19.4.tar.gz     decompression

yum install -y gcc zlib zlib-devel openssl openssl-devel pcre
//Install gcc compilation environment
//Install the zlib library, which provides many ways to compress and decompress
//Install socket cipher library, which is a powerful socket layer cipher library. nginx supports not only http but also HTTPS (that is, http is transmitted over ssl Protocol)
//pcre regular expression

cd /usr/local/nginx-1.19.4/

./configure
make
make install

cd /usr/local/nginx/sbin
./nginx                   //start-up
ps aux |grep nginx        //Check whether the process has started
Enter your own ECS ip address in the URL bar to see that you can successfully access it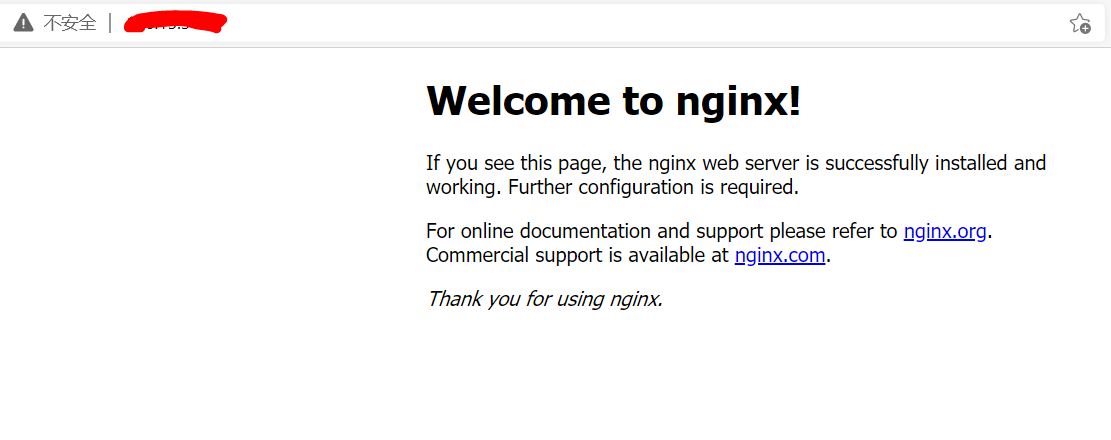
After rewriting the configuration file, you need to restart the nginx server.
Restart command/ nginx -s reload
Note that the absolute path / usr/local/nginx/sbin must be added to start nginx in other locations, because nginx was not added to the path during installation.
6.2 Nginx configuration and optimization
Because every time you start nginx, if it is not in the / usr/local/nginx/sbin directory, you must add an absolute path, that is, use this command to start nginx: / usr/local/nginx/sbin // Nginx is troublesome, so we can directly use nginx commands to start nginx by creating a soft connection.
The specific principle is as follows:
- In linux, LS and cd are commands. Through which ls, you can find that the LS command is in / usr/bin/ls. Through echo $PATH, you can see that the environment variable of linux contains the following PATH / usr / local / SBIN: / usr / SBIN: / usr / bin: / root / bin, which contains the PATH of LS. Therefore, we can understand that, By adding a PATH to the PATH, we can start nginx directly using the concise command nginx.
Step 1: first close the running nginx and enter it in the * * / usr/local/nginx/sbin * * directory/ nginx -s stop
Step 2: through ln - S / usr / local / nginx / SBIN // Nginx / usr/bin / nginx command, set / usr / local / nginx / SBIN // Nginx is added to the / usr/bin / directory and named nginx. So far, we only need to enter nginx anywhere to start the nginx server.
And now the command to close nginx only needs to enter nginx -s stop. In addition, the nginx -s quit command will be softer. It will finish the work in hand first and then exit nginx.
Note that this operation in step 2 can be used to improve office efficiency in many places
Official reference documents of Nginx: http://nginx.org/en/docs/
Taobao team translation version: http://tengine.taobao.org/nginx docs/cn/cocs/ You need to look at the source code to further understand. Generally, you need to understand the operation and maintenance.
Location of configuration file / usr/local/nginx/conf
6.3 Nginx test
Step 1: add the test file html1 tar. GZ upload to ECs. Enter tar zxvf html1 tar. GZ for decompression. After decompression, a demo directory will be automatically created with corresponding files in it
Step 2: modify the configuration file. Here we add two interfaces for testing.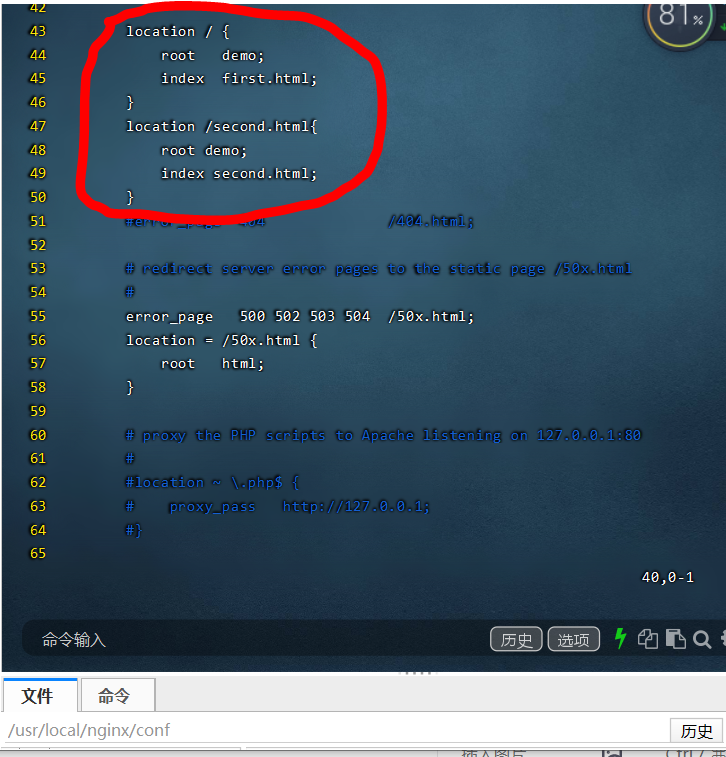
Enter the ip address of ECs and the ip address of ECS / second HTML, you can access the following two pages.
From the above two static pages, users can also add other static pages at any time. The / after the ip address refers to the resource file. Such as 192.168 22.12/second.html, enter this URL, and you will find second.html in the root directory of the resource file HTML resources. Another example is 192.168 22.12/test/index.html means that the index.html in the test directory will be found in the root directory of the resource file HTML resources.
Some usage of locality in the configuration file can be explored in detail later
Supplement 1: the way to connect to the ip address through the domain name is shown in the figure below:
Supplement 2: the host file is also parsed, but it is local to access Google. In fact, there is no need for VPN. You only need to specify the parsing ip in the host file. This specific need to be consulted without further study.
Supplement 3: the premise of reverse proxy: there are multiple web servers. If there is only one, it is OK to link directly
6.4 Nginx reverse proxy
necessary condition

The configuration file of nginx under windows Configuration items to be added in conf
#Set up reverse proxy for two Linux servers
# Configure luffy first
upstream luffy.web{
	server 192.168.82.251:80;
}
# Reconfigure robin
upstream robin.web{
	server 192.168.82.253:80;
}
#Configure server information to proxy
# Configure luffy first
# luffy - 192.168.82.251
server{
	# Listening port
	listen 80;
	# What domain name is used to access the current web server
	server_name luffy.com;
	location / {
		# Set agent
		proxy_pass http://luffy.web;
		}
	}

# Configure robin
# robin	- 192.168.82.253
server{
	# Listening port
	listen 80;
	# What domain name is used to access the current web server
	server_name robin.com;
	location / {
		# Set agent
		proxy_pass http://robin.web;
		}
	}
Specific principle:
The reverse proxy server monitors port 80 to see what domain name the information from port 80 uses to access the current web server.
For example, listening to the current port 80, an access Luffy Com by locating the server_name luffy.com to view the agents in location http://luffy.web , and then pass http://luffy.web Found in upstream http://luffy.web Finally point to the real ip192 168.82. 251:80
Workflow:
- Access the server in the server module through the browser_ Domain name corresponding to name
- The server looks for location/
- You need to set up a proxy in it: proxy_pass +url
- Just make up a url yourself
- Use the name of this url to find the upstream module
- Once found, access the ip address corresponding to the server in the module
6.5 Nginx load balancing
Note: load balancing is based on reverse proxy.
Different from 6.4 reverse proxy, load balancing does not require so many server s, but only one.
#Set the load balancing of two Linux servers on the basis of reverse proxy
# Configure Linux web
upstream linux.web{
	server 192.168.82.251:80;  #If nothing is set, the default weight of the two is the same
	server 192.168.82.253:80;  #nginx passes the request to both by polling
	#The following way is to set the weight 5:1. Note that the minimum value of weight is 1
	# server 192.168.82.251:80 weight=5;
	# server 192.168.82.253:80 weight=1;
}

# Configure server information to proxy
server{
	# Listening port
	listen 80;
	# What domain name is used to access the current web server
	server_name localhost;
	location / {
		# Set agent
		proxy_pass http://linux.web;
		}
	}
- Entry: server in the server module_ The domain name corresponding to name, that is, the localhost just written, the server_ The domain name corresponding to name is not required. You can take it at will.
- After the configuration is completed, restart and enter localhost in the url bar. nginx will enter location / and find that it is a proxy_pass has a url, and then find upstream through the name of the url. After finding it, the user's request will be forwarded to one of the 251 or 253 IP addresses according to the weight.
6.6 Nginx summary
1.nginx as a web server
1. Advantages and disadvantages
advantage
- Simple deployment
- efficient
- Hot deployment
shortcoming
- Static web pages can only be deployed on nginx
- Dynamic web page?
2.1 to log in
2.2 e.g. given URL http://1.1.1.1/login.html
2.3 users need to enter the account and password to log in at this website, but nginx cannot directly process the login data
2.4 if the user wants to verify, it needs to call the third party module in nginx to process.
How
Use CGI to process
What we need to do is to call the CGI interface to complete data processing (involving HTTP protocol)
Chapter 7 FastCGI
7.1 installation of fastcgi and spawn fcgi
Step 1: install FastCGI
First, unzip FastCGI,
Then the cd enters the extracted folder,
Execution/ configure command,
Continue to execute the make command, and you will find an error.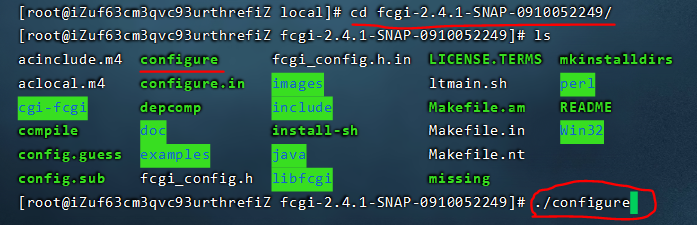

Error reason: the definition of EOF is changed to another header file during the iteration of C + + version.
Solution: in fcgio Add relevant header files to CPP. First, we need to find the fcgio cpp
The find command is find. /- name "fcgio.cpp"
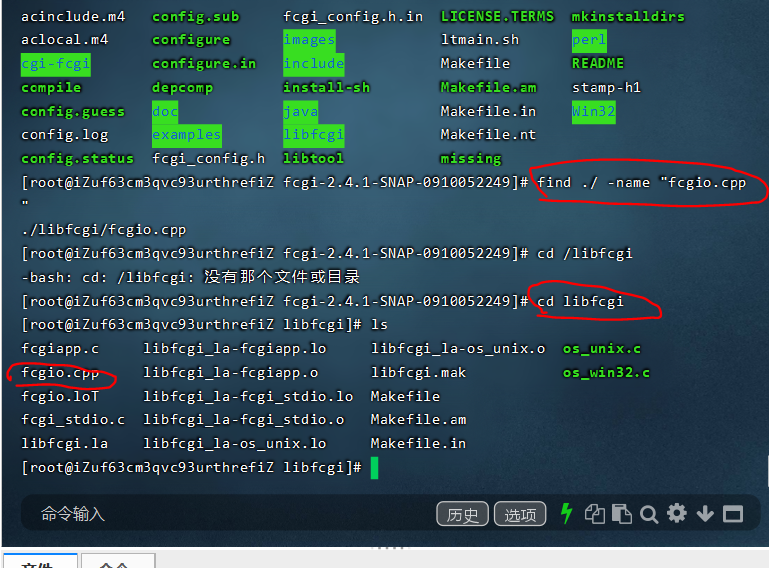
Then VIM fcgio Coo, add #include < stdio h> Header file.
Then perform the following two steps:
make
make install
Step 2: install spawn fcgi
This is simple. Follow these four steps
- Decompression: tar zxvf spawn-fcgi-1.6 4.tar. gz
- Enter the folder/ configure
- make
- make install
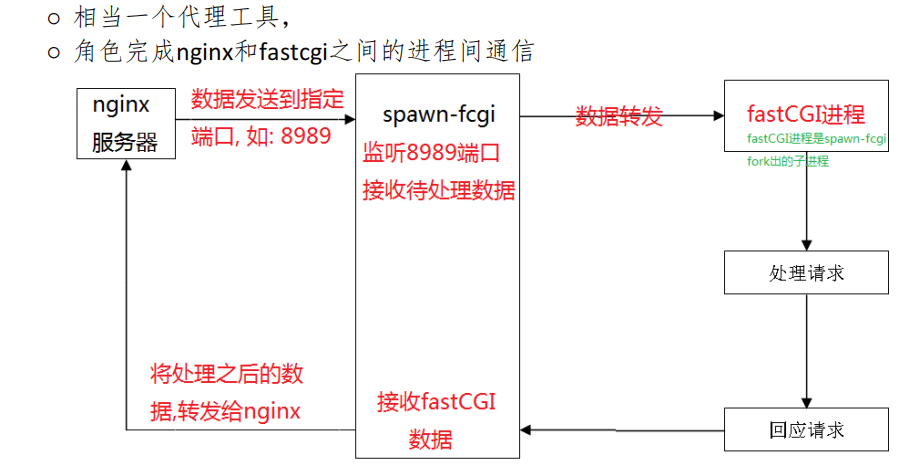
7.2 role of fastcgi and spawn fcgi
7.3 configuration of the three
Step 1: (configure nginx.conf)
When the web page needs to perform such behaviors as login and registration that cannot be completed by nginx alone, it needs to be configured with the help of fastCGI module. First, VIM nginx Conf, in nginx Add the following code to conf:
#Process an instruction test
          #url:http://106.15.34.47/test URL accessed by the user
          #However, nginx itself cannot handle instructions, so the fastCGI module should be configured
          location /test{
              #Configure fastCGI module
              fastcgi_pass localhost:9001;
              #Contains a configuration file and nginx Conf a directory
              include fastcgi.conf;
          }
Note: the localhost above is changed to 127.0 0.1 or your local ip. However, there are other things to note:
If nginx Conf is 127.0 0.1 or localhost, the IP in the command of spawn fcgi - a IP - P port - f fastcgi program should be filled in 127.0 0.1, if nginx If the server IP is written in conf, the server IP must be filled in the command of spawn fcgi - a IP - P port - f fastcgi program.
Send the data to be processed to port 9001. Port 9001 corresponds to a process that can receive the data sent by nginx.
Step 2: (write fcgi program)
Once nginx is configured, we need to write a fcgi program that is called by spawn fcgi.
We first use CP echo C ~ command, set / usr / local / fcgi-2.4 1-snap-0910052249 / examples example file echo Copy C to the root directory, and then execute the following command to compile it:
gcc echo.c   #When this sentence is executed, an error will be reported, indicating that the dynamic library is missing

gcc echo.c -lfcgi  #-l refers to connecting dynamic libraries, and fcgi refers to fcgi so

After execution, you will get a a.out file
However, when we execute the a.out file, we will report an error as follows (dynamic library not found)
./a.out: error while loading shared libraries: libfcgi.so.0: cannot open shared object file: No such file or directory

resolvent:
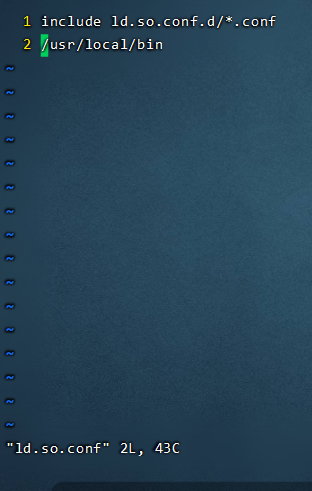
First, we check whether the dynamic library exists:
find  /usr/local/lib -name libfcgi.so.0

After execution, it is found that the dynamic library is in the following directory
/usr/local/lib/libfcgi.so.0

Then we do the following
vi /etc/ld.so.conf  Open file
Add a line below/usr/local/lib
 implement ldconfig command
As shown in the figure below

Supplement: sometimes the following operations are required for the lack of dynamic library
A problem encountered: such an error occurred when executing the command

Later, it was found that the reason was the lack of dynamic library: libhiredis so. 0.13 => not found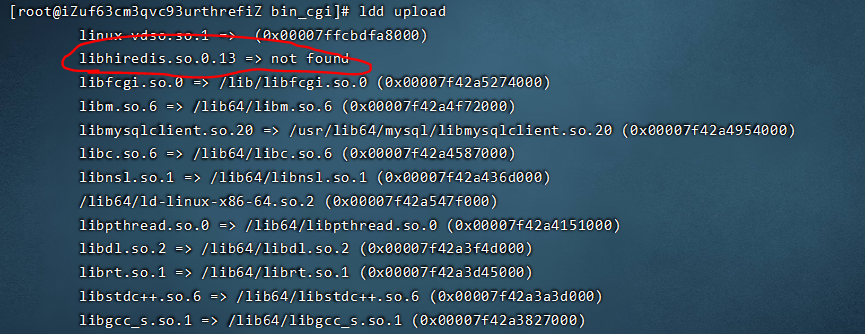
I first used find command to find this library, and found that I did not find this library. Then I saw a blog saying that I would like to download it: execute the following command
wget https://github.com/redis/hiredis/archive/v0.13.3.tar.gz
tar -xzvf v0.13.3.tar.gz
cd  hiredis-0.13.3
make -j4
make -j4 install
ldconfig
However, I found that after executing the above commands, I still can't. I need to add the next two commands.
ln -s /usr/local/lib/libhiredis.so.0.13 /usr/lib/libhiredis.so.0.13
ln -s /usr/local/lib/libhiredis.so.0.13 /usr/lib64/libhiredis.so.0.13
If you execute ldd upload now, there will be no such problem
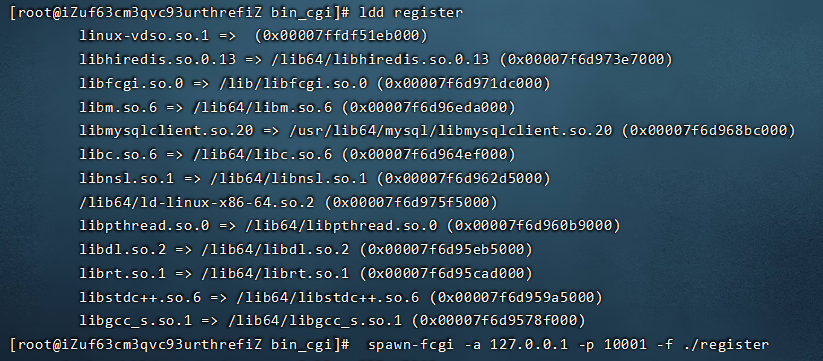
Step 3: Operation
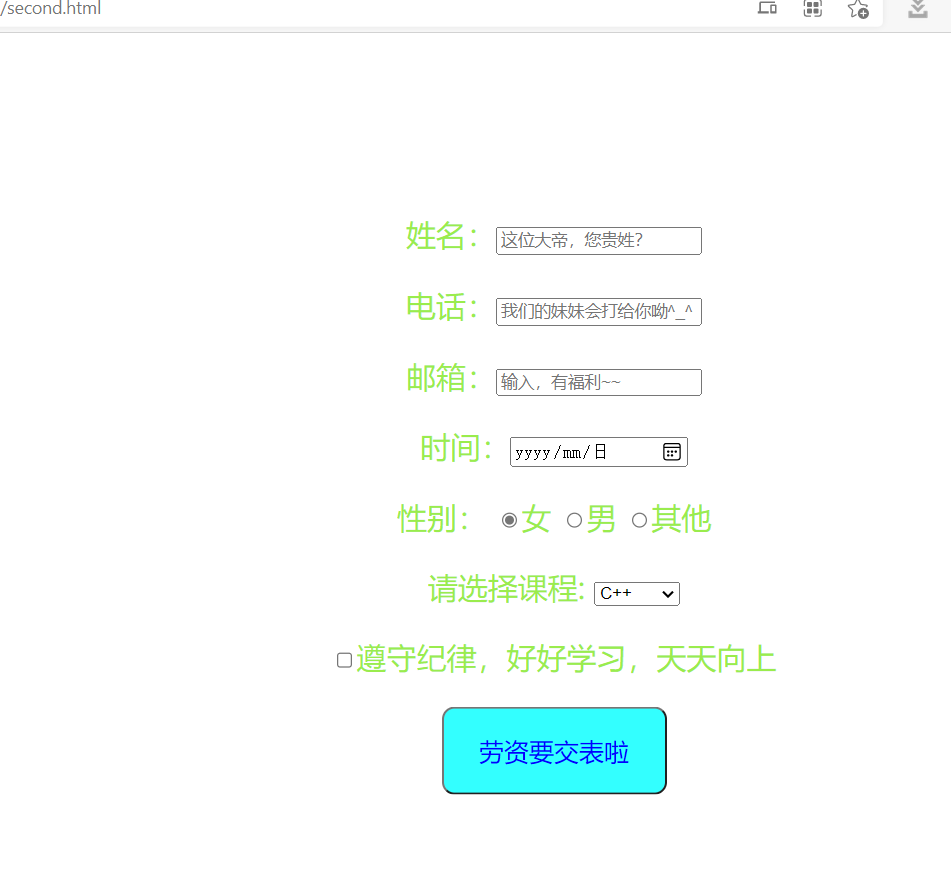
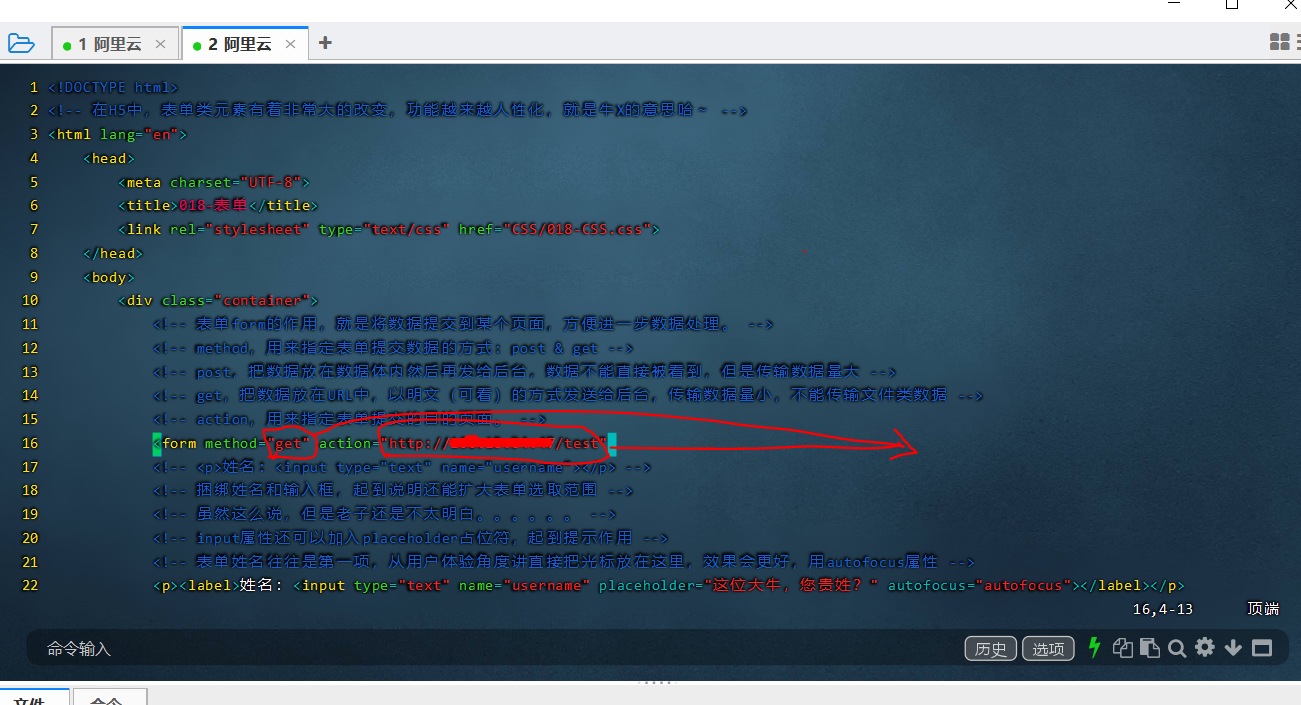
First of all, we set this in the static web page front-end code, set the method to get, and the subsequent action to your server's ip address and test request. The meaning here is equivalent to that you fill in your personal information on the web page, and then click Submit, then the get request will be triggered, and then point to the test request. As shown in the figure below.
Then we need to restart nginx, because nginx has just been modified Conf, if we do not restart, the form may not take effect when we submit it, and the following interface will be displayed.

The restart command is: nginx -s reload
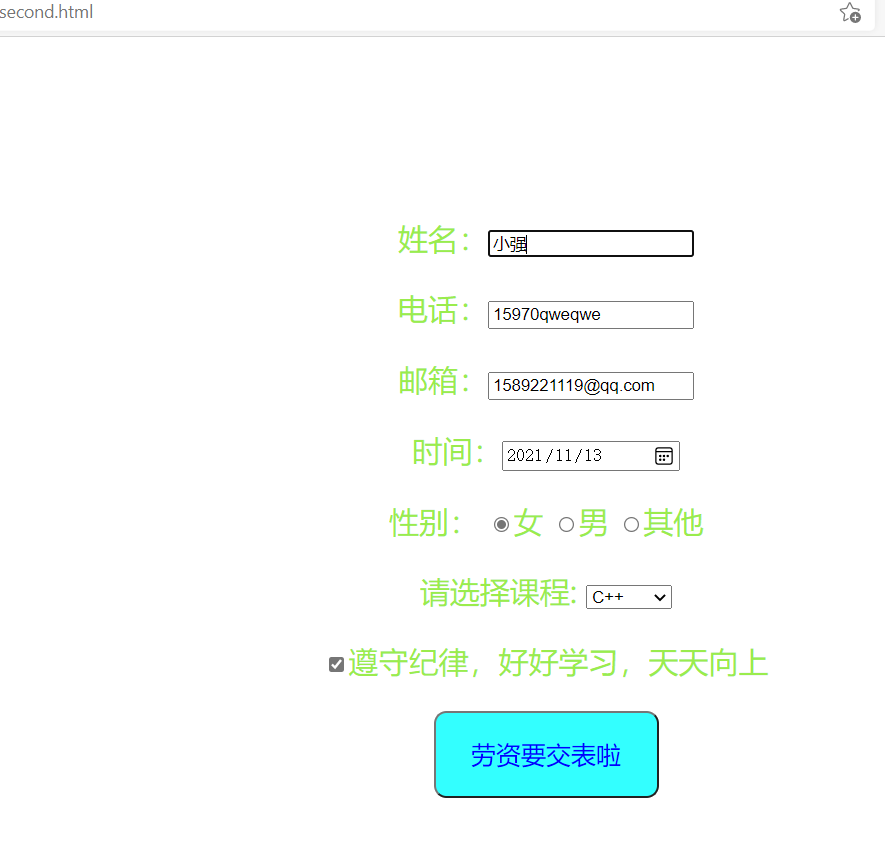
Finally, we just need to enter the following command: spawn fcgi - a 127.0 0.1 -p 9001 -f ./ a. Out, then fill in the corresponding information on the web page and submit it, as shown in the figure below:
- a - IP: server IP address
- p - port: the port to which the server sends data
- f - cgi program: the executable fastcgi program started by spawn fcgi
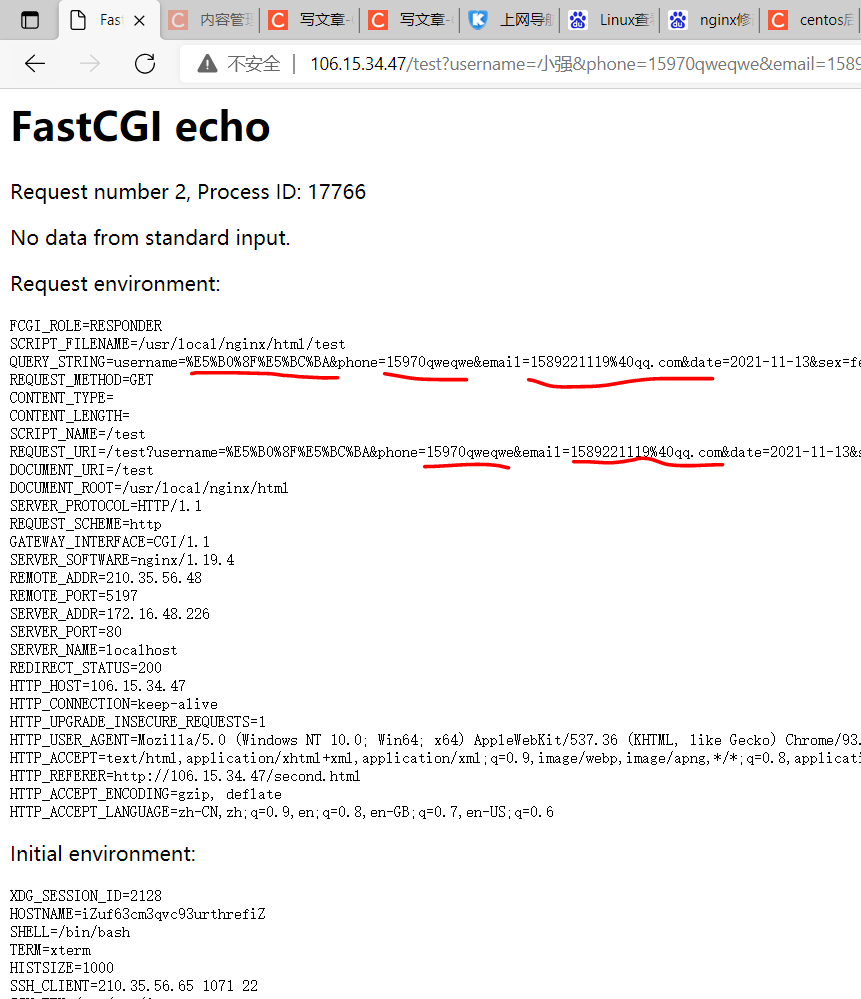
A closer look at the above figure shows that the information submitted by the user is mainly in this line query_ STRING=username=%E5%B0%8F%E5%BC%BA&phone=15970qweqwe&email=1589221119%40qq. Com & date = 2021-11-13 & sex = female & class = 3 & rule = on, then we just need to find a way to extract the information we want.
If you set the method in the static web page front-end code to post, you will get such an interface. You'll find it more concise
fastcgi. Common environment variables in conf:
○ QUERY_STRING: the requested resource, the second part of the request line
○ REQUEST_METHOD: request method, get/post
○ CONTENT_TYPE: file type
○ SCRIPT_NAME: the instruction to process, which is used when configuring cgi in nginx
○ REQUEST_URI: the resource requested in the browser, excluding IP+port
8 realize the operation of file upload
8.1 basic process
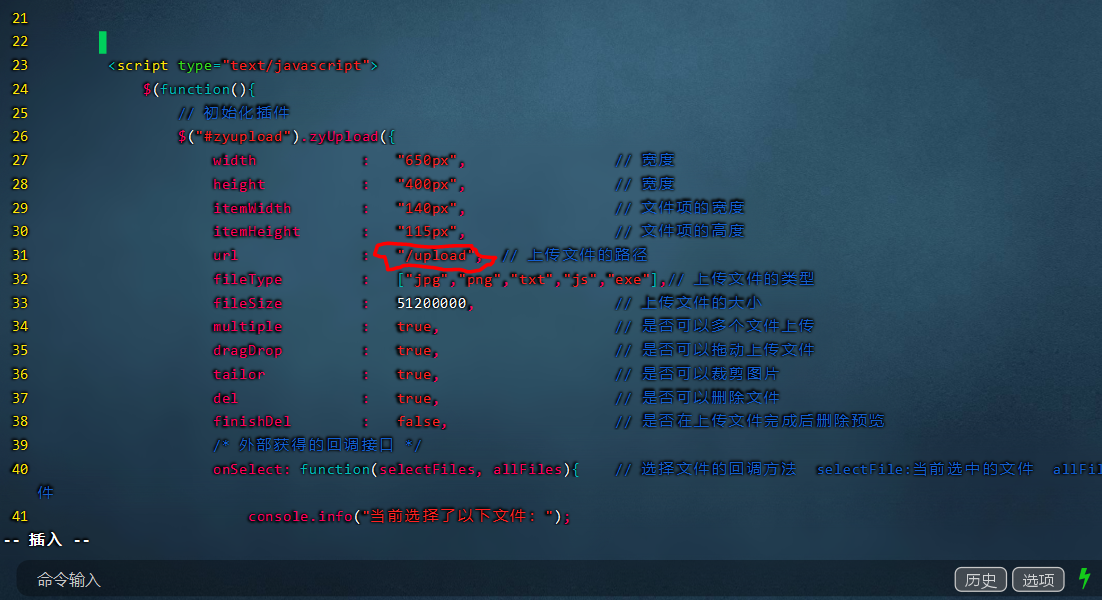
- Copy the uploaded front-end code folder zyupFile to the ngixn installation directory
- View the html file corresponding to the uploaded file
○ find the location of data submission (nginx instruction to be configured - / upload) - Modify nginx configuration file
○ add a location /upload{
fastcgi_pass IP:port;
include fastcgi.conf;
} - Reload nginx configuration file
○ nginx -s reload - Write a fastcgi program
save the uploaded file content to the web server
call fastdfs api to upload files to fastdfs storage node
get a file ID
store the file and the file ID returned by the corresponding fastdfs in the mysql database
delete the uploaded file from the web server
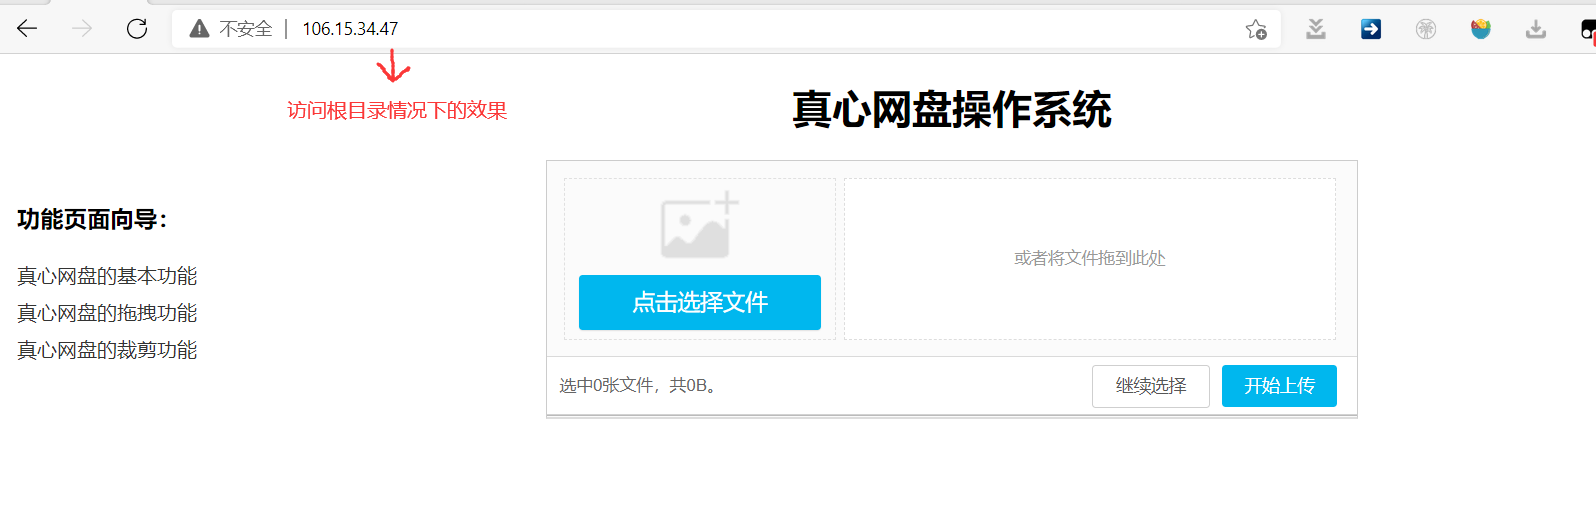
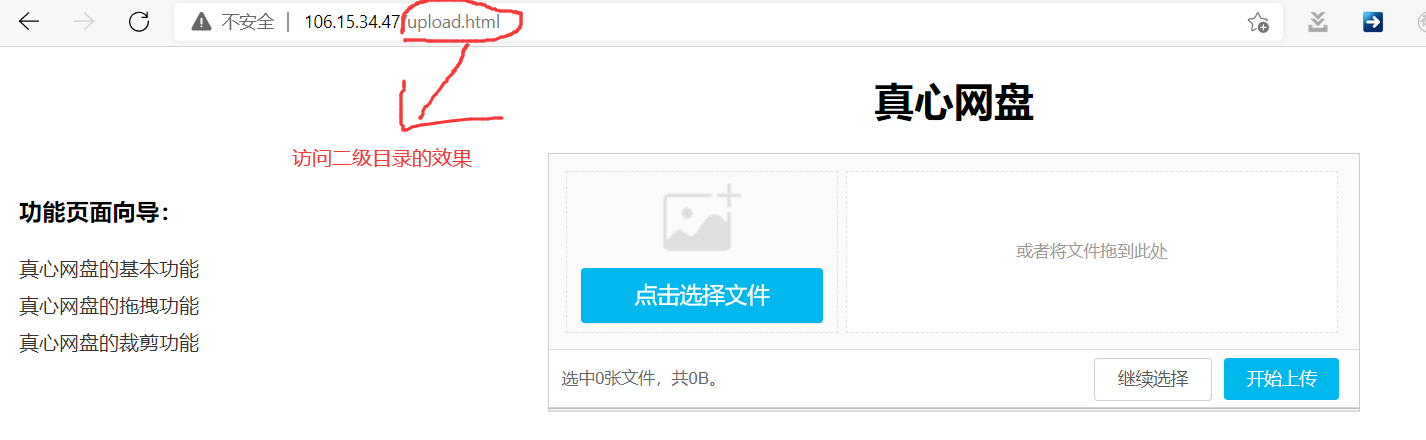
8.2 deploy web interface
- Front end html file interpretation

- nginx.conf configuration (remember to restart after configuration)

- Enter the corresponding url in the browser in two ways, and then observe the effect. It can be seen that after configuration, both the root directory and the secondary directory can be accessed. The effect is as follows:
8.3 file upload (phase I)
In phase 1, let's first look at what information will be available during file upload.
- First, view the uploaded request in the html file
- You will find that the upload request will be used when uploading. At this time, we need to use nginx Configure the upload request in conf.
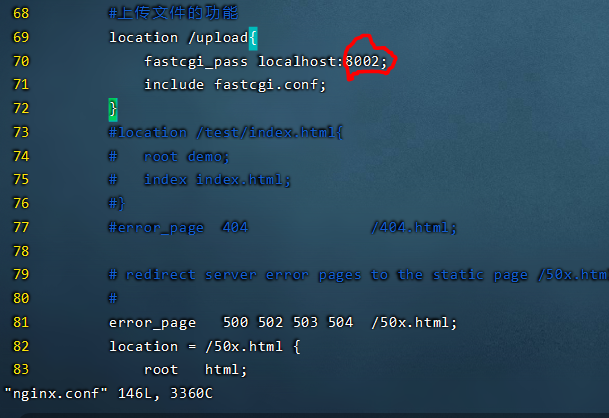
- We set up an 8002 port to be responsible for the upload request, and then through spawn fcgi - a 127.0 0.1 -p 8002 -f ./ a. The out command starts the a.out program to listen to port 8002. Once a request comes, the a.out program will be executed. The function of the a.out program is to print the uploaded file information on the web page, as shown in the figure below. We uploaded a picture. When we click the upload operation, the a.out program will display the following information.

The picture information is sandwiched between two lines of statements, as shown in the figure below. Purple is the file name and red is the self information of the file
------WebKitFormBoundaryHnkjpSB2GTtBWlrg
 file name
 file type
 File data
------WebKitFormBoundaryHnkjpSB2GTtBWlrg

In this section, we mainly demonstrate that when uploading pictures, we print out their information, mainly using the a.out program, that is, echo c.
So think about how to upload pictures to the server?
In fact, it is to write a program that will ----- WebKit formboundaryhnkjpsb2gttbwlrg
The contents of the file, that is, the file name and information, can be written to fastDFS. With the name uploaded to fastDFS, we can also get an id, and then save the name and id to the database. At this time, the download operation can be realized. That's what we're going to do in phase two.
8.4 file upload (phase II)
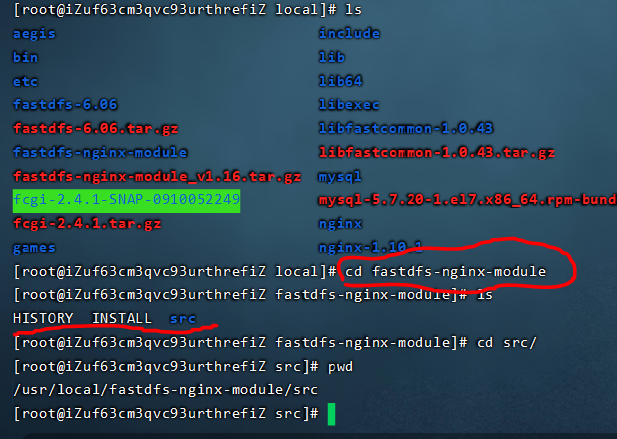
Step 1:
Fastdfs nginx module_ v1. 16.tar. Upload the GZ file to the ECS. After decompression, the following files will appear in the path.
Step 2: (note that this step is wrong and will be corrected below)
Here we need to start the next 1.10 Version 1 of nginx is used to deploy on the storage node to facilitate the download phase. 1.10 Errors may be reported for versions above 1.
nginx1.10.1 download link: https://nginx.org/download/nginx-1.10.1.tar.gz
After downloading, recompile nginx. In the process of compiling nginx, add the pwd path shown above to the command.
./configure --add-module=/usr/local/fastdfs-nginx-module/src
make
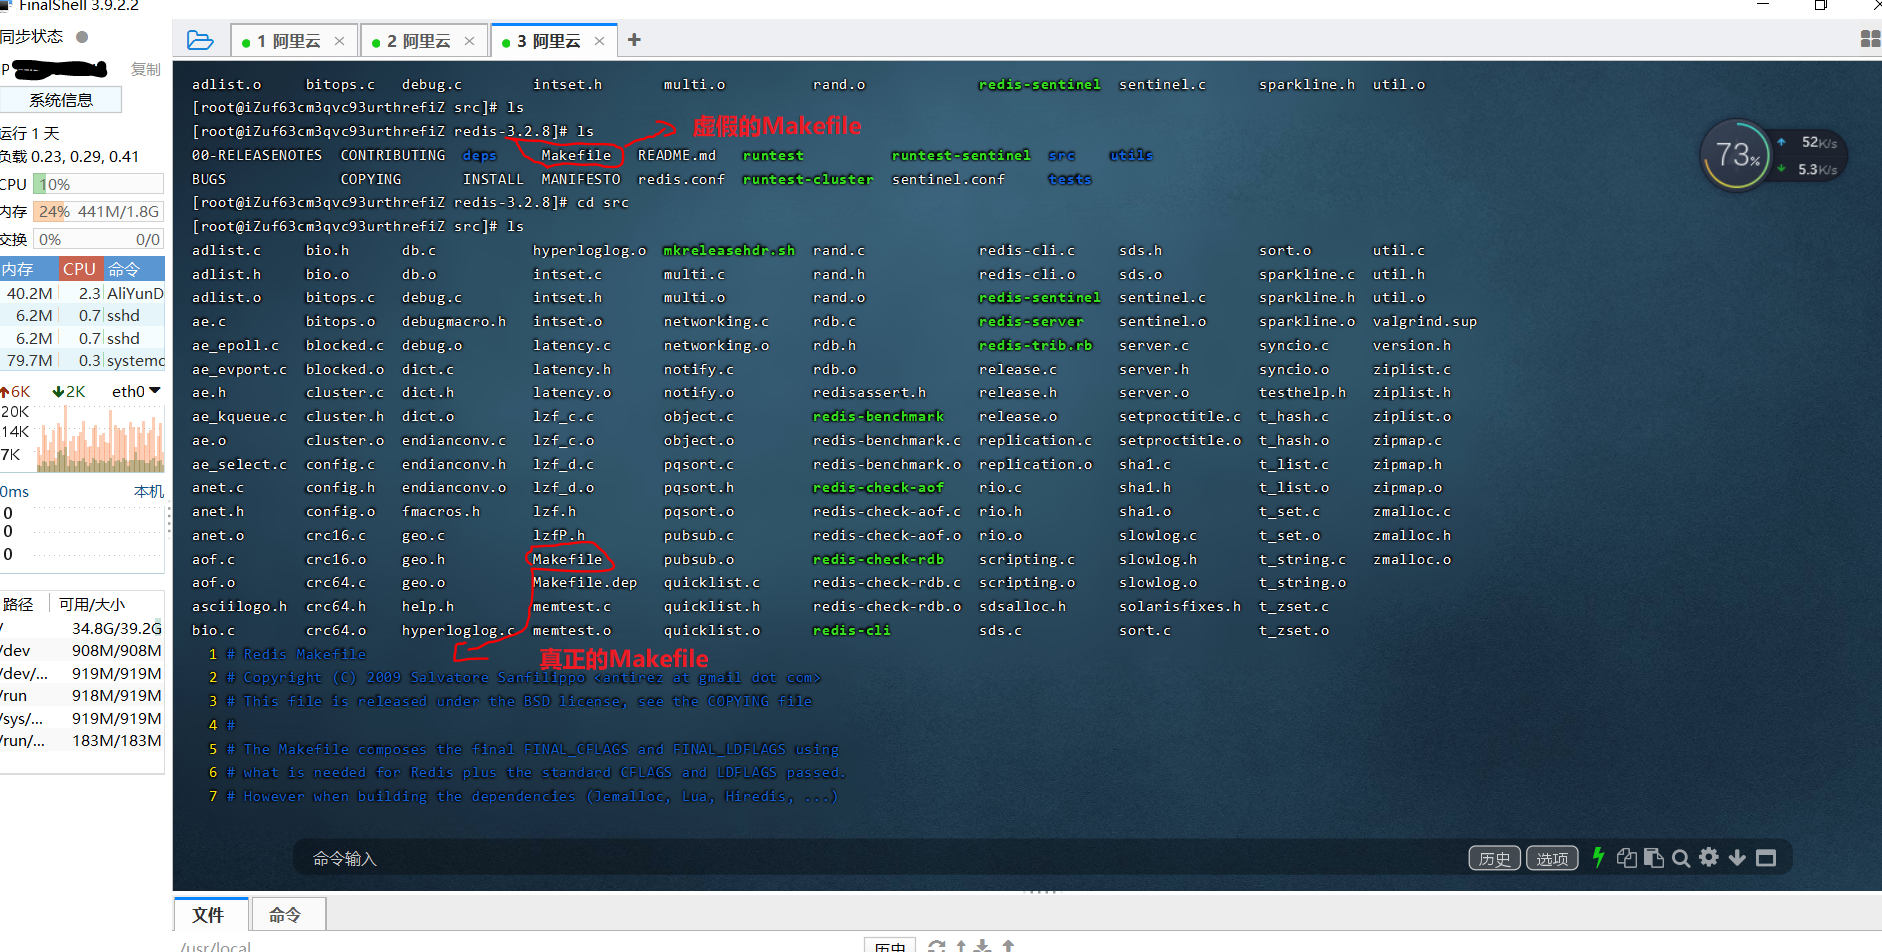
An error will be reported after make, saying it is missing h file. At this time, we need to add the path of this header file to the makefile.
When you open the Makefile, you will find that the file has only 23 lines. After careful interpretation, you will find that the real Makefile work is carried out in the objs directory.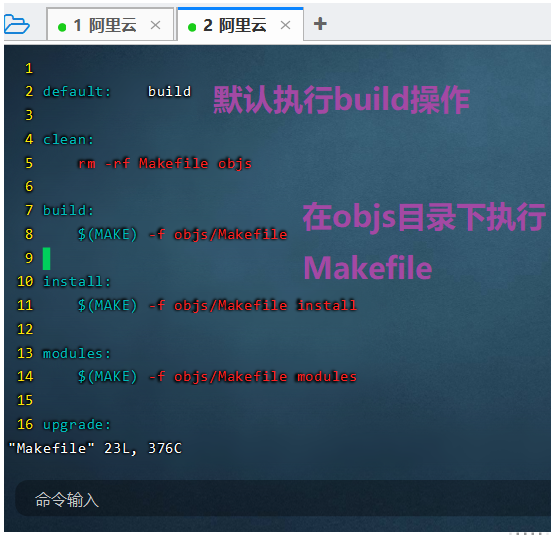
When you open the real Makefile, you will find that there are more than 1000 lines, and then we will put the path of the missing header file in the * * - I * *.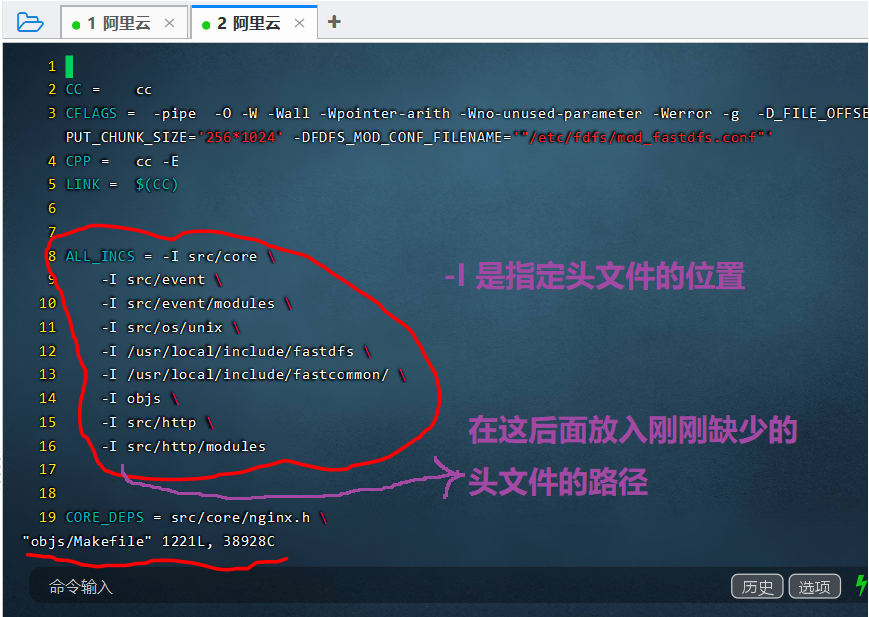
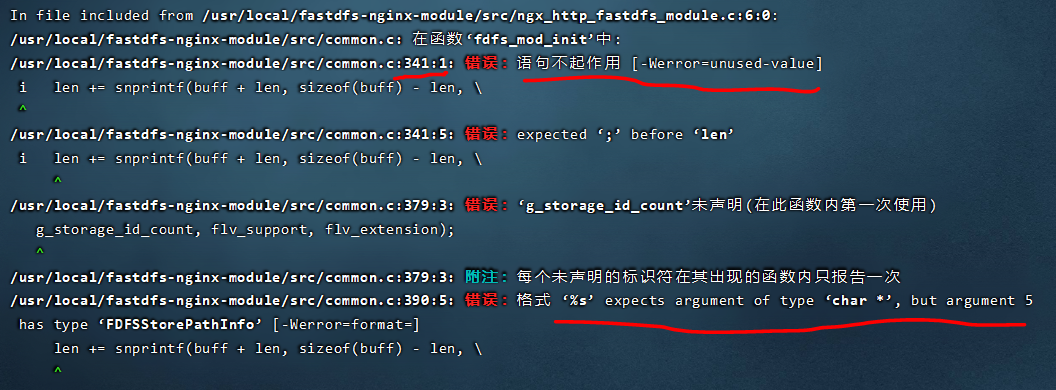
Find the path of the missing header file. Generally, the header file is in the / usr/include / directory. Enter the following command to query: find /usr/include/ -name fdfs_define.h. You will find that the header file is in this directory: / usr/include/fastdfs/fdfs_define.h. After adding this path to - I and continuing to make, you will also find that a logger is missing H file, continue to execute according to the same method, but it will be found that the problem has not been solved, but there are more errors.
Step 2:
Therefore, the second step needs to be repeated, and later it is found that it is not necessary to download an nginx, but to configure it directly on the basis of the original nginx,
-
Delete the two folders just now. There is a problem with the code in fastdfs nginx module. Considering that the versions of fastdfs nginx module and nginx may be incompatible, we download a fastdfs nginx module again
Download address: https://github.com/happyfish100/fastdfs-nginx-module. -
nginx uses the previous. At this time, re execute the following two lines of code
./configure --add-module=/usr/local/fastdfs-nginx-module-master/src
make
Finally, make install directly -
Then restart nginx -s reload and check the process ps aux|grep nginx. You will find that the worker process in nginx has not started, indicating that there is still a problem.

-
Find the log of nginx, and you will find that mod is missing_ fastdfs. Conf, at this time, we need to put mod_fastdfs.conf is placed in the / etc/fdfs directory.
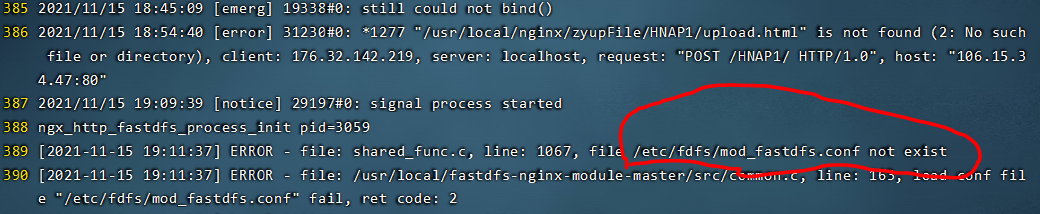
-
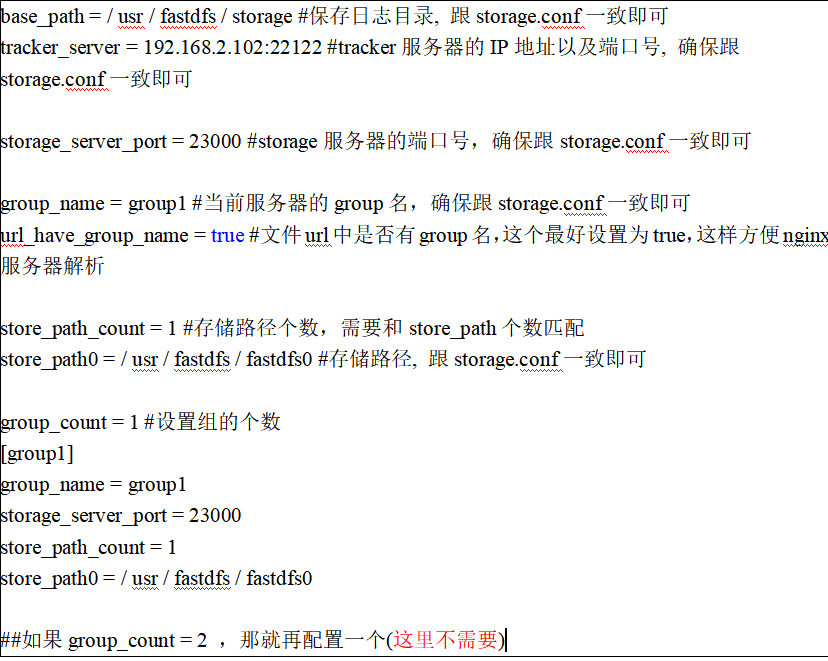
At the same time, we are also interested in mod_fastdfs.conf for configuration, configuration and storage Conf almost.
-
In addition, you need to add http. Exe in usr/local/fastdfs/conf / Copy conf to / etc/fdfs / from mime in usr/local/nginx-1.19/conf / Types copy
Go to / etc/fdfs / -
Configure nginx Conf, add the following modules:
-
location /group1/M00 {
root /root/fastdfs/storage/data;
ngx_fastdfs_module;
} -
Put nginx Replace the #user nobody in the first line of conf with user root, otherwise there will be insufficient permissions later.
-
Finally, restart nginx -s reload.
Step 3: Test
The above location refers to orienting the * * / group1/M00 address in the browser to the address / root/fastdfs/storage/data * * in the server memory. We have a picture on the server with the name of ag8iL2F_X8aAfZhjAAX3_BxwTws124.png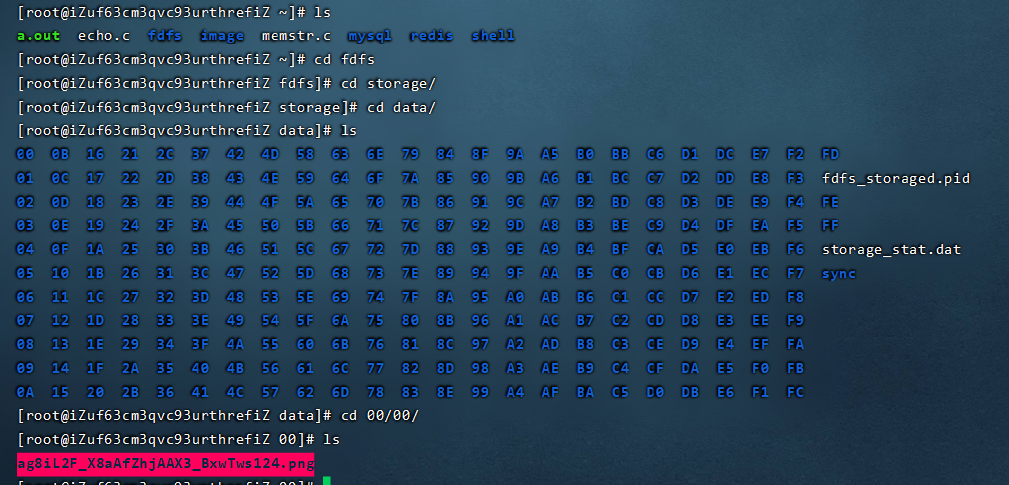
Then in our website bar, enter the name corresponding to the file, and you can see the pictures stored on the server.