preface
Qt provides many auxiliary tools for visiting controls
1, Five layout managers
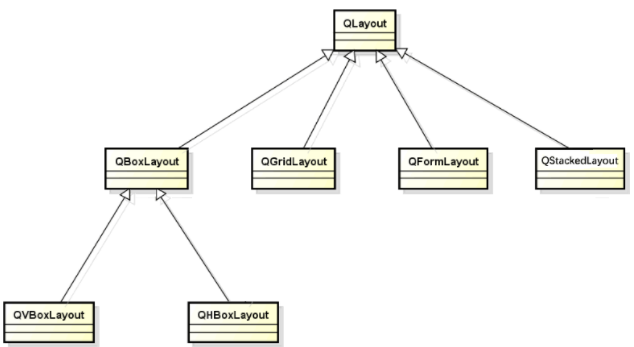
QVBoxLayout vertical layout
- VBox layout

QVBoxLayout();
QVBoxLayout(QWidget* parent);
- Simple use method
//1. Main window
QWidget wid;
wid.setWindowTitle("Vertical layout");
//2.new QVBoxLayout
QVBoxLayout *layout = new QVBoxLayout();
layout->setDirection(QBoxLayout::BottomToTop);
//3 window contains layout
wid.setLayout(layout );
//4. layout contains controls
layout->addStretch(2);
layout->addWidget(&lab1,1)
layout->addWidget(&lab2,1)
layout->addStretch(1);
- function
| Member function | function |
|---|---|
| add controls | - state - |
| addWidget | Add widget control to layout |
| addWidget(QWidget*,int stretch) | |
| stretch = is the future share | |
| Add blank | - state - |
| addStretch(int strech) | Add blank line |
| addSpacing(int size) | Add a fixed size spacing |
| Set distance | - state - |
| setMargin(int margin) | Set your own boundaries |
| setContentsMargins | Sets the boundary of the internal control |
| factor | - state - |
| setStretchFactor(QWidget *widget, int stretch) | Set control ratio column |
| setStretchFactor(QLayout *layout, int stretch) | Set internal layout ratio column |
- qtCreator settings
4.1 setting layout
On the qtCreator designer, you can set the window layout = wid - > setlayout (& layout);
| Editor settings layout | Main layout code setLayout |
|---|---|
 | QWidget widget; QVBoxLayout *layout = new QVBoxLayout(); widget.setLayout(layout ); |
In addition, QVBoxLayout on the control panel is actually a child layout
| Main layout widLayout | Child layout |
|---|---|
 wid->setLayout(widLayout) | 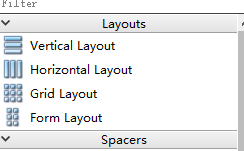 widLayout->addLayout(childLayout); |
4.2 setting stretch
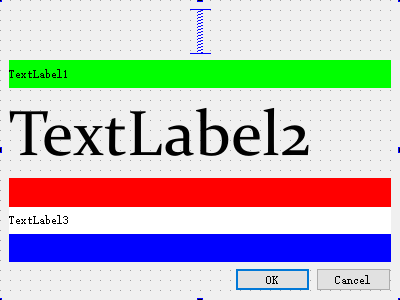
Here, a total of 5 controls are arranged in the main layout QVBoxLayout
Set in the property to
| control | proportion | other |
|---|---|---|
| v-spacer | 0 | Fixed height 45 see the following figure for details |
| label | 1 | TextLabel1 |
| label | 2 | TextLabel2 |
| label | 3 | TextLabel3 |
| OK-CANCEL | 1 |
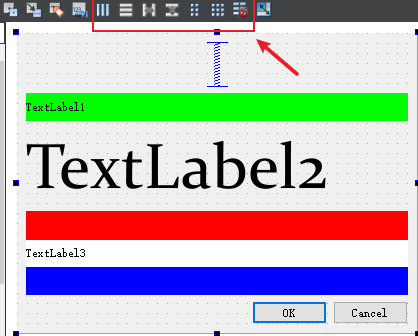
| window | Property set ratio column |
|---|---|
 | 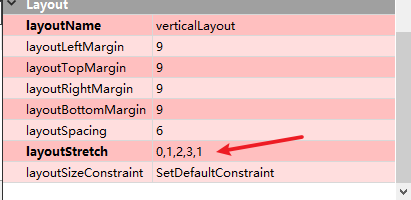 |
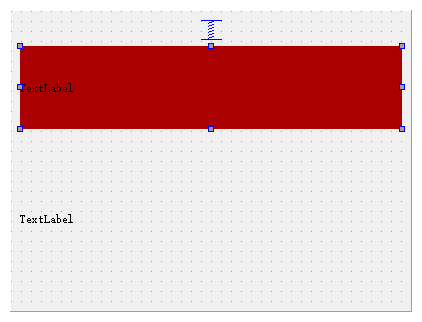
| a. The first control: the fixed height of the spacer is set to 45 and its stretch = 0 | Special: if stretch is not set for others, the spacer will occupy unlimited space |
| b. Second control: Lab, stretch = 1 | |
| c. Third control: Lab, stretch = 2 | |
| c. Fourth control: buttons, stretch = 1 | For button, the booth is enlarged, but it will not expand up and down |
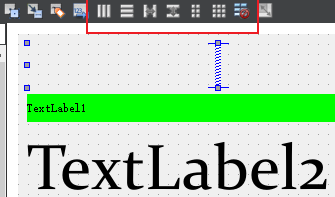
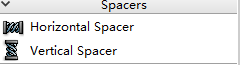
| Spacer settings | Spacer control list |
|---|---|
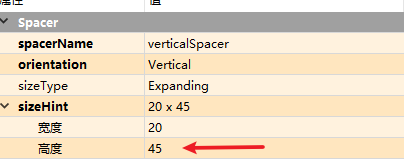 |  |
| Spacer = fixed size occupancy, stretch=0 |
4.3 examples
 //Create a Lab and use setStyleSheet to set the style
 //Create three text boxes in succession and set their background and font size
    QLabel lab1("Label1");
    lab1.setStyleSheet("QLabel{background:#dddddd;font:20px;}");
    lab1.setAlignment(Qt::AlignCenter);
    QLabel lab2("Label2");
    lab2.setStyleSheet("QLabel{background:#cccccc;font:20px;}");
    lab2.setAlignment(Qt::AlignCenter);
    QLabel lab3("Label3");
    lab3.setStyleSheet("QLabel{background:#ffffff;font:20px;}");
    lab3.setAlignment(Qt::AlignCenter);

  //Add 3 text boxes and 2 blank columns to the manager with a stretch factor ratio of 2:1:2:3:3
    layout->addStretch(2);
    layout->addWidget(&lab1,1);
    layout->addWidget(&lab2,2);
    layout->addWidget(&lab3,3);
    layout->addStretch(3);
    widget.setLayout(layout);
    widget.show();
4.4 setting of qlabel
- setStyleSheet use
| Change background color | qtCreator + code |
|---|---|
 | 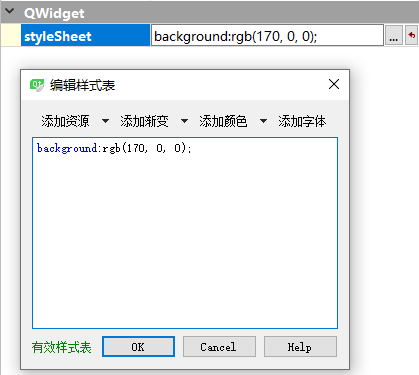 lab.setStyleSheet("QLable{background:rgb(170,0,0);}") |
| Difference: Is QLabel{XXX} required |
QHBoxLayout horizontal layout

- The main functions are the same as VBox
function
hbox.addWidget(QWidget*);
hbox.addStretch(int );
Window.setLayout(hbox);
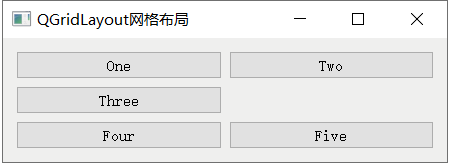
QGridLayout layout
function
| QGridLayout member function | function |
|---|---|
| Query function | -----Explain------ |
| rowCount() | Number of rows |
| columnCount() | Number of columns |
| add controls | -----Explain------ |
| addWidget() | (QWidget *widget, int row, int column) add a control at the row col umn position |
| addWidget() | fromRow, int fromColumn, int rowSpan, int columnSpan, cross column |
| Add sub layout | -----Explain------ |
| addLayout() | QLayout *layout, int row, int column, int rowSpan, int columnSpan, add sub layout |
| Set stretch | -----Explain------ |
| setColumnStretch(int column, int stretch) | Sets the stretch of the column |
| setRowStretch(int row, int stretch) | Sets the stretch of the row |
addWidget(ctrl,row,column); Directly specify the location without setting the number of rows and columns first
 QGridLayout *layout = new QGridLayout;
   //Add controls to the layout and specify the location of each control
   layout->addWidget(but1, 0, 0);
   layout->addWidget(but2, 0, 2);
   layout->addWidget(lab3, 1, 0, 3, 3);
   layout->addWidget(but3, 4, 0);
   layout->addWidget(but4, 4, 2);
   //Add layout to widget window
   widget.setLayout(layout);
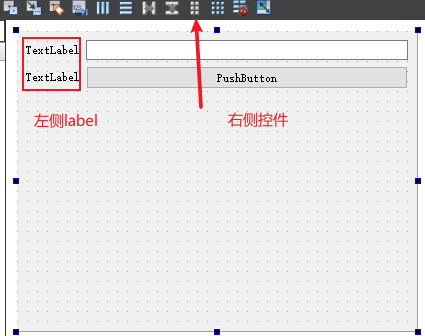
QFormLayout form layout
- QLabel on the left and controls on the right
- function
| function | explain |
|---|---|
| add to | -----Explain----- |
| addRow(QWidget *label, QWidget *field) | Left label right field |
| addRow(const QString &labelText, QWidget *field) | Left label right field |
| insertRow(int row, const QString &labelText, QWidget *field) | Left label right field |
| delete | -----Explain----- |
| removeRow(int row) | |
| Line feed strategy | -----Explain----- |
| setRowWrapPolicy(RowWrapPolicy policy) | The DontWrapRows tag is always on the left WrapLongRows tags can be left or top WrapAllRows tag is always on |
- Example description
| function | explain |
|---|---|
 | The tag is always above setRowWrapPolicy(QFormLayout::WrapAllRows) Add a line layout - > addrow ("Name:", new QLineEdit()); Spacing (10); |
    QFormLayout* layout = new QFormLayout();
    //Set all labels in the form above the control
    layout->setRowWrapPolicy(QFormLayout::WrapAllRows);
    //Add 3 lines of input boxes and labels
    layout->addRow("Name:",new QLineEdit());
    layout->addRow("Email:",new QLineEdit());
    layout->addRow("Adress:",new QLineEdit());
    //Set row and column spacing to 10
    layout->setSpacing(10);
    //Add the layout form to the widget window
    widget.setLayout(layout);
QStackedLayout group layout
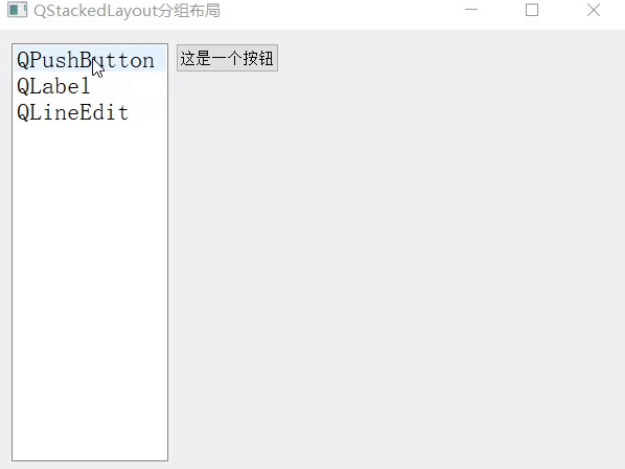
 QHBoxLayout *layout=new QHBoxLayout;

    //Create a list
    QListWidget listWidget(&widget);
    listWidget.setMinimumWidth(150);
    listWidget.setFont(QFont("Song typeface",14));
    listWidget.addItem("QPushButton");
    listWidget.addItem("QLabel");
    listWidget.addItem("QLineEdit");

    //Create three new windows to place text boxes, buttons and single line input boxes respectively
    QWidget widget1;
    widget1.setMinimumSize(400,400);
    QPushButton but1("This is a button",&widget1);
    QWidget widget2;
    widget2.setMinimumSize(400,400);
    QLabel lab1("This is a text box",&widget2);
    QWidget widget3;
    widget3.setMinimumSize(400,400);
    QLineEdit edit("This is a single line input box",&widget3);

    //Create a grouping layout and add 3 windows to the grouping control
    QStackedLayout *stackedLayout = new QStackedLayout;
    stackedLayout->addWidget(&widget1);
    stackedLayout->addWidget(&widget2);
    stackedLayout->addWidget(&widget3);

    //The QListWidget control is added to the first column of layout, and the grouping layout control is added to the second column. Set their expansion factor ratio to 1:4
    layout->addWidget(&listWidget,1);
    layout->addLayout(stackedLayout,4);
    //Add the layout horizontal layout control to the widget window
    widget.setLayout(layout);
    widget.show();