Step 1: set up XXL job
1. Download the XXL job code
Code cloud address: https://gitee.com/xuxueli0323/xxl-job
gitHub address: https://github.com/xuxueli/xxl-job
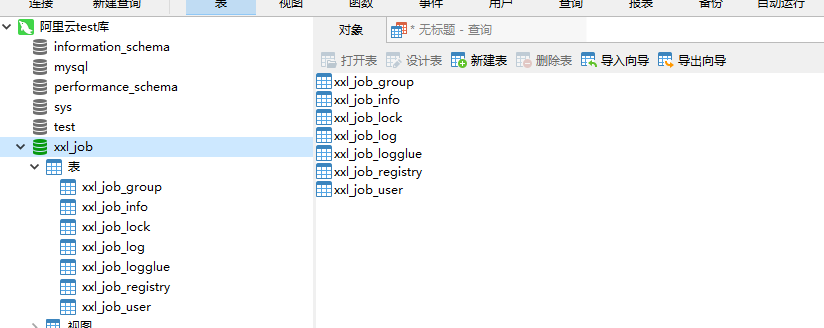
2. Initialize the database
Execute \ XXL job \ doc \ DB \ tables in the database_ xxl_ job. sql
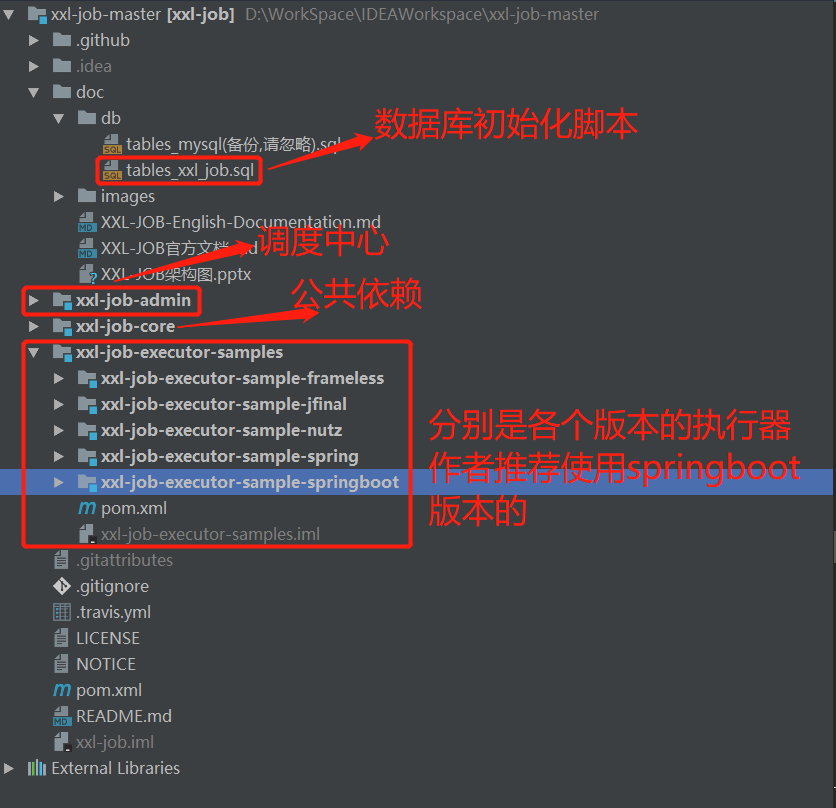
3. Import the source code structure into idea
Import existing modules: File – New – Module from Existing Sources
4. Configure dispatching center
The scheduling center is the XXL job admin project in the source code. We need to configure it as the scheduling center we need. Through this project, we can uniformly manage the scheduling tasks on the task scheduling platform in a graphical way and be responsible for triggering scheduling execution.
(1) Modify the configuration file of dispatching center
File address: / XXL job / XXL job admin / SRC / main / resources / XXL job admin properties
The configuration file is described as follows:
### 1. Port number and access path of Dispatching Center Project
server.port=8080
server.context-path=/xxl-job-admin

### 2. Prefix of configuration static file
spring.mvc.static-path-pattern=/static/**
spring.resources.static-locations=classpath:/static/

### 3. Configuration template file
spring.freemarker.templateLoaderPath=classpath:/templates/
spring.freemarker.suffix=.ftl
spring.freemarker.charset=UTF-8
spring.freemarker.request-context-attribute=request
spring.freemarker.settings.number_format=0.##########

### 4. Configure the mapper file address of mybatis
mybatis.mapper-locations=classpath:/mybatis-mapper/*Mapper.xml

### 5. Address of the configuration database
spring.datasource.url=jdbc:mysql://127.0.0.1:3306/xxl-job?Unicode=true&characterEncoding=UTF-8
spring.datasource.username=root
spring.datasource.password=root_pwd
spring.datasource.driver-class-name=com.mysql.jdbc.Driver

spring.datasource.type=org.apache.tomcat.jdbc.pool.DataSource
spring.datasource.tomcat.max-wait=10000
spring.datasource.tomcat.max-active=30
spring.datasource.tomcat.test-on-borrow=true
spring.datasource.tomcat.validation-query=SELECT 1
spring.datasource.tomcat.validation-interval=30000

### 6. Configure alarm mailbox
spring.mail.host=smtp.qq.com
spring.mail.port=25
spring.mail.username=xxx@qq.com
spring.mail.password=xxx
spring.mail.properties.mail.smtp.auth=true
spring.mail.properties.mail.smtp.starttls.enable=true
spring.mail.properties.mail.smtp.starttls.required=true


### 7. Login user name and password of management interface
xxl.job.login.username=admin
xxl.job.login.password=123456

### 8. The communication TOKEN of the dispatching center is enabled when it is not empty
xxl.job.accessToken=

### 9. For the internationalization setting of the dispatching center, the default is the Chinese version. When the value is set to "en", it is switched to the English version
xxl.job.i18n=
Note: basically, only point 5 of the above configuration file needs to be modified. Modify the address of the database, which should be consistent with the database name, path, user name and password initialized earlier;
The second is to modify point 6, the alarm mailbox, because there is a failure alarm function after the project task fails, which can be reminded by email. If we need this function, we can configure it.
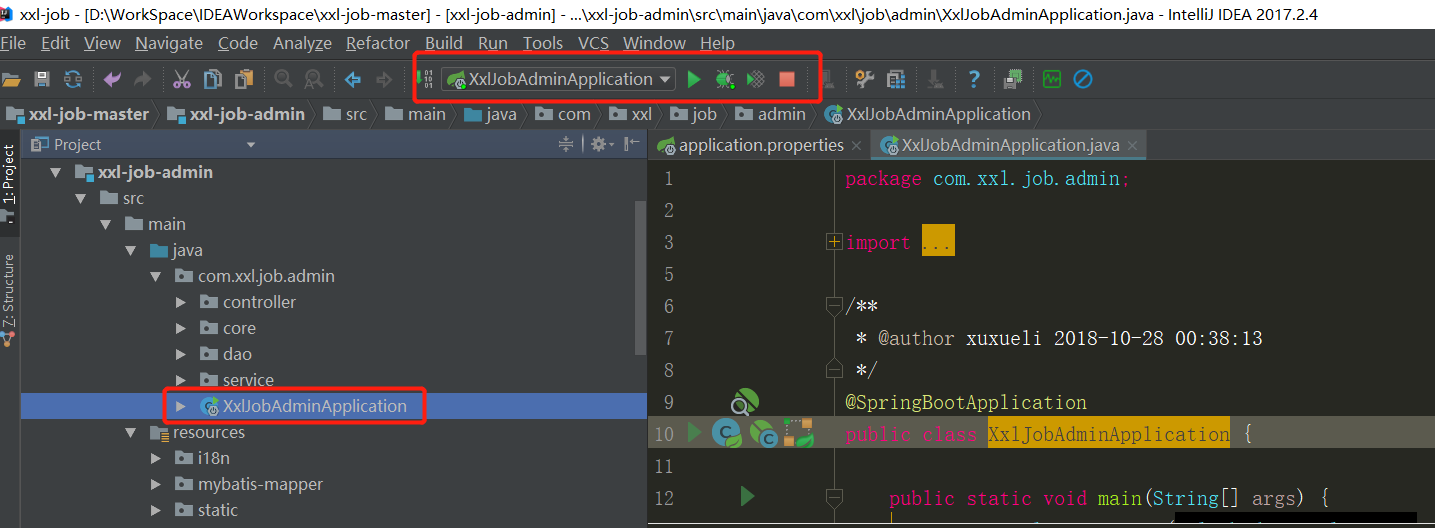
(2) Deployment dispatching center
The project is a springboot project. We only need to execute the XxlJobAdminApplication class in the IDEA to run the project:
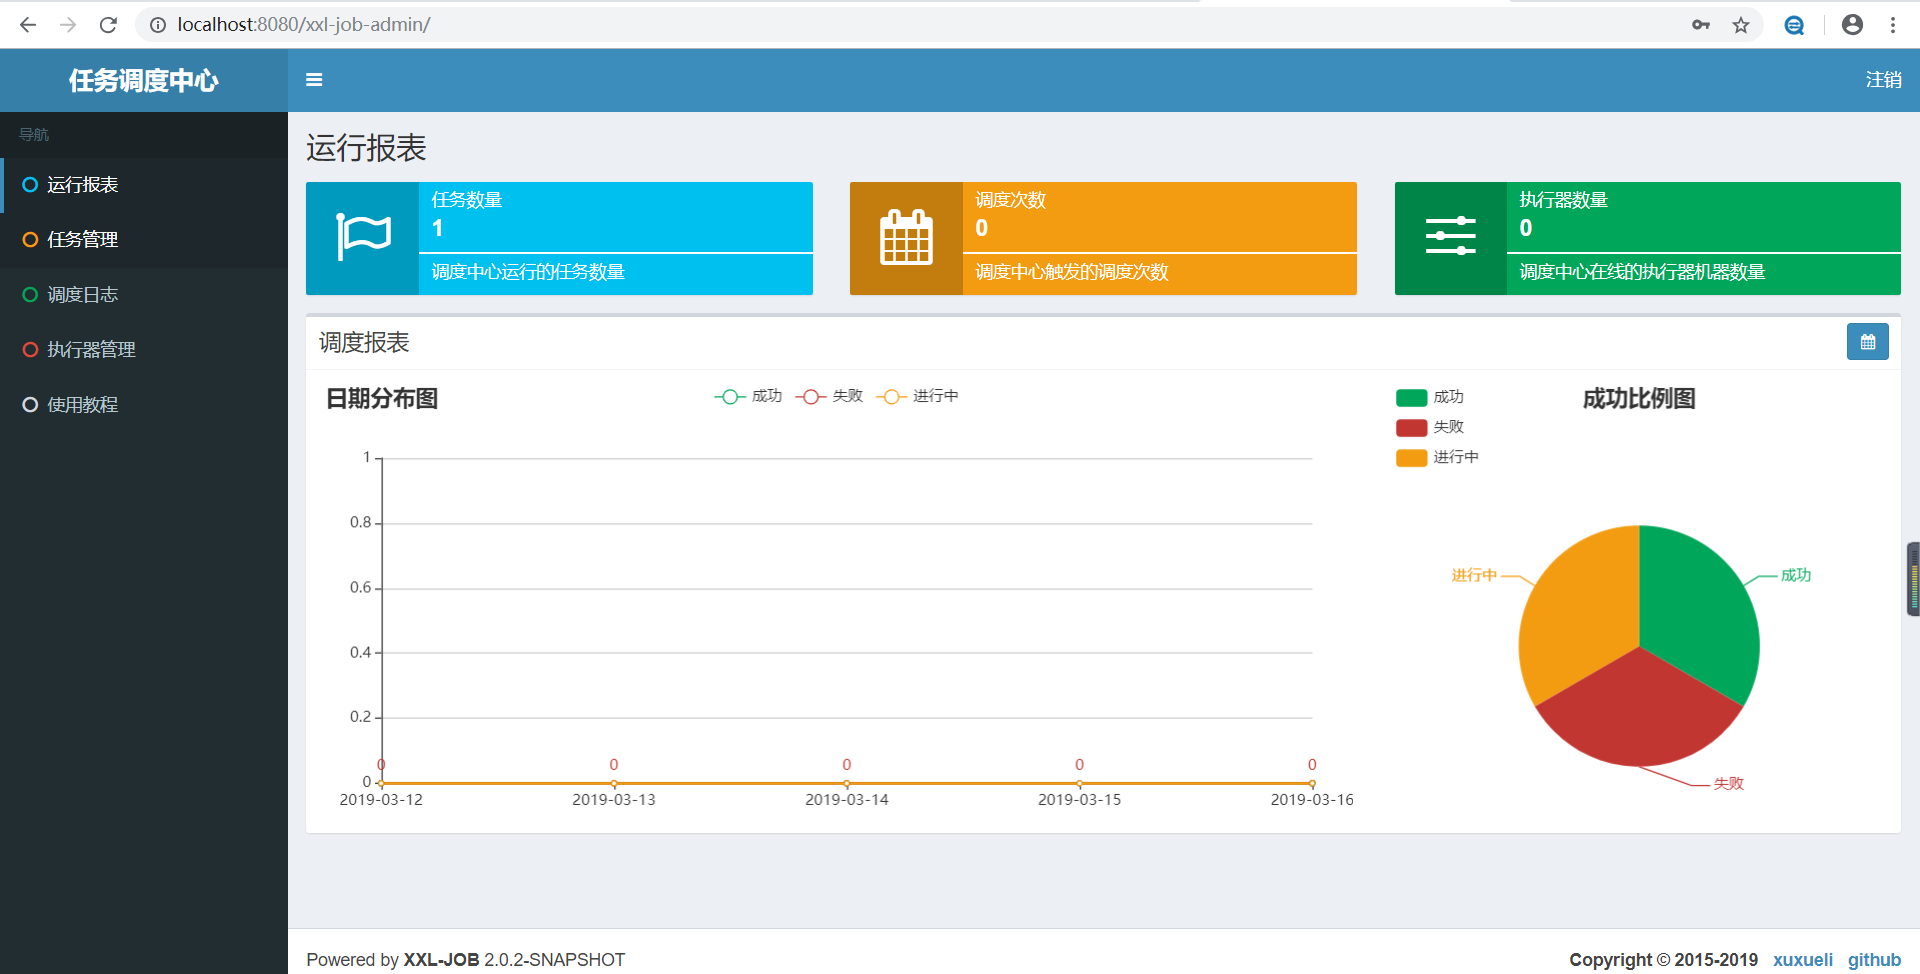
(3) Access dispatching center management interface
Enter in the browser http://localhost:8080/xxl -Job admin, and then enter the user name and password (configured in the previous configuration file), you can see the following management interface.
5. Create actuator project
(1) Add Maven dependency
<!-- xxl-rpc-core -->
<dependency>
      <groupId>com.xuxueli</groupId>
      <artifactId>xxl-job-core</artifactId>
      <version>2.2.0</version>
</dependency>
(2) Configure actuator
In the created springboot project configuration file application YML add the following configuration:
xxl:
  job:
    admin:
      #Dispatching center deployment and address: if there are multiple addresses in the cluster deployment of dispatching center, separate them with commas.
      #The actuator will use this address for "actuator heartbeat registration" and "task result callback".
      addresses: http://127.0.0.1:8080/xxl-job-admin

    #Configure the name, ip address and port number of the actuator respectively
    #Note: if multiple actuators are configured, prevent port conflicts
    executor:
      appname: executorDemo
      ip: 127.0.0.1
      port: 9999

      #The disk location where the execution log file is stored. You need to have read and write permissions on this path
      logpath: /data/applogs/xxl-job/jobhandler
      #The regular cleaning function of the executor Log file specifies the number of days to save the Log, and the Log file will be automatically deleted when it expires. The restriction shall be maintained for at least 3 days, otherwise the function will not take effect;
      #-1 means never delete
      logretentiondays: -1
Note here: configure the name, IP address and port number of actuators. If multiple actuators are configured later, prevent port conflicts. Then there is the name of the actuator. We will go to the dispatching center management interface in the previous step for corresponding configuration.
(3) Load profile
package com.abc.xxljob;

import com.xxl.job.core.executor.impl.XxlJobSpringExecutor;
import lombok.extern.slf4j.Slf4j;
import org.springframework.beans.factory.annotation.Value;
import org.springframework.context.annotation.Bean;
import org.springframework.context.annotation.Configuration;

@Slf4j
@Configuration
public class XXlJobConfig {
    @Value("${xxl.job.admin.addresses}")
    private String adminAddresses;

    @Value("${xxl.job.executor.appname}")
    private String appName;

    @Value("${xxl.job.executor.ip}")
    private String ip;

    @Value("${xxl.job.executor.port}")
    private int port;

    @Value("${xxl.job.accessToken}")
    private String accessToken;

    @Value("${xxl.job.executor.logpath}")
    private String logPath;

    @Value("${xxl.job.executor.logretentiondays}")
    private int logRetentionDays;


    @Bean(initMethod = "start", destroyMethod = "destroy")
    public XxlJobSpringExecutor xxlJobExecutor() {
        log.info(">>>>>>>>>>> xxl-job config init.");
        XxlJobSpringExecutor xxlJobSpringExecutor = new XxlJobSpringExecutor();
        xxlJobSpringExecutor.setAdminAddresses(adminAddresses);
        xxlJobSpringExecutor.setAppname(appName);
        xxlJobSpringExecutor.setIp(ip);
        xxlJobSpringExecutor.setPort(port);
        xxlJobSpringExecutor.setAccessToken(accessToken);
        xxlJobSpringExecutor.setLogPath(logPath);
        xxlJobSpringExecutor.setLogRetentionDays(logRetentionDays);

        return xxlJobSpringExecutor;
    }
}
(4) Create task JobHandler
package com.abc.handle;

import com.xxl.job.core.biz.model.ReturnT;
import com.xxl.job.core.handler.IJobHandler;
import com.xxl.job.core.handler.annotation.XxlJob;
import com.xxl.job.core.log.XxlJobLogger;
import org.springframework.stereotype.Component;

@Component
public class DemoHandler extends IJobHandler {
    @XxlJob("demoHandler")
    public ReturnT<String> execute(String s) throws Exception {
        XxlJobLogger.log("XXL-JOB, Hello World.");
        return ReturnT.SUCCESS;
    }
}
Note: @ XxlJob("demoHandler") registers on XXL job with the latest annotation @ XxlJob
6. Configure the actuator in the dispatching center
(1) Configure actuator
Click actuator management - add actuator - the following interface, then fill in this form and click save.
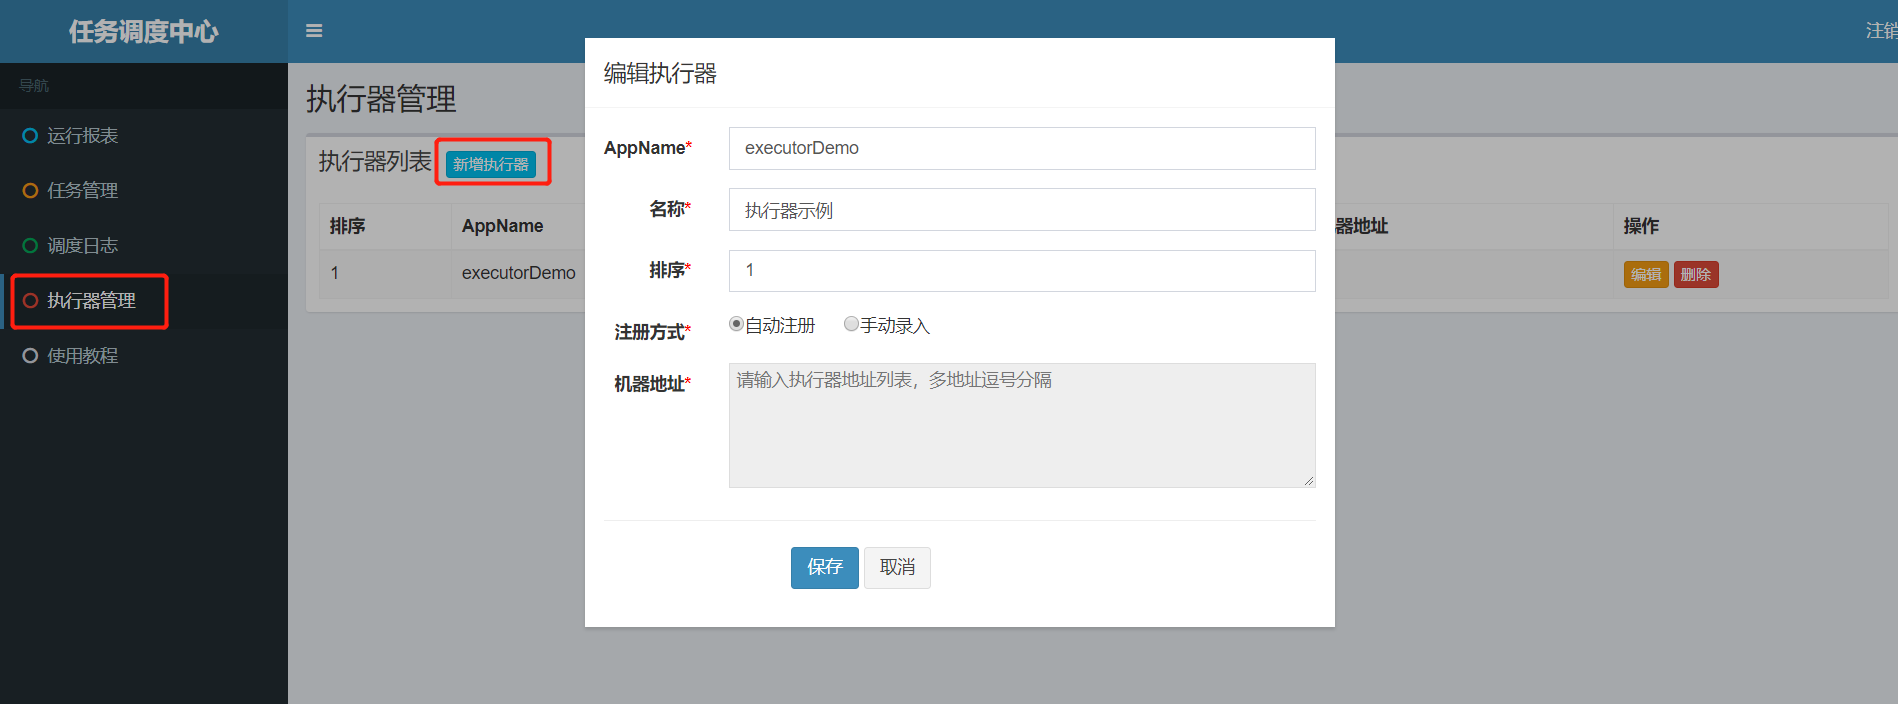
The following is an introduction to these parameters:
AppName: it is the unique identifier appName of each actuator cluster. The actuator will automatically register with appName as the object periodically. The successfully registered executors can be automatically found through this configuration for task scheduling;
Name: the name of the actuator. Because AppName is limited to alphanumeric composition, the readability is not strong. The name is to improve the readability of the actuator;
Sorting: the sorting of actuators. Where actuators are needed in the system, if a task is added, the list of available actuators will be read according to the sorting;
Registration method: the method by which the dispatching center obtains the actuator address,
Automatic registration: the actuator is registered automatically, and the dispatching center can dynamically find the actuator machine address through the underlying registry;
Manual entry: manually enter the address information of the actuator. Multiple addresses are separated by commas for use by the dispatching center;
Machine address: valid when the "registration method" is "manual entry", it supports manual maintenance of actuator address information;
(2) Create task
Click task management - add task
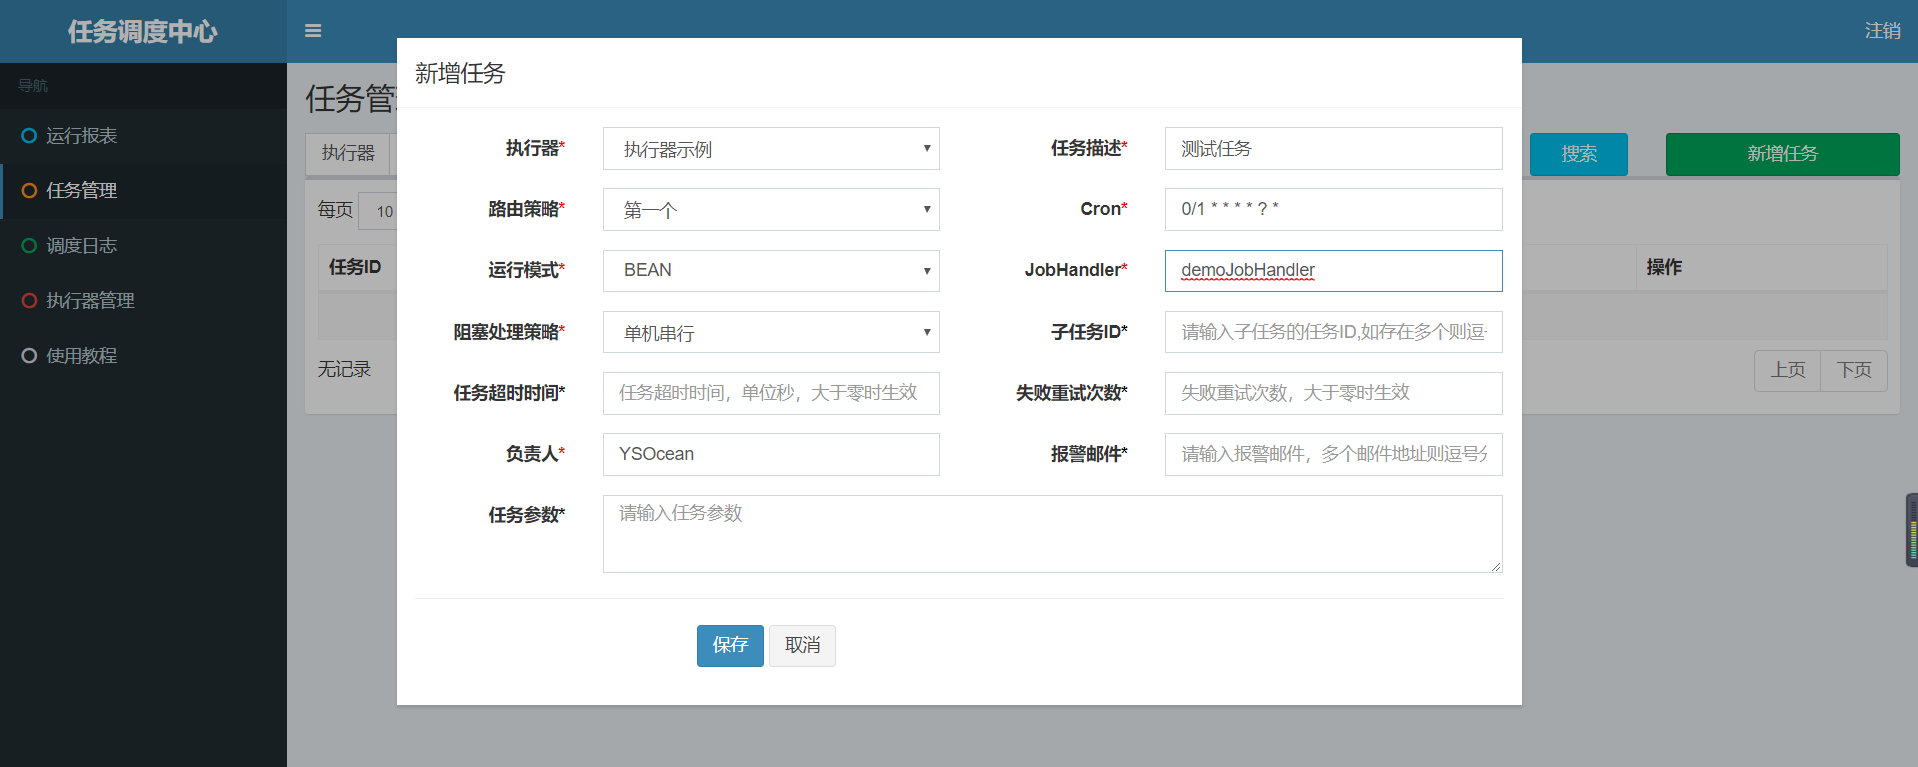
Executor: the bound executor of the task. When the task triggers scheduling, the successfully registered executor will be automatically found to realize the function of automatic task discovery; On the other hand, it is also convenient to group tasks. Each task must be bound with an actuator, which can be set in actuator management.
Task description: task description information, which is convenient for task management;
Routing strategy: when the actuator cluster is deployed, it provides rich routing strategies, including;
FIRST: select the FIRST machine fixedly;
LAST: select the LAST machine fixedly;
ROUND:;
RANDOM: randomly select online machines;
CONSISTENT_HASH (consistent hash): each task selects a machine according to the hash algorithm, and all tasks are evenly hashed on different machines.
LEAST_FREQUENTLY_USED (least frequently used): the machine with the lowest frequency of use is preferentially elected;
LEAST_RECENTLY_USED: the machine that has been used for the longest time shall be elected first;
FAILOVER: heartbeat detection is performed in sequence. The first machine with successful heartbeat detection is selected as the target actuator and initiates scheduling;
BUSYOVER: idle detection is carried out in sequence. The first machine with successful idle detection is selected as the target actuator and initiates scheduling;
SHARDING_ Broadcast: the broadcast triggers all machines in the corresponding cluster to execute a task, and the system automatically transmits fragmentation parameters; The slicing task can be developed according to the slicing parameters;
Cron: cron expression that triggers task execution;
Operation mode:
BEAN mode: the task is maintained at the actuator end in the form of JobHandler; You need to match the tasks in the executor in combination with the "JobHandler" attribute;
GLUE mode (Java): tasks are maintained in the dispatching center in the form of source code; The task of this mode is actually a piece of Java class code inherited from IJobHandler and maintained in the "groovy" source code mode. It runs in the actuator project and can be injected into other services in the actuator using @ Resource/@Autowire;
GLUE mode (Shell): tasks are maintained in the dispatching center in the form of source code; The task of this mode is actually a "shell" script;
GLUE mode (Python): tasks are maintained in the dispatch center in the form of source code; The task of this pattern is actually a "python" script;
GLUE mode (PHP): tasks are maintained in the dispatching center in the form of source code; The task of this mode is actually a "php" script;
GLUE mode (NodeJS): tasks are maintained in the dispatch center in the form of source code; The task of this mode is actually a "nodejs" script;
GLUE mode (PowerShell): tasks are maintained in the dispatching center in the form of source code; The task of this mode is actually a "PowerShell" script;
JobHandler: takes effect when the operation mode is "BEAN mode", and corresponds to the custom value value annotated by the "@ JobHandler" annotation of the newly developed JobHandler class in the actuator;
Blocking processing strategy: the processing strategy when the scheduling is too intensive and the executor has no time to process;
Single machine serial (default): after dispatching request enters single machine executor, dispatching request enters FIFO queue and runs in serial mode.
Discard subsequent scheduling: after the scheduling request enters the single machine actuator, it is found that there are running scheduling tasks in the actuator. This request will be discarded and marked as failed;
Before coverage scheduling: after the scheduling request enters the single machine executor, it finds that the executor has the running scheduling task, will terminate the running task and clear the queue, then run the local scheduling task.
Subtask: each task has a unique task ID (the task ID can be obtained from the task list). When the execution of this task is completed and successful, an active scheduling of the task corresponding to the subtask ID will be triggered.
Task timeout time: it supports user-defined task timeout time. If the task runs overtime, it will actively interrupt the task;
Number of failed retries; Support custom task failure retry times. When a task fails, it will be retried actively according to the preset failure retry times;
Alarm email: the email address notified by email when task scheduling fails. Multiple email addresses can be configured. Multiple email addresses are separated by commas when configuring;
Person in charge: the person in charge of the task;
Execution parameters: parameters required for task execution. Multiple parameters are separated by commas. During task execution, multiple parameters will be converted into arrays and passed in;
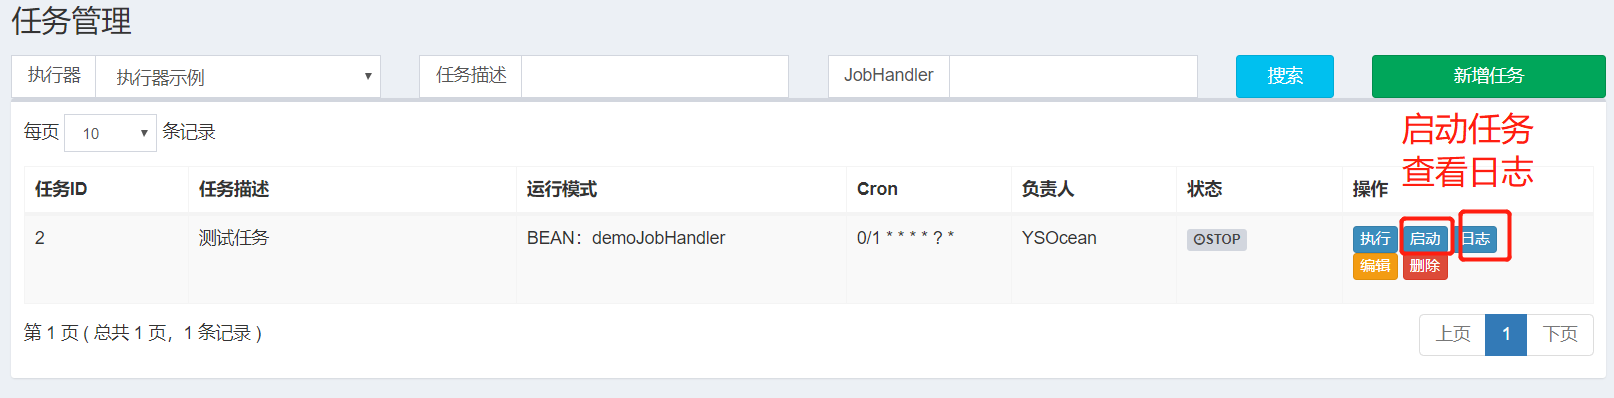
7. Start the task
After configuring the actuator and task, we just need to start the task and run it.
After startup, we view the log:
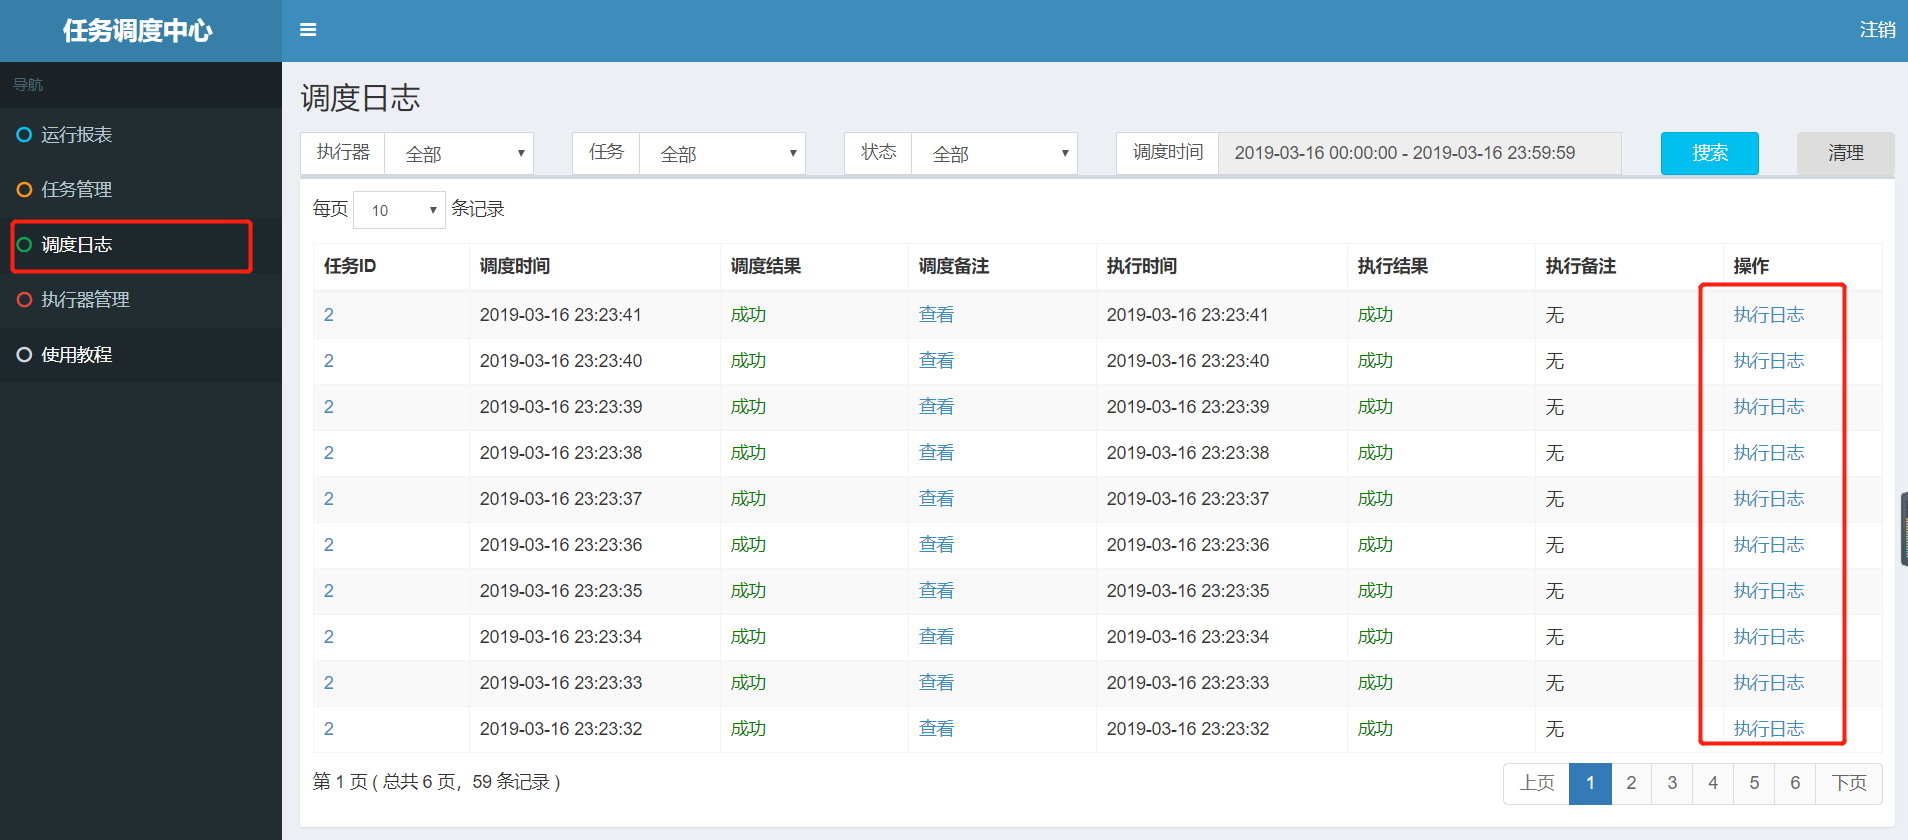
When we configure the task above, the cron expression is executed every second (0 / 1 * *? *):
Print the log as follows:
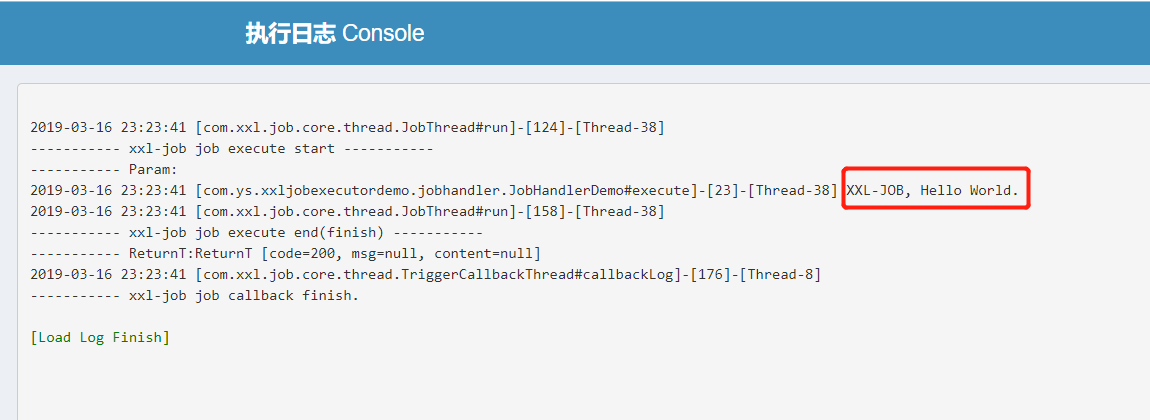
Note: in the project, only through xxljoblogger The log () code can print the log to it.