1 Why use SDK
In the last article, I explained how to add custom software. The whole process is still troublesome. What if some software is open source tools? For example, for a performance testing tool, it is too troublesome to add it according to the way of adding in the previous article, and the standard tool does not need to be modified, so it is not necessary to add the tool source code to the project compilation, just use the yocto project compilation environment to compile the tool and then add it to the image.
The following is the SDK generation output workflow.
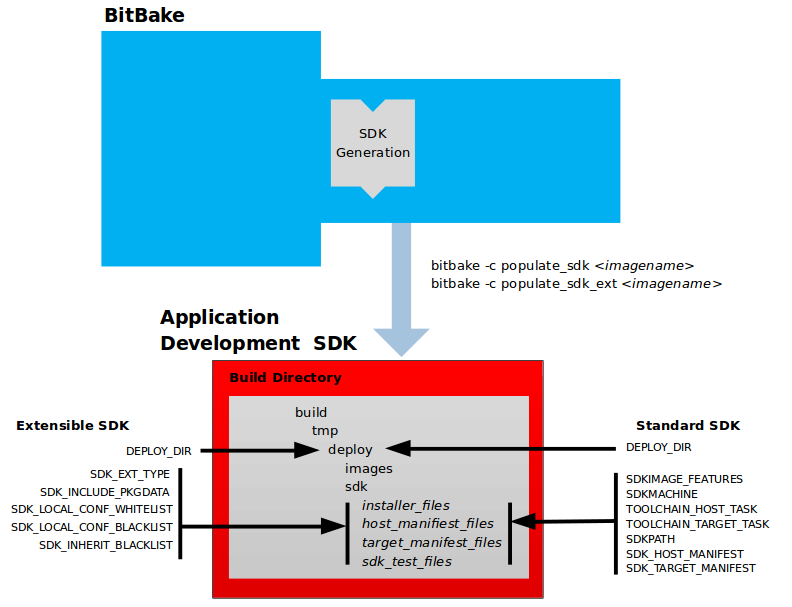
The build output is a set of specific form files, including SDK self extracting installer (*. sh), host, target manifest files and files for SDK testing. For details of SDK, please refer to https://www.yoctoproject.org/docs/2.7/sdk-manual/sdk-manual.html .
2 SDK construction and installation
The sdk construction process is described below.
2.1 view and select the model
~/work/byobmc$ . setup
Target machine must be specified. Use one of:

1u-x91          2u-x201         4u-x201         atx-i1331
Take the 4u-x201 model as an example, set and analyze the environment variables.
export TEMPLATECONF=meta-byosoft/meta-4u-x201/conf
. openbmc-env
In this way, the 4u-x201 model is selected.
2.2 execute the command to compile and build SDK
bitbake obmc-phosphor-image -c populate_sdk
An error similar to the following figure will appear:
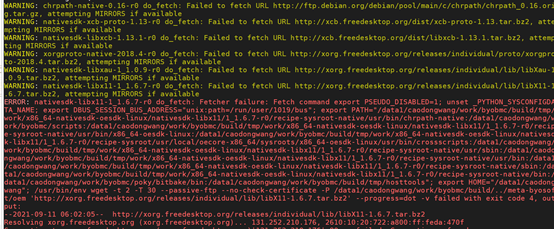
This is because the source code lacks some component packages, and the compilation process is not connected to the network (or the download website is inaccessible), and other component packages will be prompted again and again in the future. These component packages can be downloaded from the prompted website (or search and download the same components in the network), put them in the build/downloads / directory, and then create the component package name + Just use the file of done.
For example:
~/work/byobmc$ ls build/downloads/
Cython-0.29.21.tar.gz
Cython-0.29.21.tar.gz.done
Linux-PAM-1.3.1.tar.xz
Linux-PAM-1.3.1.tar.xz.done
Mako-1.1.4.tar.gz
Mako-1.1.4.tar.gz.done
...
Keep trying until all the missing components are downloaded. It takes about 1 to 2 hours to compile, depending on the configuration of the compiling machine.
2.3 viewing compiled output
The compilation output is located in the build/tmp/deploy/sdk Directory:
~/work/byobmc$ ls build/tmp/deploy/sdk/
oecore-x86_64-armv6-toolchain-nodistro.0.host.manifest  oecore-x86_64-armv6-toolchain-nodistro.0.target.manifest
oecore-x86_64-armv6-toolchain-nodistro.0.sh             oecore-x86_64-armv6-toolchain-nodistro.0.testdata.json
Where * sh file is the SDK self extracting program. Executing this file will install the SDK in the specified directory.
2.4 installing sdk
Create the mytest/sdk directory under the build directory and record its absolute path, then execute the sdk installation script under the build/tmp/deploy/sdk directory and specify the installation directory as build/mytest/sdk. The results are as follows:
~/work/byobmc/build$ mkdir -p mytest/sdk
~/work/byobmc/build$ ls
bitbake-cookerdaemon.log  cache  conf  mytest  sstate-cache  tmp

~/work/byobmc/build$ cd mytest/sdk/
~/work/byobmc/build/mytest/sdk$ pwd
/data1/hostname/work/byobmc/build/mytest/sdk

~/work/byobmc/build/mytest/sdk$ cd ../..
~/work/byobmc/build$ ./tmp/deploy/sdk/oecore-x86_64-armv6-toolchain-nodistro.0.sh

Phosphor OpenBMC (Phosphor OpenBMC Project Reference Distro) SDK installer version nodistro.0
=============================================================================================

Enter target directory for SDK (default: /usr/local/oecore-x86_64): /data1/hostname/work/byobmc/build/mytest/sdk
You are about to install the SDK to "/data1/hostname/work/byobmc/build/mytest/sdk". Proceed [Y/n]? Y
Extracting SDK......................................................................done
Setting it up...done
SDK has been successfully set up and is ready to be used.
Each time you wish to use the SDK in a new shell session, you need to source the environment setup script e.g.
 $ . /data1/hostname/work/byobmc/build/mytest/sdk/environment-setup-armv6-openbmc-linux-gnueabi
Enter the build/mytest/sdk directory to view the results as follows:
~/work/byobmc/build/mytest/sdk$ ls
environment-setup-armv6-openbmc-linux-gnueabi  sysroots
site-config-armv6-openbmc-linux-gnueabi        version-armv6-openbmc-linux-gnueabi
SDK is composed of a cross development tool chain, a set of libraries, header files and an SDK environment setting script. As shown above, sysroots is the file system finally packaged into the image.
3 SDK usage
Enter the build/mytest/sdk directory and execute Note that there is a space in front of the command number. Linux-environment-bmc-abi, and the result is as follows.
~/work/byobmc/build/mytest/sdk$ . environment-setup-armv6-openbmc-linux-gnueabi
Your environment is misconfigured, you probably need to 'unset LD_LIBRARY_PATH'
but please check why this was set in the first place and that it's safe to unset.
The SDK will not operate correctly in most cases when LD_LIBRARY_PATH is set.
For more references see:
  http://tldp.org/HOWTO/Program-Library-HOWTO/shared-libraries.html#AEN80
  http://xahlee.info/UnixResource_dir/_/ldpath.html
Prompt that the environment variable protection is set, execute unset LD_ LIBRARY_ The path command is unprotected and the script can be executed again (if there is no prompt, the unlocking command does not need to be executed).
Note: you need to execute the script (or newly open the terminal) every time you use the SDK.
Execute the $CC -v command to view the compiler details:
~/work/byobmc/build/mytest/sdk$ $CC -v
Using built-in specs.
COLLECT_GCC=arm-openbmc-linux-gnueabi-gcc
COLLECT_LTO_WRAPPER=/data1/hostname/work/byobmc/build/mytest/sdk/sysroots/x86_64-oesdk-linux/usr/libexec/arm-openbmc-linux-gnueabi/gcc/arm-openbmc-linux-gnueabi/8.3.0/lto-wrapper
Target: arm-openbmc-linux-gnueabi
Configured with: ...
...
Create a new test directory under the build/mytest/sdk directory, and create a new hello. Com directory under the test directory C file, fill in the following.
#include <stdio.h>

int main (int argc, char *argv[])
{
  printf("Hello World!\n");

  return 0;
}
Execute the compile command $CC - O hello in the build/mytest/sdk/test directory c. Be sure to use $CC. Note that if the program is compiled through CMAKE, you must specify host, that is, execute/ Configure -- host = arm openbmc Linux gnueabi (get the compiler name through $CC -v).
~/work/byobmc/build/mytest/sdk$ mkdir test
~/work/byobmc/build/mytest/sdk$ cd test/
~/work/byobmc/build/mytest/sdk/test$ vim hello.c
~/work/byobmc/build/mytest/sdk/test$ $CC -o hello hello.c
~/work/byobmc/build/mytest/sdk/test$ ls
hello  hello.c
Execute file/ hello command, you can see the hello binary file, and view the file information through the file command. It is a 32-bit arm and is a dynamic link.
~/work/byobmc/build/mytest/sdk/test$ file hello
hello: ELF 32-bit LSB executable, ARM, EABI5 version 1 (SYSV), dynamically linked, interpreter /lib/ld-linux.so.3, BuildID[sha1]=a21307be9712a1e4522b888615593960f945ac8b, for GNU/Linux 3.2.0, with debug_info, not stripped
In the build/opt/bmcsdk/test directory, execute QEMU arm directly/ Helloc command, prompting that the so library file cannot be found.
~/work/byobmc/build/mytest/sdk/test$ qemu-arm ./hello
/lib/ld-linux.so.3: No such file or directory
You need to specify the library path in the image file system, that is, the library in the sysroots directory generated by SDK installation.
The final implementation results are as follows:
~/work/byobmc/build/mytest/sdk/test$ qemu-arm /data1/hostname/work/byobmc/build/mytest/sdk/sysroots/armv6-openbmc-linux-gnueabi/lib/ld-linux.so.3 --library-path /data1/hostname/work/byobmc/build/mytest/sdk/sysroots/armv6-openbmc-linux-gnueabi/lib ./hello
Hello World!
In this way, the compiled hello program can be directly added to the image packaging. For the adding process, refer to the script adding method in the previous article.
A reminder: before using the SDK compiler, you must first execute the environment variable insertion script, and each time you open a new terminal, you need to insert the environment variable
4 add tool chain to firmware
Sometimes we want to compile the debugger on the target device. What should we do?
Temporary method: in build / conf / local Conf add
EXTRA_IMAGE_FEATURES += "tools-sdk"
This method is lost as the configuration file in the build directory changes. The other is to add it to the configuration file of the model and remove it when it is not needed (this method is not recommended), such as meta-byosoft / meta-4u-x201 / conf / local Conf.sample file.