This article is shared from Huawei cloud community< YoloV5 actual combat: teach object detection by hand -- YoloV5 >, author: AI Hao.
abstract
Strictly speaking, yoov5 is not the fifth version of YOLO, because it has not been recognized by Joe Redmon, the father of YOLO, but the overall performance of the test data is good. Detailed data are as follows
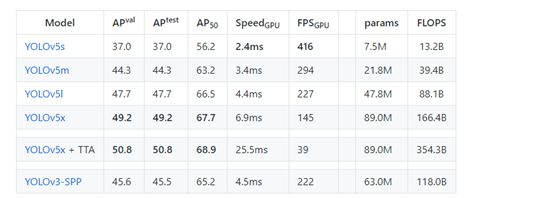
Yolov5 is not a separate model, but a model family, including YOLOv5s, YOLOv5m, YOLOv5l, YOLOv5x, YOLOv5x+TTA, which is a bit like EfficientDet. Because we didn't find the V5 paper, we can only learn it from the code. On the whole, it is similar to yoov4 and can be considered as an enhanced version of yoov5.
Project address: GitHub - ultralytics/yolov5: YOLOv5 🚀 in PyTorch > ONNX > CoreML > TFLite
train
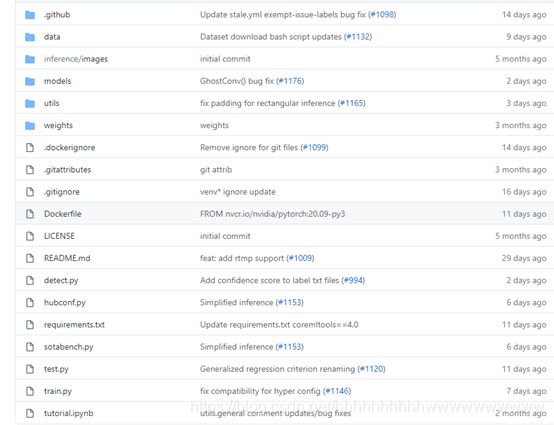
1. Download code
Project address: https://github.com/ultralytics/YOLOv5 Recently, the author updated some codes.
2. Configuration environment
matplotlib>=3.2.2

numpy>=1.18.5

opencv-python>=4.1.2

pillow

PyYAML>=5.3

scipy>=1.4.1

tensorboard>=2.2

torch>=1.6.0

torchvision>=0.7.0

tqdm>=4.41.0
3. Prepare dataset
The data set adopts the data format labeled by Labelme. The data set obtains two kinds of data sets: aircraft and oil barrel from RSOD data set, and converts them into Labelme labeled data set.
Address of data set: https://pan.baidu.com/s/1iTUpvA9_cwx1qiH8zbRmDg
Extraction code: gr6g
Or: labelmedata zip_ Yolov5 actual combat - in-depth learning document resources - CSDN Download
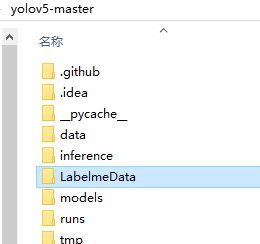
Unzip the downloaded data set and put it into the root directory of the project. Prepare for the next step of generating data sets for testing. As shown below:
4. Generate dataset
The dataset of YoloV5 is different from that of previous versions. Let's take a look at the converted dataset first.
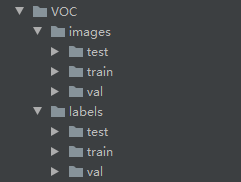
The data structure is as follows:
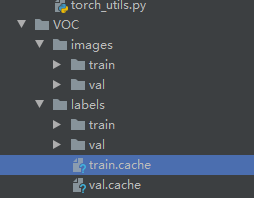
The images folder stores the images of train and val
labels store the object data of train and val, and each txt file in it corresponds to the picture in images one by one.
txt file is as follows:
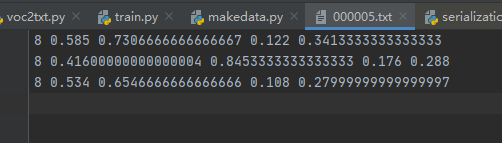
Format: object category x y w h
Whether the coordinates are real or not is calculated by dividing the coordinates by width and height, which is the ratio of width and height.
Let's write the code to generate the dataset and create a new labelmetoyolo V5 Py, and then write the following code.
import os

import numpy as np

import json

from glob import glob

import cv2

from sklearn.model_selection import train_test_split

from os import getcwd
classes = ["aircraft", "oiltank"]

# 1. Label path

labelme_path = "LabelmeData/"

isUseTest = True  # Create test set

# 3. Obtain documents to be processed

files = glob(labelme_path + "*.json")

files = [i.replace("\\", "/").split("/")[-1].split(".json")[0] for i in files]

print(files)

if isUseTest:

    trainval_files, test_files = train_test_split(files, test_size=0.1, random_state=55)

else:

    trainval_files = files

# split

train_files, val_files = train_test_split(trainval_files, test_size=0.1, random_state=55)
def convert(size, box):

    dw = 1. / (size[0])

    dh = 1. / (size[1])

    x = (box[0] + box[1]) / 2.0 - 1

    y = (box[2] + box[3]) / 2.0 - 1

    w = box[1] - box[0]

    h = box[3] - box[2]

    x = x * dw

    w = w * dw

    y = y * dh

    h = h * dh

    return (x, y, w, h)
wd = getcwd()

print(wd)
def ChangeToYolo5(files, txt_Name):

    if not os.path.exists('tmp/'):

        os.makedirs('tmp/')

    list_file = open('tmp/%s.txt' % (txt_Name), 'w')

    for json_file_ in files:

        json_filename = labelme_path + json_file_ + ".json"

        imagePath = labelme_path + json_file_ + ".jpg"

        list_file.write('%s/%s\n' % (wd, imagePath))

        out_file = open('%s/%s.txt' % (labelme_path, json_file_), 'w')

        json_file = json.load(open(json_filename, "r", encoding="utf-8"))

        height, width, channels = cv2.imread(labelme_path + json_file_ + ".jpg").shape

        for multi in json_file["shapes"]:

            points = np.array(multi["points"])

            xmin = min(points[:, 0]) if min(points[:, 0]) > 0 else 0

            xmax = max(points[:, 0]) if max(points[:, 0]) > 0 else 0

            ymin = min(points[:, 1]) if min(points[:, 1]) > 0 else 0

            ymax = max(points[:, 1]) if max(points[:, 1]) > 0 else 0

            label = multi["label"]

            if xmax <= xmin:

                pass

            elif ymax <= ymin:

                pass

            else:

                cls_id = classes.index(label)

                b = (float(xmin), float(xmax), float(ymin), float(ymax))

                bb = convert((width, height), b)

                out_file.write(str(cls_id) + " " + " ".join([str(a) for a in bb]) + '\n')

                print(json_filename, xmin, ymin, xmax, ymax, cls_id)

ChangeToYolo5(train_files, "train")

ChangeToYolo5(val_files, "val")

ChangeToYolo5(test_files, "test")
After the execution of this code, the txt annotation data of each picture will be generated in LabelmeData, and the TXT of training set, verification set and test set will be generated under the tmp folder. TXT records the path of the picture to prepare for the next generation of data set for YoloV5 training and test. Create a new makedata under the tmp folder Py file to generate the final result. The directory structure is as follows:
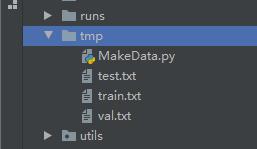
Open makedata Py, write the following code.
import shutil
import os

file_List = ["train", "val", "test"]
for file in file_List:
    if not os.path.exists('../VOC/images/%s' % file):
        os.makedirs('../VOC/images/%s' % file)
    if not os.path.exists('../VOC/labels/%s' % file):
        os.makedirs('../VOC/labels/%s' % file)
    print(os.path.exists('../tmp/%s.txt' % file))
    f = open('../tmp/%s.txt' % file, 'r')
    lines = f.readlines()
    for line in lines:
        print(line)
        line = "/".join(line.split('/')[-5:]).strip()
        shutil.copy(line, "../VOC/images/%s" % file)
        line = line.replace('JPEGImages', 'labels')
        line = line.replace('jpg', 'txt')
        shutil.copy(line, "../VOC/labels/%s/" % file)
After execution, you can generate the dataset used for YoloV5 training. The results are as follows:
5. Modify configuration parameters
open voc.yaml File and modify the configuration parameters inside

train: VOC/images/train/  # Path of training set picture

val: VOC/images/val/  # Verify the path of the set picture

# number of classes

nc: 2 #For the detected category, this dataset has two categories, so write 2
# class names

names: ["aircraft", "oiltank"]#The name of the category corresponds to the list when converting the dataset
6. Modify train Parameters of PY
cfg Parameter is YoloV5 The configuration file of the model is stored in models Under the folder, fill in different documents as required.

weights Parameter is YoloV5 The pre training model, and cfg Corresponding, for example: cfg The configuration is yolov5s.yaml,weights You need to configure yolov5s.pt

data Is the configuration file of the configuration dataset. We choose voc.yaml,So configuration data/voc.yaml

You can start training by modifying the above three parameters, and other parameters can be modified according to your own needs. The modified parameter configuration is as follows:

parser.add_argument('--weights', type=str, default='yolov5s.pt', help='initial weights path')

parser.add_argument('--cfg', type=str, default='yolov5s.yaml', help='model.yaml path')

parser.add_argument('--data', type=str, default='data/voc.yaml', help='data.yaml path')
After the modification, you can start training. As shown in the figure below:
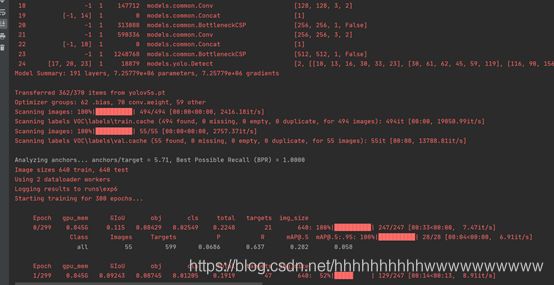
7. View workout results
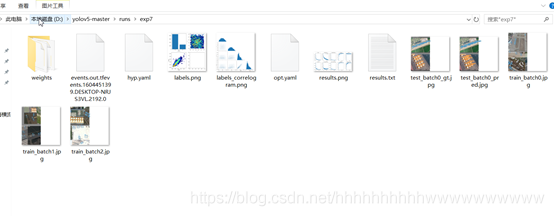
After 300 epoch training, we will find the trained weight files and some files of the training process under the runs folder. As shown in the figure:

test
First of all, you need to use the VOC Add the path of the test set in yaml and open VOC Yaml, add test: TMP / test after the val field Txt, as shown in the figure:

Modify test Py. The following parameters need to be modified.
parser = argparse.ArgumentParser(prog='test.py')
parser.add_argument('--weights', nargs='+', type=str, default='runs/exp7/weights/best.pt', help='model.pt path(s)')
parser.add_argument('--data', type=str, default='data/voc.yaml', help='*.data path')
parser.add_argument('--batch-size', type=int, default=2, help='size of each image batch')
parser.add_argument('--save-txt', default='True', action='store_true', help='save results to *.txt')
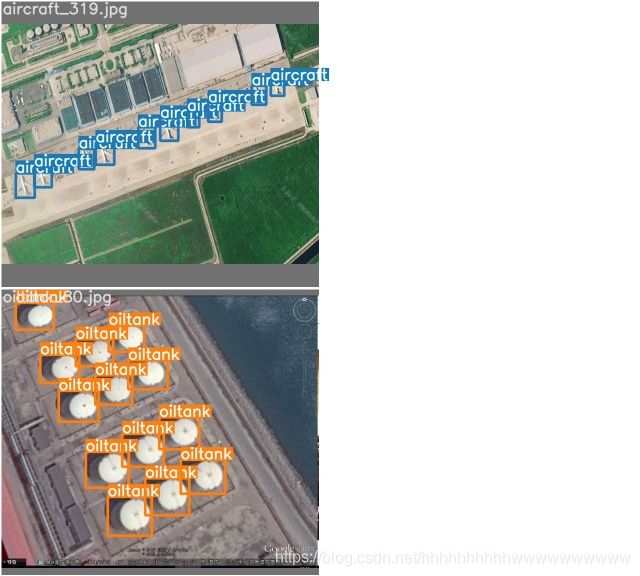
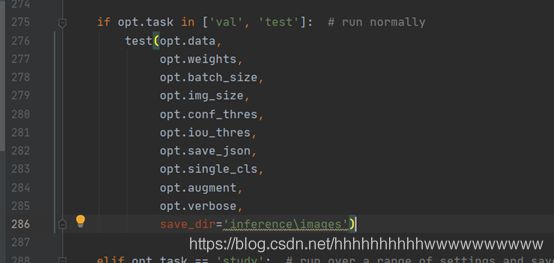
Modify the test method in line 275 and add the path to save the test results. In this way, after the test is completed, you can view the test picture in information \ images and the saved test results in information \ output.
As shown in the figure:
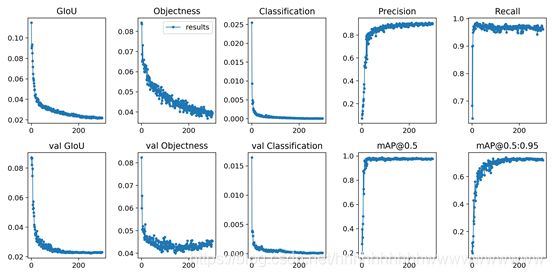
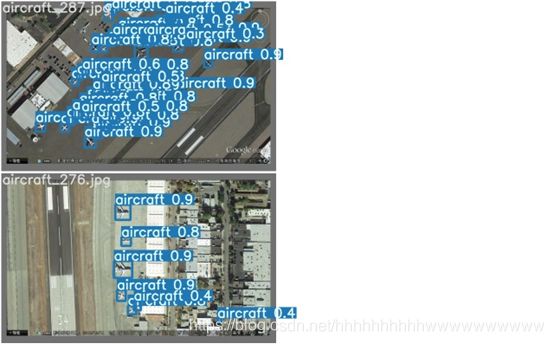
Here are the results of the run:
Click follow to learn about Huawei's new cloud technology for the first time~