Write in front
Because wechat applet claims to solve the compatibility problem of front-end programmers, it only needs to code according to the official set of rules of Tencent to meet different terminal needs. Therefore, in the second half of last year, I realized a project used internally by our company with wechat applet (700 + users at present). Here are some experience I summarized in the process of exploration, paving the way for the students behind, so that we can go home from work early to accompany our wife and children.
You will learn:
- How to use custom tabbar and permission control
- How to use the charts plugin
- How to subcontract when the program size exceeds the limit
- How to use vantUI component to solve the problem of pop-up layer sliding and penetrating page scrolling
- Customize the header and scroll page to the top
- How to realize automatic update and manual update scheme
- Internal use of software requires login. How to pass the audit
Other pits - Why not update the view after setting data with wepy
- How to access your own methods in wepy methods
- Applet naming may violate regulations
- Time Date initialization on iOS
1 how to use custom tabbar and permission control
Students who have used the native tabbar know that the native tabbar is too ugly, and there is no way to customize some styles. Most app s will eventually have the need to customize the tabbar.
Throw it first according to the rules Official link
Use steps:
Copy the custom tab bar file in the official demo to the root directory
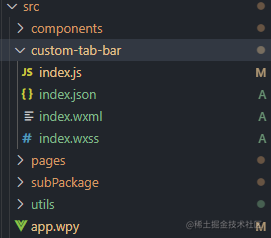
The wepy framework I use is copied to the src directory, as shown in the figure. Yes, the custom tabbar part needs to be written in the native way, and other business pages use the wepy framework.
Entry file app JSON enable custom tabbar
The wepy framework is in app WPY config object
The pagePath in the list is the directory of your own page, which is necessary. Other attributes can be deleted, because the specific tabbar style (such as picture and color) still needs to be set in the custom tab bar.
"tabBar": {
    "custom": true,
    //"color": "#7A7E83"
    //"selectedColor": "#3cc51f", / / write comments here
    //"borderStyle": "black", / / here is a comment
    //"backgroundColor": "#ffffff"
    "list": [
      {
        "pagePath": "index/index",
        "iconPath": "image/icon_component.png",//Here is a comment
        "selectedIconPath": "image/icon_component_HL.png",//Here is a comment
        "text": "assembly"//Here is a comment
      },
      {
        "pagePath": "index/index2",
        "iconPath": "image/icon_API.png",//Here is a comment
        "selectedIconPath": "image/icon_API_HL.png",//Here are some notes to make
        "text": "Interface"//Here is a comment
      }
    ]
  },
Go back to custom tab bar / index js
There are the following codes:
Component({
  data: {
    selected: 0,//Default selected subscript
    color: "#7A7E83 ", / / default item font color
    selectedColor: "#3cc51f ", / / font color of the selected item
    list: [{
      pagePath: "/index/index",
      iconPath: "/image/icon_component.png",
      selectedIconPath: "/image/icon_component_HL.png",
      text: "assembly"
    }, {
      pagePath: "/index/index2",
      iconPath: "/image/icon_API.png",
      selectedIconPath: "/image/icon_API_HL.png",
      text: "Interface"
    }]
  },
  attached() {
  },
  methods: {
    switchTab(e) {
      const data = e.currentTarget.dataset
      const url = data.path
      wx.switchTab({url})
      //this.setData({comment out these three lines
      //  selected: data.index
      //})
    }
  }
})
Comment out this The setData () method is used because the tab page you jump to will also setData once to avoid flashing caused by repeatedly setting data. Continue to look down.
Add code for each tab page lifecycle show
In the wepy framework is the onShow method.
Get the current page object this$ wxpage
onShow() {
    if (typeof this.$wxpage.getTabBar === 'function' &&
        this.$wxpage.getTabBar()) {
        this.$wxpage.getTabBar().setData({
            selected: 0//Each tab page has different subscripts in the configured list array and needs to be modified accordingly
        })
    }
}
It is not difficult to find that each time you enter the tab page, you will get the bar object of the current page (the tabbar object is not the same in each tab page, but a new object), and then set selected. Therefore, comment out the setData method in the switchTab method above because it is repeated.
Implementation and update of digital info in the upper right corner of the menu
- Add the attribute infoNum to the list array (only required menu items are added).
- Render infoNum conditionally in wxml code (only if it has a value and is greater than 0).
- Each tab page show s the setData after obtaining the info number in the life cycle.
this.$wxpage.getTabBar().setData({
    ['list[1].infoNum']: infoNum //Update info number
})
['list[1].infoNum'] update multi-layer object, is it a bit make complaints about it?
Control the menu items according to the login role
I believe many students also have this demand. According to different login users, they see different menus at the bottom, such as administrators.
The implementation is very similar to info
- Add the attribute show to the list array
- Add the classnames of show and hide conditionally in the wx:for loop in wxml code
- After logging in, get the user permission list and judge the items to be displayed or hidden
Call the method to update the data of the bar instance
For convenience, you can use the custom tab bar / index Create a method in JS methods, and then call this on each tab page$ wxpage. getTabBar(). Your funcname (Balabala), please note that each bar page, because the bar instance of each tab page mentioned above is independent.Get the TabBar instance from the native page and directly this Gettabbar().
Due to limited space, some details have not been finished. If you need to leave a comment or contact me directly.
How to use the echats chart plug-in
It is a very common requirement to use charts in small programs. Fortunately, there are relatively mature echarts components. The use method is very simple. Dump it first according to the rules Official link
You can configure it according to the official documents, but you should pay attention to the following points:
- Original ecarts JS is relatively large, and there is a size limit for small program packaging. It is recommended to package on demand on the official website of echarts
- You need to write in style:
ec-canvas {
  width: 100%;
  height: 100%;
}
3. There is a problem with the preview of the charts in wechat development tool, but it does not appear on the real machine
How to subcontract when the program size exceeds the limit
Applet to ensure that users can quickly open the program and have a good user experience. Therefore, the size of small programs is limited (no more than 20M in total, and no more than 2M in each package). However, as the programs become more and more complex and there are more and more pages, we will inevitably exceed the limit. Fortunately, the official has given a subcontracting scheme. By the rules Official link
- In short, the main pages (those associated with tabbar) are downloaded to the client first and displayed - the main package
- Other secondary pages (detail pages) can be downloaded and displayed when needed- to subcontract
There can be any number of subcontracts, so that the size of each packet can be effectively controlled.
Core configuration code:
app.js/app.wepy
pages: [ //Main package tab page
    'pages/index',
    'pages/bill',
    'pages/mgMenu',
    'pages/my',
],
subPackages: [{//Subcontracting configuration is an array representative, and multiple can be added
    root: 'subPackage1',//subPackage1 is the name of the subcontracting directory. You can use the name you want
    pages: [
        "pages/login", //Sign in
        "pages/billDetail", //Bill details
        "pages/shopDetail", //Commodity application
    ]
}],
Note: each time a new page is added, the page path should be added in the pages of the corresponding package
When it comes to the size of small programs, static files in the project, such as open source js, fonts, pictures and videos, can be thrown onto the CDN. On the one hand, the package size can be reduced and the reading speed can be increased. The CDN can use a paid CDN, such as Alibaba, or a free CDN, such as Alibaba BootCDN,jsdelivr (it has been slow in China recently and should be used with caution) unpkg Domestic version, etc. If you are interested, I will write a separate article on white whoring CDN.
How to use vantUI components
In the current trend of rapid iteration, UI libraries are very important. I prefer vantUI that likes open source. Of course, other UI libraries also have very good ones. It depends on my preferences. Throw it out according to the rules Official link
Let's share some of my experiences with vant components:
What I choose is to download the compiled component code, and copy which component the project needs into its own components, Click here
One disadvantage of using this method is that if the components used depend on other components, they need to be copied together. For dependent components, see component / index json
For example, the index of the < van button > component JSON is as follows:{ "component": true, "usingComponents": { "van-icon": "../icon/index", "van-loading": "../loading/index" } }You can see that < van button > components also depend on < van iconn > and < van loading > components. At this time, we can copy the < van iconn > and < van loading > components to our components directory.
2. Before using in the page, it is necessary to configure in usingComponents, and the path during configuration is the relative position. It cannot be in the form of @ in import, but To find the path.
usingComponents: {
    "van-action-sheet": "../components/lib/action-sheet/index",
    "van-toast": "../components/lib/toast/index",
    "van-picker": "../components/lib/picker/index",
    "van-popup": "../components/lib/popup/index",
    "van-search": "../components/lib/search/index"
},
Pop up pop-up method to prevent page scrolling
When we use the Popup layer to pop up the time selector, or picker, etc. At this time, when scrolling the pop-up layer content, the main page content at the bottom will also slide, affecting the user's operation. We can wrap the main content with < scroll View >, and the default scroll-y="true". When we realize the pop-up layer, set the attribute scroll-y = "{false}".
Through variable control:
<scroll-view scroll-y="{{!noScroll}}" bindscroll="scrol">
Set noScroll to true or '' (empty string) when the pop-up layer is displayed or hidden. Note that the Boolean value of the string "false" is actually true
In addition, if the page itself has only one screen of content and there is no need to scroll, you can set disableScroll: false through page config
How does the internal software pass the audit
Most of the software inside the enterprise enters the program and must be logged in to continue to use, but it does not meet the official design specifications of small programs. Before, our company jumped to the login page when we entered the page, and the result was not approved.
If your page is not so confidential, you can display the home page and menu by default, but the data is left blank. Visible after prompt login in key places,
Our company's applet visitor mode is as follows:
If your software is highly confidential, you must authorize the user to log in. You can provide an experience account to the reviewer when initiating the audit, and indicate that the software is only used for enterprise content.
Customize the head and slide to emerge at the top
Custom headers are also common requirements. The following describes how I implement them
- Page config setting navigationStyle: 'custom'
- Adding code to wxml
<view class="cus-head" hidden="{{!showCusHead}}" style="height:{{cusHead}}"></view>
<view class="head-title" style="top:{{titleTop}}">I'm the page title</view>
Cus head: Custom head block fixed layout.
Head Title: the title is fixed. Ensure that the z-index is above the cus head, the top value is the same as the capsule, and the line height is the same as the capsule height. The following is the api for obtaining capsules:
const res = wx.getMenuButtonBoundingClientRect()
console.log(res.height)//Get capsule height
console.log(res.top)//Get capsule top value
cusHead: customize the head. The height should be greater than the capsule height, which can be adjusted according to your own needs.
showCusHead: controls display and hiding. It is displayed when scrolling to a certain extent and hidden when scrolling back to the top
- Add scroll listener function
scroll(e) { //The wepy framework is triggered when scrolling, and the native setData method is used
    const top = e.detail.scrollTop;
    if (top >= 10) {
        this.showCusHead = true;
    } else {
        this.showCusHead = false;
    }
    this.$apply();
},
How to realize automatic update and manual update standby scheme during automatic update
On app WPY or app JS lifecycle show/onLaunch add the following code. You can write it as a function and call it directly.
Full code reference:
// Get applet update mechanism compatibility
if (wx.canIUse('getUpdateManager')) {
    const updateManager = wx.getUpdateManager()
    //1. Check whether the applet has a new version released
    updateManager.onCheckForUpdate(function (res) {
        // Callback after requesting new version information
        if (res.hasUpdate) {
            //2. If there is a new version of the applet, download the new version silently and prepare for the update
            updateManager.onUpdateReady(function () {
                wx.showModal({
                    title: 'Update tips',
                    content: 'The new version is ready. Do you want to restart the application?',
                    success: function (res) {
                        if (res.confirm) {
                            //3. The new version has been downloaded. Call applyUpdate to apply the new version and restart
                            updateManager.applyUpdate()
                        } else if (res.cancel) {
                            //If a forced update is required, a second pop-up window will be given. If not, the code here can be deleted
                            wx.showModal({
                                title: 'reminder',
                                content: 'This version update involves the addition of new functions. The old version cannot be accessed normally~',
                                success: function (
                                    res) {
                                    self.autoUpdate()
                                    return;
                                    //After the second prompt, force the update
                                    if (res
                                        .confirm
                                    ) {
                                        // The new version has been downloaded. Call applyUpdate to apply the new version and restart
                                        updateManager
                                            .applyUpdate()
                                    } else if (
                                        res
                                        .cancel
                                    ) {
                                        //Go back to the version update prompt
                                        self.autoUpdate()
                                    }
                                }
                            })
                        }
                    }
                })
            })
            updateManager.onUpdateFailed(function () {
                // Download of new version failed
                wx.showModal({
                    title: 'Update tips',
                    content: 'The new version has been launched~,Please delete the current applet and open it again',
                })
            })
        }
    })
# } else {
    // If you want users to experience your applet on the latest version of the client, you can prompt like this
    wx.showModal({
        title: 'Tips',
        content: 'The current wechat version is too low to use this function. Please upgrade to the latest wechat version and try again.'
    })
}
Alternative update scheme
In the applet page, such as the personal center, add the version number, add a click event to the version number, and then call the above method again for manual update.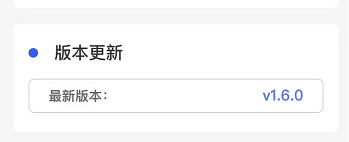
Other pits
After the wepy framework sets data, you need to manually call this$ The APPLAY () view will be updated
Students who use vue are very unfriendly. They often forget to write, resulting in no update of the view. They think there is a bug
This. Cannot be passed in wepy methods Funnamevisit yourself
- Use this For direct access to funname, it needs to be written in the outermost layer (at the same level of the life cycle)
- If you want to call directly, you can use this methods. funcName. call(this)
Error reporting of new Date on iOS system
On iOS systems, new Date('2021-1-1 12:00:00 ') is an unrecognizable string connected by replace(/\-/g, '/') method with '/' to solve.
Applet naming may violate regulations
The name of the applet when it goes online is very critical. The name is a drainage tool to some extent, but the applet official has very strict regulations on the name. If it is not named according to the regulations, it will be forcibly removed from the shelf after it goes online. Our company took the word "electricity charge" and asked for rectification and renaming, because the word is government in nature and cannot be used by private enterprises. Official connection
thank
As this is the first time to write this kind of technical article, there are many shortcomings. Thank you for seeing it. Finally, if this article is helpful to you, please don't forget to give me praise and comments.