Learning objectives
- Create Vue instances and know the common properties of Vue
- The hook function of Vue's life cycle will be used
- Can use vue common instructions
- vue will be used to calculate properties and watch monitoring
- Can write Vue components
- Master communication between components
- Understand the use of Vue router
0. Preface
A few days ago, we have done some research on the backend Technology stack Have a preliminary understanding, and have built the whole back-end micro service platform. The next thing to do is function development. But without the front-end page, we certainly can't start, so today we're going to learn about some front-end technologies and complete the front-end page construction.
Let's talk about the development of front-end development mode first.
Static page
The original web page is mainly HTML, which is a pure static web page. The web page is read-only, and the information flow can only flow one way from the server to the client. Developers only care about the style and content of the page.
Asynchronous refresh, DOM operation
In 1995, Brendan Eich, a Netscape engineer, spent 10 days designing the JavaScript language
With the birth of JavaScript, we can manipulate the DOM elements and styles of the page. The page has some dynamic effects, but it is still static.
ajax prevalence:
- Since 2005, ajax has been paid more and more attention by front-end developers, because the data and rendering effect of the page can be updated without refreshing the page.
- At this time, developers should not only write HTML styles, but also understand the interaction between ajax and the back end, and then operate Dom elements through JS to achieve page dynamic effects. Popular frameworks such as Jquery are typical.
MVVM, focus on models and views
In 2008, google's Chrome was released, and then it occupied the market at a very fast speed, surpassing IE to become the leader of the browser market.
In 2009, based on Google's Chrome V8 engine, Ryan Dahl created an asynchronous IO framework based on event loop: node js.
- Asynchronous IO based on event loop
- Single thread operation to avoid multi-threaded variable synchronization
- JS can write background code and unify the front and back programming language
node. The greatness of JS is not to make JS move towards back-end development, but to build a huge ecosystem.
In 2010, NPM served as node JS package management system is released for the first time, and developers can follow common JS specification to write node JS module, and then publish it to NPM for other developers to use. At present, it is the world's largest package module management system.
Subsequently, a large number of front-end frameworks emerged on the basis of node:
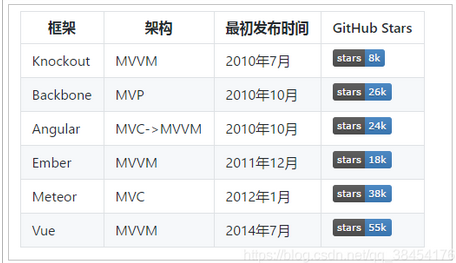
MVVM mode
- M: That is, Model, including data and some basic operations
- 5: That is, View, page rendering result
- VM: view model, two-way operation between model and view (without developer intervention)
Liberate developers from cumbersome DOM operations and focus on how to operate the Model.

What we want to learn today is a framework of MVVM mode: Vue
1. Recognize Vue
Vue (pronunciation / vju) ː/, Similar to view) is a progressive framework for building user interfaces. Unlike other large frameworks, Vue is designed to be applied layer by layer from bottom to top. Vue's core library only focuses on view layers, which is not only easy to start, but also easy to integrate with third-party libraries or existing projects. On the other hand, when combined with modern tool chains and various supporting class libraries, Vue can also provide drivers for complex single page applications.
Front end framework big three: Vue js,React.js,AngularJS,vue. JS is famous for its light weight and easy to use, Vue JS and react JS is developing fastest, and angularjs is still the boss.
Official website: Vue.js
reference resources: Introduction - Vue js

Git address: https://github.com/vuejs
2.Node and NPM
As mentioned earlier, NPM is a module management tool provided by node. It is very convenient to download and install many front-end frameworks, including Jquery, AngularJS and VueJs. For the convenience of later learning, we first install node and NPM tools.
2.1. Download node js
Download address: https://nodejs.org/en/

It is recommended to download the LTS version.
Version 8.11.3 is used in the course. It is also the latest. Download or use the installation package provided in the pre class materials. Then install it in the next step.
When finished, enter on the console:
node -v
See version information:

2.2.NPM
Node comes with NPM. Enter npm -v on the console to view:

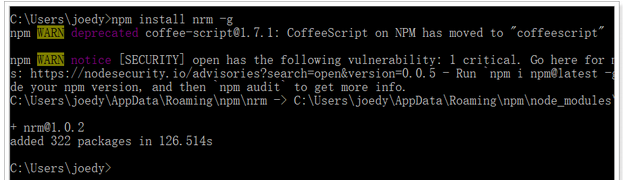
The default warehouse address of npm is on foreign websites, which is slow. It is recommended to set it to Taobao image. But switching images is troublesome. Recommend a tool for switching images: nrm
We first install nrm, where - g stands for global installation. It may take a little time
npm install nrm -g
Then view the warehouse list of npm through nrm ls command. The currently selected image warehouse is marked with *

Specify the mirror source to use through nrm use taobao:

Then test the speed through nrm test npm:

be careful:
- Some tutorials recommend that you use the cnpm command, but sometimes there are bug s in cnpm, which is not recommended.
- Please restart the computer after installation!!!
- Please restart the computer after installation!!!
- Please restart the computer after installation!!!
3. Quick start
Next, let's quickly appreciate the charm of vue
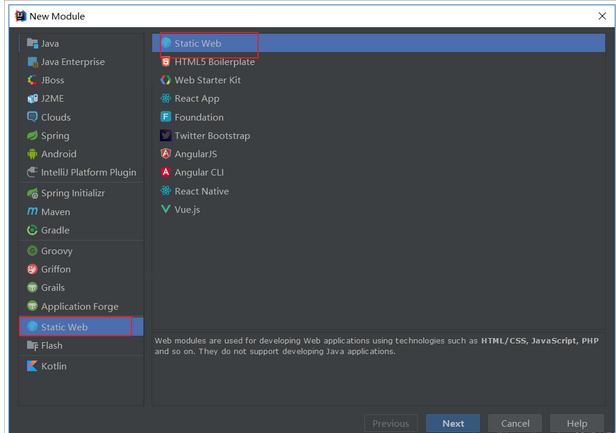
3.1. Create project
Create a new empty project:

Then create a new module:

Select static web, static web project:
3.2. Install vue
3.2.1. Download and install
Download address: https://github.com/vuejs/vue
You can download version 2.5.16 https://github.com/vuejs/vue/archive/v2.5.16.zip
Download and unzip to get Vue JS file.
3.2.2. Using CDN
Or you can directly use the public CDN service:
<!-- Development environment version, including command line warnings with help -->
<script src="https://cdn.jsdelivr.net/npm/vue/dist/vue.js"></script>
Or:
<!-- Production environment version, optimized size and speed -->
<script src="https://cdn.jsdelivr.net/npm/vue"></script>
3.2.3. Recommended npm installation
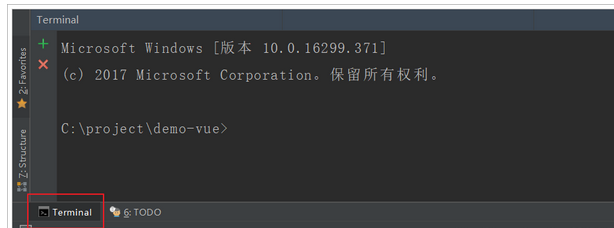
In the lower left corner of idea, there is a Terminal button. Click to open the console: cd to module project

Enter the Hello Vue directory and enter: npm init -y to initialize
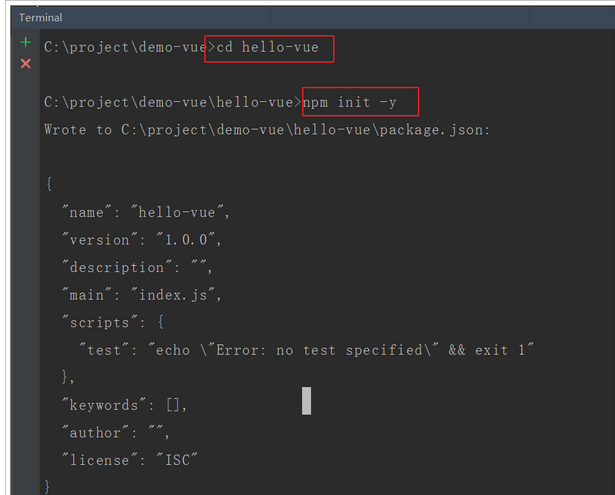
To install Vue, enter the command: npm install vue --save
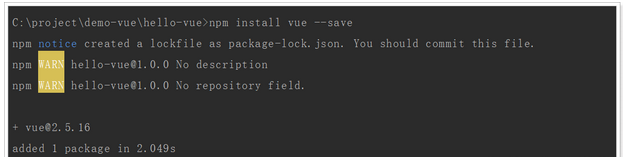
Then you will find a node in the Hello vue directory_ Modules directory, and there is a vue directory below.
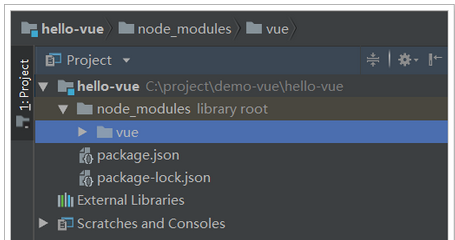
node_modules is the default location for all modules installed through npm.
3.3. Introduction to Vue
3.3.1.HTML template
Create a new HTML in the Hello Vue directory
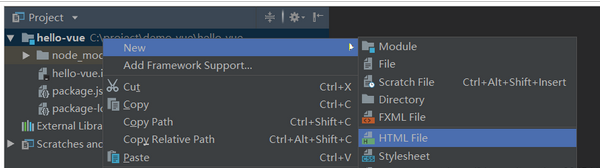
In hello HTML, we write a simple code:
h2 to output a sentence: xx is very handsome. The previous xx is the data to be rendered.
3.3.2.vue declarative rendering
Then we render via Vue:
<body>
    <div id="app">
        <h2>{{name}},Very handsome!!!</h2>
    </div>
</body>
<script src="node_modules/vue/dist/vue.js" ></script>
<script>
    // Create vue instance
    var app = new Vue({
        el:"#app", // el is element, which is the page element to be rendered by this vue instance
        data:{ // Data needed to render the page
            name: "Feng Ge"
        }
    });

</script>
First, create a Vue instance through new Vue()
Then the constructor receives an object with some properties:
el: is the abbreviation of element. Select the page element to be rendered by id. in this case, it is a div
Data: data. Data is an object with many attributes, which can be rendered into the view
Name: Here we specify a name attribute
In the h2 element in the page, we render the name attribute just defined by {name}}.
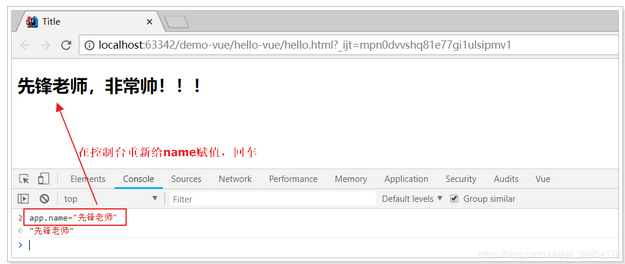
Open the page to view the effect: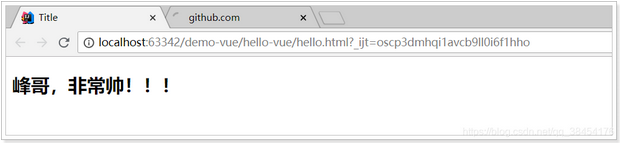
What's more amazing is that when you modify the name attribute, the page will change:
3.3.3. Bidirectional binding
Let's make a simple modification to the case just now:
<body>
    <div id="app">
        <input type="text" v-model="num">
        <h2>
            {{name}},Very handsome!!! have{{num}}A goddess was fascinated by him.
        </h2>
    </div>
</body>
<script src="node_modules/vue/dist/vue.js" ></script>
<script>
    // Create vue instance
    var app = new Vue({
        el: "#app", // el is element, which is the page element to be rendered by this vue instance
        data: { // Data needed to render the page
            name: "Feng Ge",
            num: 5
        }
    });

</script>
- We added a new attribute to data: num
- There is an input element in the page, which is bound with num through v-model.
- At the same time, output on the page through {{num}}
effect:
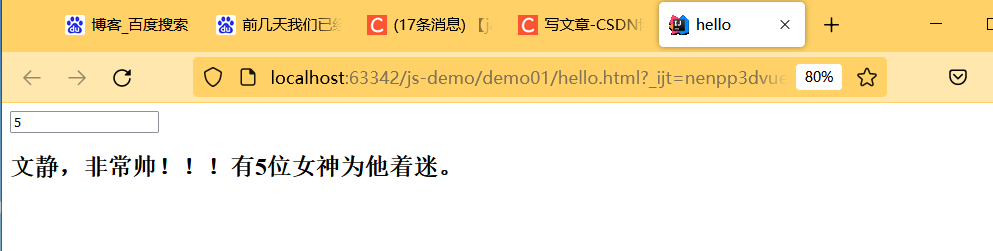
We can observe that the change of input box causes the change of num in data, and the page output also changes.
Input is bound to num, and the value of input changes, which affects the value of num in data
The page {{num}} is bound to the data num, so the change of num value causes the change of page effect.
There is no dom operation, which is the charm of two-way binding.
3.3.4. event processing
We add a button to the page:
<button v-on:click="num++">Point me</button>
- Here, use the v-on instruction to bind the click event instead of the ordinary onclick, and then directly operate num
- Normal click cannot directly operate num.
effect:
4.Vue instance
4.1. Create Vue instance
Each Vue application starts by creating a new Vue instance with the Vue function:
var vm = new Vue({
  // option
})
Pass in an object in the constructor, and declare various data and methods required by Vue in the object, including:
- el
- data
- methods
wait
Next, let's introduce them one by one.
4.2. Template or element
Each Vue instance needs to be associated with an Html template, and Vue will render the view based on this template.
We can specify it through the el attribute.
For example, an html template:
<div id="app">

</div>
Create this instance, vudiv
var vm = new Vue({
	el:"#app"
})
In this way, Vue can render based on the div element with id app as a template. The Vue feature cannot be used outside this div range.
4.3. data
When the Vue instance is created, it will try to obtain all the attributes defined in data for view rendering, and monitor the attribute changes in data. When the data changes, all relevant views will be re rendered, which is a "responsive" system.
<div id="app">
    <input type="text" v-model="name"/>
</div>
js:
var vm = new Vue({
    el:"#app",
    data:{
        name:"Lau Andy"
    }
})
- The change of name will affect the value of input
- The value entered in input will also cause the name in vm to change
4.4. method
In addition to defining data attributes, Vue instances can also define methods, which are used within the scope of Vue instances.
html:
<div id="app">
    {{num}}
    <button v-on:click="add">plus</button>
</div>
js:
var vm = new Vue({
    el:"#app",
    data:{
        num: 0
    },
    methods:{
        add:function(){
            // this represents the current vue instance of
            this.num++;
        }
    }
})
4.5.life cycle hook
4.5.1. life cycle
When each Vue instance is created, it goes through a series of initialization processes: creating an instance, loading a template, rendering a template, and so on. Vue sets for each state in the lifecycle Hook function (listening function). Each time a Vue instance is in a different life cycle, the corresponding function will be triggered and called.
Life cycle:
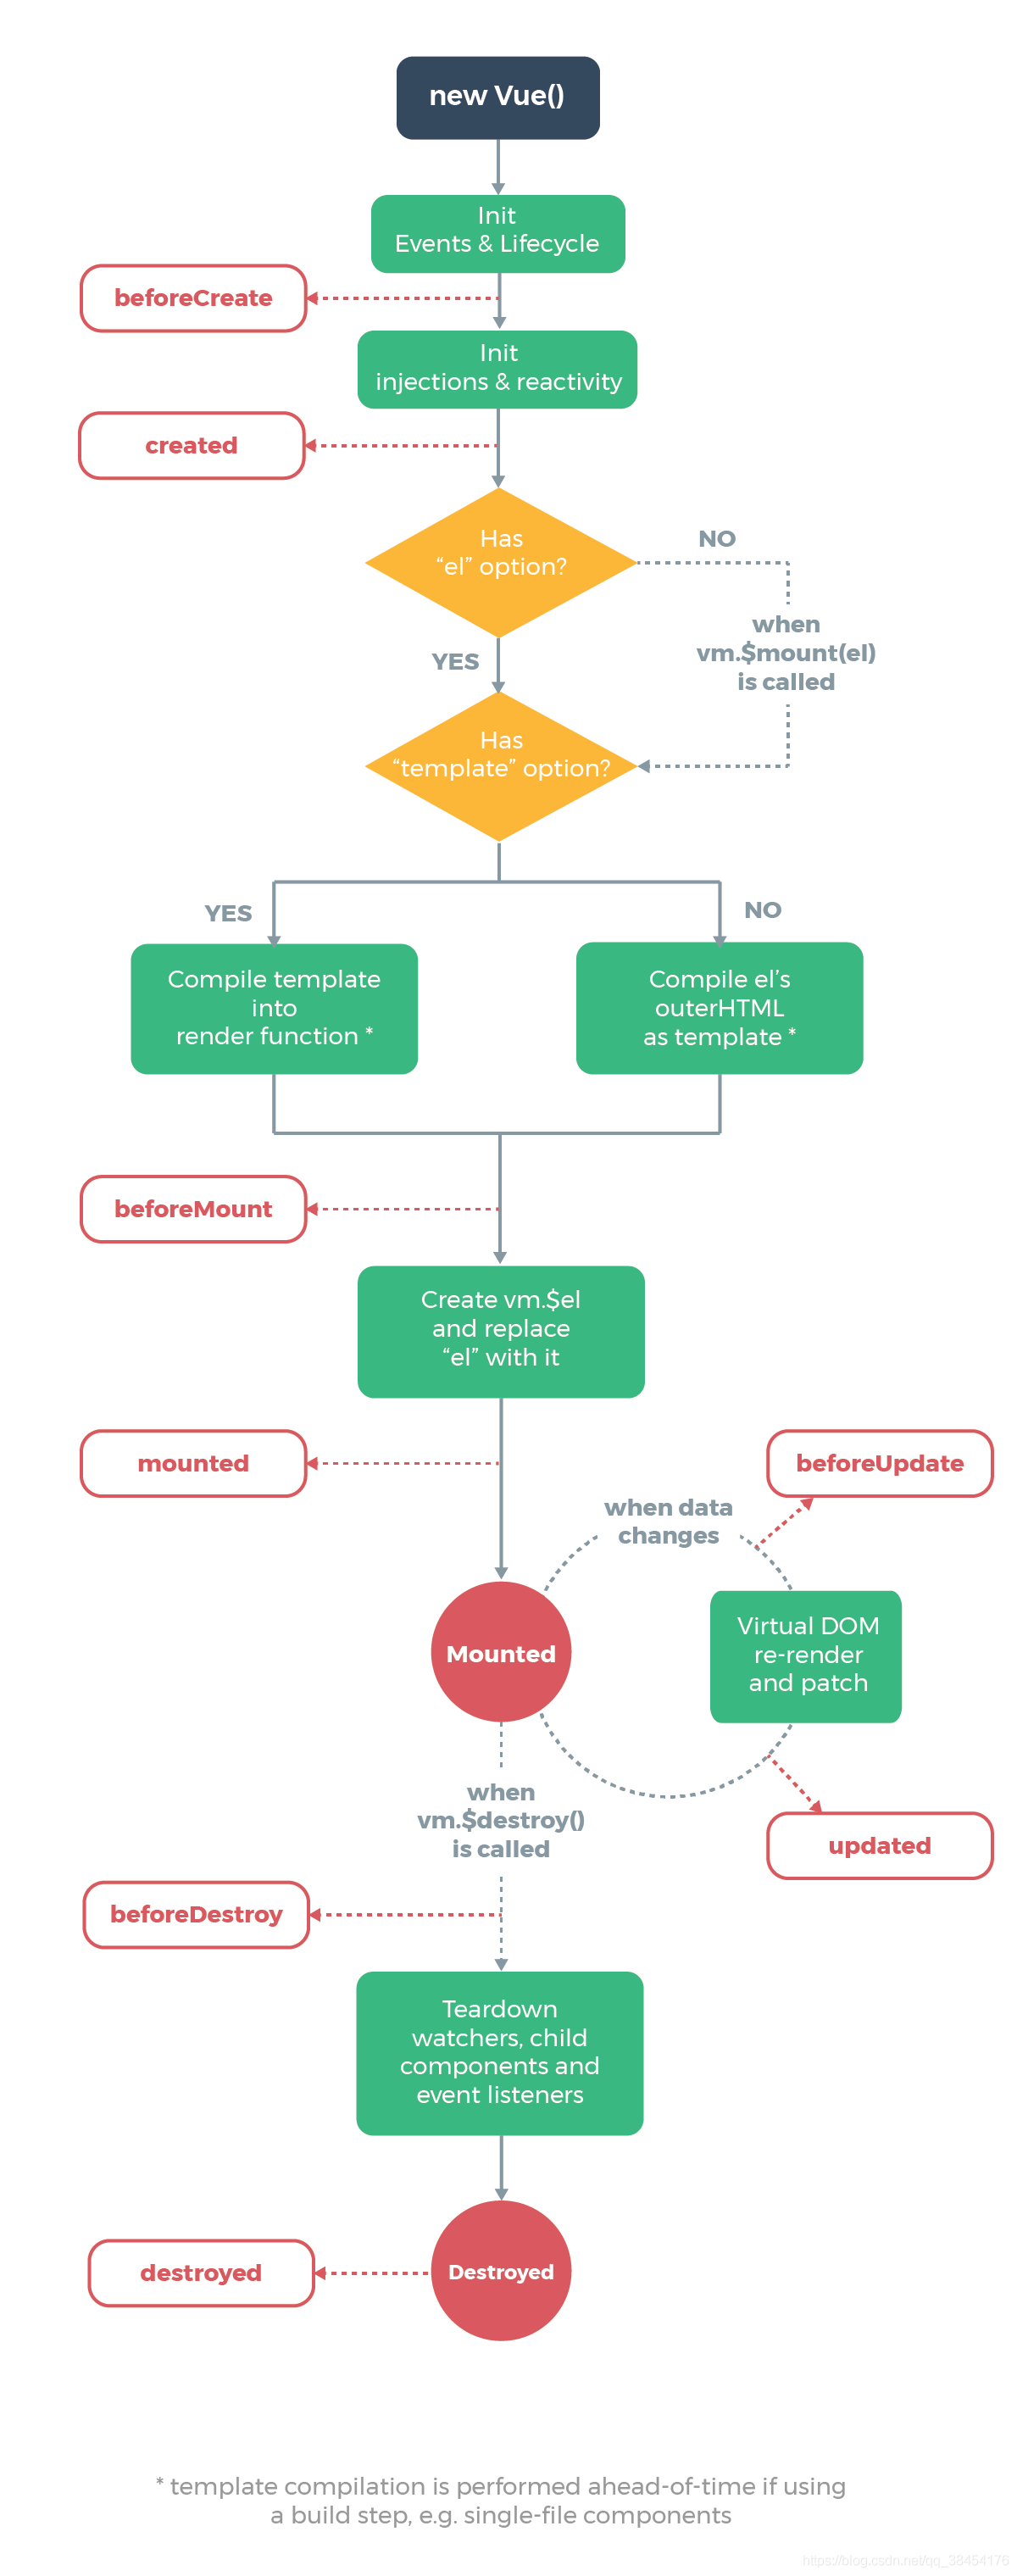
4.5.2. Hook function
beforeCreated: we need to instantiate when using Vue. Therefore, this function is called when Vue is instantiated. It can also be understood as an initialization function. It is more convenient in vue1 0, the name of this function is init.
Created: called after the instance is created.
beforeMount: the page is loaded without rendering. For example, the page is still {undefined{name}}
mounted: we can understand it as window in native js ο nl ο ad=function({.,.}), Maybe you are also using jquery, so it can also be understood as $(document) in jquery ready(function(){….}), Its function is: the function to be executed after the dom document is rendered. The function is in vue1 The name in version 0 is compiled. At this time, {undefined{name}} in the page has been rendered as Fengge
beforeDestroy: this function will be called before destroying the instance.
Destroyed: the modified function will be called when the instance is destroyed.
Before update: before component update.
Updated: after the component is updated.
For example: created means after the vue instance is created;
We can define a created function in Vue to represent the hook function of this period:
    // Create vue instance
    var app = new Vue({
        el: "#app", // el is element, which is the page element to be rendered by this vue instance
        data: { // Data needed to render the page
            name: "Feng Ge",
            num: 5
        },
        methods: {
            add: function(){
                this.num--;
            }
        },
        created: function () {
            this.num = 100;
        }
    });
result:
4.5.3.this
We can see who the this variable is inside vue, and print this when we create it
        methods: {
            add: function(){
                this.num--;
                console.log(this);
            }
        },
5. Instructions
What are instructions?
Directives are special features with v-prefix. The expected value of the instruction attribute is a single JavaScript expression. When the value of an expression changes, the function of the instruction is to apply its associated influence to the DOM responsively.
For example, v-on in our introductory case represents binding events.
5.1. Interpolation expression
5.1.1. Curly bracket
Format:
{{expression}}
explain:
- This expression supports JS syntax and can call JS built-in functions (there must be a return value)
- The expression must have a return result. For example, 1 + 1, expressions without results are not allowed, such as var a = 1 + 1;
- You can directly obtain the data or functions defined in the Vue instance
Example:
HTML:
<div id="app">{{name}}</div>
JS:
var app = new Vue({
    el:"#app",
    data:{
        name:"Jack"
    }
})
5.1.2. Interpolation flicker
Using {undefined {}} will cause problems when the network speed is slow. When the data is not loaded, the original {}} will be displayed on the page, and the correct data will be displayed only after loading, which is called interpolation flicker.
Let's slow down the network speed and try the case just now:
5.1.3.v-text and v-html
Use v-text and v-html instructions instead of {}
explain:
- v-text: output the data to the inside of the element. If the output data has HTML code, it will be output as normal text
- v-html: output the data to the inside of the element. If the output data has HTML code, it will be rendered
Example:
HTML:
<div id="app">
    v-text:<span v-text="hello"></span> <br/>
    v-html:<span v-html="hello"></span>
</div>
JS:
var vm = new Vue({
    el:"#app",
    data:{
        hello: "<h1>Hello, I'm brother Feng</h1>"
    }
})
effect:
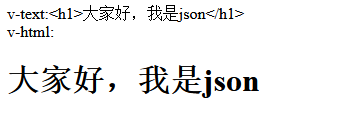
And there will be no interpolation flicker. When there is no data, it will display blank.
5.2.v-model
Just now, v-text and v-html can be regarded as one-way binding. The data affects the View rendering, but vice versa. The next v-model to learn is two-way binding, and views and models will affect each other.
Since it is a two-way binding, the data must be modifiable in the view, which limits the element type of the view. Currently, the available elements of v-model are:
input
select
textarea
checkbox
radio
Components (custom components in Vue)
Basically, except for the last item, everything else is the input item of the form.
give an example:
html:
<div id="app">
    <input type="checkbox" v-model="language" value="Java" />Java<br/>
    <input type="checkbox" v-model="language" value="PHP" />PHP<br/>
    <input type="checkbox" v-model="language" value="Swift" />Swift<br/>
    <h1>
        You chose:{{language.join(',')}}
    </h1>
</div>
<script src="./node_modules/vue/dist/vue.js"></script>
<script type="text/javascript">
    var vm = new Vue({
        el:"#app",
        data:{
            language: []
        }
    })
</script>
- When a single checkbox model is an array type, the default value is one or more
- The value corresponding to radio is the value of input
- By default, the corresponding model of text and textarea is a string
- select single selection corresponds to string, and multiple selection corresponds to array
effect:

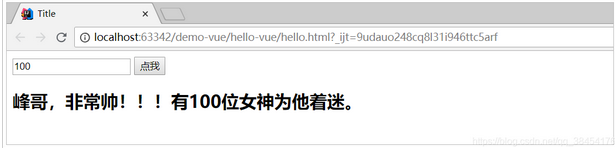
5.3.v-on=@
5.3.1. Basic Usage
The v-on instruction is used to bind events to page elements.
Syntax:
v-on:Event name="js Fragment or function name"
Example:
<div id="app">
    <!--Write directly in event js fragment-->
    <button v-on:click="num++">Add one</button><br/>
    <!--Event specifies a callback function, which must be Vue Functions defined in the instance-->
    <button v-on:click="decrement">Reduce one</button><br/>
    <h1>have{{num}}A goddess is infatuated with brother Feng</h1>
</div>
<script src="./node_modules/vue/dist/vue.js"></script>
<script type="text/javascript">
    var app = new Vue({
        el:"#app",
        data:{
            num:100
        },
        methods:{
            decrement(){
                this.num--;
            }
        }
    })
</script>
effect:
In addition, event binding can be abbreviated. For example, v-on:click='add 'can be abbreviated as @ click='add'
5.3.2. Event modifier
Calling event. in event handler Preventdefault() or event Stoppropagation () is a very common requirement. Although we can easily implement this in the method, a better way is that the method only has pure data logic, rather than dealing with DOM event details.
To solve this problem, Vue JS provides event modifiers for v-on. A modifier is represented by an instruction suffix beginning with a dot.
- . stop: prevent the event from bubbling to the parent element
- . Prevent: prevent default events from happening*
- . Capture: use event capture mode
- . self: only the event triggered by the element itself can be executed. (neither bubbling nor capturing will be performed)
- . Once: execute only once
Block default events
<div id="app">
    <!--Right click the event and prevent the default event from happening-->
    <button v-on:contextmenu.prevent="num++">Add one</button>
    <br/>
    <!--Right click the event to not prevent the default event from happening-->
    <button v-on:contextmenu="decrement($event)">Reduce one</button>
    <br/>
    <h1>have{{num}}A goddess is infatuated with brother Feng</h1>
</div>
<script src="./node_modules/vue/dist/vue.js"></script>
<script type="text/javascript">
    var app = new Vue({
        el: "#app",
        data: {
            num: 100
        },
        methods: {
            decrement(ev) {
                // ev.preventDefault();
                this.num--;
            }
        }
    })
</script>
Effect: (right clicking "add one" will not trigger the default browser right-click event; right clicking "reduce one" will trigger the default browser right-click event)
5.3.3. Key modifier
When monitoring keyboard events, we often need to check common key values. Vue allows v-on to add key modifiers when listening for keyboard events:
<!-- Only in `keyCode` Called when is 13 `vm.submit()` -->
<input v-on:keyup.13="submit">
It is difficult to remember all keycodes, so Vue provides aliases for the most commonly used keys:
<!-- ditto -->
<input v-on:keyup.enter="submit">

<!-- Abbreviation syntax -->
<input @keyup.enter="submit">
<!-- ditto -->
<input v-on:keyup.enter="submit">

<!-- Abbreviation syntax -->
<input @keyup.enter="submit">
All key aliases:
- .enter*
- .tab
- . delete (capture delete and backspace keys)
- .esc
- .space
- .up
- .down
- .left
- .right
5.3.4. Combination button
The following modifiers can be used to implement a listener that triggers mouse or keyboard events only when the corresponding key is pressed.
- .ctrl
- .alt
- .shift
For example:
<!-- Alt + C -->
<input @keyup.alt.67="clear">

<!-- Ctrl + Click -->
<div @click.ctrl="doSomething">Do something</div>
5.4.v-for
Traversing the data rendering page is a very common requirement, which is implemented through the v-for instruction in Vue.
5.4.1. Traversal array
Syntax:
v-for="item in items"
- items: the array to be traversed needs to be defined in vue's data.
- item: alias of array element obtained by iteration
Examples
<div id="app">
<ul>
<li v-for="user in users">
{{user.name}} - {{user.gender}} - {{user.age}}
</li>
</ul>
</div>
<script src="./node_modules/vue/dist/vue.js"></script>
<script type="text/javascript">
var app = new Vue({
el: "#app",
data: {
users:[
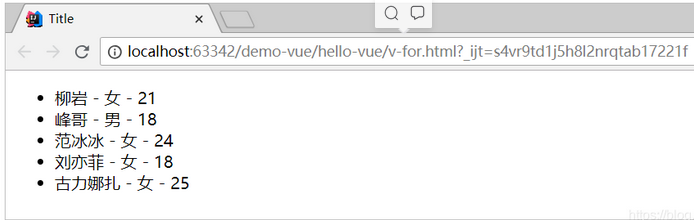
{name:'Liuyan', gender:'female', age: 21},
{name:'Feng Ge', gender:'male', age: 18},
{name:'Fan Bingbing', gender:'female', age: 24},
{name:'Liu Yifei', gender:'female', age: 18},
{name:'Gulinaza', gender:'female', age: 25}
]
},
})
</script>
Effect:
5.4.2. Array subscript
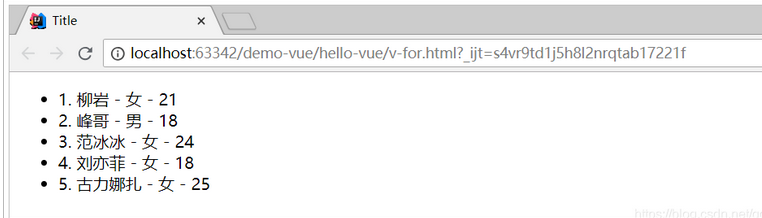
In the process of traversal, if we need to know the array subscript, we can specify the second parameter:
grammar
v-for="(item,index) in items"
    <ul>
        <li v-for="(user, index) in users">
            {{index + 1}}. {{user.name}} - {{user.gender}} - {{user.age}}
        </li>
    </ul>
effect:
5.4.3. Traversal object
In addition to iterating over arrays, v-for can also iterate over objects. The grammar is basically similar
Syntax:
v-for="value in object"
v-for="(value,key) in object"
v-for="(value,key,index) in object"
- 1 parameter, the attribute value of the object is obtained
- When there are two parameters, the first is the attribute value and the second is the attribute name
- When there are 3 parameters, the third is the index, starting from 0
Example:
<div id="app">
    <ul>
        <li v-for="(value, key, index) in user">
            {{index + 1}}. {{key}} - {{value}}
        </li>
    </ul>
</div>
<script src="./node_modules/vue/dist/vue.js"></script>
<script type="text/javascript">
    var vm = new Vue({
        el:"#app",
        data:{
            user:{name:'Feng Ge', gender:'male', age: 18}
        }
    })
</script>
Effect:

5.4.4.key
When Vue When JS is updating the list of rendered elements with v-for, it uses the "reuse in place" strategy by default. If the order of data items is changed, Vue will not move DOM elements to match the order of data items, but simply reuse each element here and ensure that it displays each element that has been rendered under a specific index.
This function can effectively improve the efficiency of rendering.
But to implement this function, you need to give Vue some hints so that it can track the identity of each node, so as to reuse and reorder existing elements. You need to provide a unique key attribute for each item. The ideal key value is the unique id that each item has.
Example:
<ul>
    <li v-for="(item,index) in items" :key=index></li>
</ul>- A special syntax is used here: key = "" we will talk about later. It allows you to read the attribute in vue and assign it to the key attribute
- The key we bind here is the index of the array and should be unique
5.5.v-if and v-show
5.5.1. Basic use
v-if, as the name suggests, conditional judgment. When the result is true, the element will be rendered.
Syntax:
v-if = "Boolean expression"
Example:
<div id="app">
    <button v-on:click="show = !show">Order me</button>
    <br>
    <h1 v-if="show">
        See me?!
    </h1>
    <h1 v-show="show">
        See me?! show
    </h1>
</div>
<script src="./node_modules/vue/dist/vue.js"></script>
<script type="text/javascript">
    var app = new Vue({
        el: "#app",
        data: {
            show: true
        }
    })
</script>
Effect:

5.5.2. Combined with v-for
When v-if and v-for appear together, v-for takes precedence. In other words, it will traverse first and then judge the conditions.
Modify the case in v-for and add v-if:
    <ul>
        <li v-for="(user, index) in users" v-if="user.gender == 'female'">
            {{index + 1}}. {{user.name}} - {{user.gender}} - {{user.age}}
        </li>
    </ul>
effect:

Show only female user information
5.5.3.v-else
You can use the v-else instruction to represent the "else block" of v-if:
<div id="app">
    <h1 v-if="Math.random() > 0.5">
        See me?! if
    </h1>
    <h1 v-else>
        See me?! else
    </h1>
</div>
The v-else element must follow the element with v-if or v-else-if, otherwise it will not be recognized.
v-else-if, as the name suggests, acts as the "else if block" of v-if and can be used continuously:
<div id="app">
    <button v-on:click="random=Math.random()">Order me</button><span>{{random}}</span>
    <h1 v-if="random >= 0.75">
        See me?! if
    </h1>
    <h1 v-else-if="random > 0.5">
        See me?! if 0.5
    </h1>
    <h1 v-else-if="random > 0.25">
        See me?! if 0.25
    </h1>
    <h1 v-else>
        See me?! else
    </h1>
</div>
<script src="./node_modules/vue/dist/vue.js"></script>
<script type="text/javascript">
    var app = new Vue({
        el: "#app",
        data: {
            random: 1
        }
    })
</script>
Similar to v-else, v-else-if must also follow the element with v-if or v-else-if.
demonstration:

5.5.4.v-show
Another option for displaying elements based on conditions is the v-show instruction. The usage is roughly the same:
<h1 v-show="ok">Hello!</h1>
The difference is that elements with v-show are always rendered and retained in the DOM. V-show simply switches the CSS attribute display of an element.
Example:
    <div id="app">
        <!--Write directly in event js fragment-->
        <button v-on:click="show = !show">Click switch</button><br/>
        <h1 v-if="show">
            Hello
        </h1>
    </div>
    <script src="./node_modules/vue/dist/vue.js"></script>
    <script type="text/javascript">
        var app = new Vue({
            el:"#app",
            data:{
                show:true
            }
        })
    </script>
code:

5.6.v-bind
html attributes cannot be bound in the form of double curly braces. Only the v-bind instruction can be used.
When using v-bind for class and style, Vue JS has been specially enhanced. In addition to string, the type of expression result can also be object or array.
<div id="app">
    <!--It can be a data model or a model with a return value js Code block or function-->
    <div v-bind:title="title" style="border: 1px solid red; width: 50px; height: 50px;"></div>
</div>
<script src="./node_modules/vue/dist/vue.js"></script>
<script type="text/javascript">
    var app = new Vue({
        el: "#app",
        data: {
            title: "title",
        }
    })
</script>
effect:

When using v-bind for class and style, Vue JS has been specially enhanced. In addition to string, the type of expression result can also be object or array.
5.6.1. Bind class style
Array syntax
We can use the v-bind instruction to realize:
HTML:
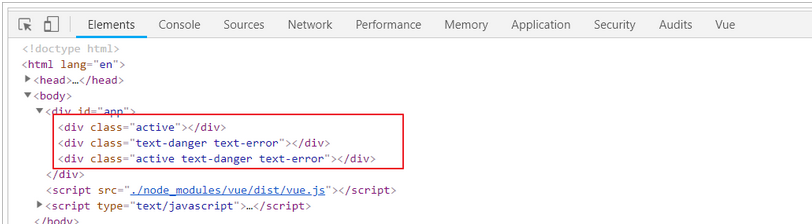
<div id="app">
    <div v-bind:class="activeClass"></div>
    <div v-bind:class="errorClass"></div>
    <div v-bind:class="[activeClass, errorClass]"></div>
</div>
<script src="./node_modules/vue/dist/vue.js"></script>
<script type="text/javascript">
    var app = new Vue({
        el: "#app",
        data: {
            activeClass: 'active',
            errorClass: ['text-danger', 'text-error']
        }
    })
</script>
Effect after rendering: (style with active and hasError)
Object syntax
We can pass an object to v-bind:class to dynamically switch class:
<div v-bind:class="{ active: isActive }"></div>
The above syntax indicates that the existence of the active class will depend on the truth of the data attribute isActive (all values are true, except false,0, "", null,undefined and NaN).
You can dynamically switch multiple classes by passing in more properties in the object. In addition, the v-bind:class instruction can also coexist with the ordinary class attribute. The following template:
<div class="static"
     v-bind:class="{ active: isActive, 'text-danger': hasError }">
</div>
And the following data:
data: {
  isActive: true,
  hasError: false
}
The result is rendered as:
<div class="static active"></div>
The existence of active style and text danger style depends on the values of isActive and hasError. In this example, isActive is true and hasError is false, so the active style exists and the text danger does not exist.
5.6.2. Bind style
Array syntax
Array syntax can apply multiple style objects to the same element:
<div v-bind:style="[baseStyles, overridingStyles]"></div>
Data:
data: {
    baseStyles: {'background-color': 'red'},
    overridingStyles: {border: '1px solid black'}
}
Rendered result:
<div style="background-color: red; border: 1px solid black;"></div>
Object syntax
The object syntax of v-bind:style is very intuitive -- it looks very much like CSS, but it's actually a JavaScript object. CSS attribute names can be named with camel case or kebab case (remember to enclose them in single quotation marks):
<div v-bind:style="{ color: activeColor, fontSize: fontSize + 'px' }"></div>
Data:
data: {
  activeColor: 'red',
  fontSize: 30
}
effect:
<div style="color: red; font-size: 30px;"></div>
5.6.3. Abbreviation
v-bind:class can be abbreviated as: class
5.7. Calculation properties
It is very convenient to use js expression in interpolation expression, and it is often used.
However, if the content of the expression is very long, it will not be elegant enough, and it is inconvenient to maintain later. For example, in the following scenario, we have a date data, but it is a millisecond value:
data:{
    birthday:1529032123201 // Millisecond value
}
When we render the page, we want to get the style of yyyy MM DD:
<h1>Your birthday is:{{
    new Date(birthday).getFullYear() + '-'+ new Date(birthday).getMonth()+ '-' + new Date(birthday).getDay()
    }}
</h1>
Although the results can be obtained, it is very troublesome.
Calculation properties are provided in Vue to replace complex expressions:
var vm = new Vue({
    el:"#app",
    data:{
        birthday:1429032123201 // Millisecond value
    },
    computed:{
        birth(){// Computing an attribute is essentially a method, but it must return a result
            const d = new Date(this.birthday);
            return d.getFullYear() + "-" + d.getMonth() + "-" + d.getDay();
        }
    }
})
- Computing properties is essentially a method, but you must return data. Then, when rendering the page, you can use this method as a variable.
Page usage:
    <div id="app">
       <h1>Your birthday is:{{birth}} </h1>
    </div>
effect:

We can define the same function as a method rather than a calculated attribute. The final result of the two methods is exactly the same. However, the difference is that calculated attributes are cached based on their dependencies. A computed property is re evaluated only when its related dependencies change. This means that as long as birthday has not changed, multiple accesses to birthday calculation properties will immediately return the previous calculation results without executing the function again.
5.8.watch
watch allows us to monitor the change of a value. So as to respond accordingly.
Examples
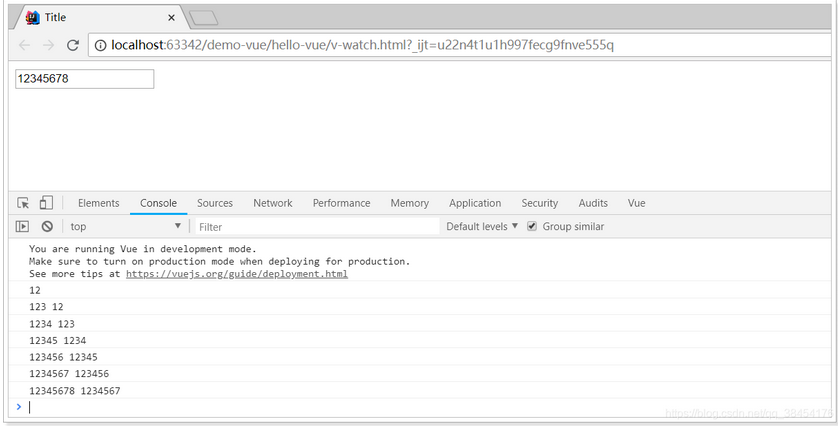
<div id="app">
    <input type="text" v-model="message">
</div>
<script src="./node_modules/vue/dist/vue.js"></script>
<script type="text/javascript">
    var vm = new Vue({
        el:"#app",
        data:{
            message:""
        },
        watch:{
            message(newVal, oldVal){
                console.log(newVal, oldVal);
            }
        }
    })
</script>
effect:
6. Componentization
In large-scale application development, the page can be divided into many parts. Often different pages have the same parts. For example, there may be the same head navigation.
However, if each page is developed independently, it will undoubtedly increase the cost of our development. Therefore, we will split different parts of the page into independent components, and then share these components on different pages to avoid repeated development.
In vue, all vue instances are components
6.1. Global components
We define a global component through Vue's component method.
<div id="app">
<!--Use defined global components-->
<counter></counter>
</div>
<script src="./node_modules/vue/dist/vue.js"></script>
<script type="text/javascript">
// Define global components with two parameters: 1. Component name. 2. Component parameters
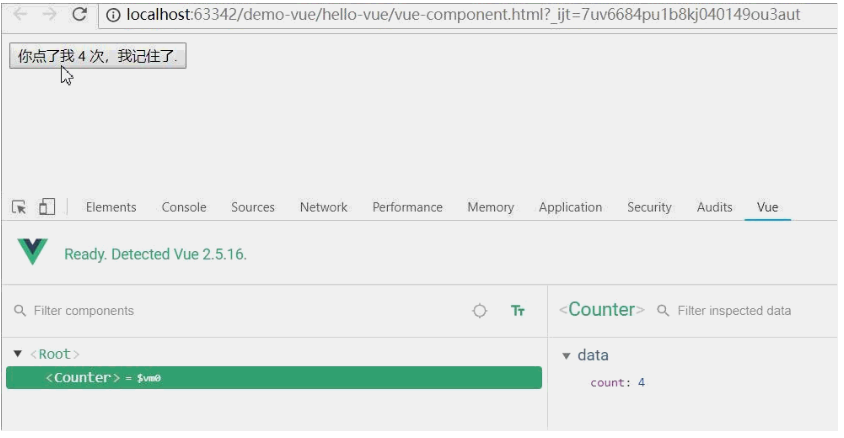
Vue.component("counter",{
template:'<button v-on:click="count++">You ordered me {{ count }} Once, I remember.</button>',
data(){
return {
count:0
}
}
})
var app = new Vue({
el:"#app"
})
</script>
- In fact, a component is also a Vue instance, so it will also receive data, methods, lifecycle functions, etc. when defining
- The difference is that the component will not bind to the elements of the page, otherwise it cannot be reused, so there is no el attribute.
- However, component rendering requires HTML template, so the template attribute is added, and the value is HTML template
- After the global component is defined, any vue instance can use the component directly through the component name in HTML.
- data must be a function, not an object.
effect:
6.2. Reuse of components
Defined components can be reused for many times at will:
<div id="app">
    <!--Use defined global components-->
    <counter></counter>
    <counter></counter>
    <counter></counter>
</div>
effect:
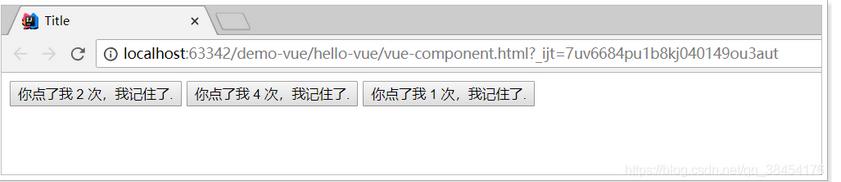
You will find that each component does not interfere with each other and has its own count value. How?
The data attribute of the component must be a function!
When we define this < counter > component, its data does not directly provide an object as before:
data: {
  count: 0
}
Instead, the data option of a component must be a function, so each instance can maintain an independent copy of the returned object:
data: function () {
  return {
    count: 0
  }
}
If Vue does not have this rule, clicking a button will affect all other instances!
6.3. Local component
Once registered globally, it means that even if you no longer use this component in the future, it will still load with Vue loading.
Therefore, for some components that are not used frequently, we will use local registration.
We first define an object externally, and the structure is consistent with the second parameter passed when creating the component:
const counter = {
    template:'<button v-on:click="count++">You ordered me {{ count }} Once, I remember.</button>',
    data(){
        return {
            count:0
        }
    }
};
Then use it in Vue:
var app = new Vue({
    el:"#app",
    components:{
        counter:counter // Register the defined object as a component
    }
})
- components is the collection of subcomponents of the current vue object.
- The key is the name of the sub component
- The value of the object is its component name
- The effect is similar to the global registration just now, except that this counter component can only be used in the current Vue instance
6.4. Component communication
Usually, a single page application is organized in the form of a nested component tree:
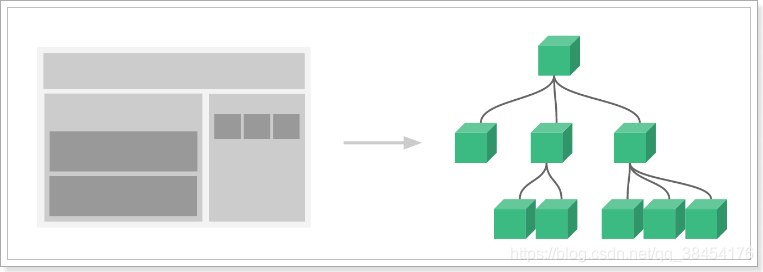
- The page is first divided into three parts: top navigation, left content area and right sidebar
- The content area on the left is divided into upper and lower components
- The right sidebar contains three sub components
The components are combined in a nested relationship, so there will inevitably be the need for communication between components at this time.
6.4.1.props (pass from parent to child)
- When the parent component uses the child component, customize the attribute (the attribute name is arbitrary, and the attribute value is the data to be transferred)
- The child component receives the parent component data through props and defines the attribute name of the attribute
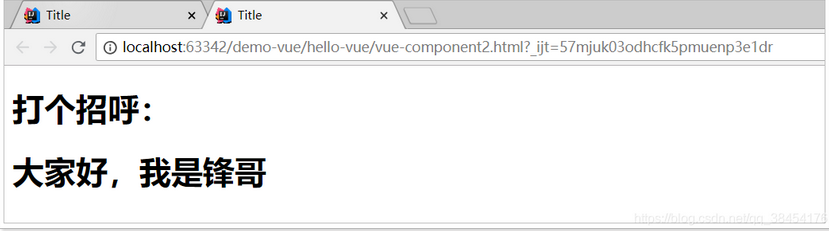
The parent component uses the child component and customizes the title attribute:
<div id="app">
    <h1>Say hello:</h1>
    <!--Use subcomponents and pass title attribute-->
    <introduce title="Hello, I'm brother Feng"/>
</div>
<script src="./node_modules/vue/dist/vue.js"></script>
<script type="text/javascript">
    Vue.component("introduce",{
        // Directly use the properties received by props to render the page
        template:'<h1>{{title}}</h1>',
        props:['title'] // Receive the attributes passed by a parent component through props
    })
    var app = new Vue({
        el:"#app"
    })
</script>
effect:
6.4.2.props verification
We define a sub component and receive complex data:
    const myList = {
        template: '\
        <ul>\
        	<li v-for="item in items" :key="item.id">{{item.id}} : {{item.name}}</li>\
        </ul>\
        ',
        props: {
            items: {
                type: Array,
                default: [],
                required: true
            }
        }
    };
This sub component can iterate over the items and output them to the page.
- props: defines the properties that need to be received from the parent component
- items: is the name of the attribute to be received
- type: qualified parent component must pass an array
- Default: the default value
- Required: required
When the prop verification fails, Vue will generate a console warning.
We use it in the parent component:
<div id="app">
    <h2>Course:</h2>
    <!-- While using sub components, you can pass attributes. Here, you use v-bind,Points to the parent component's own properties lessons -->
    <my-list :items="lessons"/>
</div>
var app = new Vue({
    el:"#app",
    components:{
        myList // When key and value are the same, you can write only one
    },
    data:{
        lessons:[
            {id:1, name: 'java'},
            {id:2, name: 'php'},
            {id:3, name: 'ios'},
        ]
    }
})
effect:

type, which can include:
Note: the subcomponent template has and only has one root label
6.4.3. Dynamic and static transfer
Pass a static value to prop:
<introduce title="Hello, I'm brother Feng"/>
Pass a dynamic value to prop: (get the value of title from the data model through v-bind)
<introduce :title="title"/>
In static transmission, the values we pass in are of string type, but in fact, any type of value can be passed to a props.
<!-- even if `42` Is static, we still need `v-bind` To tell Vue -->
<!-- This is a JavaScript Expression instead of a string.-->
<blog-post v-bind:likes="42"></blog-post>

<!-- Dynamic assignment with a variable.-->
<blog-post v-bind:likes="post.likes"></blog-post>
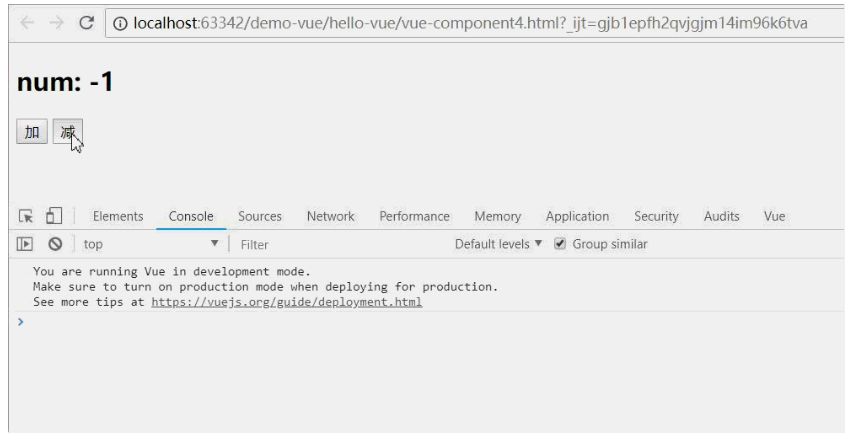
6.4.4. Communication from child to parent: $emit
Let's look at a case:
<div id="app">
    <h2>num: {{num}}</h2>
    <!--When using subcomponents, pass num Into sub components-->
    <counter :num="num"></counter>
</div>
<script src="./node_modules/vue/dist/vue.js"></script>
<script type="text/javascript">
    Vue.component("counter", {// Subcomponent, which defines two buttons. Clicking the number num will add or subtract
        template:'\
            <div>\
                <button @click="num++">plus</button>  \
                <button @click="num--">reduce</button>  \
            </div>',
        props:['num']// count is obtained from the parent component.
    })
    var app = new Vue({
        el:"#app",
        data:{
            num:0
        }
    })
</script>
- The child component receives the num attribute of the parent component
- Sub component definition: click the button to add or subtract num
We try to run it. It seems that there is no problem. Click the button to try:

After the child component receives the parent component property, it is not allowed to modify by default. What should I do?
Since only the parent component can be modified, the addition and subtraction operations must be placed on the parent component:
var app = new Vue({
    el:"#app",
    data:{
        num:0
    },
    methods:{ // The method of operating num is defined in the parent component
        increment(){
            this.num++;
        },
        decrement(){
            this.num--;
        }
    }
})
However, clicking the button is in the child component, which means that the child component needs to call the function of the parent component. What should I do?
We can bind the function of the parent component to the child component through the v-on instruction:
<div id="app">
    <h2>num: {{num}}</h2>
    <counter :count="num" @inc="increment" @dec="decrement"></counter>
</div>
The function is defined in the sub component, the implementation of the function calls the implementation of the parent component and calls these functions in the sub components. When the button in the subcomponent is clicked, call the bound function:
        Vue.component("counter", {
            template:'\
                <div>\
                    <button @click="plus">plus</button>  \
                    <button @click="reduce">reduce</button>  \
                </div>',
            props:['count'],
            methods:{
                plus(){
                    this.$emit("inc");
                },
                reduce(){
                    this.$emit("dec");
                }
            }
        })
- vue provides a built-in this$ The emit() function is used to call the function bound by the parent component
effect:
7. Route Vue router
7.1. Scene simulation
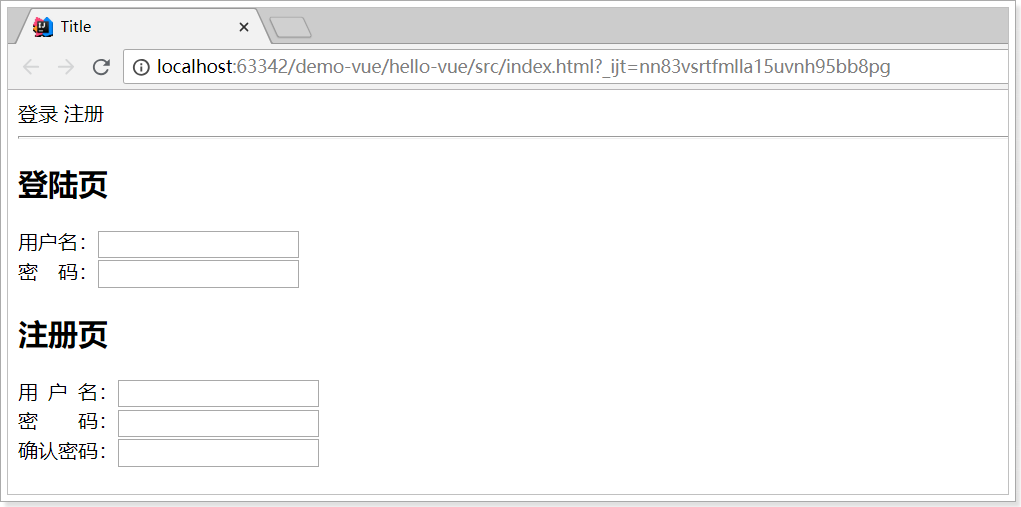
Now let's implement such a function:
One page includes login and registration. Click different buttons to switch between login and registration pages:

7.1.1. Write parent component
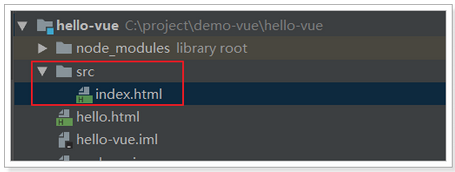
To make the following functions clearer, let's create a new folder: src
Then create a new HTML file as the entry: index html
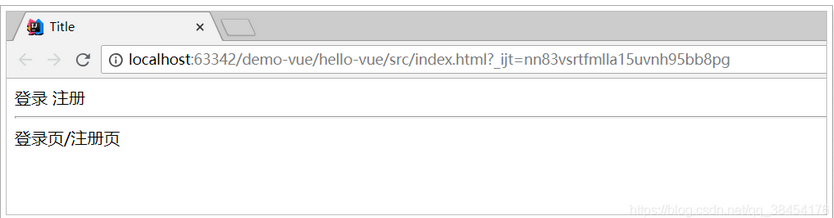
Then write the basic structure of the page:
<div id="app">
    <span>Sign in</span>
    <span>register</span>
    <hr/>
    <div>
        Login page/Registration page
    </div>
</div>
<script src="../node_modules/vue/dist/vue.js"></script>
<script type="text/javascript">
    var vm = new Vue({
        el:"#app"
    })
</script>
Style:
7.1.2. Write login and registration components
Next, let's implement the login component. We used to write it in a file, but for reusability, we will put the component into a separate JS file in development. We will create a user directory and login JS and register js:
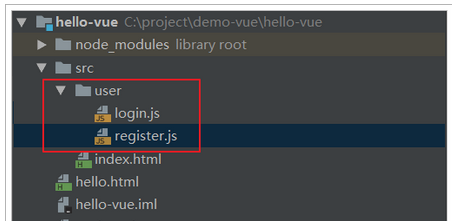
Write components. Here we only write templates, not functions.
login.js contents are as follows:
const loginForm = {
    template:'\
    <div>\
    <h2>Login page</h2> \
    user name:<input type="text"><br/>\
    password:<input type="password"><br/>\
    </div>\
    '
}
register.js content:
const registerForm = {
template:'\
<div>\
<h2>Registration page</h2> \
use household Name:<input type="text"><br/>\
dense  Code:<input type="password"><br/>\
Confirm password:<input type="password"><br/>\
</div>\
'
}
7.1.3. Reference in parent component
<div id="app">
    <span>Sign in</span>
    <span>register</span>
    <hr/>
    <div>
        <!--<loginForm></loginForm>-->
        <!--
            Question: why not use the above wording?
            because html It is case insensitive. If the above writing method is adopted, it is considered to be case insensitive<loginform></loginform>
            Therefore, if it is a component in the form of hump, it is necessary to convert the hump into“-"Form of
         -->
        <login-form></login-form>
        <register-form></register-form>
    </div>
</div>
<script src="../node_modules/vue/dist/vue.js"></script>
<script src="user/login.js"></script>
<script src="user/register.js"></script>
<script type="text/javascript">
    var vm = new Vue({
        el: "#app",
        components: {
            loginForm,
            registerForm
        }
    })
</script>
effect:
7.1.5. problem
What we expect is that when we click the login or registration button, the login page or registration page will be displayed respectively, not together.
However, how to dynamically load components and realize component switching?
Although it can be implemented using native Html5 and JS, we are officially recommended to use Vue router module.
7.2. Introduction and installation of Vue router
Using vue router and vue can easily realize the dynamic routing function of complex single page applications.
Official website: https://router.vuejs.org/zh-cn/
Install using npm: npm install Vue router -- save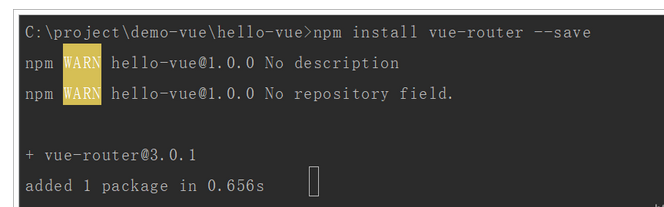
In index Introducing dependencies in HTML:
<script src="../node_modules/vue-router/dist/vue-router.js"></script>
7.3. quick get start
Create a new Vue router object and specify routing rules:
// Create a vueroouter object
const router = new VueRouter({
    routes:[ // Write routing rules
        {
            path:"/login", // Request path, starting with "/"
            component:loginForm // Component name
        },
        {
            path:"/register",
            component:registerForm
        }
    ]
})
- Create a vueroouter object and specify routing parameters
- routes: an array of routing rules. Multiple objects can be specified. Each object is a routing rule and contains the following attributes:
- Path: the path of the route
- Component: component name
Introduce router object in parent component:
var vm = new Vue({
    el:"#app",
    components:{// Reference login and registration components
        loginForm,
        registerForm
    },
    router // Reference the router object defined above
})
Page jump control:
<div id="app">
    <!--router-link To specify the path to jump-->
    <span><router-link to="/login">Sign in</router-link></span>
    <span><router-link to="/register">register</router-link></span>
    <hr/>
    <div>
        <!--vue-router Anchor point of-->
        <router-view></router-view>
    </div>
</div>
- Specify an anchor point through < router View >. When the route paths match, Vue router will automatically place the corresponding components at the anchor point for rendering
- Specify a jump link through < router link >. When clicked, the routing function of Vue router will be triggered, and the hash value in the path will change accordingly
effect:

Note: in single page applications, page switching is not a page Jump. Only the last hash value of the address changes.
In fact, we have only one HTML: index html