WeChat official account: operation and development story, author: wanger
one
Upgrade scheme
1
Scope of influence
During the upgrade, the existing system will not be affected, and the system will maintain normal operation. After the upgrade, the availability test will be conducted for a period of time, and the production monitoring will be replaced after the system is stable.
2
Upgrade method
This upgrade adopts the blue-green deployment method. Firstly, redeploy a set of 4.0 in the test environment, import the original system configuration file into the test environment, and then upgrade from 4.0 to 5.0. Since 5.0 has changed a lot compared with 4.0, and the number of tables and table fields in the database have changed a little compared with 4.0, directly installing 5.0 and then importing the 4.0 library will lead to database data import failure.
3
Risk after upgrading
Due to the short release time of the official Zabbix 5.0, there may be some bugs in Zabbix 5.0. In the later stage, the official will carry out some small upgrades to fix the bugs.
4
Upgrade principle
-
The newly built Zabbix service should be the same as the original 4.0 environment, and the configuration of each service should be set according to the original 4.0 service configuration and Zabbix monitoring content. If the minimum version required for some components does not meet the requirements, it should be upgraded. For example, the MySQL service in Zabbix uses too much memory. You can appropriately improve the memory configuration of MySQL service in the new environment.
-
Do a good job in the isolation between networks, and do not conflict with the original network environment.
-
Ensure that the original data is available and make a backup. You may enter the original 4.0 environment to view some service configurations. Do not cause data loss or service unavailability due to misoperation.
-
The host naming specification enables you to understand the purpose of a single host through the host name. The ES cluster name should not conflict with the existing cluster name.
-
After upgrading, the service availability requires that mysql master-slave synchronization must be normal, the synchronization data of ES nodes must be normal, the historical data collected by ES is normal, the cluster health status is green, the connection between Zabbix proxy and server is normal, and the data can be obtained normally. The web service is built by lamp.
two
**Upgrade ZABBIX
**
1
Close the Zabbix process and the web process
systemctl stop zabbix-server
systemctl stop zabbix-proxy
systemctl stop httpd php-fpm
2
Backup 4.0 configuration data
mysqldump -uzabbix -p --single-transaction --master-data=2 --databases zabbix > olddata.sql
# mkdir /opt/zabbix-backup/
# cp /etc/zabbix/zabbix_server.conf /opt/zabbix-backup/
# cp /etc/httpd/conf.d/zabbix.conf  /opt/zabbix-backup/
# cp -R /usr/share/zabbix/ /opt/zabbix-backup/
# cp -R /usr/share/doc/zabbix-* /opt/zabbix-backup/
3
Update repository
Because it is not good to use the official source network, I use Alibaba cloud's Zabbix source here.
rm -rf /etc/repos.d/zabbix.repo
rpm -qa | grep zabbix-release && rpm -e zabbix-release
rpm -Uvh https://mirrors.aliyun.com/zabbix/zabbix/5.0/rhel/7/x86_64/zabbix-release-5.0-1.el7.noarch.rpm
sed -i 's@repo.zabbix.com@mirrors.aliyun.com/zabbix@g'/etc/yum.repos.d/zabbix.repo
yum clean all
yum makecache fast
4
Upgrade Zabbix
yum upgrade zabbix-server-mysql zabbix-web-mysql zabbix-agent
5
Upgrade Zabbix web front end
yum remove zabbix-web
yum install centos-release-scl -y
yum install https://mirrors.aliyun.com/zabbix/zabbix/5.0/rhel/7/x86_64/frontend/zabbix-web-deps-scl-5.0.0-1.el7.noarch.rpm
yum install https://mirrors.aliyun.com/zabbix/zabbix/5.0/rhel/7/x86_64/frontend/zabbix-web-5.0.0-1.el7.noarch.rpm
yum install https://mirrors.aliyun.com/zabbix/zabbix/5.0/rhel/7/x86_64/frontend/zabbix-web-mysql-scl-5.0.0-1.el7.noarch.rpm
yum install https://mirrors.aliyun.com/zabbix/zabbix/5.0/rhel/7/x86_64/frontend/zabbix-apache-conf-scl-5.0.0-1.el7.noarch.rpm
6
Modify php time zone
vim /etc/opt/rh/rh-php72/php-fpm.d/zabbix.conf
php_value[date.timezone] = Asia/shanghai
7
Start Zabbix
systemctl start zabbix-server zabbix-agent httpd rh-php72-php-fpm
8
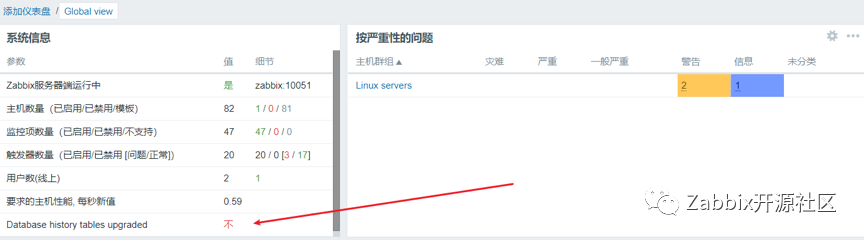
This error may be encountered after startup
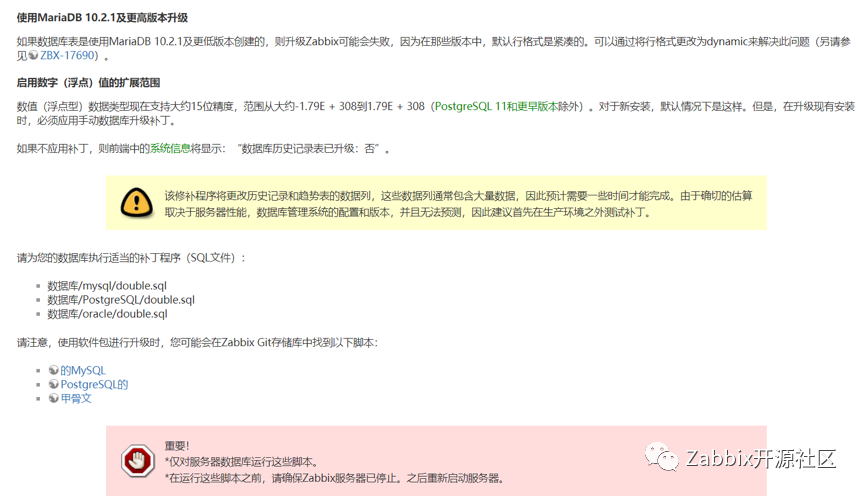
The official documents are still not carefully read here because the numerical (floating-point) data types of Zabbix's historical data and trend data support higher accuracy, and the database patch needs to be updated manually,
The MySQL patch address is:
https://git.zabbix.com/projects/ZBX/repos/zabbix/raw/database/mysql/double.sql
ALTER TABLE trends MODIFY value_min DOUBLE PRECISION DEFAULT '0.0000' NOT NULL, MODIFY value_avg DOUBLE PRECISION DEFAULT '0.0000' NOT NULL, MODIFY value_max DOUBLE PRECISION DEFAULT '0.0000' NOT NULL;
ALTER TABLE history MODIFY value DOUBLE PRECISION DEFAULT '0.0000' NOT NULL;
You also need to update the configuration file
vim /etc/zabbix/web/zabbix.conf.php
$DB['DOUBLE_IEEE754'] = true;
Restart ZABBIX server after the update
systemctl restart zabbix-server
three
Upgrade Elasticsearch
Zabbix 5.0 now supports es7.0 X version no longer supports the old version. One of the benefits of the upgrade is that ES supports index life cycle management from version 6.6, which is more convenient for the index management of historical data collected by Zabbix.
The newly upgraded Zabbix of ES can be directly deployed in 7 Es cluster of X. If you still need previous historical data, you can copy the original historical data from the original cluster. You can use the snapshot function of ES or logstash to copy.
The following describes how to upgrade ES 6.1 to ES7.0 0, 6.1-7.0.1 do not support rolling upgrade, that is, the entire ES cluster must be stopped for upgrade.
Refer to the official ES documentation:
https://www.elastic.co/guide/en/elasticsearch/reference/7.0/restart-upgrade.html
1
Close Zabbix docking ES
Zabbix5.0 supports 7 For es of X, the writing of historical data to ES is temporarily stopped before the upgrade is successful, and MySQL storage is used instead.
Note out the part of docking ES.
vim /etc/zabbix/web/zabbix.conf.php
//$HISTORY['url'] = 'http://192.168.179.134:9200';
//$HISTORY['types']=['uint','dbl','str','log','text'];
vim /etc/zabbix/zabbix_server.conf
#HistoryStorageURL=http://192.168.179.134:9200
#HistoryStorageTypes=uint,dbl,str,log,text
#HistoryStorageDateIndex=1
systemctl restart zabbix-server
2
Disable replica shard allocation
PUT_cluster/settings
{
 "persistent": {
 "cluster.routing.allocation.enable": "primaries"
 }
}
3
Stop all nodes under the ES cluster
systemctl stop elasticsearch
4
Upgrade all nodes
Since binary deployment was used before, I also use binary upgrade here.
wget https://artifacts.elastic.co/downloads/elasticsearch/elasticsearch-7.0.1-linux-x86_64.tar.gz
tar -zxvf elasticsearch-7.0.1-linux-x86_64.tar.gz
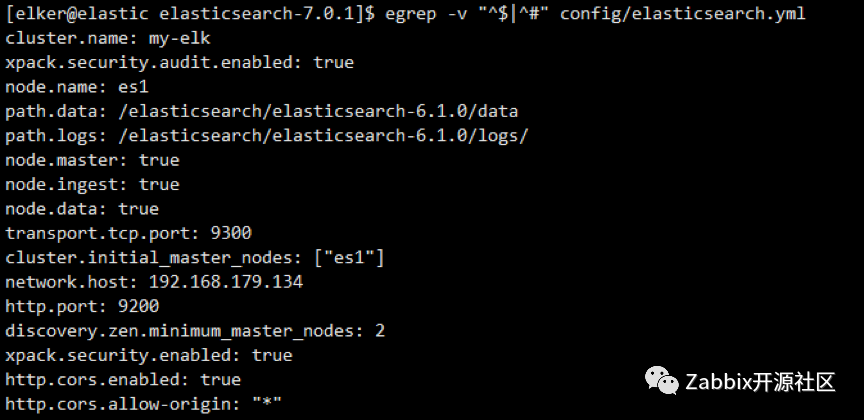
Overwrite the configuration file of 6.1 to the config directory of 7.0.1.
cp /elasticsearch/elasticsearch-6.1.0/config/elasticsearch.yml /elasticsearch-7.0.1/config/elasticsearch.yml
The modified configuration file is as follows. It needs to be defined in the cluster when starting the cluster for the first time.
cluster.initial_master_nodes is a group of nodes with master node qualification.
5
Start all nodes
su elker
./elasticsearch-7.0.1/bin/elasticsearch
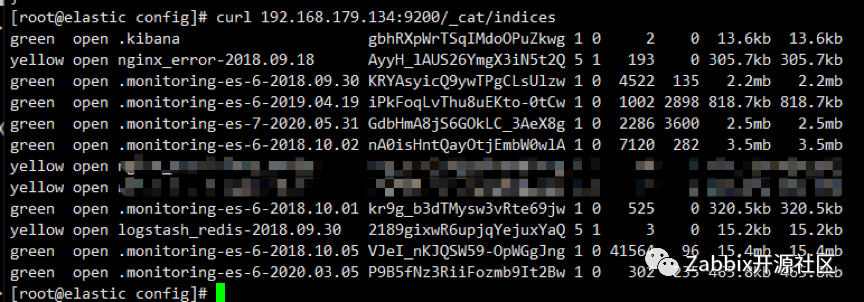
Viewing the node status, you can see that it has been upgraded to 7.0.
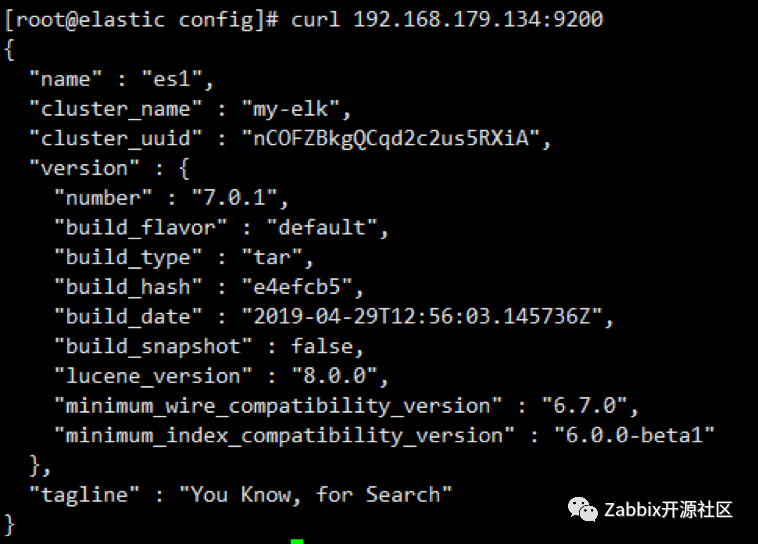
Check the index and find that the previous index is still there.
6
Re enable slice allocation
When the primary partition recovery is completed and the cluster status is yellow, partition allocation can be re enabled.
PUT_cluster/settings
{
  "persistent": {
  "cluster.routing.allocation.enable": null
 }
}
7
Modify the configuration file to connect Zabbix to ES
vim /etc/zabbix/web/zabbix.conf.php
$HISTORY['url'] = 'http://192.168.179.134:9200';
$HISTORY['types']=['uint','dbl','str','log','text'];
vim /etc/zabbix/zabbix_server.conf
HistoryStorageURL=http://192.168.179.134:9200 HistoryStorageTypes=uint,dbl,str,log,text
HistoryStorageDateIndex=1
systemctl restart zabbix-server
Welcome to communicate with you