1, Zabbix
1. Necessity of monitoring system
As an O & M, you need to be able to use the monitoring system to view the server status and website traffic indicators, and use the data of the monitoring system to understand the results published online and the health status of the website.
2. Function of monitoring software
With an excellent monitoring software, we can:
● browse all server status of the whole website through a friendly interface
● monitoring data can be easily viewed at the Web front end
● it can trace back to find the problems and alarms of the system when the accident occurs
3. Definition of ZABBIX
● zabbix is an enterprise class open source solution that provides distributed system monitoring and network monitoring functions based on Web interface.
● zabbix can monitor various network parameters to ensure the safe operation of the server system; Flexible notification mechanism is provided to enable system administrators to quickly locate / solve various problems.
● zabbix consists of two parts, zabbix server and optional zabbix agent. Collect data through C/S mode, and display and configure it on the Web through B/S mode.
● zabbix server can provide remote server / network status monitoring, data collection and other functions through SNMP, zabbix agent, ping, port monitoring and other methods. It can run on Linux and other platforms.
● zabbix agent needs to be installed on the monitored target server. It mainly collects hardware information or memory, CPU and other information related to the operating system.
4. Zabbix's monitoring principle
The zabbix agent is installed on the monitored host. The zabbix agent is responsible for regularly collecting various local data of the client and sending it to the zabbix server. After receiving the data, the zabbix server stores the data in the database. The user can see the data and display the image on the front end based on the Zabbix WEB. When zabbix monitors a specific project, it will set a trigger threshold. When the monitored indicators exceed the threshold set by the trigger, it will take some necessary actions, including sending information (e-mail, wechat, SMS), sending commands (shell command, reboot, restart, install, etc.).
5. Five common ZABBIX procedures
zabbix_server,zabbix_agent,zabbix_proxy,zabbix_get,zabbix_sender et al.
5.1 zabbix server
zabbix server daemon, where zabbix_agent,zabbix_get,zabbix_sender,zabbix_ The proxy data is finally submitted to the zabbix server.
5.2 zabbix agent
The client daemon is responsible for collecting client data, such as CPU load, memory, hard disk usage, etc.
5.3 zabbix proxy
zabbix distributed agent daemon, which is usually larger than 500 hosts, needs to be deployed with distributed monitoring architecture.
5.4 zabbix get
zabbix data receiving tool is a separate command. It usually executes the command to obtain remote client information on the server or proxy side.
5.5 zabbix sender
The zabbix data sending tool allows users to send data to the server or proxy, which usually takes a long time for users to check.
2, Installing and deploying Zabbix 5.0
1. Deploy Zabbix server
1.1 server configuration
| The server | to configure | ip address | host name | Main software |
|---|---|---|---|---|
| zabbix-server | At least 2G memory, 4G recommended | 192.168.122.10 | zabbix_server | zabbix-server-mysql,zabbix-agent |
1.2 server environment
[root@localhost ~]# hostnamectl set-hostname zabbix_server
[root@localhost ~]# su
[root@zabbix_server ~]# systemctl disable --now firewalld
[root@zabbix_server ~]# setenforce 0
setenforce: SELinux is disabled
1.3 get the download source of zabbix
[root@zabbix_server ~]# rpm -ivh https://mirrors.aliyun.com/zabbix/zabbix/5.0/rhel/7/x86_64/zabbix-release-5.0-1.el7.noarch.rpm
1.4 replace zabbix.repo with online source (Alibaba source is used here)
[root@zabbix_server ~]# cd /etc/yum.repos.d/
[root@zabbix_server yum.repos.d]# sed -i 's#http://repo.zabbix.com#https://mirrors.aliyun.com/zabbix#' zabbix.repo
[root@zabbix_server yum.repos.d]# yum clean all && yum makecache
1.5 download and install zabbix and components
[root@zabbix_server yum.repos.d]# yum install -y zabbix-server-mysql zabbix-agent
[root@zabbix_server yum.repos.d]# yum install -y centos-release-scl
Install SCL(Software Collections) to facilitate subsequent installation of higher versions of php. By default, the php version installed by yum is 5.4, which is too low. ZABBIX version 5.0 is at least 7.2.0 for php. SCL enables multiple versions of software to be used on the same machine without affecting the dependent environment of the whole system. The package will be installed in the / opt/rh directory.
1.6 modify the zabbix front-end source and install the zabbix front-end environment into the scl environment
[root@zabbix_server yum.repos.d]# vim zabbix.repo

······
[zabbix-frontend]
##Line 11, turn on the installation source
enabled=1

[root@zabbix_server yum.repos.d]# yum install -y zabbix-web-mysql-scl zabbix-apache-conf-scl
[root@zabbix_server yum.repos.d]# cd /opt/rh
[root@zabbix_server rh]# ls
rh-php72
1.7 install and start the database required by zabbix
[root@zabbix_server rh]# yum install -y mariadb-server mariadb
[root@zabbix_server rh]# systemctl enable --now mariadb
1.8 initialize database and set password
[root@zabbix_server yum.repos.d]# mysql_secure_installation

Enter current password for root (enter for none):
#Log in with the current password of root and press enter
Set root password? [Y/n] y
#Set root password, y
New password:
#Set password
Re-enter new password:
#Enter the password again
Remove anonymous users? [Y/n] y
#Remove anonymous user, y
Disallow root login remotely? [Y/n] y
#Disable root remote login, y
Remove test database and access to it? [Y/n] y
#Remove test database, y
Reload privilege tables now? [Y/n] y
#Reload permission table, y
1.9 add database users and database permissions required by zabbix
[root@zabbix_server yum.repos.d]# mysql -u root -p
Enter password:

MariaDB [(none)]> create database zabbix character set utf8 collate utf8_bin;
#Create a zabbix database and use utf8 character encoding
Query OK, 1 row affected (0.00 sec)

MariaDB [(none)]> grant all on zabbix.* to 'zabbix'@'%' identified by 'zabbix';
#The zabbix user has all permissions in the zabbix library on any host, and the password is zabbix
Query OK, 0 rows affected (0.00 sec)

MariaDB [(none)]> flush privileges;
#Refresh permissions
Query OK, 0 rows affected (0.00 sec)

MariaDB [(none)]> show databases;
+--------------------+
| Database           |
+--------------------+
| information_schema |
| mysql              |
| performance_schema |
| zabbix             |
+--------------------+
4 rows in set (0.00 sec)

MariaDB [(none)]> use zabbix;
Database changed
MariaDB [zabbix]> show tables;
Empty set (0.00 sec)
1.10 importing database information
[root@zabbix_server yum.repos.d]# rpm -ql zabbix-server-mysql /etc/logrotate.d/zabbix-server/etc/zabbix/zabbix_server.conf/usr/lib/systemd/system/zabbix-server.service/usr/lib/tmpfiles.d/zabbix-server.conf/usr/lib/zabbix/alertscripts/usr/lib/zabbix/externalscripts/usr/sbin/zabbix_server_mysql/usr/share/doc/zabbix-server-mysql-5.0.16/usr/share/doc/zabbix-server-mysql-5.0.16/AUTHORS/usr/share/doc/zabbix-server-mysql-5.0.16/COPYING/usr/share/doc/zabbix-server-mysql-5.0.16/ChangeLog/usr/share/doc/zabbix-server-mysql-5.0.16/NEWS/usr/share/doc/zabbix-server-mysql-5.0.16/README/usr/share/doc/zabbix-server-mysql-5.0.16/create.sql.gz/usr/share/doc/zabbix-server-mysql-5.0.16/double.sql/usr/share/man/man8/zabbix_server.8.gz/var/log/zabbix/var/run/zabbix[root@zabbix_server yum.repos.d]# zcat /usr/share/doc/zabbix-server-mysql-5.0.16/create.sql.gz | mysql -uroot -p123456 zabbix[root@zabbix_server yum.repos.d]# mysql -u root -pEnter password: MariaDB [(none)]> show databases;+--------------------+| Database |+--------------------+| information_schema || mysql || performance_schema || zabbix |+--------------------+4 rows in set (0.00 sec) MariaDB [(none)]> use zabbix;Database changedMariaDB [zabbix]> show tables;+----------------------------+| Tables_in_zabbix |+----------------------------+| acknowledges || ...... || widget_field |+----------------------------+166 rows in set (0.00 sec)
The zcat command is used to display the contents of the files in the compressed package without actually decompressing the files. Zcat is a command line utility for viewing the contents of a compressed file without decompressing it. It extends the compressed file to standard output so that you can view its contents. In addition, zcat is exactly the same as running the gunzip -c command.
1.11 modification zabbix_server profile
[root@zabbix_server yum.repos.d]# vim /etc/zabbix/zabbix_server.conf ##In line 124, uncomment and specify the password of zabbix database DBPassword=zabbix
1.12 modify the php configuration file of zabbix
[root@zabbix_server yum.repos.d]# vim /etc/opt/rh/rh-php72/php-fpm.d/zabbix.conf ##Line 24, uncomment and modify the time zone_ value[date.timezone] = Asia/Shanghai
1.13 start zabbix related services
[root@zabbix_server yum.repos.d]# systemctl restart zabbix-server zabbix-agent httpd rh-php72-php-fpm[root@zabbix_server yum.repos.d]# systemctl enable zabbix-server zabbix-agent httpd rh-php72-php-fpm
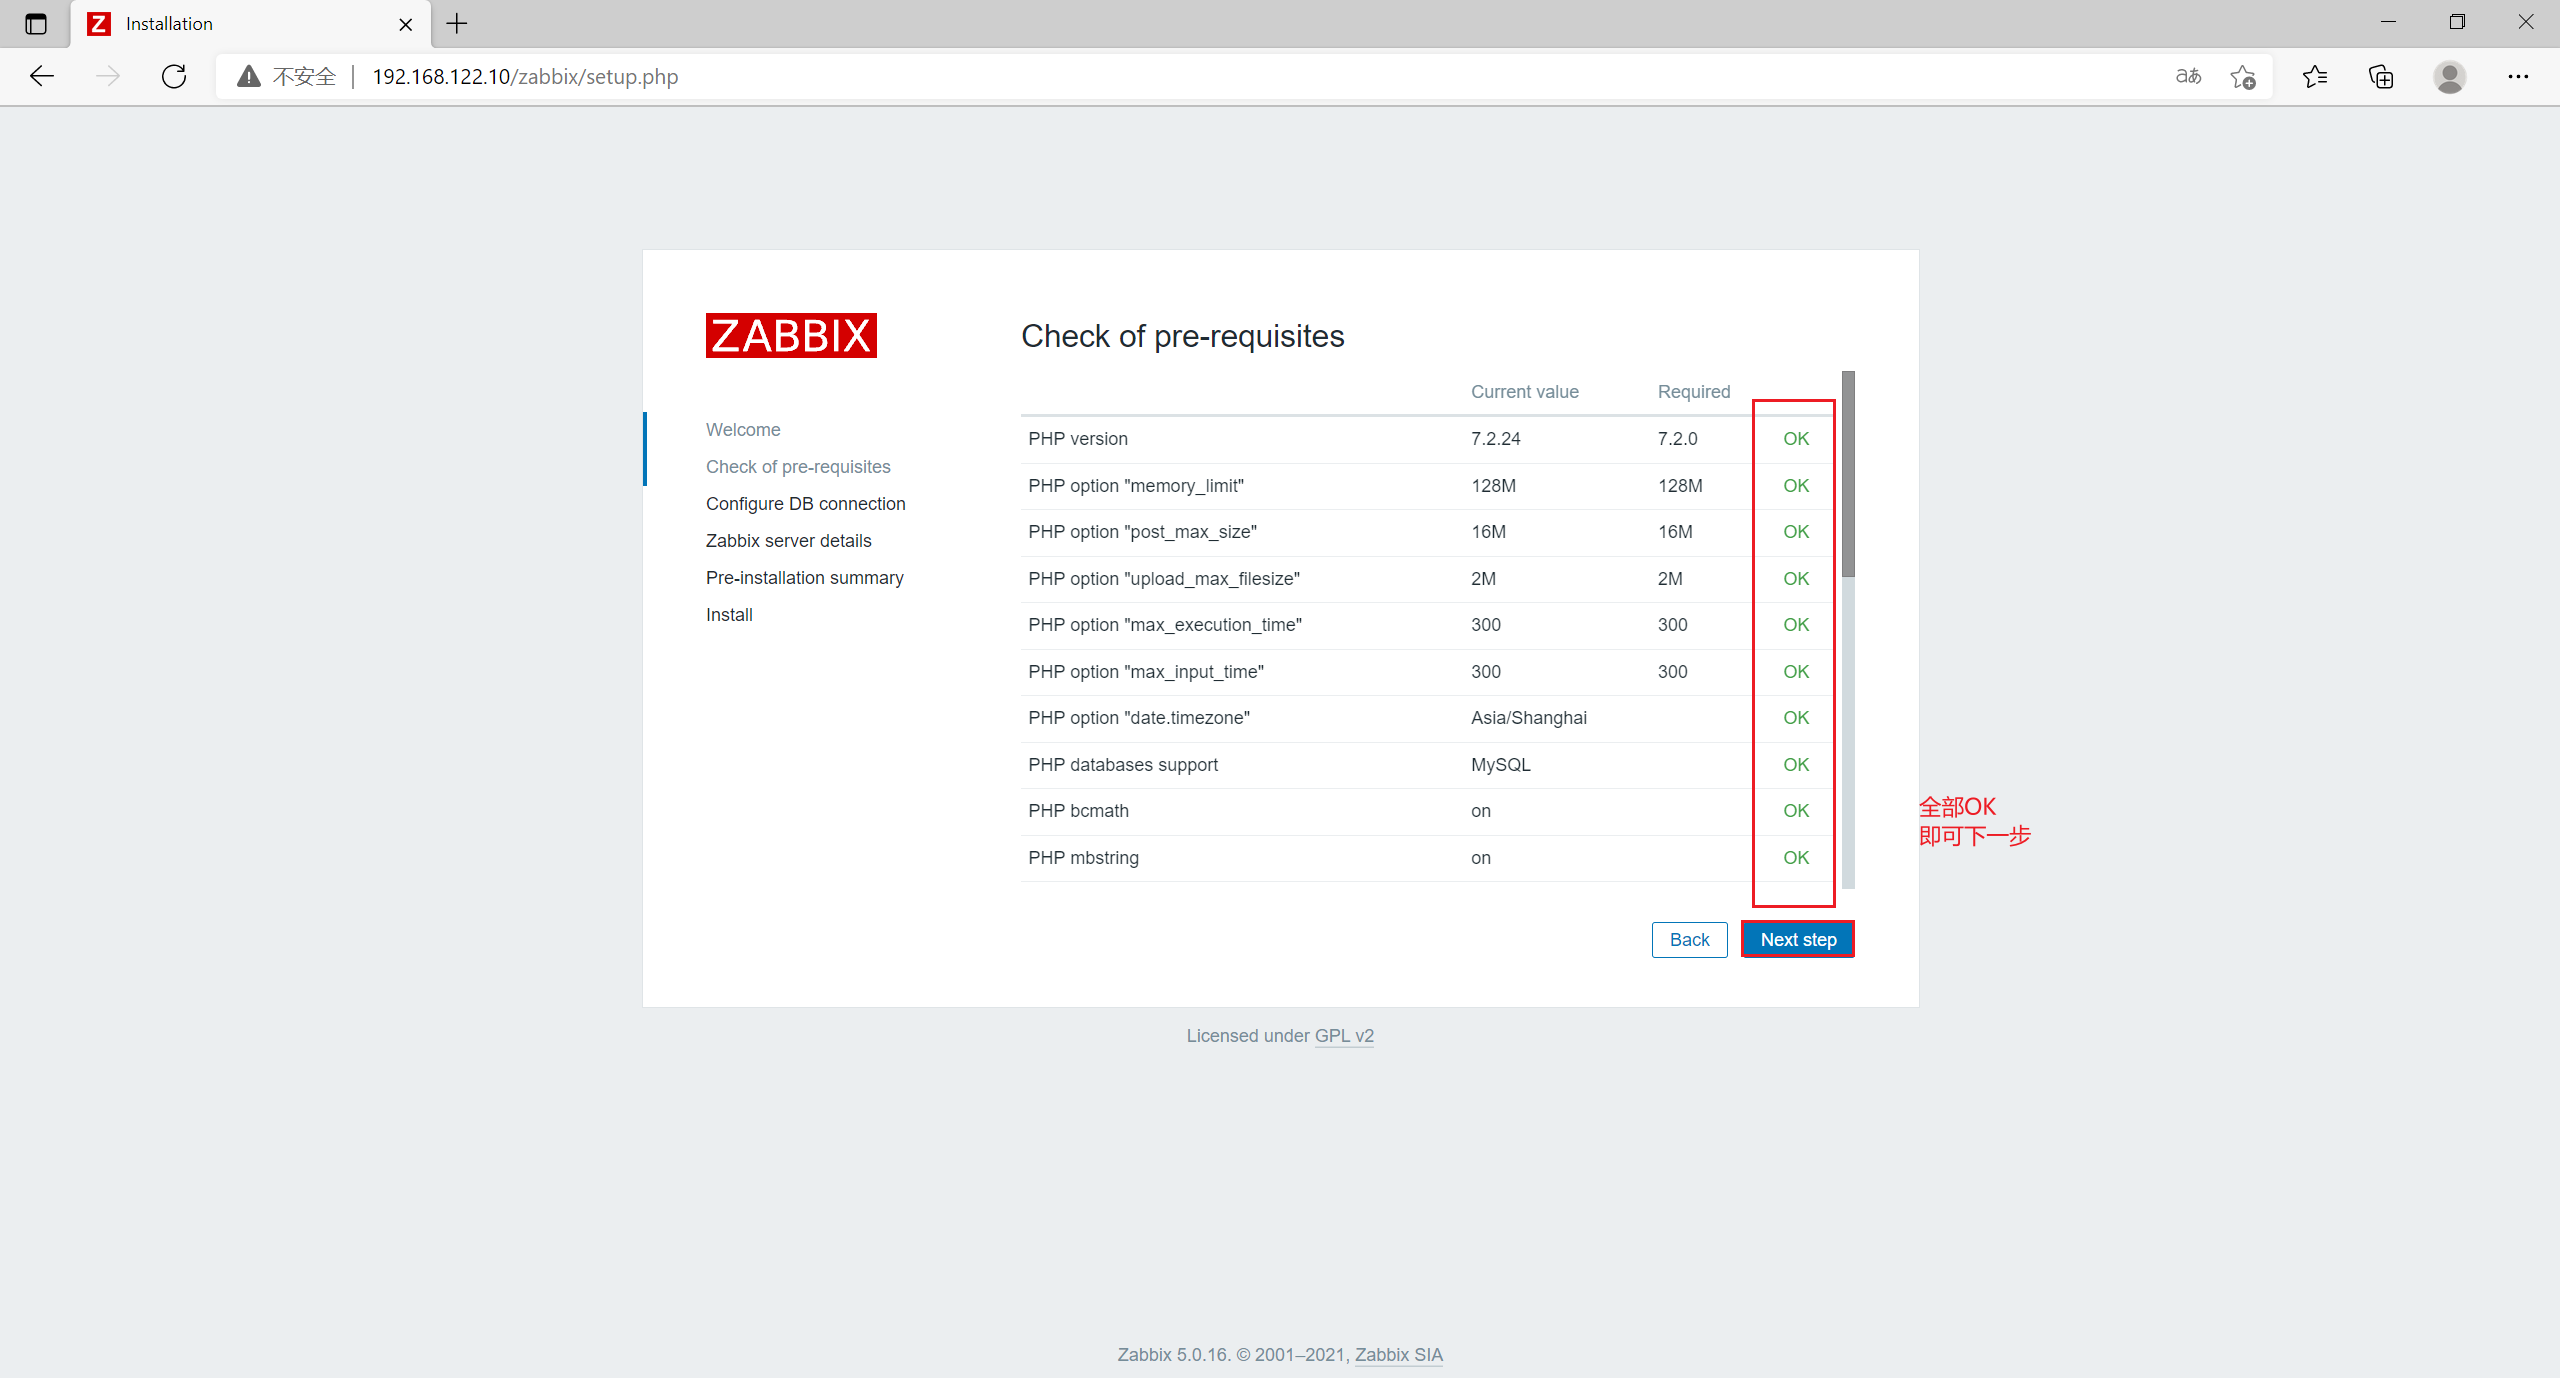
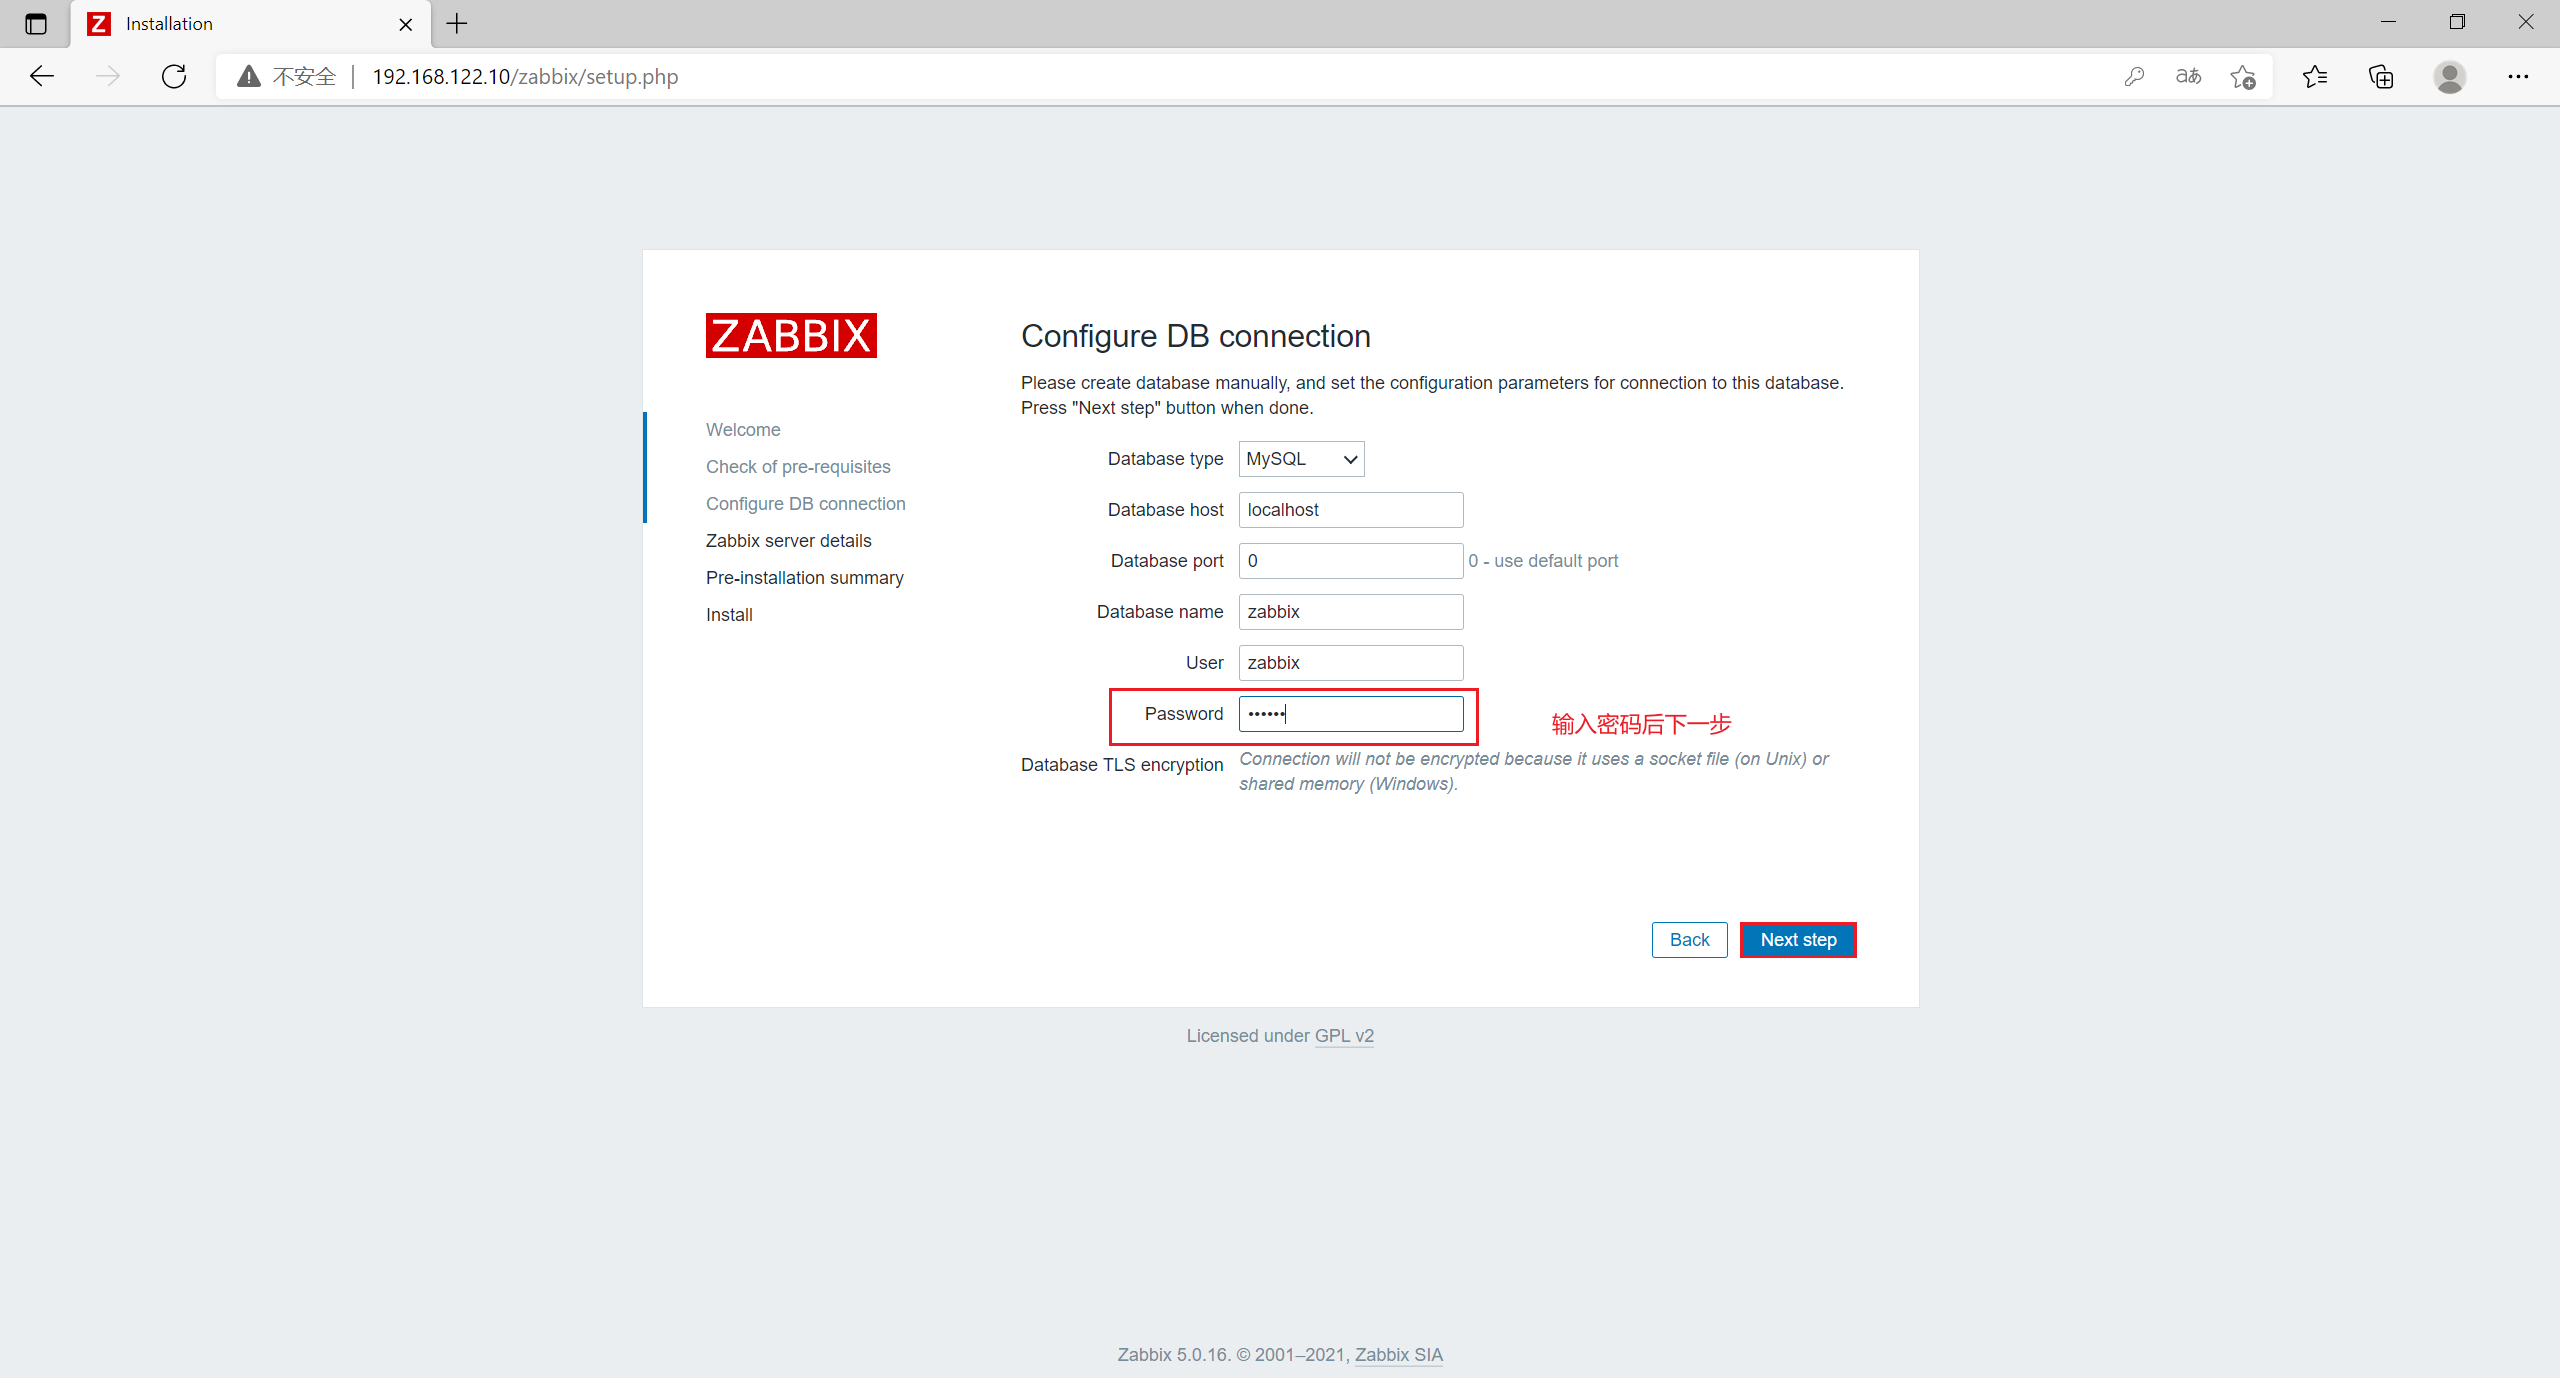
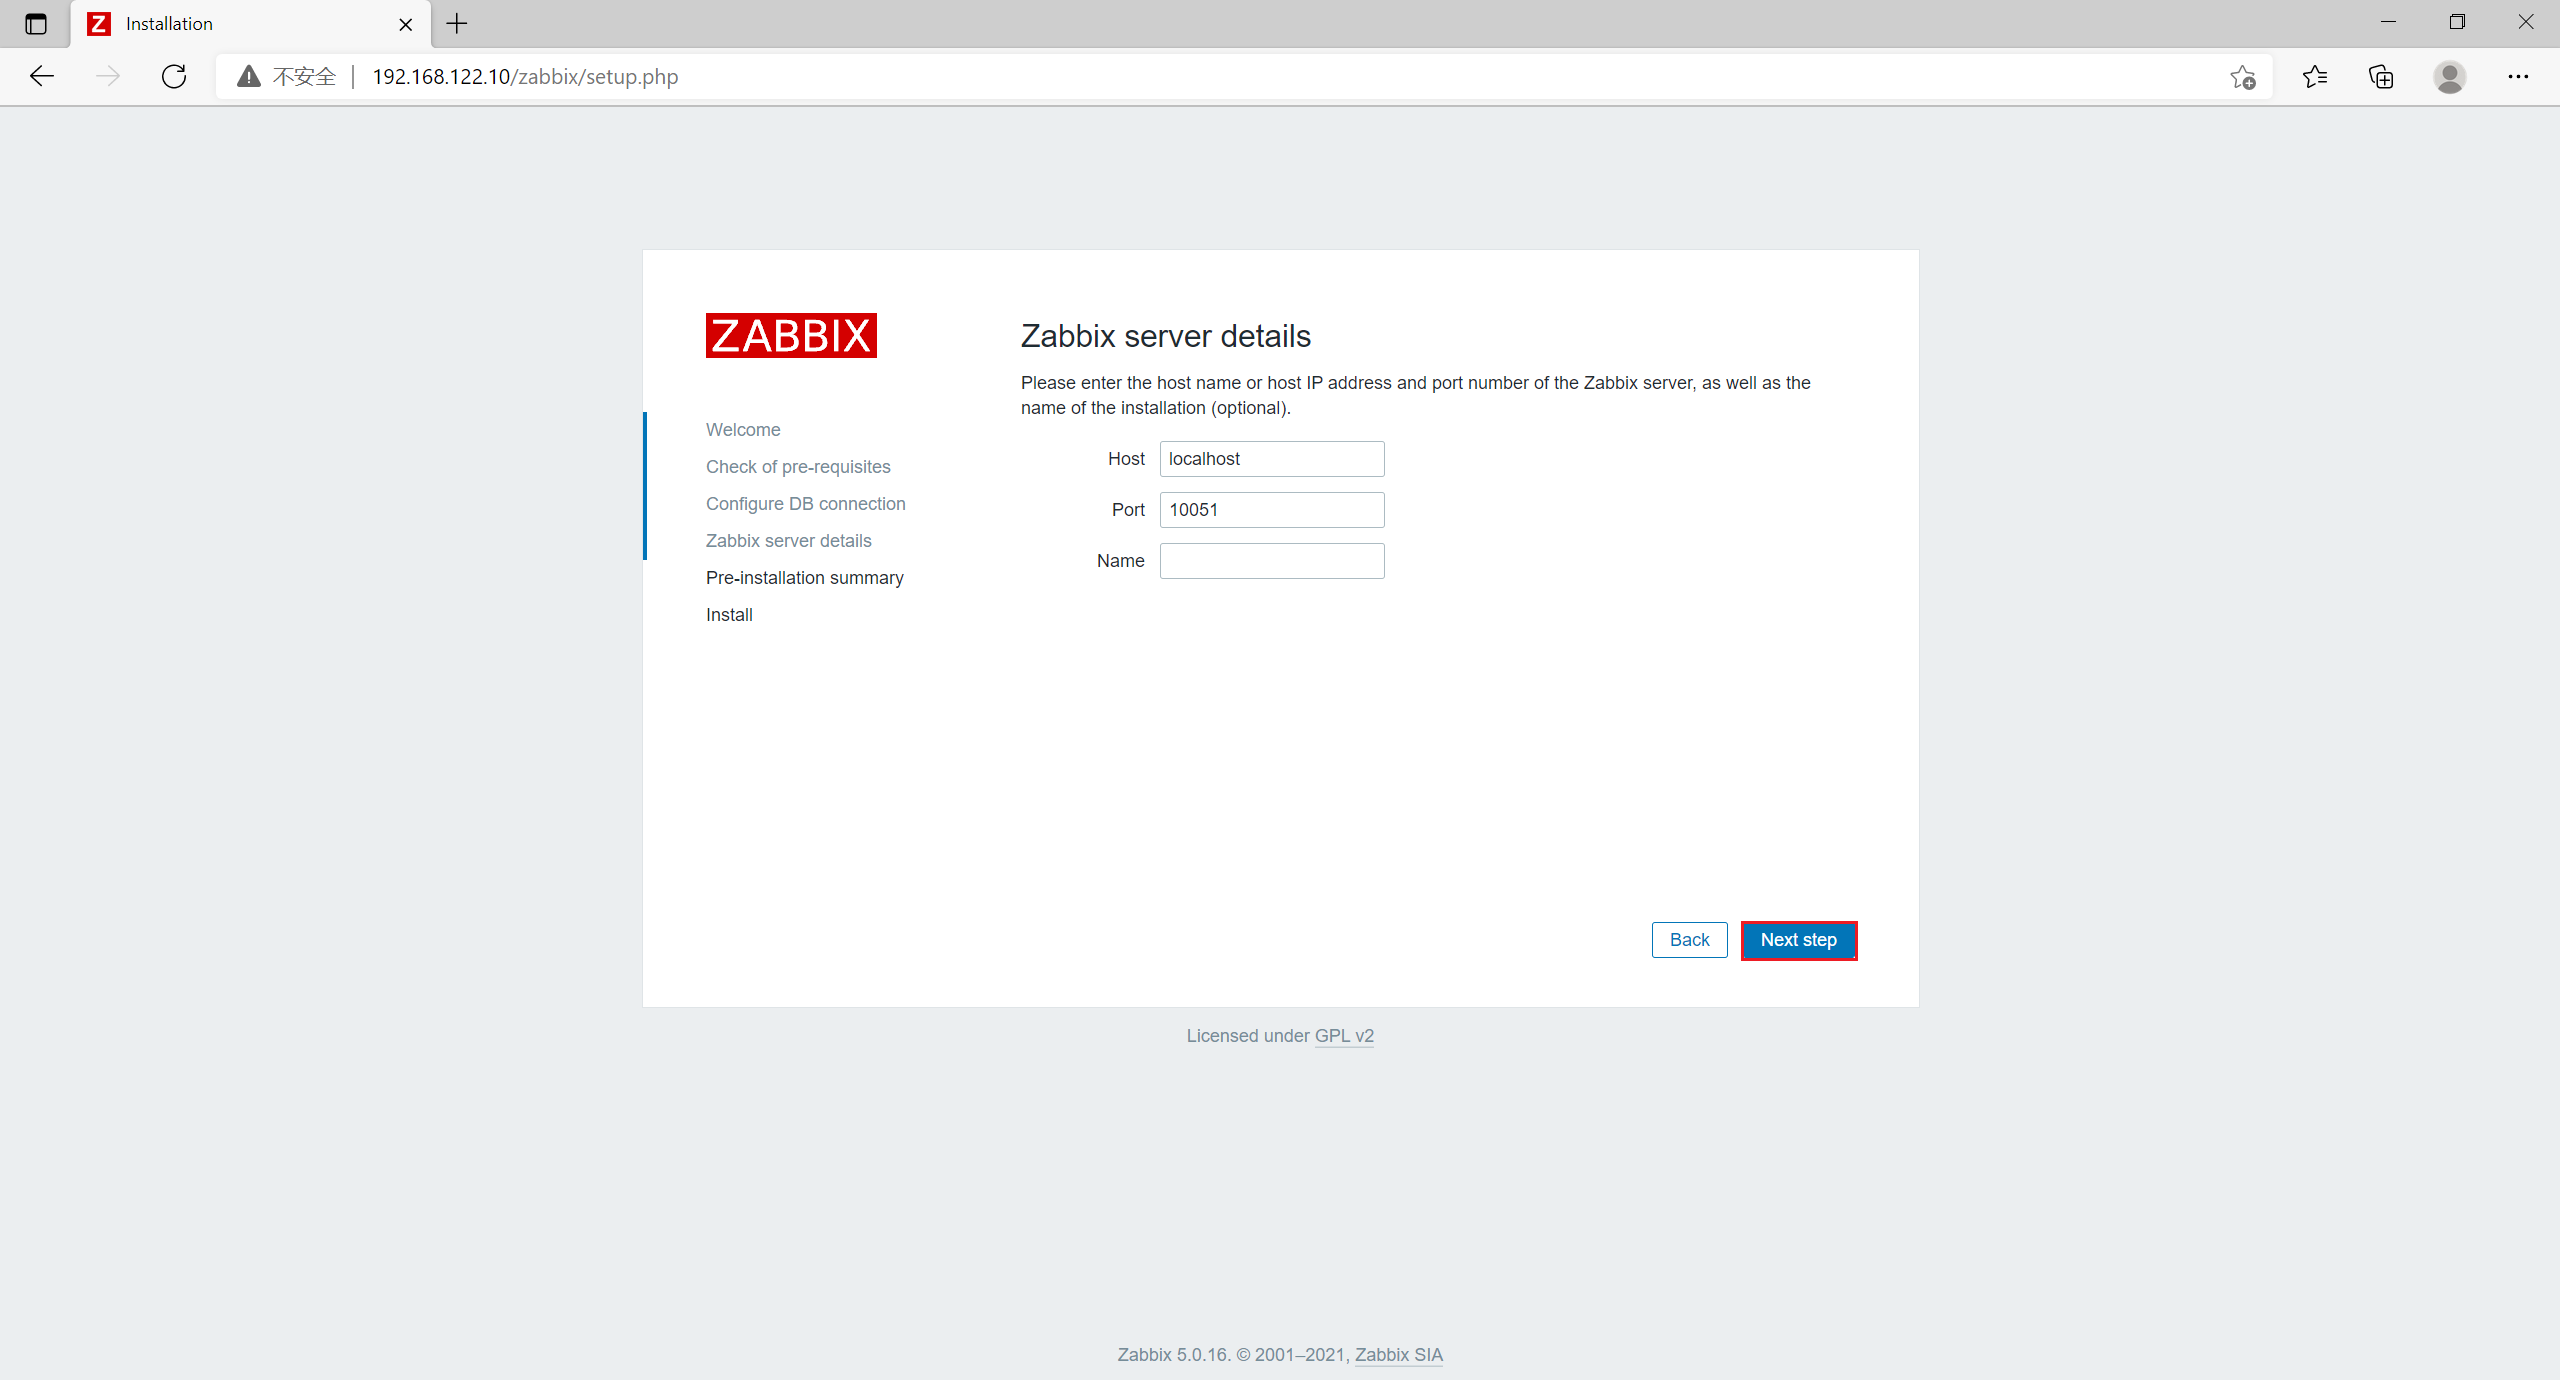
1.14 browser access
Browser access: http://192.168.122.10/zabbix
If the firefox browser in the linux virtual machine cannot connect to mysql, you can use the host to access it

Click next to set the database password zabbix


After installation, the default login account and password are Admin/zabbix
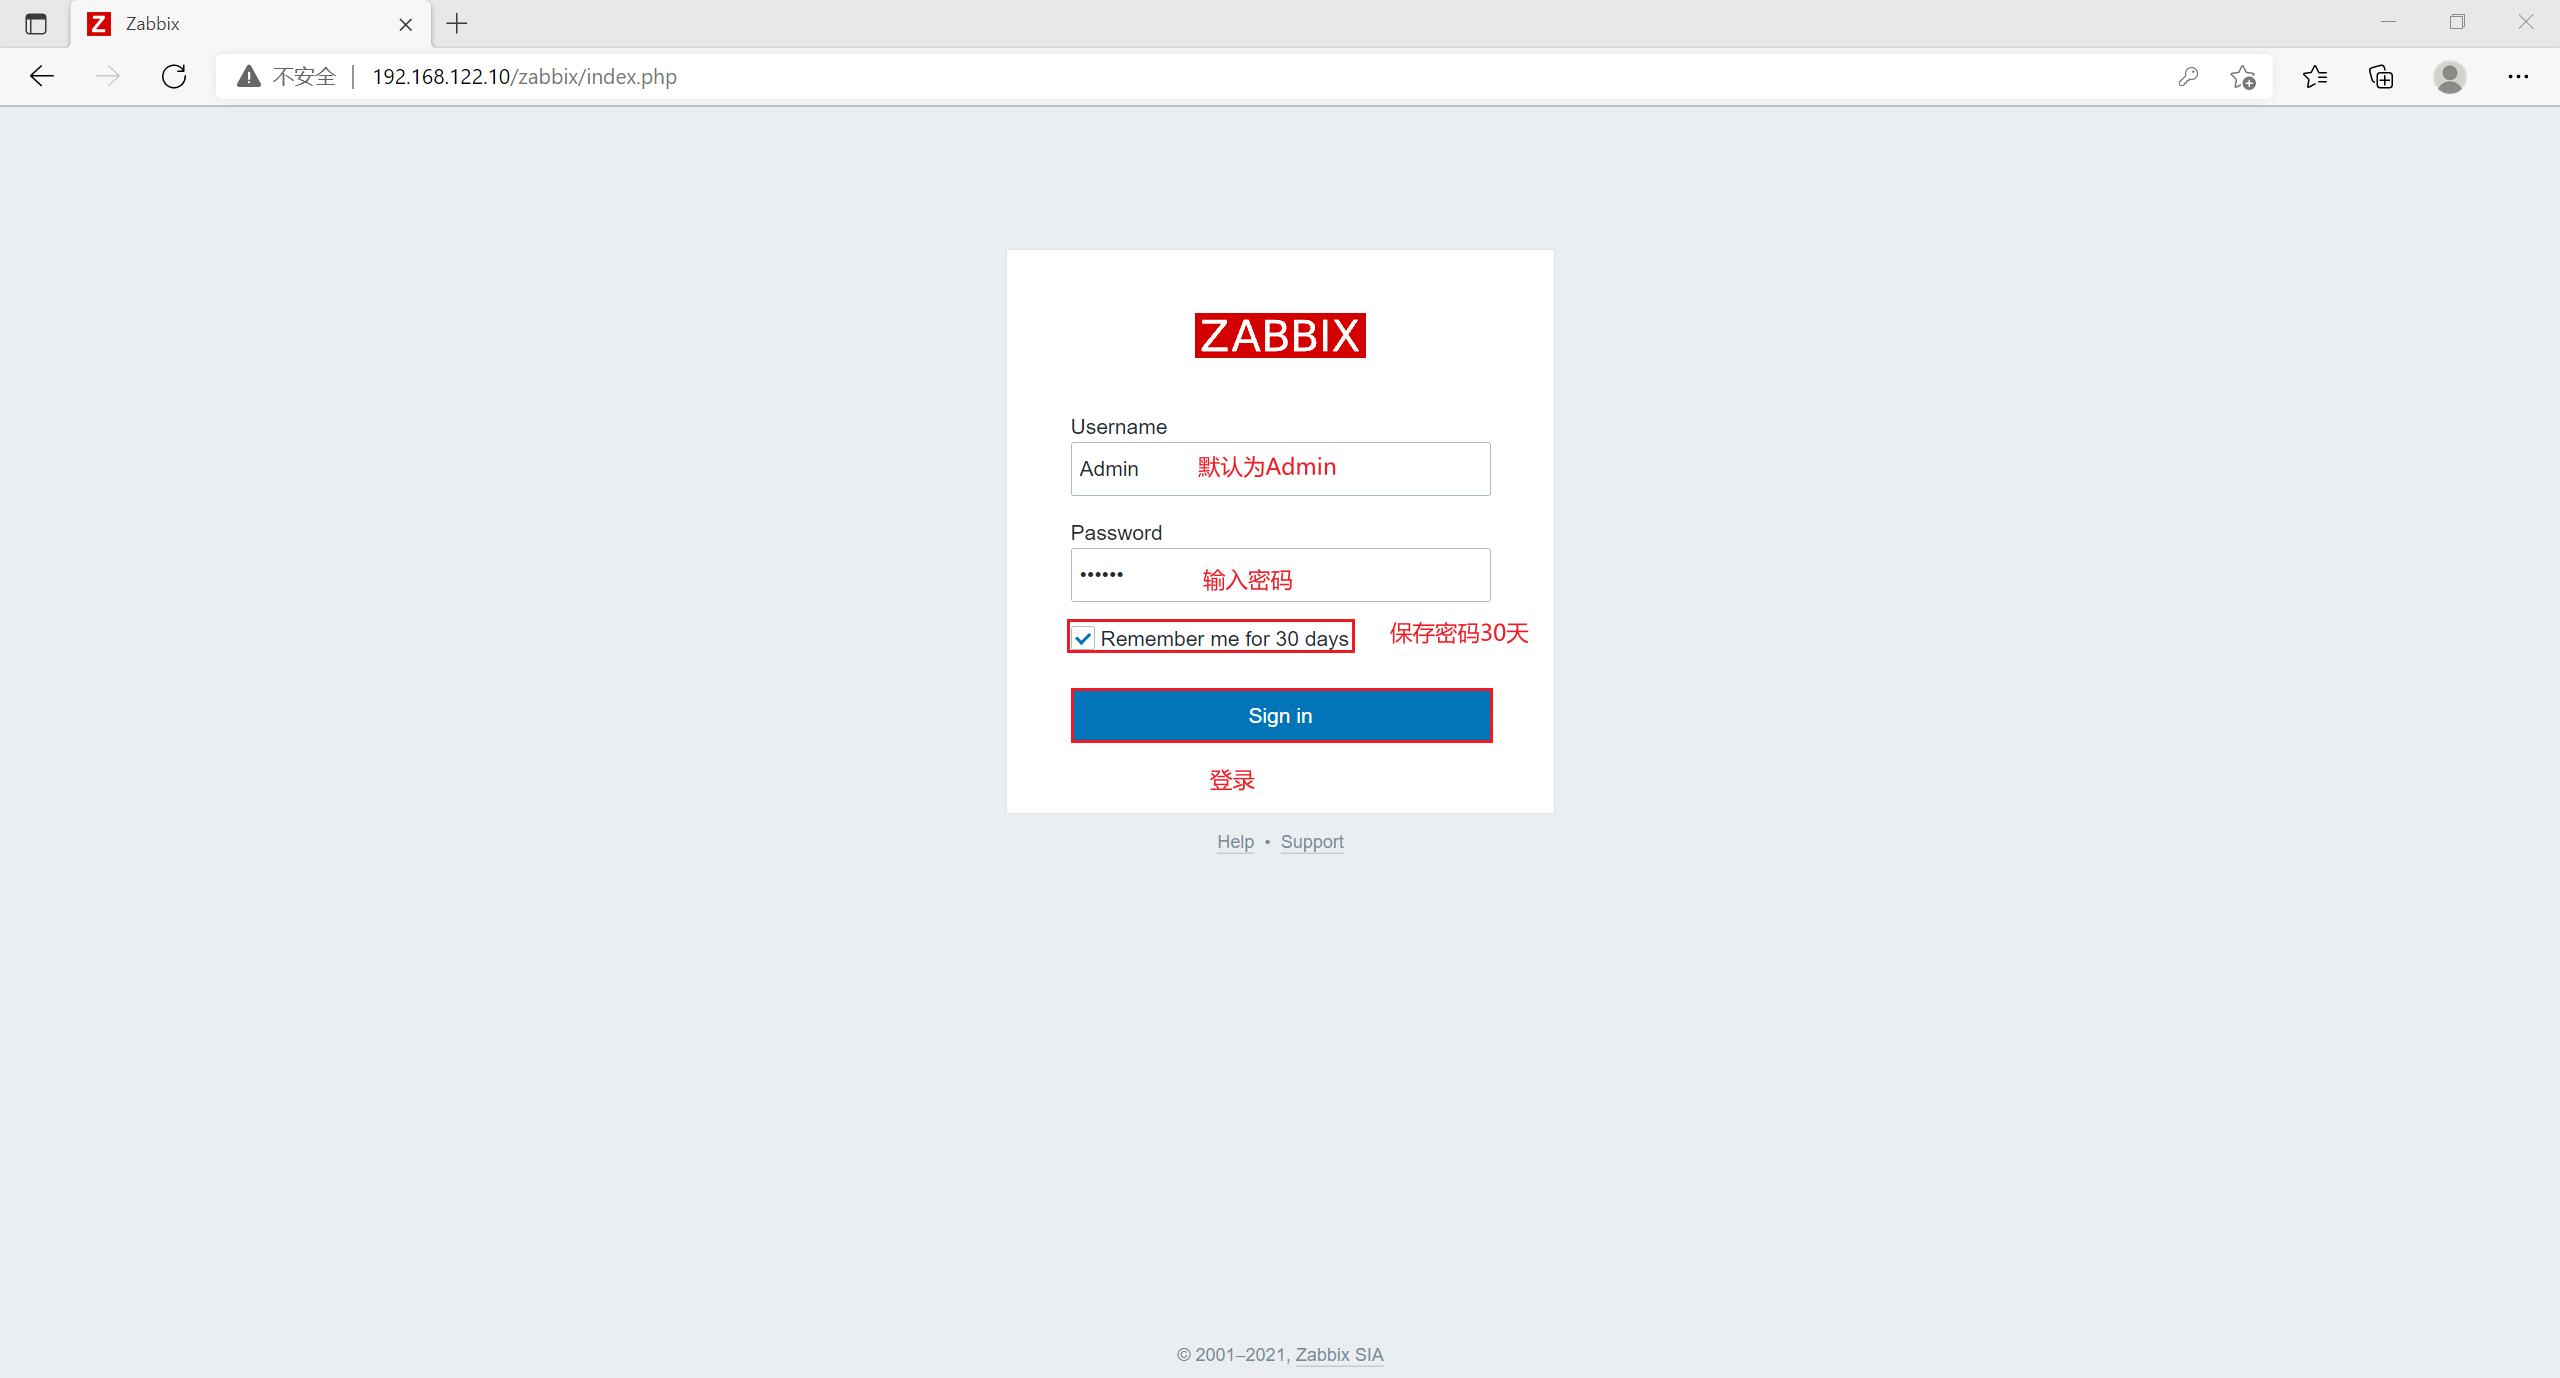
Login succeeded

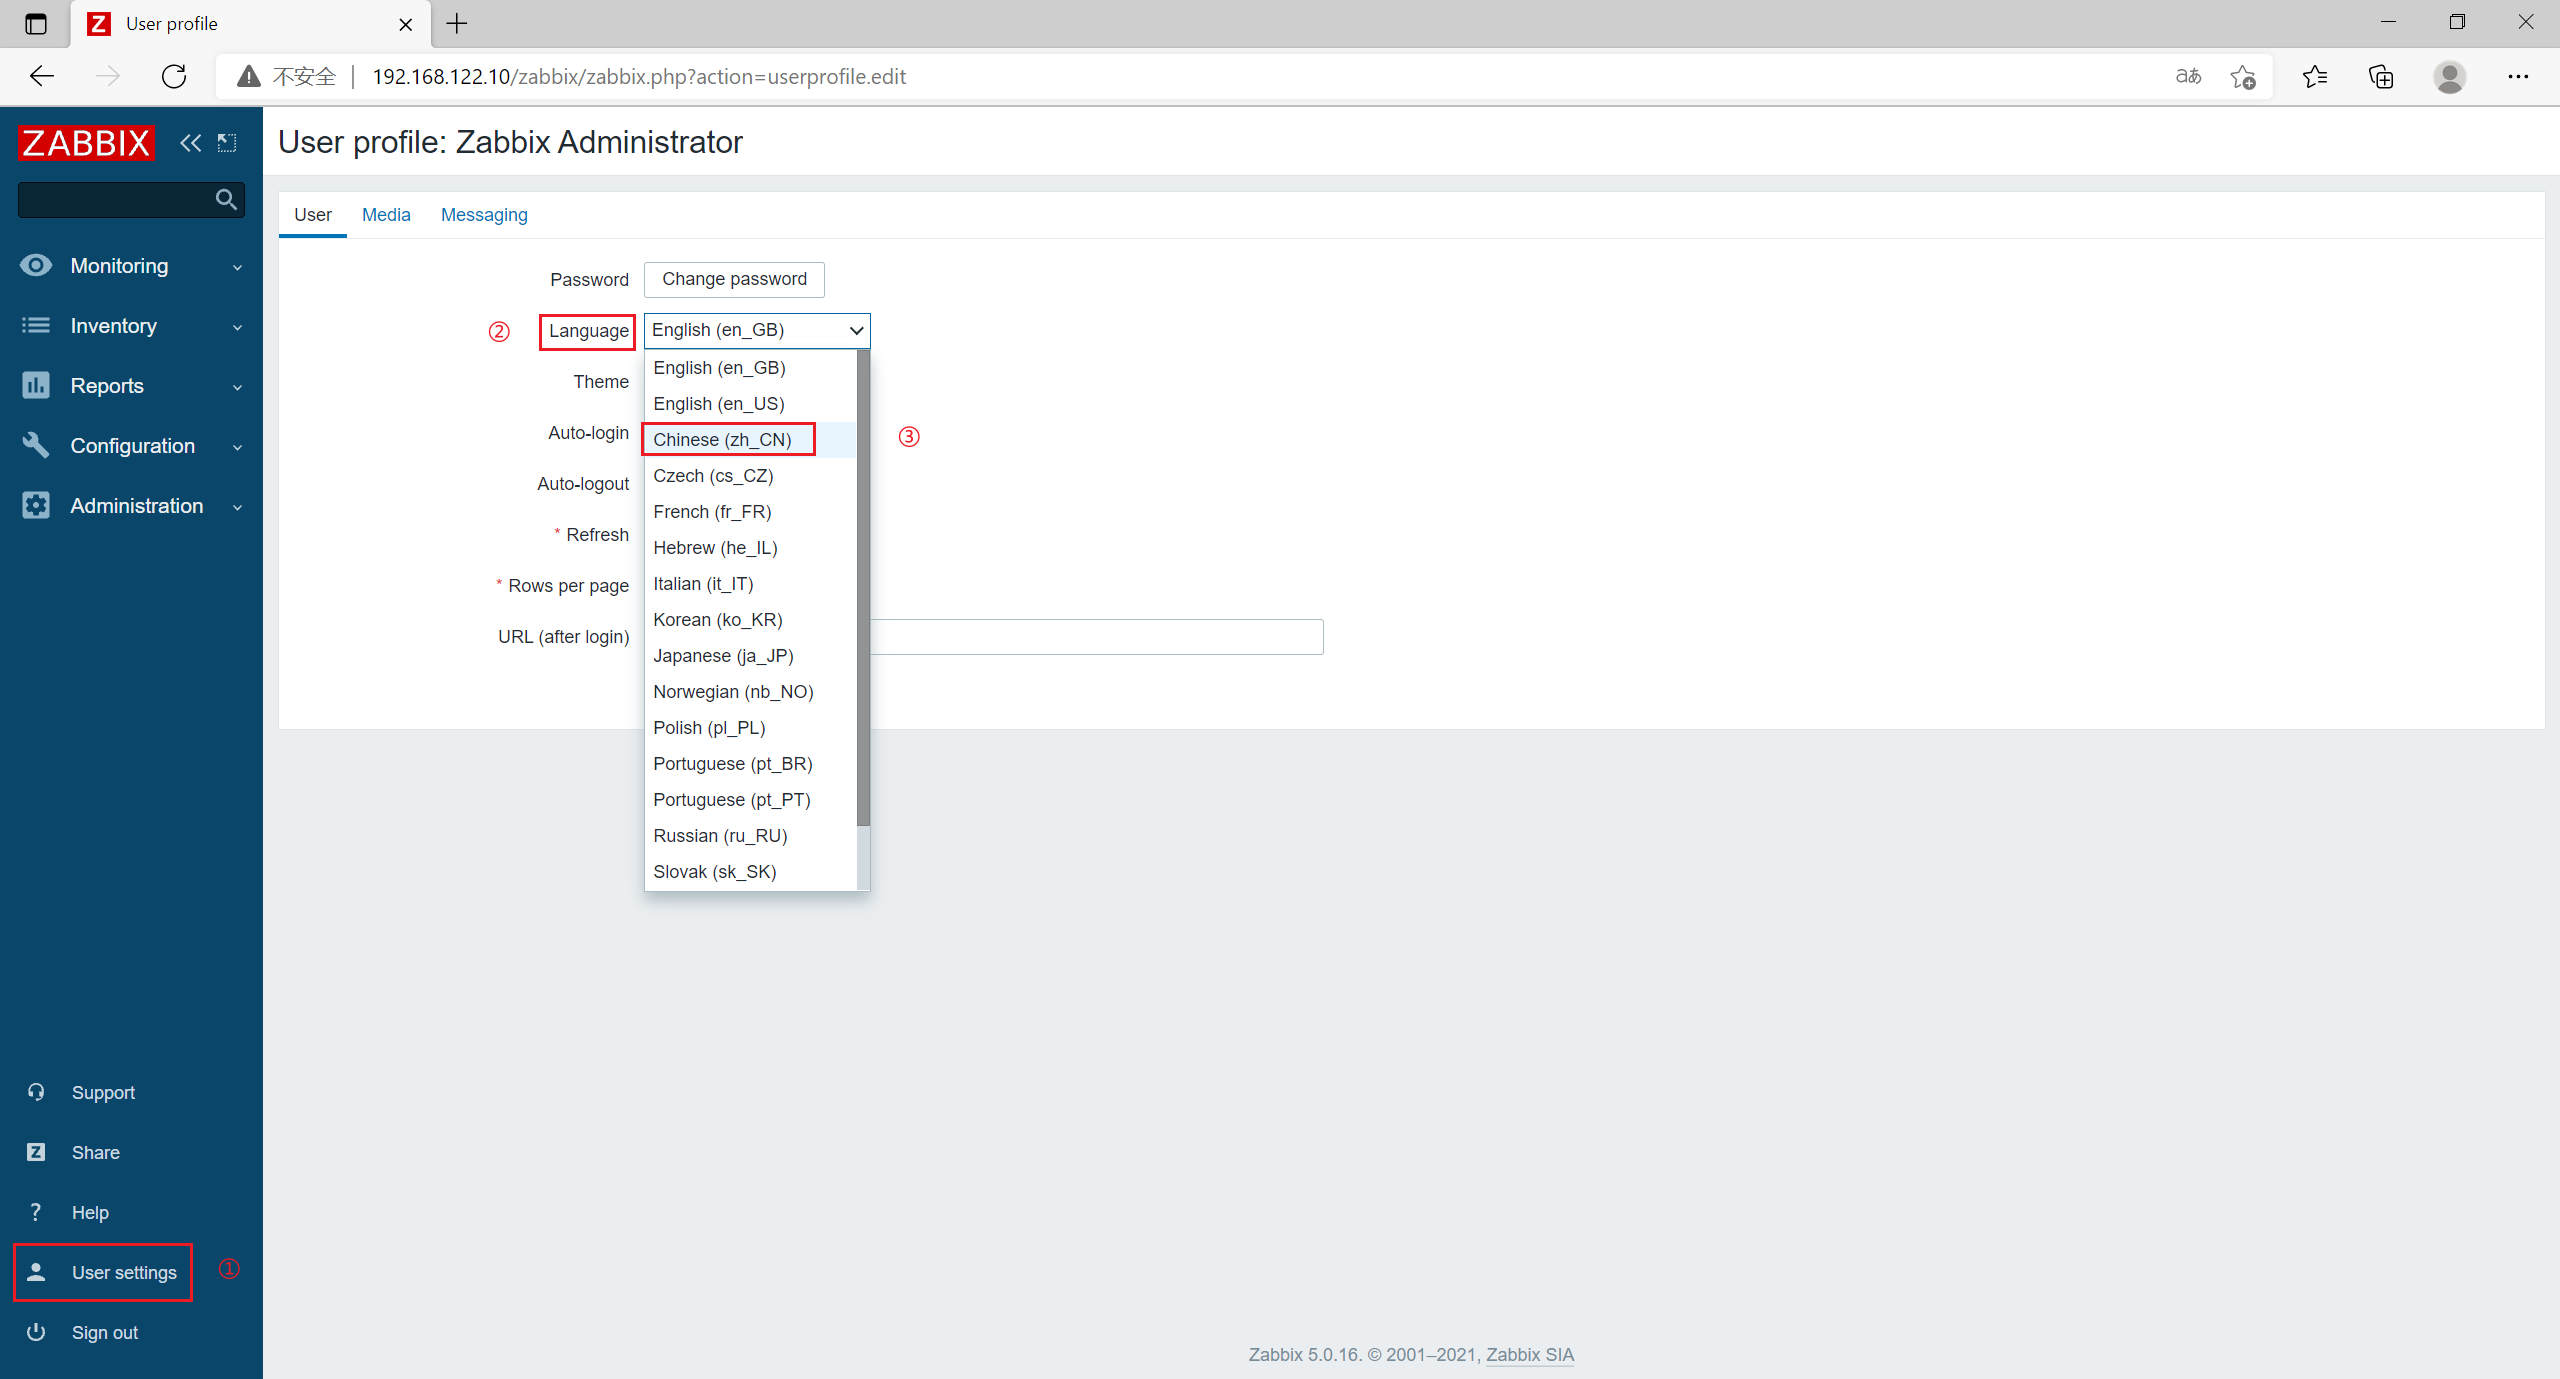
Setting file interface: click [User settings] in the left menu bar, select Chinese(zh_CN) in [Language], and then click Update.
1.15 solution ZABBIX_ Web garbled code problem of serber
Host - Graphics view, found a lot of garbled code
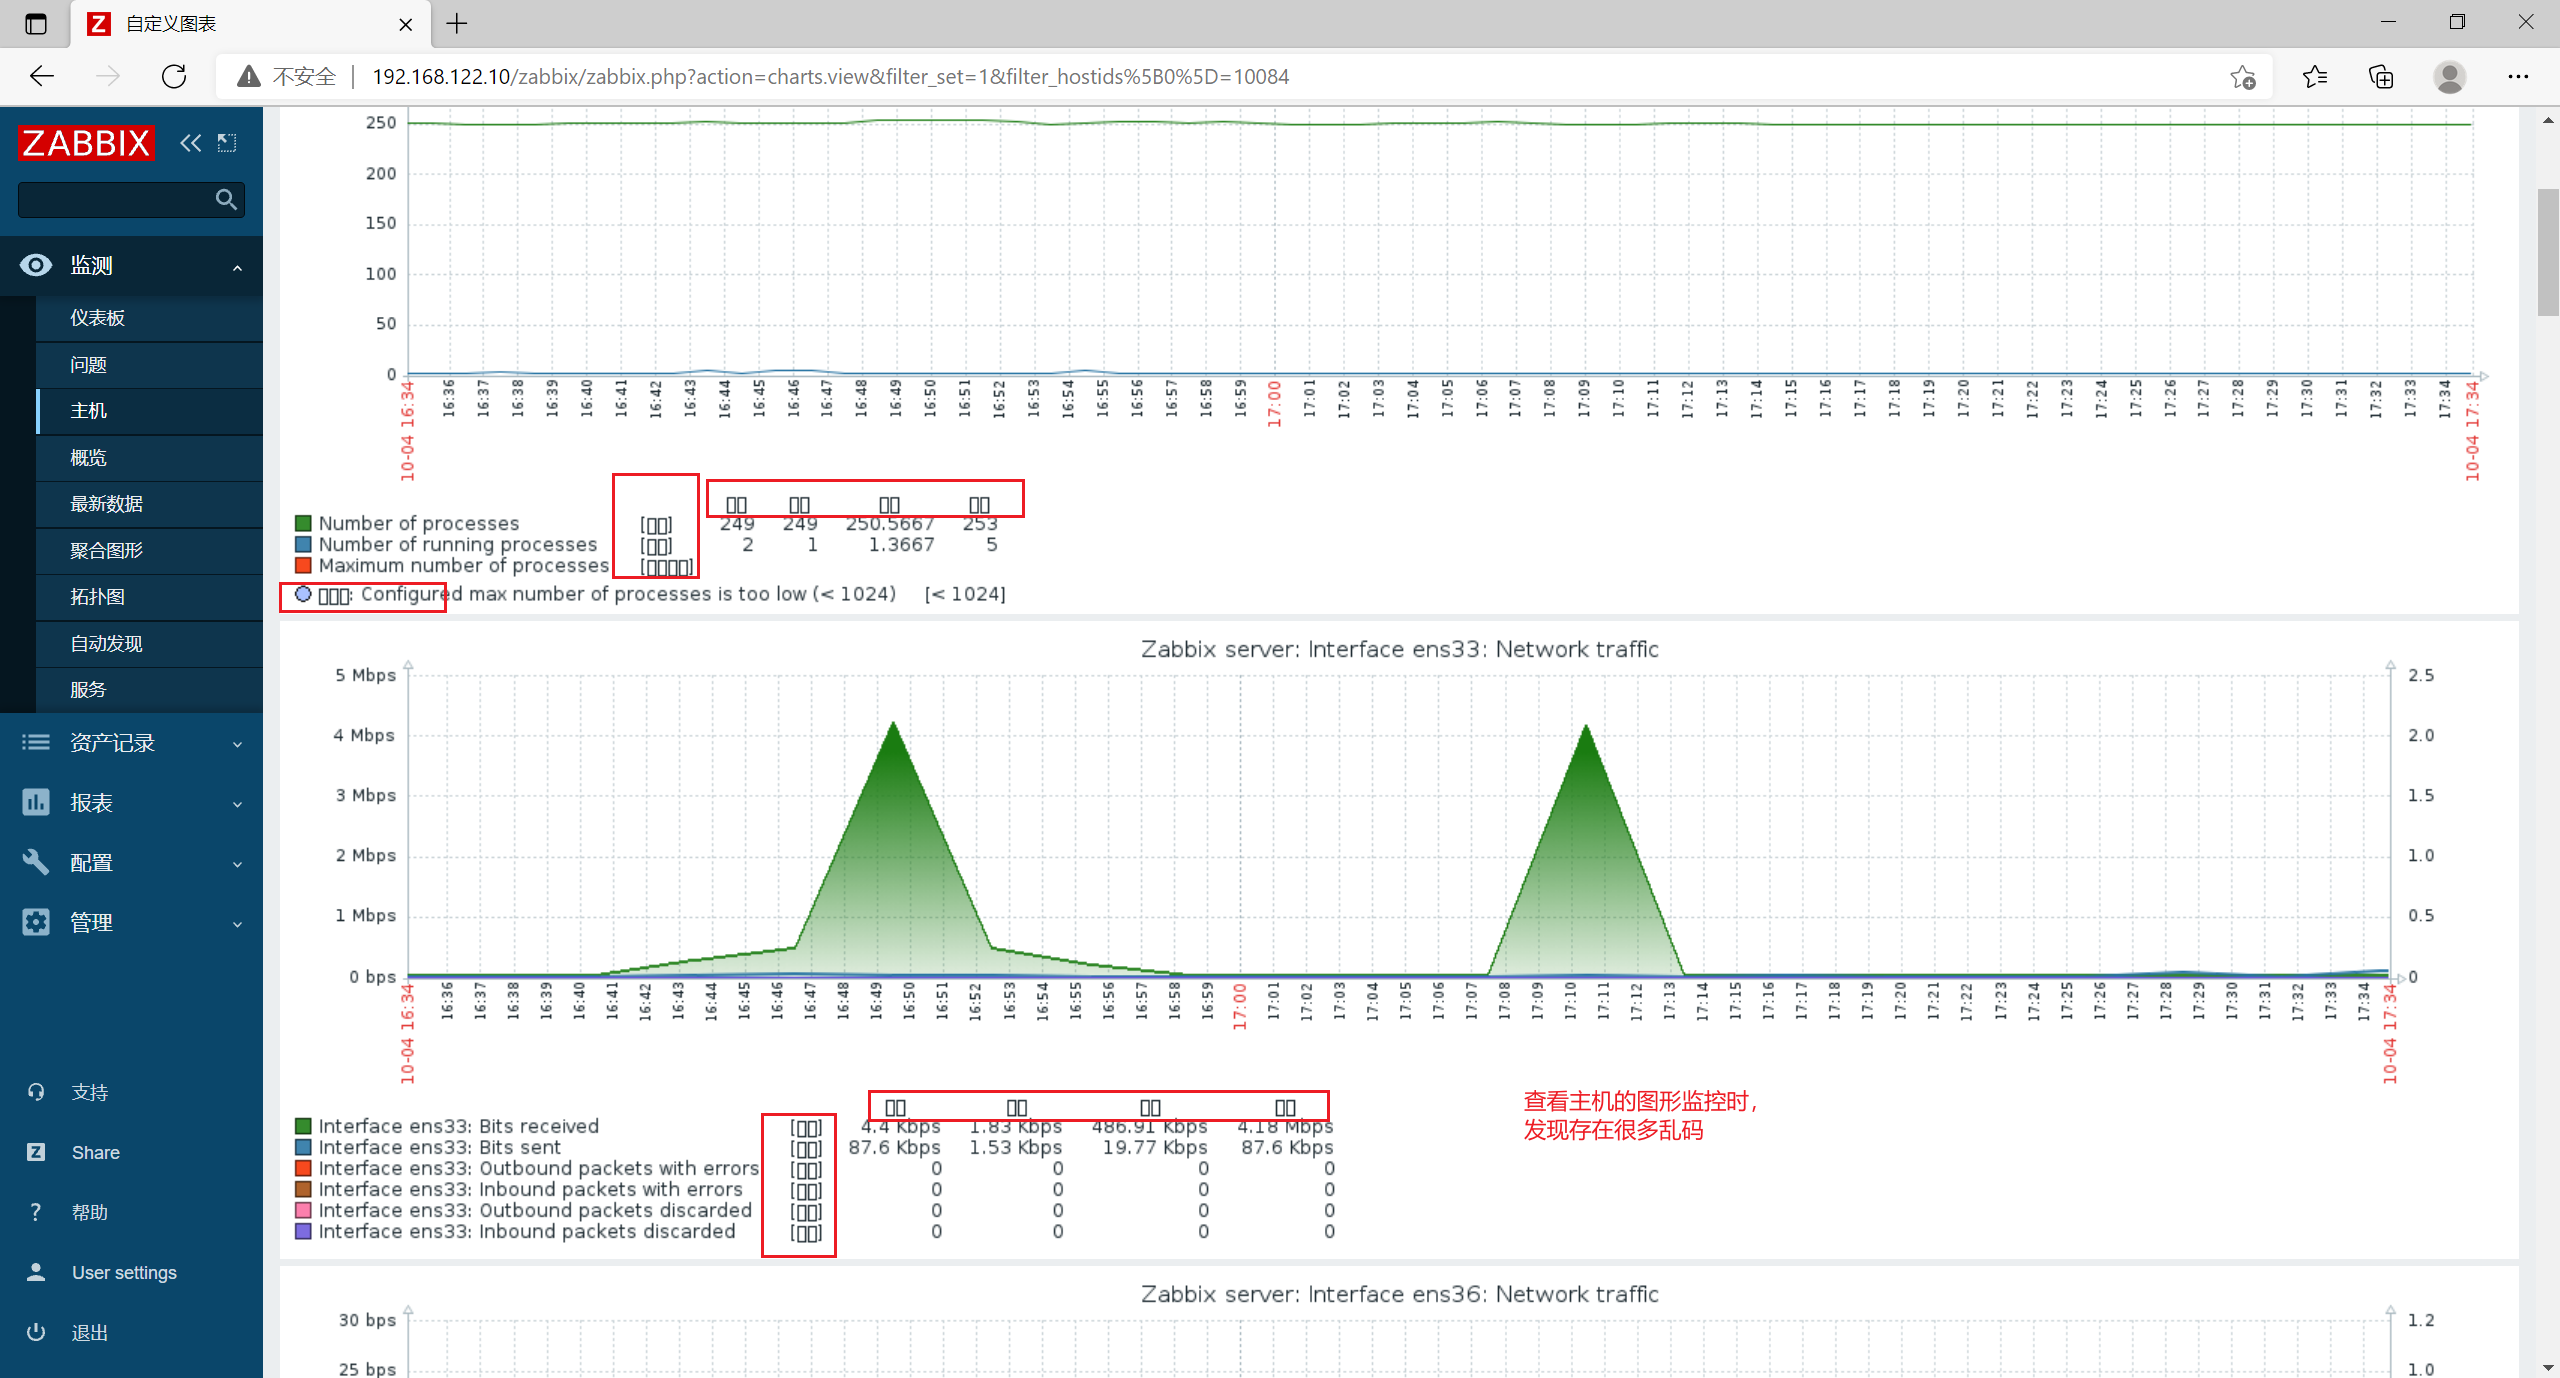
[root@zabbix_server yum.repos.d]# yum install -y wqy-microhei-fonts[root@zabbix_server yum.repos.d]# \cp -f /usr/share/fonts/wqy-microhei/wqy-microhei.ttc /usr/share/fonts/dejavu/DejaVuSans.ttf
Go back to the Web page and check whether the garbled code still exists

There is no garbled code. The problem is solved.
2. Deploy zabbix client
2.1 server configuration
| The server | ip address | host name | Main software |
|---|---|---|---|
| zabbix-agent | 192.168.122.11 | zabbix_agent | zabbix-agent2 |
| ZABBIX version 5.0 is a new version of client agent2 developed in golang language. | |||
| zabbix server_ The server uses 10051 port by default, and the client zabbix_agent2 uses 10050 port by default. |
2.2 server environment
[root@localhost ~]# hostnamectl set-hostname zabbix_agent[root@localhost ~]# su[root@zabbix_agent ~]# systemctl disable --now firewalld[root@zabbix_agent ~]# setenforce 0setenforce: SELinux is disabled
2.3 server and client configuration time synchronization
Server
[root@zabbix_server ~]# yum install -y ntpdate[root@zabbix_server ~]# ntpdate -u ntp.aliyun.com
client
[root@zabbix_agent ~]# yum install -y ntpdate[root@zabbix_agent ~]# ntpdate -u ntp.aliyun.com
2.4 configure the time zone for the client to be consistent with the server
[root@zabbix_agent ~]# mv /etc/localtime{,.bak}[root@zabbix_agent ~]# ln -s /usr/share/zoneinfo/Asia/Shanghai /etc/localtime
2.5 set the download source of ZABBIX and install zabbix-agent2
[root@zabbix_agent ~]# rpm -ivh https://mirrors.aliyun.com/zabbix/zabbix/5.0/rhel/7/x86_64/zabbix-release-5.0-1.el7.noarch.rpm [root@zabbix_agent ~]# sed -i 's#http://repo.zabbix.com#https://mirrors.aliyun.com/zabbix#' /etc/yum.repos.d/zabbix.repo[root@zabbix_agent ~]# yum install -y zabbix-agent2
2.6 modifying agent2 configuration file
[root@zabbix_agent ~]# vim /etc/zabbix/zabbix_agent2.conf

##Line 80, specify the IP address of the zabbix server
Server=192.168.122.10
##Line 120, specify the IP address of the zabbix server
ServerActive=192.168.122.10
##Line 131, specifying the hostname of the current zabbix client
Hostname=zabbix_agent
2.7 start zabbix-agent2
[root@zabbix_agent ~]# vim /etc/zabbix/zabbix_agent2.conf
[root@zabbix_agent ~]# systemctl enable --now zabbix-agent2.service
Created symlink from /etc/systemd/system/multi-user.target.wants/zabbix-agent2.service to /usr/lib/systemd/system/zabbix-agent2.service.
[root@zabbix_agent ~]# netstat -natp | grep zabbix
tcp6       0      0 :::10050                :::*                    LISTEN      26725/zabbix_agent2
2.8 verify the connectivity of zabbix-agent2 on the server
[root@zabbix_server ~]# yum install -y zabbix-get
#Install zabbix proactive data acquisition command
[root@zabbix_server ~]# zabbix_get -s '192.168.122.11' -p 10050 -k 'agent.ping'
#If 1 is returned, the connection is successful. If 0 is returned, the connection fails
1
[root@zabbix_server ~]# zabbix_get -s '192.168.122.11' -p 10050 -k 'system.hostname'
#Displays the host name of the client
zabbix_agent
2.9 add agent host in web page
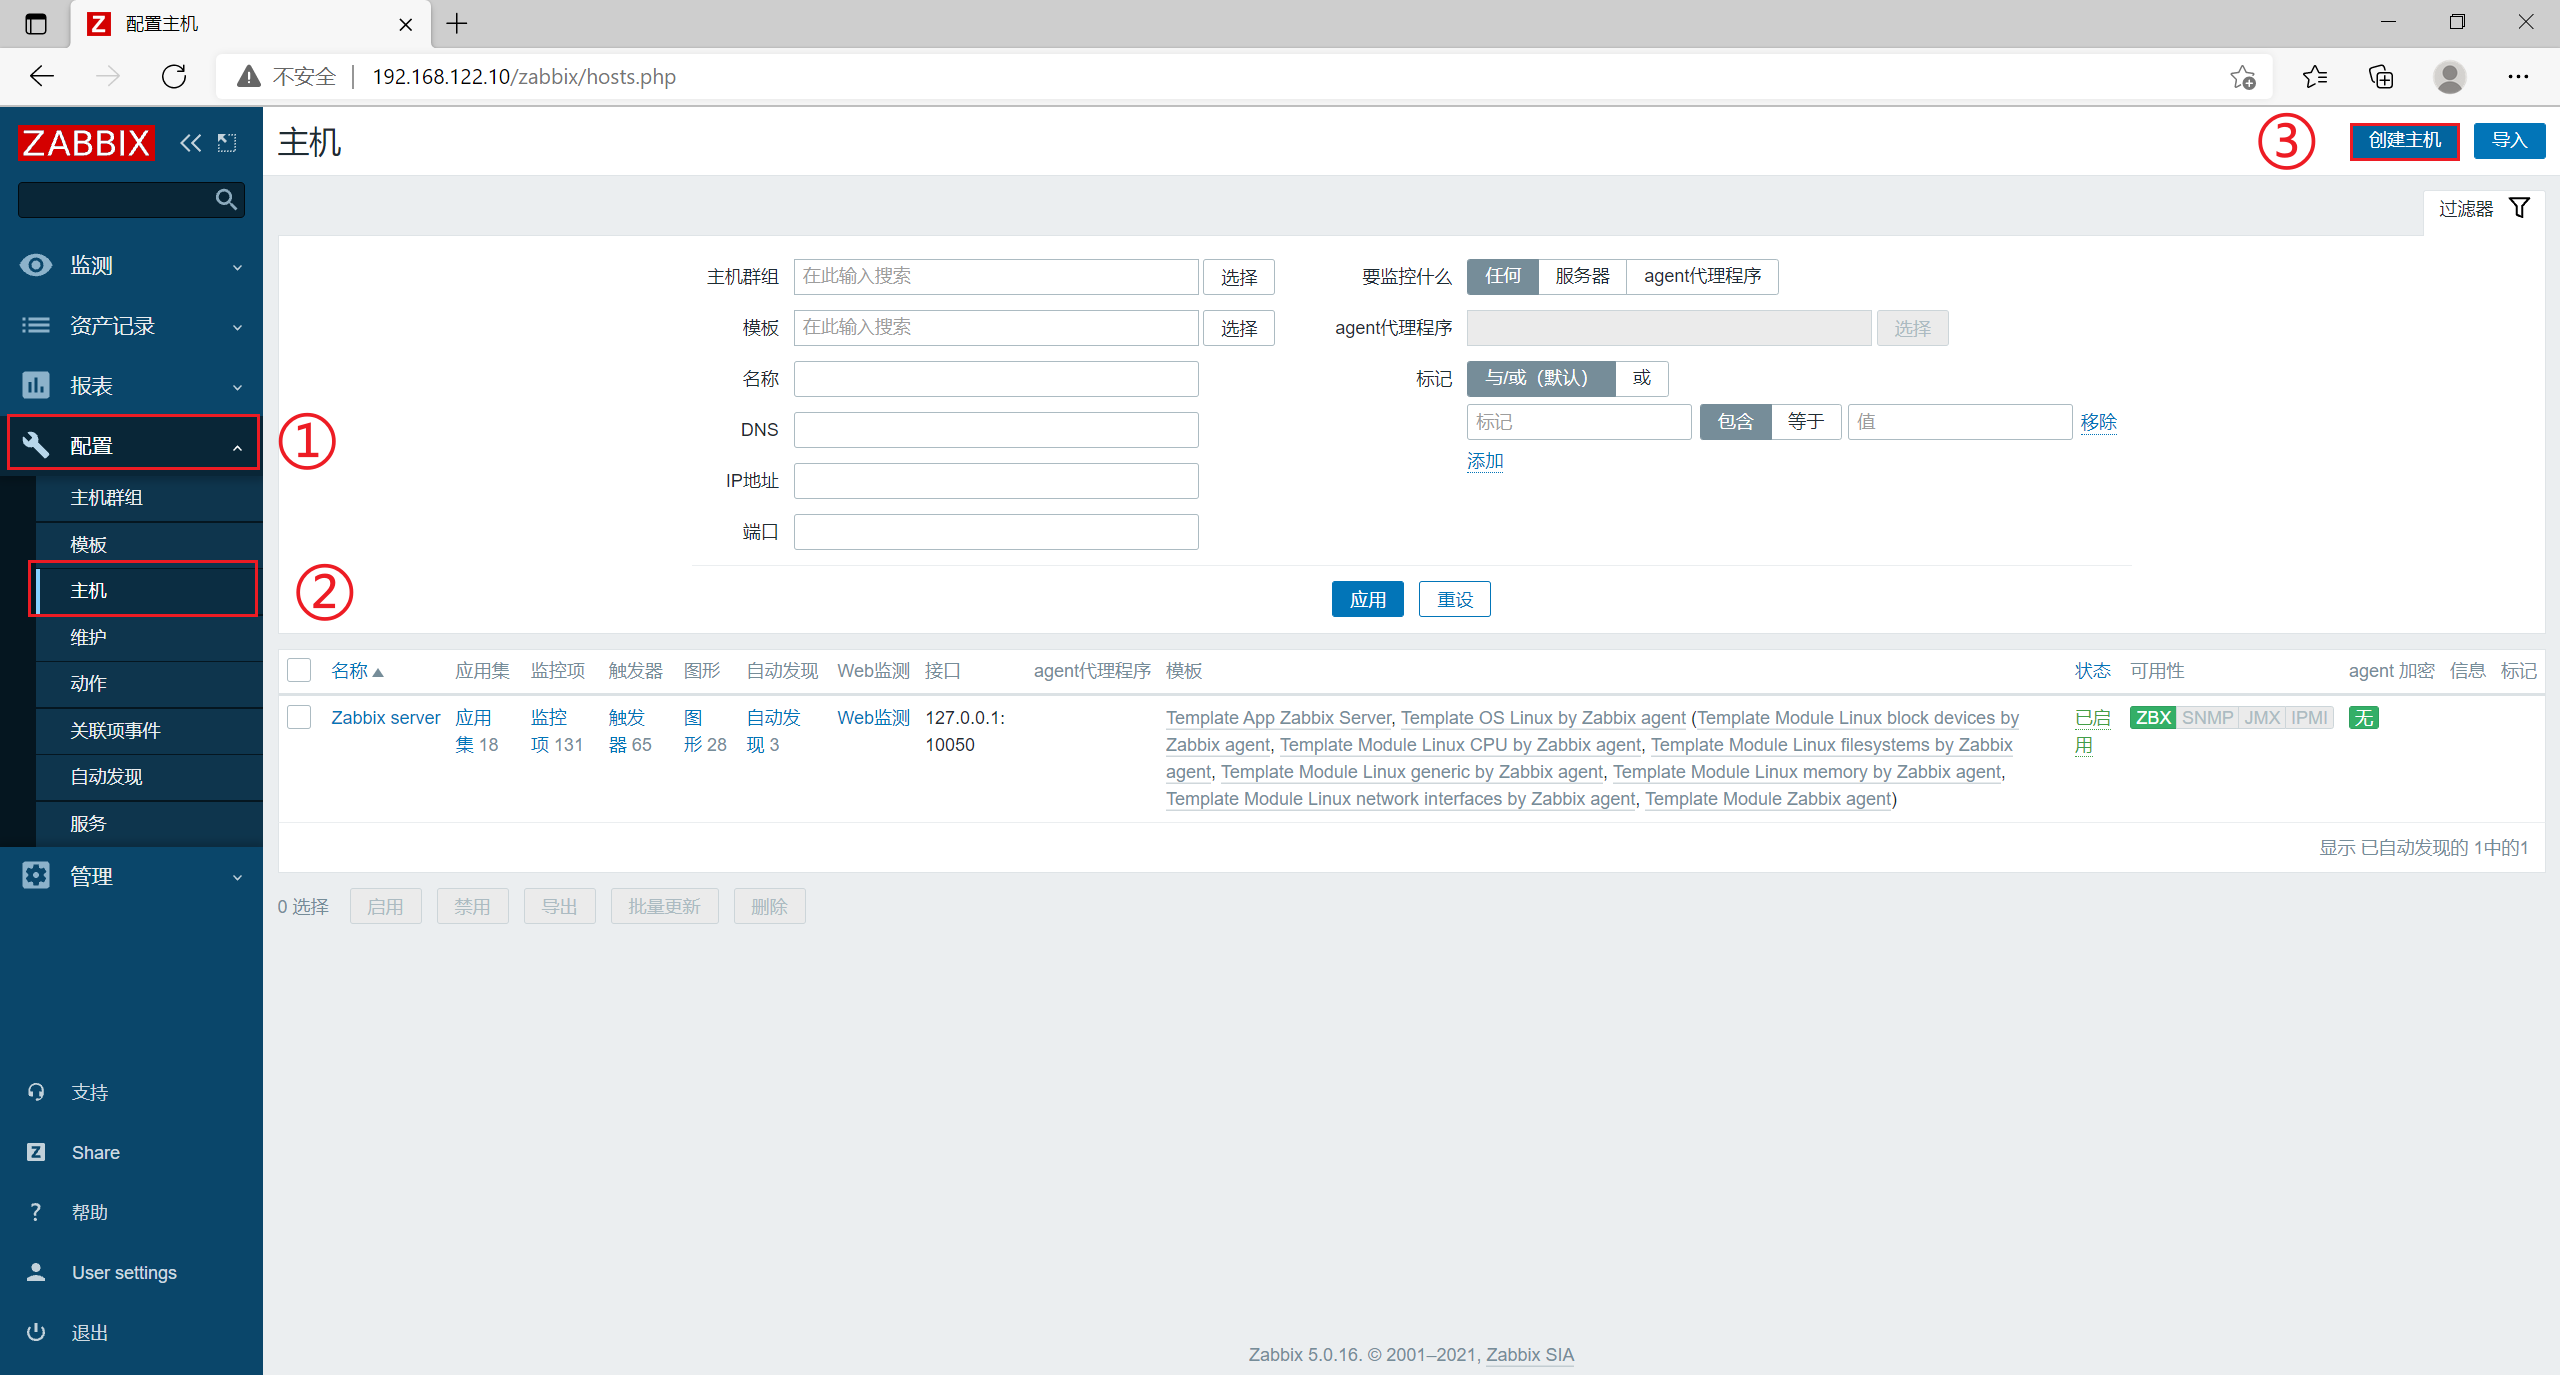
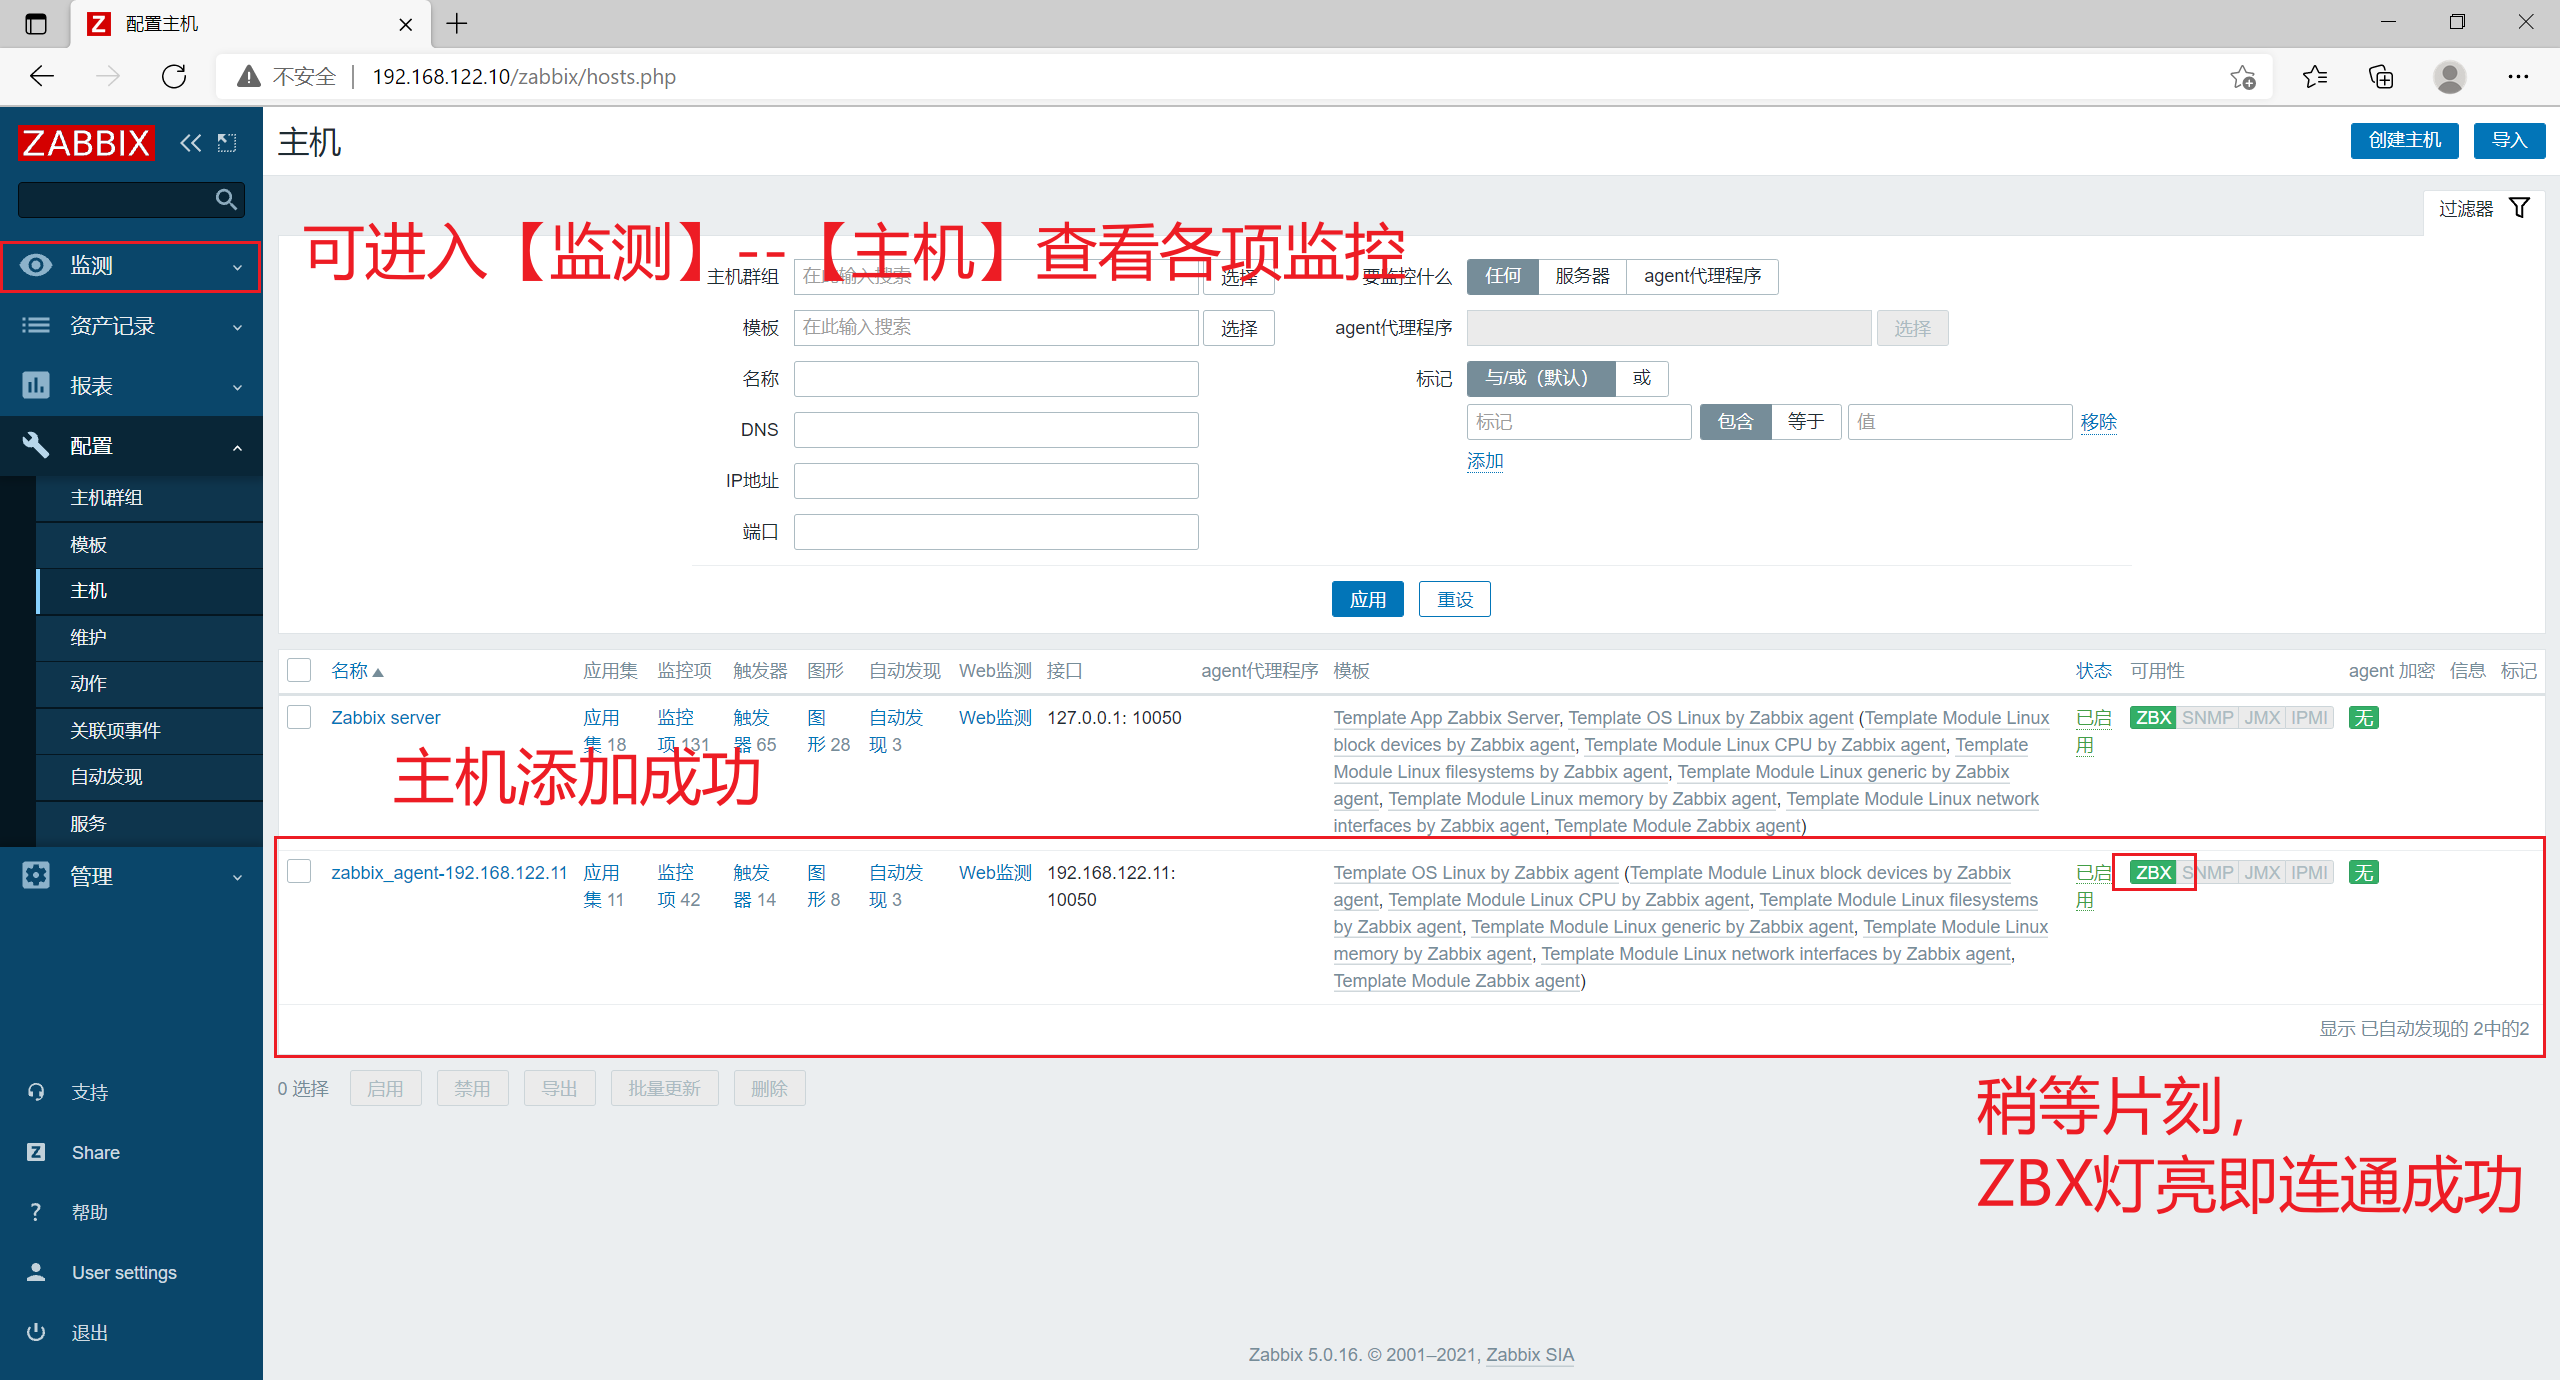
- Click [host] in [configuration] in the left menu bar, and click [create host]
- [host name] is set to zabbix_agent
[visible name] is set to zabbix_agent-192.168.122.11
[group] Select Linux servers
[IP address] of [Interfaces] is set to 192.168.122.11
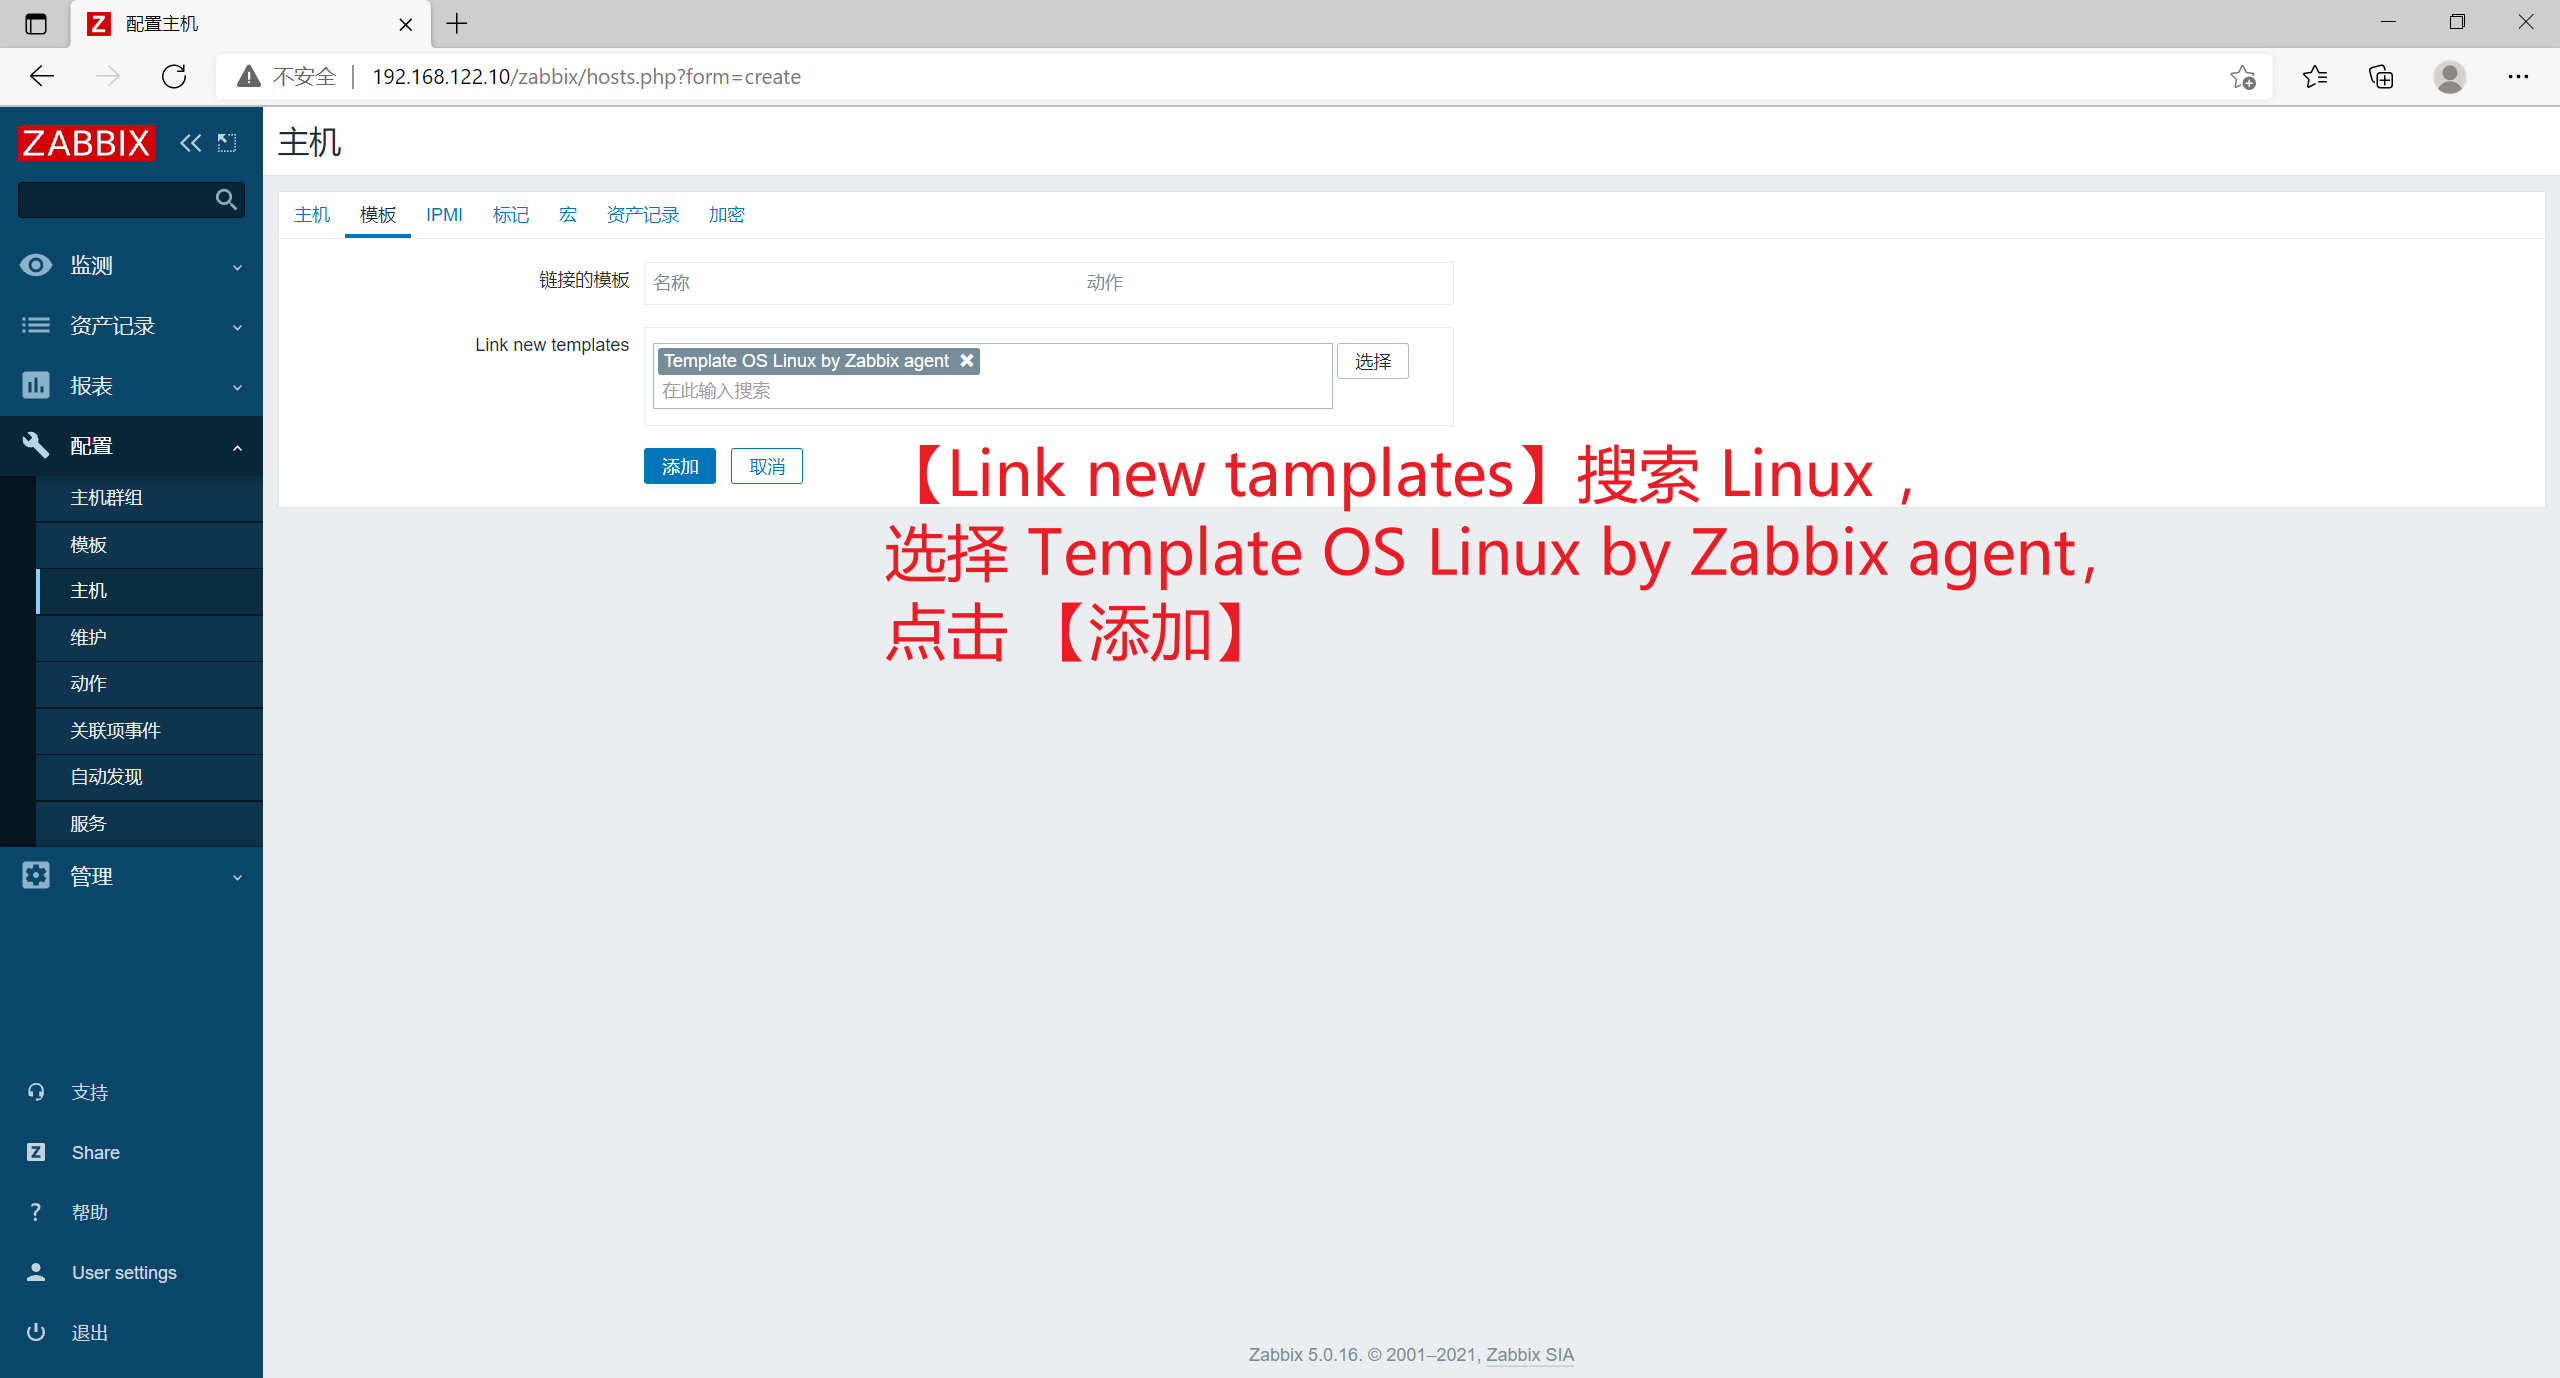
Then click [template] in the upper menu bar
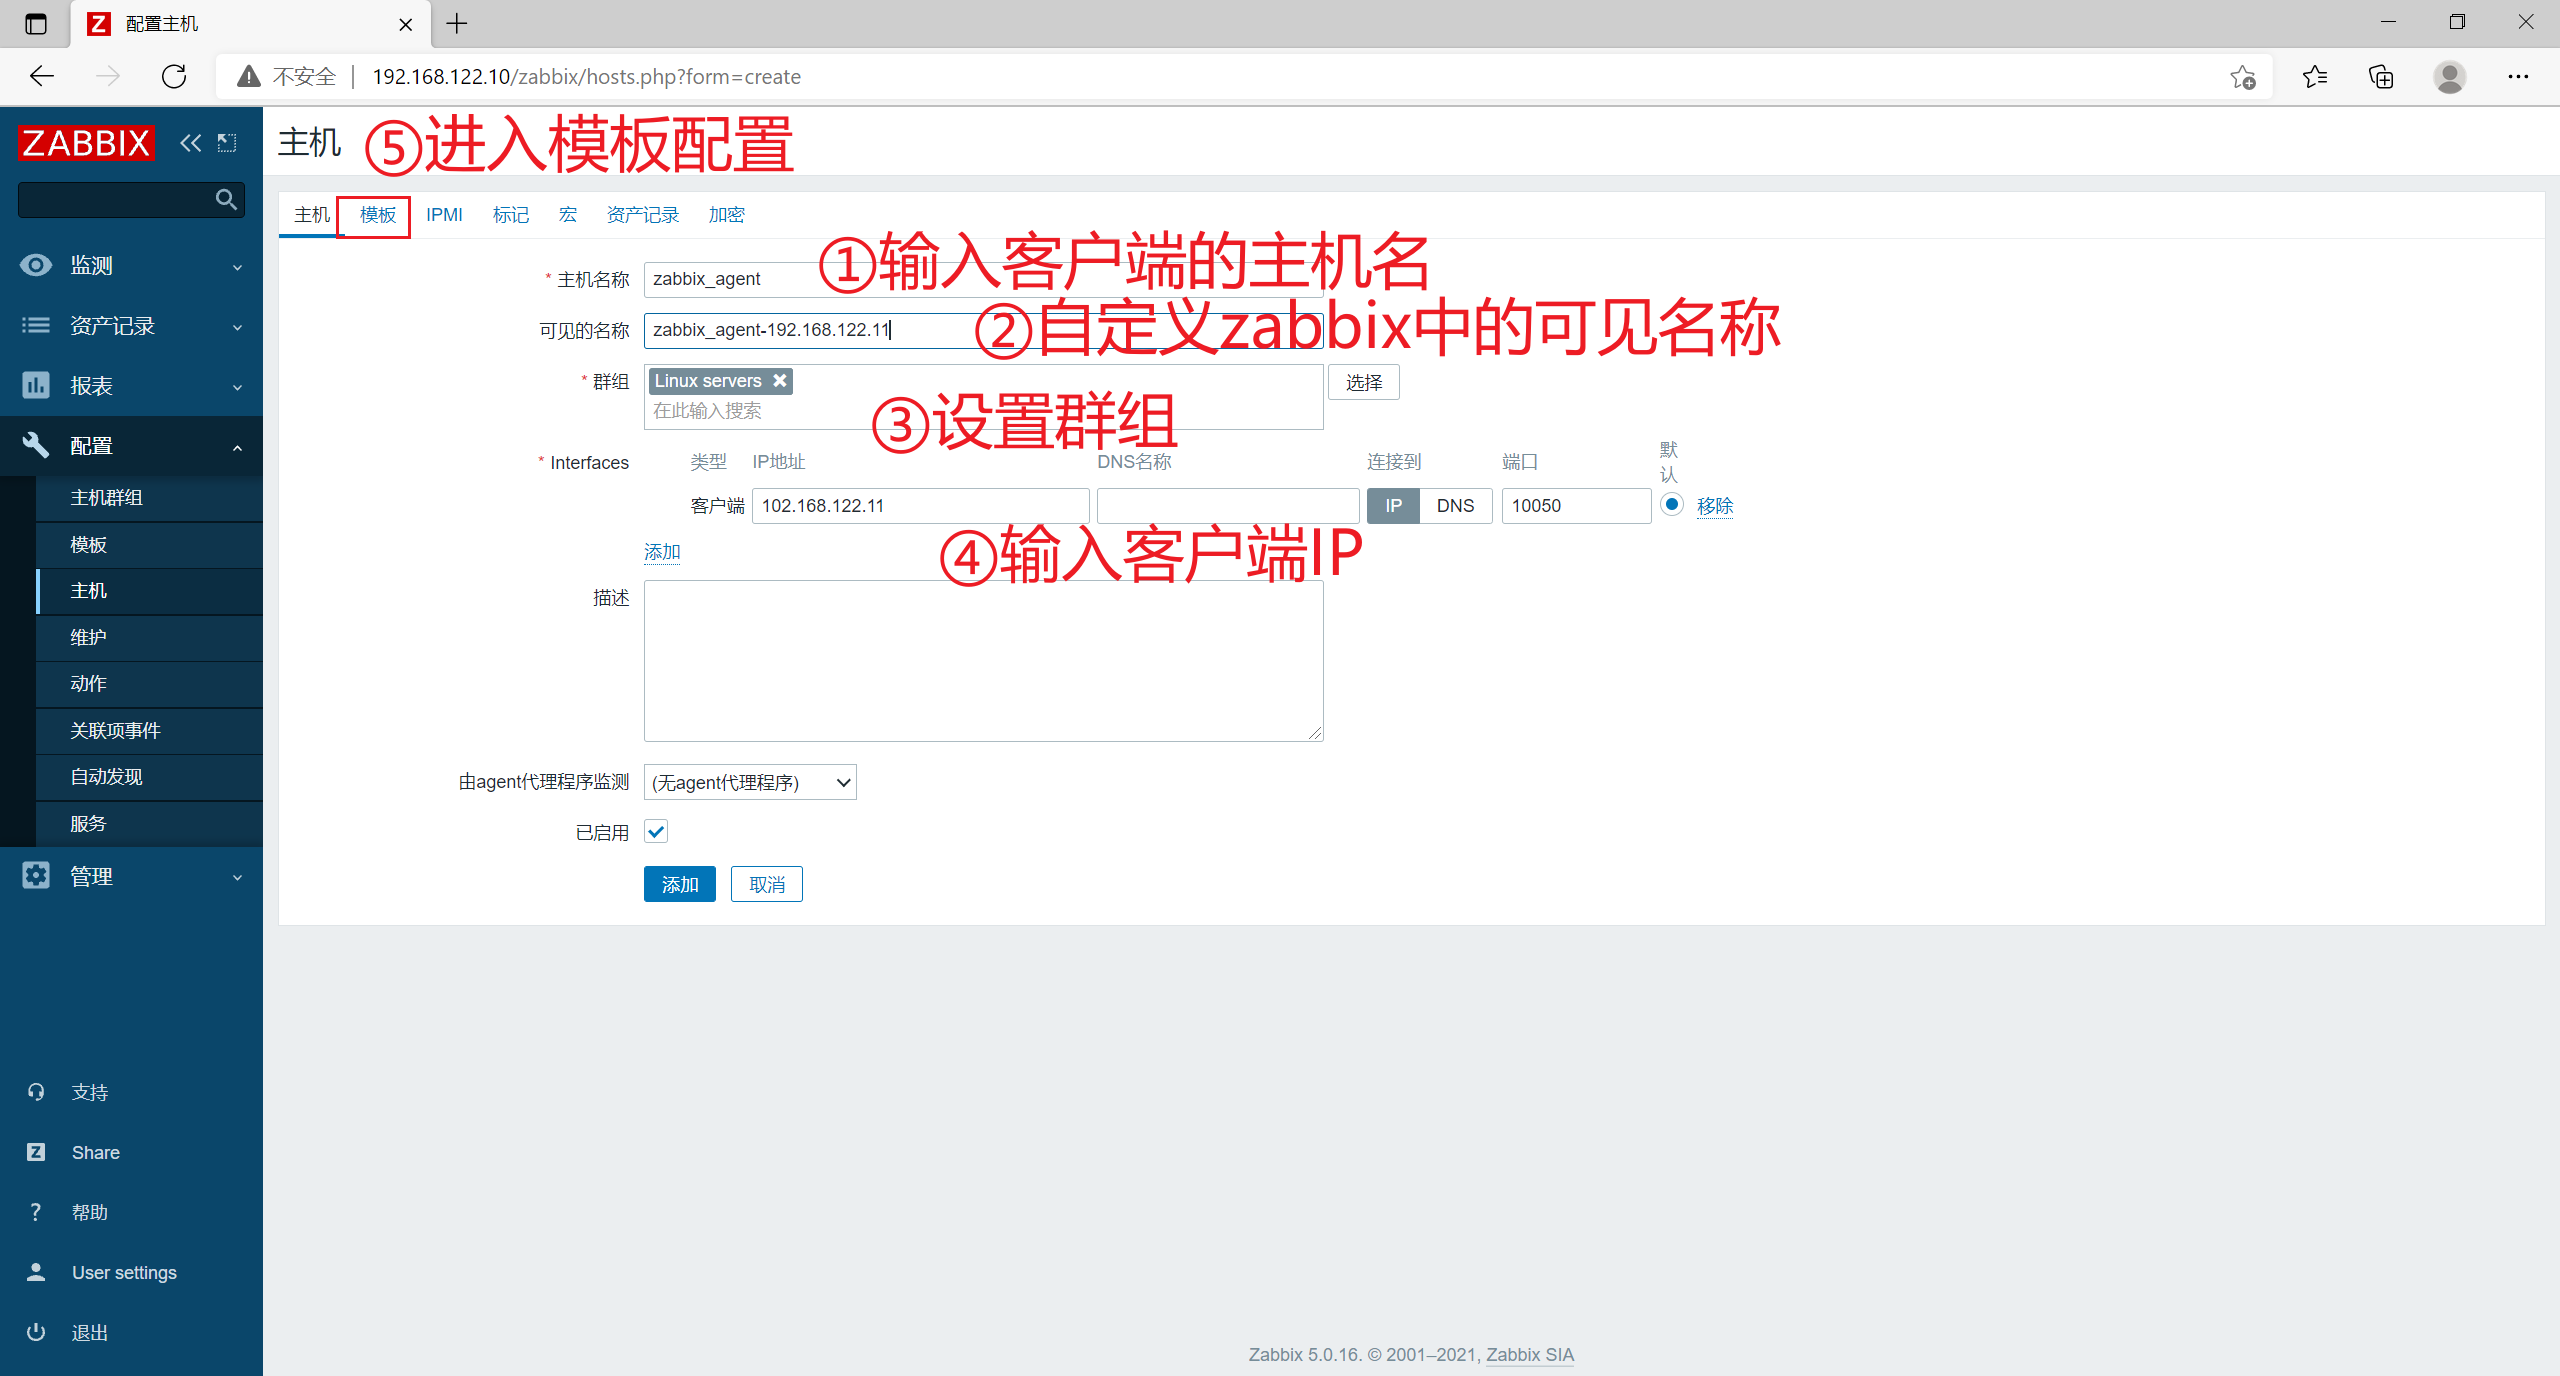
- [link new stamps] search for Linux, select Template OS Linux by Zabbix agent, and click [add]

3, Custom monitoring content
1. Monitoring requirements
Case: user defined monitoring client server login number
Requirements: limit the number of logins to no more than 3, and alarm information will be sent when the number exceeds 3
2. Create a custom key on the client
2.1 specify the linux commands to be executed
[root@zabbix_agent ~]# whoroot pts/1 2021-10-04 00:34 (192.168.122.1)[root@zabbix_agent ~]# who | wc -l1
2.2 create zabbix's monitoring item configuration file for user-defined key s
[root@zabbix_agent ~]# vim /etc/zabbix/zabbix_agent2.conf

##Line 268, you can create a customized monitoring item configuration file in zabbix_agent2.d directory
Include=/etc/zabbix/zabbix_agent2.d/*.conf
##Line 291, the format of the user-defined monitoring item is as follows
#       Format: UserParameter=<key>,<shell command>

[root@zabbix_agent zabbix_agent2.d]# vim user_login_limit.conf

UserParameter=user_login_limit,who | wc -l

[root@zabbix_agent zabbix_agent2.d]# systemctl restart zabbix-agent2.service
2.3 verify the newly created monitoring item on the server
[root@zabbix_server ~]# zabbix_get -s '192.168.122.11' -p 10050 -k 'user_login_limit'
1
Add login terminal to client
[root@zabbix_agent ~]# who
root     pts/1        2021-10-04 00:34 (192.168.122.1)
root     pts/2        2021-10-04 22:34 (192.168.122.1)
[root@zabbix_agent ~]# who | wc -l
2
Server revalidation
[root@zabbix_server ~]# zabbix_get -s '192.168.122.11' -p 10050 -k 'user_login_limit'
2
Validation succeeded
3. Create a custom monitor item template on the web page
3.1 create template
- Click template in configuration in the left menu bar and click create template
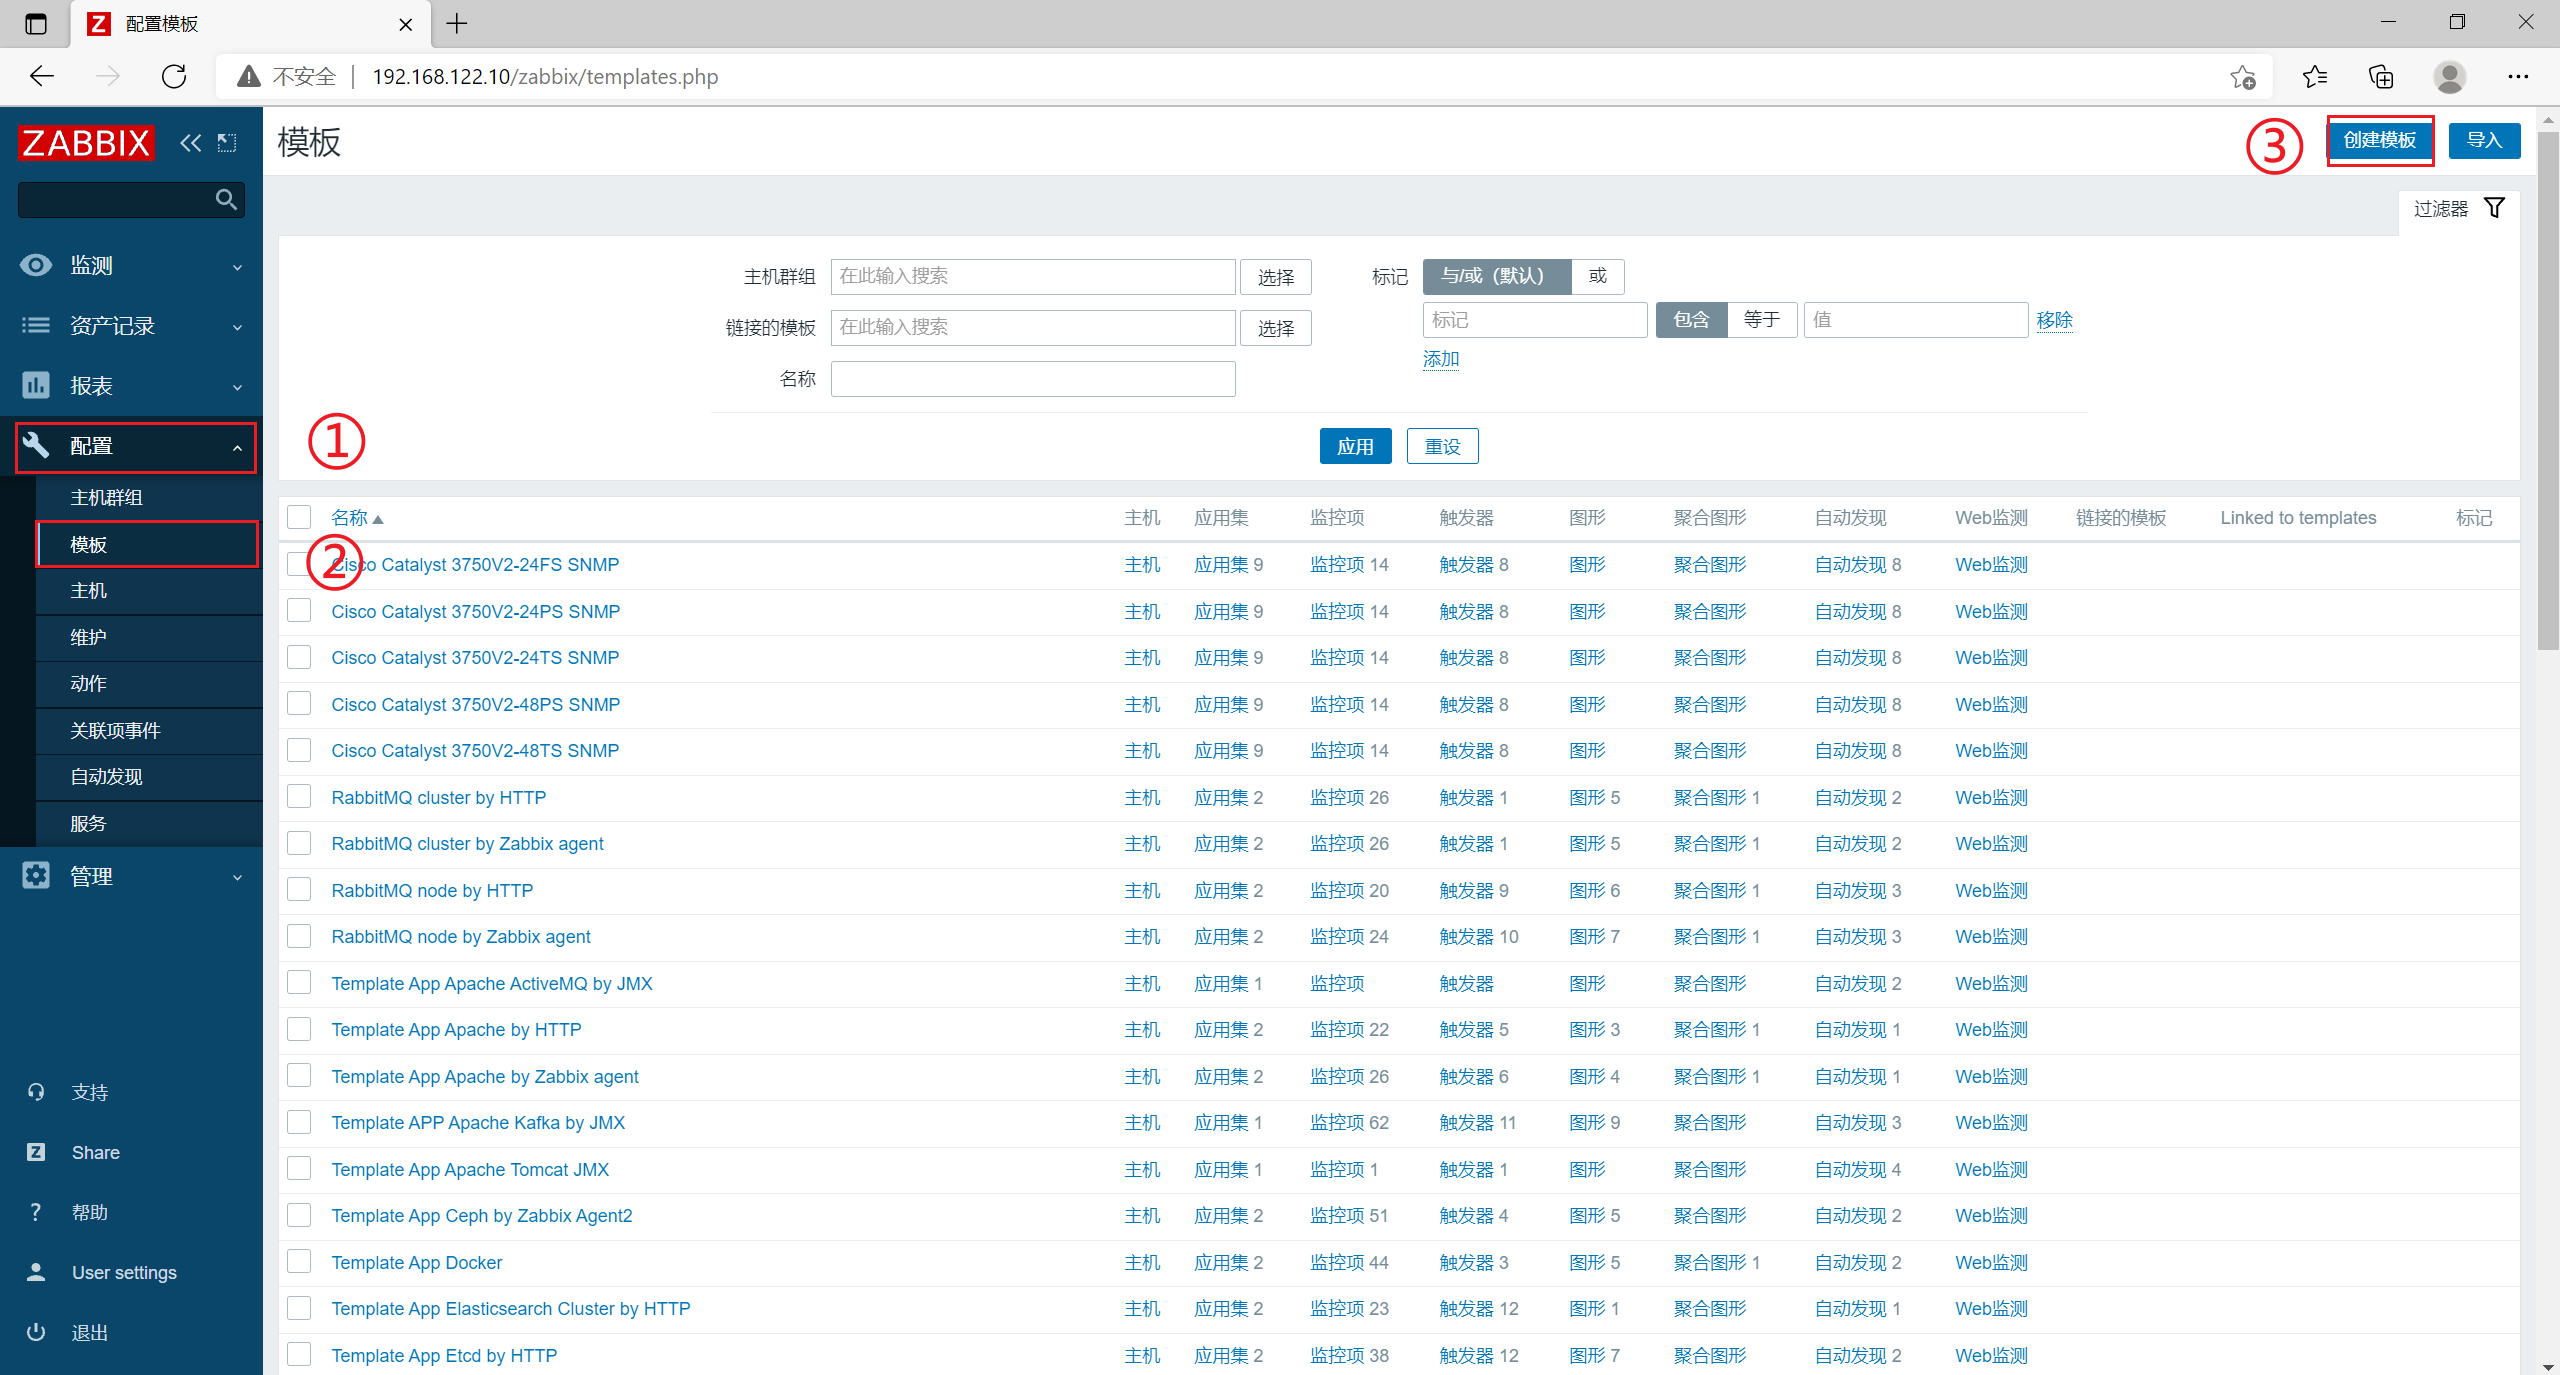
- Set [template name] to Template User Login
Set [visible name] to Template User Login
[group] Select Templates
[description] can be customized
Click [add]

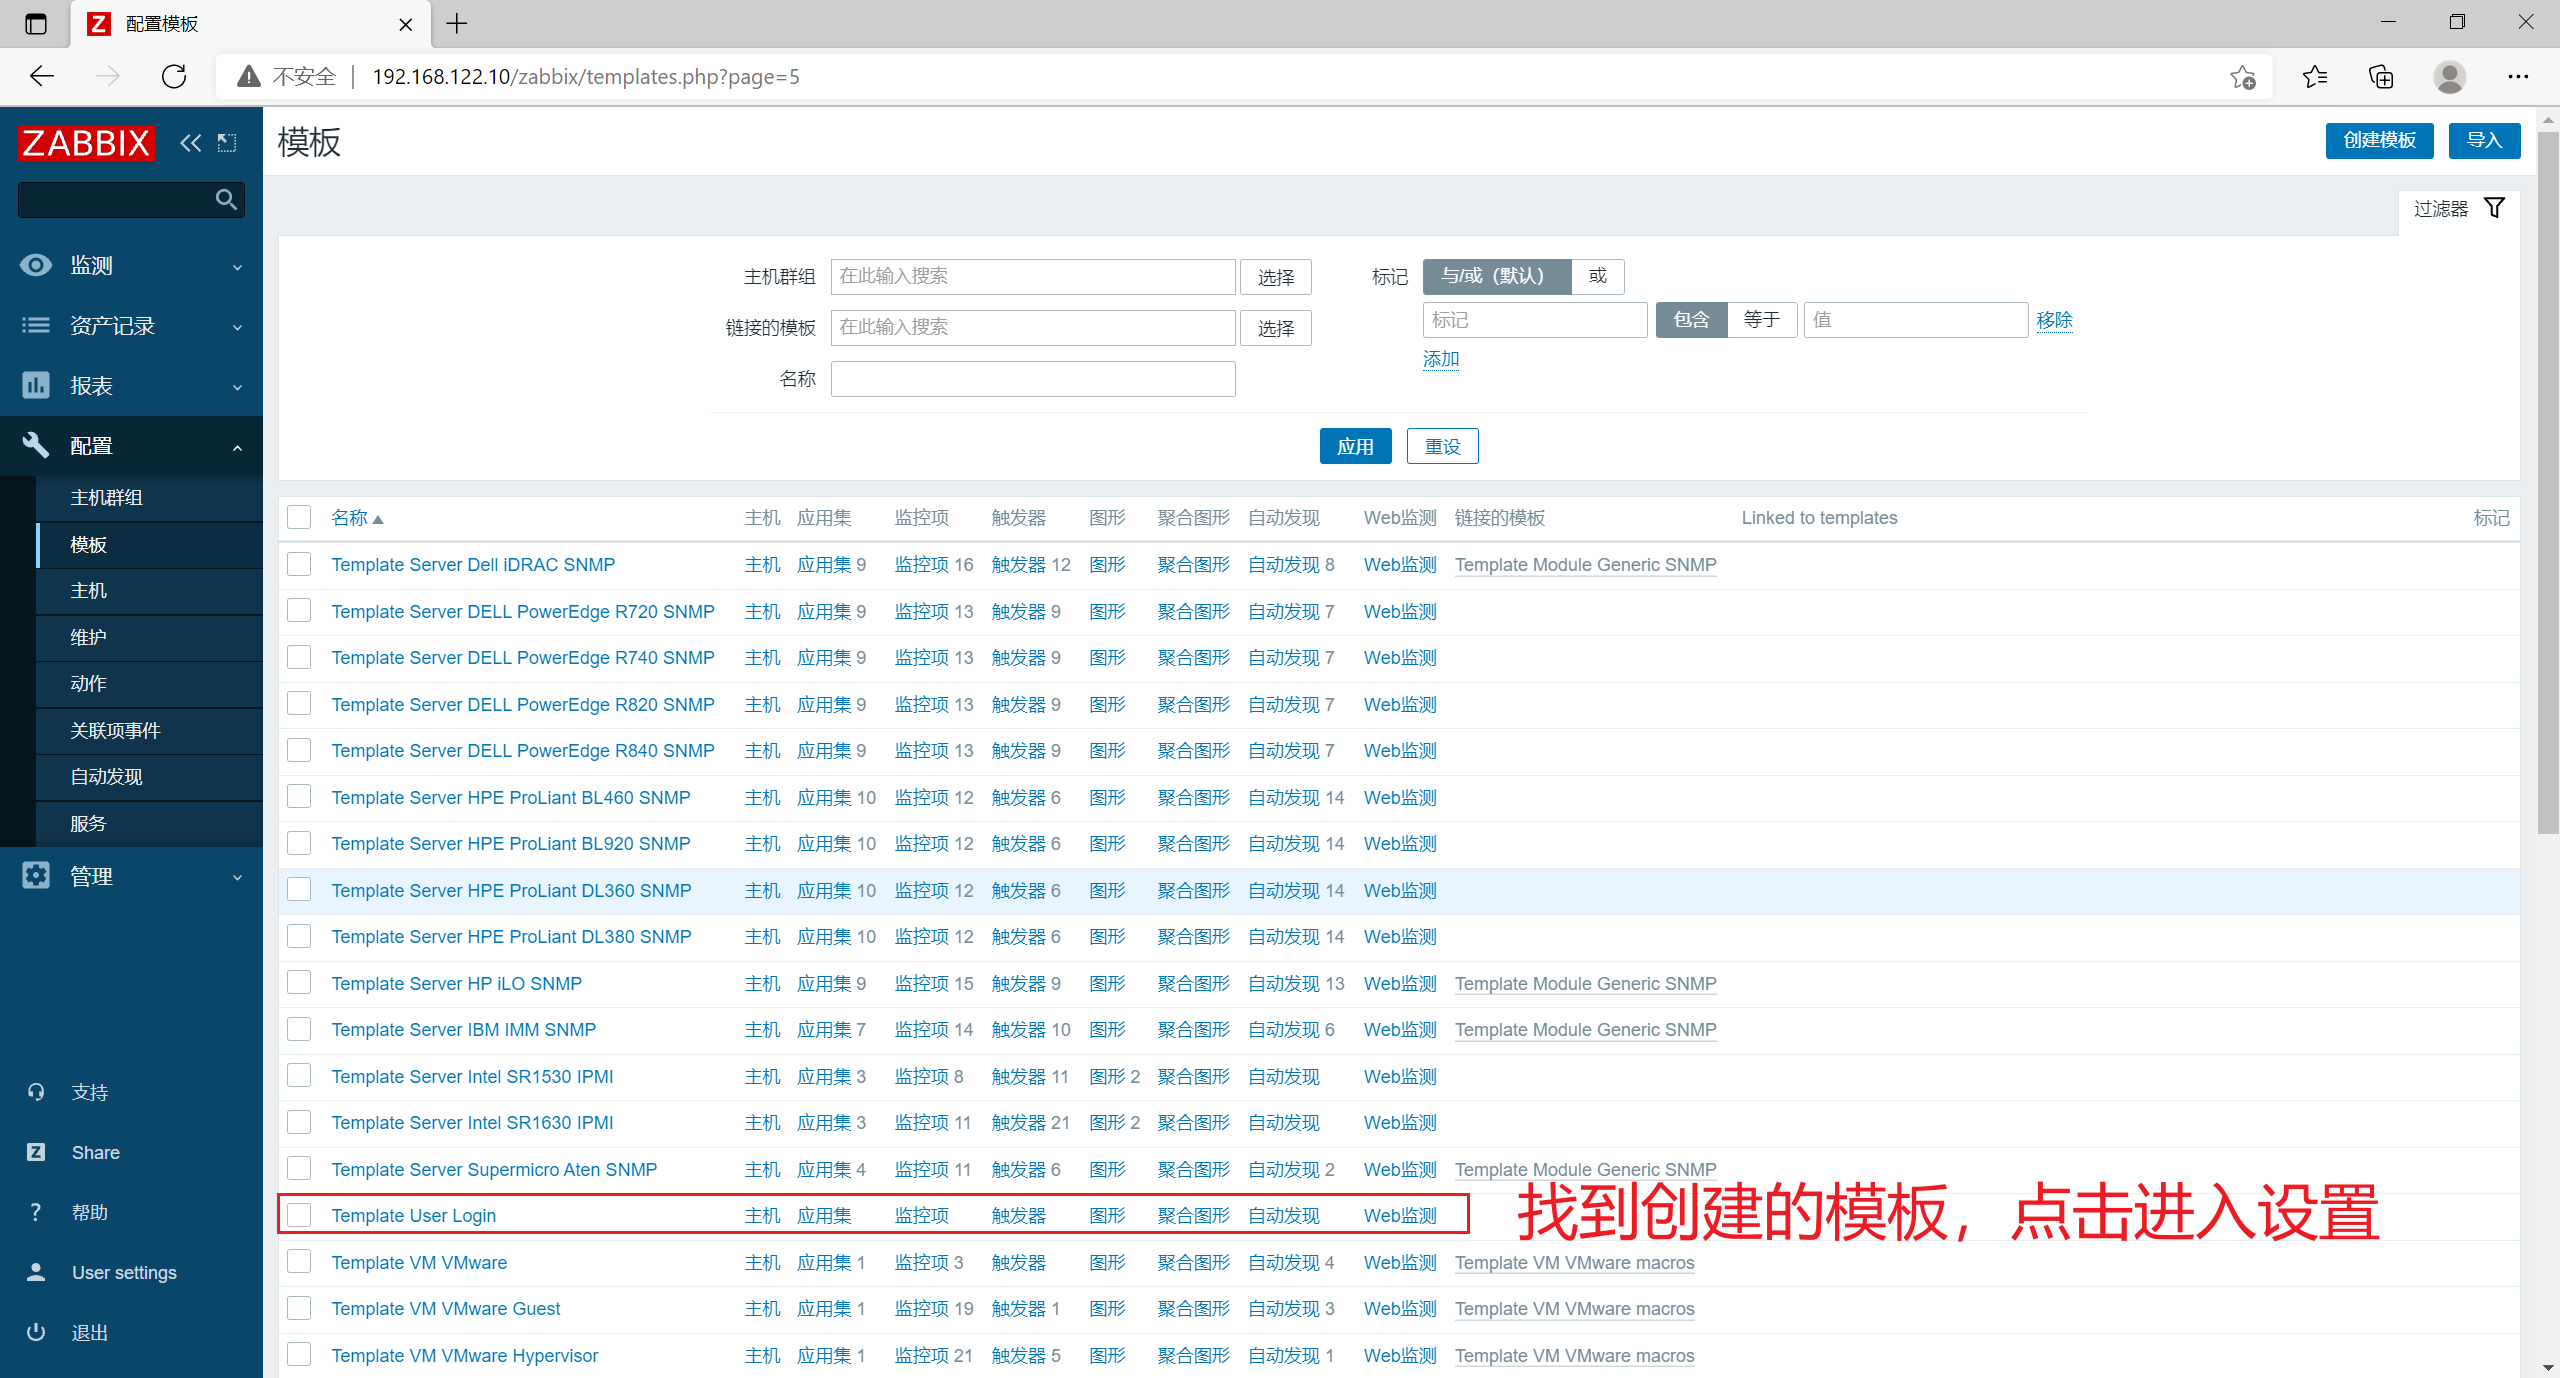
- Now you can search Template Login User in linked template
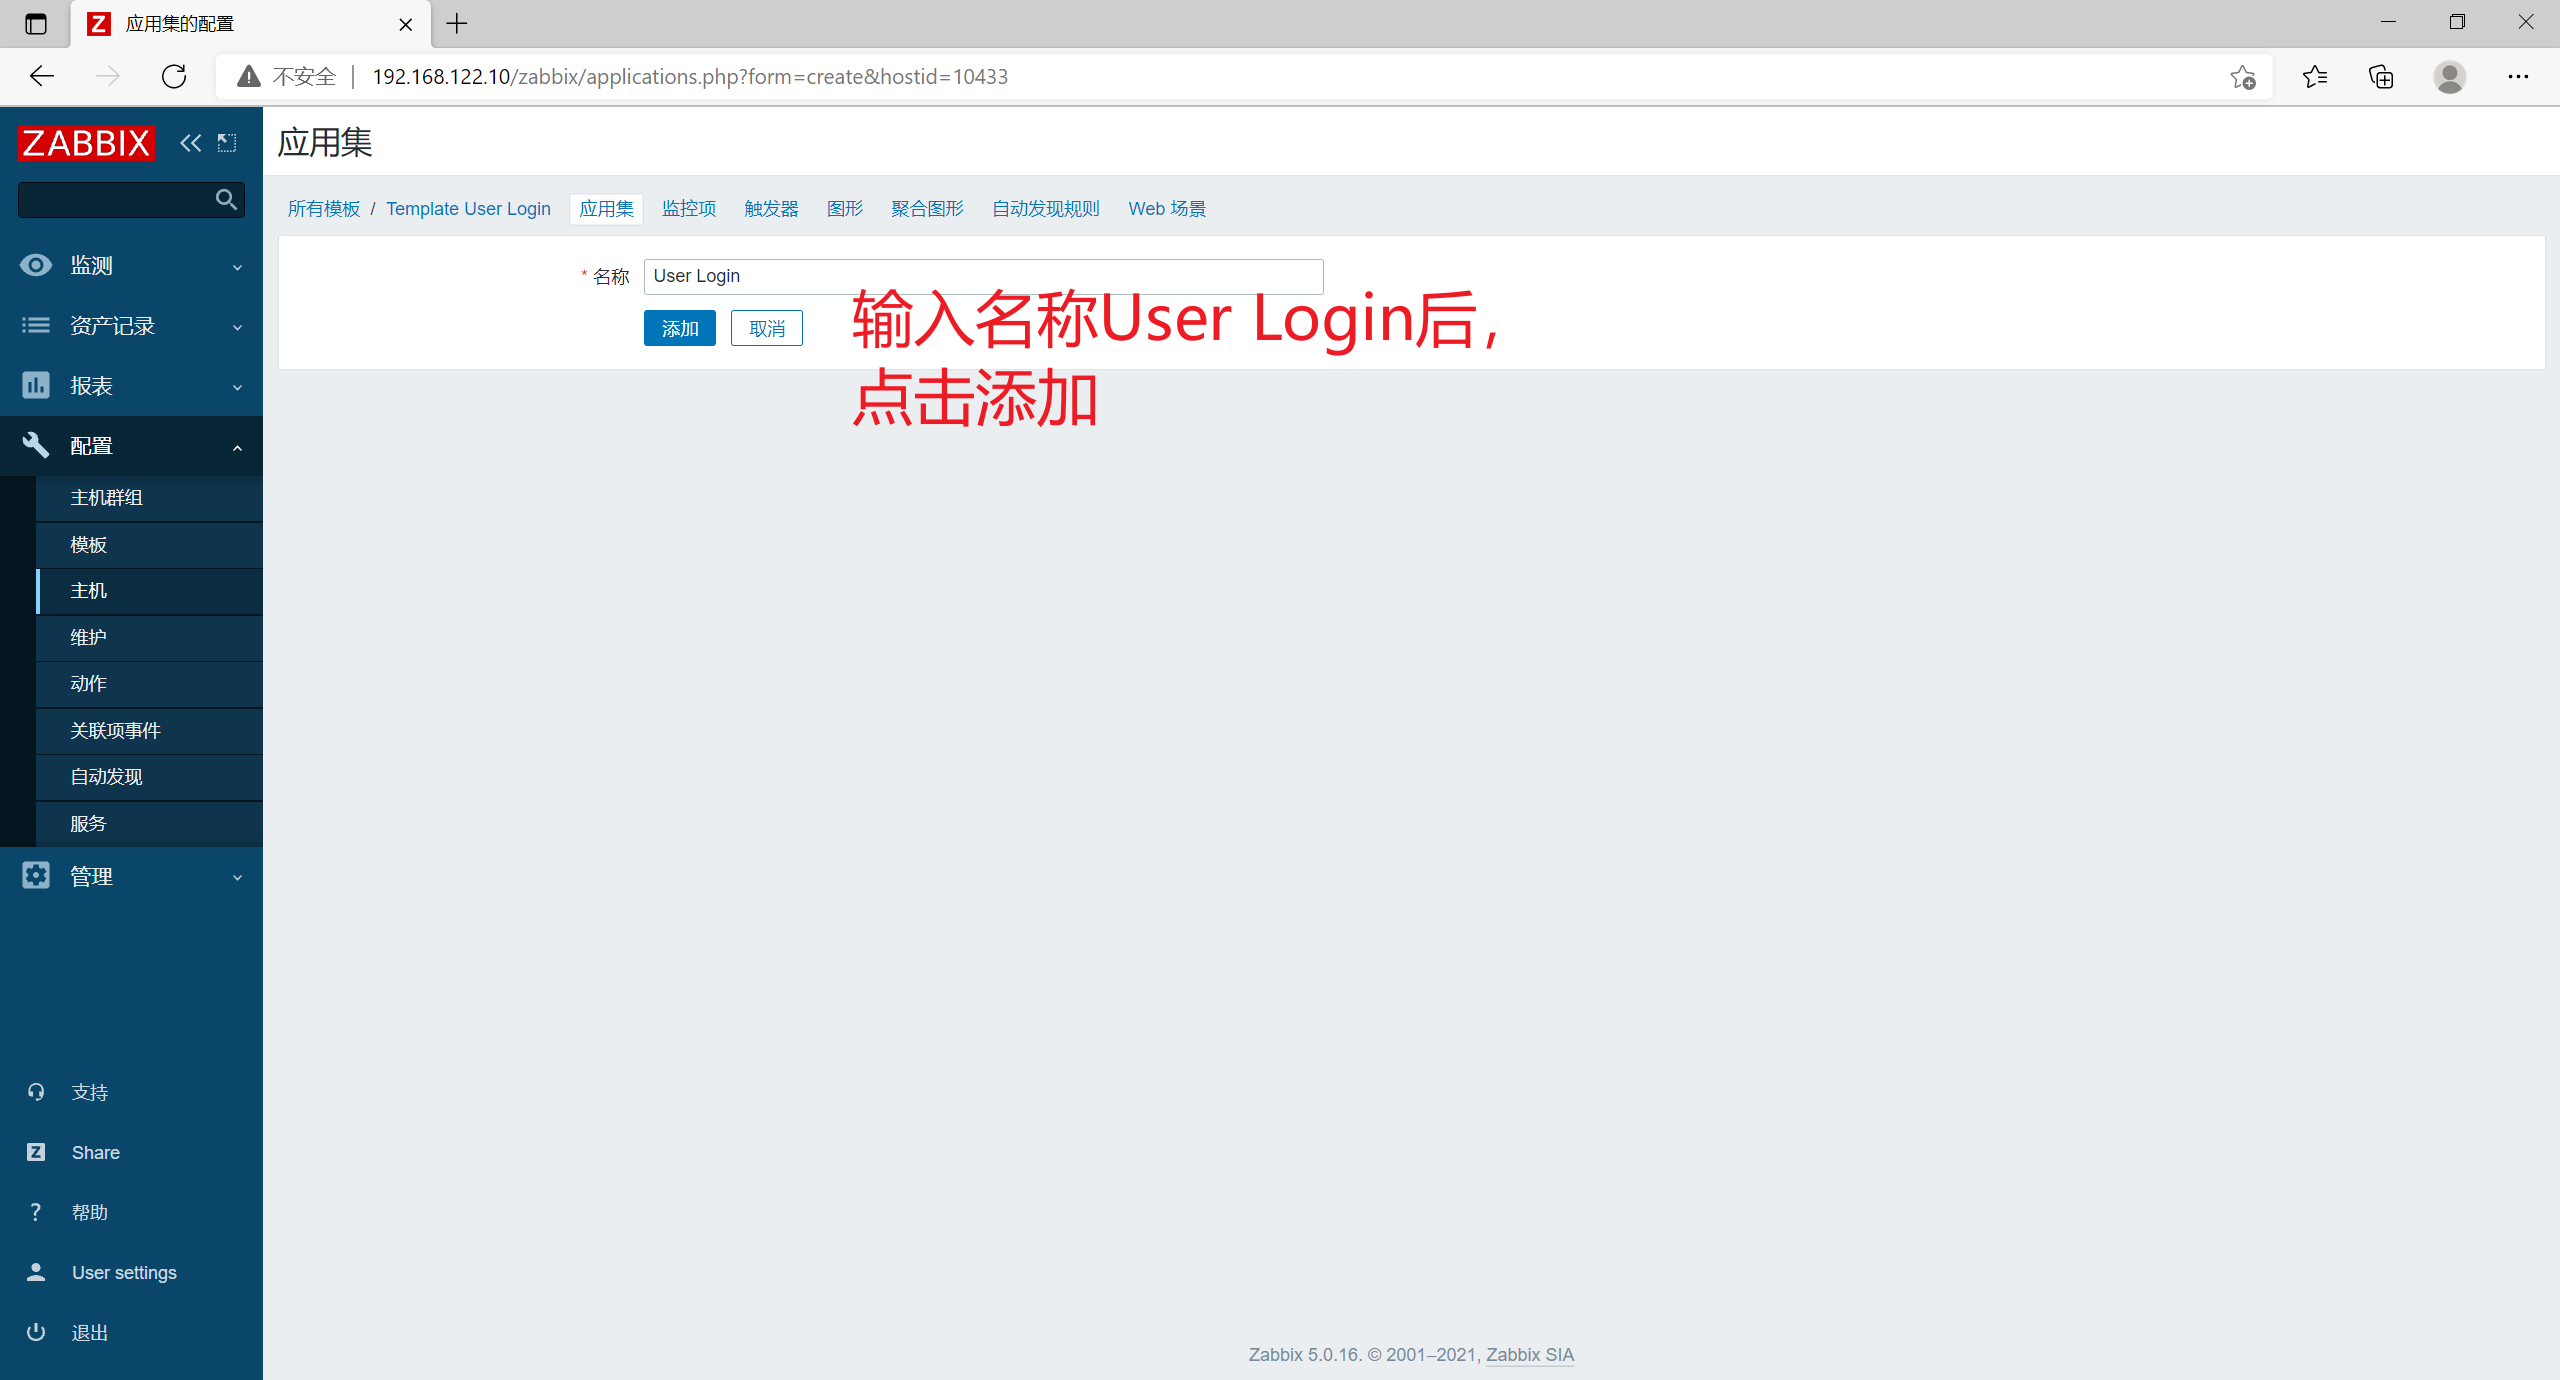
3.2 create application set (for managing monitoring items)
- Click application set in the upper menu bar and click create application set
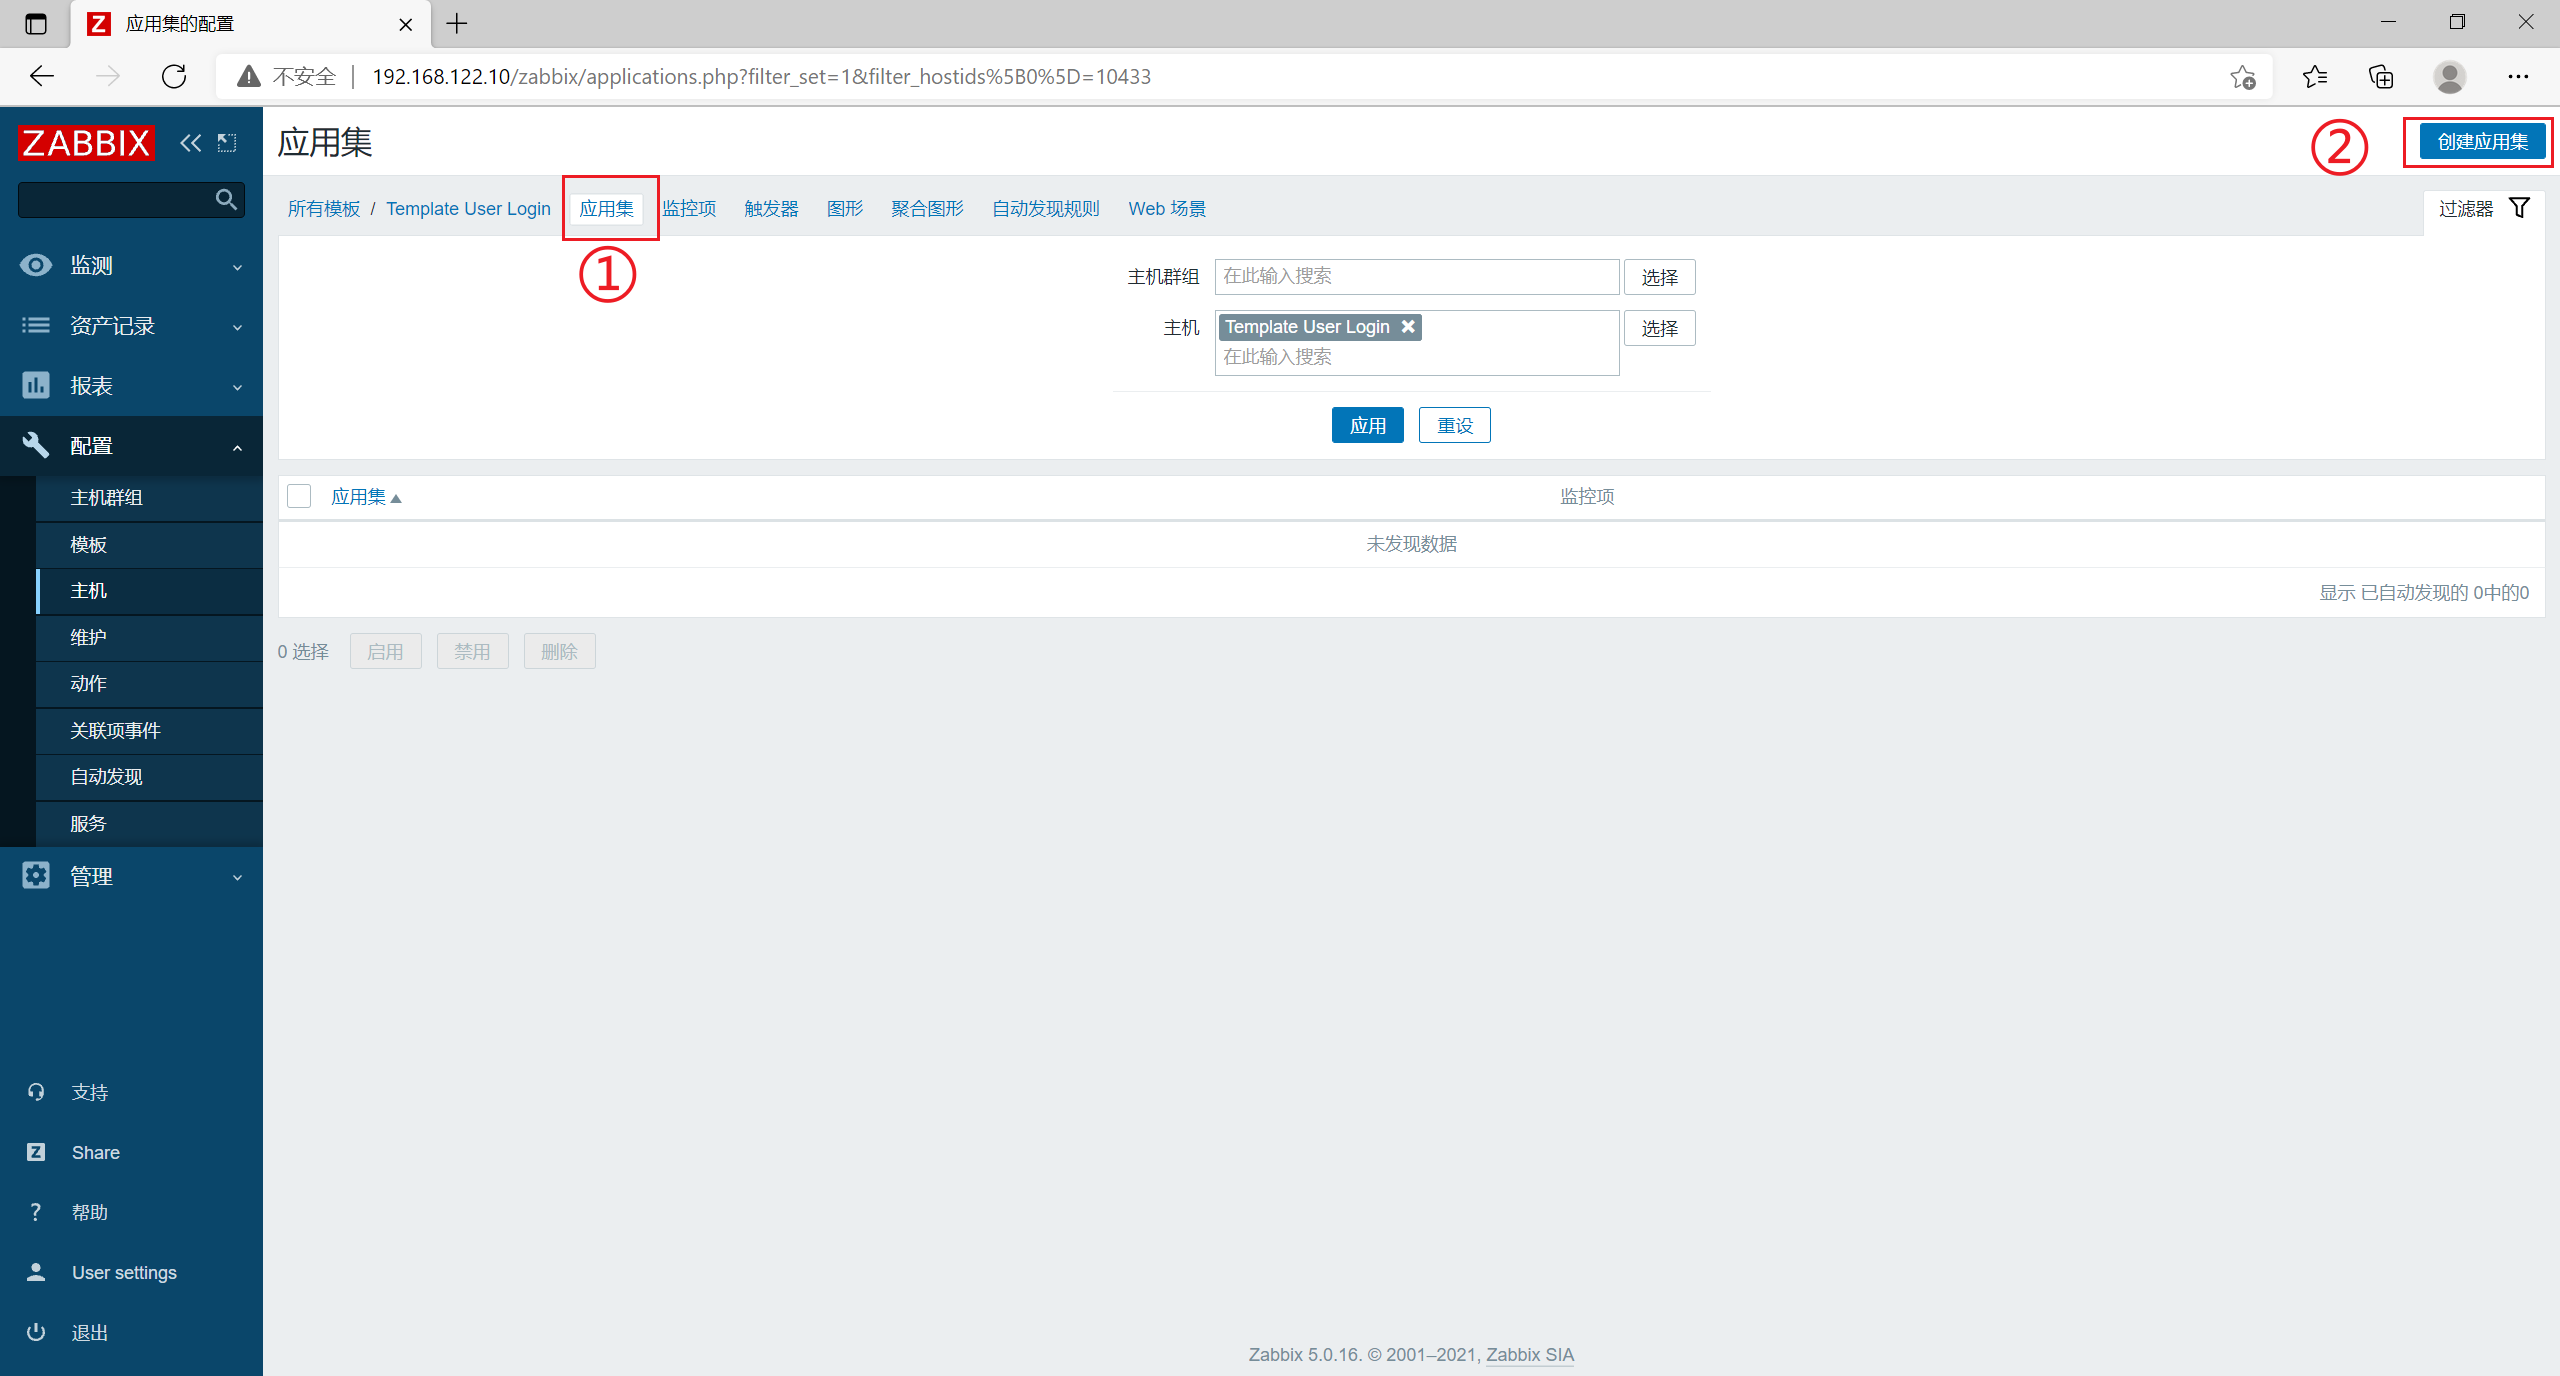
- [name] is set to User Login
Click [add]
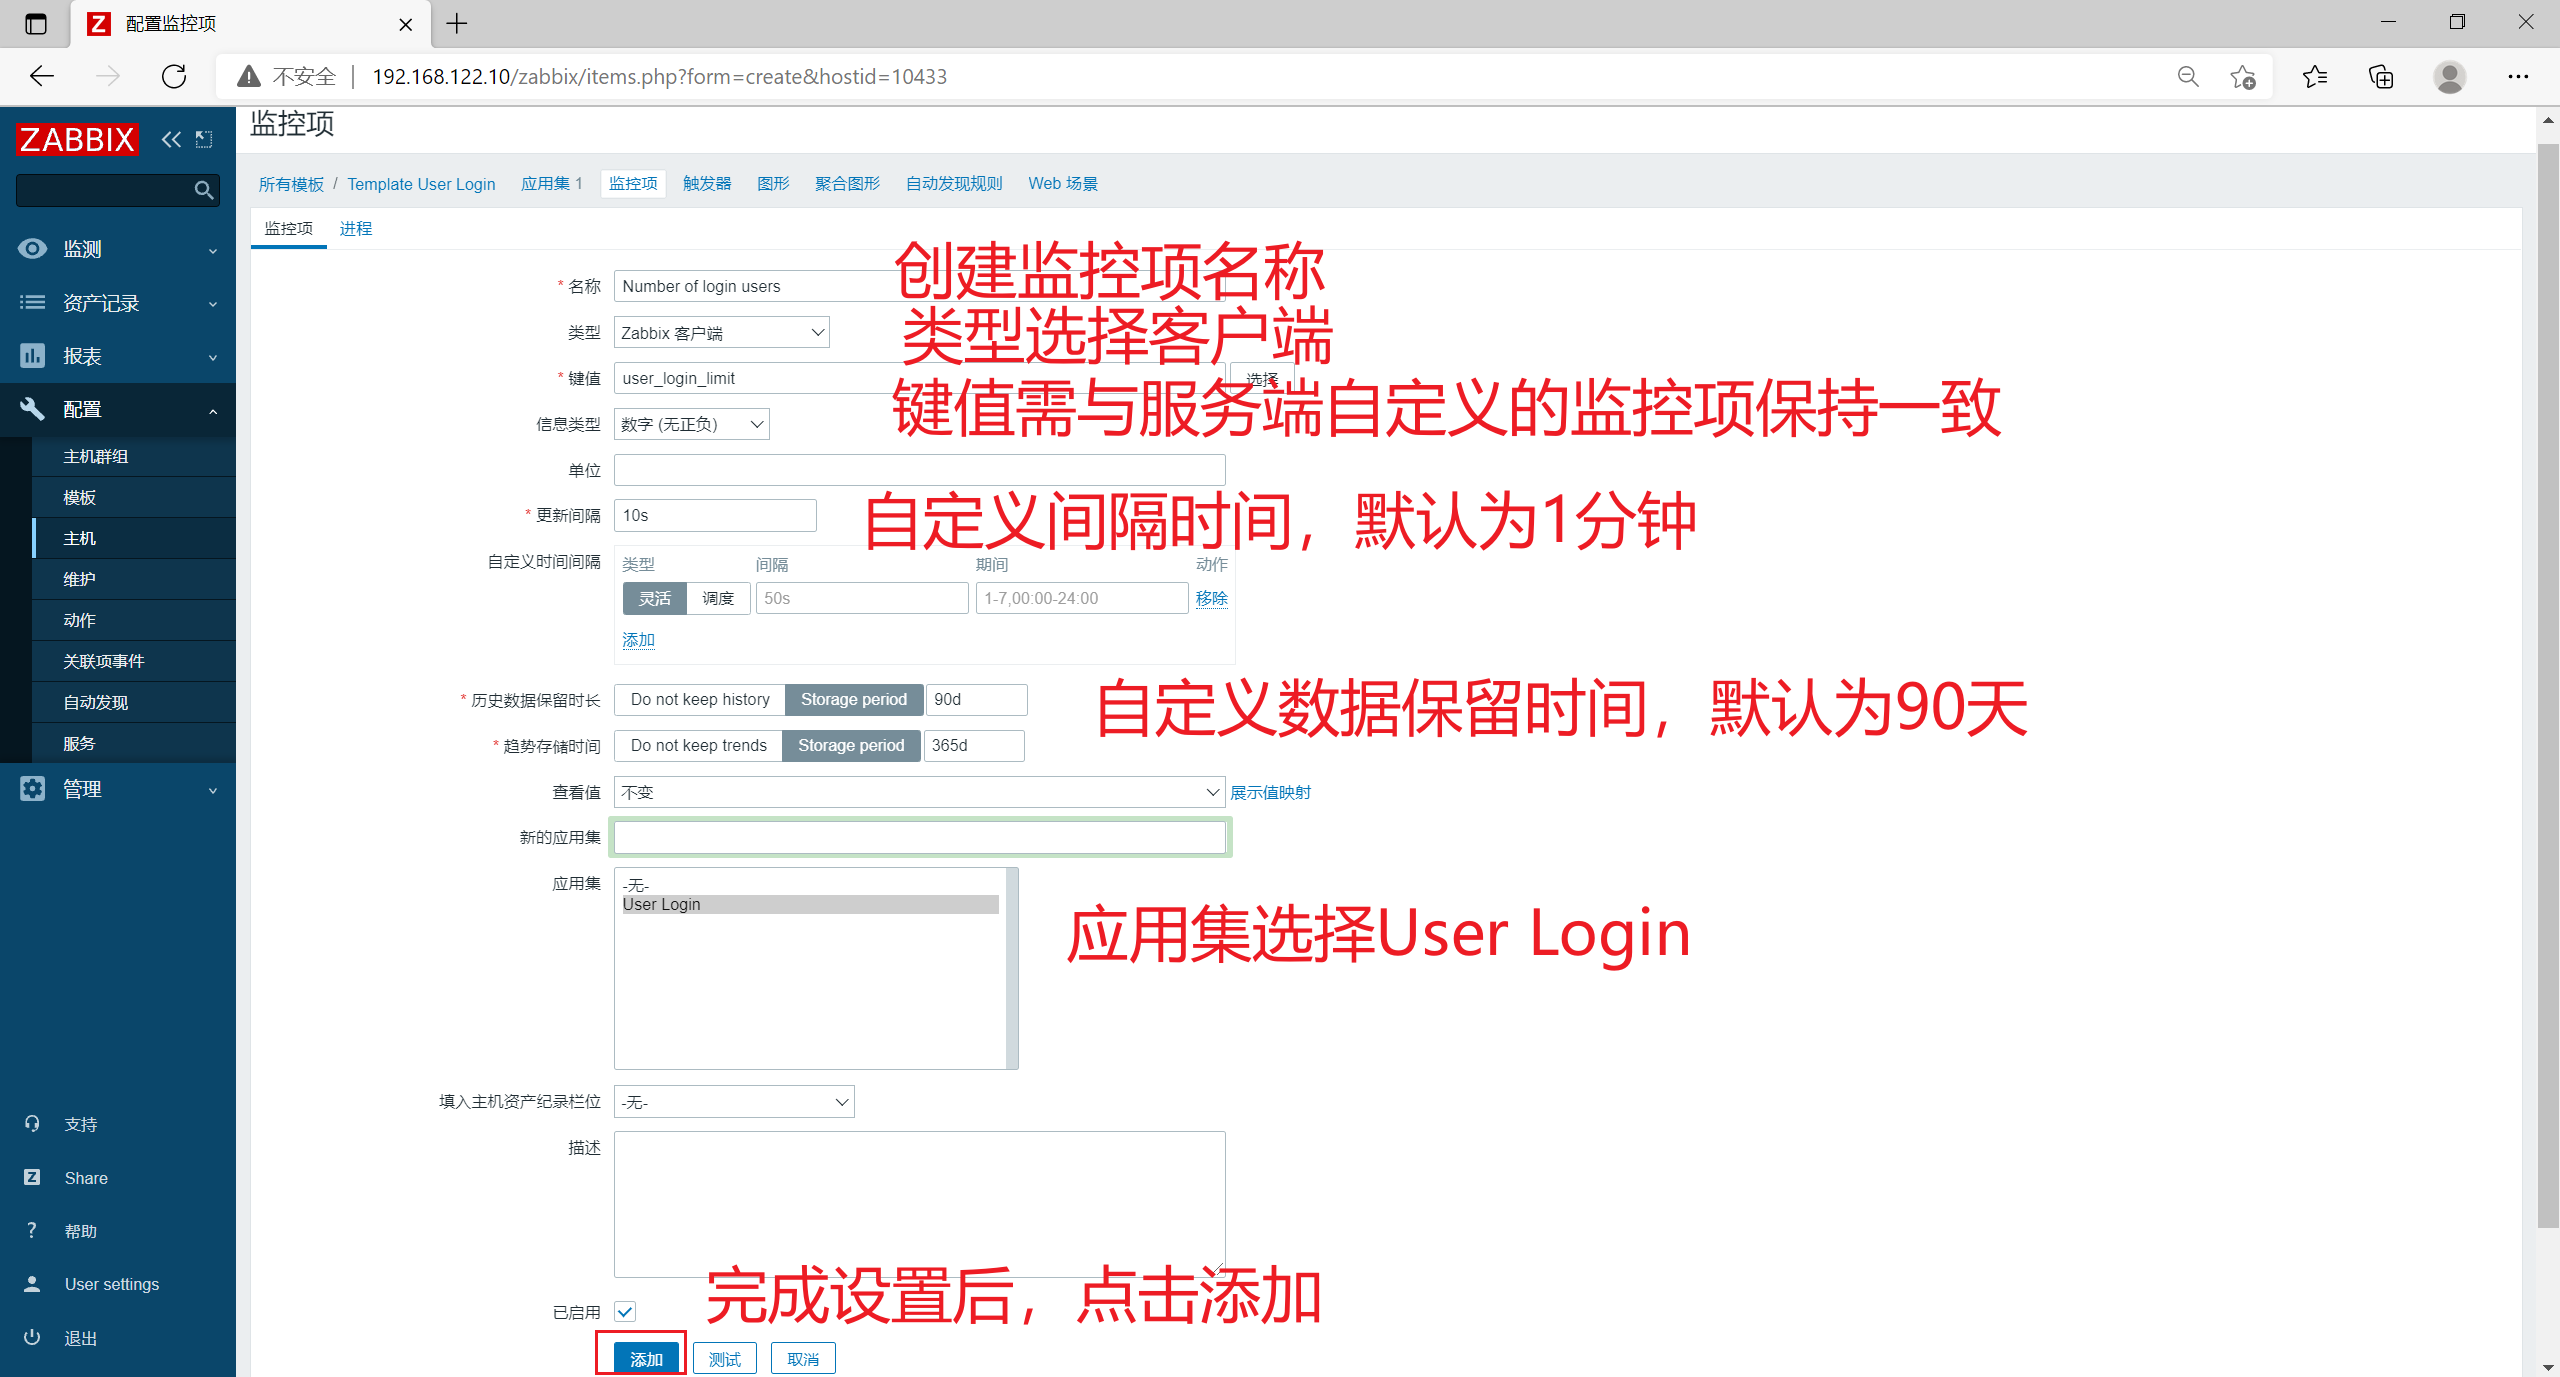
3.3 create monitoring item
- Click [monitoring item] in the upper menu bar and click [create monitoring item]
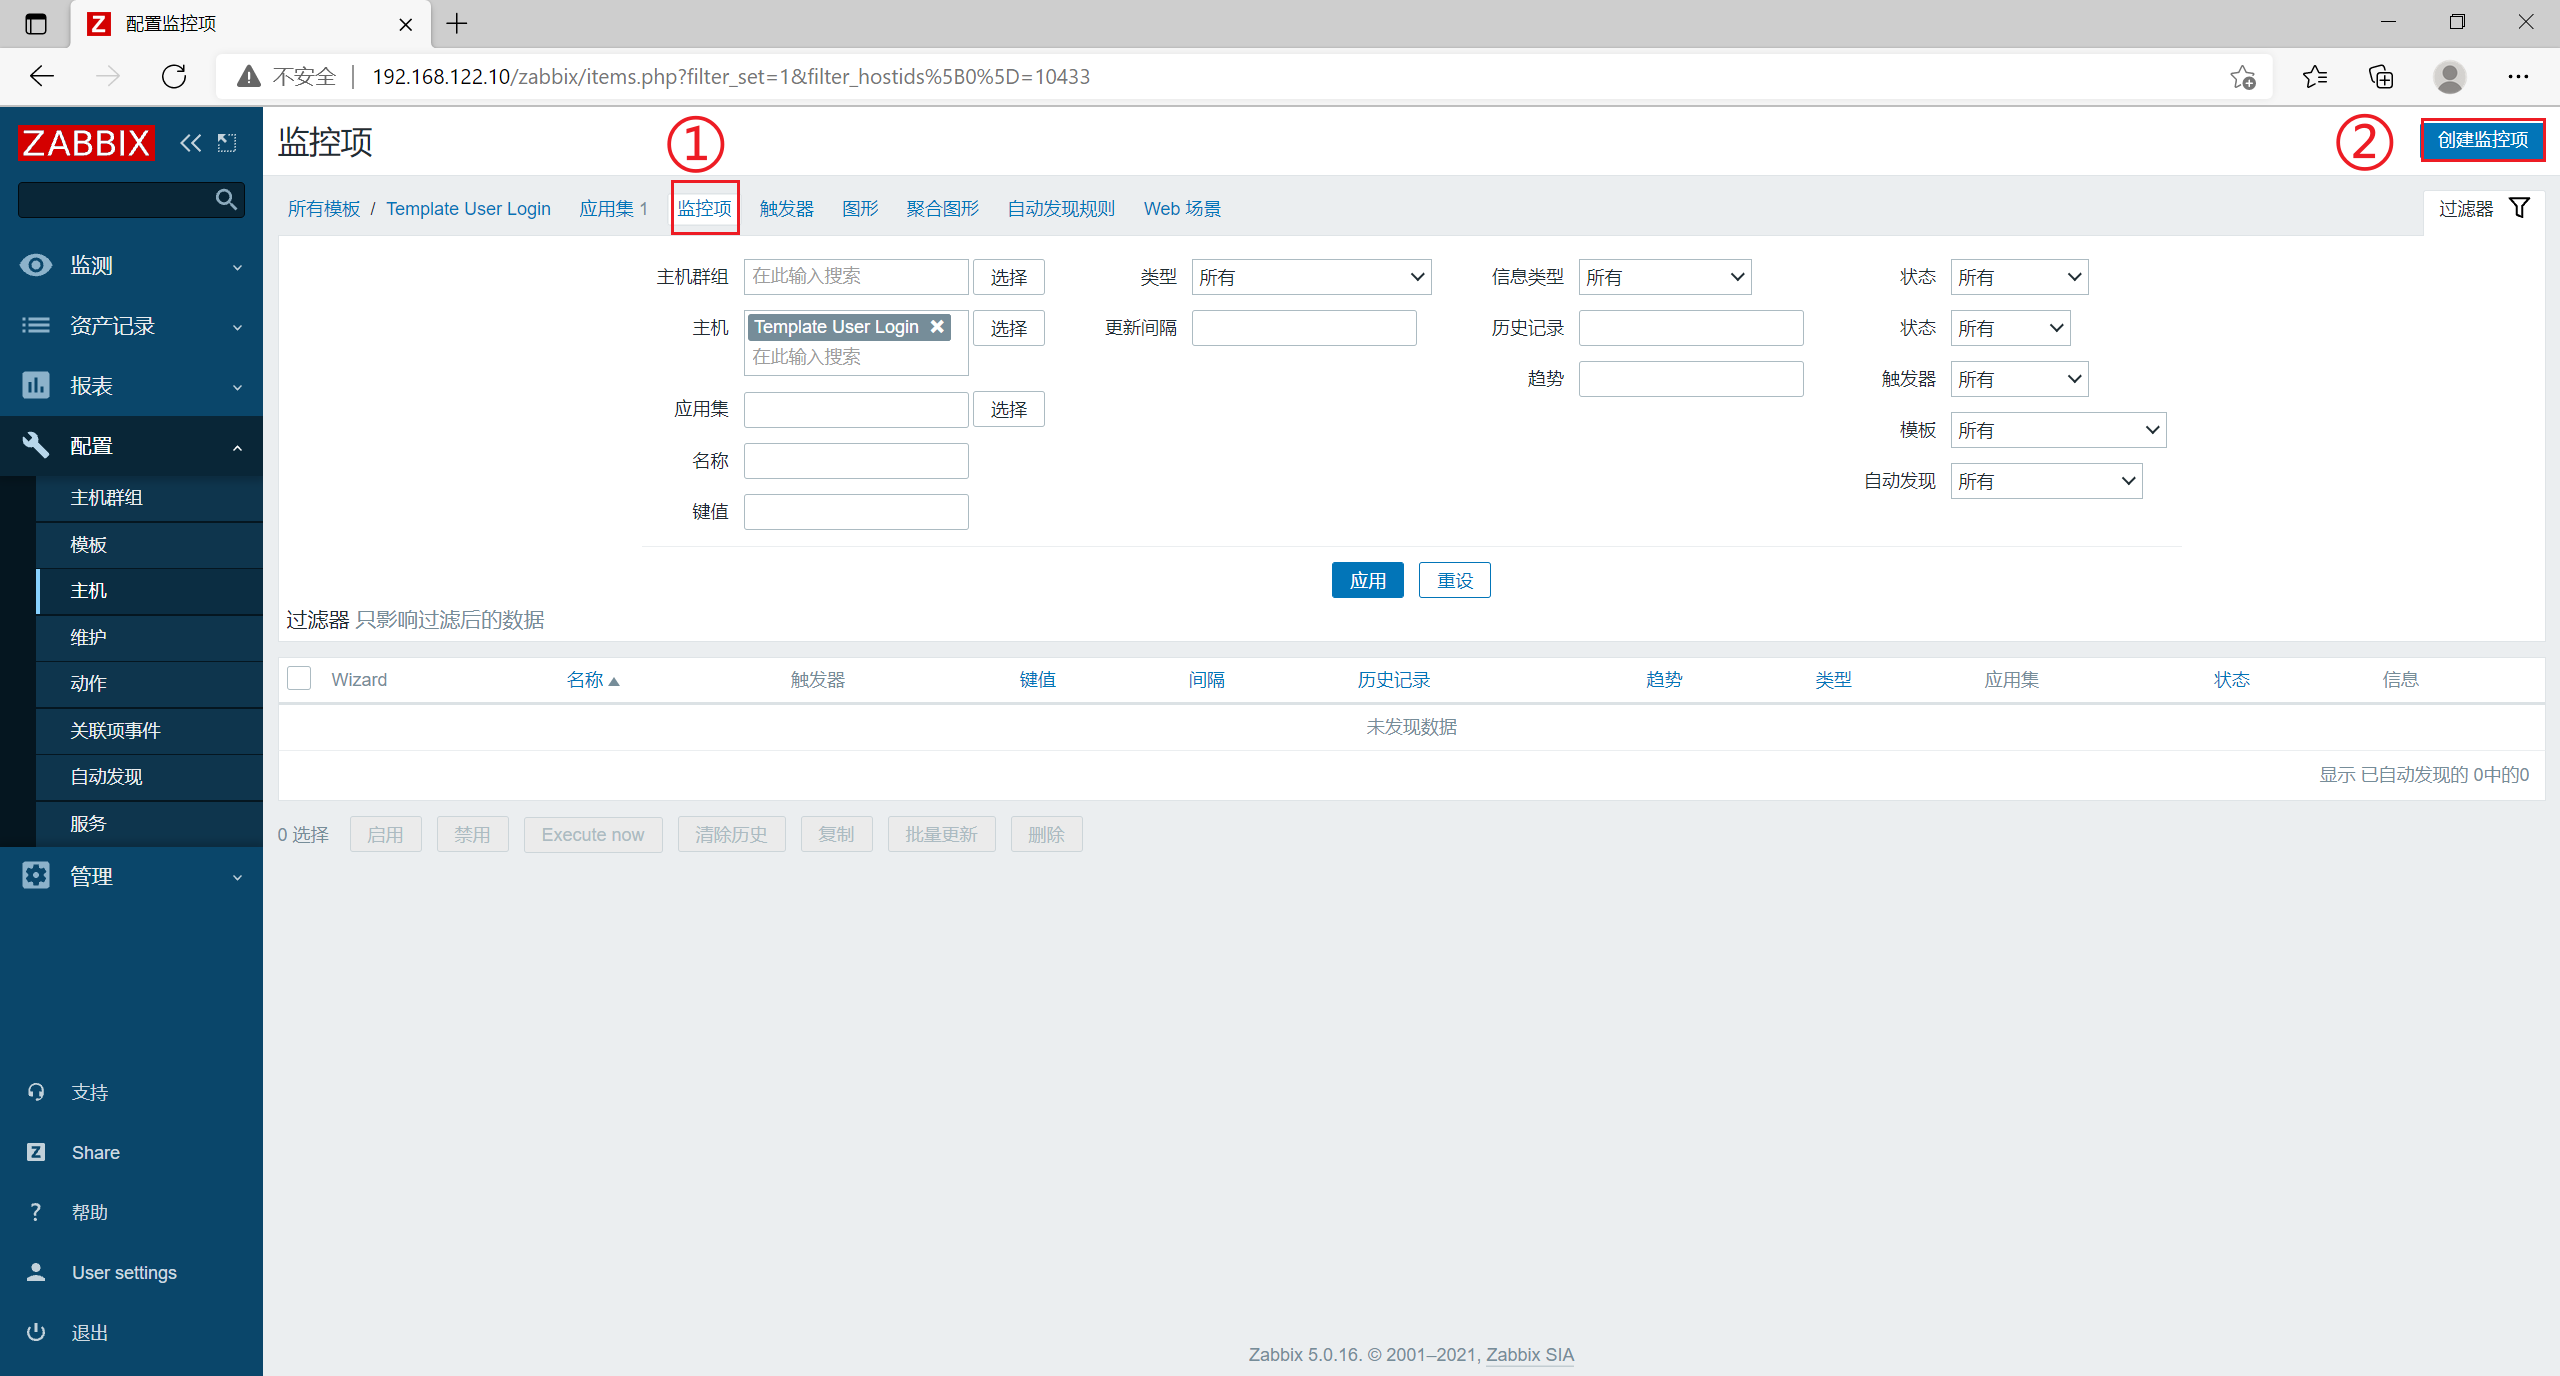
- [name] is set to Number of login users
[key value] set to login.user (the key value must be consistent with that set in the user-defined monitoring item configuration file)
[update interval] is set to 10s
[historical data retention time] Storage period 30d (retention time can be customized)
Click [add]
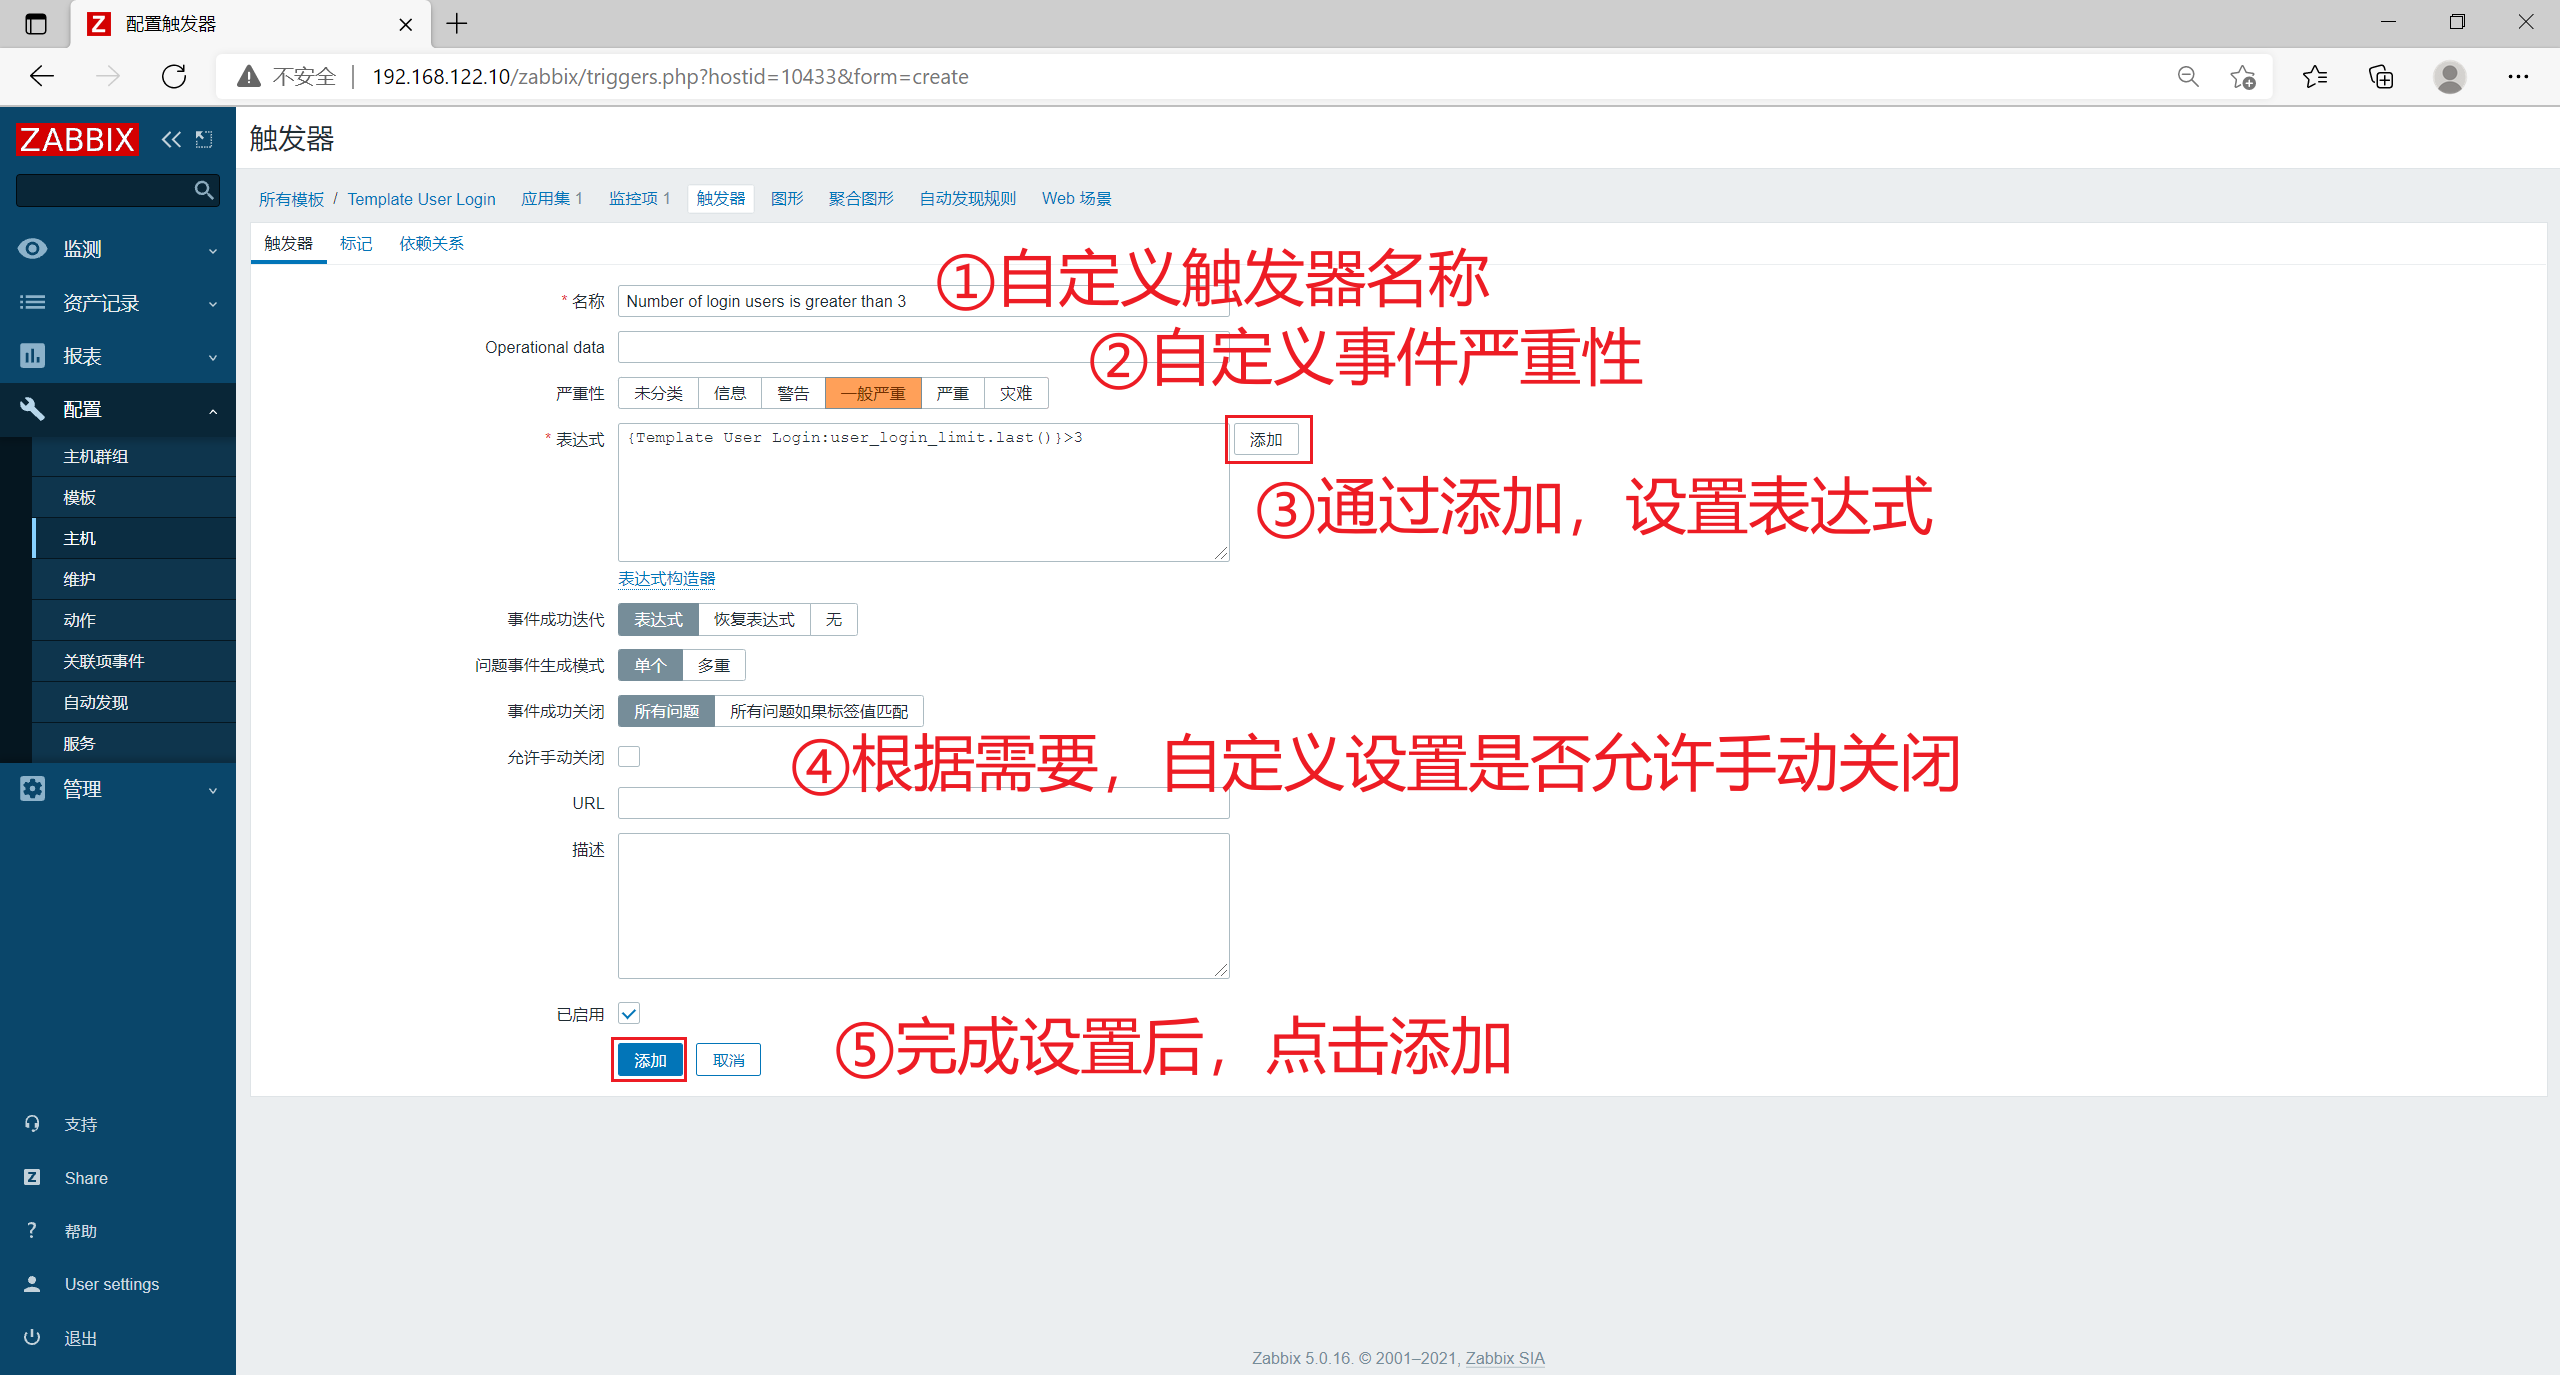
3.4 create a trigger (when the data of the monitoring item exceeds the set threshold, an alarm is triggered)
- Click trigger in the upper menu bar and click create trigger
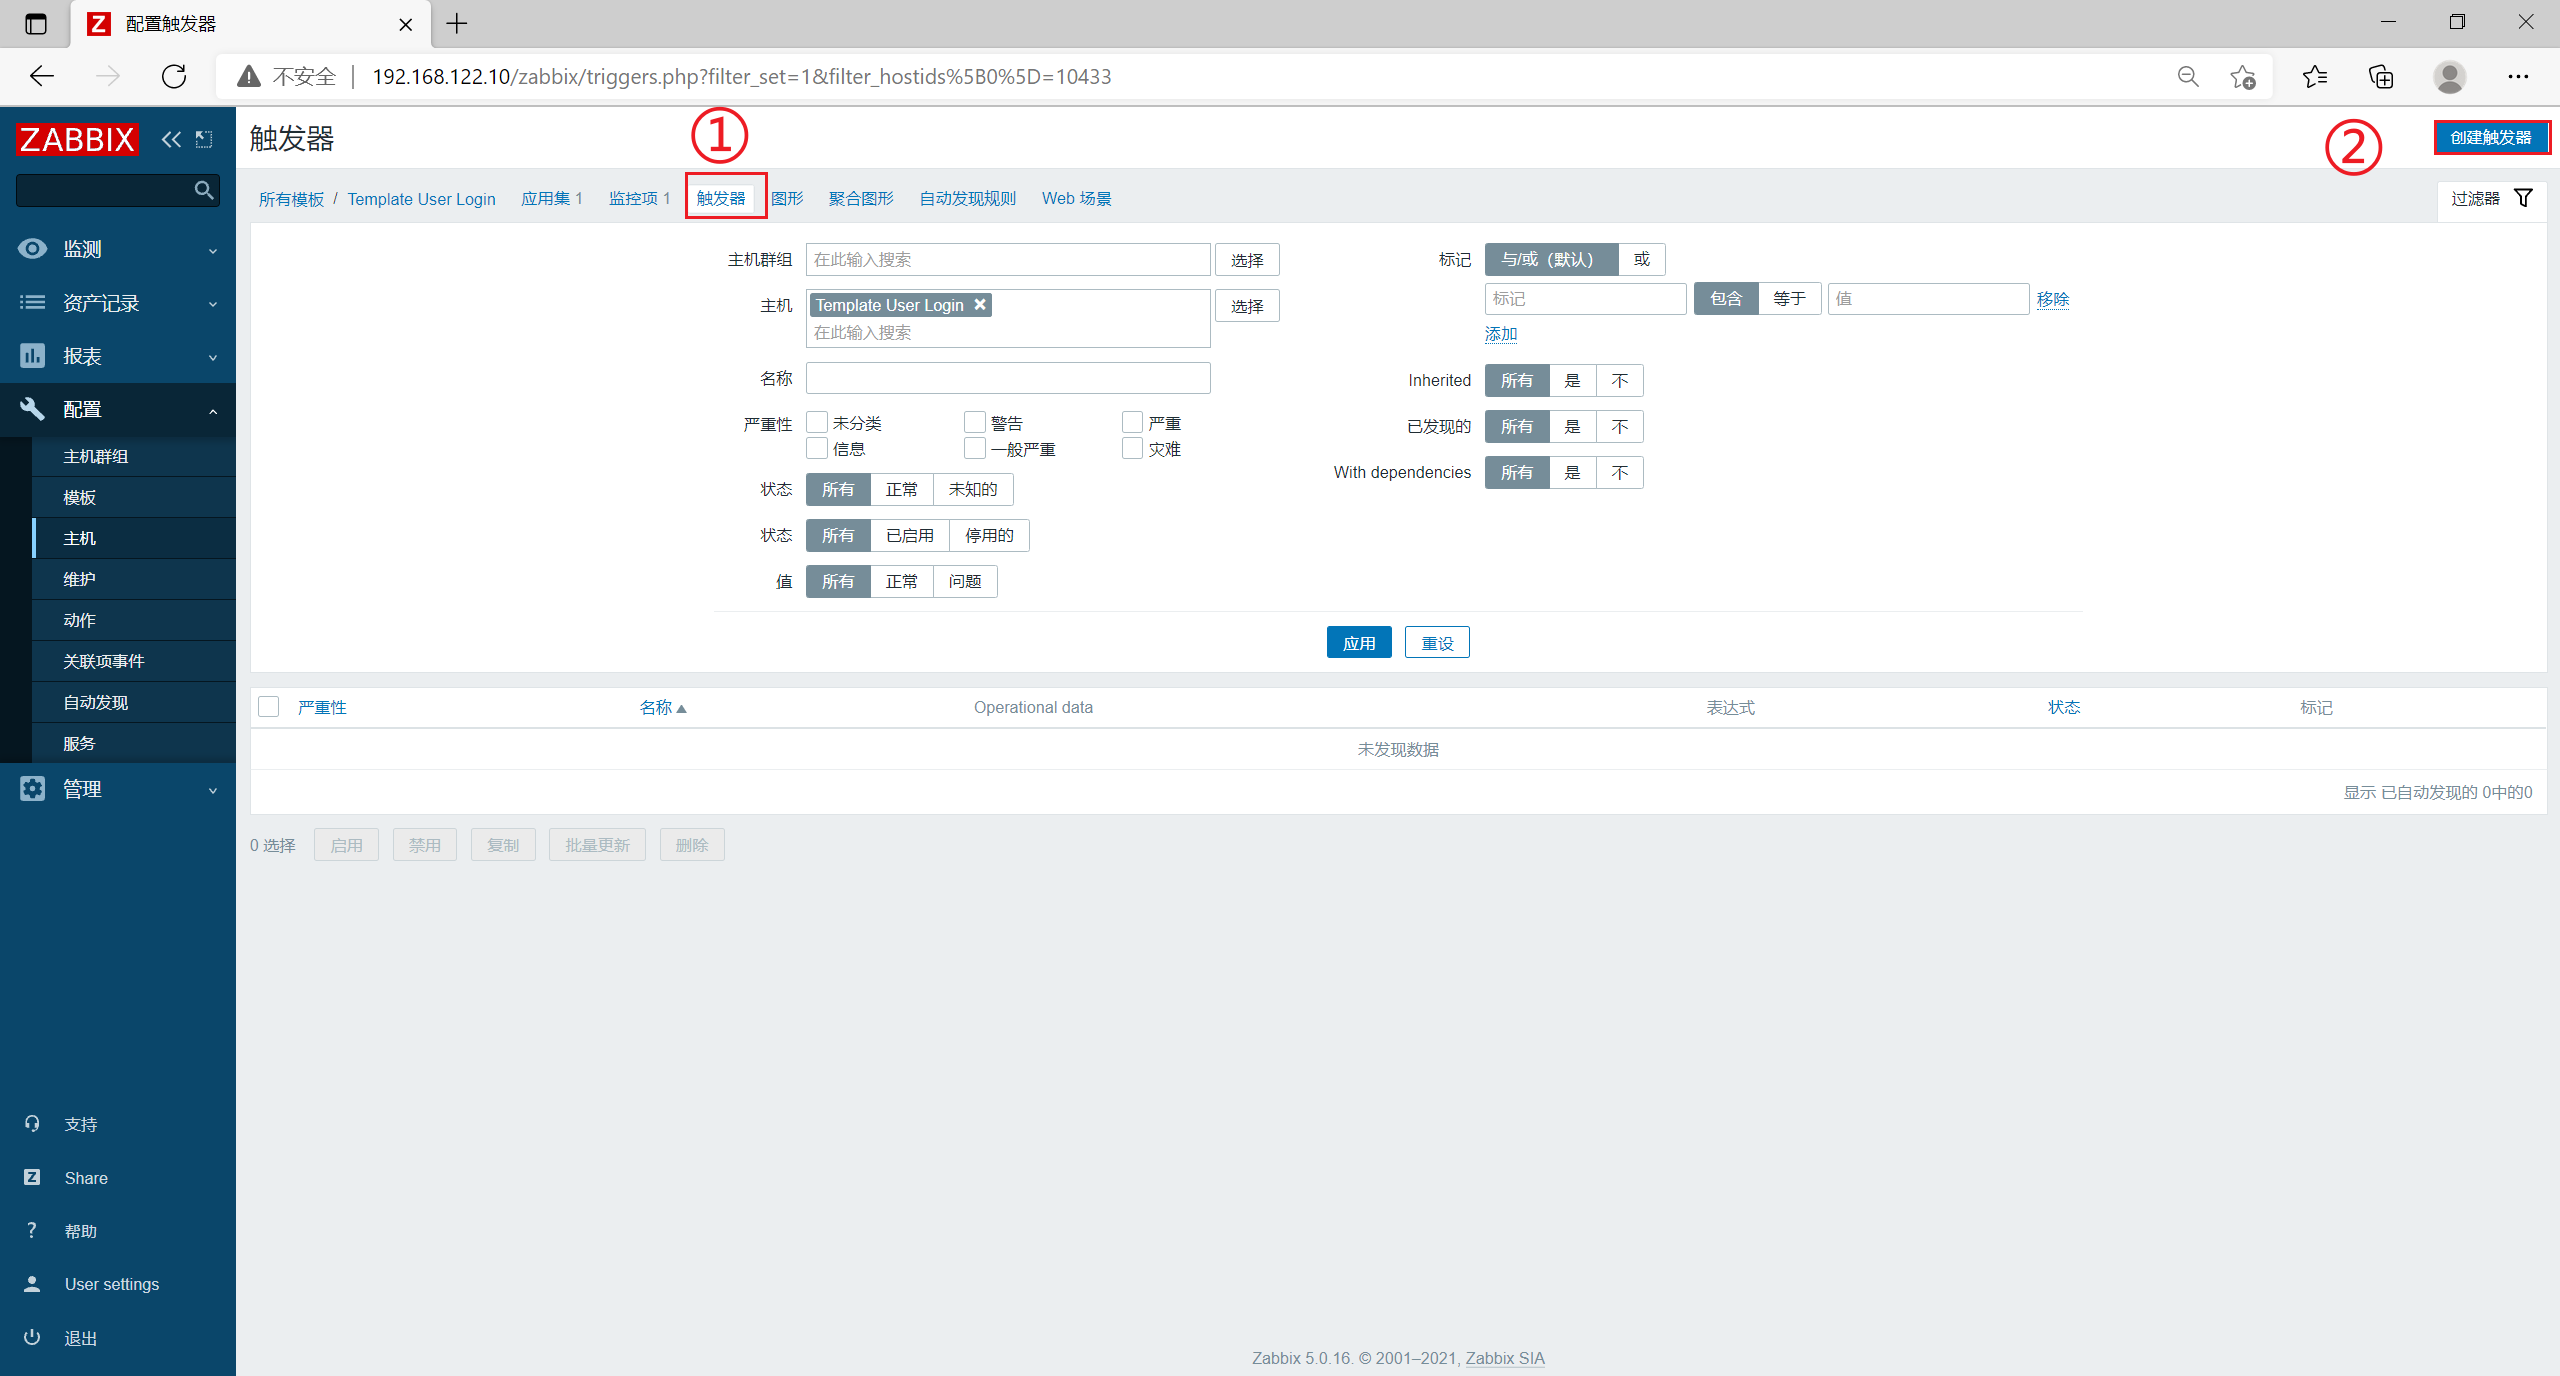
- [name] set to Number of login users is greater than 3
[severity] set to general severity
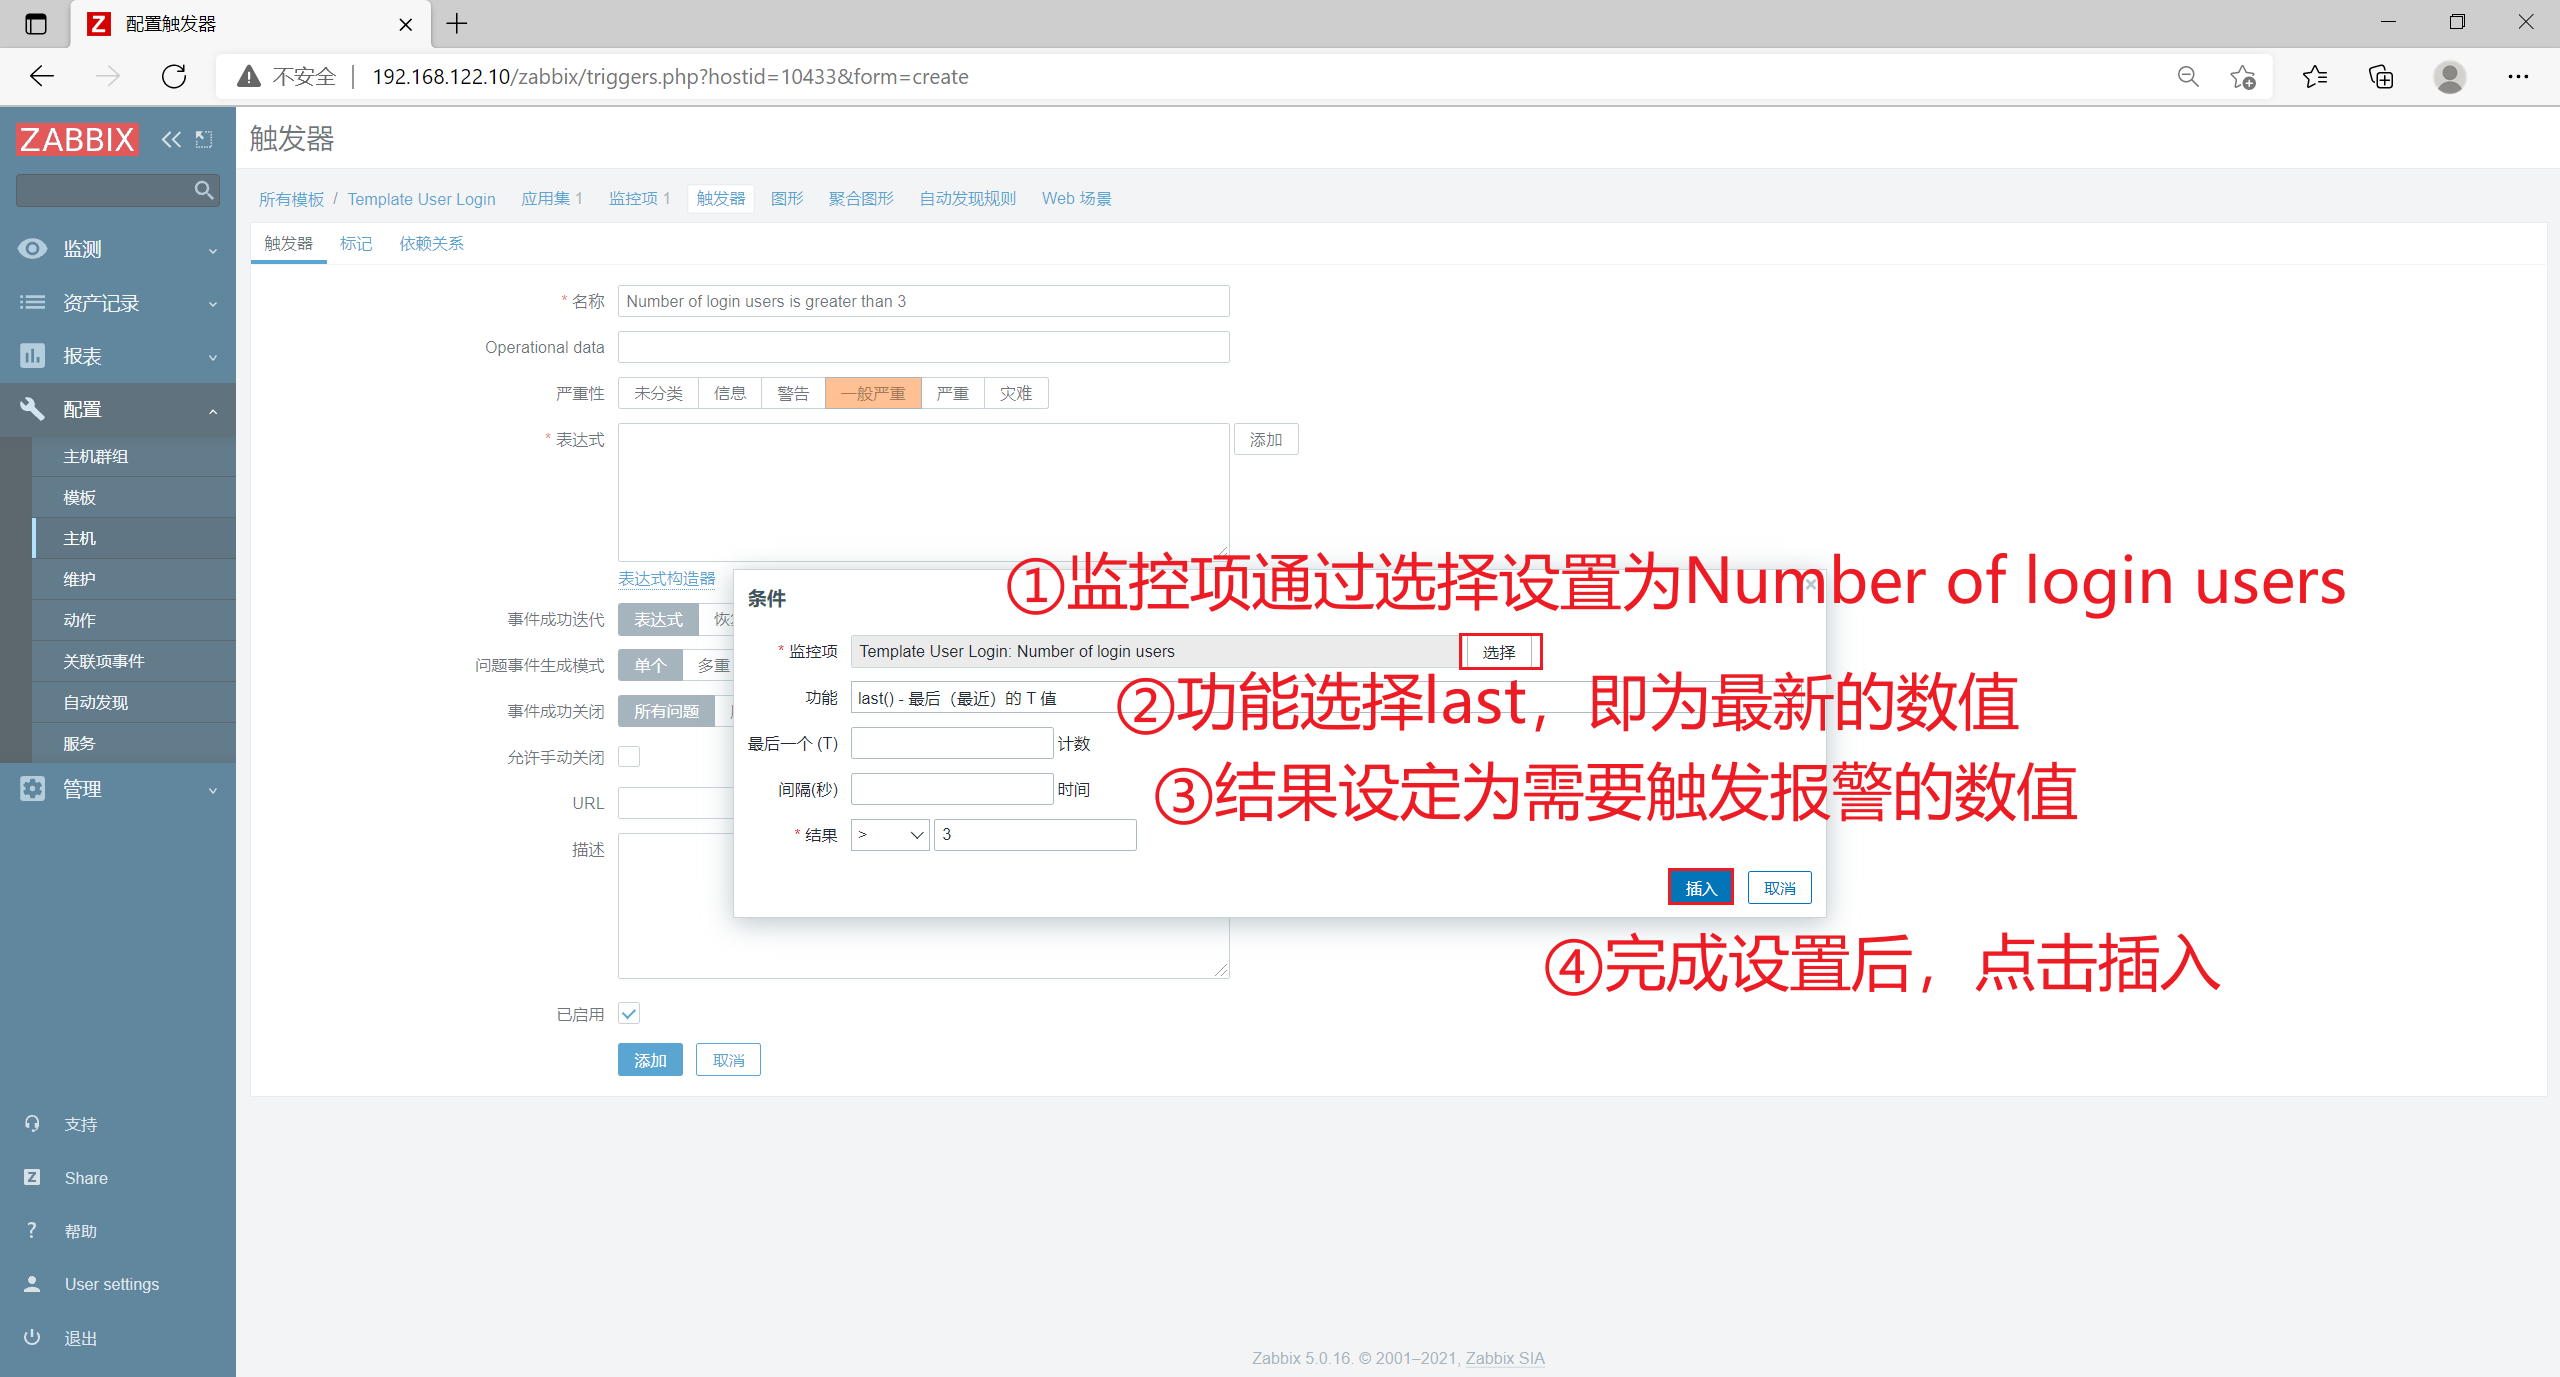
Click [expression] to add, click [monitoring item] to select Number of login users, click [function] to select last(), Select > 3 for [result], and click [insert]
Click [add]
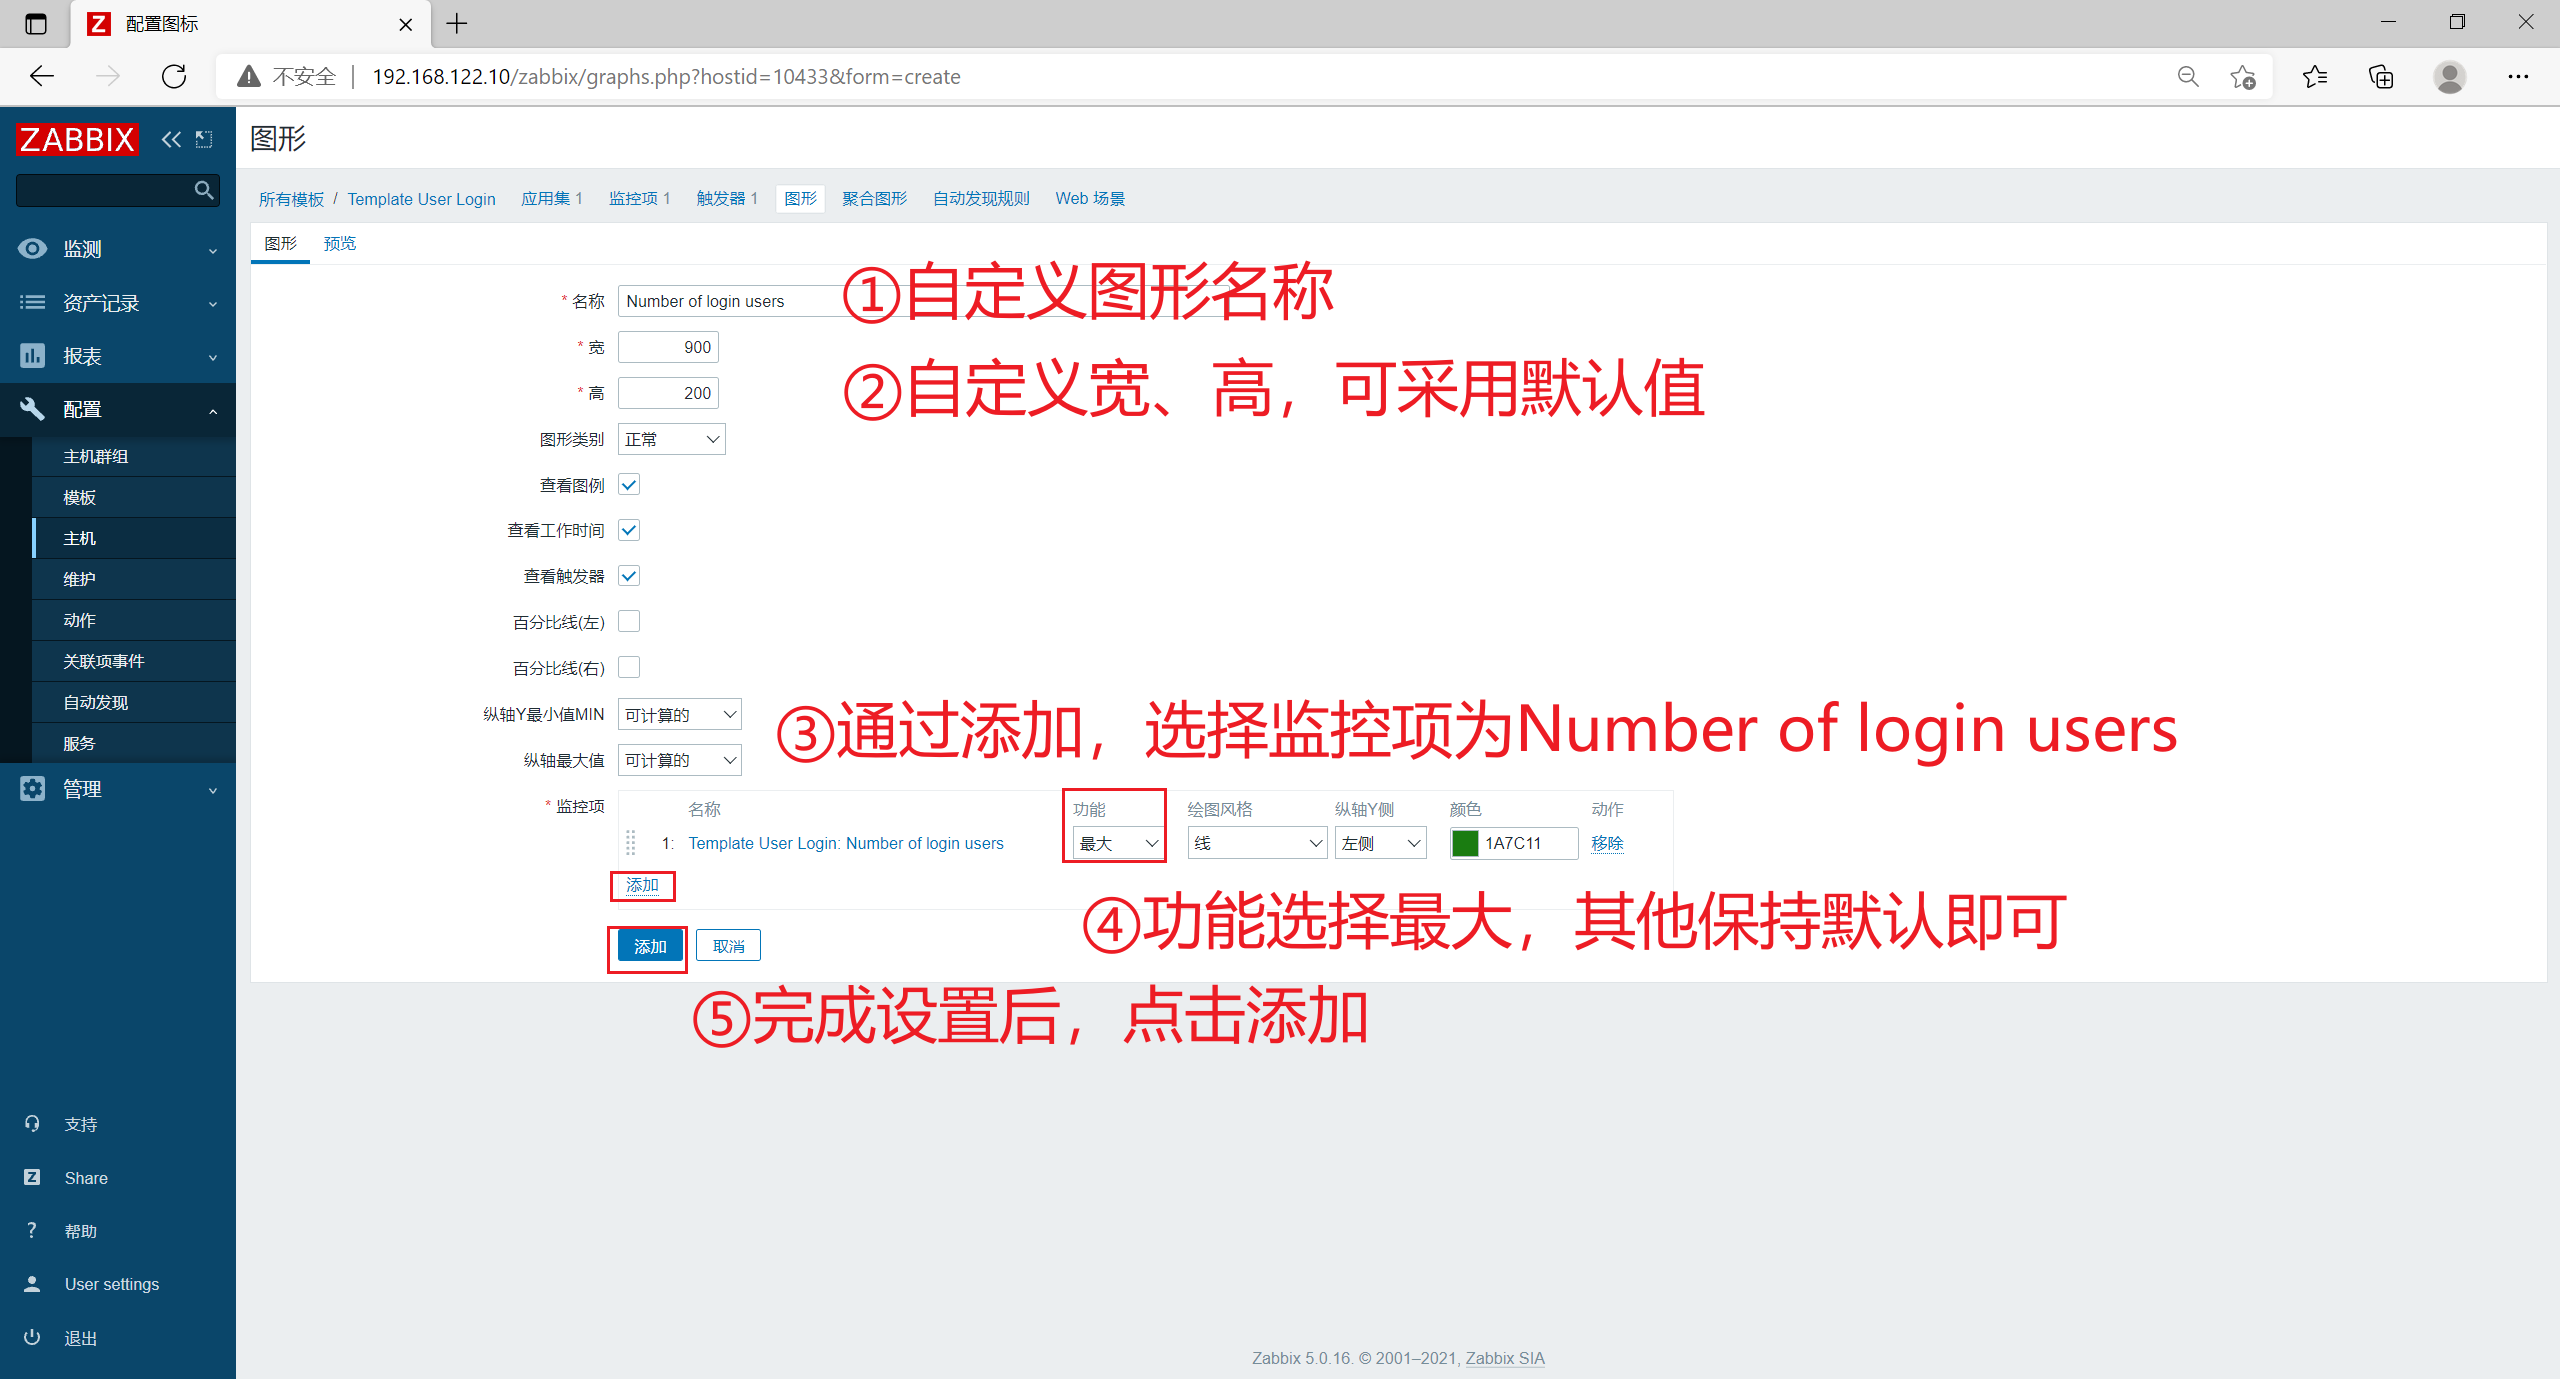
3.5 creating graphics
- Click graph in the upper menu bar and click Create graph
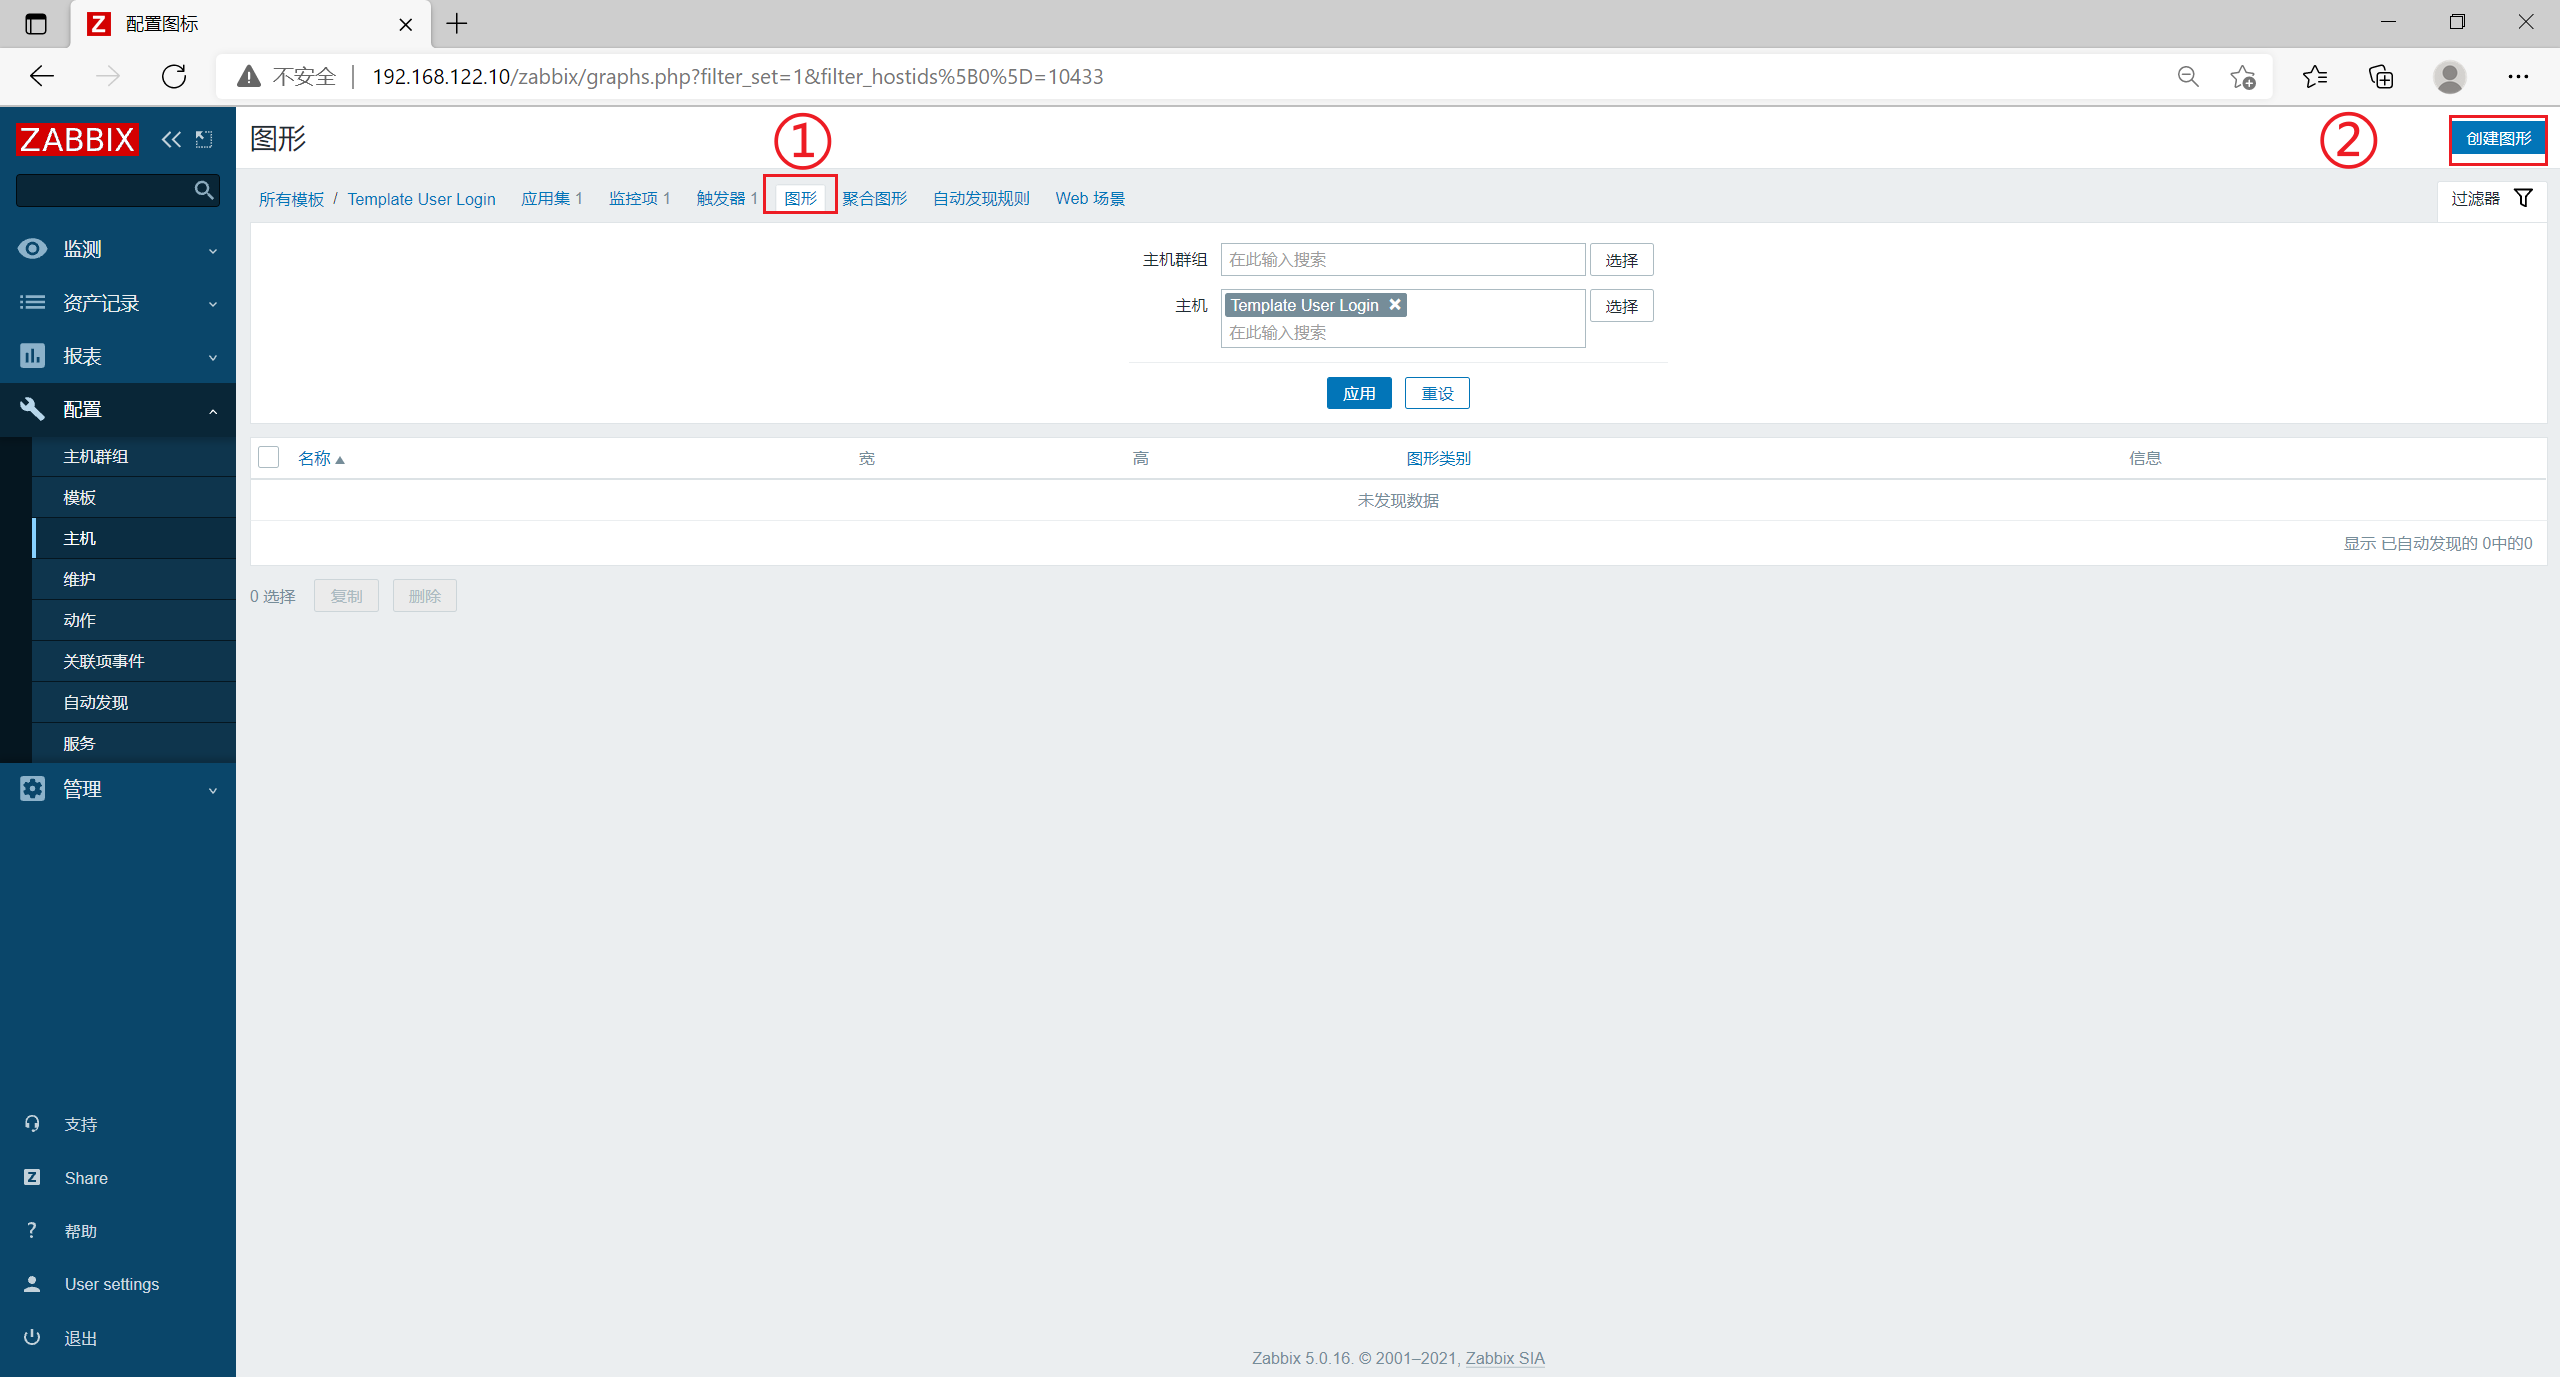
- [name] is set to Number of login users
Default values can be directly used for width and height
[monitoring item] click add, check the relevant monitoring item Number of login users, select the maximum in [function], and others can maintain the default value
Click [add]
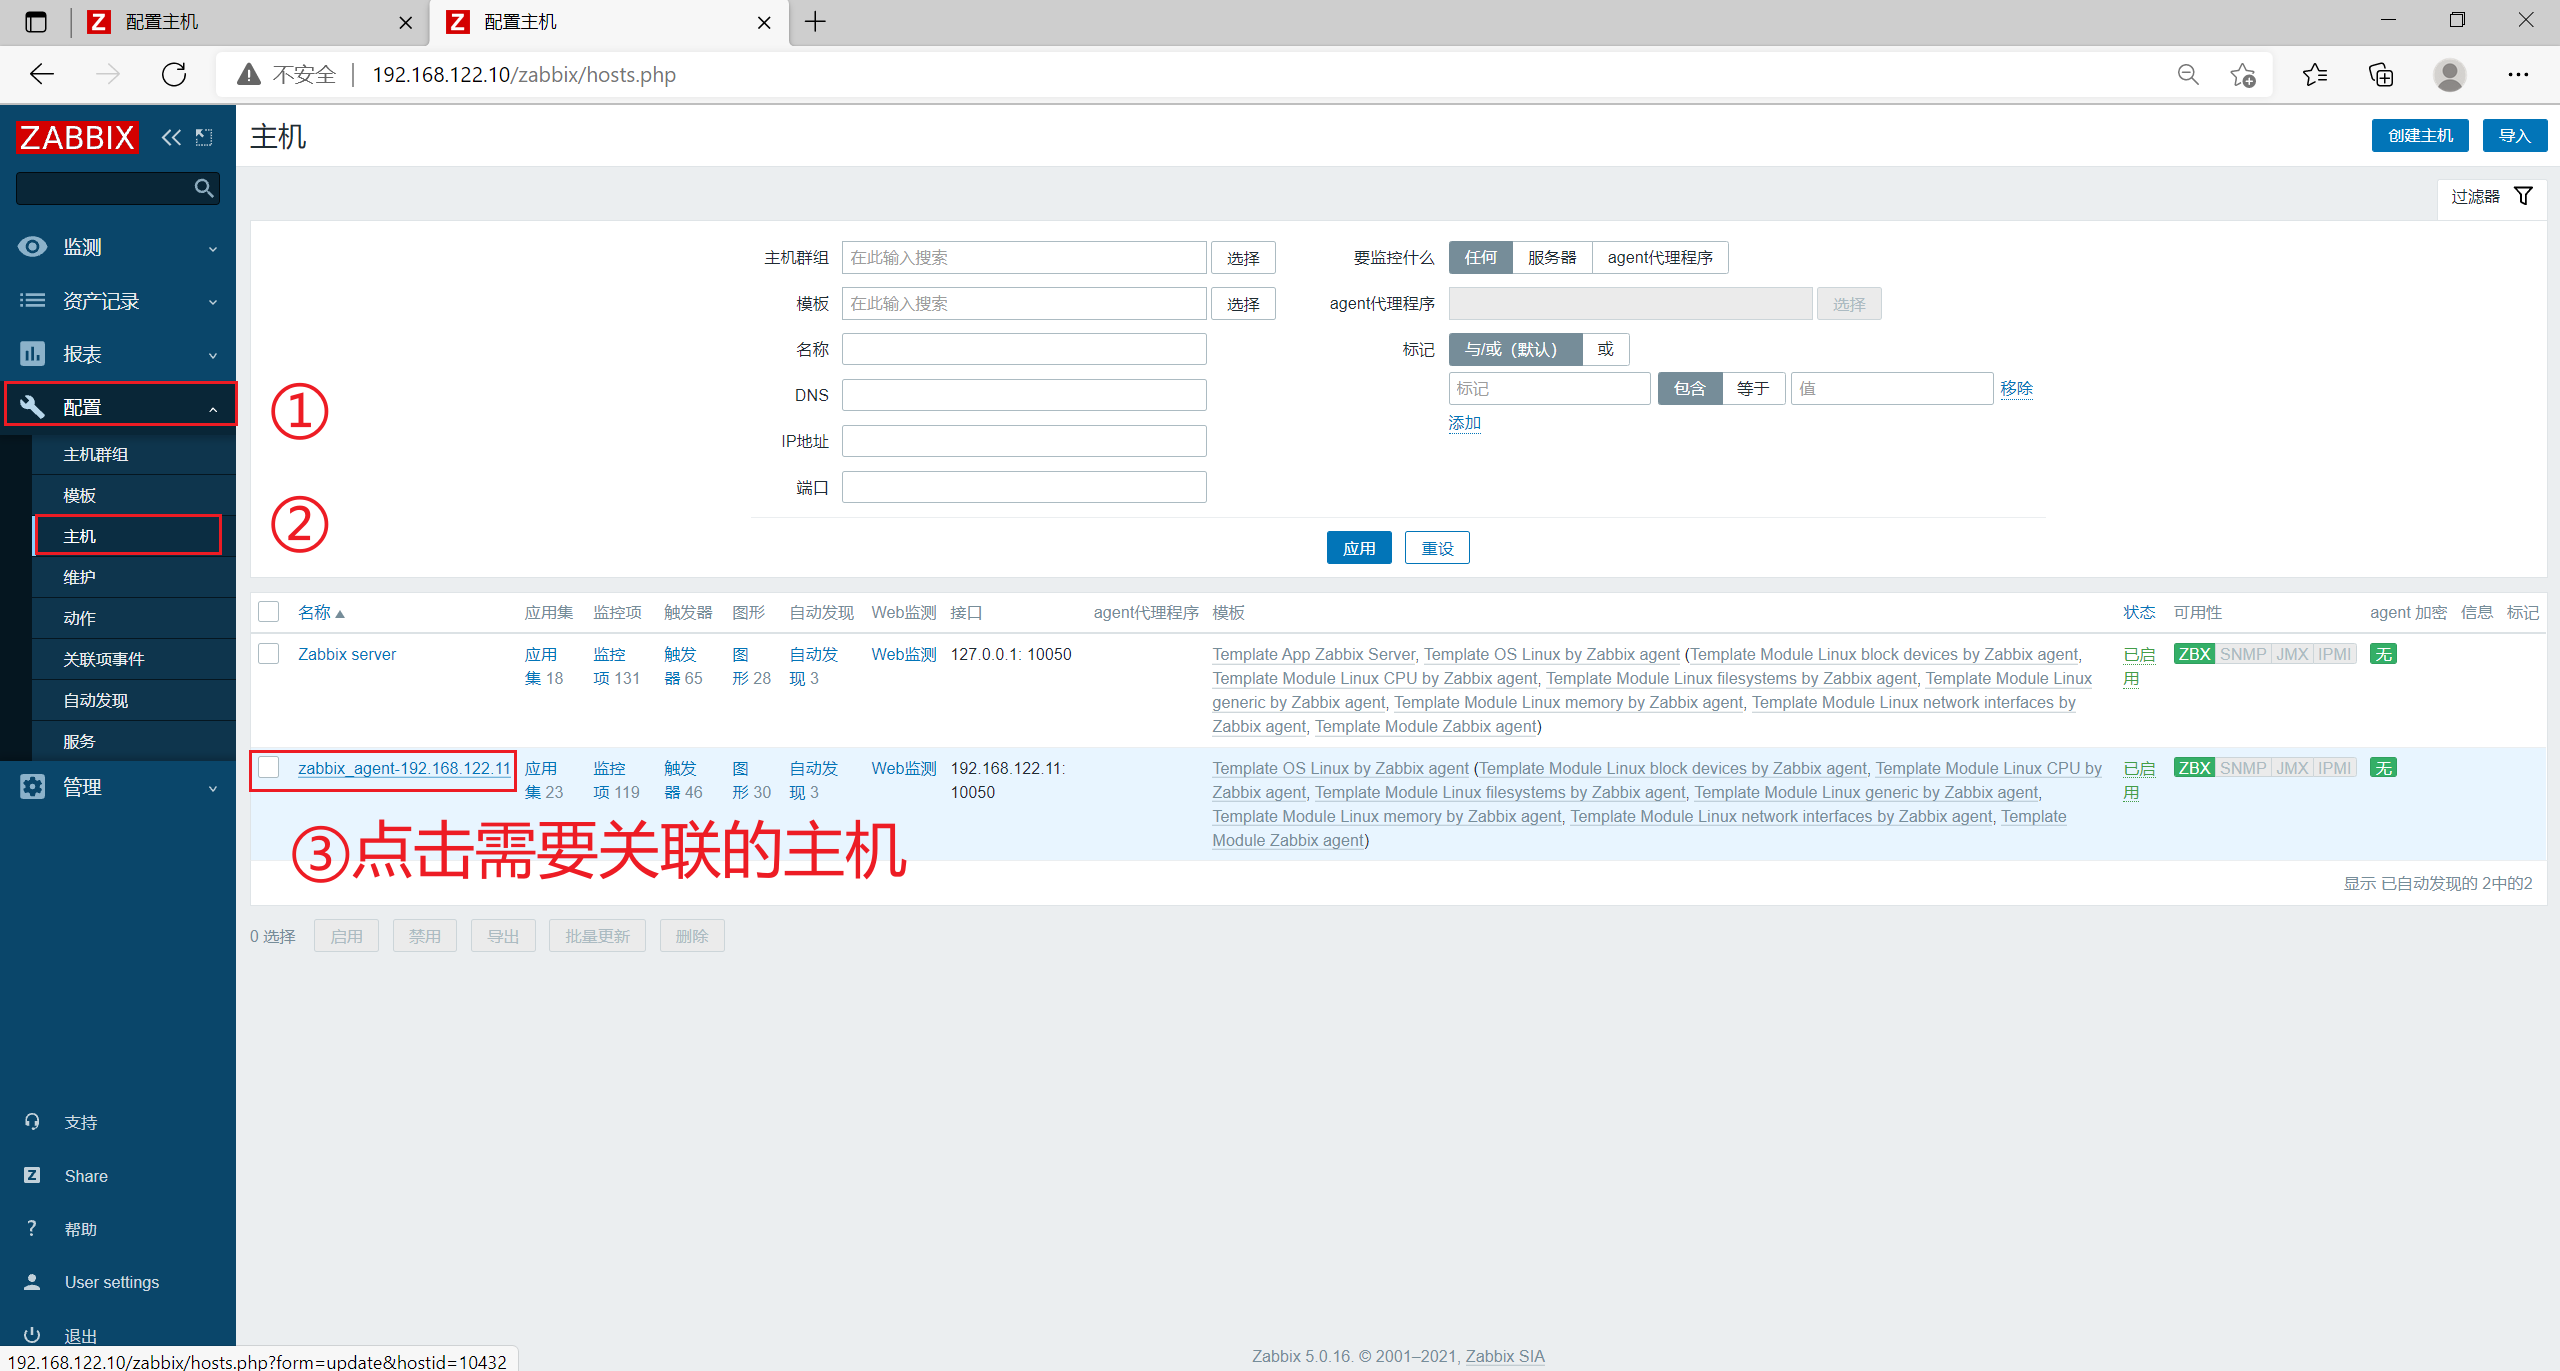
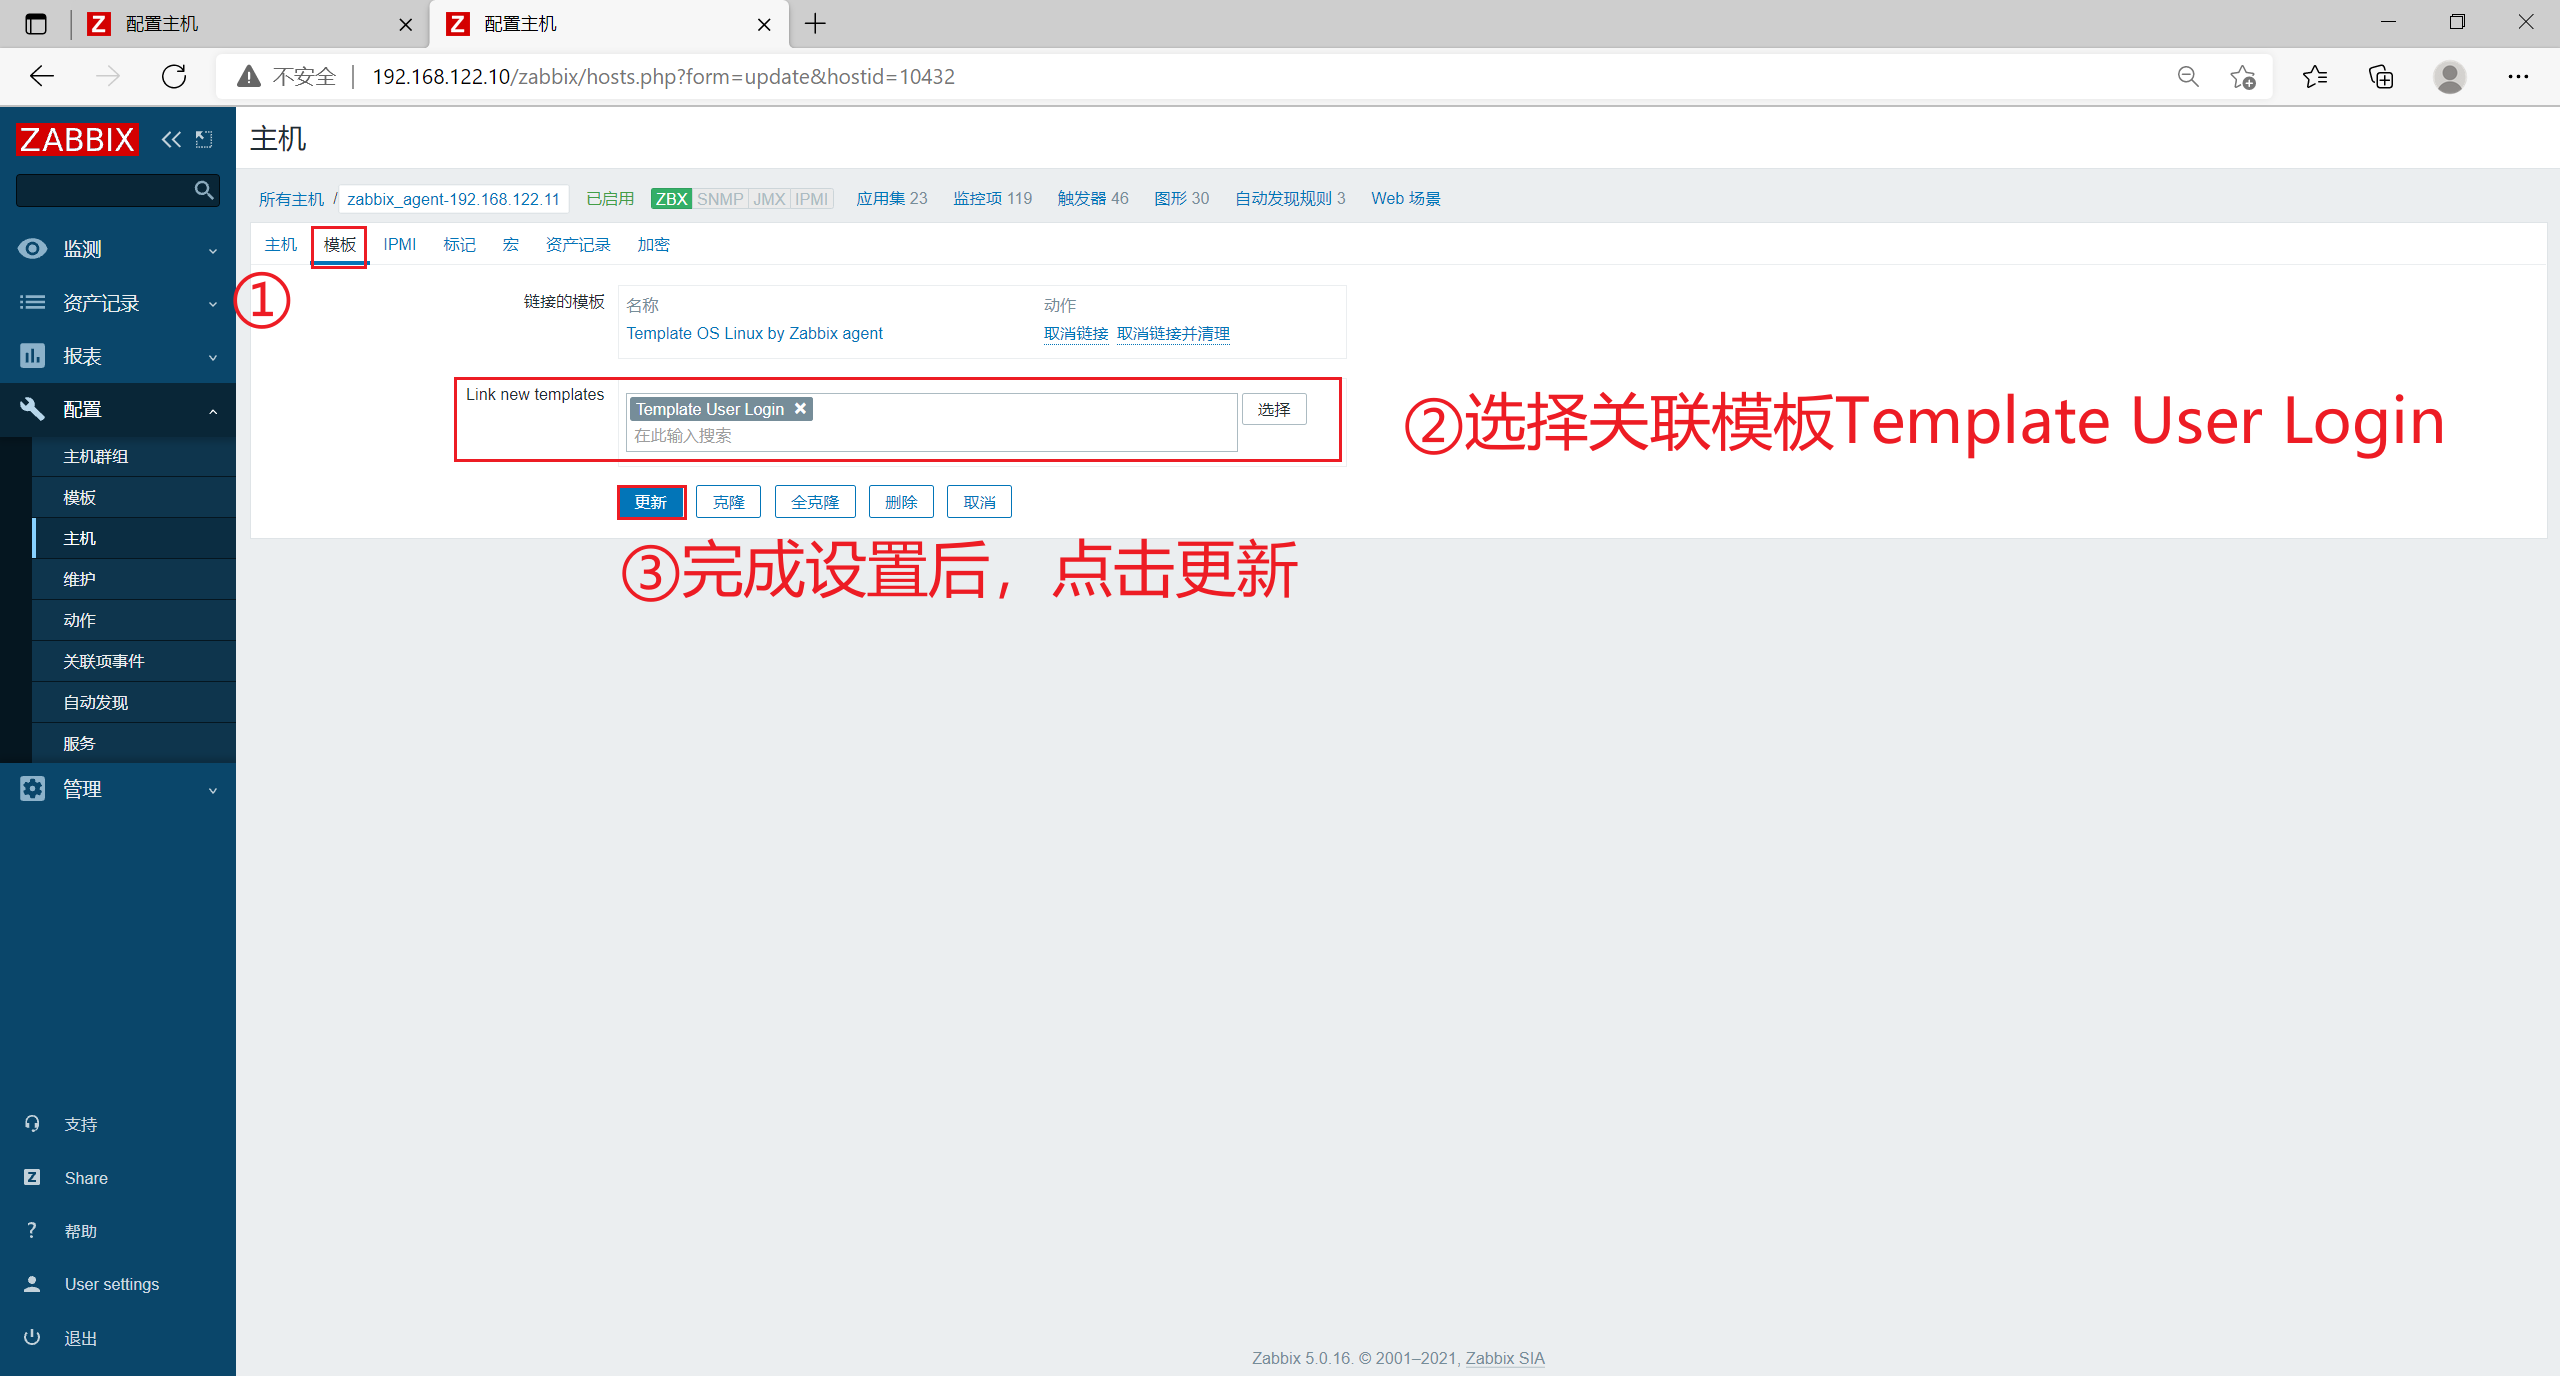
3.6 associate a host with a template (a host can be associated with multiple templates)
- Click [host] in [configuration] in the left menu bar, and click the host you want to associate
- Click template in the upper menu bar, search login in link new templates, select Template User Login, and click Update
3.7 viewing monitoring graphics
Click [host] in [monitoring] and click [graphics] of your associated host to view the relevant monitoring item indicators


4. Mail alarm
4.1 setting mail alarm
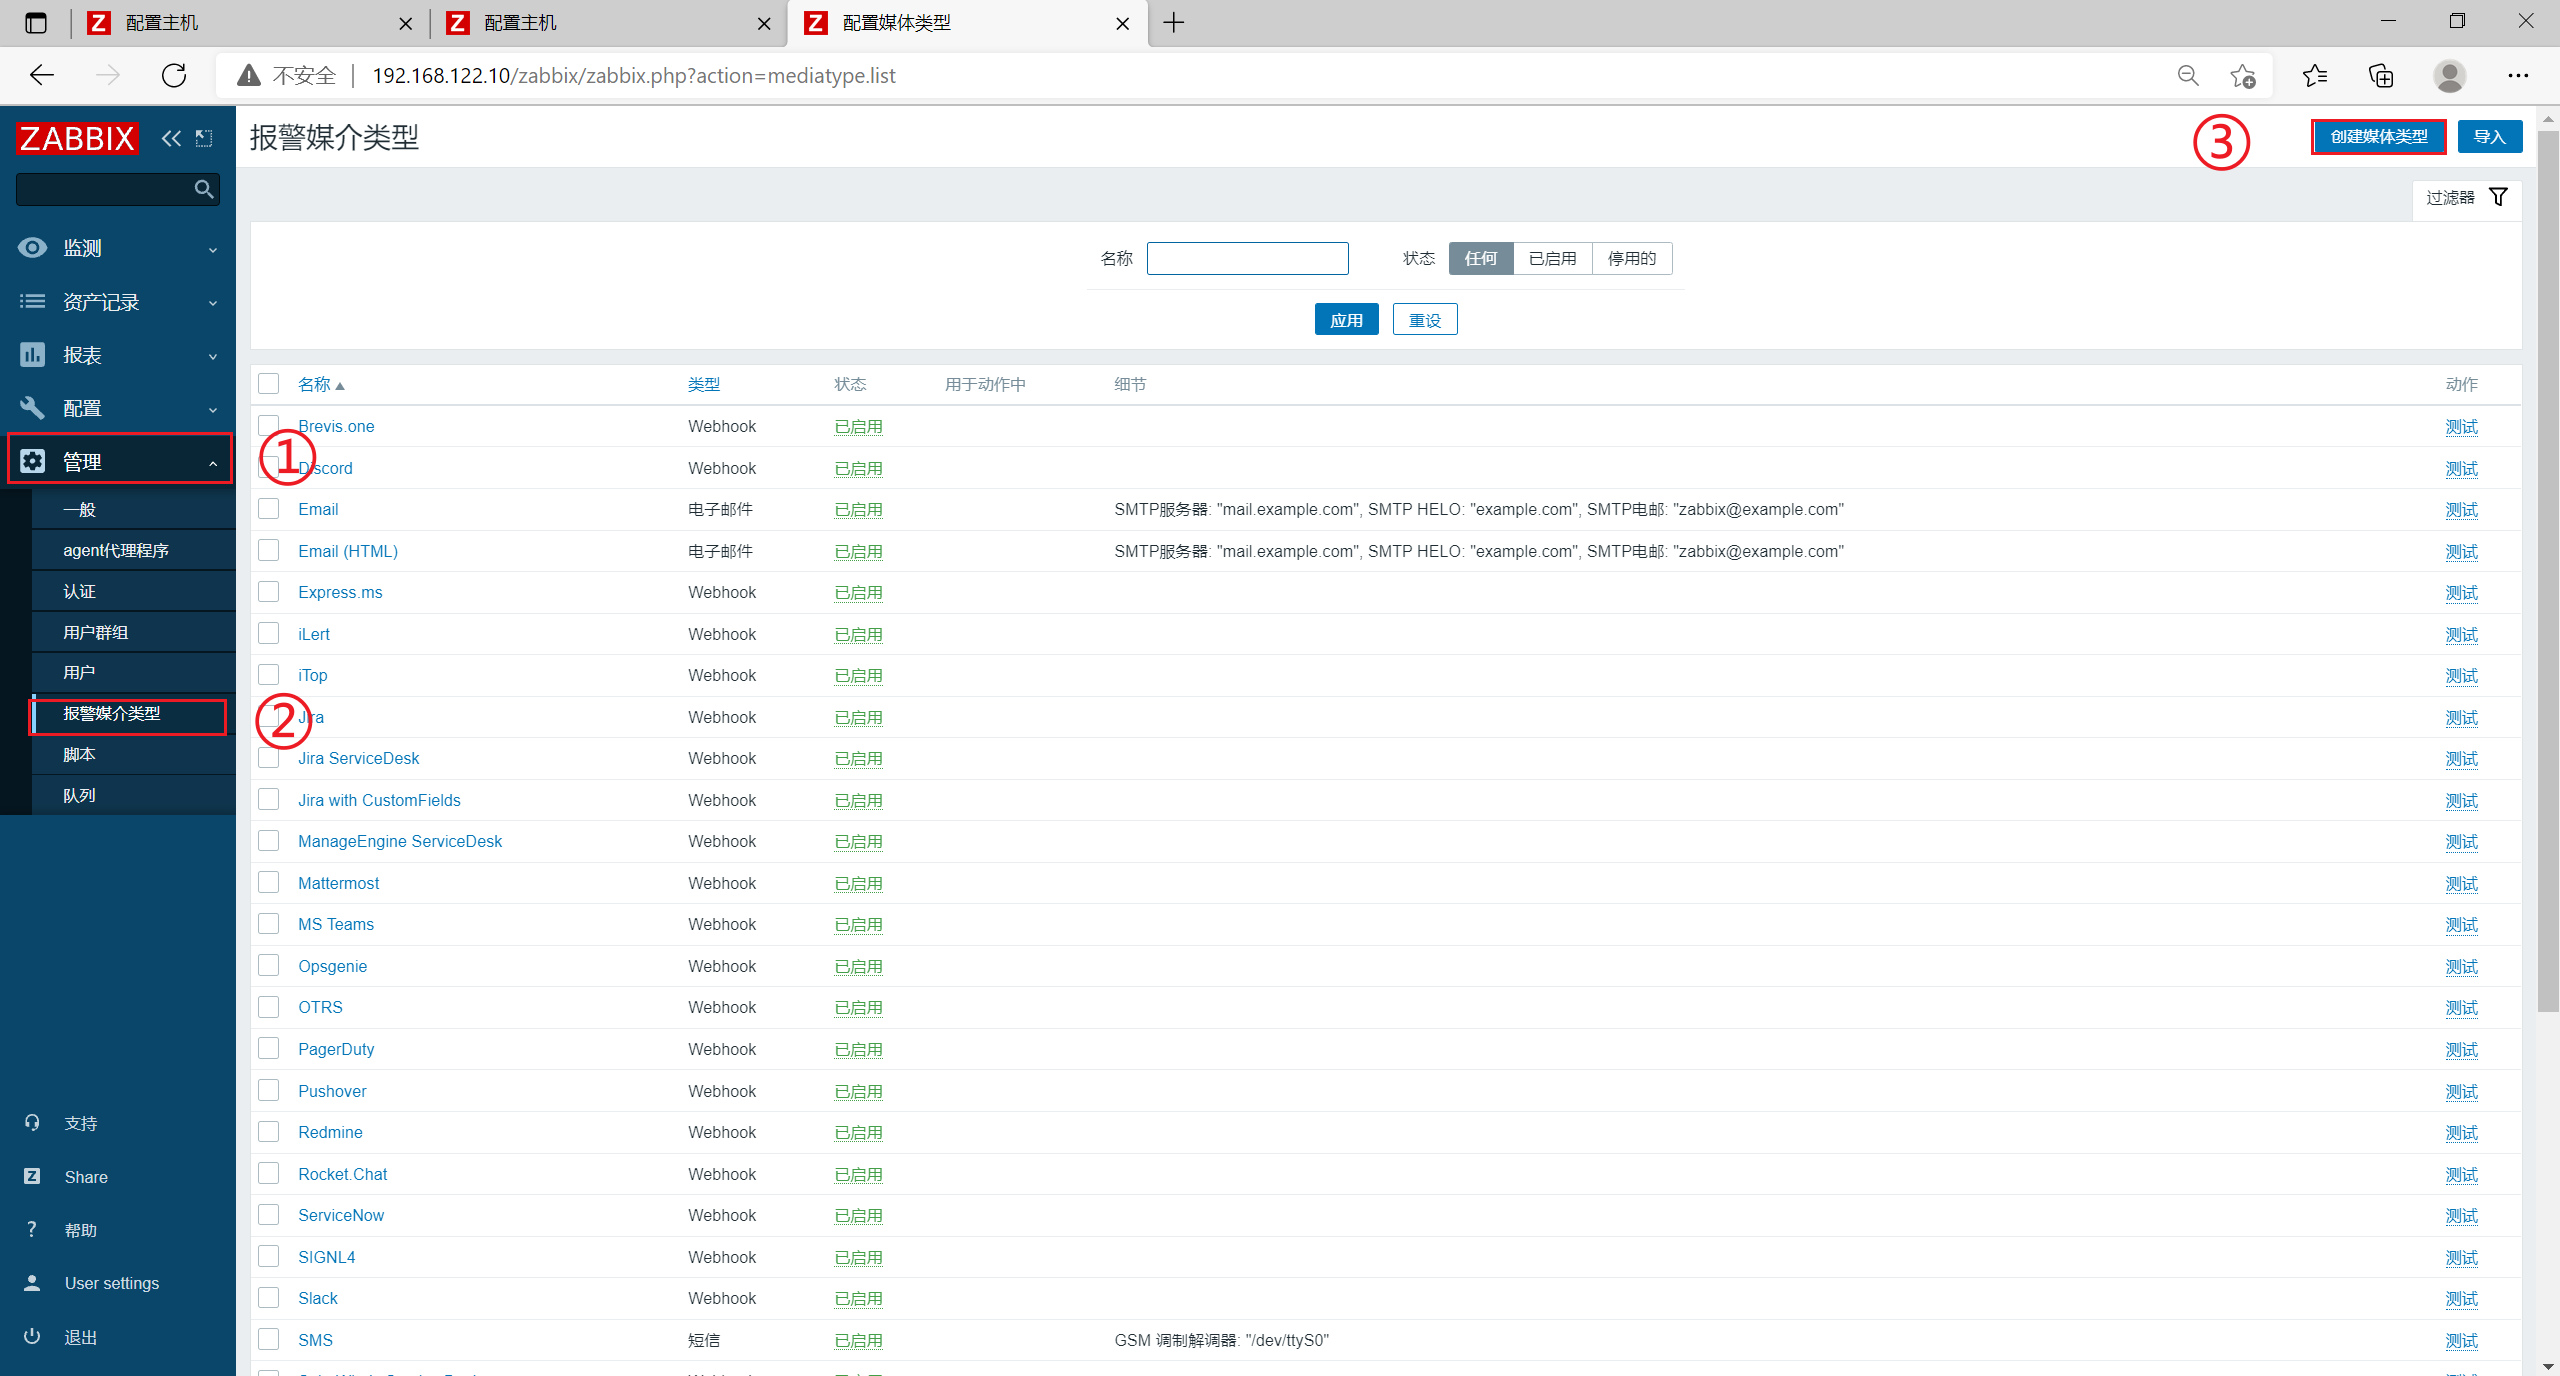
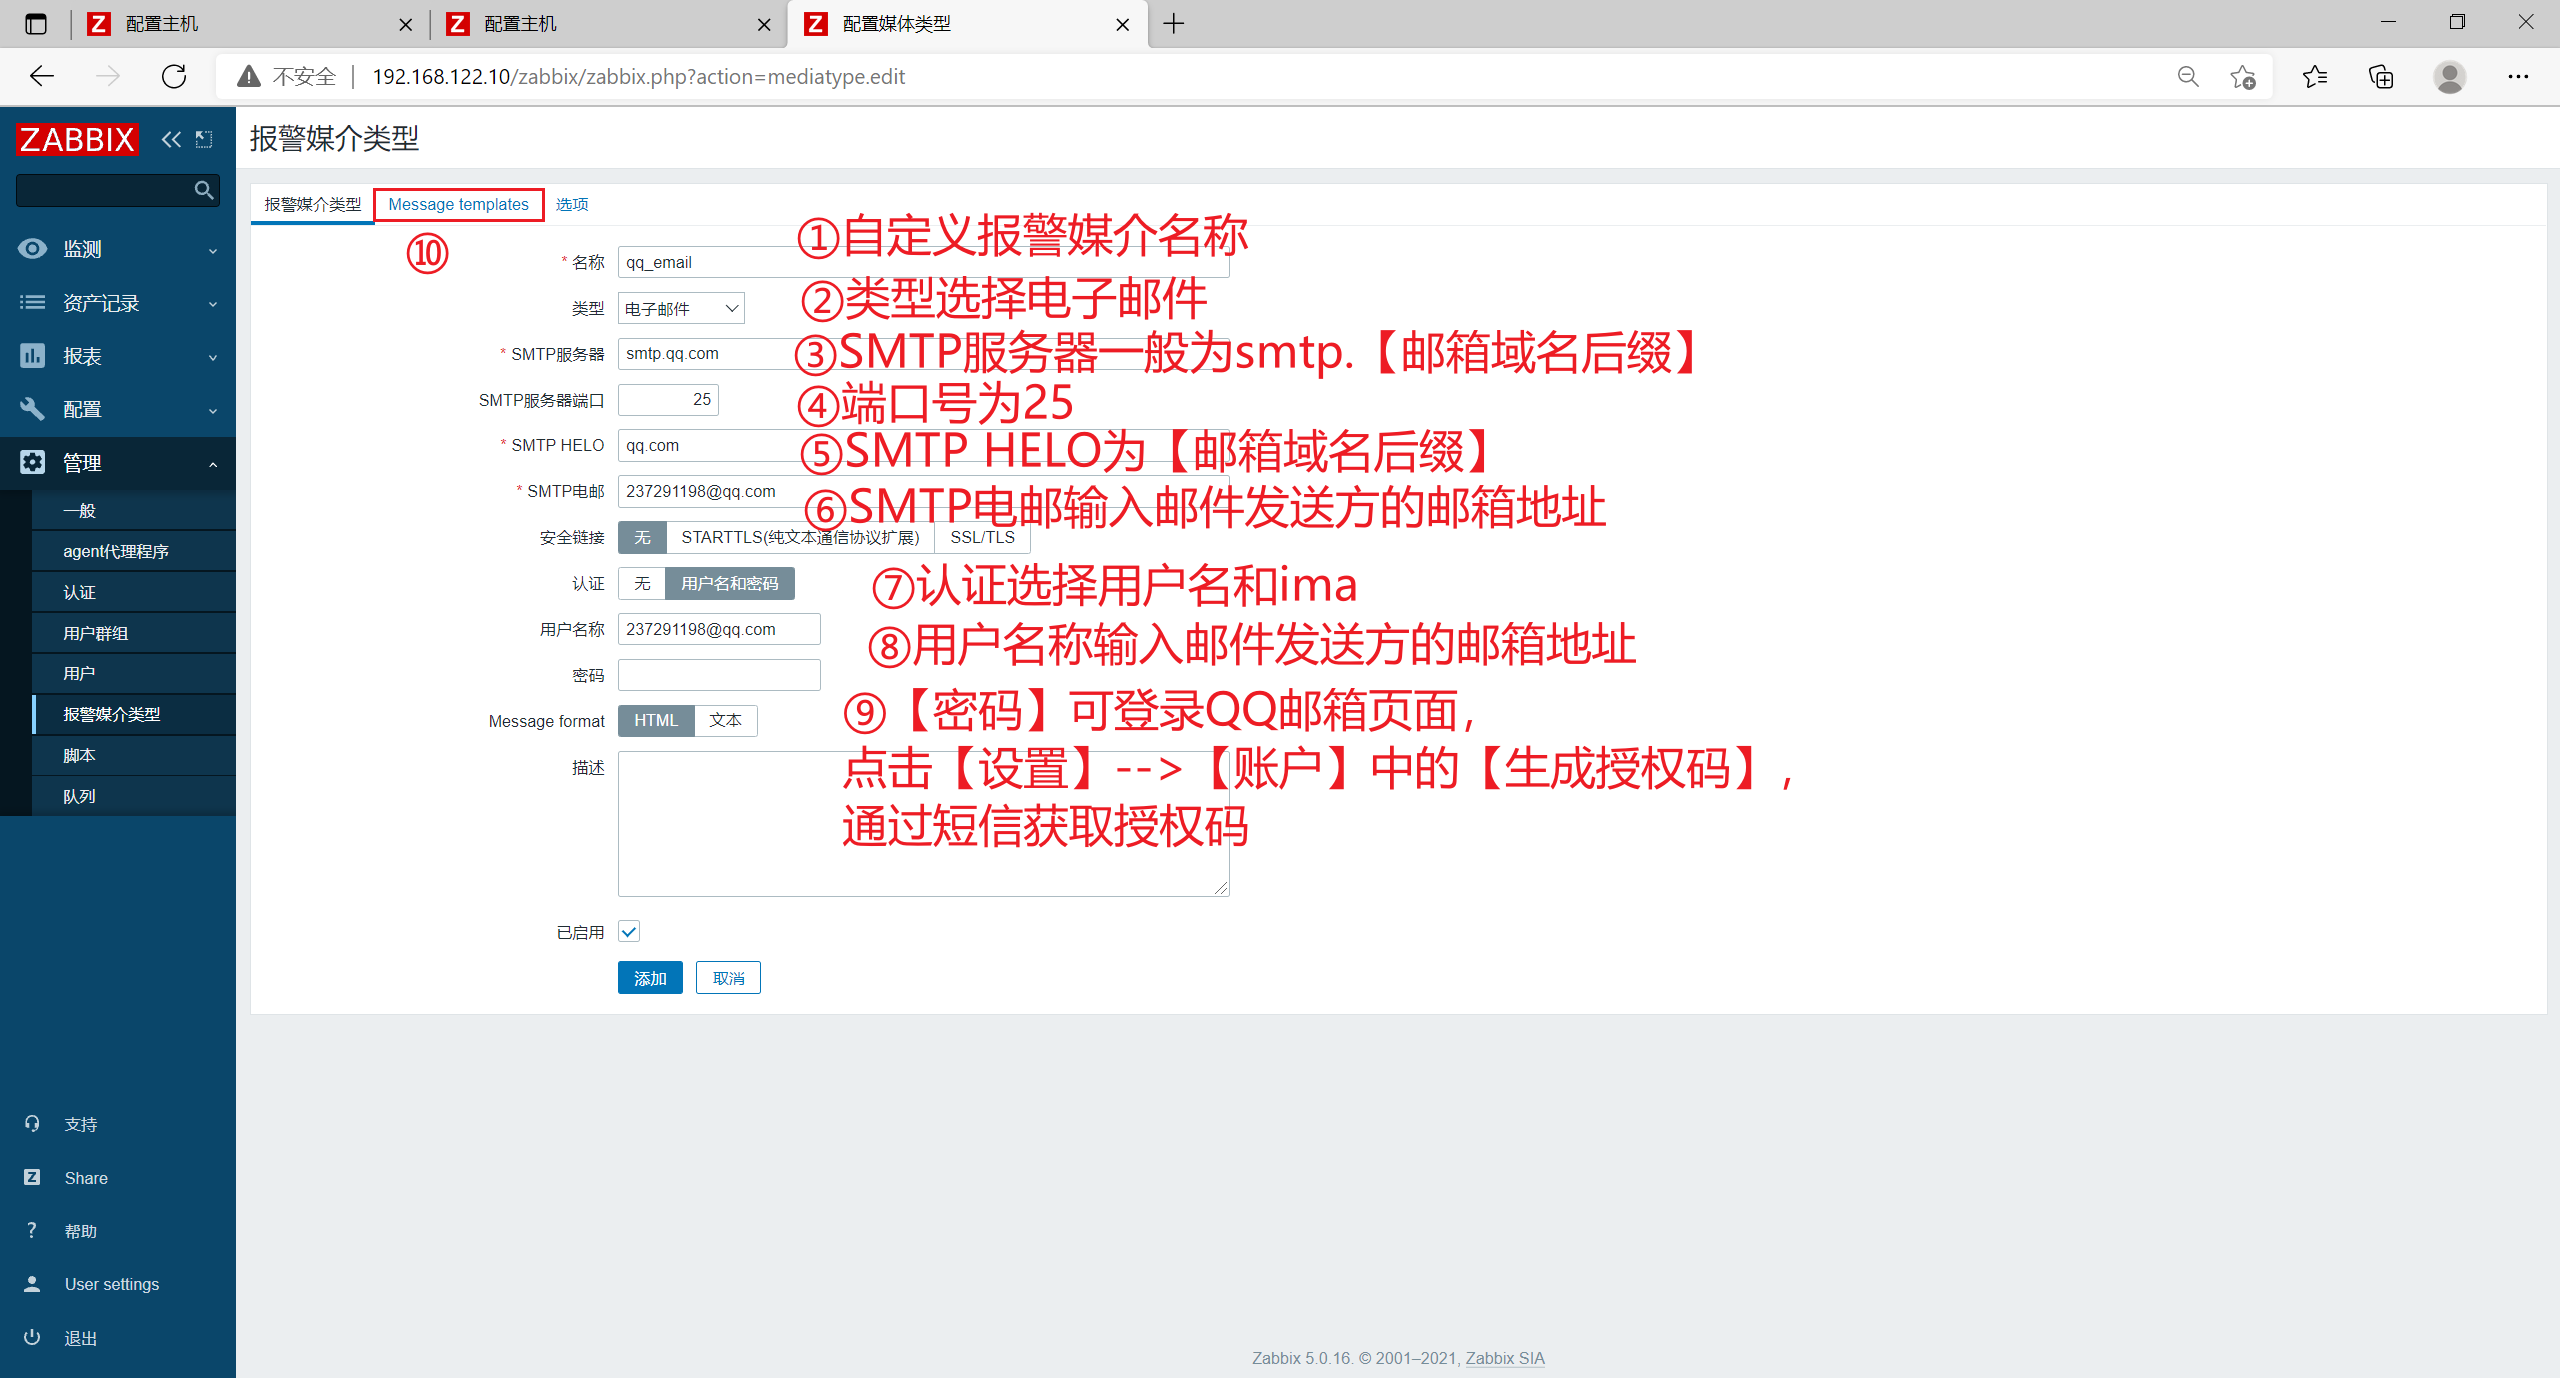
Click [alarm media type] in [management] in the left menu bar, and click [create media type]
[name] set to qq_Email
[SMTP server] set to smtp.qq.com
Set [SMTP server port] to 25
[SMTP HELO] set to qq.com
[SMTP email] set to your own email address, for example xxxx@qq.com
[authentication] select user name and password
[user name] is set to its own email address, for example xxxx@qq.com
[password] you can log in to the QQ email page and click [generate authorization code] in [settings] - [account] to obtain the authorization code through SMS
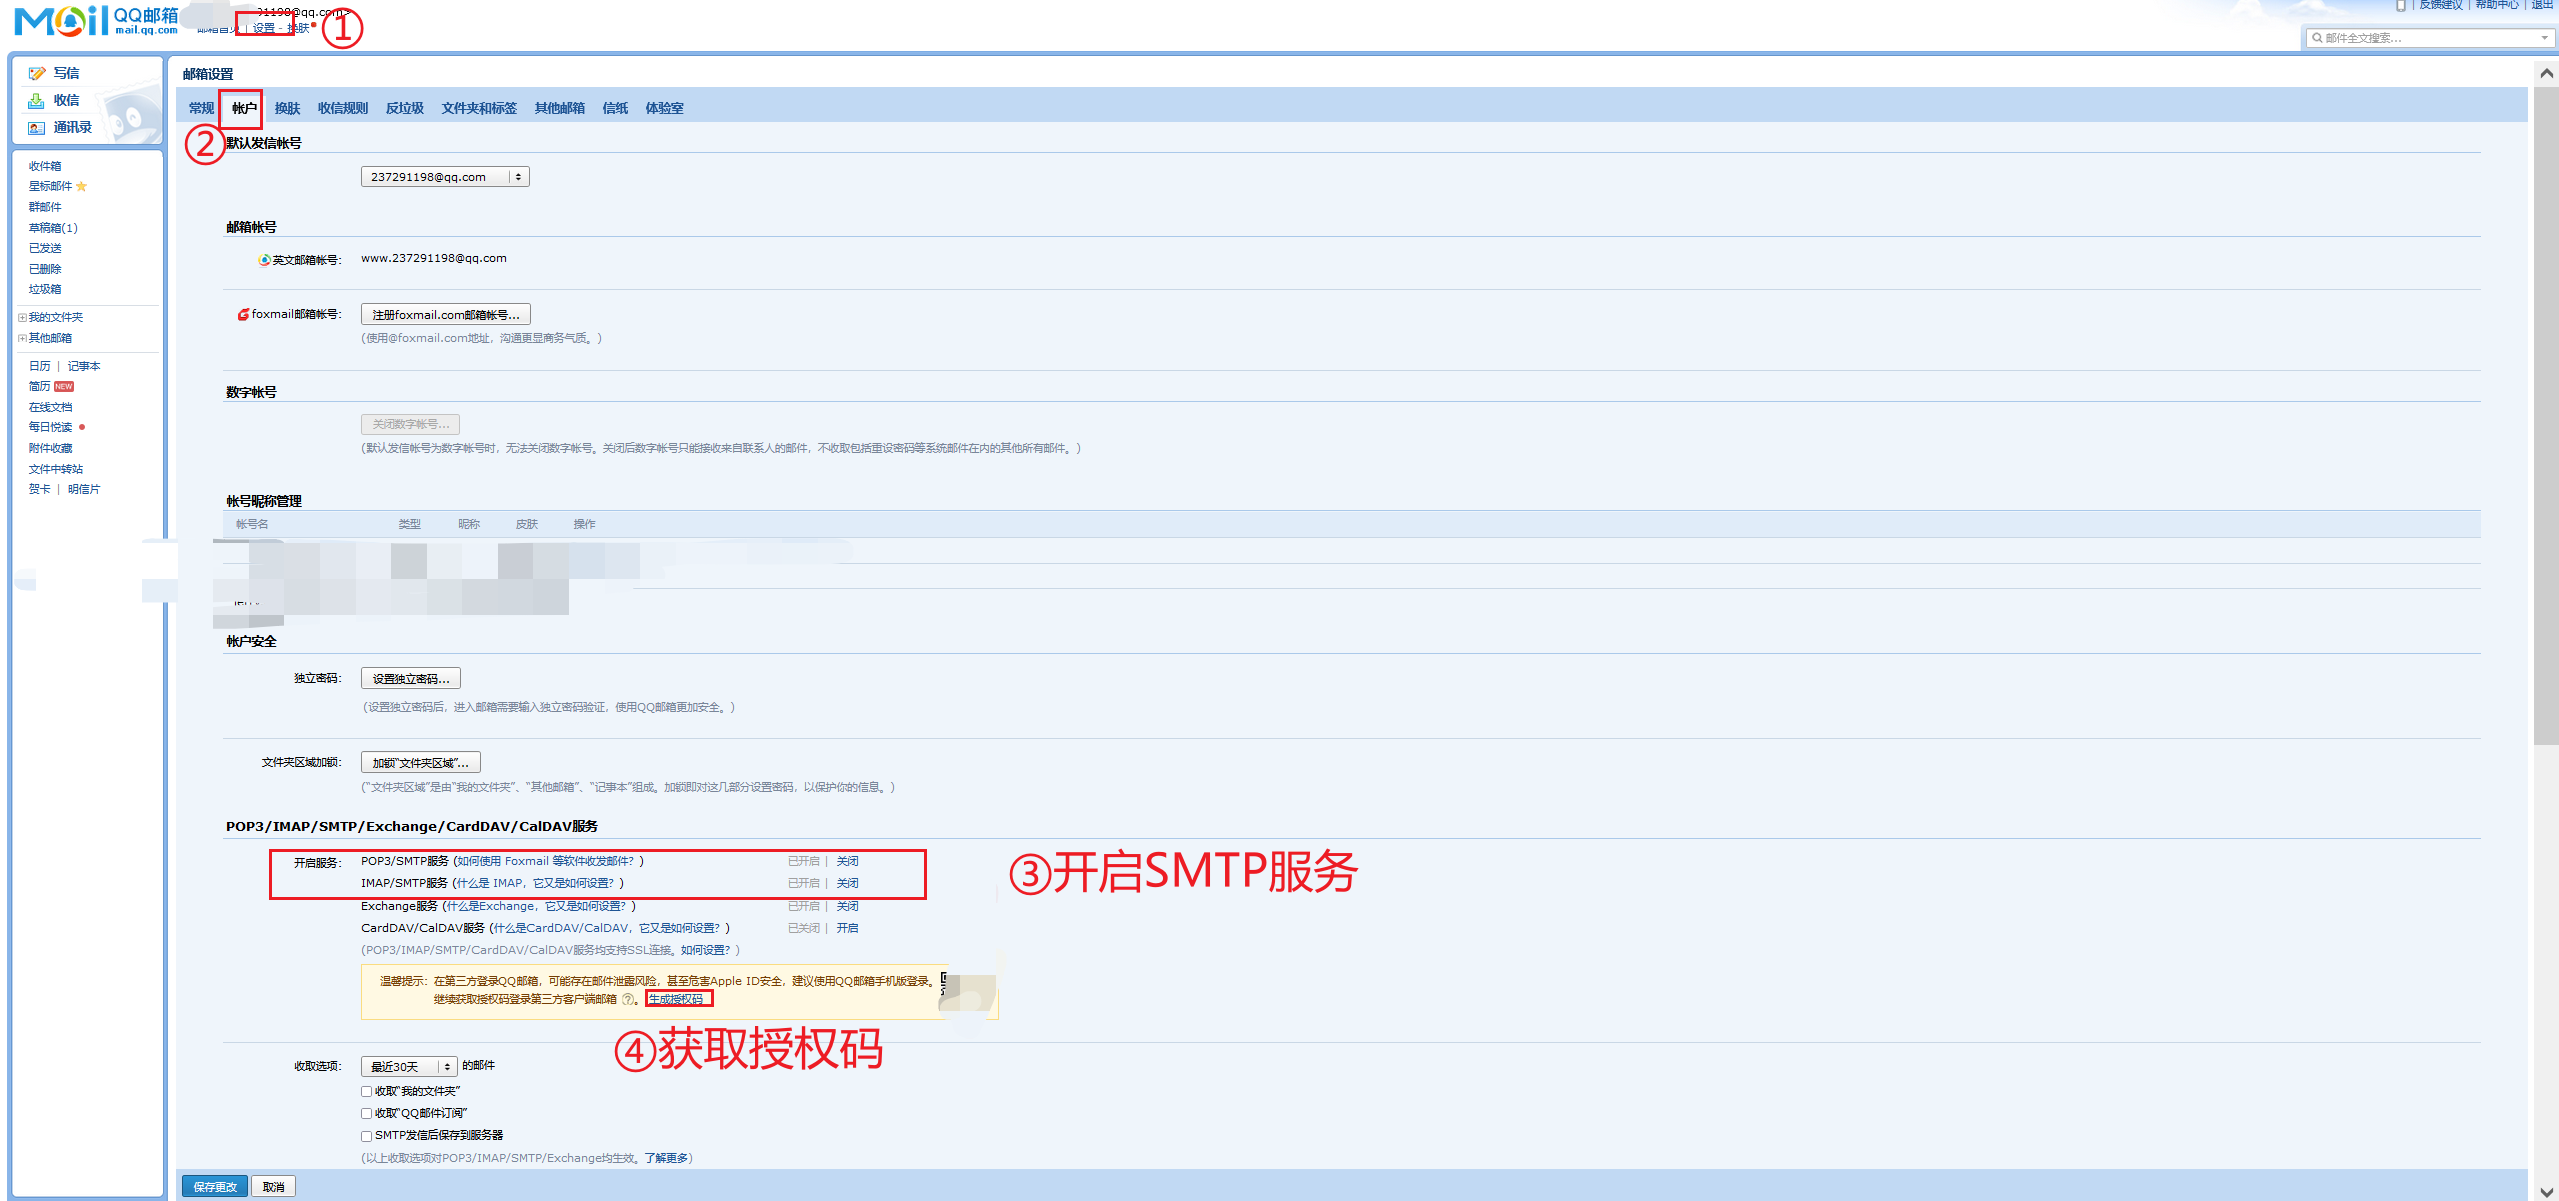
[description] can be customized
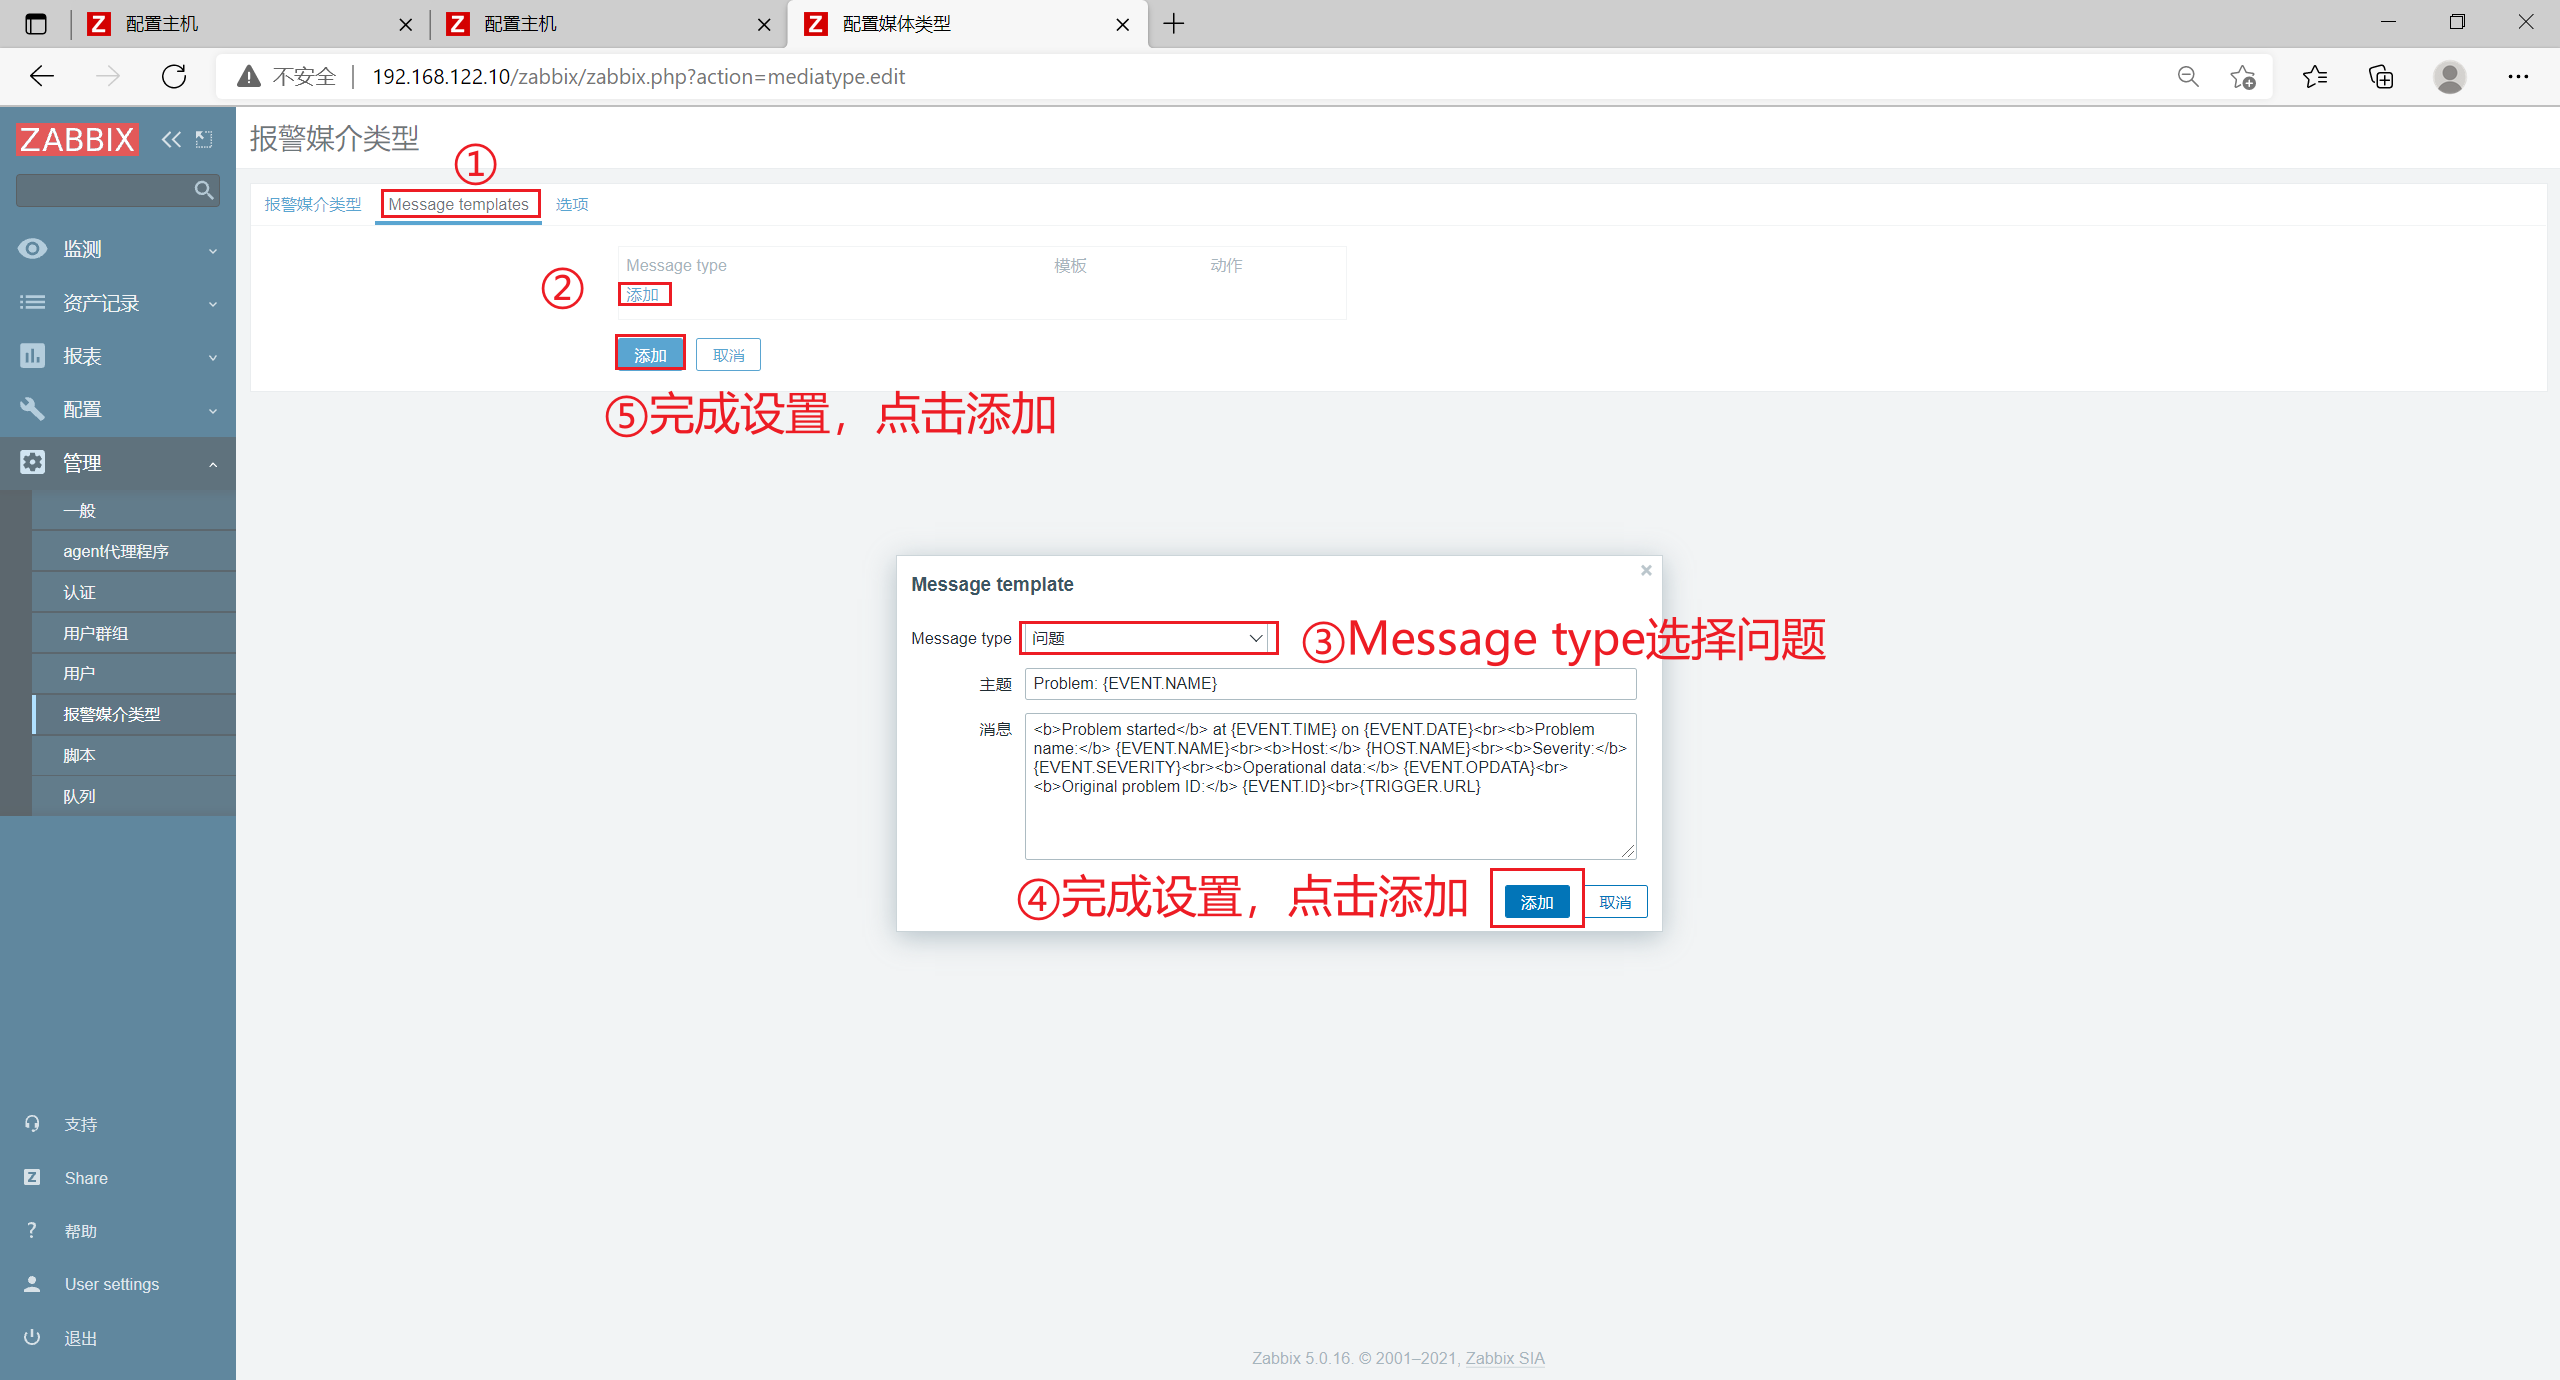
Click Message templates in the upper menu bar, click add, select a question in Message type, and click Add
Click Add to test


After receiving the email, the test was successful.
Click User settings - > alarm media in the left menu bar, and click Add
[type] Select qq_Email
[to] set to xxxx@qq.com
[when enabled] is set to 1-7,00:00-24:00
Click [add]
Then click Update

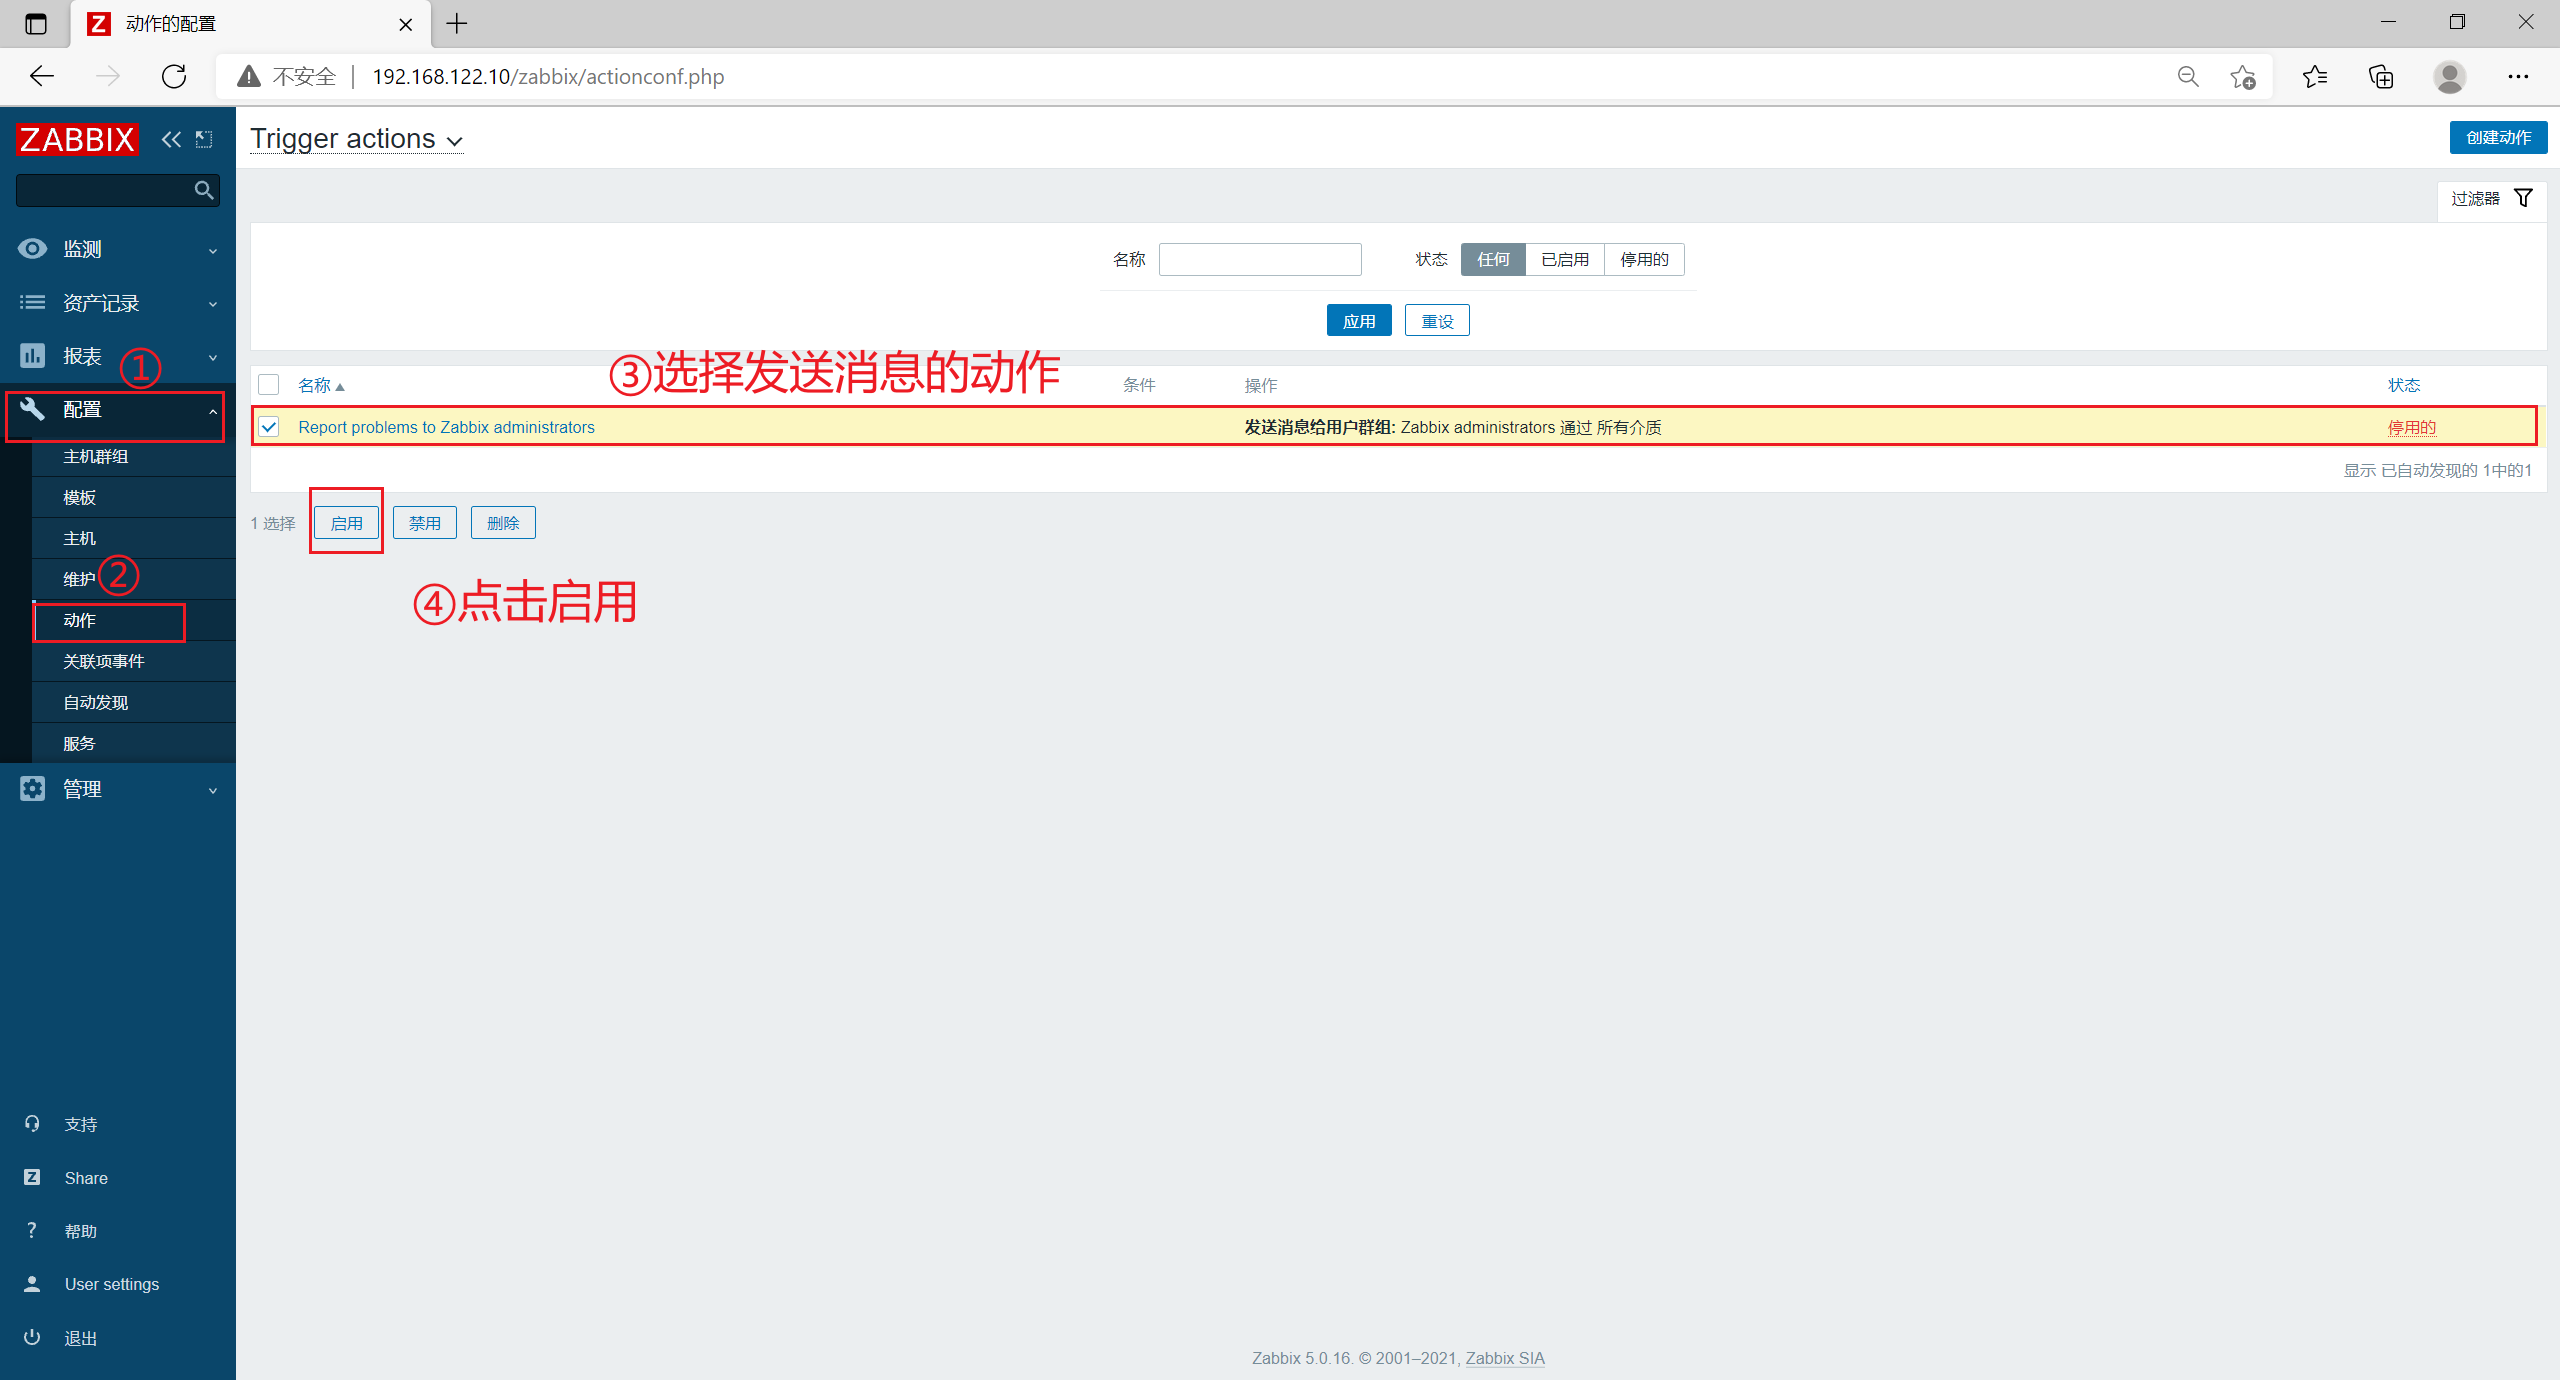
Click [action] in [configuration] in the left menu bar, select the corresponding action name, and click [enable]
4.2 test mail alarm
Increase the number of terminal connections of the client to 4 and confirm whether the alarm email can be received.
[root@zabbix_agent ~]# whoroot pts/1 2021-10-04 00:34 (192.168.122.1)root pts/2 2021-10-05 01:46 (192.168.122.1)root pts/3 2021-10-05 01:46 (192.168.122.1)root pts/4 2021-10-05 01:46 (192.168.122.1)[root@zabbix_agent ~]# who | wc -l4

Alarm information
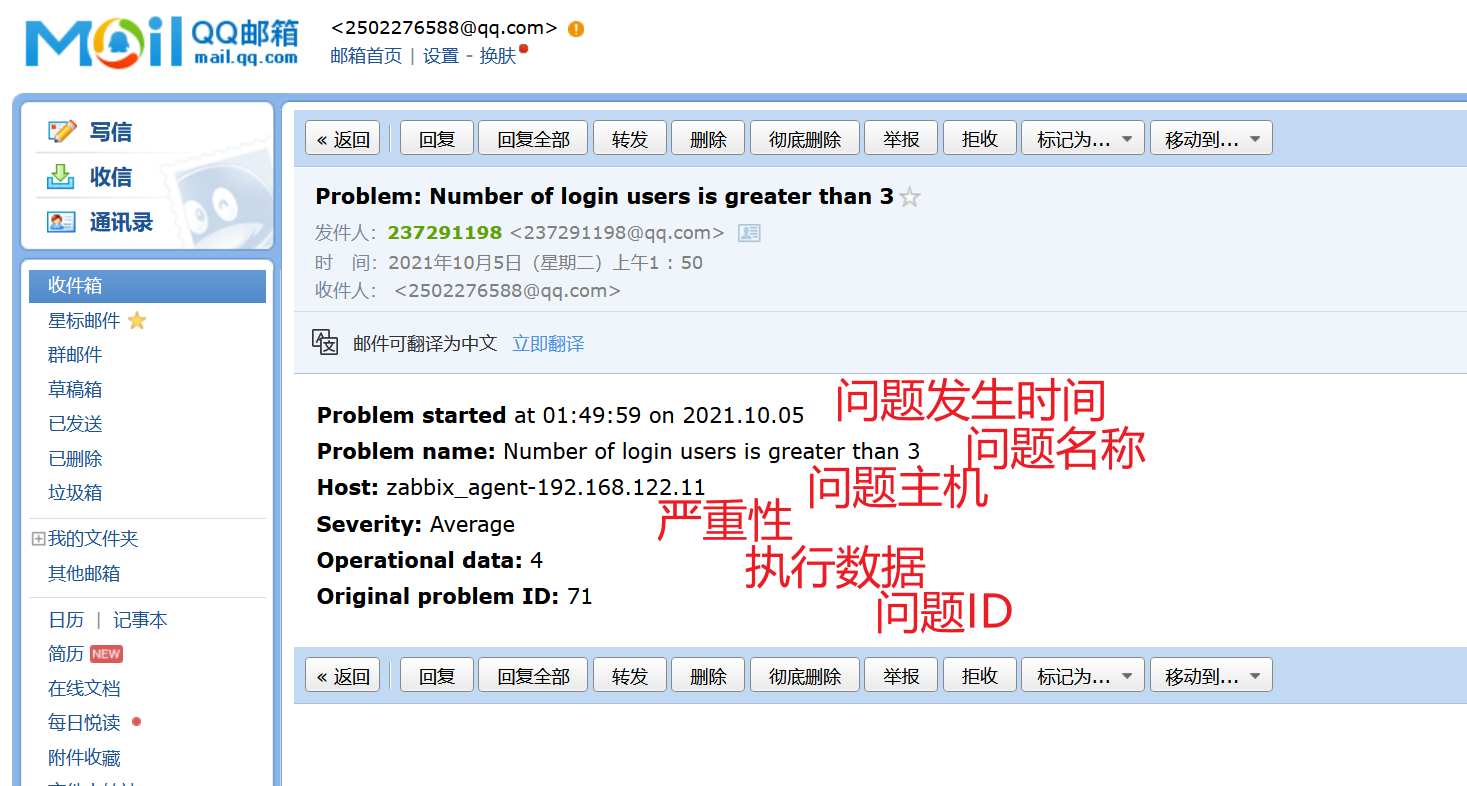
Alarm mail
4, zabbix auto discovery and auto registration
1. zabbix auto discovery (passive mode for agent2)
zabbix server actively discovers all clients, and then registers the client information on the server.
The disadvantage is that if the number of hosts in the defined network segment is large, the zabbix server registration takes a long time and the pressure will be large.
1.1 ensure that the zabbix-agent2 service status on the client is normal
[root@zabbix_agent ~]# systemctl status zabbix-agent2.service ● zabbix-agent2.service - ZABBIX agent 2 loaded: loaded (/ usr / lib / SYSTEMd / system / zabbix-agent2.service; enabled; vendor preset: disabled) active: active (running) since 2021-10-05 01:23:41
1.2 delete the original client host on the Web page
First delete the registered zabbix client and return it to the unregistered state.
Click [host] in [configuration] in the left menu bar, check the original client host, and click delete

1.3 configure hosts resolution on the server and client
Server
[root@zabbix_server ~]# echo '192.168.122.10 zabbix_server' >> /etc/hosts[root@zabbix_server ~]# echo '192.168.122.11 zabbix_agent' >> /etc/hosts
client
[root@zabbix_agent ~]# echo '192.168.122.10 zabbix_server' >> /etc/hosts[root@zabbix_agent ~]# echo '192.168.122.11 zabbix_agent' >> /etc/hosts
1.4 configure automatic discovery on web pages
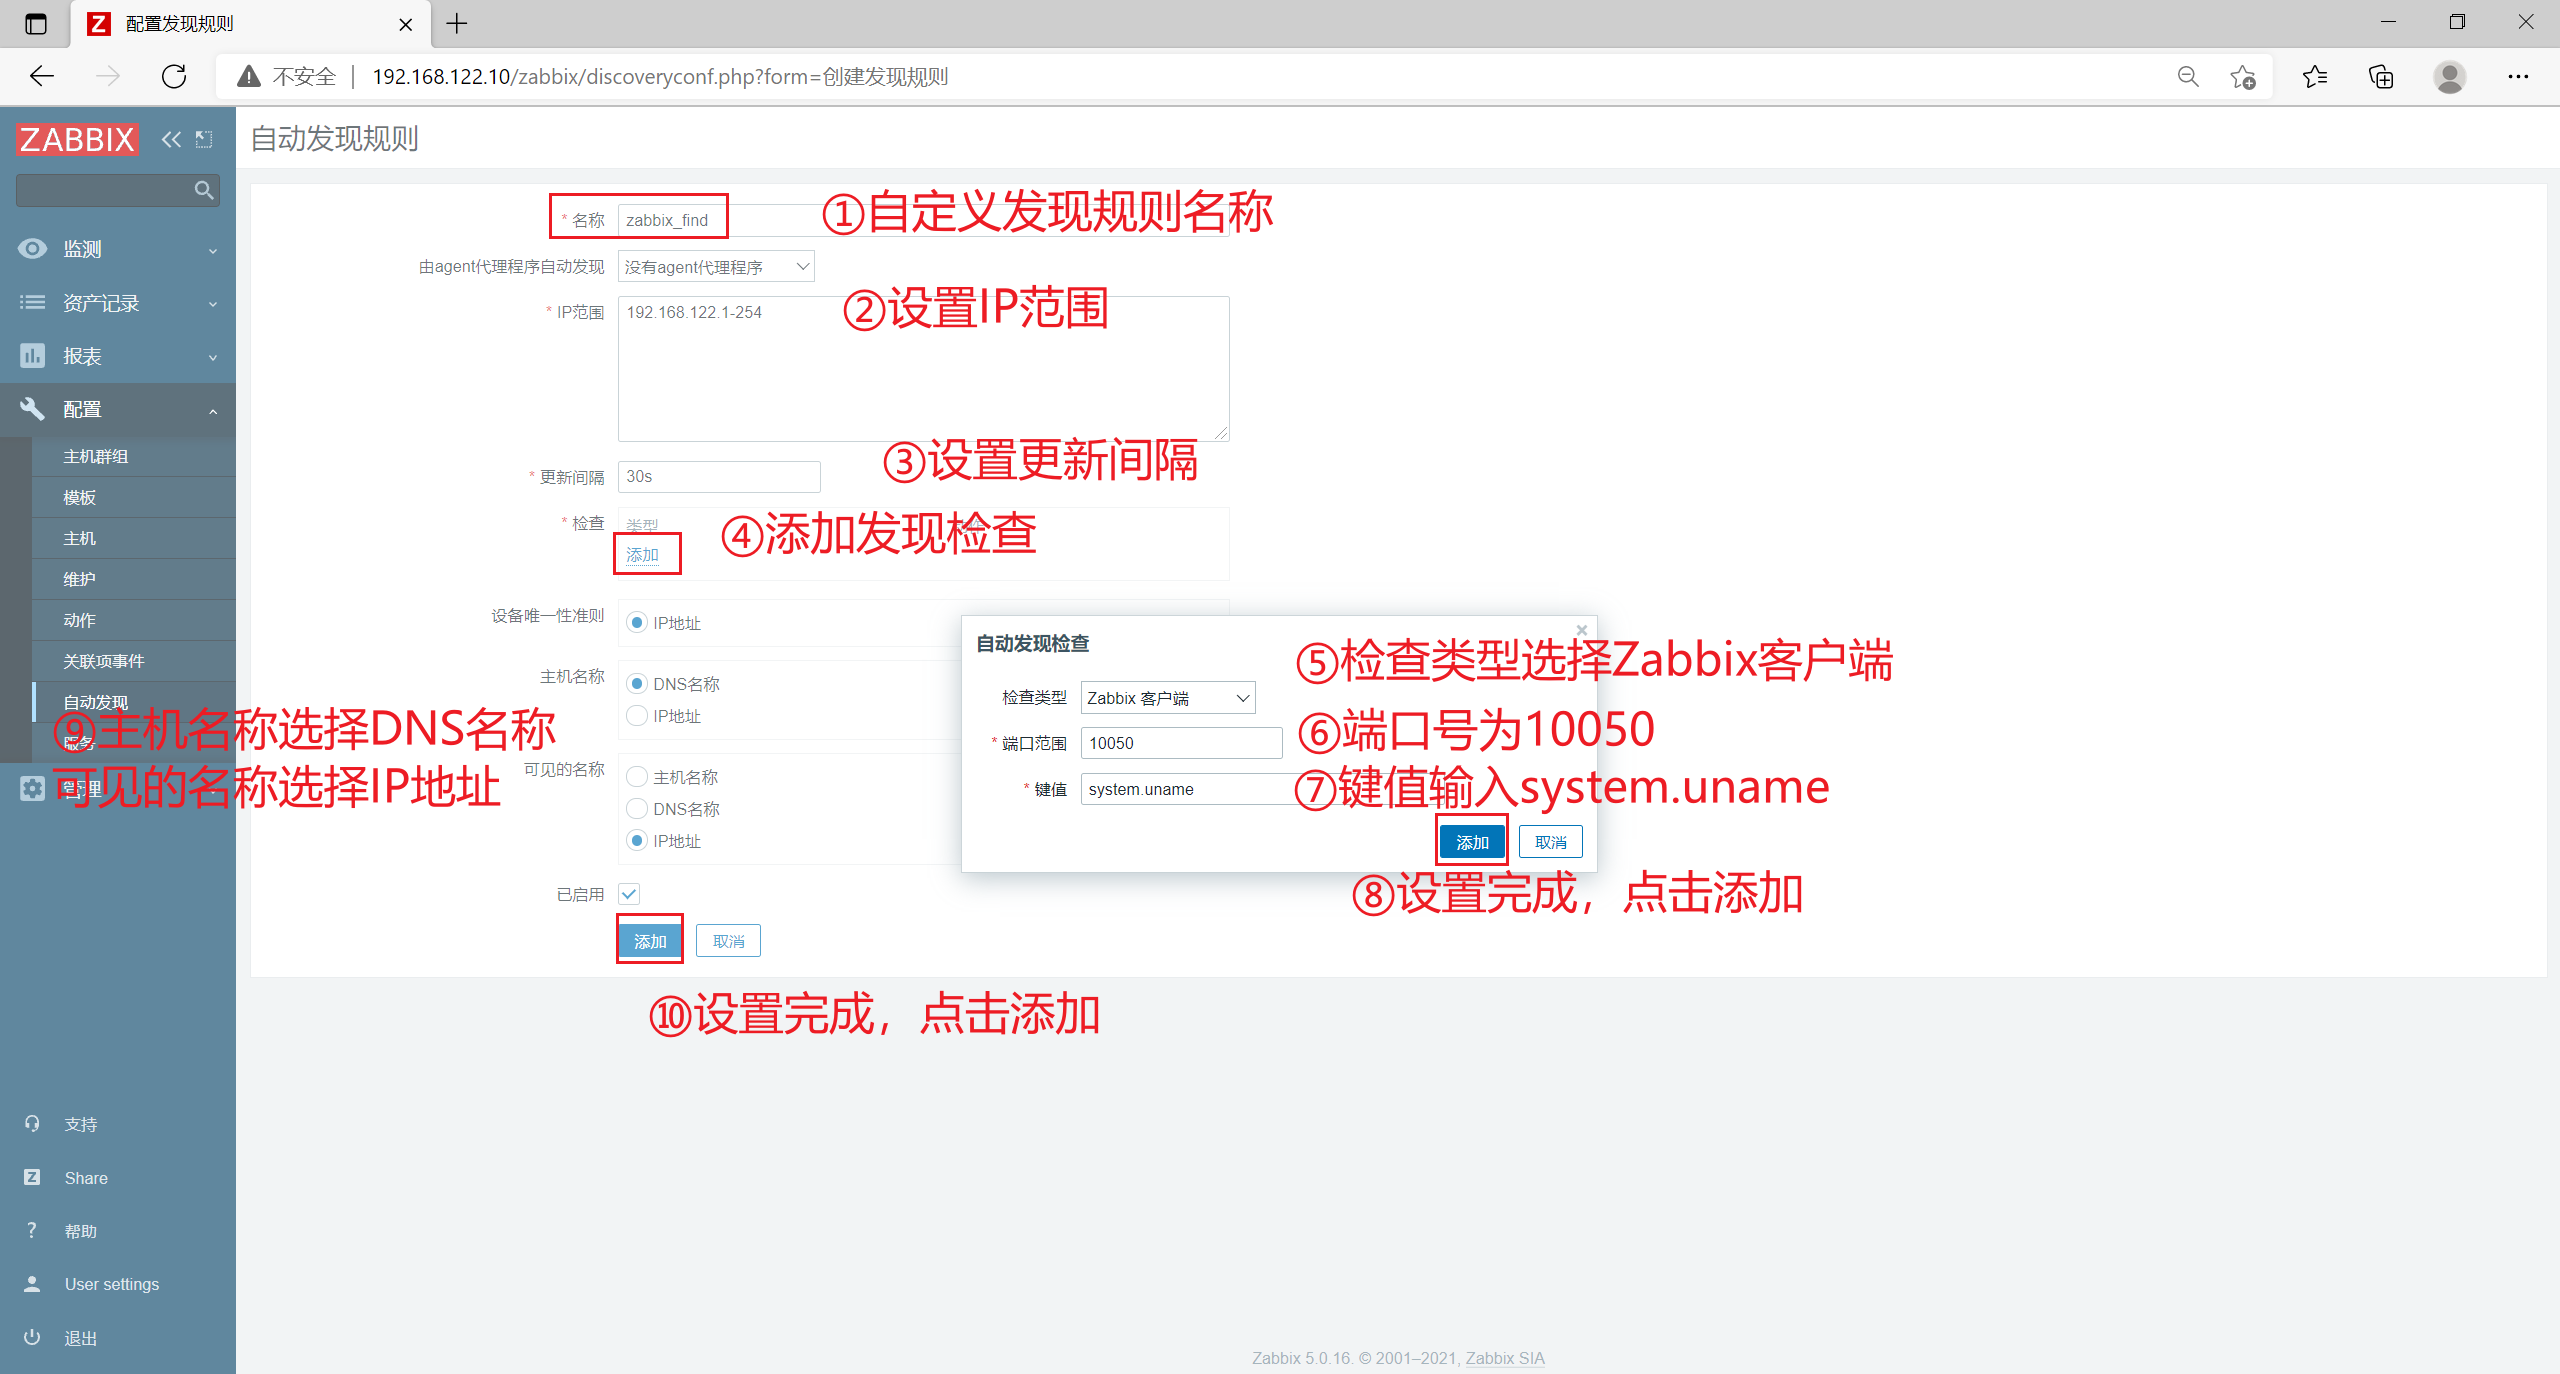
Click auto discovery in configuration in the left menu bar, and click Create discovery rule
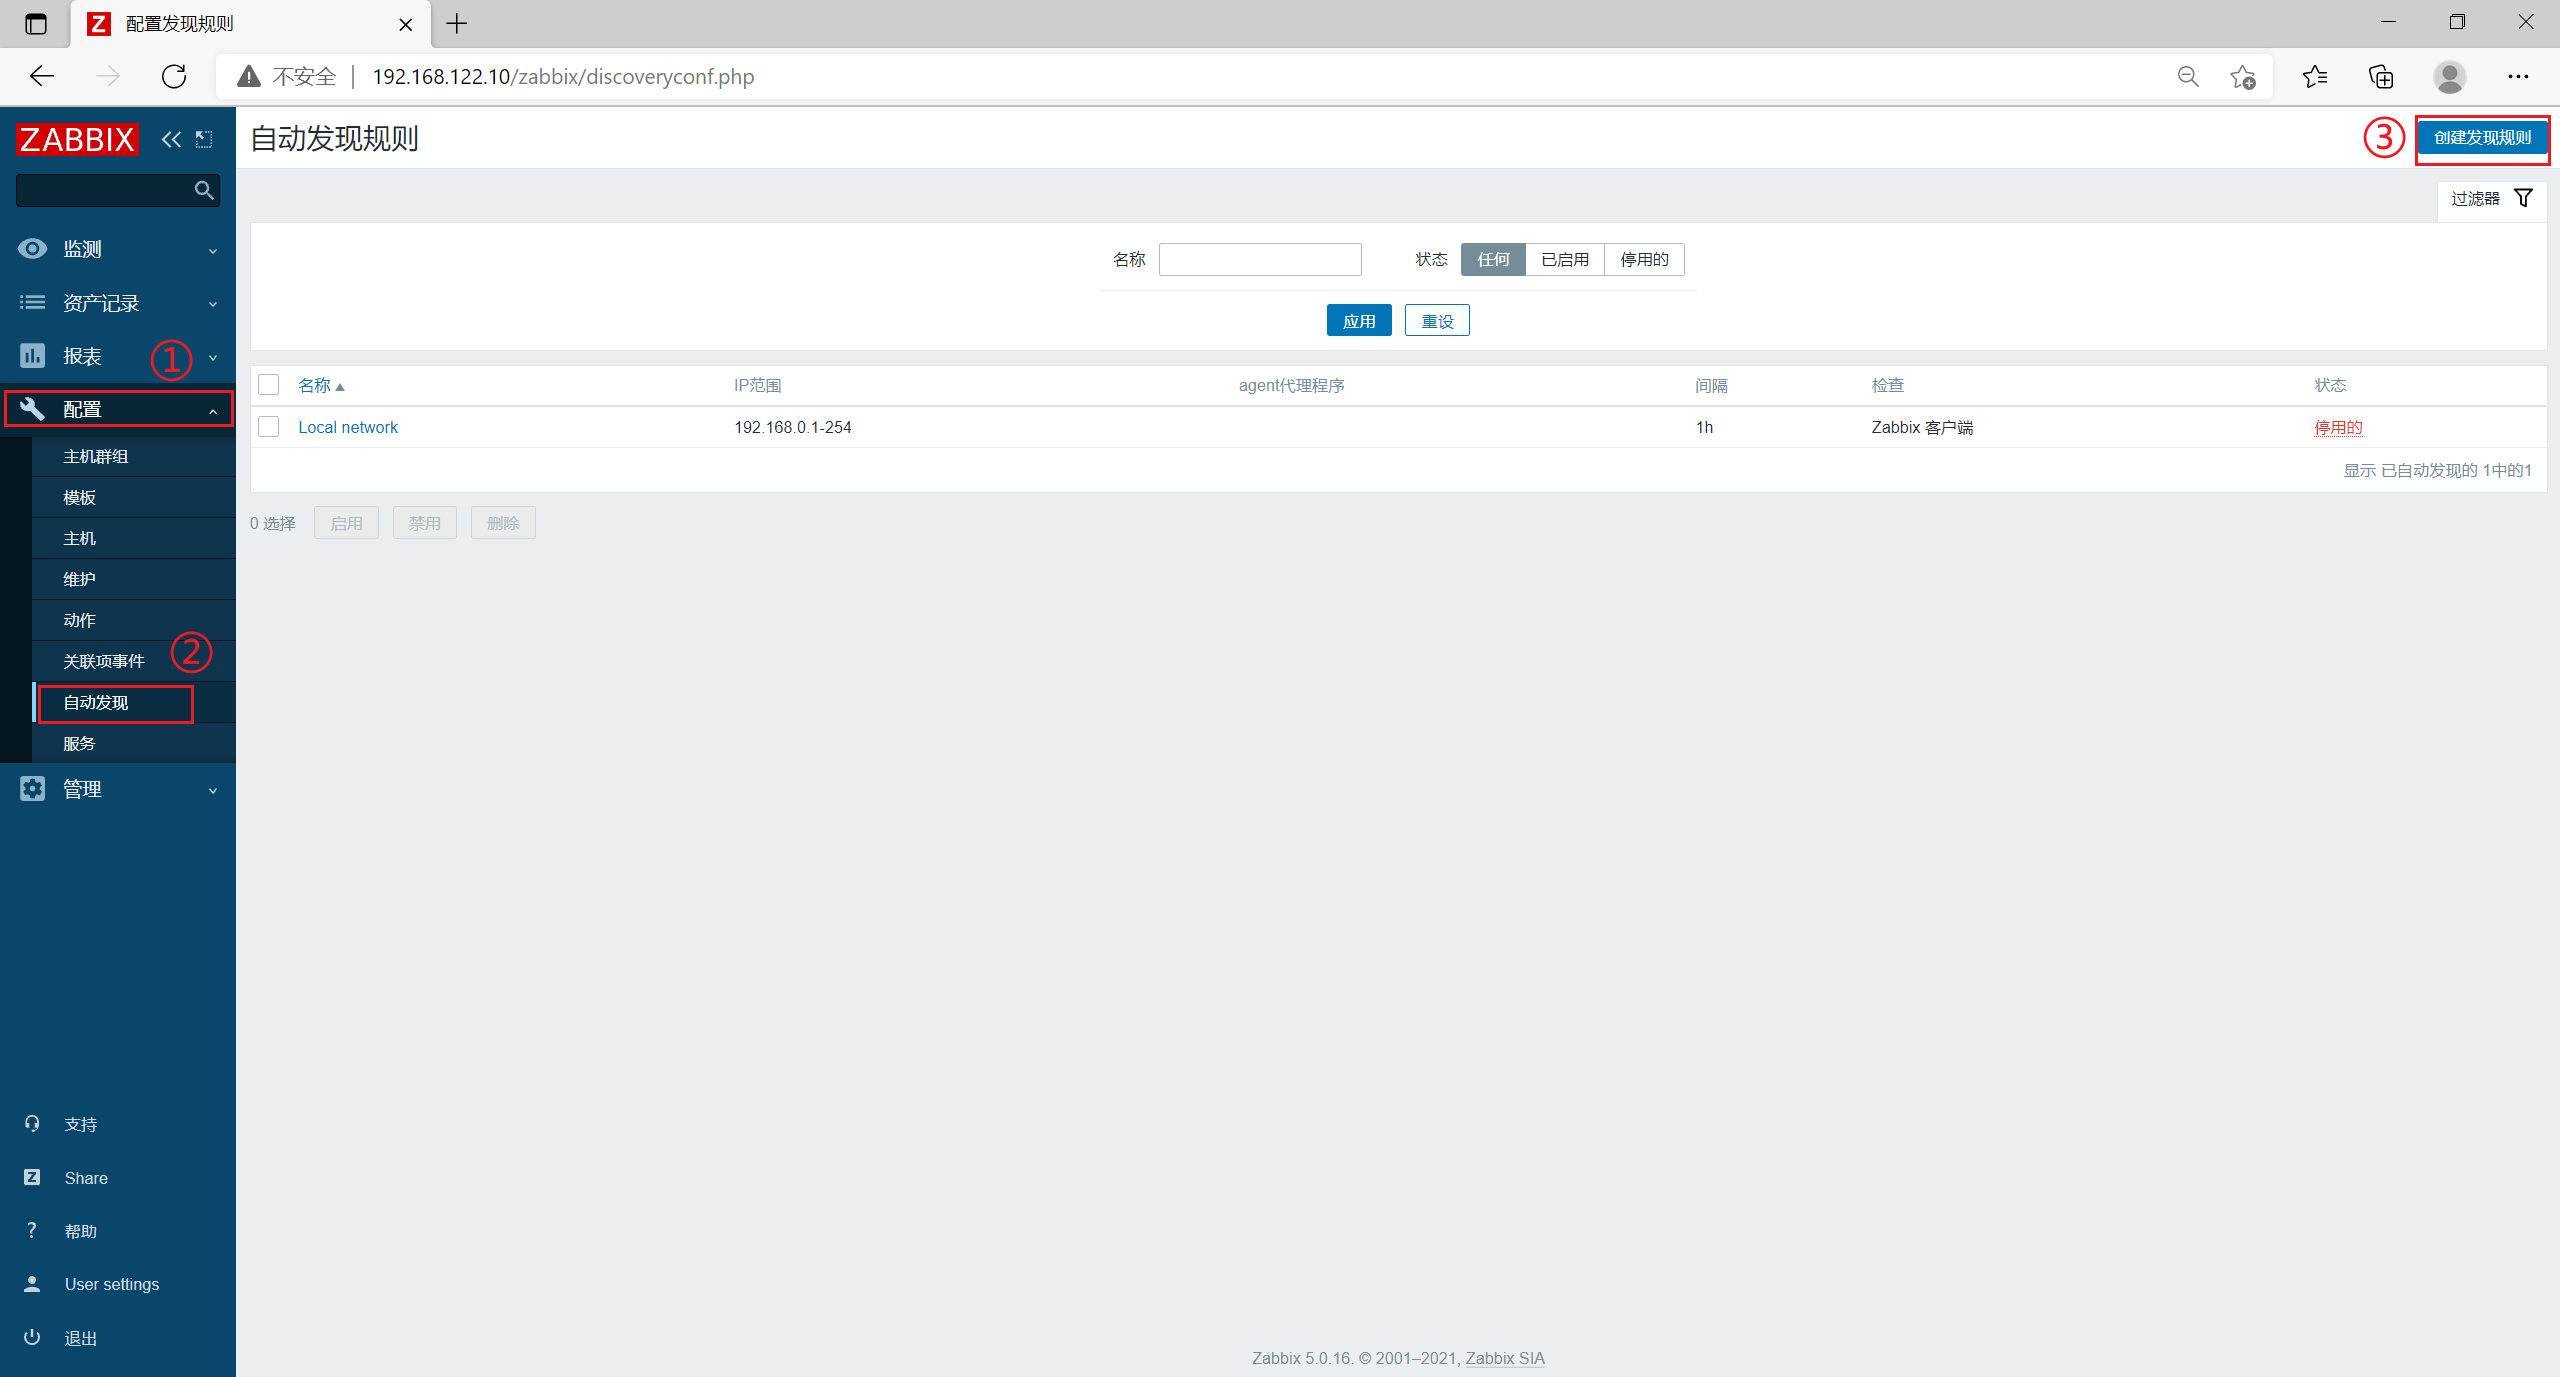
[name] set to mynetwork
[IP range] is set to 192.168.122.1-254
[update interval] is set to 30s
[check] click [add], select Zabbix client in [check type], set [port range] to 10500 and [key value] to system.uname
[equipment uniqueness criteria] select an IP address
[host name] Select DNS name
[visible name] select the host name
Check enabled and click Update
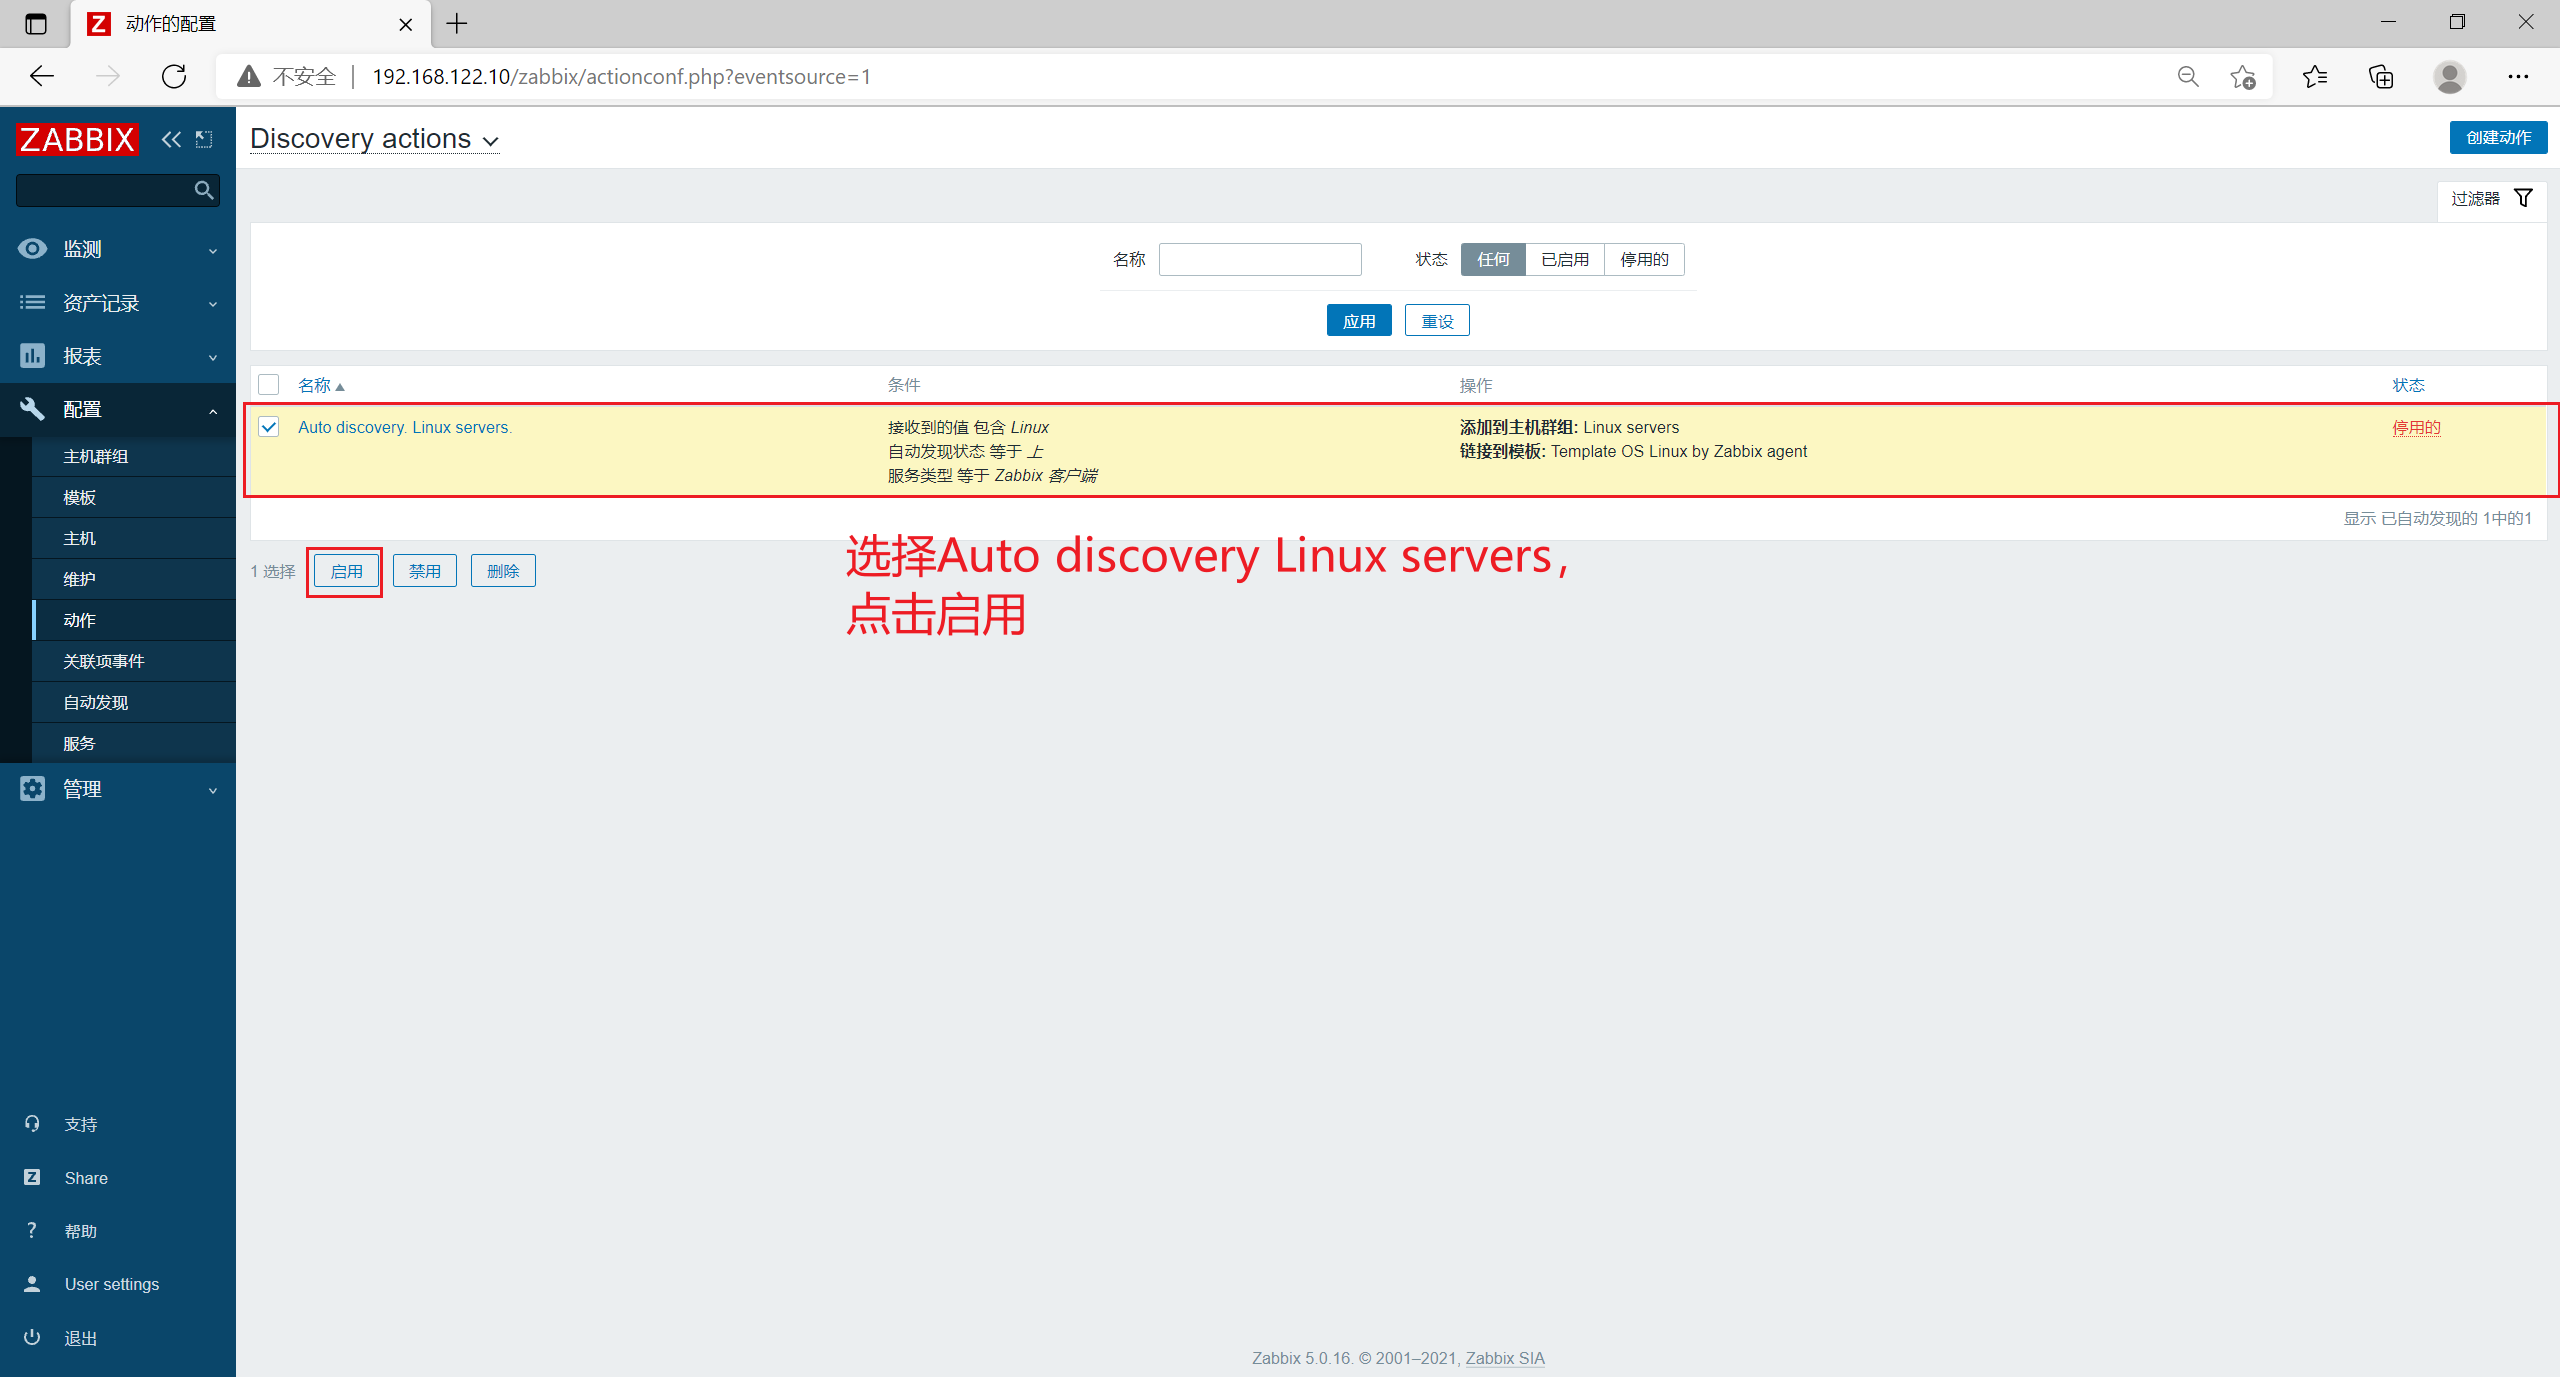
Click [actions] in [configuration] in the left menu bar, and select [Discovery actions] in the upper menu
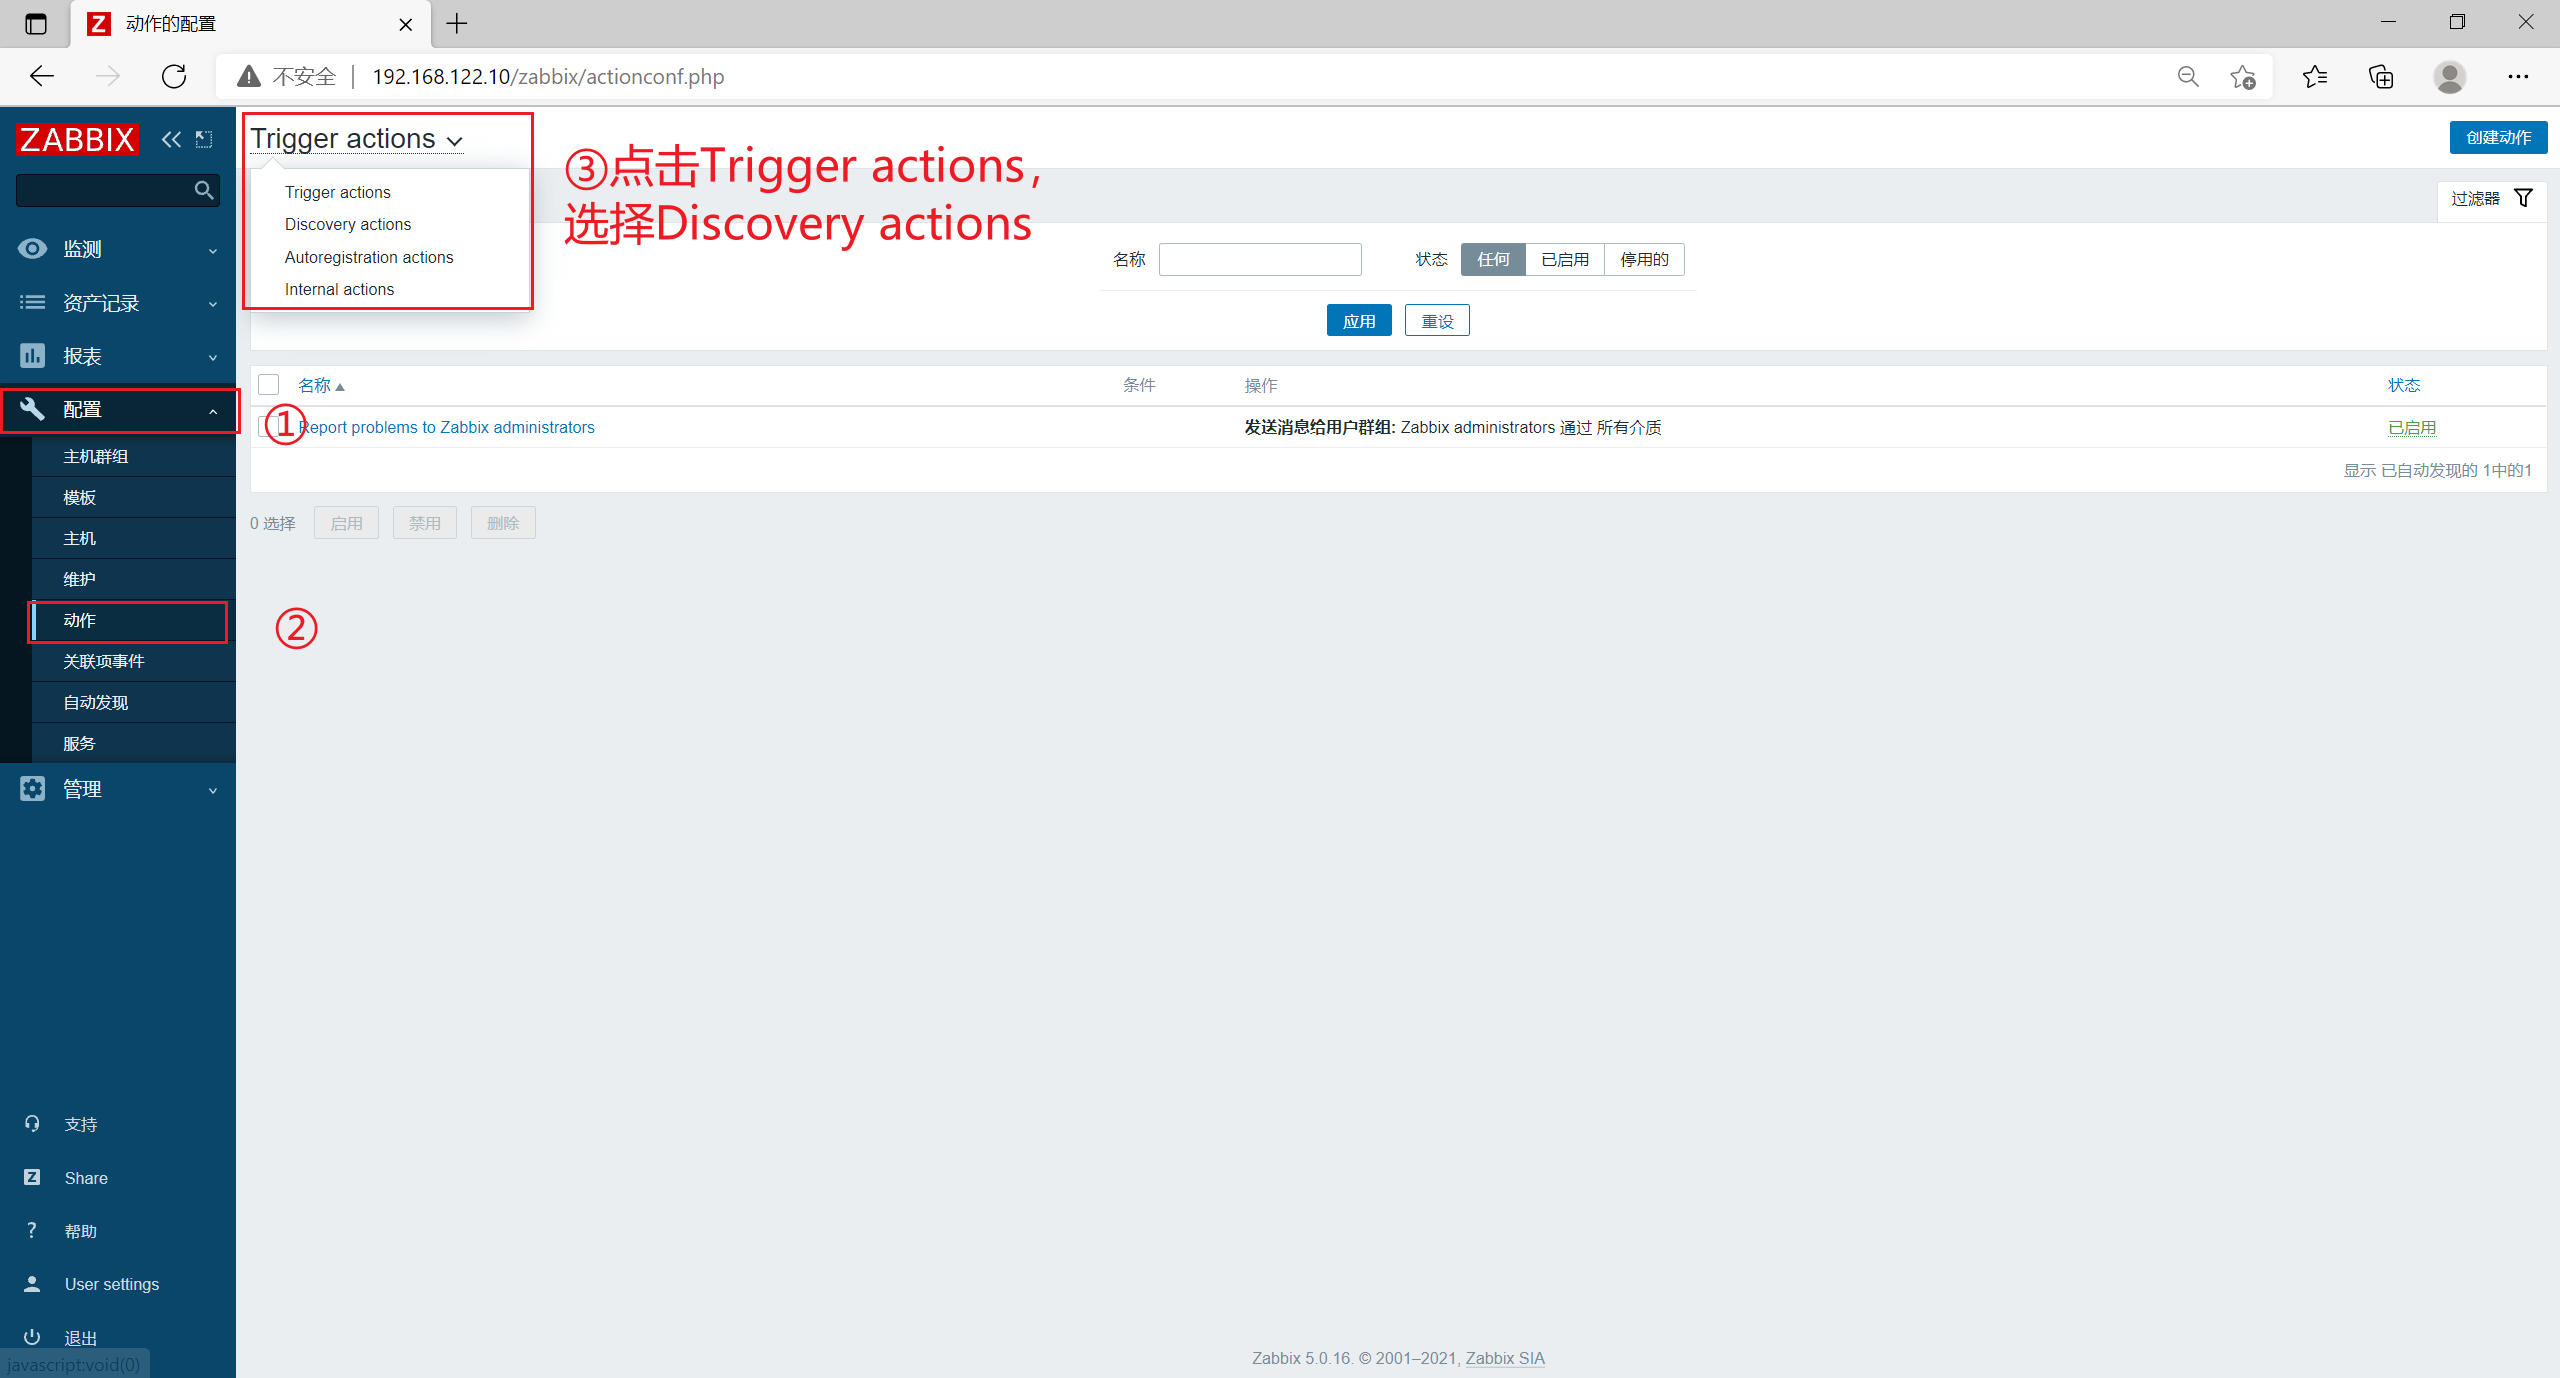
Check [Auto discovery. Linux servers.] and click [enable]
Click [host] in [configuration] on the left menu bar to refresh, and wait for a period of time to refresh the automatically discovered client host
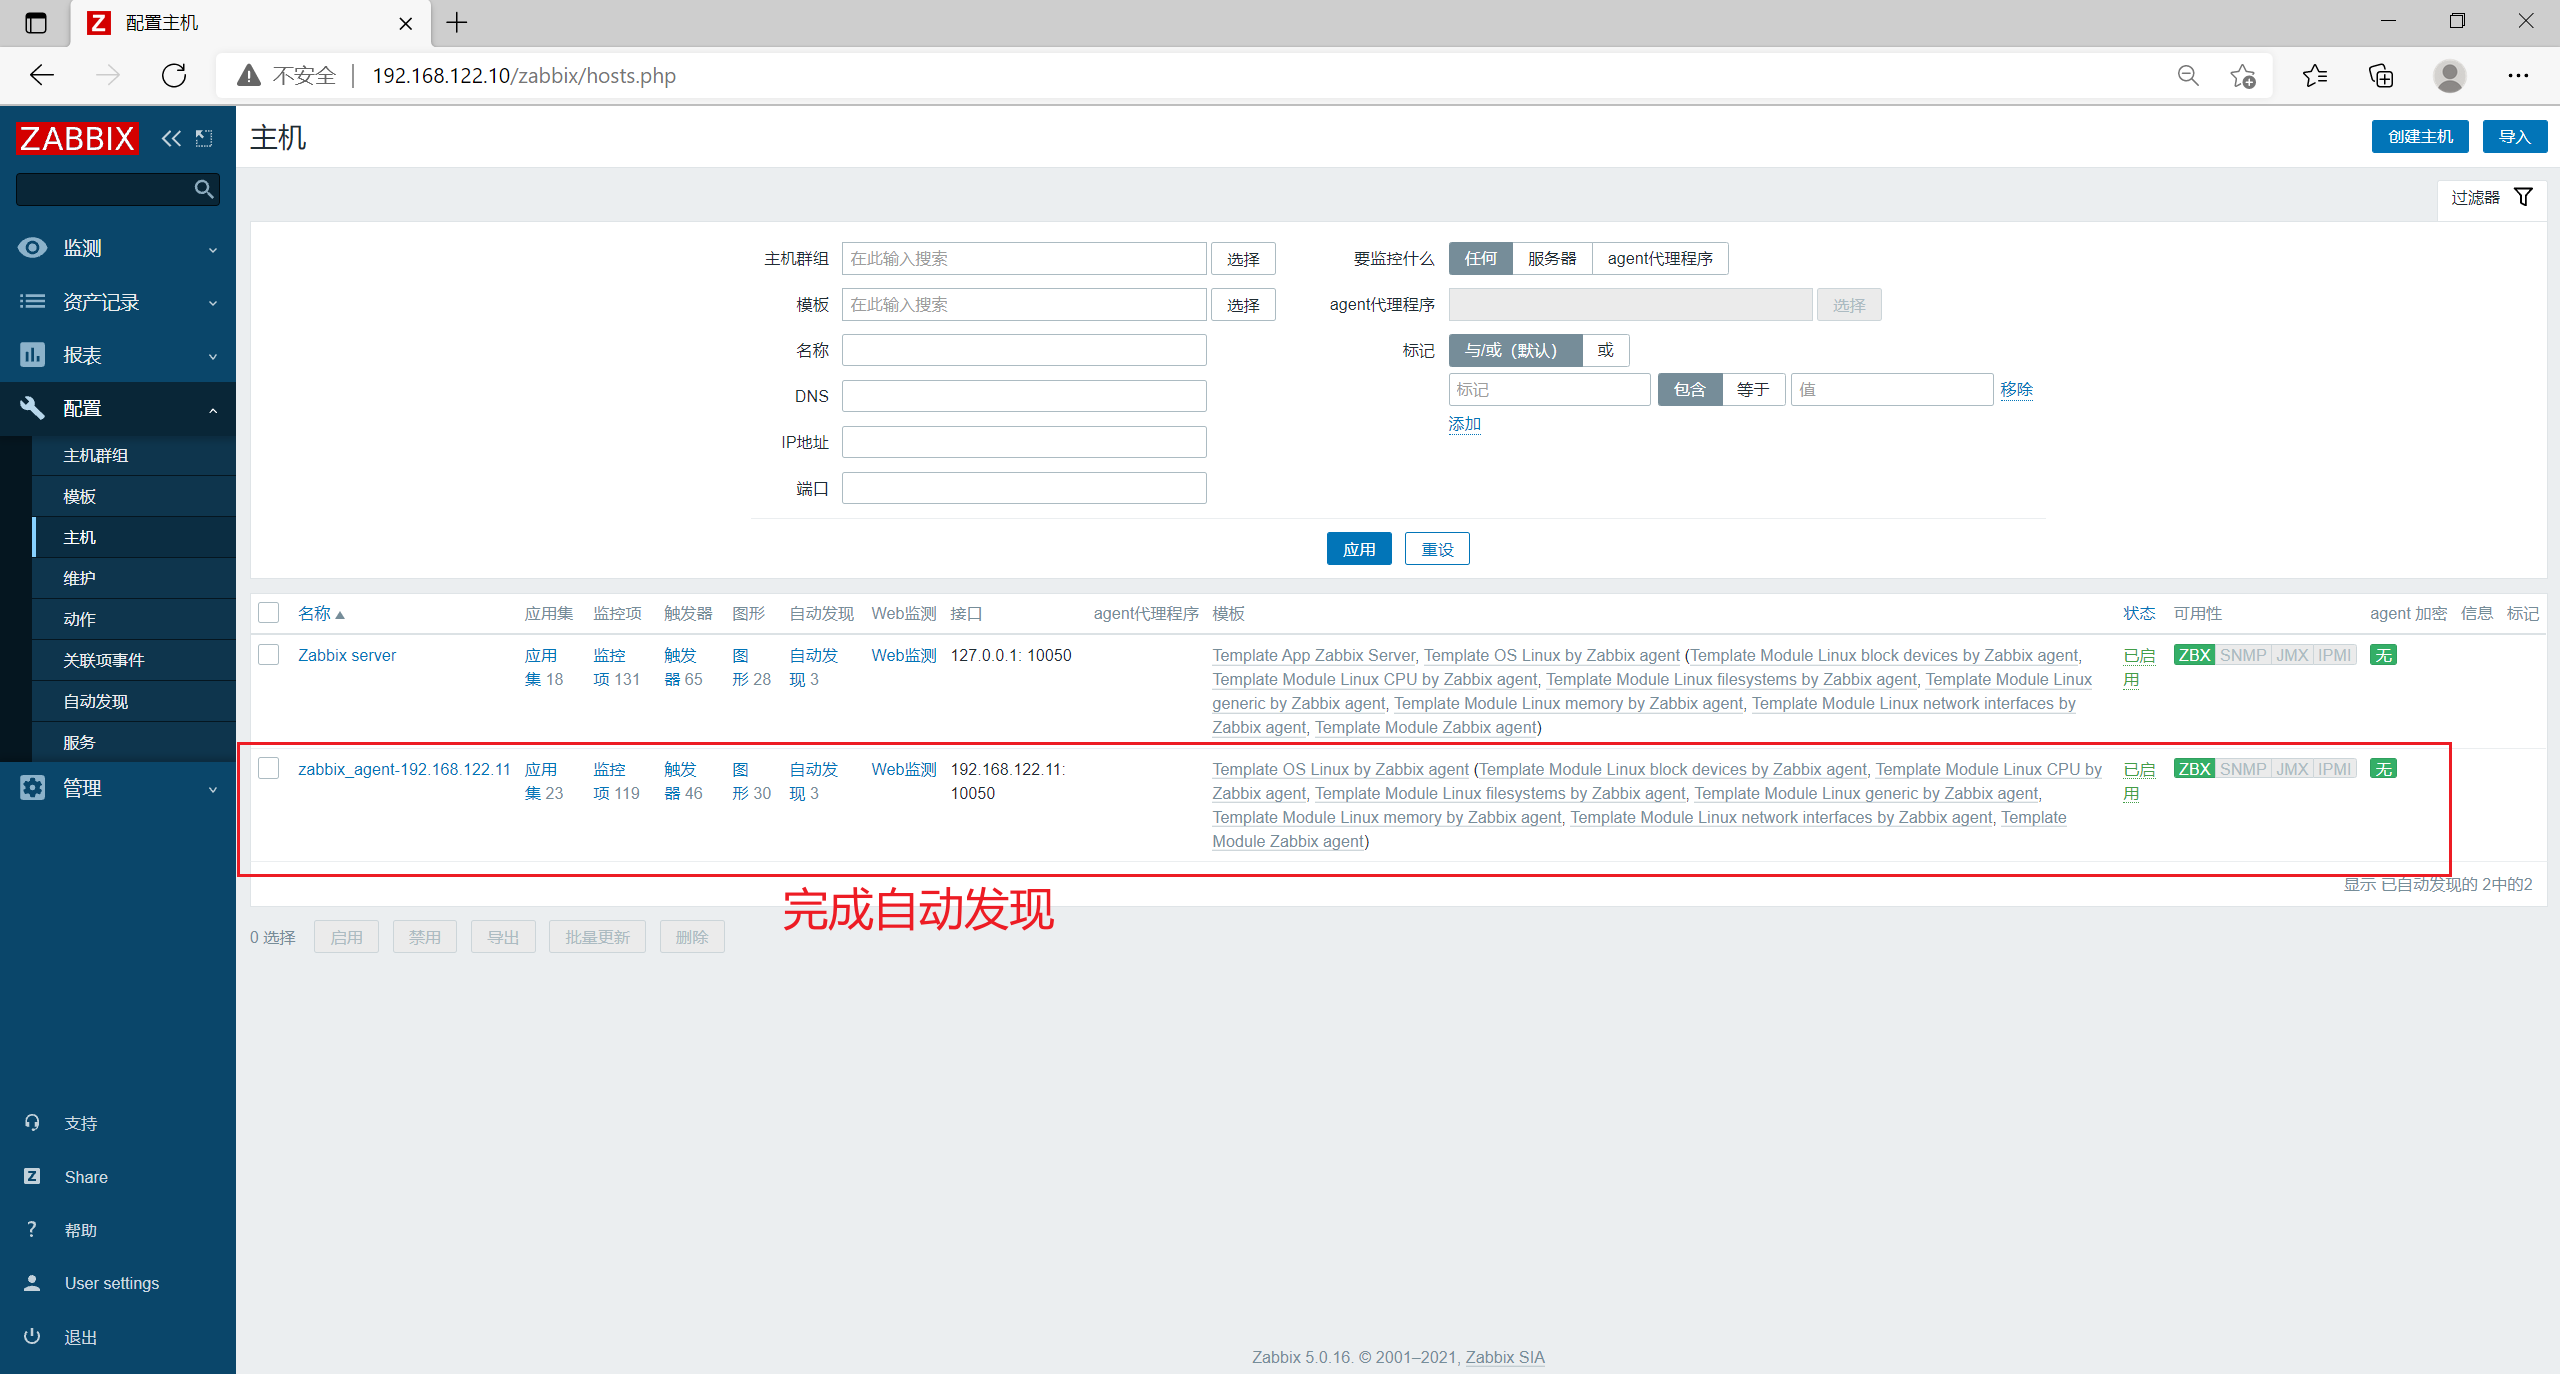
You can view the zabbix log on the server
[root@zabbix_server ~]# tail -f /var/log/zabbix/zabbix_server.log ······ 39773:20211005:020555.798 enabling Zabbix agent checks on host "zabbix_agent": host became available
2. zabbix automatic registration (active mode for agent2)
zabbix agent2 will actively report its own information and send it to zabbix server.
The disadvantage is that zabbix agent2 may not find the zabbix server due to incorrect configuration of the configuration file or network connection.
2.1 environmental preparation
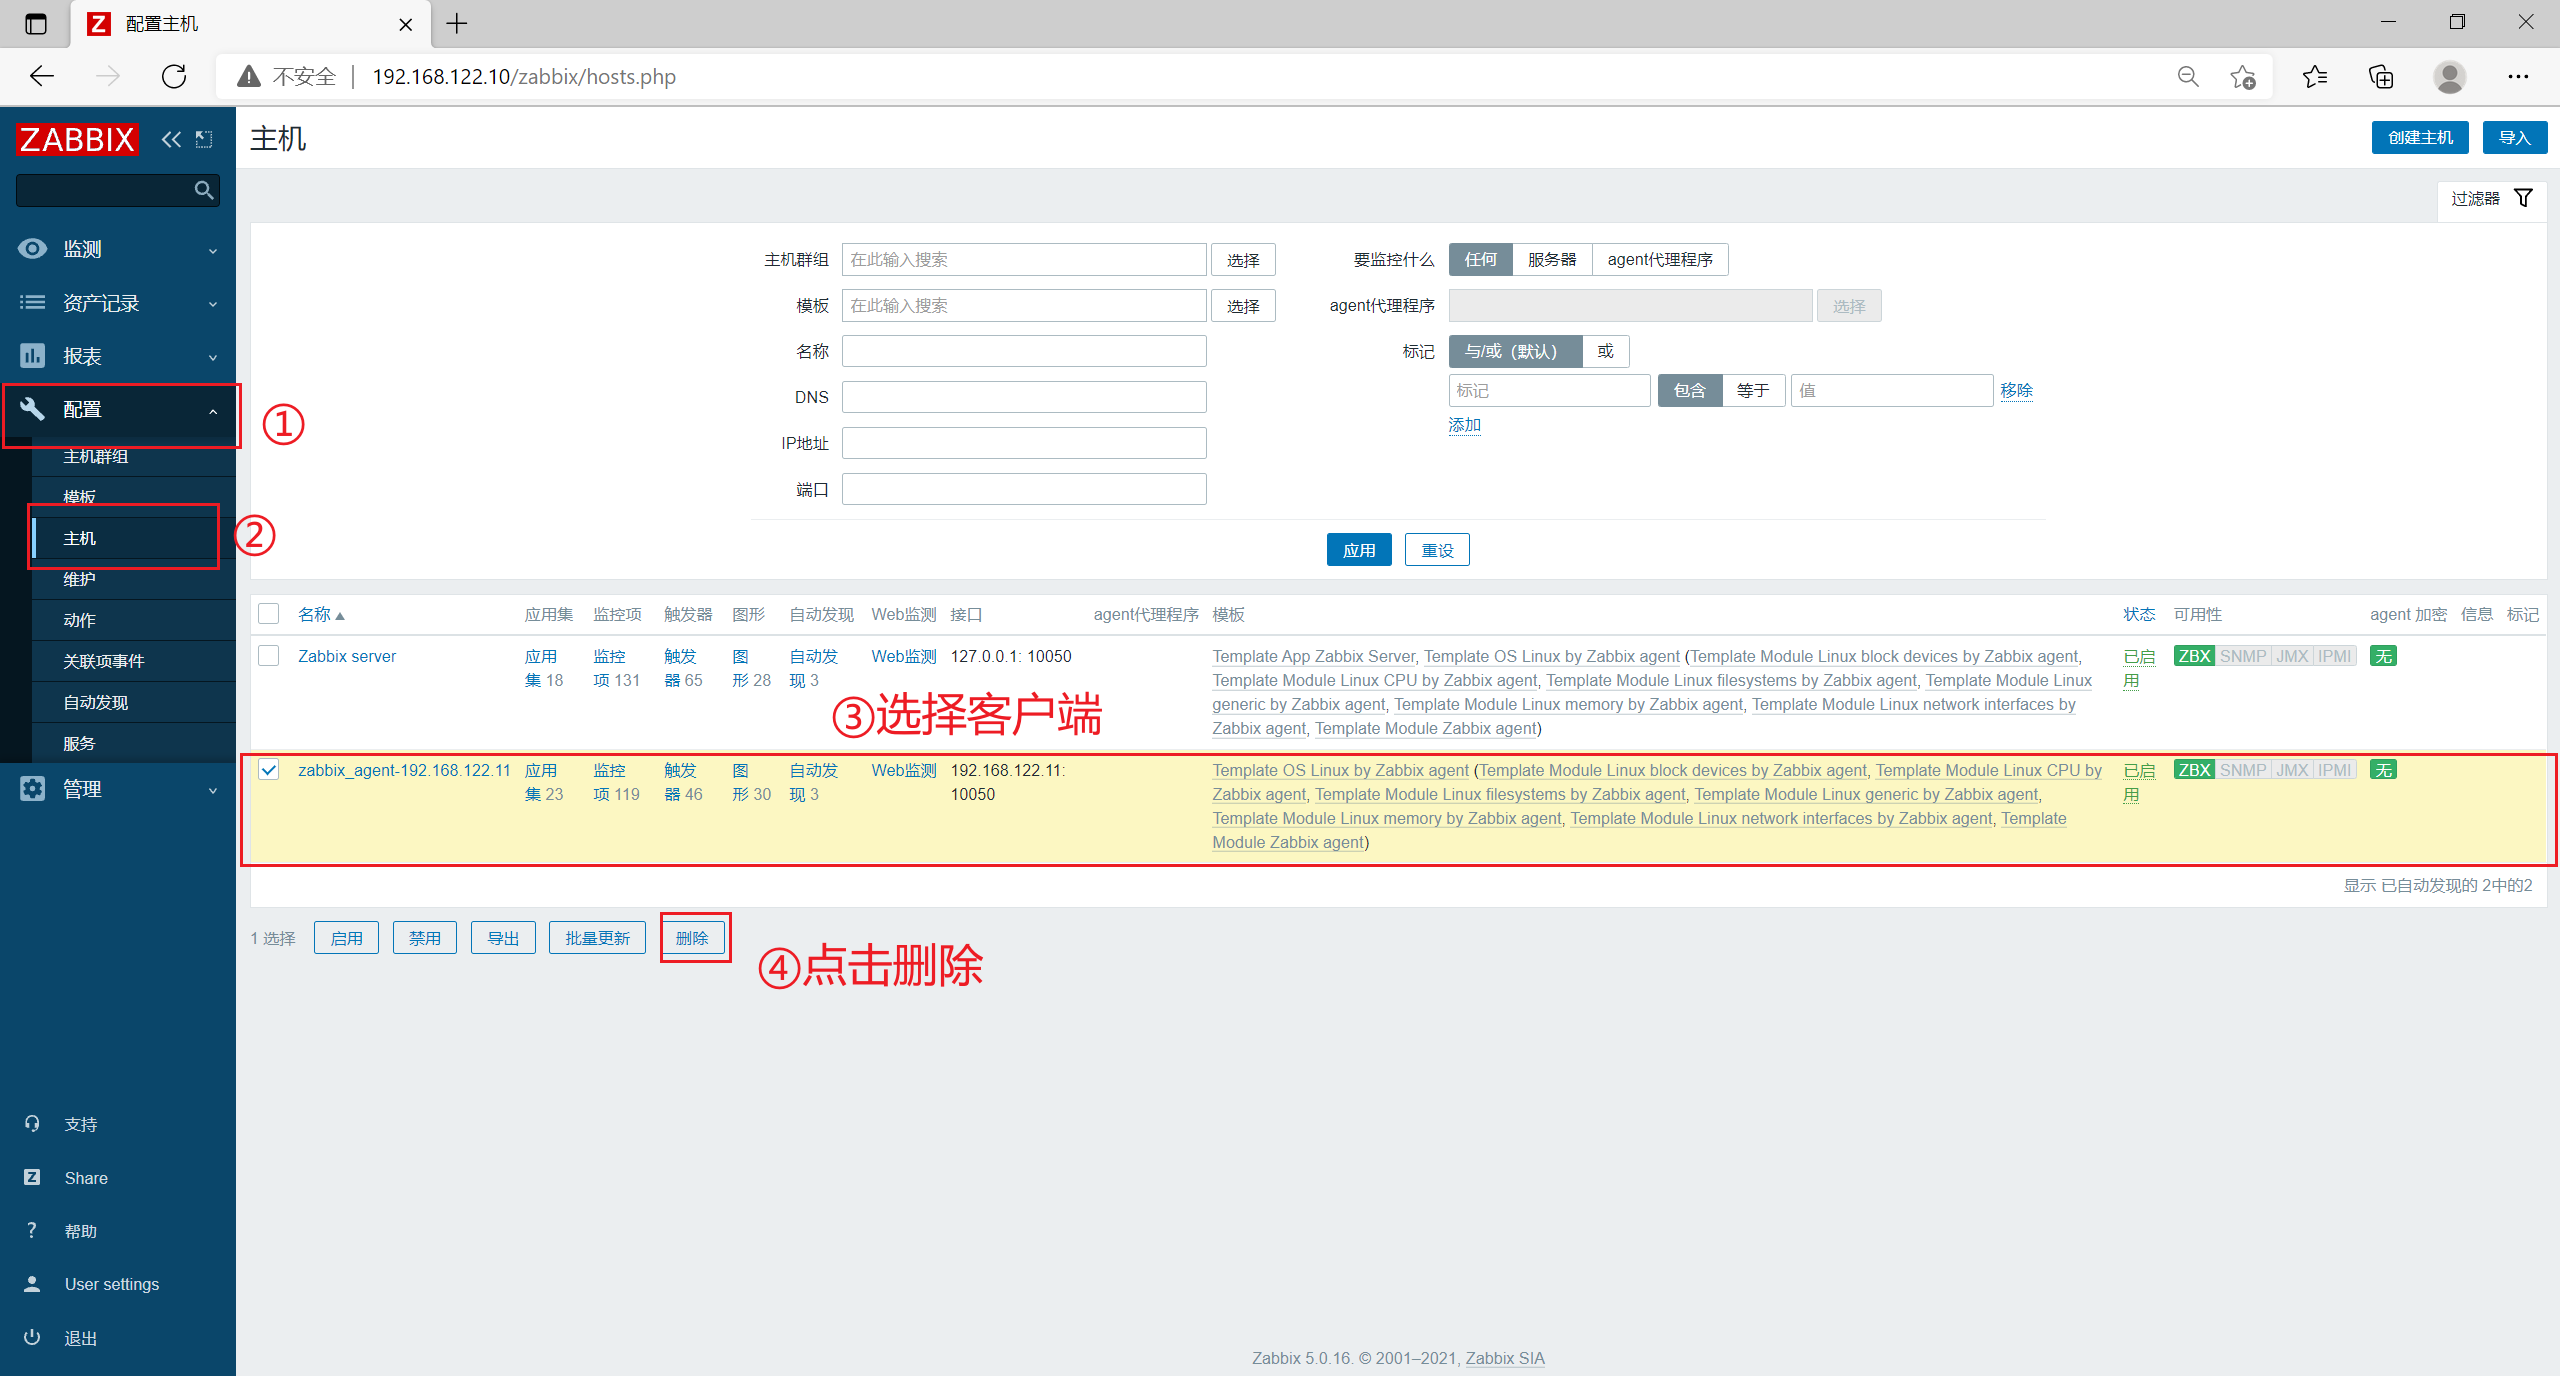
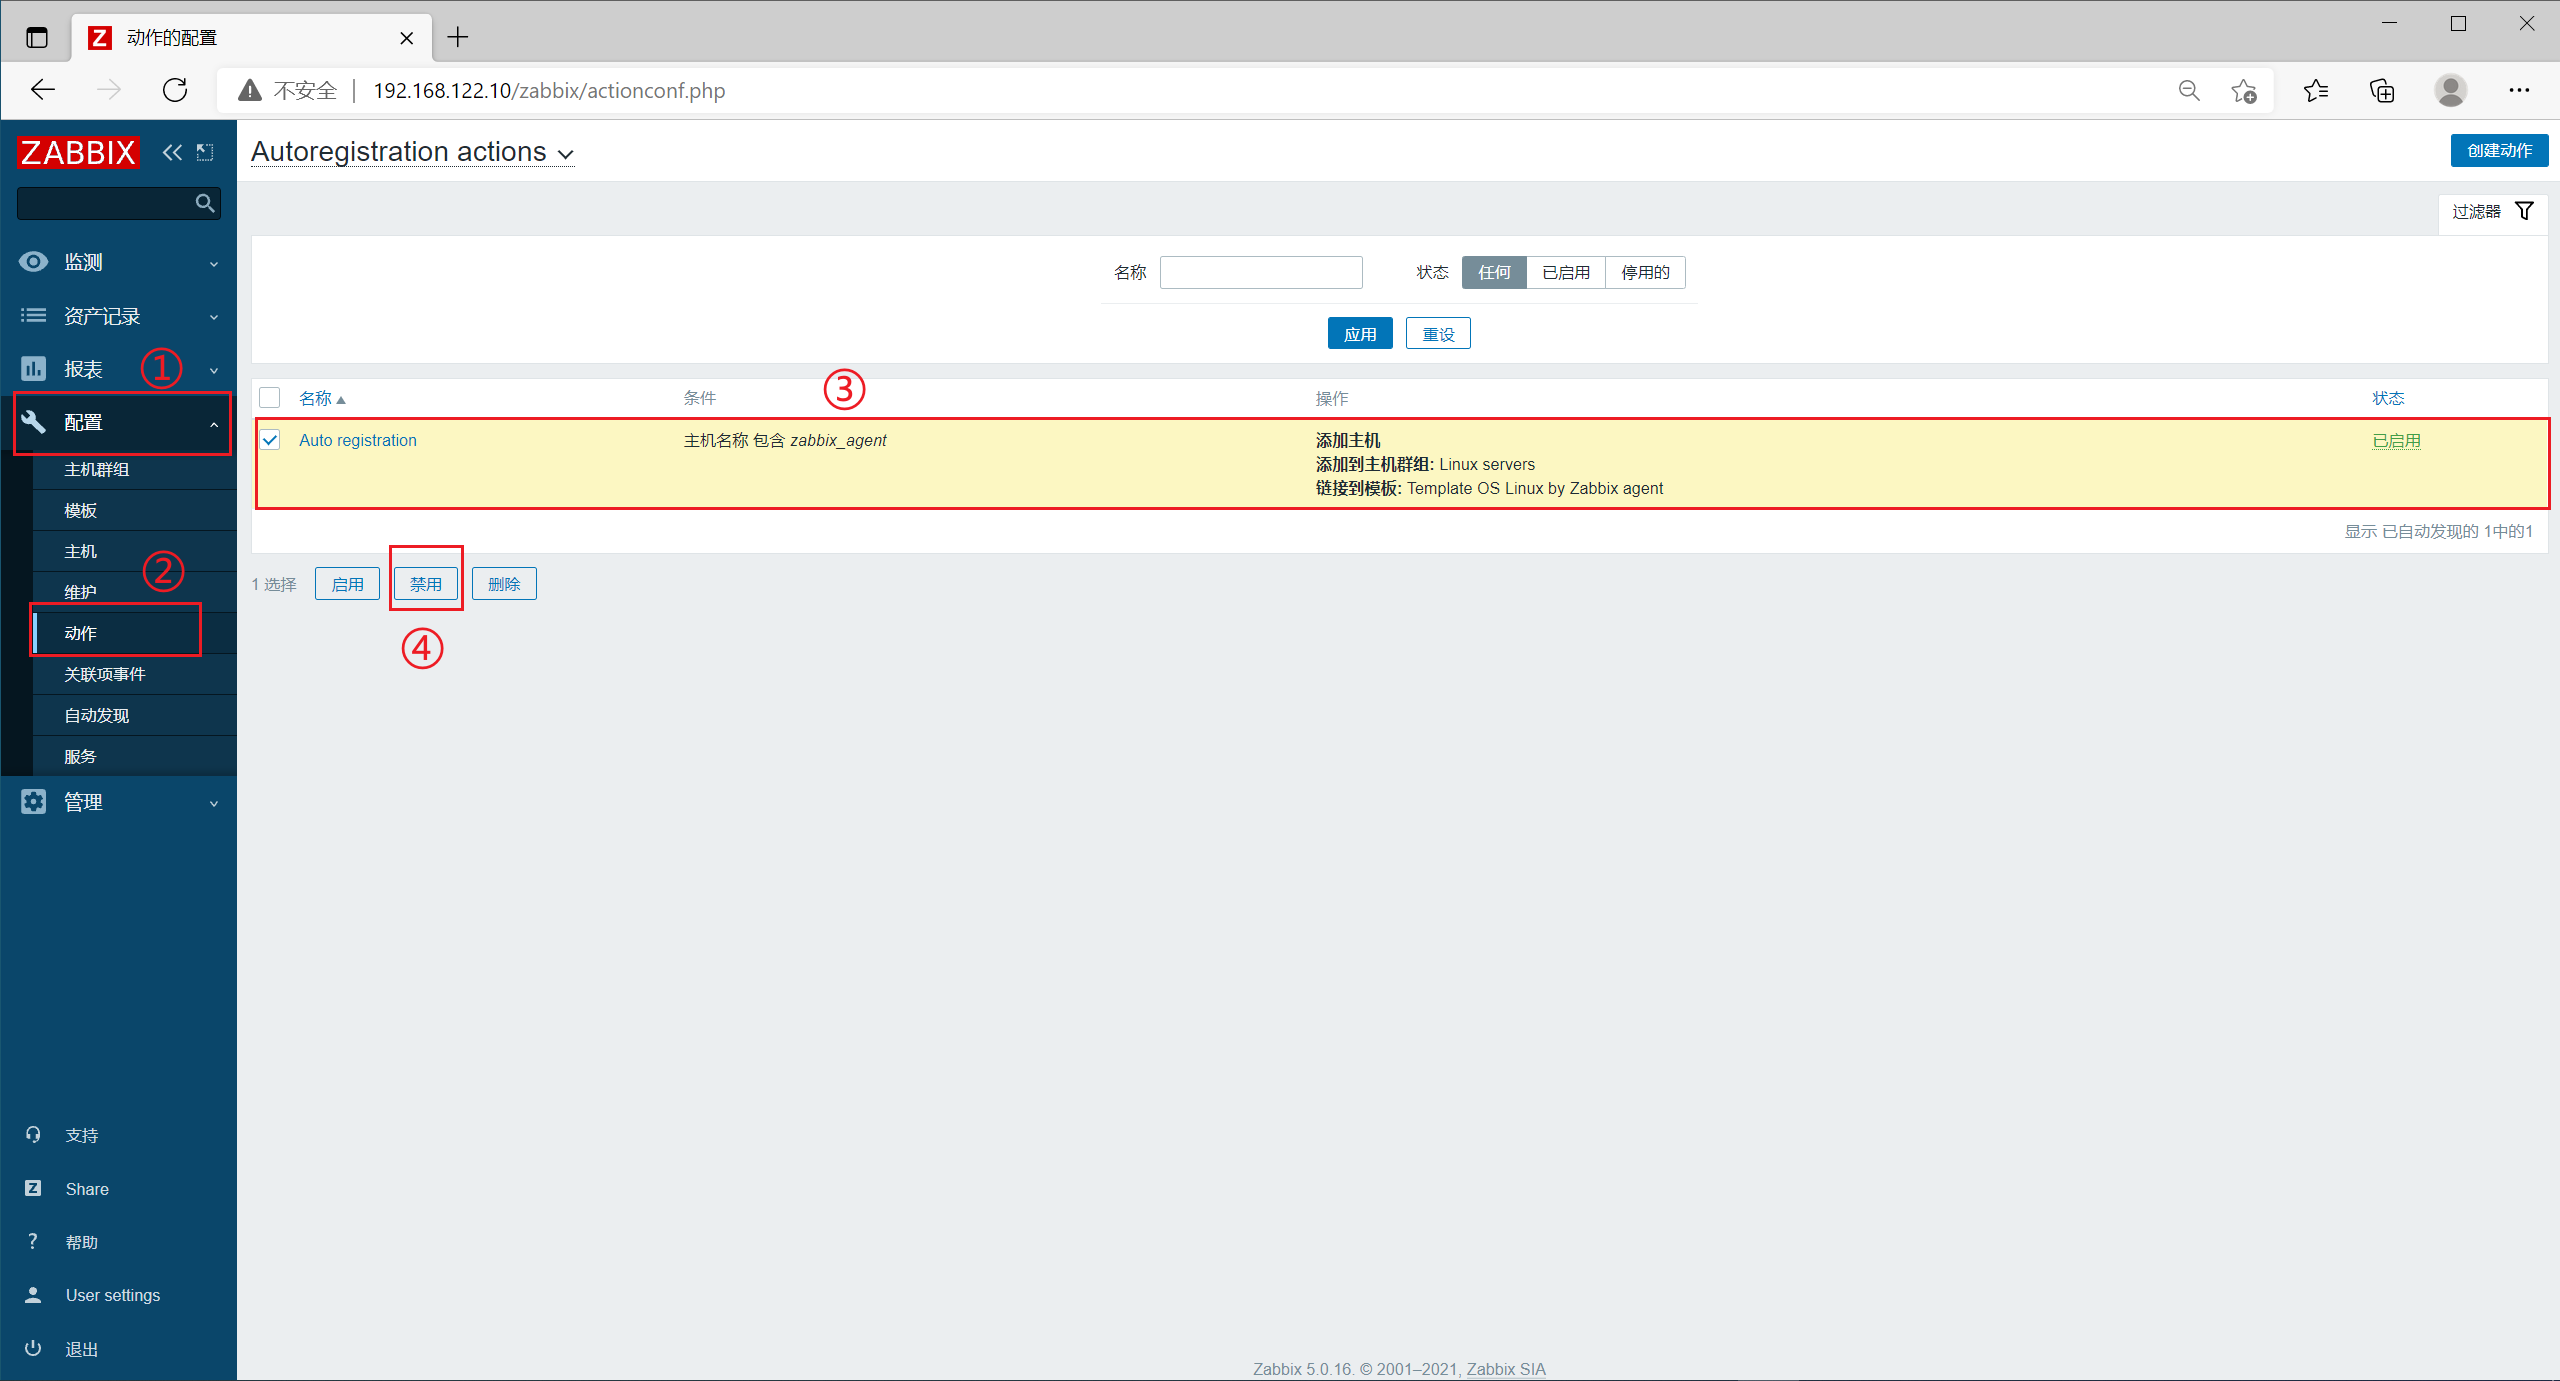
Click [auto discovery] in [configuration] in the left menu bar, check the discovery rule, and click disable

Click [host] in [configuration] in the left menu bar, check the original client host, and click delete
2.2 modifying the zabbix-agent2 configuration file
[root@zabbix_agent ~]# vim /etc/zabbix/zabbix_agent2.conf

##Line 139, uncomment
HostnameItem=system.hostname

[root@zabbix_agent ~]# egrep -v "^#|^$" /etc/zabbix/zabbix_agent2.conf
PidFile=/var/run/zabbix/zabbix_agent2.pid
LogFile=/var/log/zabbix/zabbix_agent2.log
LogFileSize=0
Server=192.168.122.10
ServerActive=192.168.122.10
Hostname=zabbix_agent
HostnameItem=system.hostname
Include=/etc/zabbix/zabbix_agent2.d/*.conf
ControlSocket=/tmp/agent.sock
2.3 configure automatic registration on the web page
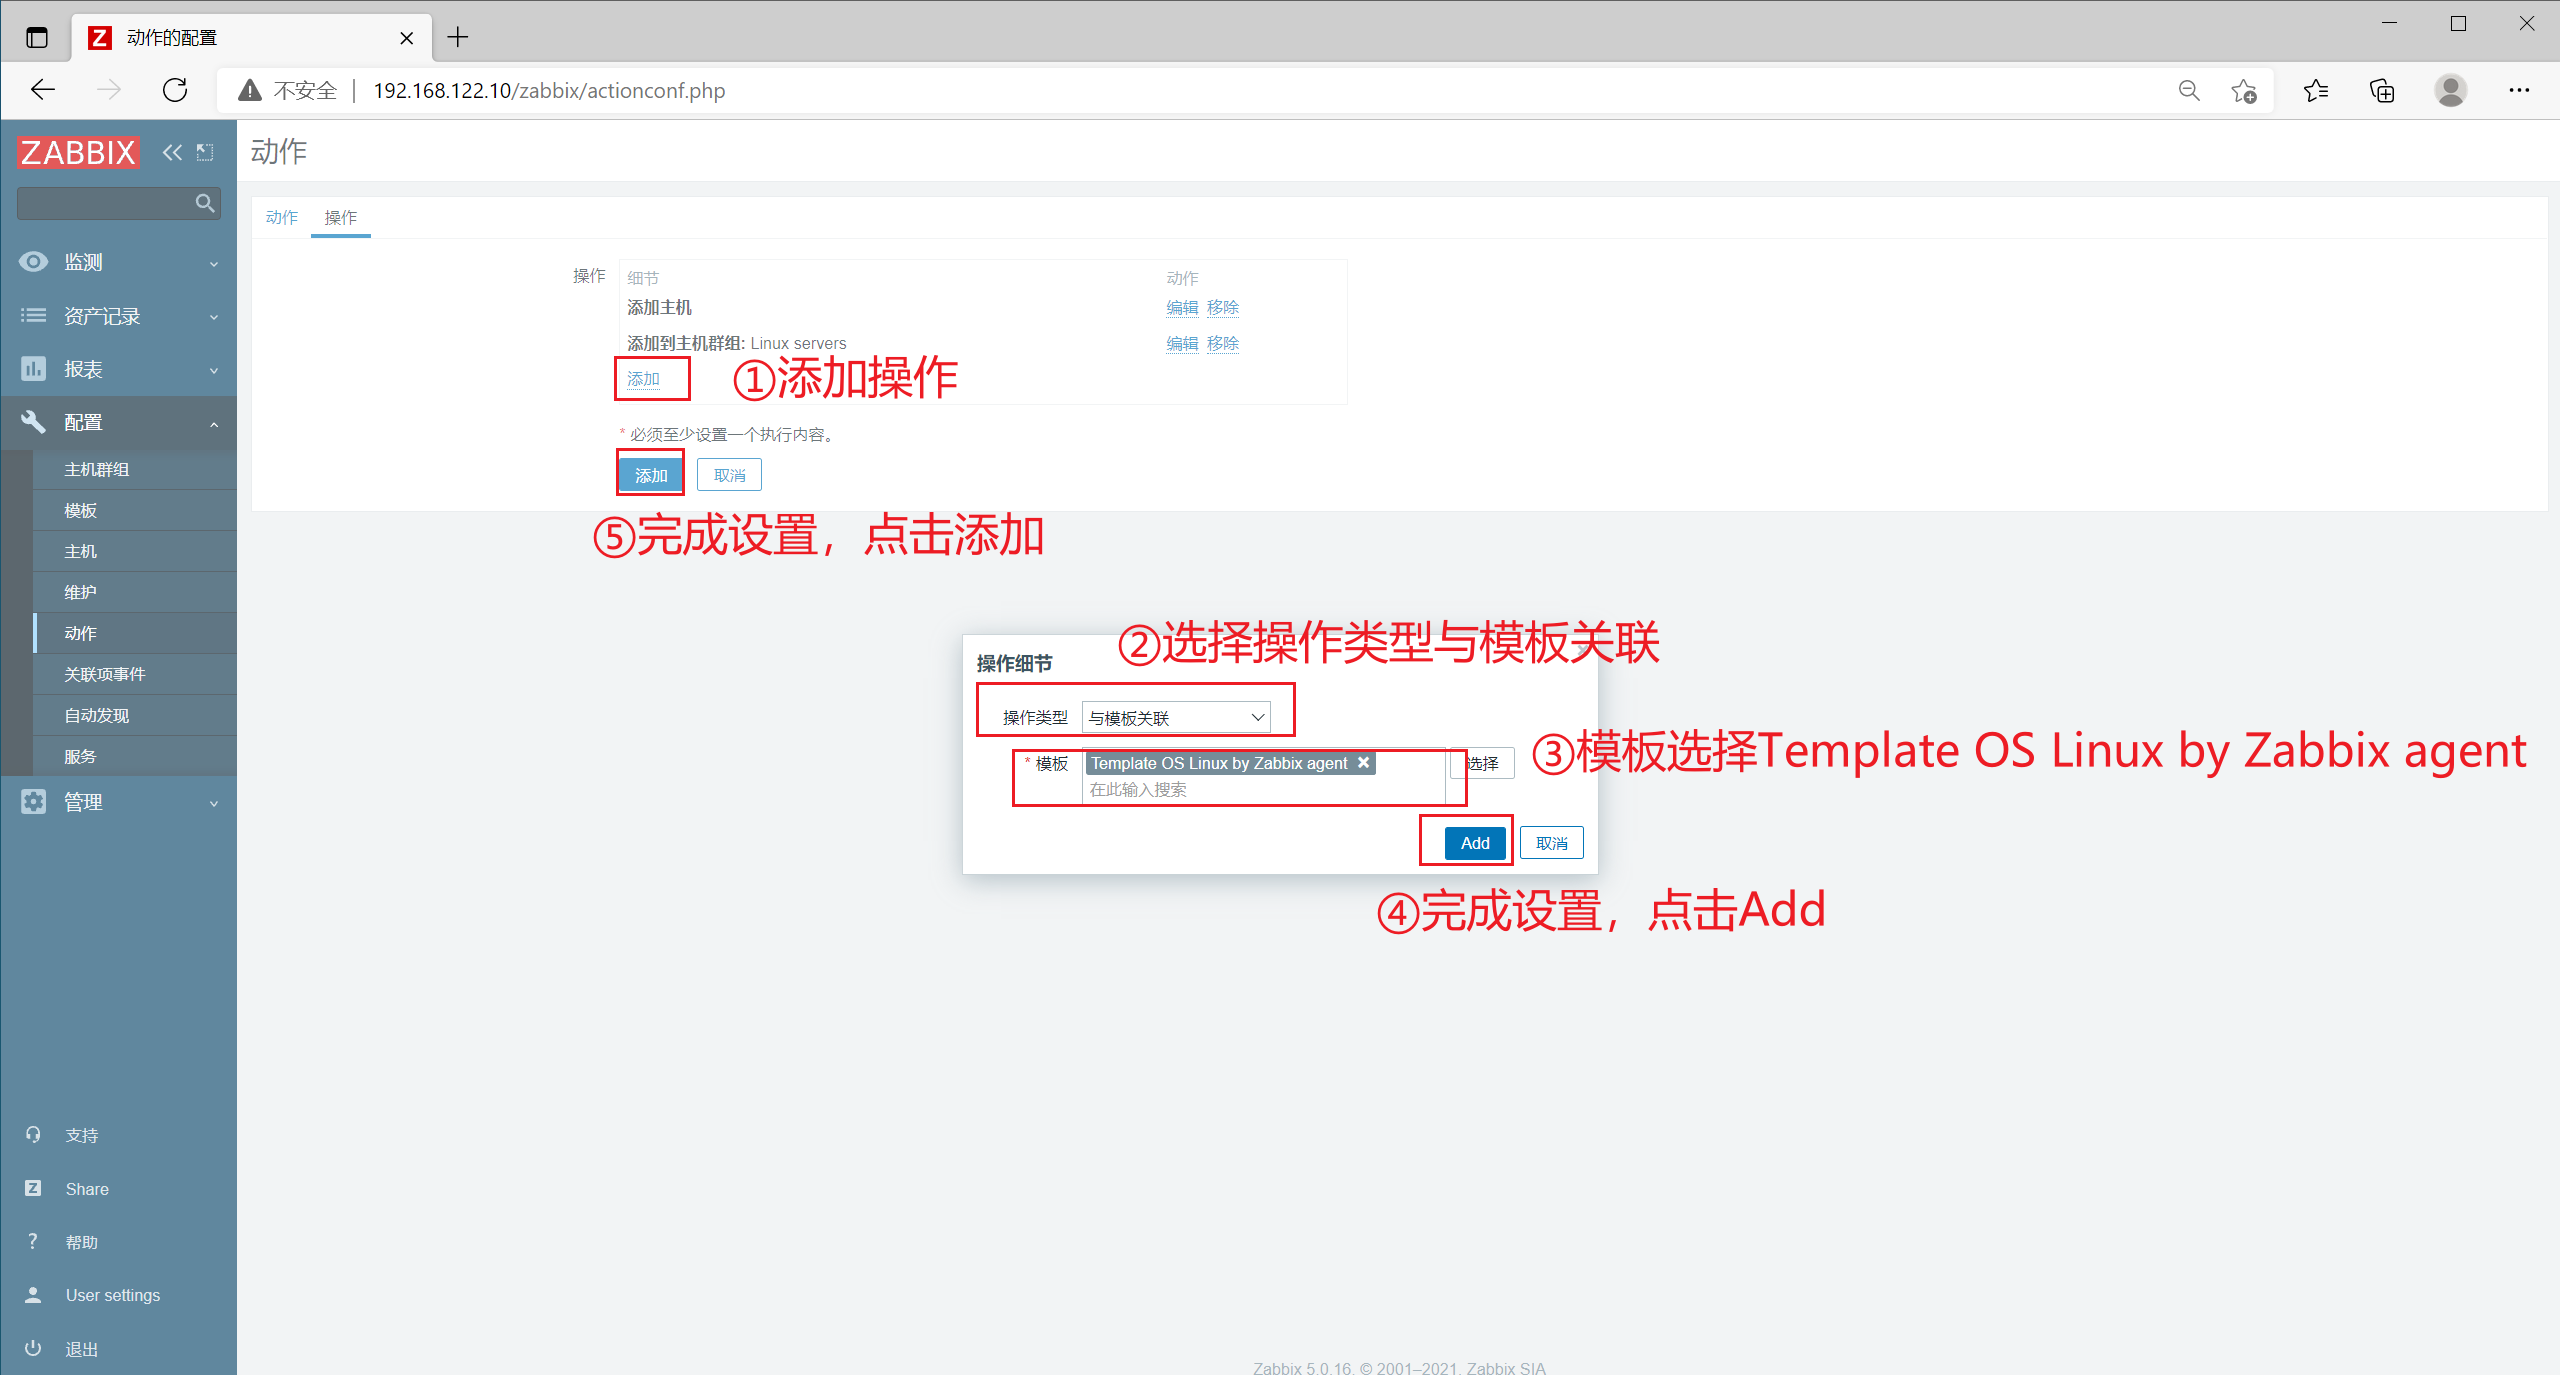
Click [action] in [configuration] in the left menu bar, select [Autoregistration actions] in the upper menu, and click [create action]
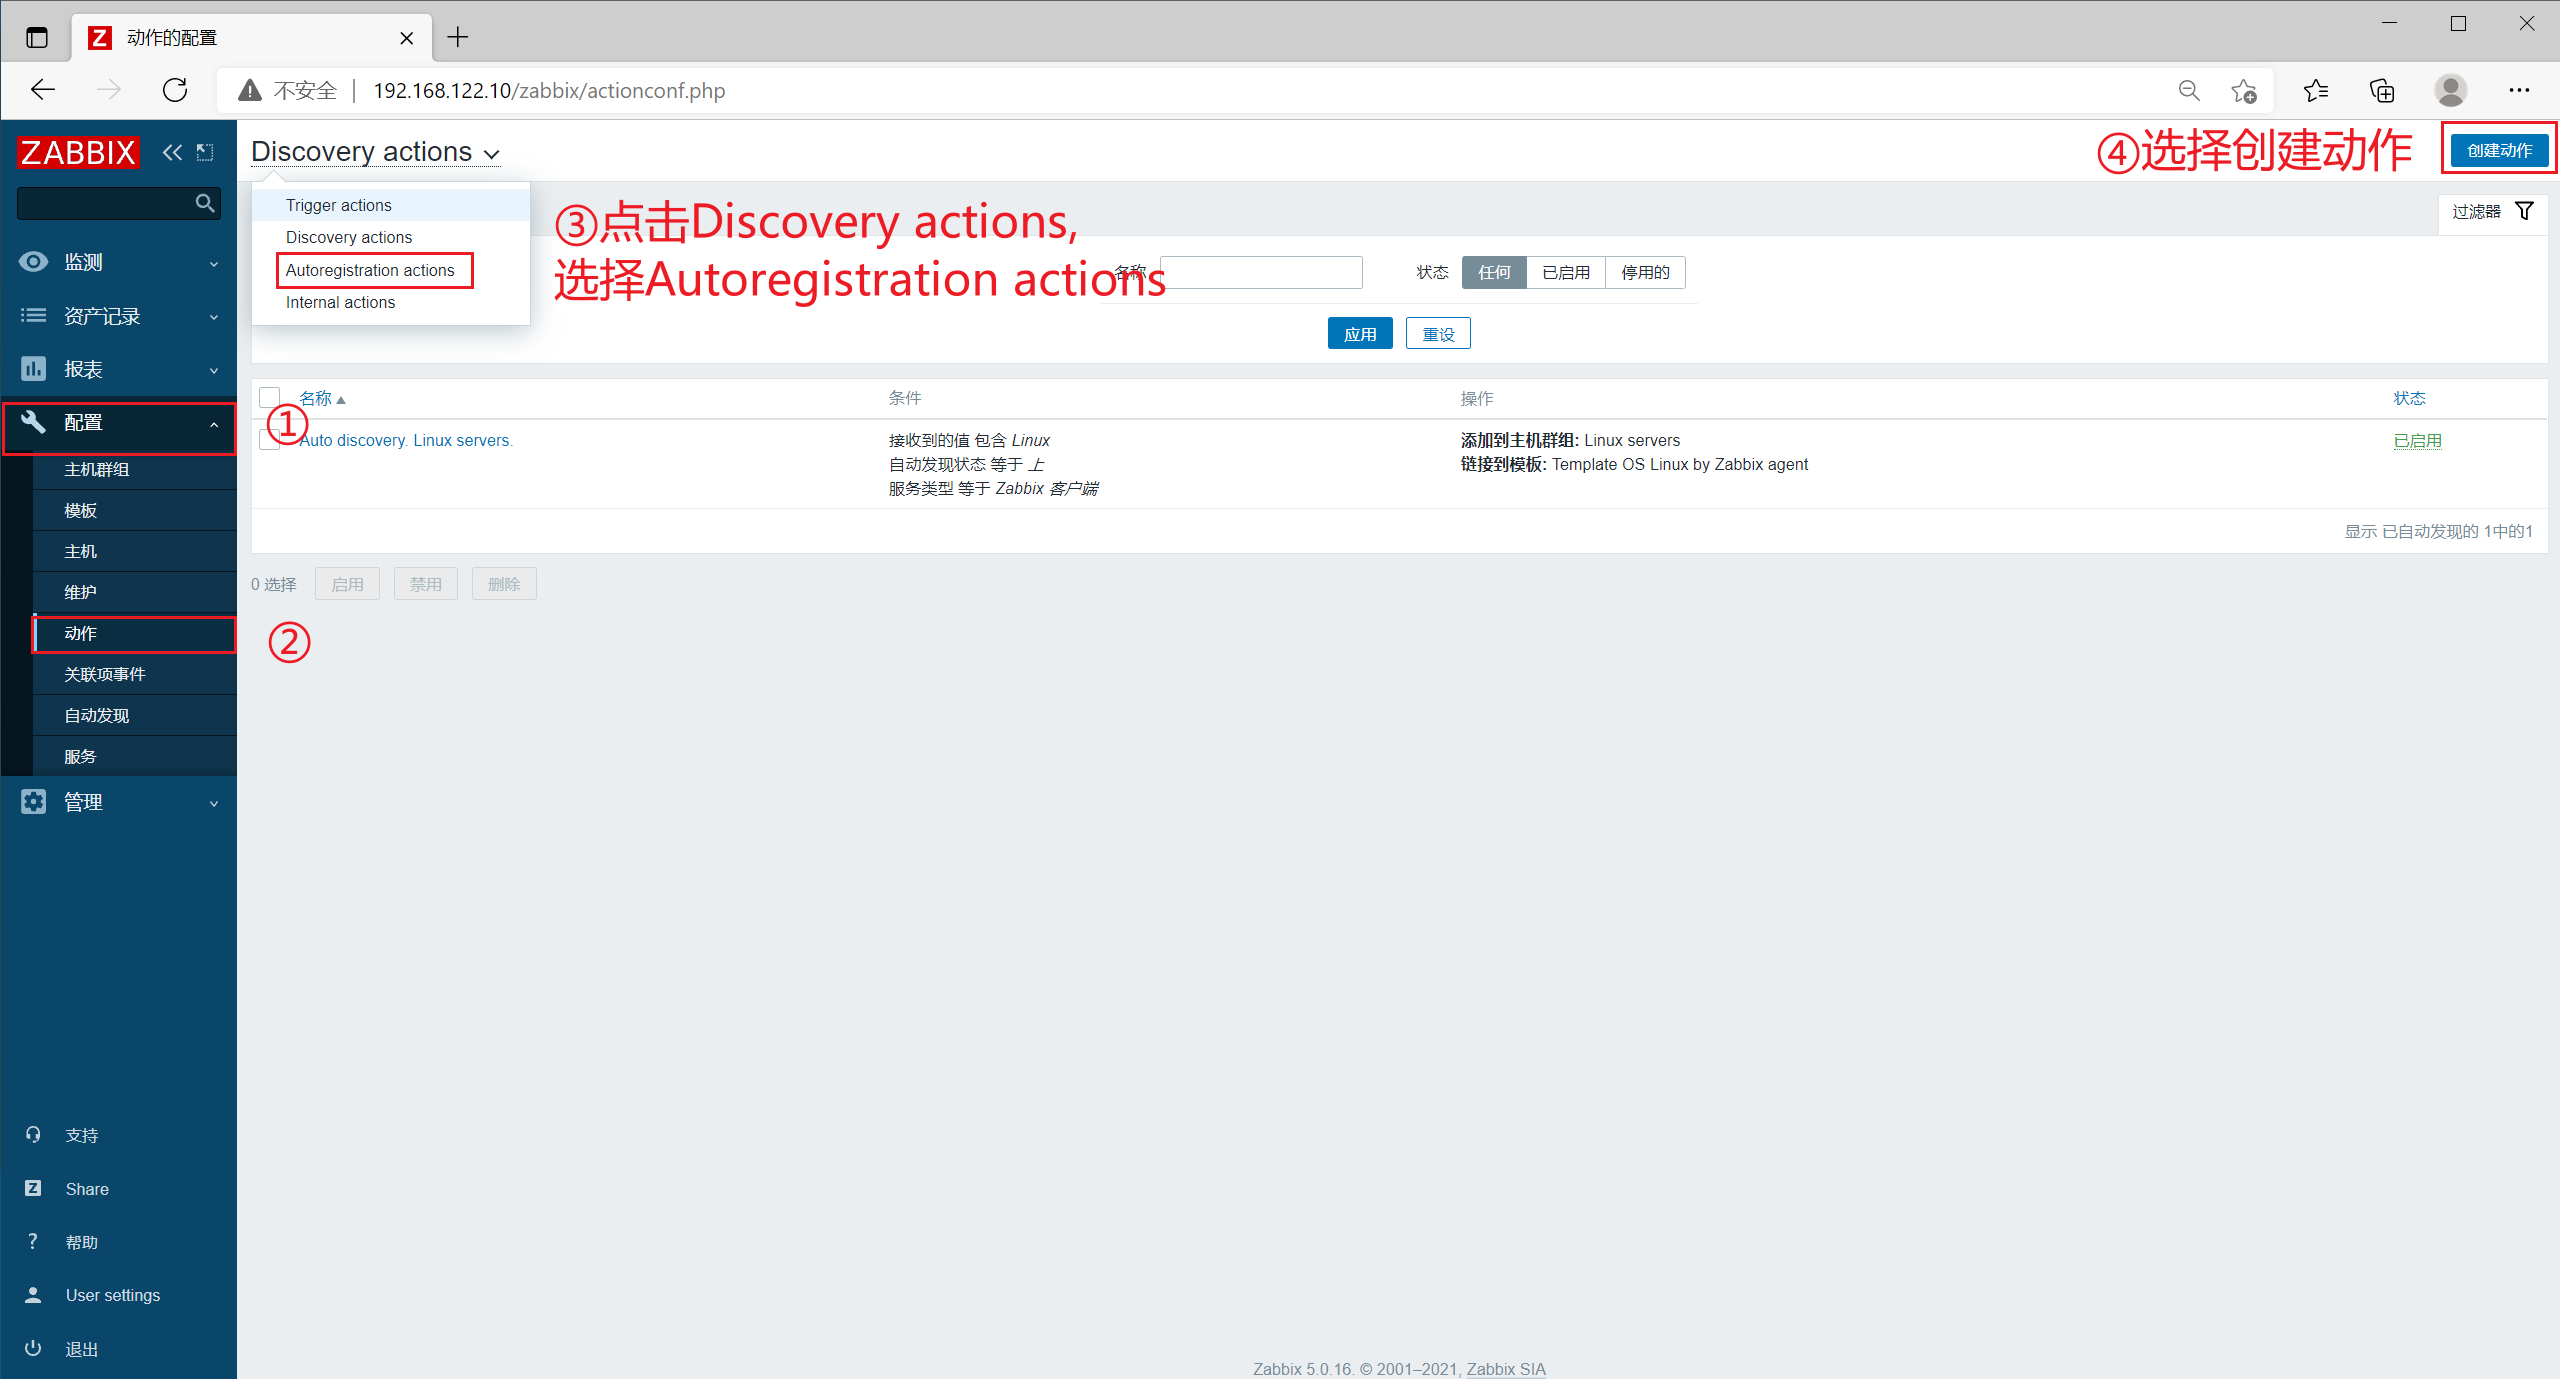
[name] is set to Auto registration
Click [add], select the host name in [type], select include in [operator], and set [value] to zabbix_agent, click [operation] in the upper menu bar

Click add, select Add host in operation type, and click Add

Then click add, select Add to host group in operation type, select Linux servers in host group, and click Add

Then click add, select associate with template in operation type, search Linux in template, select Template OS Linux by Zabbix agent, and click Add
Click [add] below
Click [host] in [configuration] on the left menu bar to refresh, and wait for a period of time to refresh the automatically discovered client host
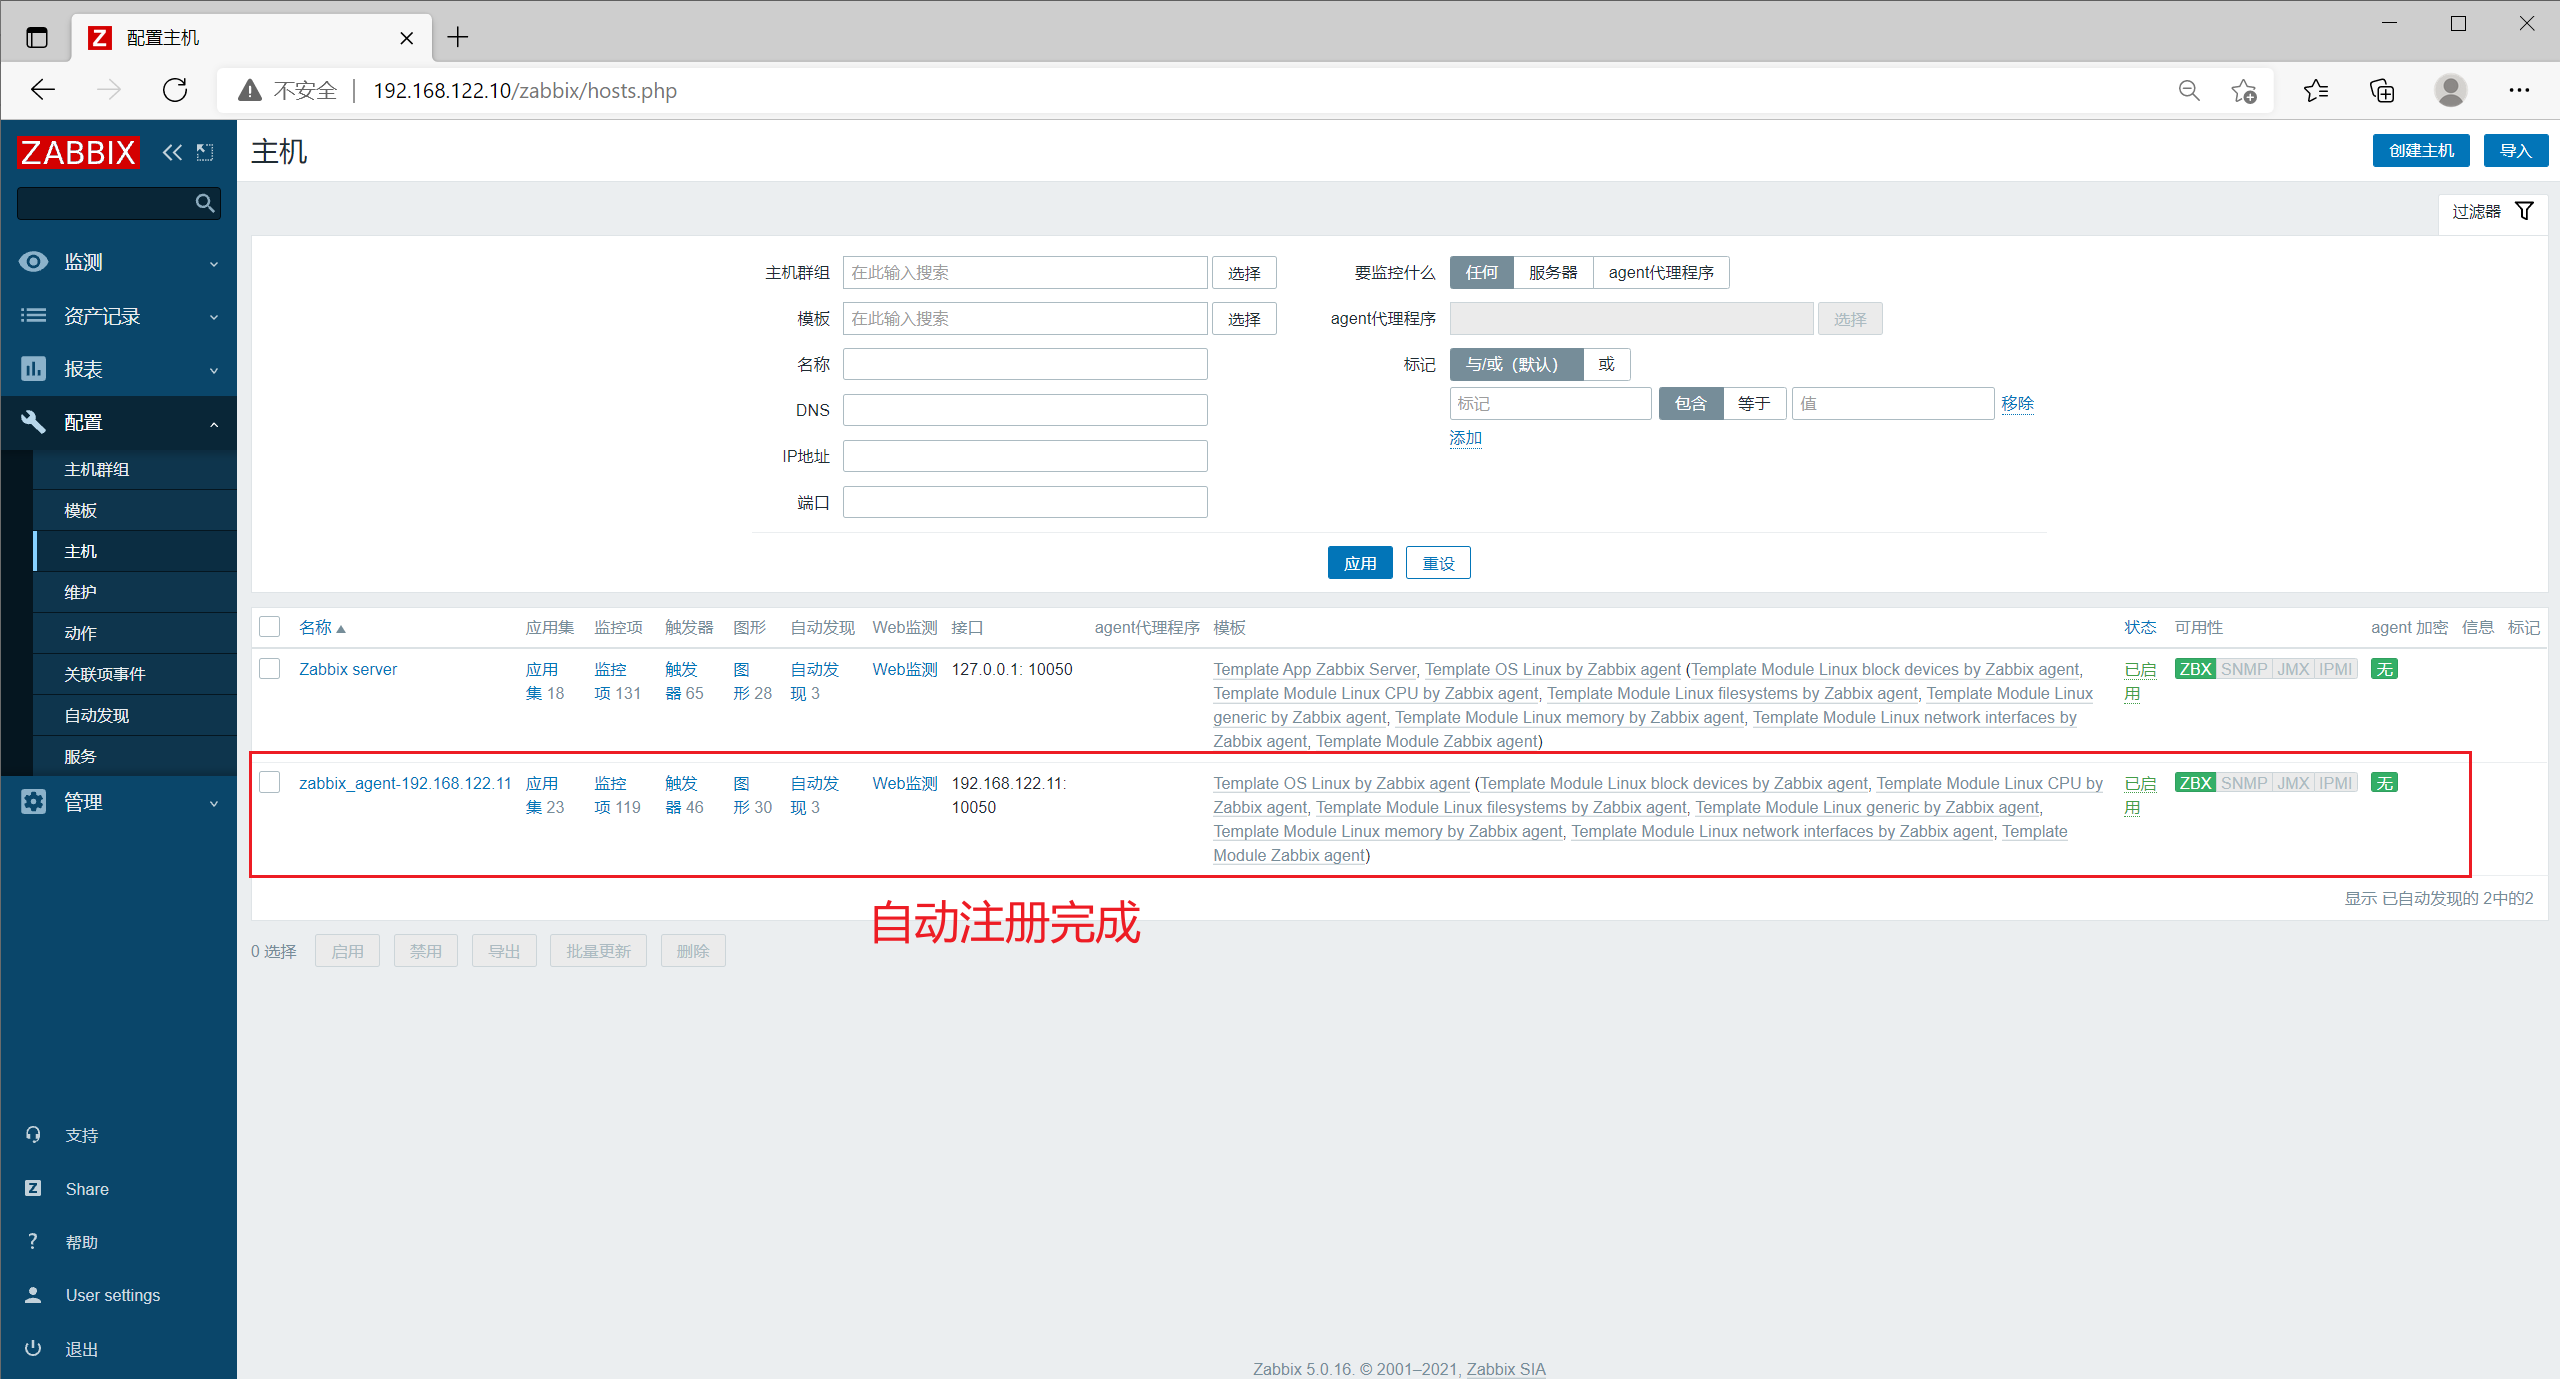
View the zabbix log on the server
[root@zabbix_server ~]# tail -f /var/log/zabbix/zabbix_server.log ······ 39771:20211005:025704.572 enabling Zabbix agent checks on host "zabbix_agent": host became available
5, Deploy zabbix proxy server
1. Role of distributed monitoring

● centralized pressure sharing
● solve the problem of network delay between multiple machine rooms
2. Data transmission process
agent --> proxy --> server
3. Server configuration
| The server | to configure | ip address | host name | Main software |
|---|---|---|---|---|
| zabbix-server | At least 2G memory, 4G recommended | 192.168.122.10 | zabbix_server | zabbix-server-mysql,zabbix-agent |
| zabbix-agent | - | 192.168.122.11 | zabbix_agent | zabbix-agent2 |
| zabbix-proxy | - | 192.168.122.12 | zabbix_proxy | zabbix-proxy |
4. Server environment
[root@localhost ~]# hostnamectl set-hostname zabbix_proxy
[root@localhost ~]# su
[root@zabbix_proxy ~]# systemctl disable --now firewalld
[root@zabbix_proxy ~]# setenforce 0
setenforce: SELinux is disabled
5. Set zabbix download source and install zabbix proxy
[root@zabbix_proxy ~]# rpm -ivh https://mirrors.aliyun.com/zabbix/zabbix/5.0/rhel/7/x86_64/zabbix-release-5.0-1.el7.noarch.rpm
[root@zabbix_proxy ~]# sed -i 's#http://repo.zabbix.com#https://mirrors.aliyun.com/zabbix#' /etc/yum.repos.d/zabbix.repo
[root@zabbix_proxy ~]# yum install -y zabbix-proxy-mysql zabbix-get
6. Install the database required by zabbix
[root@zabbix_proxy ~]# yum install -y mariadb-server mariadb
[root@zabbix_proxy ~]# systemctl enable --now mariadb.service
Created symlink from /etc/systemd/system/multi-user.target.wants/mariadb.service to /usr/lib/systemd/system/mariadb.service.
7. Initialize the database
[root@zabbix_proxy ~]# mysql_secure_installation

Enter current password for root (enter for none):
#Log in with the current password of root and press enter
Set root password? [Y/n] y
#Set root password, y
New password:
#Set password
Re-enter new password:
#Enter the password again
Remove anonymous users? [Y/n] y
#Remove anonymous user, y
Disallow root login remotely? [Y/n] y
#Disable root remote login, y
Remove test database and access to it? [Y/n] y
#Remove test database, y
Reload privilege tables now? [Y/n] y
#Reload permission table, y
8. Add database users and database information required by zabbix
[root@zabbix_proxy ~]# mysql -u root -p
Enter password:

MariaDB [(none)]> create database zabbix_proxy character set utf8 collate utf8_bin;
Query OK, 1 row affected (0.00 sec)

MariaDB [(none)]> grant all on zabbix_proxy.* to 'zabbix'@'%' identified by 'zabbix';
Query OK, 0 rows affected (0.00 sec)

MariaDB [(none)]> flush privileges;
Query OK, 0 rows affected (0.00 sec)

MariaDB [(none)]> show databases;
+--------------------+
| Database           |
+--------------------+
| information_schema |
| mysql              |
| performance_schema |
| zabbix_proxy       |
+--------------------+
4 rows in set (0.00 sec)

MariaDB [(none)]> use zabbix_proxy;
Database changed
MariaDB [zabbix_proxy]> show tables;
Empty set (0.00 sec)
9. Import database information
[root@zabbix_proxy ~]# rpm -ql zabbix-proxy-mysql
/etc/logrotate.d/zabbix-proxy
/etc/zabbix/zabbix_proxy.conf
/usr/lib/systemd/system/zabbix-proxy.service
/usr/lib/tmpfiles.d/zabbix-proxy.conf
/usr/lib/zabbix/externalscripts
/usr/sbin/zabbix_proxy_mysql
/usr/share/doc/zabbix-proxy-mysql-5.0.16
/usr/share/doc/zabbix-proxy-mysql-5.0.16/AUTHORS
/usr/share/doc/zabbix-proxy-mysql-5.0.16/COPYING
/usr/share/doc/zabbix-proxy-mysql-5.0.16/ChangeLog
/usr/share/doc/zabbix-proxy-mysql-5.0.16/NEWS
/usr/share/doc/zabbix-proxy-mysql-5.0.16/README
/usr/share/doc/zabbix-proxy-mysql-5.0.16/schema.sql.gz
/usr/share/man/man8/zabbix_proxy.8.gz
/var/log/zabbix
/var/run/zabbix
[root@zabbix_proxy ~]# zcat /usr/share/doc/zabbix-proxy-mysql-5.0.16/schema.sql.gz | mysql -uroot -p123456 zabbix_proxy
[root@zabbix_proxy ~]# mysql -u root -p
Enter password:

MariaDB [(none)]> use zabbix_proxy;
Database changed
MariaDB [zabbix_proxy]> show tables;
+----------------------------+
| Tables_in_zabbix_proxy     |
+----------------------------+
| acknowledges               |
|       ......               |
| widget_field               |
+----------------------------+
166 rows in set (0.00 sec)
10. Modify ZABBIX proxy configuration file
[root@zabbix_proxy ~]# vim /etc/zabbix/zabbix_proxy.conf

##Line 30, specify the IP address of the zabbix server
Server=192.168.122.10
##Line 49, specifying the host name of the current zabbix proxy server
Hostname=zabbix_proxy
##196 line, uncomment and specify the password of the current database zabbix user
DBPassword=zabbix
11. Start ZABBIX proxy
[root@zabbix_proxy ~]# systemctl enable --now zabbix-proxy.service
Created symlink from /etc/systemd/system/multi-user.target.wants/zabbix-proxy.service to /usr/lib/systemd/system/zabbix-proxy.service.
12. Configure hosts resolution on all hosts
zabbix_server
[root@zabbix_server ~]# echo '192.168.122.12 zabbix_proxy' >> /etc/hosts
zabbix_agent
[root@zabbix_agent ~]# echo '192.168.122.12 zabbix_proxy' >> /etc/hosts
zabbix_proxy
[root@zabbix_proxy ~]# echo '192.168.122.10 zabbix_server' >> /etc/hosts
[root@zabbix_proxy ~]# echo '192.168.122.11 zabbix_agent' >> /etc/hosts
[root@zabbix_proxy ~]# echo '192.168.122.12 zabbix_proxy' >> /etc/hosts
13. Configure the proxy on the web page
Click [action] in [configuration] in the left menu bar, check the automatic registration rule, and click disable
Click [host] in [configuration] in the left menu bar, check the original client host, and click delete

Click agent in management on the left menu bar and click Create agent

Set [agent agent name] to ZABBIX proxy
[system agent mode] select active
[agent address] is set to 192.168.122.12
Click [add]

14. Configure agent to use proxy
14.1 modify agent2 configuration file on the client
[root@zabbix_agent ~]# vim /etc/zabbix/zabbix_agent2.conf

##Line 80, specify the IP address of the zabbix proxy server
Server=192.168.122.12
##Line 120, specify the IP address of the zabbix proxy server
ServerActive=192.168.122.12
14.2 configuration on web page
Click [host] in [configuration] in the left menu bar, and click [create host]

Set [host name] to ZABBIX agent
[visible name] is set to zabbix-agent-192.168.122.11
[group] Select Linux servers
[IP address] of [Interfaces] is set to 192.168.122.11
[monitored by agent agent] select ZABBIX proxy
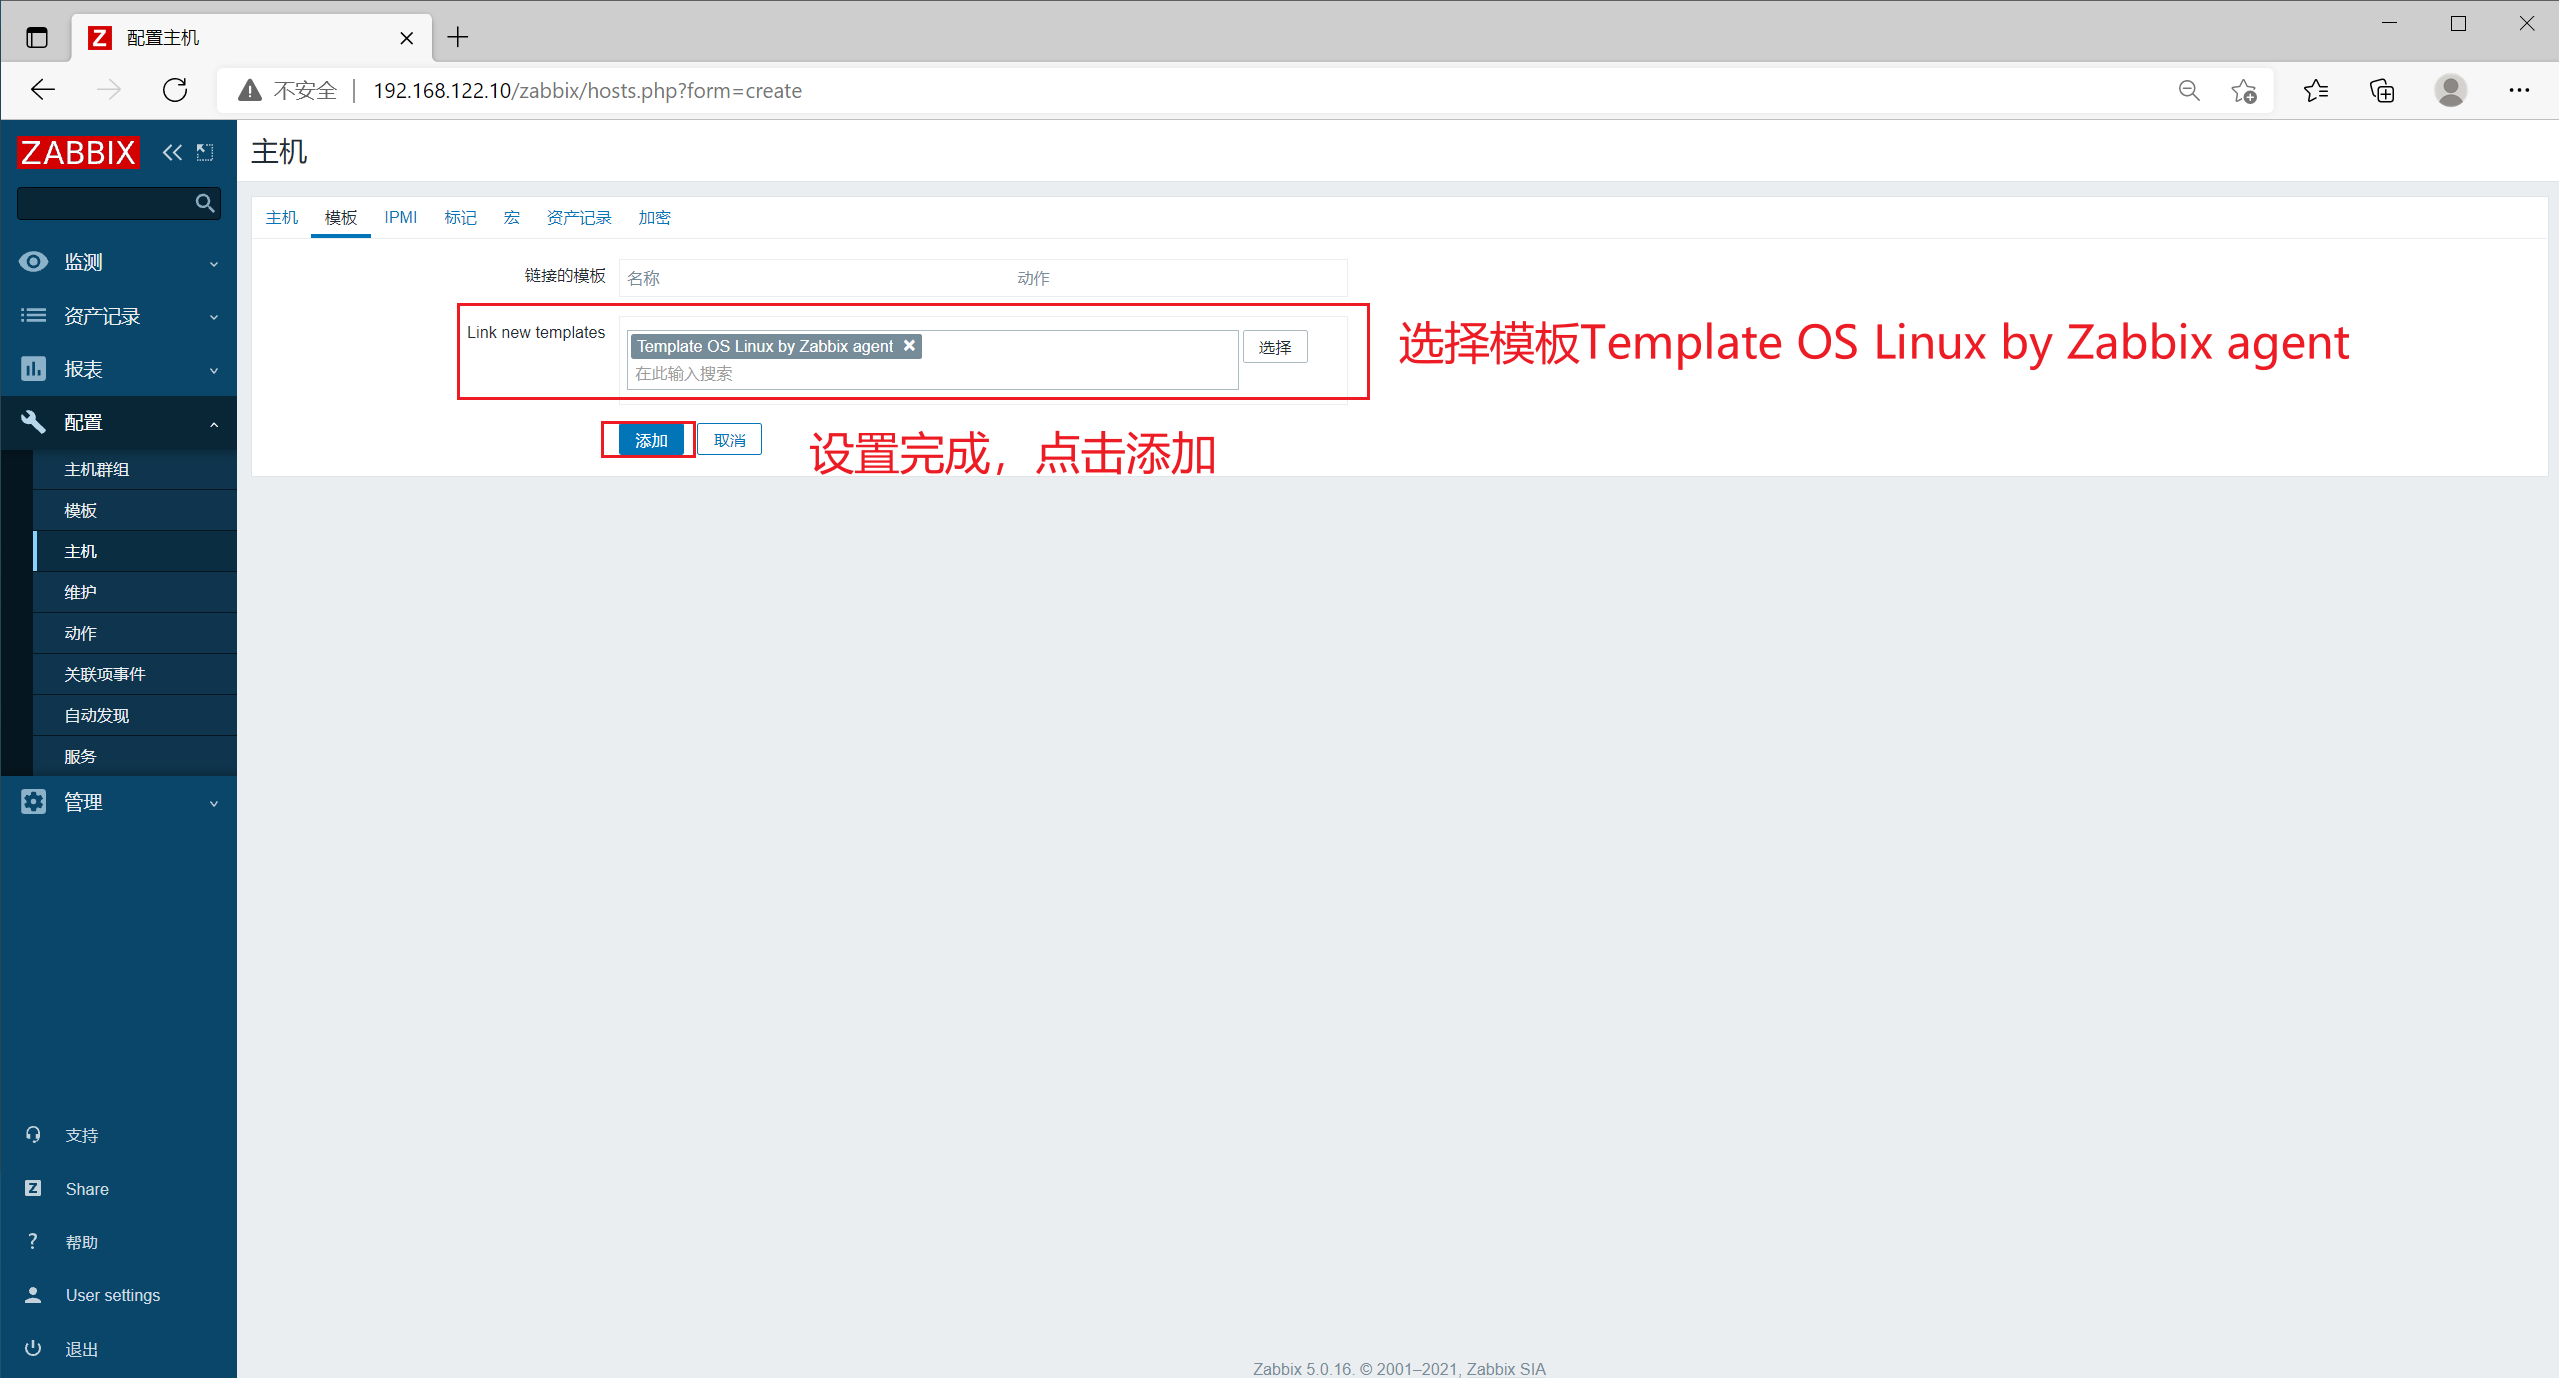
Then click [template] in the upper menu bar

[link new stamps] search for Linux and select Template OS Linux by Zabbix agent
Click [add]
14.3 restart the service on each server
Restart sequence: server - > proxy - > client
Server side
[root@zabbix_server ~]# systemctl restart zabbix-server.service
proxy server
[root@zabbix_proxy ~]# systemctl restart zabbix-proxy.service
client
[root@zabbix_agent ~]# systemctl restart zabbix-agent2.service
Click [host] refresh in [configuration] in the left menu bar to check that the monitoring status of the client host is normal

View logs on the server
[root@zabbix_server ~]# tail -f /var/log/zabbix/zabbix_server.log
······
 47202:20211005:043709.962 sending configuration data to proxy "zabbix_proxy" at "192.168.122.12", datalen 14053, bytes 3095 with compression ratio 4.5
6, Set up ZABBIX SNMP (Simple Network Management Protocol) monitoring
1. Install snmp monitor on the server
[root@zabbix_server ~]# yum install -y net-snmp net-snmp-utils
2. Modify the snmp configuration file and start the service
[root@zabbix_server ~]# vim /etc/snmp/snmpd.conf

##Line 57, add the following configuration
view    systemview    included   .1

[root@zabbix_server ~]# systemctl start snmpd
3. Test with snmp command
[root@zabbix_server ~]# snmpwalk -v 2c -c public 127.0.0.1 sysname
SNMPv2-MIB::sysName.0 = STRING: zabbix_server
– v 1|2c|3: Specifies the SNMP protocol version
– c: Specifies the community string
sysname: key for snmp
4. Configure snmp monitoring on the web page
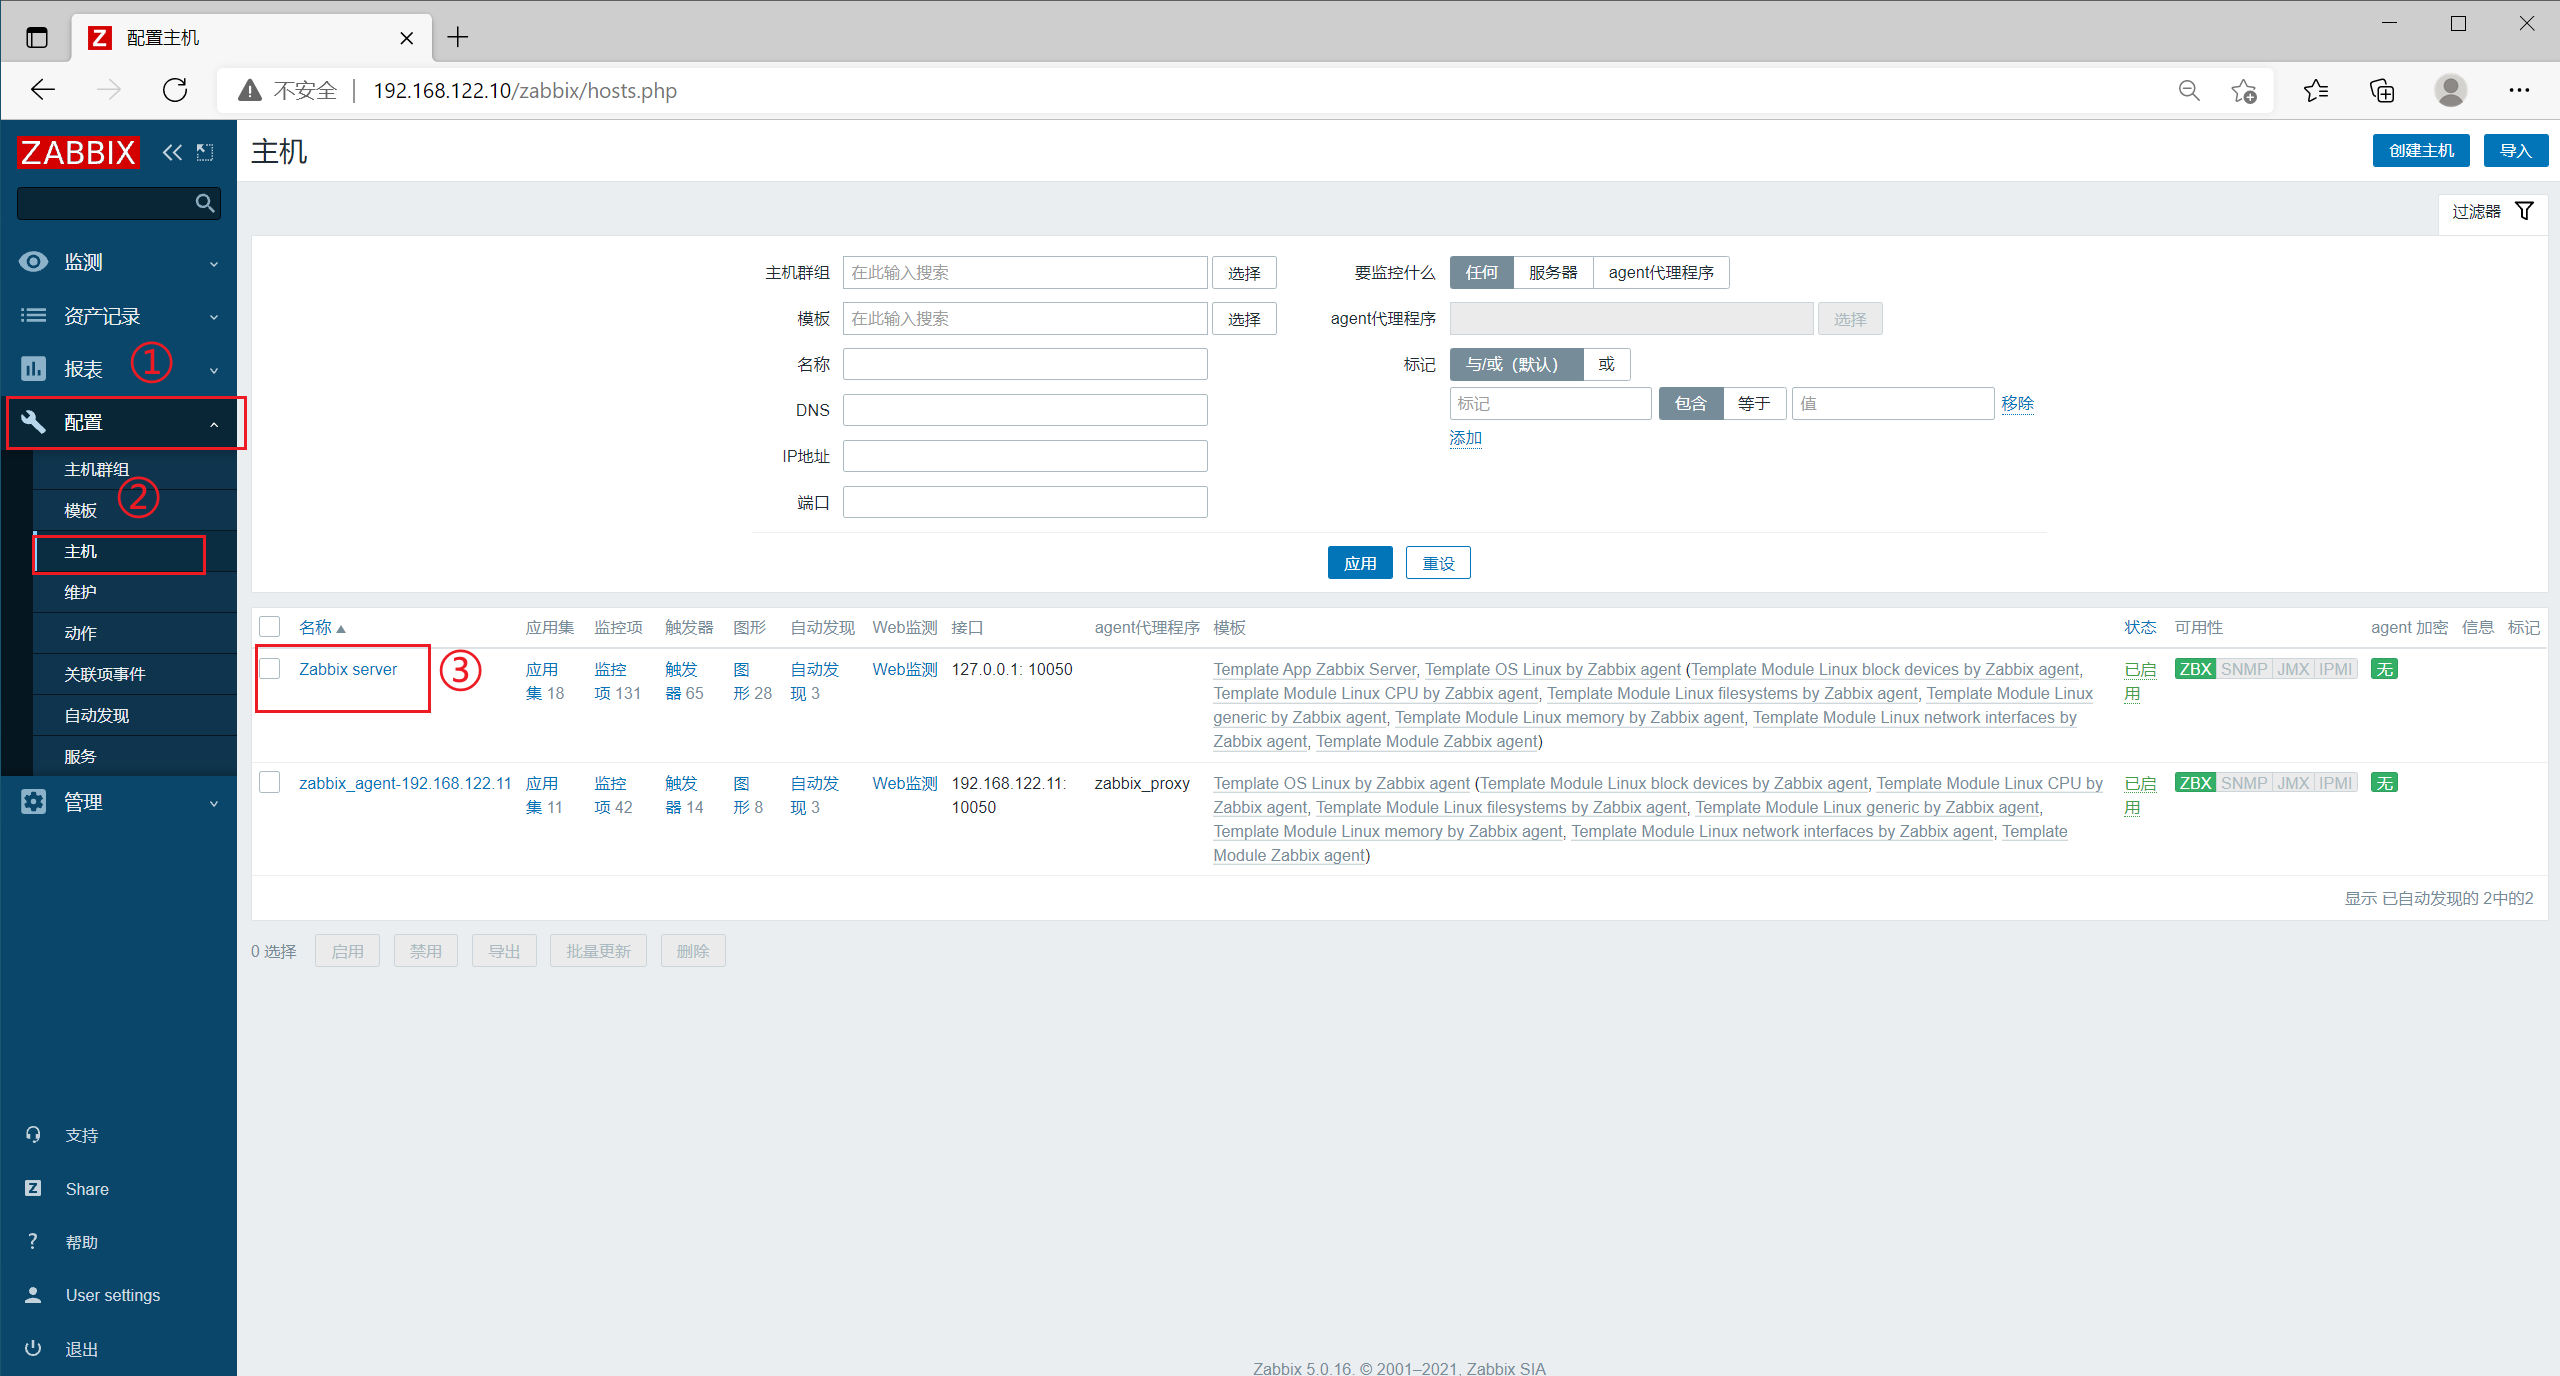
Click [host] in [configuration] in the left menu bar, and click Zabbix server
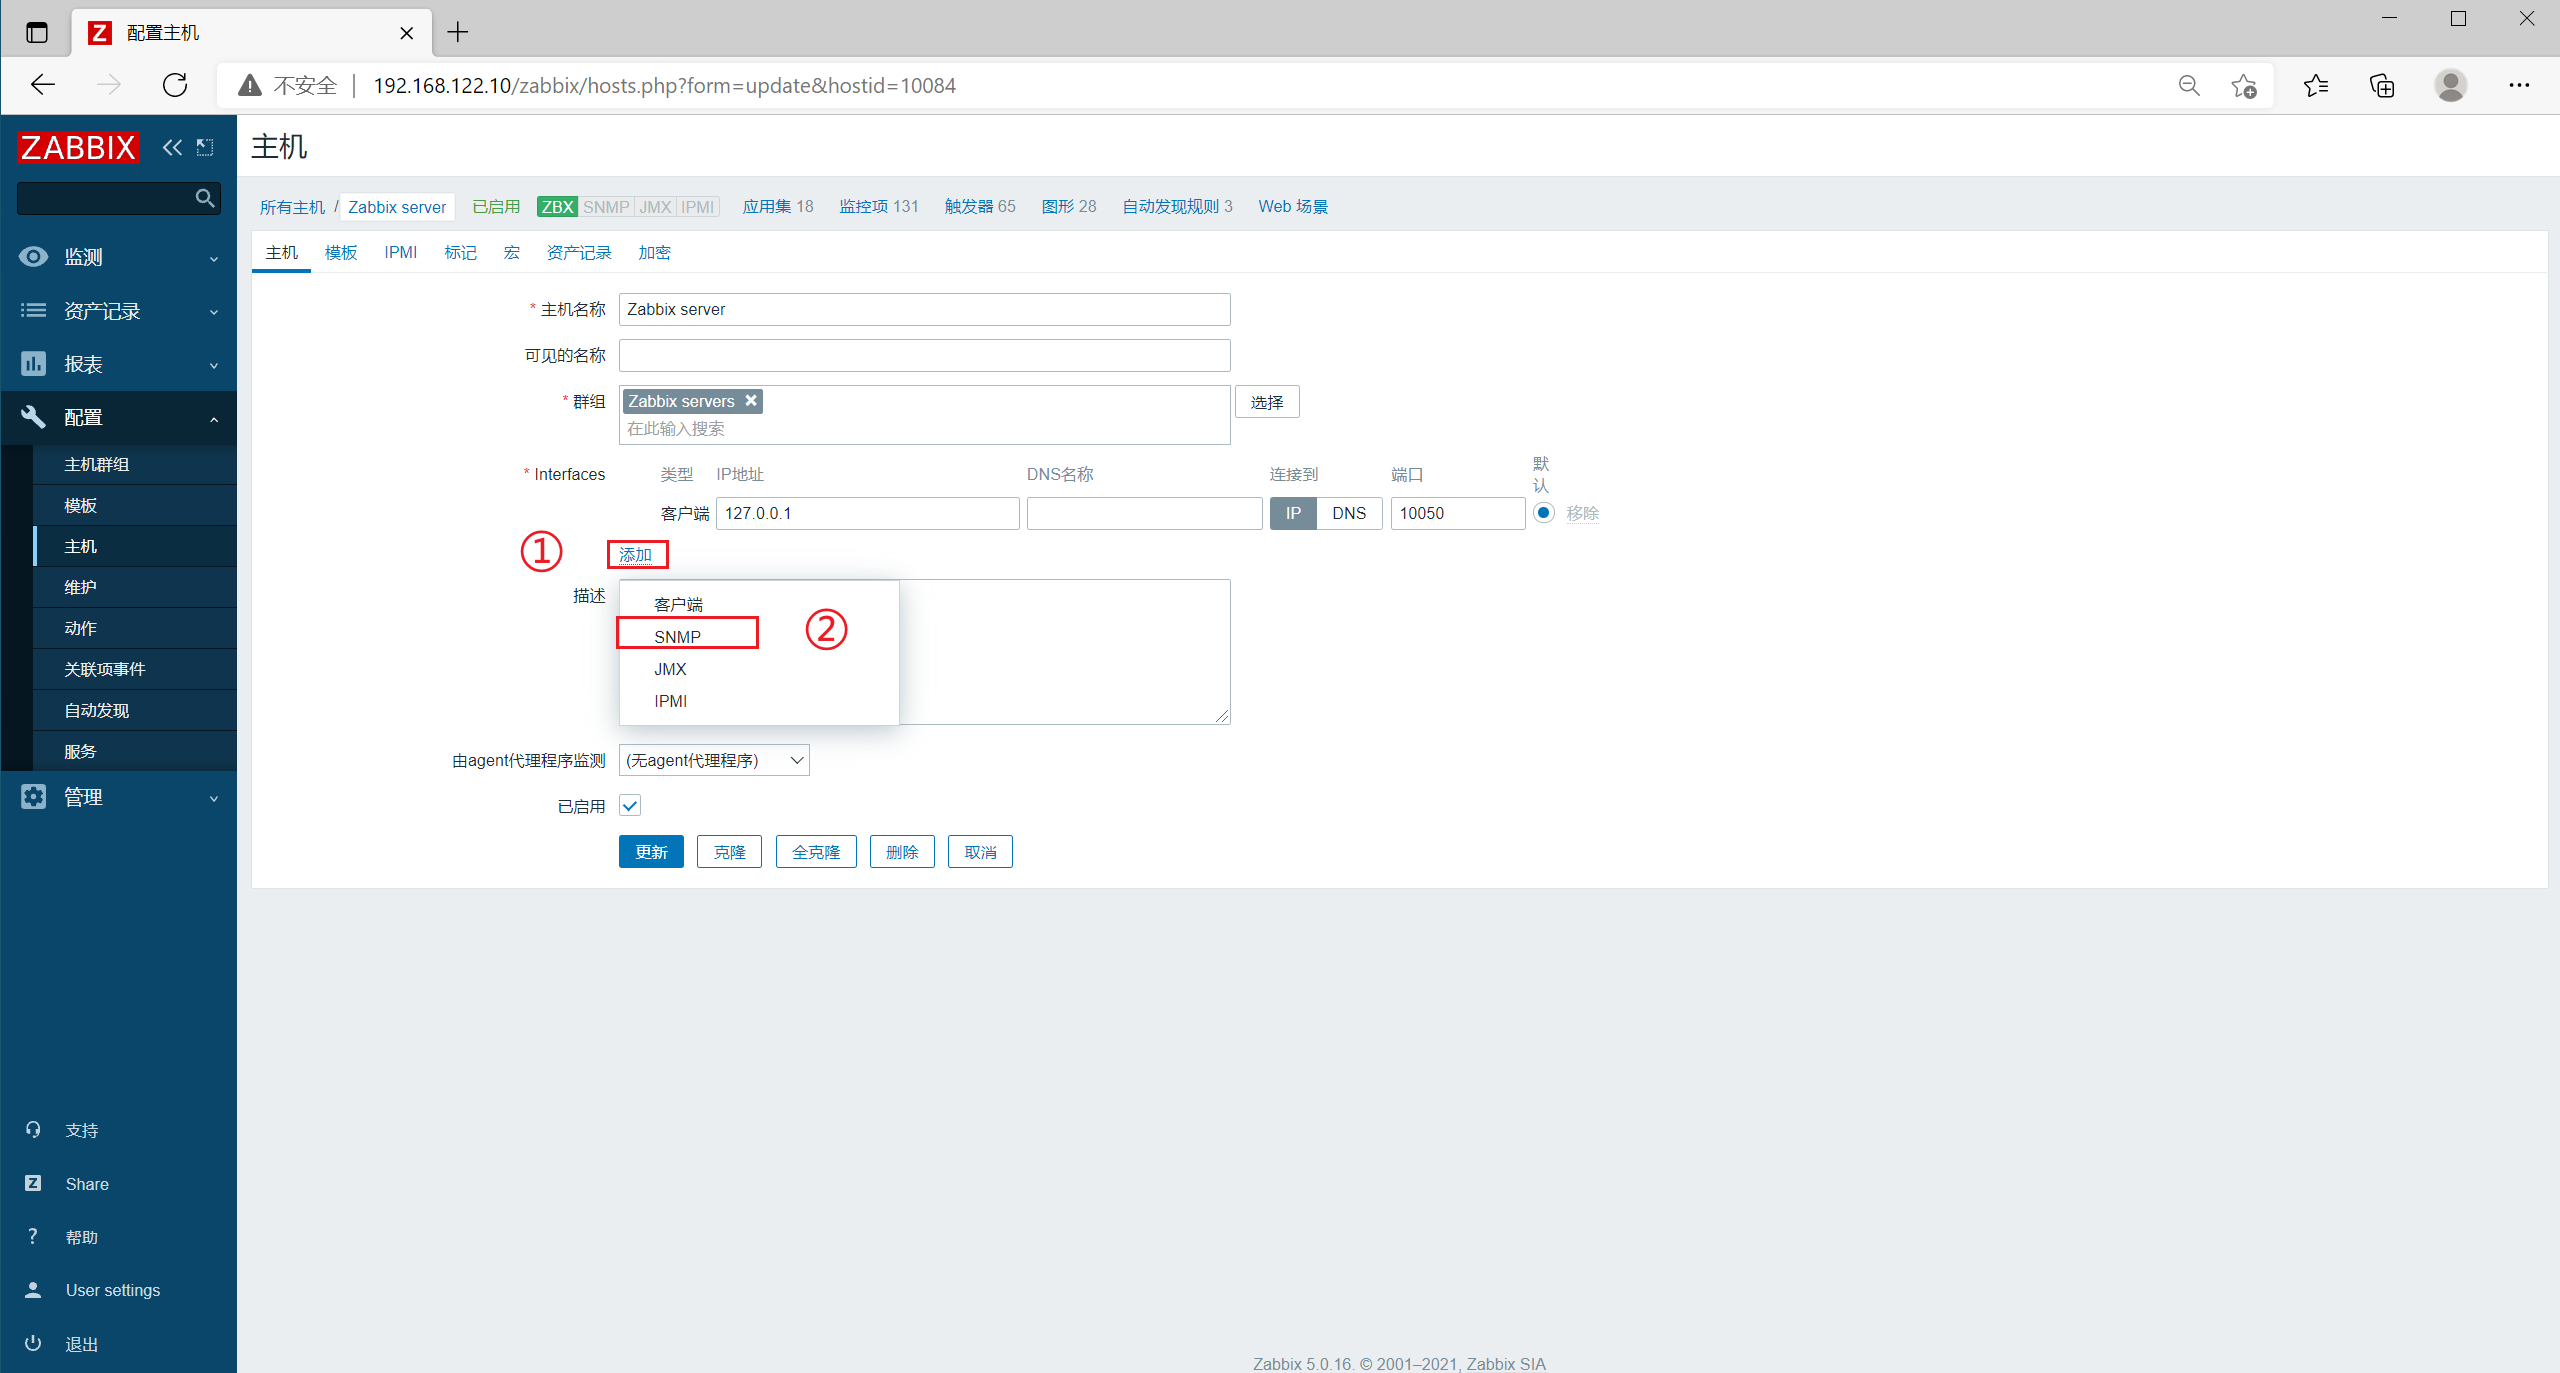
[Interfaces] click [add] to select SNMP and set the port to 161

Click template in the upper menu bar and select all agent templates in linked templates to unlink and clean up
Then search for Linux SNMP in [Link new templates] and select Template OS Linux SNMP
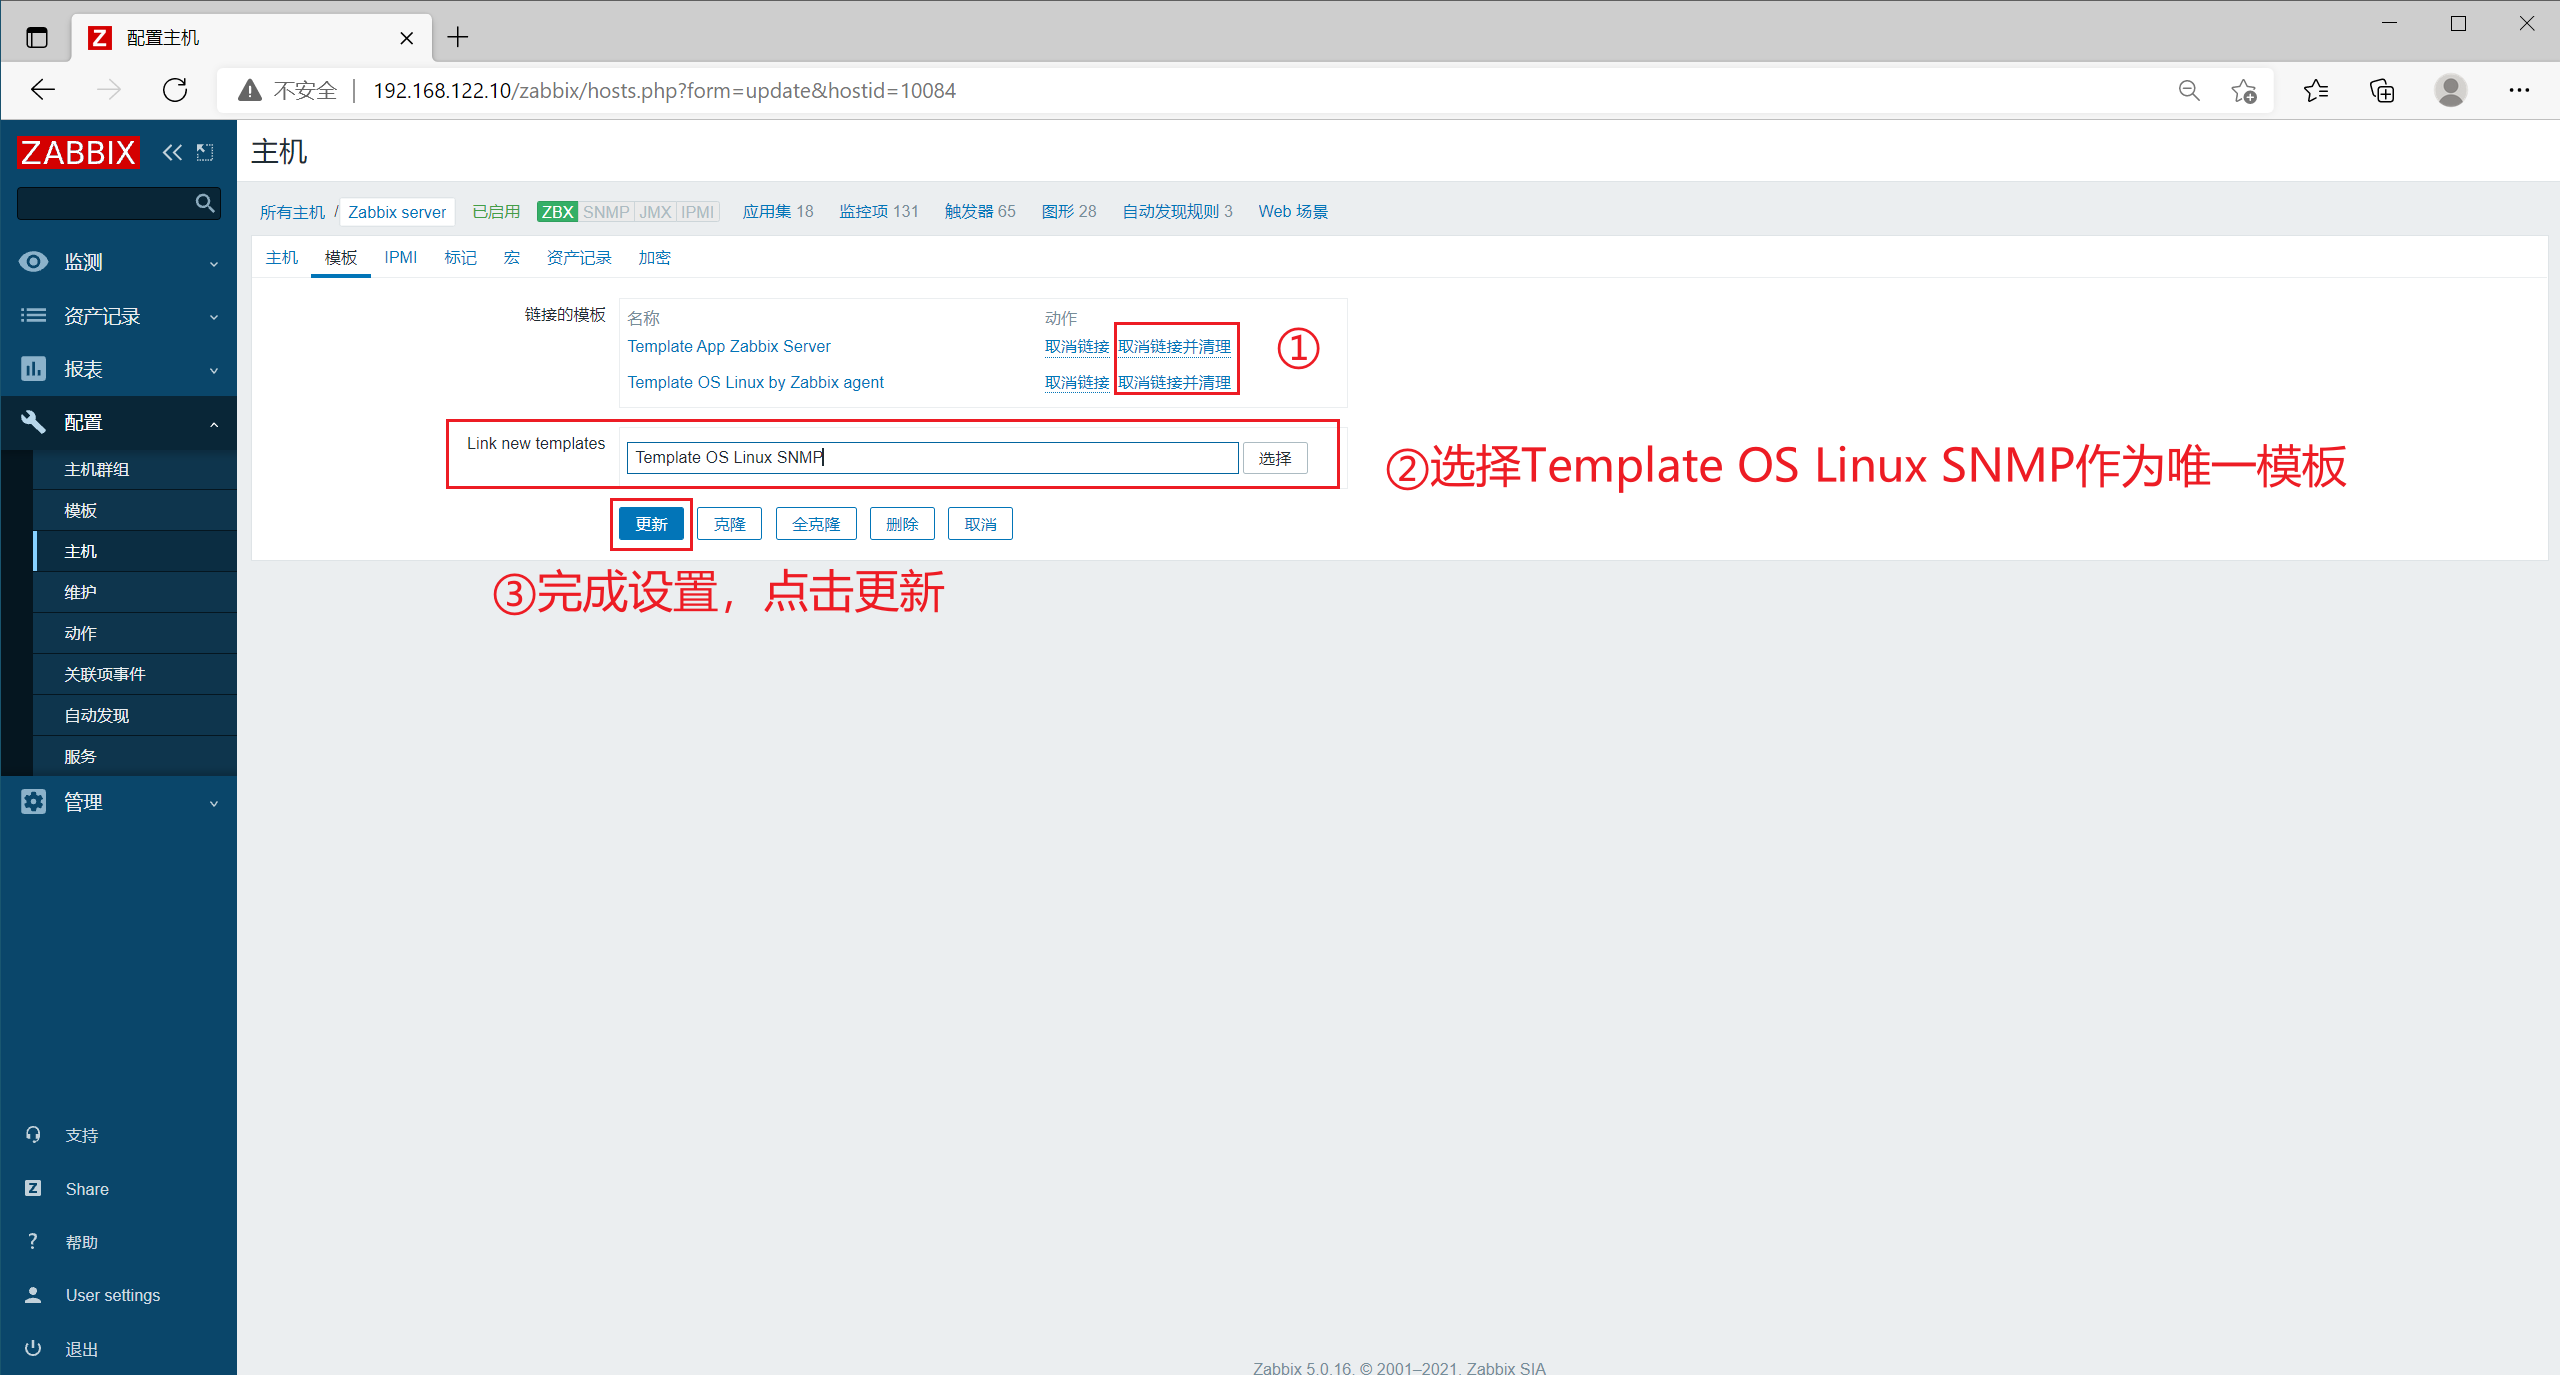
Click Update. After waiting for a period of time, the availability of Zabbix server becomes SNMP monitoring.
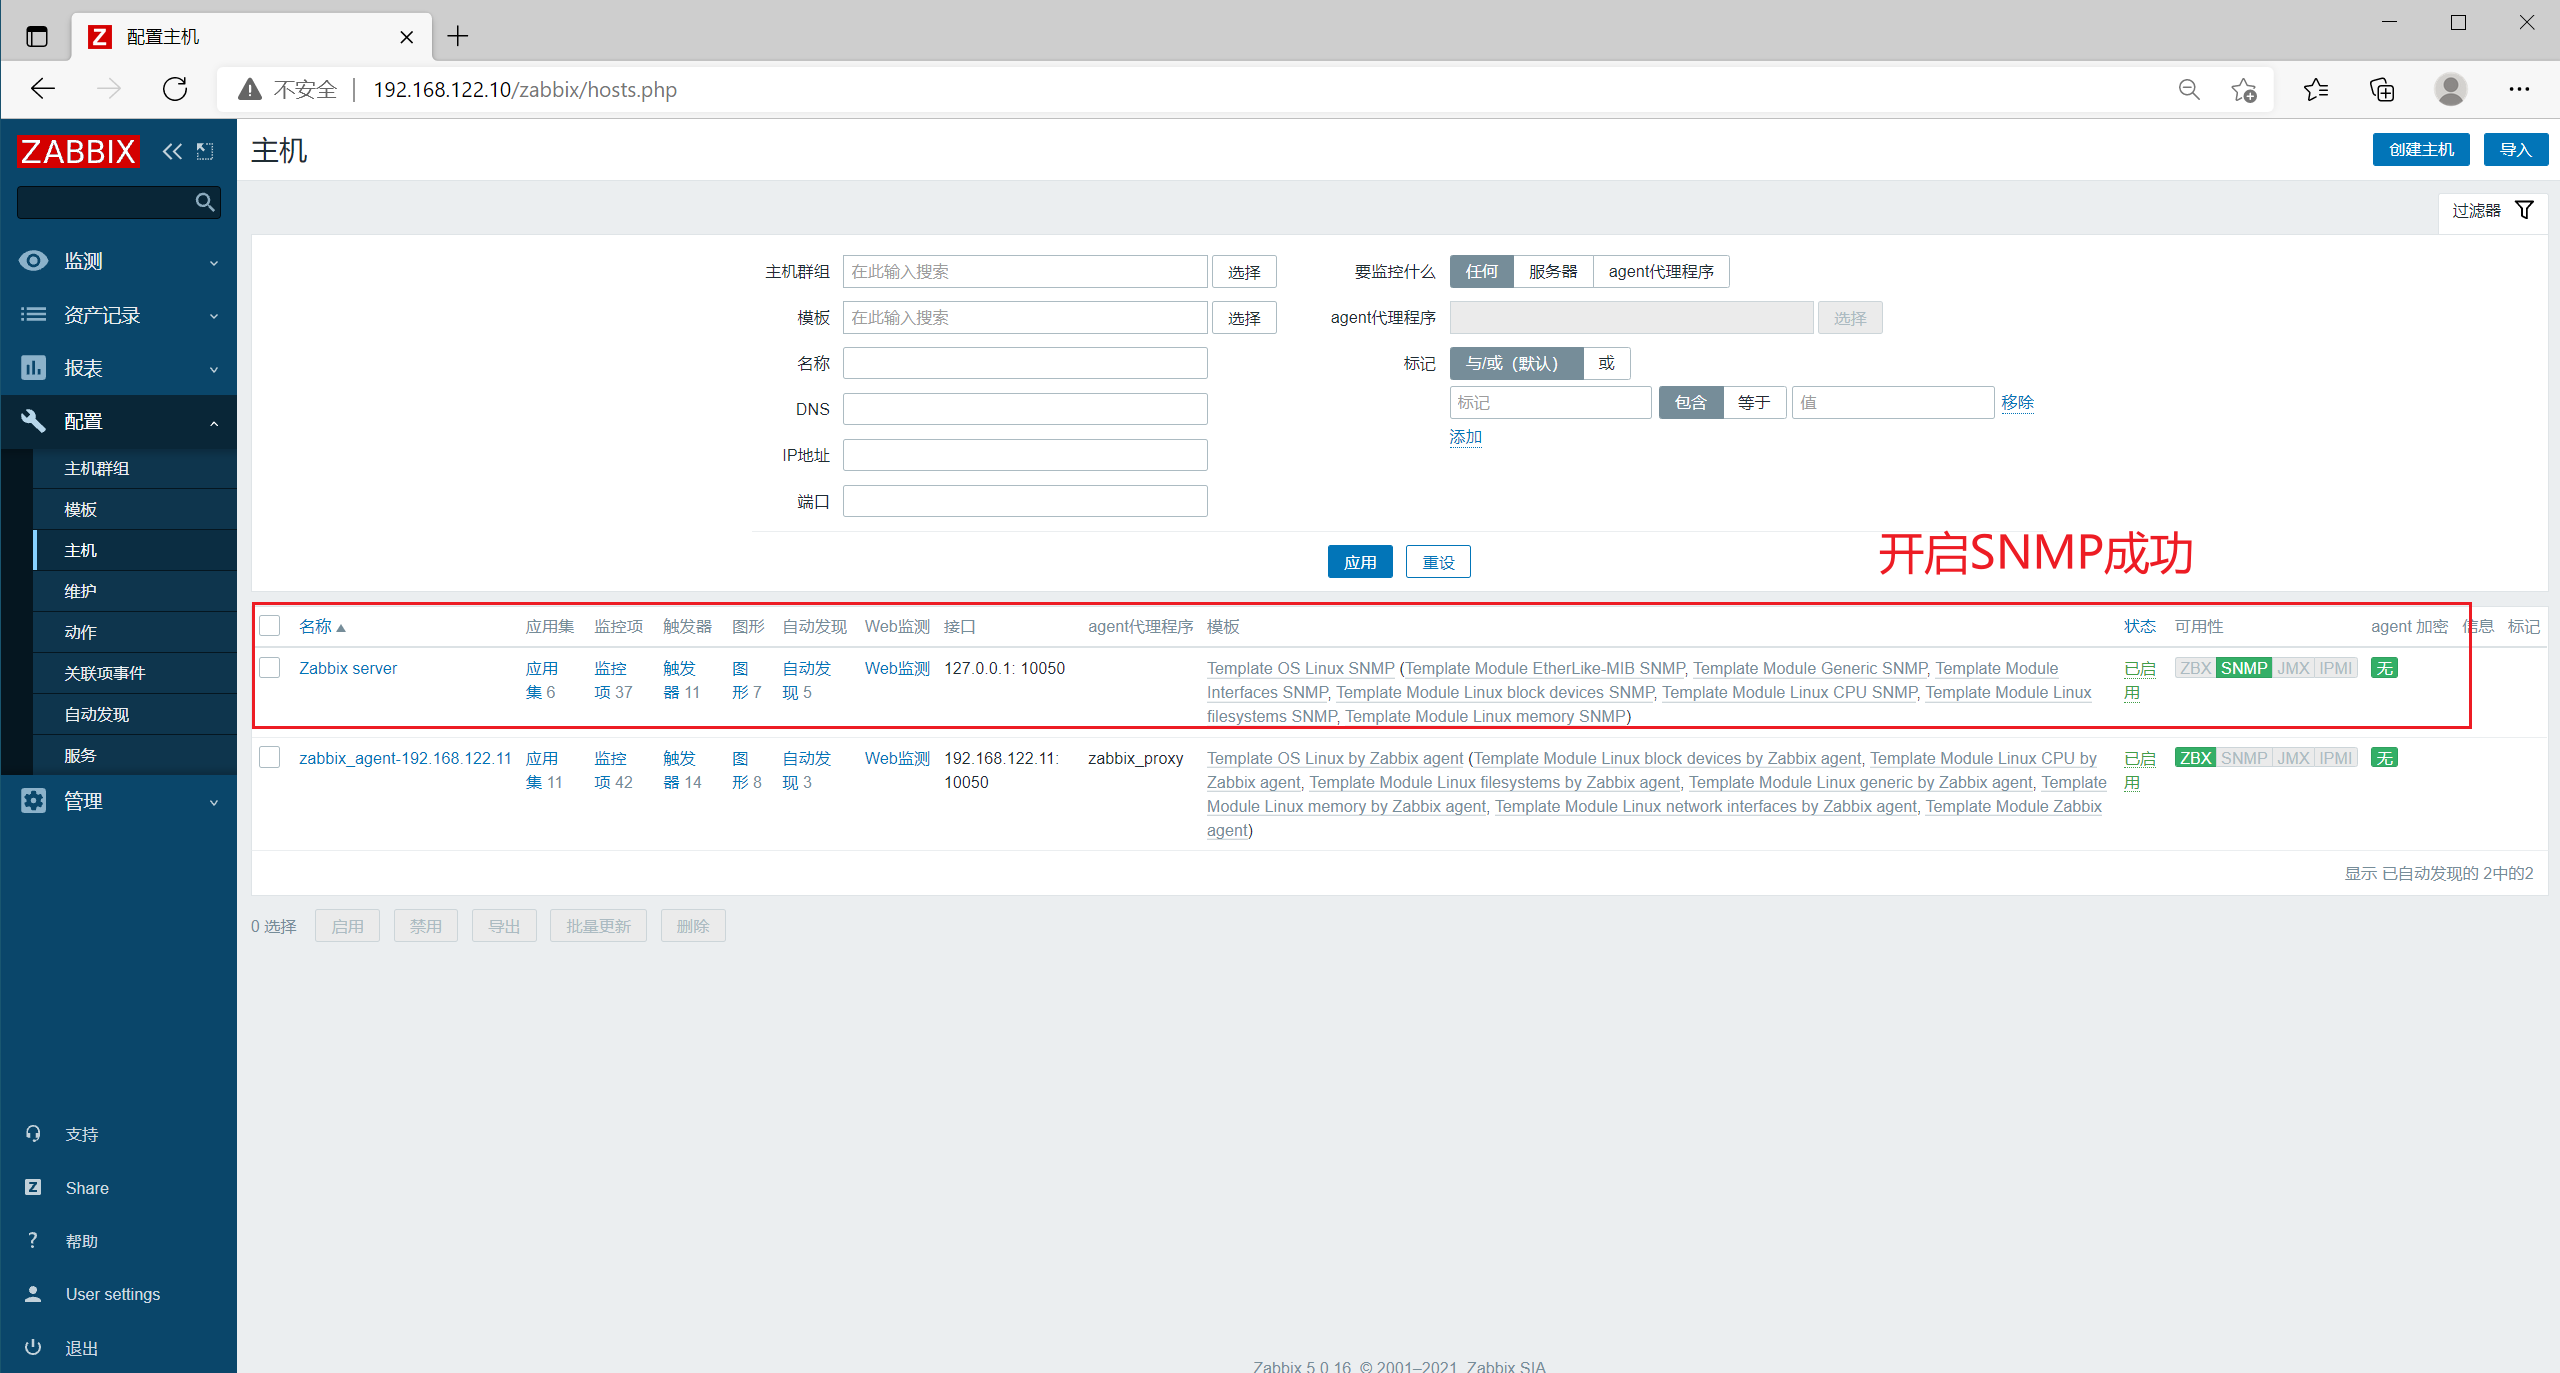
View logs on the server
[root@zabbix_server ~]# tail -f /var/log/zabbix/zabbix_server.log
······
 47194:20211005:045508.499 enabling SNMP agent checks on host "Zabbix server"