
In the private environment of some enterprises, external networks may not be connected. If you want to deploy Kubernetes clusters in such an environment, you can collect Kubernetes and install them offline. That is: deploy Kubernetes cluster with binary installation package, and the version adopted is Kubernetes v1 18.20.
The following steps demonstrate how to deploy a three node Kubernetes cluster using binary packages.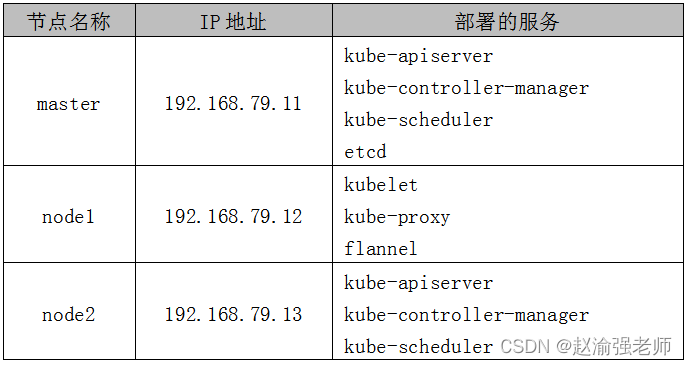
1. Deploy ETCD
(1) Download the binary installation package "etcd-v3.3.27-linux-amd64.tar.gz" of ETCD from GitHub.
(2) Download the required media from the cfssl official website and install cfssl.
chmod +x cfssl_linux-amd64 cfssljson_linux-amd64
mv cfssl_linux-amd64 /usr/local/bin/cfssl
mv cfssljson_linux-amd64 /usr/local/bin/cfssljson
Tip: cfssl is a command line toolkit that contains all the functions required to run a certification authority.
(3) Create a configuration file for generating CA certificate and private key, and execute the following command:
mkdir -p /opt/ssl/etcd
cd /opt/ssl/etcd
cfssl print-defaults config > config.json
cfssl print-defaults csr > csr.json

cat > config.json <<EOF
{
  "signing": {
    "default": {
      "expiry": "87600h"
    },
    "profiles": {
      "kubernetes": {
        "usages": [
            "signing",
            "key encipherment",
            "server auth",
            "client auth"
        ],
        "expiry": "87600h"
      }
    }
  }
}
EOF

cat > csr.json <<EOF
{
   "CN": "etcd",
   "key": {
     "algo": "rsa",
     "size": 2048
   },
   "names": [{
    "C": "CN",
    "ST": "BeiJing",
    "L": "BeiJing",
    "O": "k8s",
    "OU": "System"
   }]
   }
EOF
(4) Generate CA certificate and private key.
cfssl gencert -initca csr.json | cfssljson -bare etcd
(5) Add the file "etcd-csr.json" under the directory "/ opt/ssl/etcd", which is used to generate the certificate and private key of ETCD, as follows:
cat > etcd-csr.json <<EOF
{
  "CN": "etcd",
  "hosts": [
    "192.168.79.11"
  ],
  "key": {
    "algo": "rsa",
    "size": 2048
  },
  "names": [
    {
      "C": "CN",
      "ST": "BeiJing",
      "L": "BeiJing",
      "O": "etcd",
      "OU": "Etcd Security"
    }
  ]
}
EOF
Tip: only one ETCD node is deployed here. If you are deploying an ETCD cluster, you can modify the field "hosts" and add multiple ETCD nodes.
(6) Install ETCD.
tar -zxvf etcd-v3.3.27-linux-amd64.tar.gz
cd etcd-v3.3.27-linux-amd64
cp etcd* /usr/local/bin
mkdir -p /opt/platform/etcd/
(7) Edit the file "/ opt/platform/etcd/etcd.conf" and add the configuration information of ETCD as follows:
ETCD_NAME=k8s-etcd
ETCD_DATA_DIR="/var/lib/etcd/k8s-etcd"
ETCD_LISTEN_PEER_URLS="http://192.168.79.11:2380"
ETCD_LISTEN_CLIENT_URLS="http://127.0.0.1:2379,http://192.168.79.11:2379"
ETCD_INITIAL_ADVERTISE_PEER_URLS="http://192.168.79.11:2380"
ETCD_INITIAL_CLUSTER="k8s-etcd=http://192.168.79.11:2380"
ETCD_INITIAL_CLUSTER_STATE="new"
ETCD_INITIAL_CLUSTER_TOKEN="etcd-test"
ETCD_ADVERTISE_CLIENT_URLS="http://192.168.79.11:2379"
(8) Add the ETCD service into the system service, and edit the file "/ usr/lib/systemd/system/etcd.service" as follows:
[Unit]
Description=Etcd Server
After=network.target
After=network-online.target
Wants=network-online.target

[Service]
Type=notify
EnvironmentFile=/opt/platform/etcd/etcd.conf
ExecStart=/usr/local/bin/etcd \
--cert-file=/opt/ssl/etcd/etcd.pem \
--key-file=/opt/ssl/etcd/etcd-key.pem \
--peer-cert-file=/opt/ssl/etcd/etcd.pem \
--peer-key-file=/opt/ssl/etcd/etcd-key.pem \
--trusted-ca-file=/opt/ssl/etcd/etcd.pem \
--peer-trusted-ca-file=/opt/ssl/etcd/etcd.pem
Restart=on-failure
LimitNOFILE=65536

[Install]
WantedBy=multi-user.target
(9) Create the ETCD data storage directory, and then start the ETCD service.
mkdir -p /opt/platform/etcd/data
chmod 755 /opt/platform/etcd/data
systemctl daemon-reload
systemctl enable etcd.service
systemctl start etcd.service
(10) Verify the status of ETCD.
etcdctl cluster-health
The output information is as follows:
member fd4d0bd2446259d9 is healthy:
got healthy result from http://192.168.79.11:2379
cluster is healthy
(11) View the list of ETCD members.
etcdctl member list
The output information is as follows:
fd4d0bd2446259d9: name=k8s-etcd peerURLs=http://192.168.79.11:2380 clientURLs=http://192.168.79.11:2379 isLeader=true
Tip: since it is a single node ETCD, there is only one member information here.
(12) Copy the certificate file of ETCD to node1 and node2 nodes of.
cd /opt
scp -r ssl/ root@node1:/opt
scp -r ssl/ root@node2:/opt

2. Deploy Flannel network
(1) Write the assigned subnet segment on the master node to ETCD for Flannel to use. Execute the command:
etcdctl set /coreos.com/network/config '{ "Network": "172.17.0.0/16", "Backend": {"Type": "vxlan"}}'(2) View the written Flannel subnet information on the master node and execute the command:
etcdctl get /coreos.com/network/config
The output information is as follows:
{ "Network": "172.17.0.0/16", "Backend": {"Type": "vxlan"}}(3) Unzip flannel-v0.0 on node1 10.0-linux-amd64. tar. GZ installation package, execute the command:
tar -zxvf flannel-v0.10.0-linux-amd64.tar.gz
(4) Create the Kubernetes working directory on node1.
mkdir -p /opt/kubernetes/{cfg,bin,ssl}
mv mk-docker-opts.sh flanneld /opt/kubernetes/bin/
(5) Define the Flannel script file "flannel.sh" on node1, and enter the following contents:
#!/bin/bash
ETCD_ENDPOINTS=${1}

cat <<EOF >/opt/kubernetes/cfg/flanneld
FLANNEL_OPTIONS="--etcd-endpoints=${ETCD_ENDPOINTS} \
-etcd-cafile=/opt/ssl/etcd/etcd.pem \
-etcd-certfile=/opt/ssl/etcd/etcd.pem \
-etcd-keyfile=/opt/ssl/etcd/etcd-key.pem"
EOF

cat <<EOF >/usr/lib/systemd/system/flanneld.service
[Unit]
Description=Flanneld overlay address etcd agent
After=network-online.target network.target
Before=docker.service

[Service]
Type=notify
EnvironmentFile=/opt/kubernetes/cfg/flanneld
ExecStart=/opt/kubernetes/bin/flanneld --ip-masq \$FLANNEL_OPTIONS
ExecStartPost=/opt/kubernetes/bin/mk-docker-opts.sh -k DOCKER_NETWORK_OPTIONS -d /run/flannel/subnet.env
Restart=on-failure

[Install]
WantedBy=multi-user.target
EOF

systemctl daemon-reload
systemctl enable flanneld
systemctl restart flanneld
(6) Start the Flannel network function on node1 node and execute the command:
bash flannel.sh http://192.168.79.11:2379
Tip: the ETCD address deployed on the master node is specified here.
(7) View the status of Flannel network on node1 node and execute the command:
systemctl status flanneld
The output information is as follows:
flanneld.service - Flanneld overlay address etcd agent
 Loaded: loaded (/usr/lib/systemd/system/flanneld.service; enabled; vendor preset: disabled)
 Active: active (running) since Tue 2022-02-08 22:30:46 CST; 6s ago
(8) Modify the file "/ usr/lib/systemd/system/docker.service" on node1 node to configure the Docker on node1 node to connect to the Flannel network, and add the following line to the file:
... ...
EnvironmentFile=/run/flannel/subnet.env
... ...
(9) Restart the Docker service on node1 node.
systemctl daemon-reload
systemctl restart docker.service
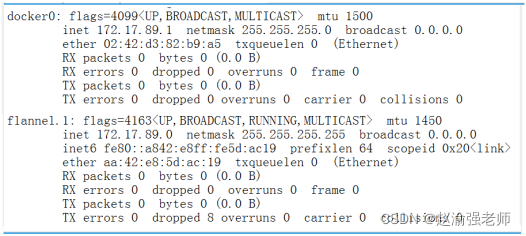
(10) View the Flannel network information on node1 node, as shown in Figure 13-3:
ifconfig
(11) Configure Flannel network on node2 node and repeat steps 3 to 10.

3. Deploy Master node
(1) Create the Kubernetes cluster certificate directory.
mkdir -p /opt/ssl/k8s
cd /opt/ssl/k8s
(2) Create a script file "k8s-cert.sh" to generate the certificate of Kubernetes cluster. Enter the following content in the script:
cat > ca-config.json <<EOF
{
  "signing": {
    "default": {
      "expiry": "87600h"
    },
    "profiles": {
      "kubernetes": {
        "usages": [
            "signing",
            "key encipherment",
            "server auth",
            "client auth"
        ],
        "expiry": "87600h"
      }
    }
  }
}
EOF

cat > ca-csr.json <<EOF
{
   "CN": "kubernetes",
   "key": {
     "algo": "rsa",
     "size": 2048
   },
   "names": [{
    "C": "CN",
    "ST": "BeiJing",
    "L": "BeiJing",
    "O": "k8s",
    "OU": "System"
   }]
   }
EOF

cfssl gencert -initca ca-csr.json | cfssljson -bare ca

cat >server-csr.json<<EOF
{
  "CN": "kubernetes",
  "hosts": [
     "192.168.79.11",
     "127.0.0.1",
     "kubernetes",
     "kubernetes.default",
     "kubernetes.default.svc",
     "kubernetes.default.svc.cluster",
     "kubernetes.default.svc.cluster.local"
  ],
  "key": {
    "algo": "rsa",
    "size": 2048
  },
  "names": [
    {
      "C": "CN",
      "L": "BeiJing",
      "ST": "BeiJing",
      "O": "system:masters",
      "OU": "System"
    }
  ]
}
EOF

cfssl gencert -ca=ca.pem -ca-key=ca-key.pem \
-config=ca-config.json -profile=kubernetes \
server-csr.json | cfssljson -bare server

cat >admin-csr.json <<EOF
{
  "CN": "admin",
  "hosts": [],
  "key": {
    "algo": "rsa",
    "size": 2048
  },
  "names": [
    {
      "C": "CN",
      "L": "BeiJing",
      "ST": "BeiJing",
      "O": "system:masters",
      "OU": "System"
    }
  ]
}
EOF
cfssl gencert -ca=ca.pem -ca-key=ca-key.pem \
-config=ca-config.json -profile=kubernetes \
admin-csr.json | cfssljson -bare admin

cat > kube-proxy-csr.json <<EOF
{
  "CN": "system:kube-proxy",
  "hosts": [],
  "key": {
    "algo": "rsa",
    "size": 2048
  },
  "names": [
    {
      "C": "CN",
      "L": "BeiJing",
      "ST": "BeiJing",
      "O": "k8s",
      "OU": "System"
    }
  ]
}
EOF

cfssl gencert -ca=ca.pem -ca-key=ca-key.pem \
-config=ca-config.json -profile=kubernetes \
kube-proxy-csr.json | cfssljson -bare kube-proxy
(3) Execute the script file "k8s-cert.sh".
bash k8s-cert.sh
(4) Copy the certificate.
mkdir -p /opt/kubernetes/ssl/
mkdir -p /opt/kubernetes/logs/
cp ca*pem server*pem /opt/kubernetes/ssl/
(5) ) unzip the kubernetes package
tar -zxvf kubernetes-server-linux-amd64.tar.gz
(6) Copy key command files
mkdir -p /opt/kubernetes/bin/
cd kubernetes/server/bin/
cp kube-apiserver kube-scheduler kube-controller-manager \
   /opt/kubernetes/bin
cp kubectl /usr/local/bin/
(7) Randomly generate serial numbers.
mkdir -p /opt/kubernetes/cfg
head -c 16 /dev/urandom | od -An -t x | tr -d ' '
The output contents are as follows:
05cd8031b0c415de2f062503b0cd4ee6
(8) Create the "/ opt/kubernetes/cfg/token.csv" file and enter the following:
05cd8031b0c415de2f062503b0cd4ee6,kubelet-bootstrap,10001,"system:node-bootstrapper"
(9) Create the configuration file "/ opt / kubernetes / CFG / Kube apiserver. Conf" of API Server, and enter the following contents:
KUBE_APISERVER_OPTS="--logtostderr=false \
--v=2 \
--log-dir=/opt/kubernetes/logs \
--etcd-servers=http://192.168.79.11:2379 \
--bind-address=192.168.79.11 \
--secure-port=6443 \
--advertise-address=192.168.79.11 \
--allow-privileged=true \
--service-cluster-ip-range=10.0.0.0/24 \
--enable-admission-plugins=NamespaceLifecycle,LimitRanger,ServiceAccount,ResourceQuota,NodeRestriction \
--authorization-mode=RBAC,Node \
--enable-bootstrap-token-auth=true \
--token-auth-file=/opt/kubernetes/cfg/token.csv \
--service-node-port-range=30000-32767 \
--kubelet-client-certificate=/opt/kubernetes/ssl/server.pem \
--kubelet-client-key=/opt/kubernetes/ssl/server-key.pem \
--tls-cert-file=/opt/kubernetes/ssl/server.pem \
--tls-private-key-file=/opt/kubernetes/ssl/server-key.pem \
--client-ca-file=/opt/kubernetes/ssl/ca.pem \
--service-account-key-file=/opt/kubernetes/ssl/ca-key.pem \
--etcd-cafile=/opt/ssl/etcd/etcd.pem \
--etcd-certfile=/opt/ssl/etcd/etcd.pem \
--etcd-keyfile=/opt/ssl/etcd/etcd-key.pem \
--audit-log-maxage=30 \
--audit-log-maxbackup=3 \
--audit-log-maxsize=100 \
--audit-log-path=/opt/kubernetes/logs/k8s-audit.log"
(10) Use systemd of the system to manage API Server and execute the following command:
cat > /usr/lib/systemd/system/kube-apiserver.service << EOF
[Unit]
Description=Kubernetes API Server
Documentation=https://github.com/kubernetes/kubernetes
[Service]
EnvironmentFile=/opt/kubernetes/cfg/kube-apiserver.conf
ExecStart=/opt/kubernetes/bin/kube-apiserver \$KUBE_APISERVER_OPTS
Restart=on-failure
[Install]
WantedBy=multi-user.target
EOF
(11) Start API Server.
systemctl daemon-reload
systemctl start kube-apiserver
systemctl enable kube-apiserver
(12) View the status of API Server.
systemctl status kube-apiserver.service
The output information is as follows:
kube-apiserver.service - Kubernetes API Server
Loaded: loaded (/usr/lib/systemd/system/kube-apiserver.service; enabled; vendor preset: disabled)
Active: active (running) since Tue 2022-02-08 21:11:47 CST; 24min ago
(13) View the monitored port 6433 and port 8080 information, as shown in Figure 13-4.
netstat -ntap | grep 6443
netstat -ntap | grep 8080

(14) Authorized kubelet bootstrap users are allowed to request certificates.
kubectl create clusterrolebinding kubelet-bootstrap \
--clusterrole=system:node-bootstrapper \
--user=kubelet-bootstrap
(15) Create a Kube controller manager configuration file and execute the following command:
cat > /opt/kubernetes/cfg/kube-controller-manager.conf << EOF
KUBE_CONTROLLER_MANAGER_OPTS="--logtostderr=false \
--v=2 \
--log-dir=/opt/kubernetes/logs \
--leader-elect=true \
--master=127.0.0.1:8080 \
--bind-address=127.0.0.1 \
--allocate-node-cidrs=true \
--cluster-cidr=10.244.0.0/16 \
--service-cluster-ip-range=10.0.0.0/24 \
--cluster-signing-cert-file=/opt/kubernetes/ssl/ca.pem \
--cluster-signing-key-file=/opt/kubernetes/ssl/ca-key.pem  \
--root-ca-file=/opt/kubernetes/ssl/ca.pem \
--service-account-private-key-file=/opt/kubernetes/ssl/ca-key.pem \
--experimental-cluster-signing-duration=87600h0m0s"
EOF
(16) Use systemd service to manage Kube controller manager and execute commands
cat > /usr/lib/systemd/system/kube-controller-manager.service << EOF
[Unit]
Description=Kubernetes Controller Manager
Documentation=https://github.com/kubernetes/kubernetes
[Service]
EnvironmentFile=/opt/kubernetes/cfg/kube-controller-manager.conf
ExecStart=/opt/kubernetes/bin/kube-controller-manager \$KUBE_CONTROLLER_MANAGER_OPTS
Restart=on-failure
[Install]
WantedBy=multi-user.target
EOF
(17) Start Kube controller manager.
systemctl daemon-reload
systemctl start kube-controller-manager
systemctl enable kube-controller-manager
(18) View the status of Kube controller manager.
systemctl status kube-controller-manager
The output information is as follows:
kube-controller-manager.service - Kubernetes Controller Manager
Loaded: loaded (/usr/lib/systemd/system/kube-controller-manager.service; enabled; vendor preset: disabled)
Active: active (running) since Tue 2022-02-08 20:42:08 CST; 1h 2min ago
(19) Create a Kube scheduler configuration file and execute the following command:
cat > /opt/kubernetes/cfg/kube-scheduler.conf << EOF
KUBE_SCHEDULER_OPTS="--logtostderr=false \
--v=2 \
--log-dir=/opt/kubernetes/logs \
--leader-elect \
--master=127.0.0.1:8080 \
--bind-address=127.0.0.1"
EOF
(20) Use systemd service to manage Kube scheduler and execute the following command:
cat > /usr/lib/systemd/system/kube-scheduler.service << EOF
[Unit]
Description=Kubernetes Scheduler
Documentation=https://github.com/kubernetes/kubernetes
[Service]
EnvironmentFile=/opt/kubernetes/cfg/kube-scheduler.conf
ExecStart=/opt/kubernetes/bin/kube-scheduler \$KUBE_SCHEDULER_OPTS
Restart=on-failure
[Install]
WantedBy=multi-user.target
EOF
(21) start Kube scheduler.
systemctl daemon-reload
systemctl start kube-scheduler
systemctl enable kube-scheduler
(22) check the status of Kube scheduler.
systemctl status kube-scheduler.service
The output information is as follows:
kube-scheduler.service - Kubernetes Scheduler
 Loaded: loaded (/usr/lib/systemd/system/kube-scheduler.service; enabled; vendor preset: disabled)
 Active: active (running) since Tue 2022-02-08 20:43:01 CST; 1h 8min ago
(23) view the status information of the master node.
kubectl get cs
The output information is as follows:
NAME                   STATUS    MESSAGE             ERROR
etcd-0                 Healthy   {"health":"true"}
controller-manager     Healthy   ok
scheduler              Healthy   ok
4. Deploy Node
(1) Create a script file "kubeconfig" on the master node and enter the following:
APISERVER=${1}
SSL_DIR=${2}

# Create kubelet bootstrapping kubeconfig
export KUBE_APISERVER="https://$APISERVER:6443"

# Set cluster parameters
kubectl config set-cluster kubernetes \
  --certificate-authority=$SSL_DIR/ca.pem \
  --embed-certs=true \
  --server=${KUBE_APISERVER} \
  --kubeconfig=bootstrap.kubeconfig

# Set client authentication parameters
# Note that the token ID here needs to be the same as the token The IDS in the CSV file are consistent.
kubectl config set-credentials kubelet-bootstrap \
  --token=05cd8031b0c415de2f062503b0cd4ee6 \
  --kubeconfig=bootstrap.kubeconfig

# Setting context parameters
kubectl config set-context default \
  --cluster=kubernetes \
  --user=kubelet-bootstrap \
  --kubeconfig=bootstrap.kubeconfig

# Set default context
kubectl config use-context default --kubeconfig=bootstrap.kubeconfig

#----------------------

# Create Kube proxy kubeconfig file

kubectl config set-cluster kubernetes \
  --certificate-authority=$SSL_DIR/ca.pem \
  --embed-certs=true \
  --server=${KUBE_APISERVER} \
  --kubeconfig=kube-proxy.kubeconfig

kubectl config set-credentials kube-proxy \
  --client-certificate=$SSL_DIR/kube-proxy.pem \
  --client-key=$SSL_DIR/kube-proxy-key.pem \
  --embed-certs=true \
  --kubeconfig=kube-proxy.kubeconfig

kubectl config set-context default \
  --cluster=kubernetes \
  --user=kube-proxy \
  --kubeconfig=kube-proxy.kubeconfig

kubectl config use-context default --kubeconfig=kube-proxy.kubeconfig
(2) Execute the script file "kubeconfig".
bash kubeconfig 192.168.79.11 /opt/ssl/k8s/
The output information is as follows:
Cluster "kubernetes" set.
User "kubelet-bootstrap" set.
Context "default" created.
Switched to context "default".
Cluster "kubernetes" set.
User "kube-proxy" set.
Context "default" created.
Switched to context "default".
(3) Copy the configuration file generated on the master node to node1 node and node2 node.
scp bootstrap.kubeconfig kube-proxy.kubeconfig \
root@node1:/opt/kubernetes/cfg/

scp bootstrap.kubeconfig kube-proxy.kubeconfig \
root@node2:/opt/kubernetes/cfg/
(4) Unzip the file "linux-dekudz-node-dekudz-node-1".
tar -zxvf kubernetes-node-linux-amd64.tar.gz
(5) On node1 node, copy kubelet and Kube proxy to the directory "/ opt/kubernetes/bin /".
cd kubernetes/node/bin/
cp kubelet kube-proxy /opt/kubernetes/bin/
(6) Create a script file "kubelet.sh" on node1 node, and enter the following:
#!/bin/bash

NODE_ADDRESS=$1
DNS_SERVER_IP=${2:-"10.0.0.2"}

cat <<EOF >/opt/kubernetes/cfg/kubelet

KUBELET_OPTS="--logtostderr=true \\
--v=4 \\
--hostname-override=${NODE_ADDRESS} \\
--kubeconfig=/opt/kubernetes/cfg/kubelet.kubeconfig \\
--bootstrap-kubeconfig=/opt/kubernetes/cfg/bootstrap.kubeconfig \\
--config=/opt/kubernetes/cfg/kubelet.config \\
--cert-dir=/opt/kubernetes/ssl \\
--pod-infra-container-image=registry.cn-hangzhou.aliyuncs.com/google-containers/pause-amd64:3.0"

EOF

cat <<EOF >/opt/kubernetes/cfg/kubelet.config

kind: KubeletConfiguration
apiVersion: kubelet.config.k8s.io/v1beta1
address: ${NODE_ADDRESS}
port: 10250
readOnlyPort: 10255
cgroupDriver: systemd
clusterDNS:
- ${DNS_SERVER_IP}
clusterDomain: cluster.local.
failSwapOn: false
authentication:
  anonymous:
    enabled: true
EOF

cat <<EOF >/usr/lib/systemd/system/kubelet.service
[Unit]
Description=Kubernetes Kubelet
After=docker.service
Requires=docker.service

[Service]
EnvironmentFile=/opt/kubernetes/cfg/kubelet
ExecStart=/opt/kubernetes/bin/kubelet \$KUBELET_OPTS
Restart=on-failure
KillMode=process

[Install]
WantedBy=multi-user.target
EOF

systemctl daemon-reload
systemctl enable kubelet
systemctl restart kubelet
(7) Execute the script file "kubelet.sh" on the node1 node.
bash kubelet.sh 192.168.79.12
Tip: the IP address of node1 node specified here.
(8) Check the status of Kubelet on node1 node.
systemctl status kubelet
The output information is as follows:
kubelet.service - Kubernetes Kubelet Loaded: loaded
(/usr/lib/systemd/system/kubelet.service; enabled; vendor preset:
disabled) Active: active (running) since Tue 2022-02-08 23:23:52 CST;
3min 18s ago
(9) Create a script file "proxy.sh" on node1 node and enter the following
#!/bin/bash

NODE_ADDRESS=$1

cat <<EOF >/opt/kubernetes/cfg/kube-proxy

KUBE_PROXY_OPTS="--logtostderr=true \\
--v=4 \\
--hostname-override=${NODE_ADDRESS} \\
--cluster-cidr=10.0.0.0/24 \\
--proxy-mode=ipvs \\
--kubeconfig=/opt/kubernetes/cfg/kube-proxy.kubeconfig"

EOF

cat <<EOF >/usr/lib/systemd/system/kube-proxy.service
[Unit]
Description=Kubernetes Proxy
After=network.target

[Service]
EnvironmentFile=-/opt/kubernetes/cfg/kube-proxy
ExecStart=/opt/kubernetes/bin/kube-proxy \$KUBE_PROXY_OPTS
Restart=on-failure

[Install]
WantedBy=multi-user.target
EOF

systemctl daemon-reload
systemctl enable kube-proxy
systemctl restart kube-proxy
(10) Execute the script file "proxy.sh" on node1 node.
bash proxy.sh 192.168.79.12
(11) Check the status of Kube proxy on node1 node.
systemctl status kube-proxy.service
The output information is as follows:
kube-proxy.service - Kubernetes Proxy
 Loaded: loaded (/usr/lib/systemd/system/kube-proxy.service; enabled; vendor preset: disabled)
 Active: active (running) since Tue 2022-02-08 23:30:51 CST; 9s ago
(12) Check the request information of node1 node to join the cluster on the master node and execute the command:
kubectl get csr
The output information is as follows:
NAME                                                 ... CONDITION
node-csr-Qc2wKIo6AIWh6AXKW6tNwAvUqpxEIXFPHkkIe1jzSBE ... Pending
(13) Approve the request of node1 node on the master node and execute the command:
kubectl certificate approve \
node-csr-Qc2wKIo6AIWh6AXKW6tNwAvUqpxEIXFPHkkIe1jzSBE
(14) View the node information in the Kubernetes cluster on the master node and execute the command:
kubectl get node
The output information is as follows:
NAME            STATUS   ROLES    AGE   VERSION
192.168.79.12   Ready    <none>   85s   v1.18.20
Tip: node1 node has successfully joined the Kubernetes cluster at this time.
(15) Repeat steps 4 to 14 on the node2 node, and join the node2 node into the cluster in the same way.
(16) View the node information in the Kubernetes cluster on the master node and execute the command:
kubectl get node
The output information is as follows:
NAME             STATUS   ROLES     AGE     VERSION
192.168.79.12   Ready    <none>   5m47s   v1.18.20
192.168.79.13   Ready    <none>   11s     v1.18.20
So far, a three node Kubernetes cluster has been successfully deployed using binary packages.