- 📢 Blog home page: https://blog.csdn.net/zhangay1998
- 📢 Welcome to praise 👍 Collection ⭐ Leaving a message. 📝 Please correct any errors!
- 📢 This article was originally written by little Y, who knocked the code blankly, and was first launched in CSDN 🙉
- 📢 The future is long, and it is worth our efforts to go to a better life ✨
📢 preface
- ❄️ The vast earth is broken by a sword, where is the prosperity and singing. Leaning on the clouds, thousands of pots hide loneliness, even if others laugh at me.
- 🐵 Looking back, it was another pleasant weekend~
- 👻 I'm going to roll up my sleeves to fight in the king's Canyon!
- 🔔 Ding Dong ~ it's Han Xiao yun'er who sent a message~
- 😐 I had to stop going to the canyon and skillfully open the wechat chat box.
- Xiao Yuner 👩: Little brother Y, what are you doing these days ~, why don't you make games!
- Little y (blogger): I'm too busy. I'm busy making money to buy skin and fill games~
- Xiao Yuner 👩: (dull)... Little YY, you've changed. It's agreed to take me to learn more games!!!
- Y: Emma... Since you are so eager to learn, I will meet your requirements!
- Xiao Yuner 👩: OK, OK ~ brother Y, I'm very interested in the game of Royal war recently. Can you
- Little Y: Royal war ~ well, I used to like playing! Then I'll satisfy you to make a game that reproduces the Royal war playing method!
- Xiao Yuner 👩: Brother Y, it's very kind of you ~ then I expect you to finish it and study hard again!
- Y: no problem. You see, I'll start doing it now!
- Xiao Yuner 👩: OK, little Y brother, the old rules! You can do it. Don't be too broad to move your feet!

✨ text
-
Because of my busy work recently, I haven't written an article on making games for a long time
-
When you have time this weekend, start reproducing a game Demo that was very popular in previous years

💫 Production ideas (game planning)
-
Since you want to start developing a project, according to the old rules, it's to sort out your ideas first
-
Since we do a similar game according to the playing method of the Royal war, we naturally have to get familiar with the Royal war
-
Let's first think about the game play of the Royal war. The core play of the Royal war is the battle module
-
Two people have their own card group and are limited by holy water. Only when the number of holy water is met can they summon the corresponding card characters to fight in the scene!
-
When the holy water is enough, you can drag the corresponding card to the scene, only to your own territory~
-
Here we should pay attention to giving a monster model information to no card, and call it when necessary!
-
Then the game object corresponding to the card will fight in the middle until the other party's king tower is dry blasted, even if it is a victory!
-
It seems quite simple to say, but there are operations such as card drawing, card storage, networking and database
-
In fact, some functions are irrelevant and are not very useful for us to simply reproduce a game
-
Therefore, it will certainly castrate some functions and only develop the core playing methods. After all, it is still troublesome to fully develop a game such as Royal war!
-
Let's play a stand-alone game and run to the core of the combat module!
-
Let's take a look at the game steps and mind map, and then start to operate!

🎉 Start making
-
First, open Unity and create a new project. The blogger will develop Unity 2018 four point two four
-
If you have friends to download the game resources in this article, use Unity version as appropriate~
-
It must be unrealistic to write every detail, because the production process is smelly and long
-
Therefore, the article only introduces the key operations and configurations, and refuel together~
🏳️🌈 Step 1: find the appropriate model + animation configuration
-
Before production, I checked on the Internet that the Royal war was developed with H5, so we have no way. There is no suitable resource package to use directly
-
Then we just adapt the model + animation ourselves. This is a hard work~
-
Let's use the resources at hand to make the appropriate model ourselves
-
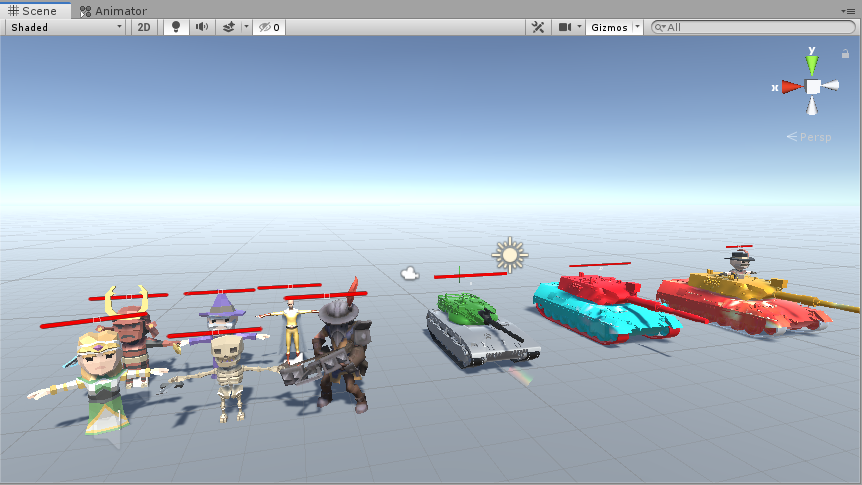
I sorted out some models from my own resources. Let's take a look at them ~ a mixed model!
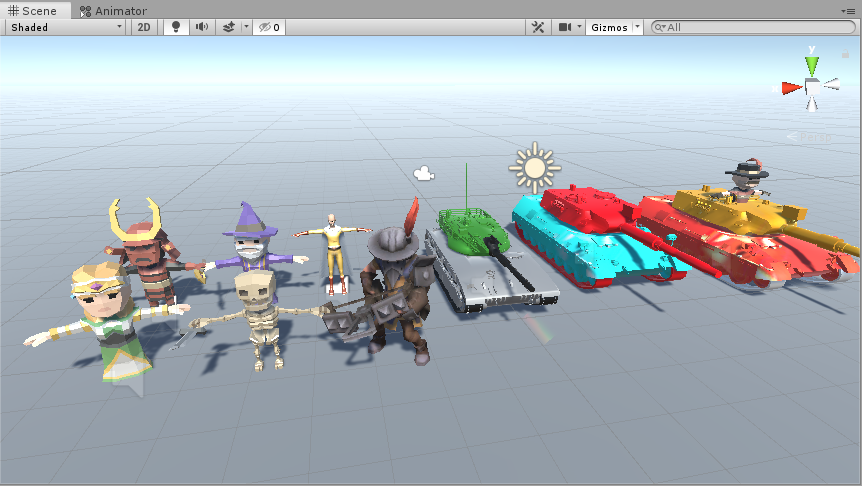
-
From left to right, I call them Princess mia, flame warrior, Dark Wizard, skeleton soldier, one punch Superman, Archer, Hulk, Captain America and iron man!
-
Ha ha, I named it all, especially the last "Marvel three". If master Stan Lee sees it, he will beat me angrily~

-
With the model, the animation will be configured by itself
-
Each model should write an animation controller to control their animation, such as walking, attack and death animation.
-
We need a simple setup here ~ there's no need to fix some unnecessary trouble
Model animation configuration
If you are not familiar with the animation system here, you can see an article I introduced the animation system in detail!
Unity zero basis to advanced ☀️| Nearly 10000 word tutorial: comprehensive analysis of the animation system foundation in unity + practical exercise
Let's take the animation configuration of the "Marvel big three" as an example
Let's look at the animation configuration of iron man first
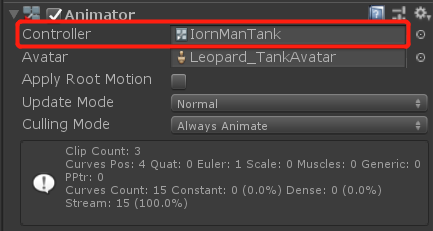
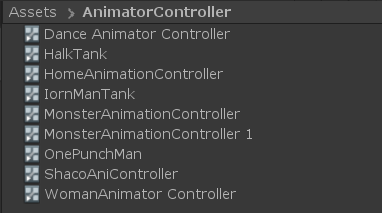
- First, right-click Create - > animator controller in the engineering interface to Create an animation controller
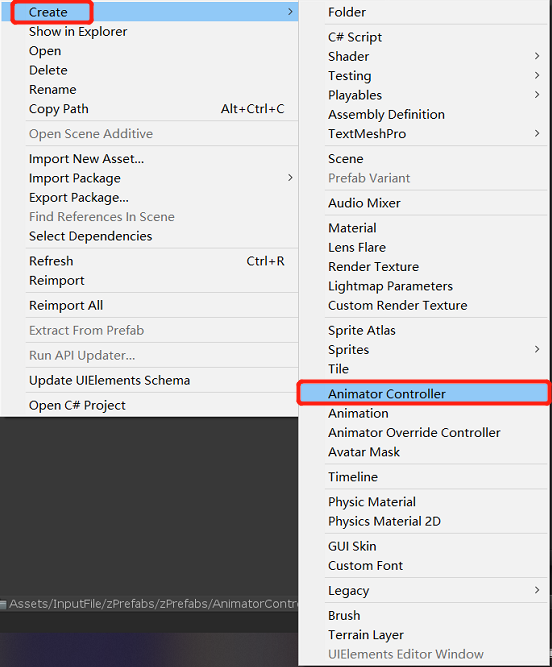
- Then add Animator animation component to iron man, and add the animation controller just created to Animator animation component
Let's take a look at my own animation
🎈 Iron man attack animation and death animation
🎈 Hulk attack animation and death animation

This animation effect ~ personal production, pure entertainment, ha ha ha ~ everyone will just look at it 😂
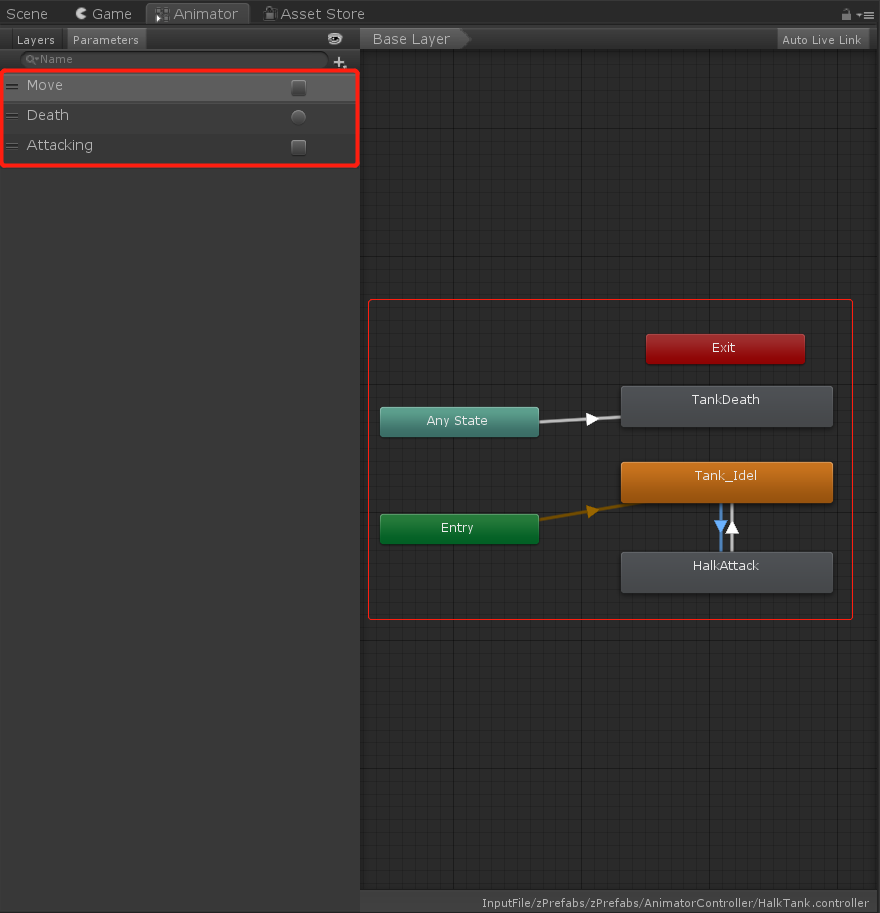
Then click the animation controller we created to configure it
-
Drag the created animation and configure it as shown in the following figure
-
Create three animation parameters: Trigger type movement, Bool type death and Trigger type attack
-
Because both movement and attack are persistent, it is better to use Bool value control
-
Death will only be executed once. It is appropriate to use the trrigger type parameter!
-
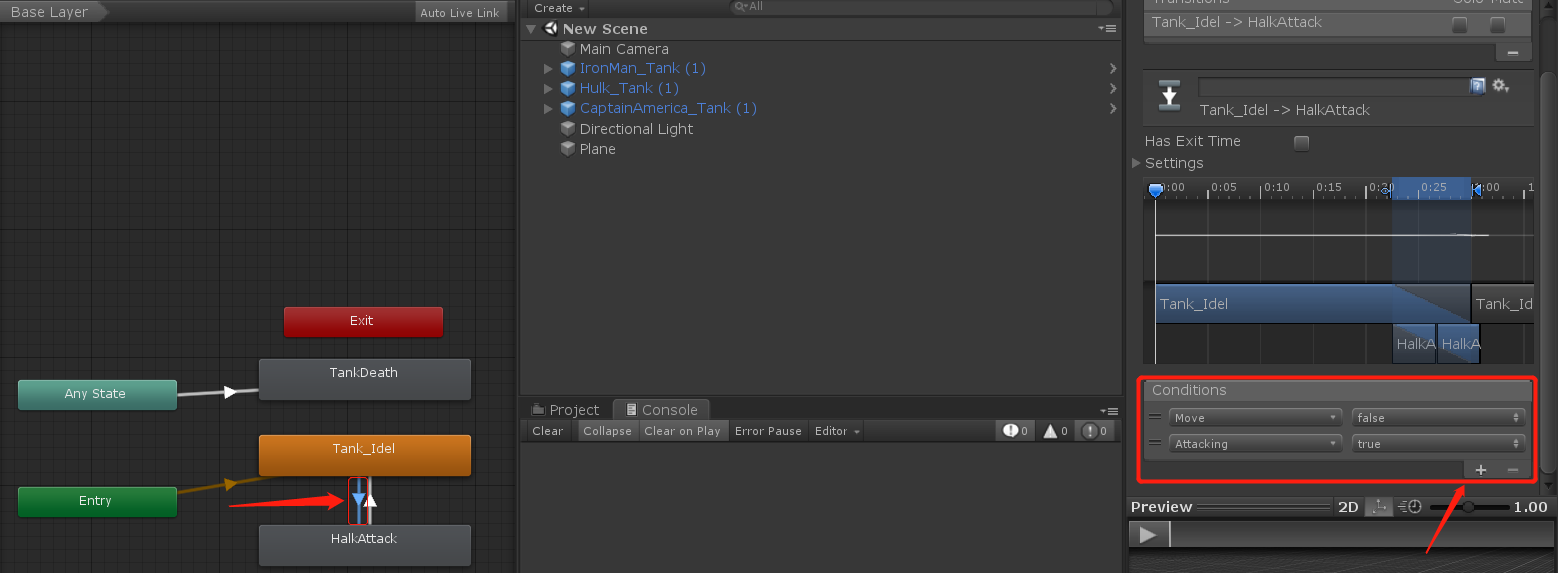
We click the arrow in the animation controller to configure the three parameters, which are:
-
Add corresponding conditions when moving to attack: Move becomes false and attack becomes true
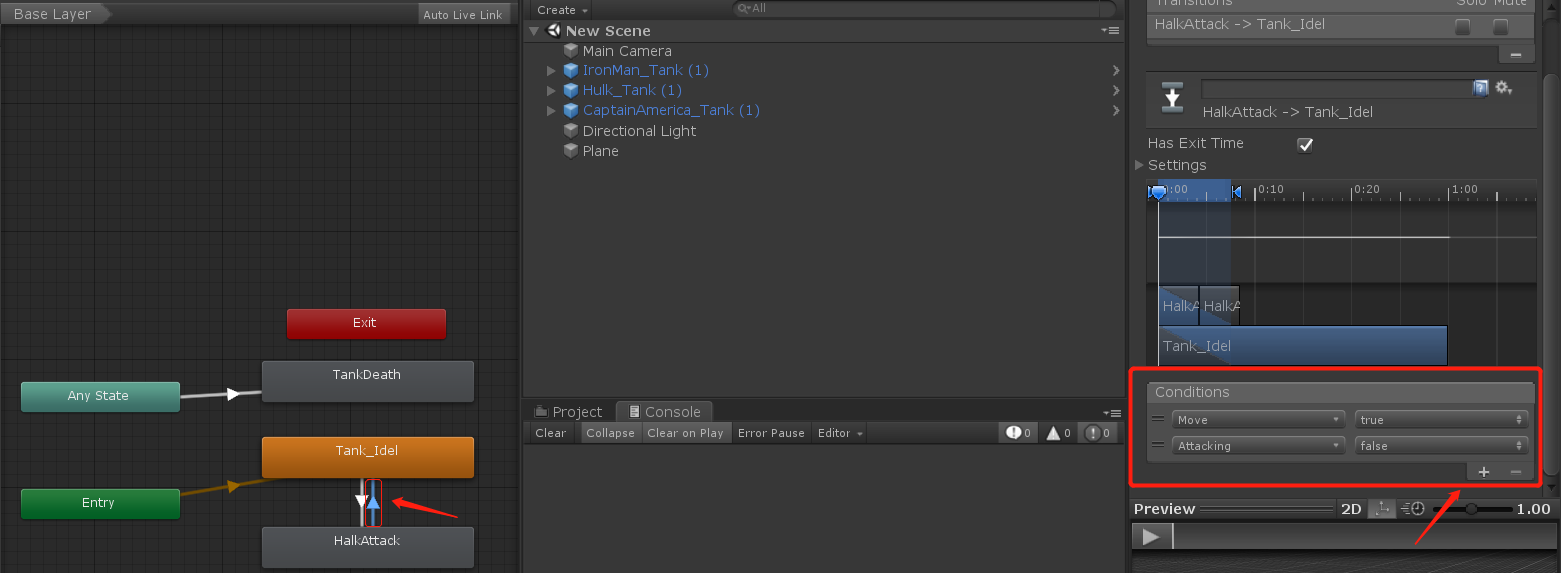
Add corresponding conditions when the attack points to the Move: Move becomes true and attack becomes false
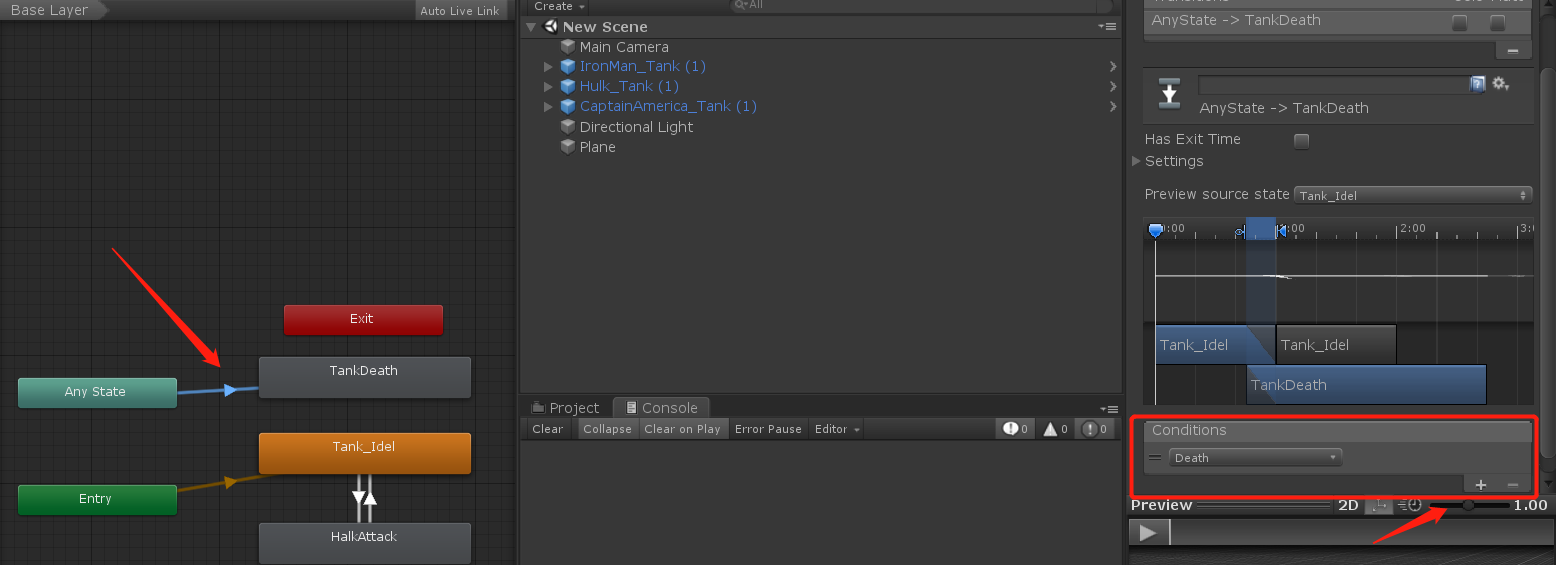
When pointing to Death, execute Death
-
Take the animation controller configuration of Hulk as an example. Other model animations have the same parameter configuration
-
I won't introduce them one by one here. Just configure them directly!
-
Finally, set all models as preforms for standby generation!
🏳️🌈 Step 2: battle scene configuration
If you want the game to run smoothly, you must need a game scene
-
Because the Royal war is a production method of realizing 3d effect with 2d picture
-
I certainly can't achieve such advanced operation myself. The lighting configuration and camera processing can't make my scalp numb
-
So let's simply build a game scene so that we can run the game!
-
Create two new game objects, namely the enemy's scene area and our scene area
-
Because when we fight, we can only drag cards to our own area
-
In the back, different scene levels should be set to distinguish, so two game objects should be used
-
Then search the Internet for some pictures of the Royal war scene, add them to the material, and then drag them to the scene!
-
Conditional can also add some embellishment, not here, time is a little insufficient

-
Add an upper level layout to our playerScene scene area. The layout is: Ground

-
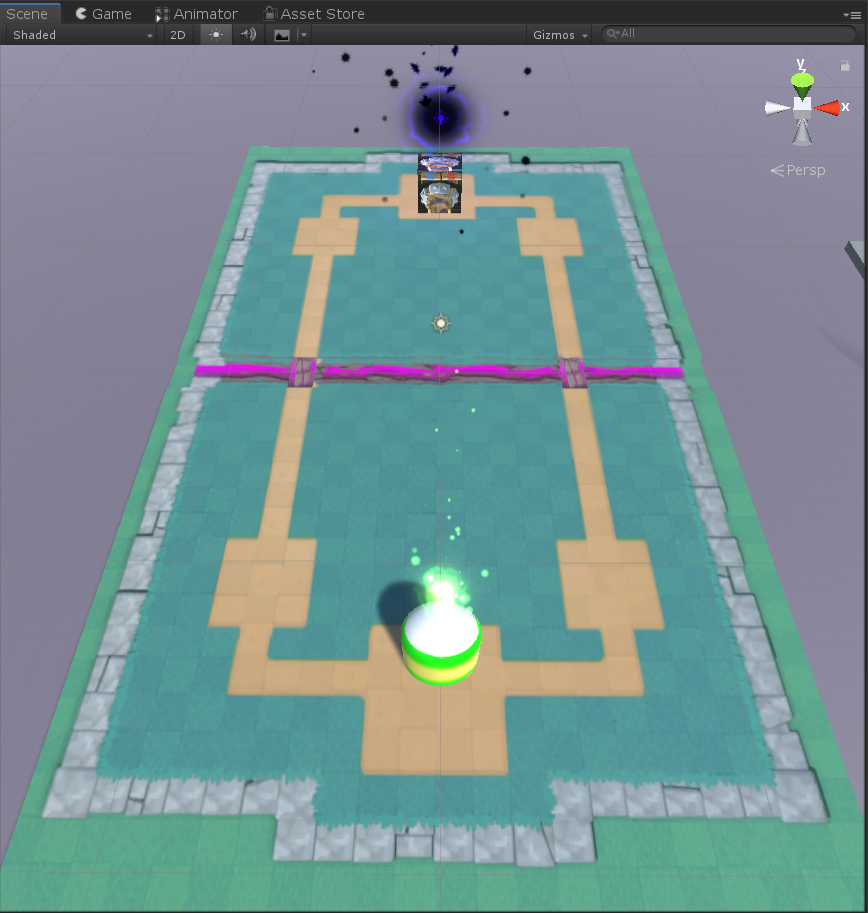
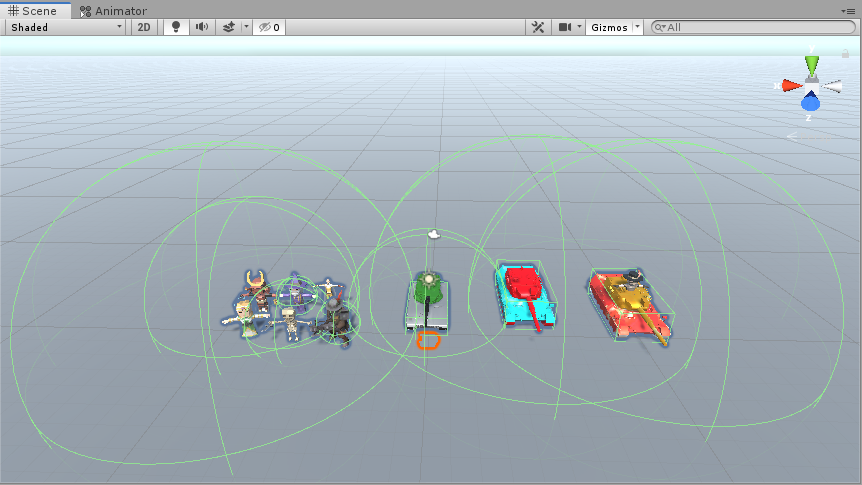
Let's take a look at the scene of the building, plus the special effects resource package shared earlier, which is just used!
-
To be honest, the scene is really lou, but we have tried our best to build it like this, and the control of the camera angle is still much worse 😨
-
This also has to make me more admire the production of the Royal war 😊
-
To produce such a good 3d effect with a 2d UI, you really have strong control over the perspective and picture rendering 🤪!
🏳️🌈 Step 3: automatic routing design
-
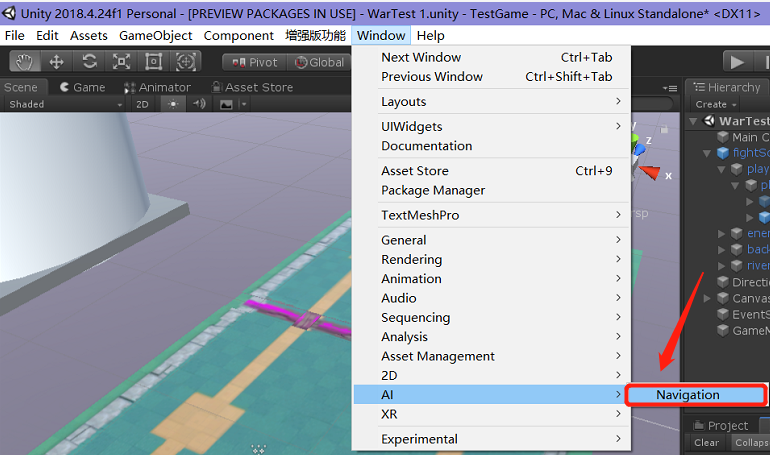
Click windows - > Ai - > navigation in the menu bar
-
Different versions may be located in different locations, but they should be found under the Windows menu!
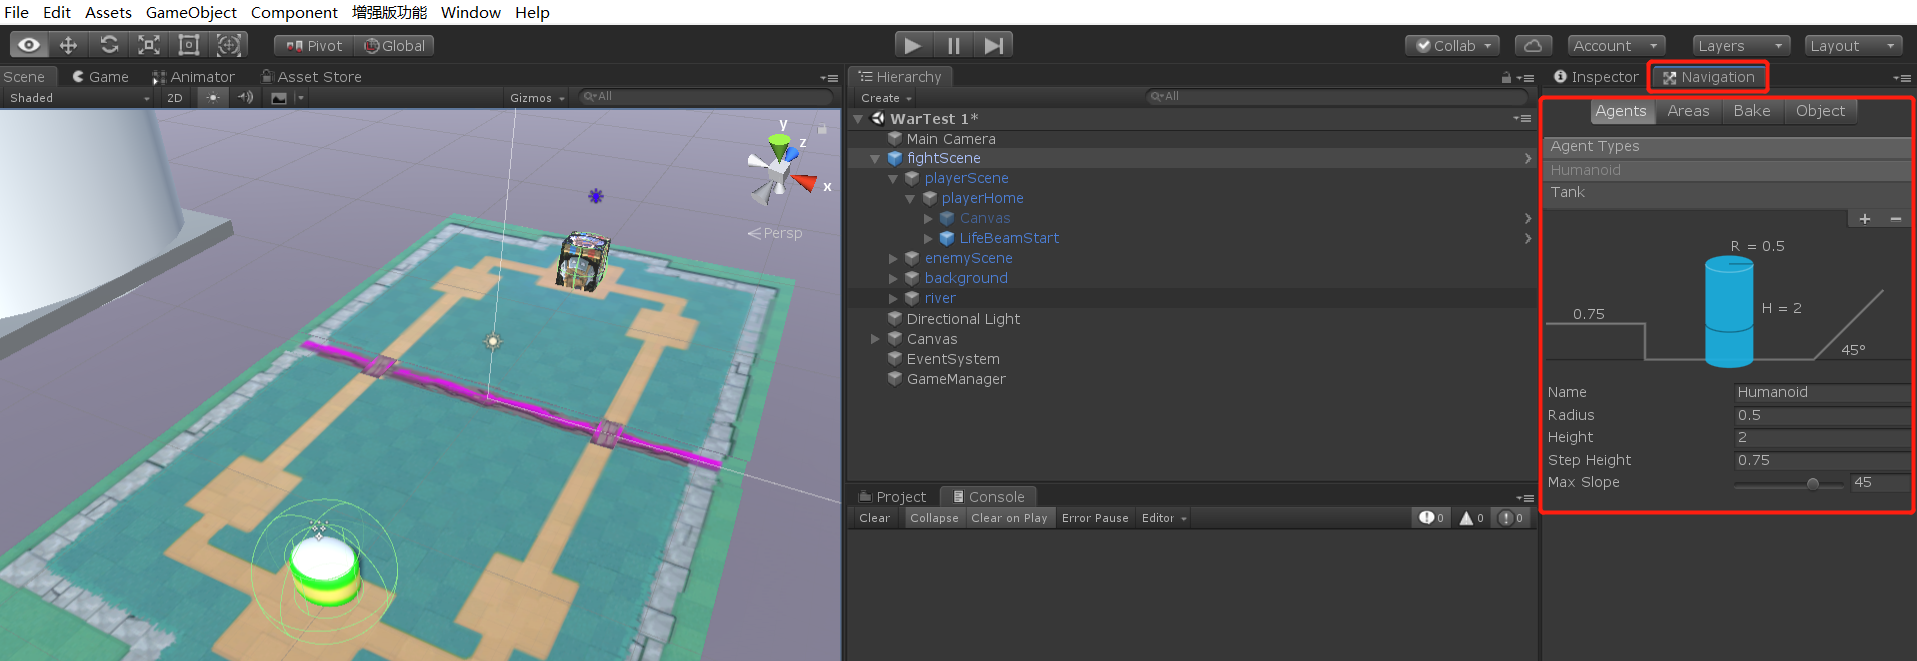
Then it will jump to this page, which is the panel for setting the Navigation of Unity's wayfinding system
-
For the time being, let's not delve into the property values of these Navigation panels
-
In fact, it is to set the path configuration that can be taken during pathfinding. Sometimes the road surface is uneven and will be used when it is very complex
-
Then we are just a plane here, so we don't need to set too many settings, just directly default the attribute value!
-
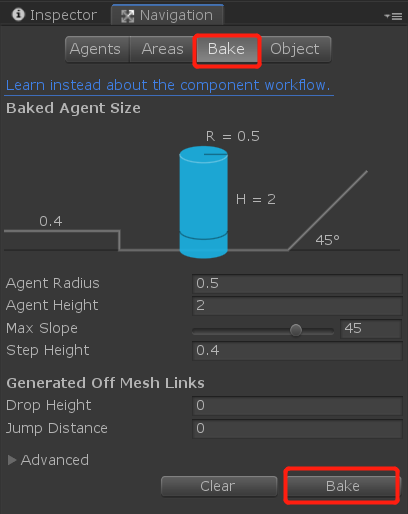
Then directly select the Bake interface and click Bake to automatically set the executable pathfinding environment configuration!
-
When we click Bake, we may find that there is no change in the scene~
-
After normal setting, select the Navigation panel, and a blue layer that can find the way will appear in the scene!
-
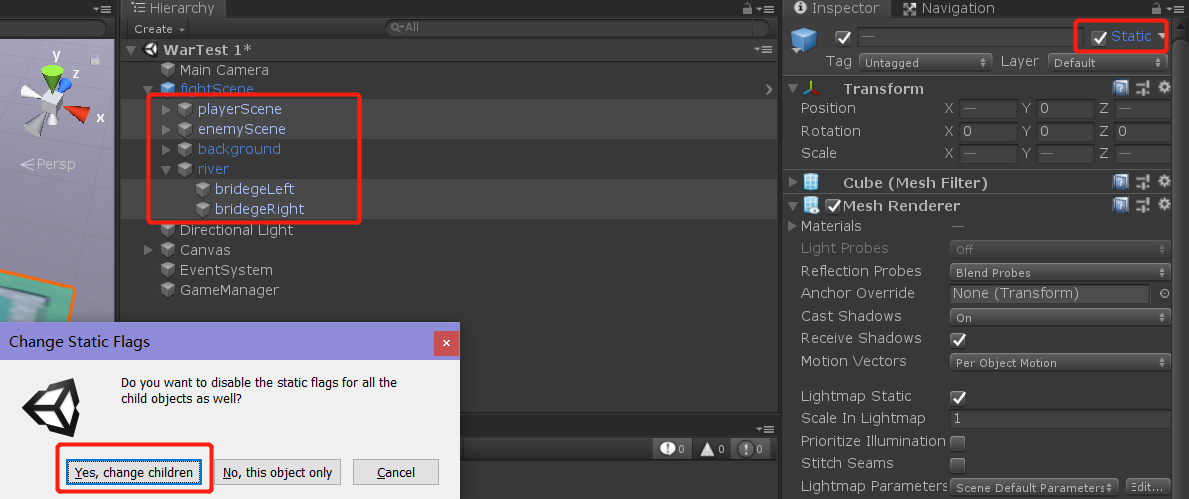
Then we may not set up a static scene here~
-
We select the game object in the scene as shown below, and then click Static on the right to set the selected object as a Static object
-
In this way, the navigation route can be set correctly when you click Bake
-
After setting the static object, click Bake again! It looks like the following, which indicates that the navigation feasible route is set successfully:
-
The blue area represents the route we can walk to find the way, which just includes the two bridges in the scene!

-
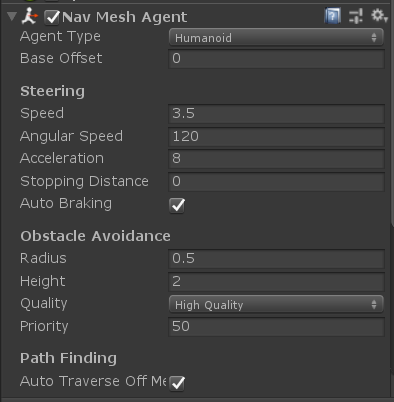
Then add this Nav Mesh Agent component to all our models
-
In this way, you can use the code to call NAV Setdestination (target. Position), confirm the pathfinding target position and enable automatic pathfinding
-
Then use NAV If issstopped = true, automatic pathfinding can be stopped temporarily~
-
In this way, automatic pathfinding is set. When it is necessary to start automatic pathfinding
-
Just set the startup in the code!
🏳️🌈 Step 4: Monster logic script writing (Key + important)
- The models, animations and scenes are very random and simple. We just quickly develop a game Demo of game playing methods
- It's not a complete development of a game. Time doesn't allow it
- So let's pack light and start writing monster logic scripts
- Because there are many contents in the code part, only the key code is introduced in this article
- After all, most people just look at the development process. If you need a complete code project, just download the source code project below~
Let's take a look at the basic attributes of Monsters:
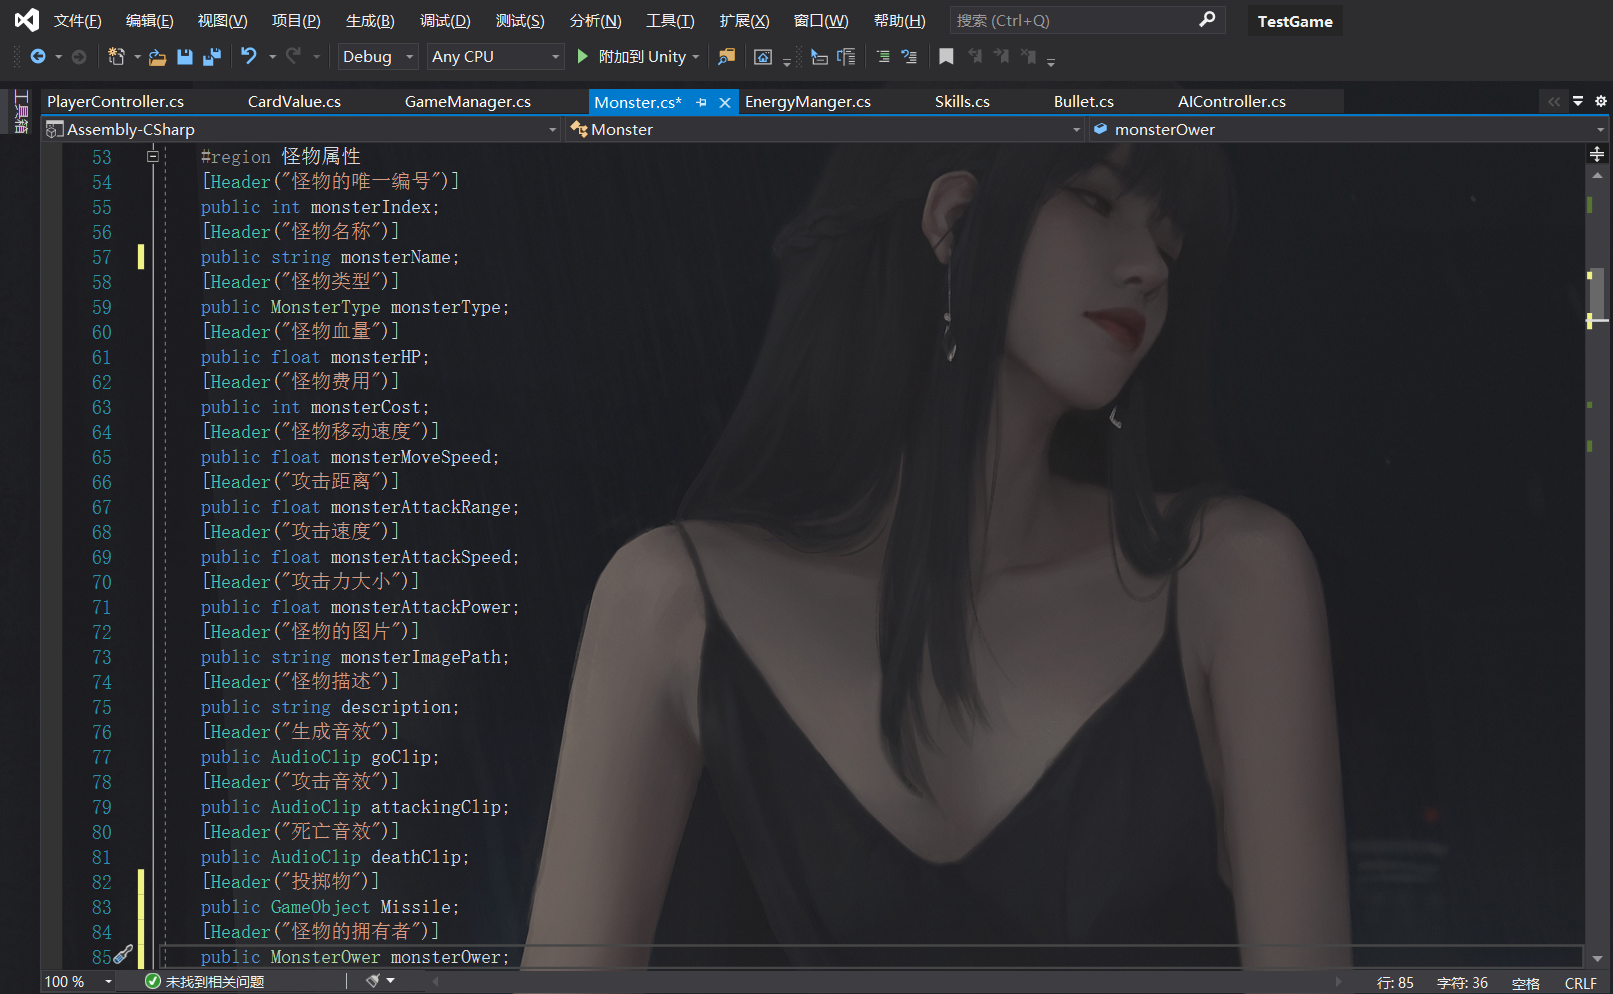
- There is a unique number, which is used as a sign when generating different monsters
- There are also monster name, blood volume, cost required for generation, movement speed, attack distance, attack speed, attack power, monster card picture, monster description, monster generation sound effect, attack sound effect, death sound effect...
- In this way, the properties of the monster are almost finished. The following is to write the method implementation according to these properties!
There are two types of Monsters: short-range and long-range attacks, which are represented by an enumeration here
/// <summary>
///Monster type, melee or throwing
/// </summary>
public enum MonsterType
{
    Infighting,
    Throw
}
- Among them, the monster itself has several states: pathfinding state, attack state, static state and death state
- These states are defined for the playback logic processing of animation
/// <summary>
///Monster state
/// </summary>
public enum MonsterState
{
    Finding,
    Attacking,
    Stopping,
    Death
}
You will also use the following attributes, monster status, attack range, navigation target, etc., which will be used later!
    public bool isHome;

    //The current state of the monster
    public MonsterState monsterCrtstate;

    //Monster's last state
    private MonsterState monsterLastState;

    [HideInInspector]
    public NavMeshAgent nav;

    private Animator ani;

    //Attack range detector
    private SphereCollider attackCol;

    //Navigation target
    public Transform target;

    [HideInInspector]
    //Monster attack queue
    public List<Monster> monsterAttackList;

    [HideInInspector]
    //Monster attacked queue
    public List<Monster> monsterBeAttackList;

    //Is it put into the scene
    private bool isEndDrag = false;

    //Acquire current skills
    [HideInInspector]
    public Skills crtSkill;

    //Blood strip
    private Slider haemalStrand;

    private AudioSource aud;
Find pathfinding, animation, sound, and a sphere collider trigger that controls the attack range in wake
    private void Awake()
    {
            nav = GetComponent<NavMeshAgent>();
            ani = GetComponent<Animator>();
            aud = GetComponent<AudioSource>();
            attackCol = GetComponent<SphereCollider>();

        attackCol.isTrigger = true;
        MonsterInit();
    }
There is also a monster initialization processing MonsterInit method to set various initial attributes of Monsters:
    /// <summary>
    ///Monster initialization
    /// </summary>
    private void MonsterInit()
    {
        crtSkill = GetComponent<Skills>();

        if (crtSkill == null)
        {
            Debug.Log("Null");
        }
        if(nav != null)
        {
            nav.stoppingDistance = monsterAttackRange;
        }
        monsterCrtstate = MonsterState.Stopping;
        monsterLastState = MonsterState.Stopping;
        attackCol.radius = monsterAttackRange;
        monsterAttackList = new List<Monster>();
        monsterBeAttackList = new List<Monster>();
        monsterCrtHP = monsterHP;
        haemalStrand = transform.Find("Canvas").GetChild(0).GetComponent<Slider>();
        //Select the navigation target according to the monster's camp

    }
-
Then judge in Update. When the monster is placed in the scene
-
If the current state is inconsistent with the last state, it is a method of state judgment
-
If there are enemies in the attack range, switch the current state to the attack state, otherwise switch to the pathfinding state
-
Then, the following MonsterStateSwitch() method is the specific method for different state switching, which will be described below.
-
As for how to find the way, we have already talked about it in the previous step~
    void Update()
    {

        if(!isEndDrag)
            return;

        //Continuous skill trigger
        if(crtSkill.skilltype == SkillType.Update)
        {
            crtSkill.use();
        }

        //If there is an object in the attack list, it will enter the attack state
        if(monsterAttackList.Count > 0)
        {
            monsterCrtstate = MonsterState.Attacking;

            if(monsterAttackList[0] != null)
            {
                //Turn to target
                MonsterLookAtTarget(monsterAttackList[0].transform);
            }
        }
        else if(monsterAttackList.Count == 0)
        {
            monsterCrtstate = MonsterState.Finding;
        }

        //State judgment
        if(monsterCrtstate != monsterLastState)
        {
            MonsterStateSwitch();
            monsterLastState = monsterCrtstate;
        }
        haemalStrand.transform.parent.LookAt(-Camera.main.transform.position);

    }
-
Then code the trigger on the monster
-
When an enemy monster or enemy crystal is detected within the trigger range, it will be added to the attack list for attack
-
When the game object disappears (is destroyed) from the trigger range, the game object is removed
    private void OnTriggerEnter(Collider other)
    {
        if (other.isTrigger)
            return;

        if(other.CompareTag(GameConst.GAME_TAG_MONSTER) || other.CompareTag(GameConst.GAME_TAG_NAV_END) || other.CompareTag(GameConst.GAME_TAG_NAV_START))
        {
            Monster otherMonster = other.GetComponent<Monster>();

            if (otherMonster == null)
                return;

            if (otherMonster.monsterOwer != this.monsterOwer)
            {
                //Set as attack target
                monsterAttackList.Add(otherMonster);

                otherMonster.monsterBeAttackList.Add(this);
            }
        }
    }

    private void OnTriggerExit(Collider other)
    {
        if (other.isTrigger)
            return;

        if (other.CompareTag(GameConst.GAME_TAG_MONSTER) || other.CompareTag(GameConst.GAME_TAG_NAV_END) || other.CompareTag(GameConst.GAME_TAG_NAV_START))
        {
            Monster otherMonster = other.GetComponent<Monster>();

            if (otherMonster != null && otherMonster.monsterOwer != this.monsterOwer)
            {
                //Remove the object from the attack queue
                monsterAttackList.Remove(otherMonster);
                otherMonster.monsterBeAttackList.Remove(this);
            }
        }
    }
- A method is also defined, which is called after dragging the card to the scene.
- After dragging into the scene, load and release sounds and skills
- It also judges its own tag tag. If it is our monster, change the pathfinding target to enemy crystal
- If it is an enemy monster, change the pathfinding target to our crystal for pathfinding
    /// <summary>
    ///End drag means that the monster enters the scene
    /// </summary>
    public void IsEndDrag()
    {
        this.gameObject.tag = "Monster";

        if(goClip == null)
        {
            goClip = Resources.Load<AudioClip>(GameConst.AUDIO_GO);
        }
        aud.clip = goClip;

        aud.Play();

        //AudioSource.PlayClipAtPoint(goClip, transform.position + Vector3.up * 48 - Vector3.right *40, 10f);

        isEndDrag = true;

        //War roar skill trigger
        if (crtSkill.skilltype == SkillType.Start && crtSkill != null)
        {
            crtSkill.use();
        }
        if (monsterOwer == MonsterOwer.Player)
        {
            target = GameObject.FindGameObjectWithTag(GameConst.GAME_TAG_NAV_END).transform;
        }
        else
        {
            if (GameObject.FindGameObjectWithTag(GameConst.GAME_TAG_NAV_START).transform)
            {
                target = GameObject.FindGameObjectWithTag(GameConst.GAME_TAG_NAV_START).transform;
            }
        }
    }
- There is also a method that will be called in the animation frame
- If it is a melee attack, perform a melee attack, and if it is a long-range attack
    /// <summary>
    //Calling this method in animated frame event
    /// </summary>
    public void MonsterAttackOne()
    {
        if (attackingClip == null)
        {
            attackingClip = Resources.Load<AudioClip>(GameConst.AUDIO_ATTACK);
        }
        aud.clip = attackingClip;
        aud.Play();
        //AudioSource.PlayClipAtPoint(attackingClip, transform.position + Vector3.up * 48 - Vector3.right * 40 * 48,10f);

        if (monsterType == MonsterType.Infighting)
        {
            //Melee
            Inflict();
            //Call the injury method through the animation frame event
        }
        else
        {
            if (Missile == null)
                return;

            if(monsterAttackList.Count >0 && monsterAttackList[0] != null)
            {
                //Long range shooting, generating mission

                GameObject btn = Instantiate(Missile,transform.position +  transform.up, Quaternion.LookRotation(transform.forward));
                btn.GetComponent<Bullet>().target = monsterAttackList[0].transform;
                btn.GetComponent<Bullet>().attackHarm = monsterAttackPower;
            }
        }
    }
-
Finally, it is the method to control the monster animation state switching and perform the corresponding state operation.
-
This method will be called when the current state is different from the last state in Update!
-
In the method, we make different corresponding to different states of monsters to meet our needs~
  #region monster status
    /// <summary>
    ///Different state switching
    /// </summary>
    private void MonsterStateSwitch()
    {
        switch (monsterCrtstate)
        {
            case MonsterState.Attacking:
                MonsterStateAttacking();
                break;
            case MonsterState.Finding:
                MonsterStateFinding();
                break;
            case MonsterState.Stopping:
                MonsterStateStopping();
                break;
            case MonsterState.Death:
                MonsterStateDeath();
                break;
        }
    }
    /// <summary>
    ///The monster is in pathfinding state
    /// </summary>
    private void MonsterStateFinding()
    {
        nav.SetDestination(target.position);
        ani.SetBool(GameConst.MONSTER_ANIPARAM_MOVE, true);
        ani.SetBool(GameConst.MONSTER_ANIPARAM_ATTACK, false);
        nav.isStopped = false;
        FindWay();
    }
    //Set navigation target
    public void FindWay()
    {
        nav.SetDestination(target.position);
    }
    /// <summary>
    ///The monster is attacking
    /// </summary>
    private void MonsterStateAttacking()
    {
        ani.SetBool(GameConst.MONSTER_ANIPARAM_ATTACK, true);
        ani.SetBool(GameConst.MONSTER_ANIPARAM_MOVE, false);
        nav.isStopped = true;
    }
    /// <summary>
    ///The monster is under control
    /// </summary>
    private void MonsterStateStopping()
    {
        nav.isStopped = true;
    }
    /// <summary>
    ///Monster death
    /// </summary>
    private void MonsterStateDeath()
    {
        if (deathClip == null)
        {
            deathClip = Resources.Load<AudioClip>(GameConst.AUDIO_DEATH);
        }
        aud.clip = deathClip;
        aud.Play();
        //AudioSource.PlayClipAtPoint(deathClip, transform.position + Vector3.up * 48 - Vector3.right * 40 , 10f);
        ani.SetTrigger(GameConst.MONSTER_ANIPARAM_DEATH);
        //Dead language skill trigger
        if(crtSkill.skilltype == SkillType.End)
        {
            crtSkill.use();
        }
        //Remove yourself from the attacked list
        for (int i = 0; i < monsterBeAttackList.Count; i++)
        {
            monsterBeAttackList[i].monsterAttackList.Remove(this);
        }
        Destroy(this.gameObject, 2f);
    }
    #endregion
Here, the most important script method on the monster is completed!
This one is the one that writes the most implementation requirements. There may be a lot of code. Just sort it out carefully~
🏳️🌈 Step 5: configure the attack range trigger and sound processing of the model
Attack range trigger
- After reading some messy logic and various methods in the monster script above, do you feel a little big~
- It contains not only some basic attributes of monsters, but also various logic and state processing of monsters.
- It's a very important script! It contains an attack range and attack design processing.
- Let's make a configuration description for this piece!
When writing monster script, you should pay attention to it
I use triggers here to control an attack range, so we need to add triggers to all monster models
Take the iron man configuration as an example:
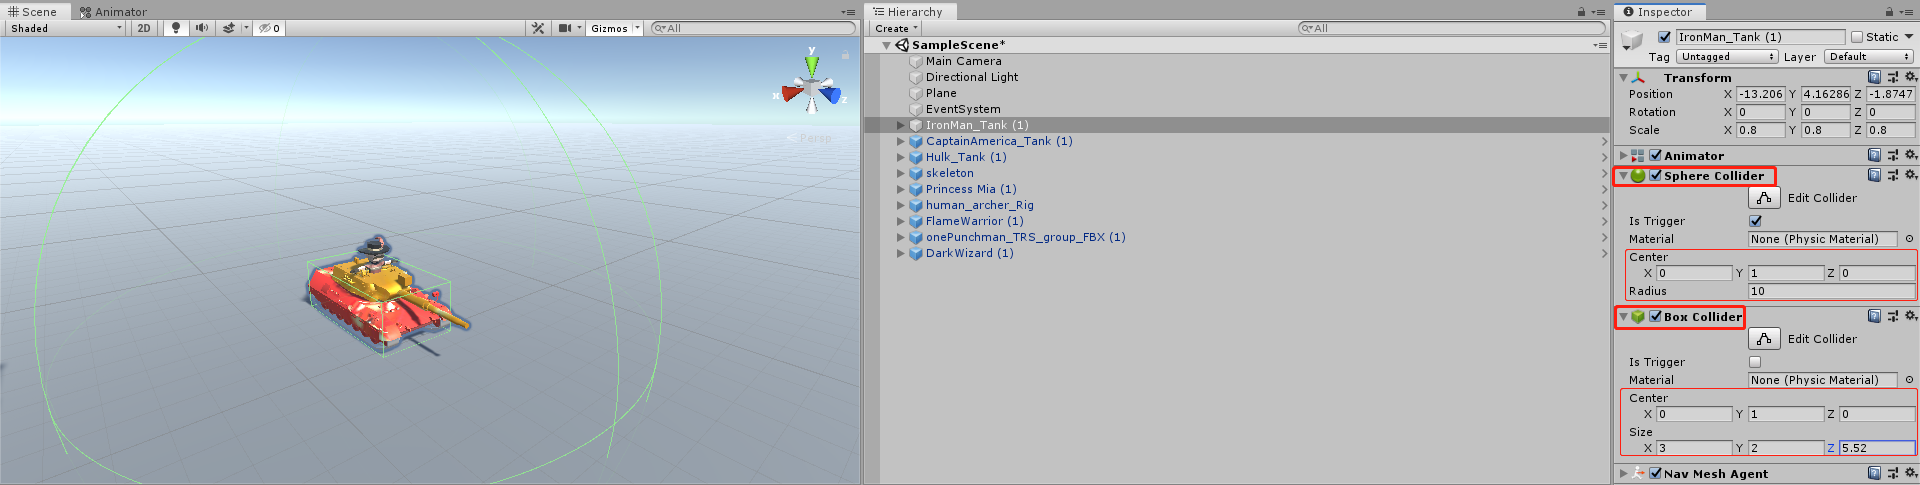
-
Select the model to be configured
-
Add the Sphere Collider component, check the is trigger option, set a default range = attack range, and let it act as a trigger
-
The Box Collider simulates a collision effect. You can adjust the size according to the model~
-
Then configure these two for all models below
-
It should be noted here that the attack range we are configuring now is the default attack range!
-
You can modify the attack range through the Monster script in the previous step~
Take a look at the final effect of my configuration: the spherical size is the attack range, and the Box type is the collision Box range!
Sound processing
-
The sound processing has been written in the Monster script
-
Includes a monster's appearance sound, attack sound and death sound
-
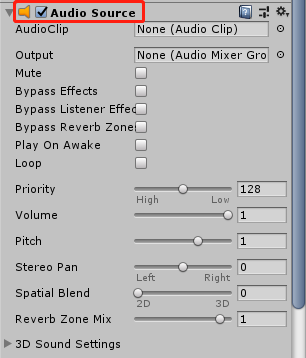
Then we just need to add an Audio Source component to each model body
-
Audio Source is a component for playing sound. There are also some attribute configurations. I won't talk about them here
-
We only need to add this component here. The sound is automatically loaded and played in the script
-
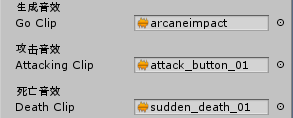
Remember that Monster's Monster attribute included the sound configuration at the beginning
-
Just add a different sound for each monster
-
Moreover, the judgment has been made in the script. If it is empty, load the sound file yourself~
-
This is the method called when the monster is dragged into the scene
//Drag to the scene
 if(goClip == null)
        {
            goClip = Resources.Load<AudioClip>(GameConst.AUDIO_GO);
        }
        aud.clip = goClip;

        aud.Play();
There are also voice processing methods called during attack and death
//attack
      if (attackingClip == null)
        {
            attackingClip = Resources.Load<AudioClip>(GameConst.AUDIO_ATTACK);
        }
        aud.clip = attackingClip;

        aud.Play();
//death
        if (deathClip == null)
        {
            deathClip = Resources.Load<AudioClip>(GameConst.AUDIO_DEATH);
        }

        aud.clip = deathClip;

        aud.Play();
At this point, almost all the components to be added to various models have been configured~
The next step is to design how to drag cards into the scene through the mouse and generate corresponding monsters!
🏳️🌈 Step 6: drag the mouse to generate monsters and cards (Key + important)
Finally, this step is reached ~ here is also a key core content of this game. Let's have a look!
Drag the mouse to generate a monster
Define a script named CardShow, which is responsible for the function implementation of dragging cards with the mouse
-
First, several interfaces are implemented
-
They are: ibegindraghandler, idraghandler, ienddraghandler, ipointenterenterhandler
-
These are the methods to realize mouse dragging. You can directly use them when you start dragging, when you are dragging, when you finish dragging, and when you enter the mouse
-
Let's take a look at the attribute definition of this script
-
First, there is a number to mark the unique mark of each monster, and random cards are generated into the card group~
-
Monster prefab, card prefab, monster script of the current monster, etc
-
Also, record the initial position of the card, so that you can directly return to the original position when you cancel the drag!
public class CardShow : MonoBehaviour, IBeginDragHandler, IDragHandler, IEndDragHandler, IPointerEnterHandler, IPointerExitHandler
{
    [HideInInspector]
    public int showMonsterIndex;//Monster number

    [HideInInspector]
    public int[] cardShowMonsterRange;//Random card group

    public GameObject monsterPrefab;//Monster preform

    [HideInInspector]
    public GameObject crtMonsterObj;//Current monster prefab

    [HideInInspector]
    public Monster crtMonster;//Gets the script of the current monster

    private GameObject showCardPropertyMSG;

    private Vector3 nowPos;//Card initial position
    private Transform parent;//The parent object of the initial card
    private Ray ray;
    private RaycastHit hit;
    private int laser;//layer
    private bool canMove = false;
}
- This part is the monster information displayed on each card, including monster blood, attack power, attack range and so on
   #region UI display
    private Text costText;

    private Image monsterImage;

    private Image crtImage;

    private object testImage;

    private GameObject crtCardValue;

    private Text monsterName;

    private Text showAttack;

    private Text showHp;

    private Text showAttackRange;

    private Text showMoveSpeed;

    private Text showSkillName;
    #endregion
- Then define a card initialization method and execute it in wake
- Record the initial position, and get and assign the attributes displayed on the card from the Monster script!
    private void Awake()
    {
        UIInit();
    }
    /// <summary>
    ///Initialization
    /// </summary>
    private void UIInit()
    {
        //Gets the layer named Ground
        laser = LayerMask.GetMask(GameConst.GAME_TAG_GROUND);
        //Record initial position
        nowPos = transform.position;

        parent = transform.parent;

        costText = GetComponentInChildren<Text>();

        monsterImage = transform.GetChild(0).GetComponent<Image>();

        crtCardValue = transform.GetChild(1).gameObject;

        monsterName = transform.GetChild(1).GetChild(1).GetComponent<Text>();

        crtImage = GetComponent<Image>();

        showAttack = transform.GetChild(1).GetChild(2).GetChild(0).GetComponent<Text>();
        showHp = transform.GetChild(1).GetChild(3).GetChild(0).GetComponent<Text>();
        showAttackRange = transform.GetChild(1).GetChild(4).GetChild(0).GetComponent<Text>();
        showMoveSpeed = transform.GetChild(1).GetChild(5).GetChild(0).GetComponent<Text>();
        showSkillName = transform.GetChild(1).GetChild(6).GetChild(0).GetComponent<Text>();
    }
- There are also two methods in Start, GetRandomMonster and ShowMsg
- GetRandomMonster is used to get all kinds of information about the current Monster through the Monster script
- ShowMsg is used to display the image information of the current Monster model, which is obtained from the Monster script
- The picture information is assigned to the Monster script on each Monster!
    void Start()
    {
        crtCardValue.SetActive(false);
        GetRandomMonster();//Get monster prefab
        ShowMsg();//Display card picture information
    }
    /// <summary>
    ///Get monster preset
    /// </summary>
    private void GetRandomMonster()
    {
        if (monsterPrefab == null)
        {
            int randomIndex = Random.Range(0, cardShowMonsterRange.Length);
            showMonsterIndex = cardShowMonsterRange[randomIndex];

            //Load Monster Prefabs of index in Resources (get Monster Prefab Path of Json)
            monsterPrefab = JsonAnalysisData.instance.GetMonsterPrefabOfIndex(showMonsterIndex);
        }
        crtMonsterObj = Instantiate(monsterPrefab, Vector3.zero, Quaternion.identity);
        crtMonsterObj.SetActive(false);

        //Gets the script of the current monster
        crtMonster = crtMonsterObj.GetComponent<Monster>();
        //Loading of pictures
        testImage = Resources.Load(crtMonster.monsterImagePath, typeof(Sprite));

        #region data information

        string[] msg = crtMonster.ReturnMonsterMsg();
        monsterName.text = msg[0];
        showAttack.text = msg[1];
        showHp.text = msg[2];
        showAttackRange.text = msg[3];
        showMoveSpeed.text = msg[4];
        showSkillName.text = msg[5];
        #endregion
    }

    /// <summary>
    ///Picture display information of card
    /// </summary>
    private void ShowMsg()
    {
        costText.text = crtMonster.monsterCost.ToString();
        //display picture
        Sprite sp = testImage as Sprite;
        monsterImage.sprite = sp;
    }
The following three methods are called when dragging the mouse
It is called at the beginning of dragging, at the end of dragging and at the end of dragging
- When you start dragging, judge whether the current amount of holy water is greater than the amount required by the card
- If the number of holy water is greater than that required by the card, change canMove to true and activate the corresponding monster prefab
- When dragging, first judge the status of canMove
- The position of the card is then moved with the mouse and the position of the ray detection mouse is enabled
- If the position detected by the ray is a scene that we can place, the card will be changed into the corresponding model
- Otherwise, hide the model and show cards
- At the end of dragging, the status of canMove is also determined first
- Then enable the radiographic inspection to check whether the position is reasonable and belongs to the area we can place
- If the position is reasonable, the monster model is generated in the current position for a long time and the card is destroyed.
- Or let the card return to its position!
    /// <summary>
    ///Called when mouse dragging starts
    /// </summary>
    /// <param name="eventData"></param>
    public void OnBeginDrag(PointerEventData eventData)
    {

        if ( EnergyManger.instance != null && crtMonster.monsterCost < EnergyManger.instance.energyTar.value)
        {
            crtMonsterObj.SetActive(true);
            transform.SetParent(transform.root);
            canMove = true;
        }
        else
        {
            canMove = false;
        }

    /// <summary>
    ///Called when the mouse is dragging
    /// </summary>
    /// <param name="eventData"></param>
    public void OnDrag(PointerEventData eventData)
    {
        if (!canMove)
            return;

        crtCardValue.SetActive(false);
        //The card moves with the mouse
        transform.position = Input.mousePosition;
        ray = Camera.main.ScreenPointToRay(Input.mousePosition);
        //The mouse position is within the range we can place
        if (Physics.Raycast(ray, out hit, 600, laser))
        {
            //Release the monster in the card after it enters the placeable range
            crtMonsterObj.transform.position = hit.point;

            //optimizable
            crtMonsterObj.SetActive(true);
            transform.GetChild(0).gameObject.SetActive(false);
        }
        else
        {
            if (crtMonsterObj != null)
            {
                //Hide the monster and display cards when the range is out of place
                crtMonsterObj.SetActive(false);
            }

            transform.GetChild(0).gameObject.SetActive(true);
        }
    }
    /// <summary>
    ///Called when the mouse is released
    /// </summary>
    /// <param name="eventData"></param>
    public void OnEndDrag(PointerEventData eventData)
    {
        if (!canMove)
            return;

        ray = Camera.main.ScreenPointToRay(Input.mousePosition);
        //GameManager.instance.HideCardPropertyMSG();
        //Judge whether the falling point is in the correct position when the mouse is released
        if (Physics.Raycast(ray, out hit, 600, laser))
        {
            crtMonsterObj.SetActive(true);

            crtMonster.IsEndDrag();

            if (CardController.instance != null)
            {
                CardController.instance.cardAmount--;
            }

            //Destroy cards
            Destroy(this.gameObject, 0.1f);

            //Buckle energy value
            EnergyManger.instance.reduceMoney(crtMonster.monsterCost);
        }
        else
        {
            //Return to the original position
            crtMonsterObj.SetActive(false);

            transform.SetParent(parent);
        }
    }
    }
- There are also two methods: when the mouse moves into the card, the information of the monster carried by the card will be displayed
- Including card name, holy water required, attack power, HP, etc...
- Remove the inside of the card with the mouse, and the card will be restored as it is!
Take a brief look at the effect:
code:
    /// <summary>
    ///Mouse entry display information
    /// </summary>
    /// <param name="eventData"></param>
    public void OnPointerEnter(PointerEventData eventData)
    {
        if (!crtImage.raycastTarget)
        {
            return;
        }
        crtCardValue.SetActive(true);
    }

    /// <summary>
    ///Mouse out of hiding
    /// </summary>
    /// <param name="eventData"></param>
    public void OnPointerExit(PointerEventData eventData)
    {
        if (!crtImage.raycastTarget)
        {
            return;
        }
        crtCardValue.SetActive(false);
    }
- You also need to define a script to control the natural growth of holy water and the method of deducting holy water~
- Let's create an EnergyManger script to control the increase and deduction of holy water!
- The code is very simple. Use the Slider to simulate the holy water energy tank. Let's look at the code directly:
  public static EnergyManger instance;

    [Header("Energy increase speed")]
    public  float addSpeed = 0.5f;

    [HideInInspector]
    public Slider energyTar;//Holy water energy tank
    private Text num_text;//Holy water energy number

    private void Awake()
    {
        instance = this;
        energyTar = GetComponent<Slider>();
        num_text = transform.Find("Cost/Num").GetComponent<Text>();
    }
    private void Update()
    {
        addMoneyTar();
    }
    /// <summary>
    ///Method of adding holy water
    /// </summary>
    private void addMoneyTar()
    {
        //The energy tank slowly increases
        energyTar.value += Time.deltaTime * addSpeed;
        //The value changes with the increase of energy tank
        num_text.text = ((int)energyTar.value).ToString();
    }
    /// <summary>
    ///Method of deducting holy water
    /// </summary>
    /// <param name="_moneyTar"></param>
    public void reduceMoney(float _moneyTar)
    {
        this.energyTar.value -= _moneyTar;
        num_text.text = string.Format(energyTar.value.ToString("f0"));
    }
Take a brief look at the effect:

Card generation
- In the actual combat process, we define a card group, which can store up to four cards
- The contents of the card set are randomly selected from our default card library, so here we implement it through code
- Create a new CardController script to control the random selection and generation of cards during combat
The code is as follows:
    public int cardAmount;//Current number of cards
    private GameObject cardPrefab;//Card prefabricated body

    private void Awake()
    {
        instance = this;
        cardAmount = 0;
        cardPrefab = Resources.Load<GameObject>(GameConst.CARD_PRDFAB_PATH);//Load the preform from the given path
    }
    // Start is called before the first frame update
    void Start()
    {
        for (int i = 0; i < 4; i++)
        {
            if(cardAmount >= 4)
            {
                break;
            }
            cardAmount++;
            GameObject card = Instantiate(cardPrefab, transform);
            CardShow show = card.GetComponent<CardShow>();
            show.cardShowMonsterRange = PlayerController.instance.playerCards;
        }
    }

    // Update is called once per frame
    void Update()
    {
        //Whenever the number of cards in the deck decreases, draw one card from the library
        if(cardAmount < 4)
        {
            cardAmount++;
            GameObject card = Instantiate(cardPrefab, transform);
            CardShow show = card.GetComponent<CardShow>();
            show.cardShowMonsterRange = PlayerController.instance.playerCards;
        }
    }
🏳️🌈 Step 7: Blood bar design and missile handling of long-range attack
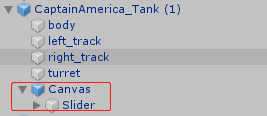
Blood bar design
- The logical processing of the blood bar is mentioned in the previous Monster script.
- A Canvas space Canvas is used, in which a blood bar made by a Slider is added.
- Then get the Slider in the Monster script and you can deduct blood!
- Very simple processing, let's see the effect!
Missile handling for ranged attacks
Because in this game, there is a model of long-range attack, we need to deal with these long-range attack missiles simply
Missile handling for ranged attacks
Because in this game, there is a model of long-range attack, we need to deal with these long-range attack missiles simply
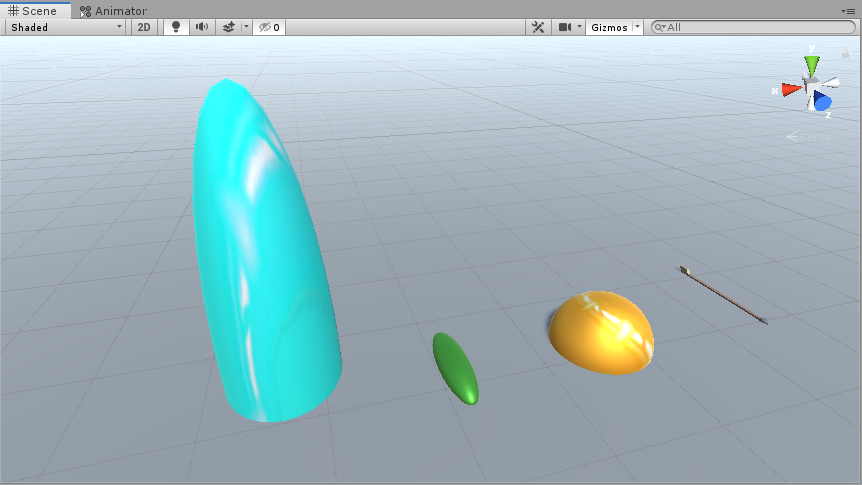
- First, we need to configure the projectile, that is, the preform corresponding to the long-range attack
- Here I have simply designed several missile models. Let's make do with it~
- Left to right missiles: Captain America, Hulk, iron man and Archer! Don't make complaints about my design!!!
- Correspondingly, you also need to create a projectile script Bullet
- The content of the script is also very simple, that is, to deal with the flying speed, damage and self destruction of the projectile!
- The missile and Target are assigned in Monster
- Then mount the script on the missile!
Let's take a look at the code:
    [HideInInspector]
    public float attackHarm;
    [HideInInspector]
    public Transform target;
    [HideInInspector]
    public float flySpeed;

    private void Awake()
    {
        Destroy(this.gameObject, 2f);
    }

    // Update is called once per frame
    void Update()
    {
        if (target == null)
        {
            Destroy(this.gameObject);
            return;
        }
        Flying();
        Reach();
    }

    private void Flying()
    {
        transform.LookAt(new Vector3(target.position.x, target.position.y + 1, target.position.z));
        transform.position += transform.forward * Time.deltaTime * flySpeed;
    }

    private void Reach()
    {
        if(Vector3.Distance(transform.position,target.position + Vector3.up) < 0.5f)
        {
            target.GetComponent<Monster>().MonsterTakeHarm(attackHarm);
            Destroy(this.gameObject);
        }
    }
🏳️🌈 Step 8: write game controller
Finally to this step ~ to write the controller means that the game is about to be completed. Let's have a look!
I use two controllers here, one is PlayerController and the other is AIController
Let's first talk about the PlayerController controller, which mainly controls simple logical operations related to players
- An int array is defined in wake to store players' cards
- The array is assigned and used in the GameManager script,
- Then in Start, simply mark that the object held by the script is the player and Home
- Update simply defines a callback when the player's crystal blood is less than 0 (that is, the player loses) to end the battle!
Take a look at the code:
    [HideInInspector]
    public Monster player;

    public  int[] playerCards = new int[8];

    private void Awake()
    {
        instance = this;
        player = GetComponent<Monster>();
        //Test deck array
        playerCards = new int[8] { 1,2,3,4,5,6,7,8 };
    }

    // Start is called before the first frame update
    void Start()
    {
        player.monsterOwer = MonsterOwer.Player;
        player.isHome = true;
    }

    void Update()
    {
        GameOver();
    }
    private void GameOver()
    {
        if(player.monsterCrtHP <= 0)
        {
            //The failed interface will pop up and the time will be suspended
            Time.timeScale = 0;

            GameObject.FindGameObjectWithTag("Canvas").GetComponent<ShowGameEnd>().ShowEnd(false);

            Debug.Log("fail");
        }
    }
The other is the AIController controller, which mainly controls the logic of the enemy AI
-
Mark AI in wake and mark Home
-
Then set a card group for AI in Start. We can set a fixed card group for him, or let him randomly generate monsters like the player's card library!
-
After setting the card set of AI, start a synergy to generate monsters
-
In the coordination process, when the enemy's crystal blood is greater than 0, it will randomly generate monsters according to the data in the card group
-
And randomly assign the generated location and set to generate a monster every three seconds (I test myself, I can't beat AI every three seconds... See if you can do it!)
-
The same is true in Update. Judge the enemy's crystal blood
-
When the enemy's crystal burps fart, it will jump out of the victory interface!!!
    [HideInInspector]
    public Monster AI;
    public Transform[] points;//AI monster birth point
    public int[] aiCards;//AI deck monster
    private int nextCardID;
    private void Awake()
    {
        AI = GetComponent<Monster>();
        AI.monsterOwer = MonsterOwer.AI;
        AI.isHome = true;
    }

    // Start is called before the first frame update
    void Start()
    {
        if(!GameManager.instance.isNever)
        {
           //Load AI deck
            aiCards = JsonAIAnalysisData.instance.GetCrtAICards(GameManager.instance.crtLevel);
        }
        else
        {
            int index = JsonAnalysisData.instance.GetCardLibraryCount();
            aiCards = new int[index];
            //TODO sets AI's deck to all library cards
            for (int i = 0; i < index; i++)
            {
                aiCards[i] = i;
            }
        }

        //Get the deck of the current level
        nextCardID = Random.Range(0,aiCards.Length);
        StartCoroutine(AIMonsterGo());
    }
    // Update is called once per frame
    void Update()
    {
        GameOver();
    }
    IEnumerator  AIMonsterGo()

        while(AI.monsterHP >0)
        {
            //Randomly generated monster
            GameObject crtMoster = Instantiate(JsonAnalysisData.instance.GetMonsterPrefabOfIndex(aiCards[nextCardID]), transform.forward, Quaternion.Euler(0, 180, 0));

            //Set monster owner to AI
            crtMoster.GetComponent<Monster>().monsterOwer = MonsterOwer.AI;

            //TODO: assign random positions to monsters
            crtMoster.transform.position = points[Random.Range(0, points.Length)].position;

            crtMoster.GetComponent<Monster>().IsEndDrag();

            //The deck position of the next card at random
            nextCardID = Random.Range(0, aiCards.Length);

            //Generate a monster every three seconds
            yield return new WaitForSeconds(3f);
        }
    }

    /// <summary>
    ///Game over
    /// </summary>
    private void GameOver()
    {
        if(AI.monsterCrtHP <= 0)
        {
            //Pause time and jump out of the victory interface
            Debug.Log("Ai death");
            Time.timeScale = 0;

            GameObject.FindGameObjectWithTag("Canvas").GetComponent<ShowGameEnd>().ShowEnd(true);
        }
    }
- A constant class is also defined to store all constants used in the project, such as paths, labels, animation parameters, etc
- Call this script uniformly when using
using System.Collections;
using System.Collections.Generic;
using UnityEngine;

public static class GameConst
{
    #region Path

    public const string JSON_MONSTER_PATH_TEXT = "JsonData/MonsterData";

    public const string JSON_AI_PATH_TEXT = "JsonData/AIData";

    public const string SQL_DATABASE_PATH = "/Game.sqlite";

    public const string CARD_PRDFAB_PATH = "Cards";

    public const string AUDIO_GO = "Audio/achievement_unlock_01";

    public const string AUDIO_ATTACK = "Audio/barbarian_attack_02";

    public const string AUDIO_DEATH = "Audio/king_mad_02";

    public const string AUDIO_BUTTON = "Audio/UI/button_click_02";

    #endregion

    #region Tag

    public const string GAME_TAG_MONSTER = "Monster";

    public const string GAME_TAG_NAV_START = "Start";

    public const string GAME_TAG_NAV_END = "End";

    public const string GAME_TAG_GROUND = "Ground";

    public const string GAME_TAG_CARDSLOT = "CardSlot";

    public const string GAME_TAG_CARD = "Card";

    public const string GAME_TAG_CARDLIBRARY = "CardLibrary";

    #endregion

    #region animation parameters

    public static int MONSTER_ANIPARAM_MOVE;

    public static int MONSTER_ANIPARAM_ATTACK;

    public static  int MONSTER_ANIPARAM_DEATH;

    #endregion

    static GameConst()
    {
        MONSTER_ANIPARAM_MOVE = Animator.StringToHash("Move");

        MONSTER_ANIPARAM_ATTACK = Animator.StringToHash("Attacking");

        MONSTER_ANIPARAM_DEATH = Animator.StringToHash("Death");
    }
}
- Well, here's a simple game controller, even if the configuration is completed
- It's finished in a hurry. I'm so tired. Cheer!!!
Let's take a look at the generation effect of AI:
🔔 Game display
When Dangdang ~ finally reached the game display stage
- I have prepared a game display from two perspectives, which can be viewed in multiple directions
- Because the camera angle adjustment is not good enough, we can only achieve the effect shown in the following video
- If you have time, you can find a more appropriate angle to place the camera
- I simply put it here. Without in-depth research, the effect is still much worse~
Compressed motion picture game display:
Full video showing player perspective:
Effect display of a self-made small game reproducing the Royal war playing method
Full video showing spectator perspective:
Homemade replica Royal war games
🎁 This article Resources Download
- The download link of resource engineering in the article is here. Those interested can download it by themselves~
- I want to experience it, but I can also send a private letter from a small partner with insufficient balance and points!
- Click the csdn download link
💬 summary
- Y: because of time and materials, this tutorial is over here ~ there are still some places that are not perfect 😅
- Xiao Yuner 👩: Yes, brother Y, it's troublesome enough to do this. I'm a little dazzled 🧐
- Y: OK, let's learn here this time. Every step and detail I mentioned in this article should be carefully read 😝
- Xiao Yuner 👩: Well, this article has so much content that I need to digest it. See you next time 😊~
This article has written nearly 30000 words to explain the basic idea and development process of the game, but there are still some details that may not be introduced


-
Only the key code is shown in the article, and some scripts are not shown
-
Interested partners can get the project according to the tutorial, and then can shape the game more perfectly on this basis
-
If you have time, you can also join the networking mode and fight with your little partners!
-
Because I don't have enough time here, this project has achieved this step
-
There are many details that can be optimized. I will update and improve them if I have time in the future~
This is the end of the game tutorial with more than 20000 words. After learning, you can also take a look at other games I wrote~
- Aircraft War: Spend a day doing a high-quality aircraft war game and have a complete tutorial of 10000 words Unity! Beautiful Xuemei looked and called 666!
- First person shooting: A first person shooting game Demo similar to CS made all night! It's not difficult to play games. Even Han Xuemei has learned it!
- Bomberman: Recall the production process of the classic game [Bomber game] played with my childhood friends + analyze | collect it and dream back to childhood with my former friends!
- Tank Battle: ☀️ Unity ❀ games ☀️| Take you back to your childhood classic series - 3D version of tank war!
- Word games: C# game making| ✨ Simple text games
this Game column I will continue to update the game in the future!
Keep up your efforts and keep going!