1, Introduction to handwritten numeral recognition technology
1 case background
Handwritten numeral recognition is a branch of image recognition. It is one of the important applications in the field of image processing and pattern recognition. Due to the great randomness of handwritten digits, such as stroke thickness, font size, tilt angle and other factors may directly affect the accuracy of character recognition, so handwritten digit recognition is a very challenging topic. In the past decades, researchers have proposed many recognition methods and achieved some results. Handwritten numeral recognition is very practical and has broad application prospects in large-scale data statistics, such as routine annual inspection, census, finance, taxation, mail sorting and other application fields.
This case describes the recognition process of handwritten Arabic numerals in images, briefly introduces and analyzes the statistical method of handwritten numeral recognition, and carries out experiments by developing a small handwritten numeral recognition system. The handwritten numeral recognition system needs to realize the reading function of handwritten numeral image, the feature extraction function, the establishment function of numeral template feature library and the recognition function.
2 theoretical basis
2.1 algorithm flow
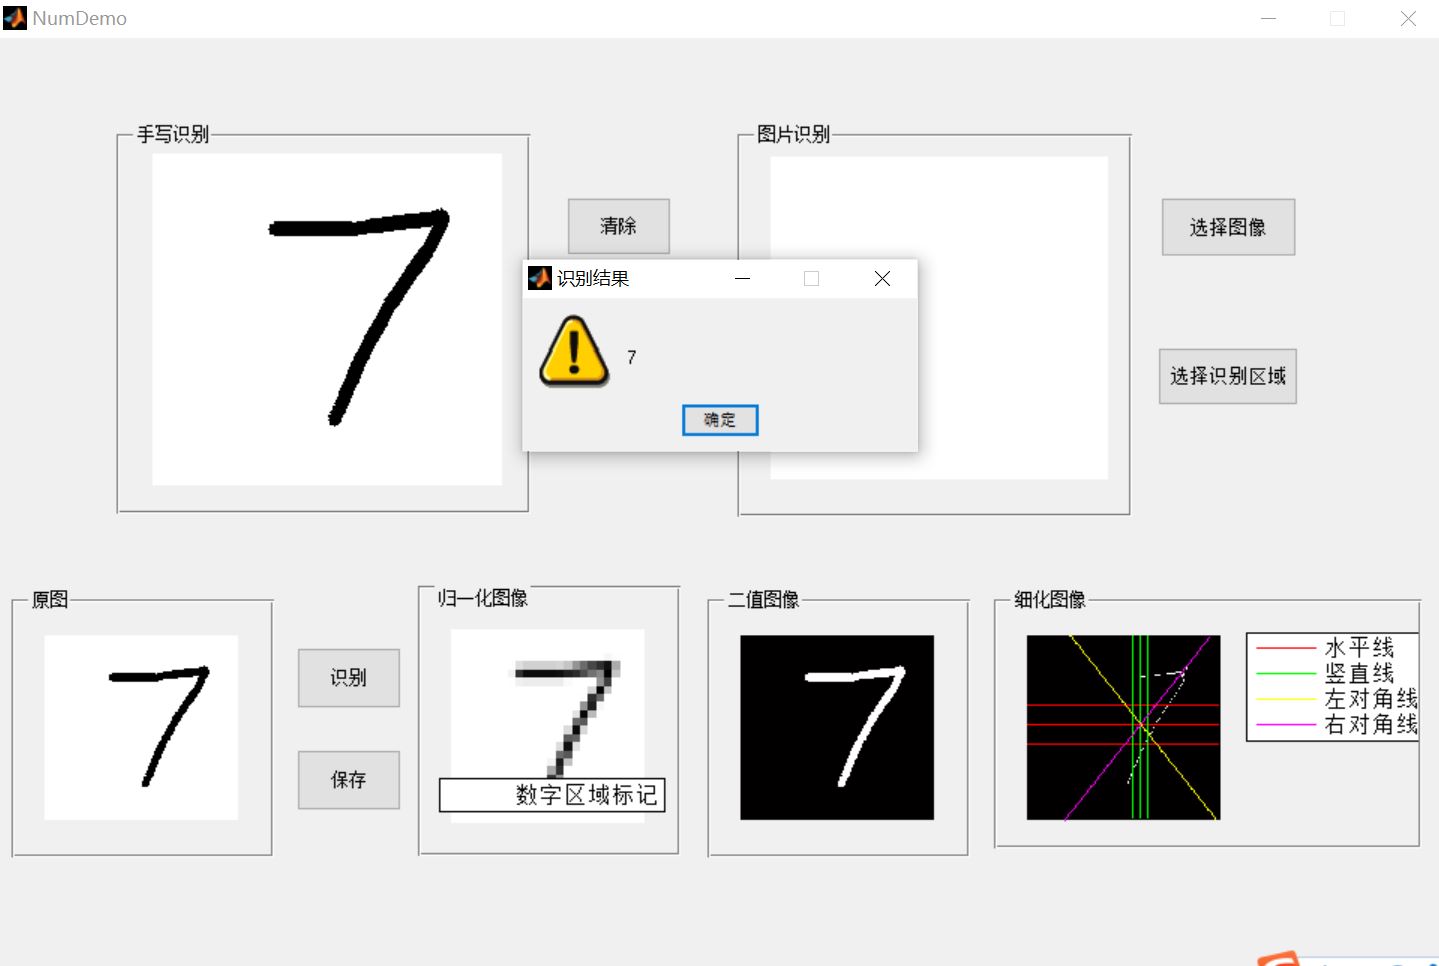
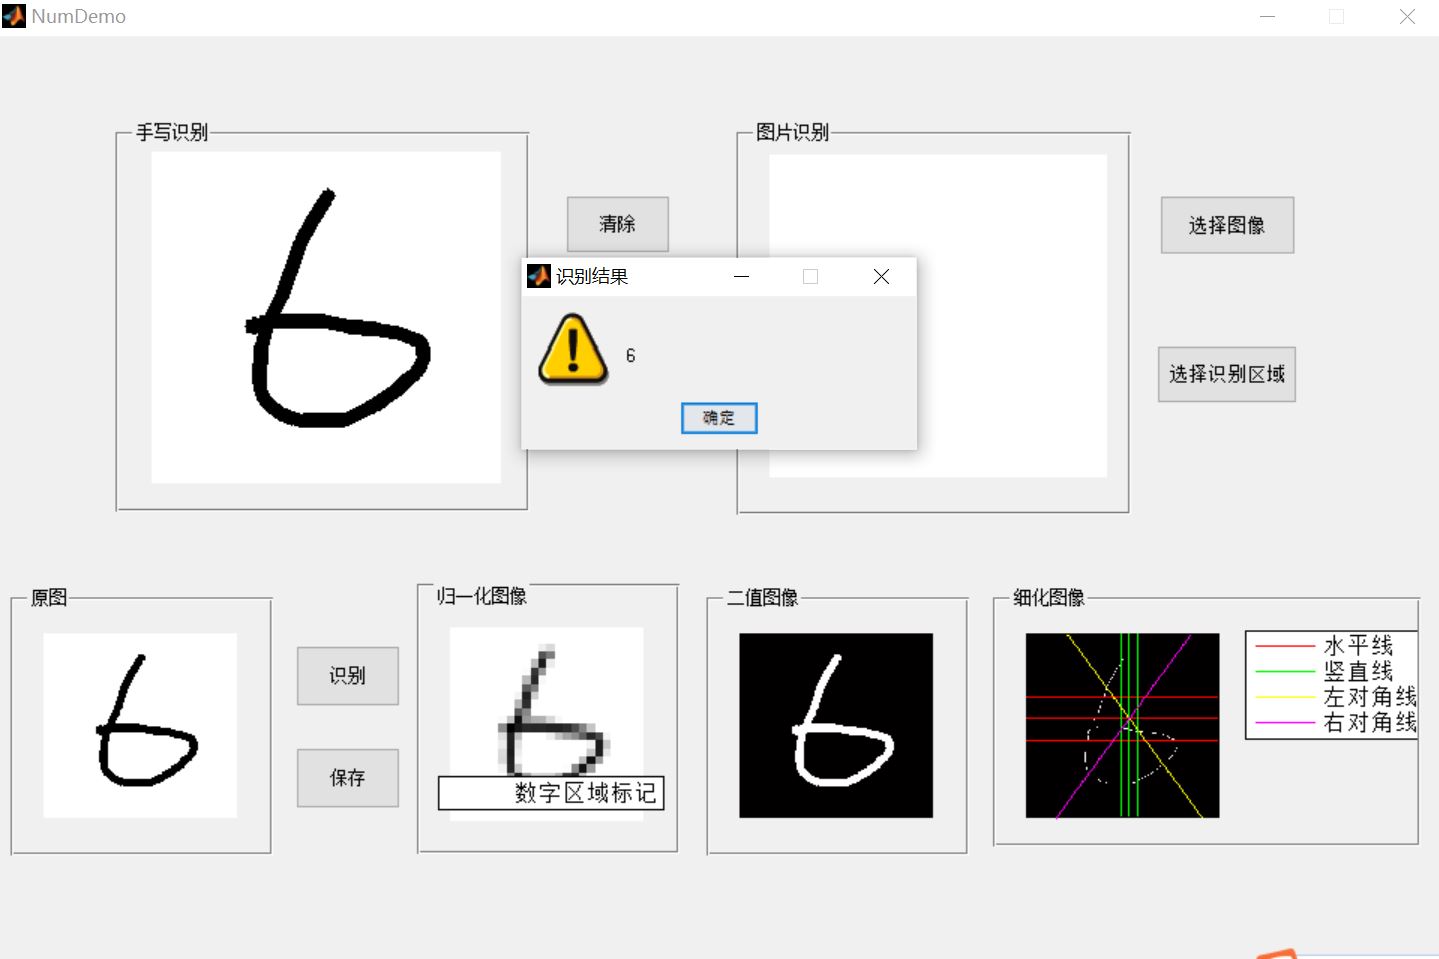
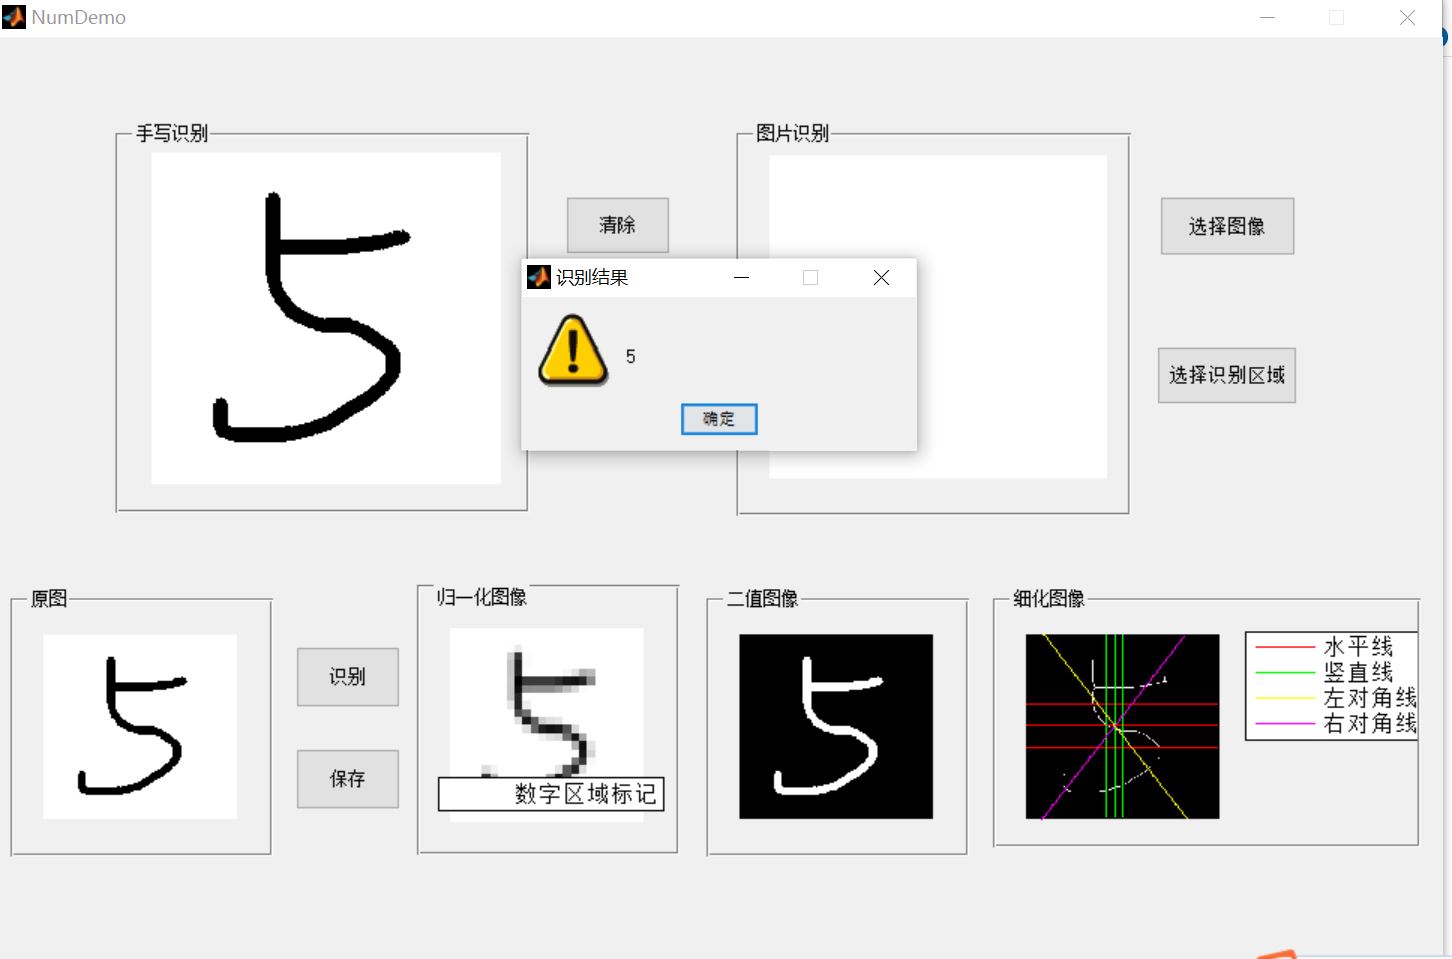
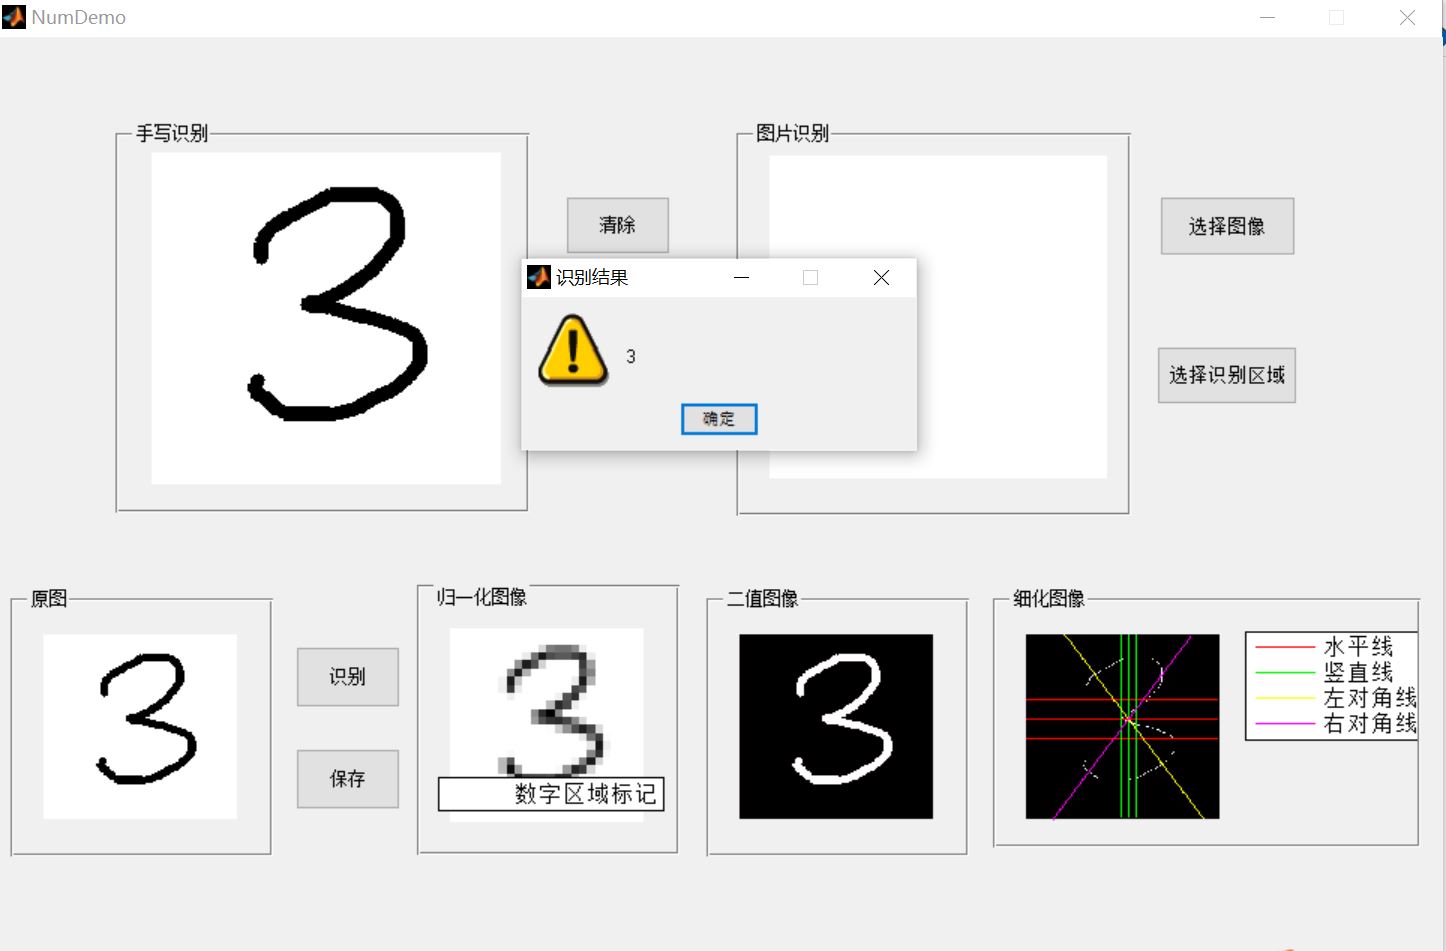
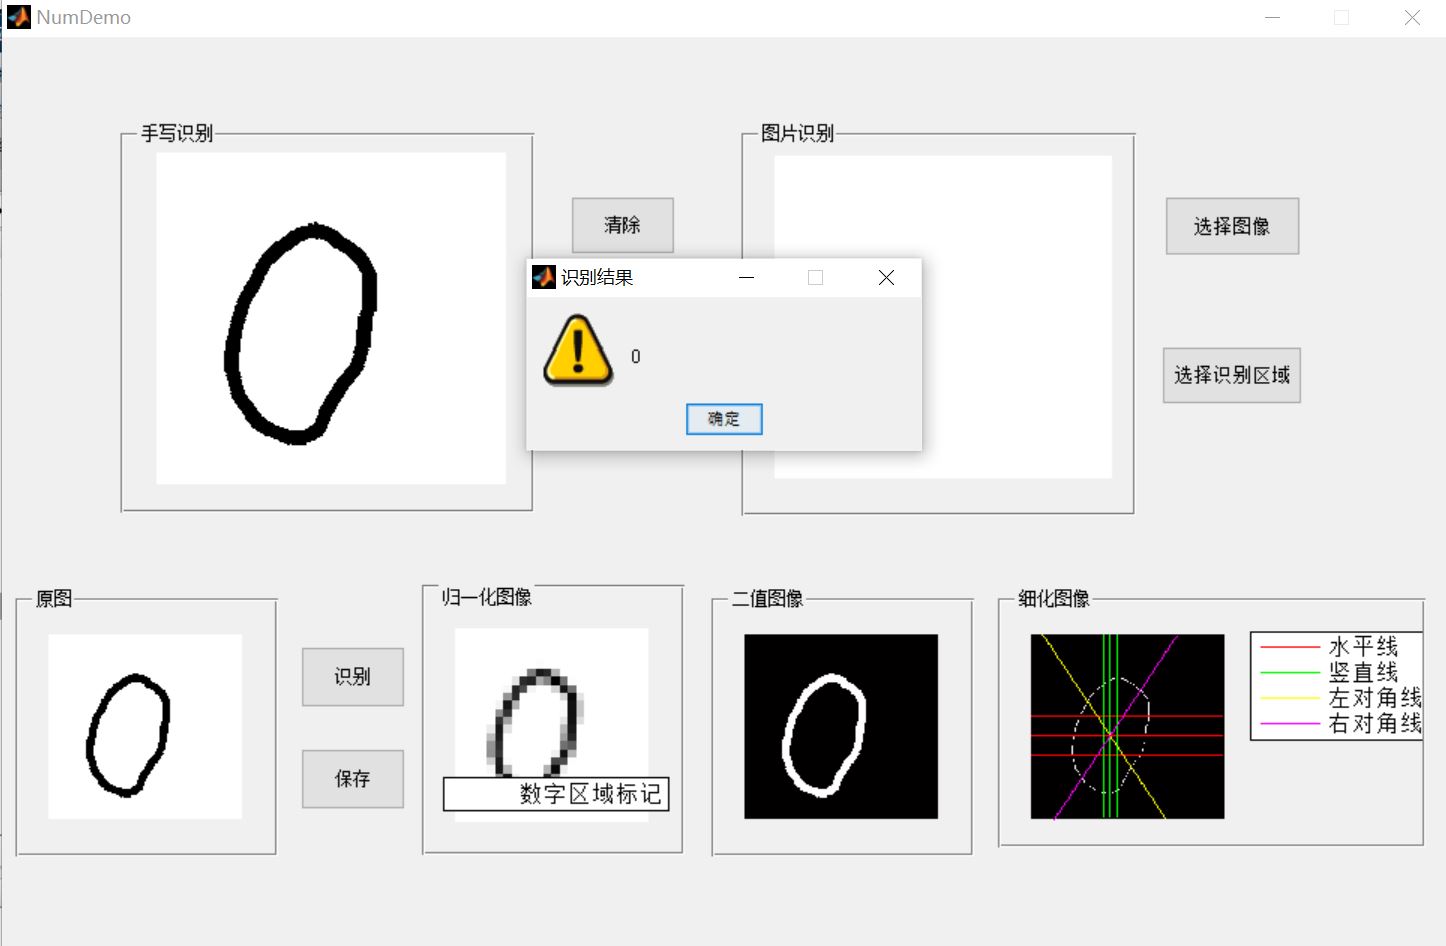
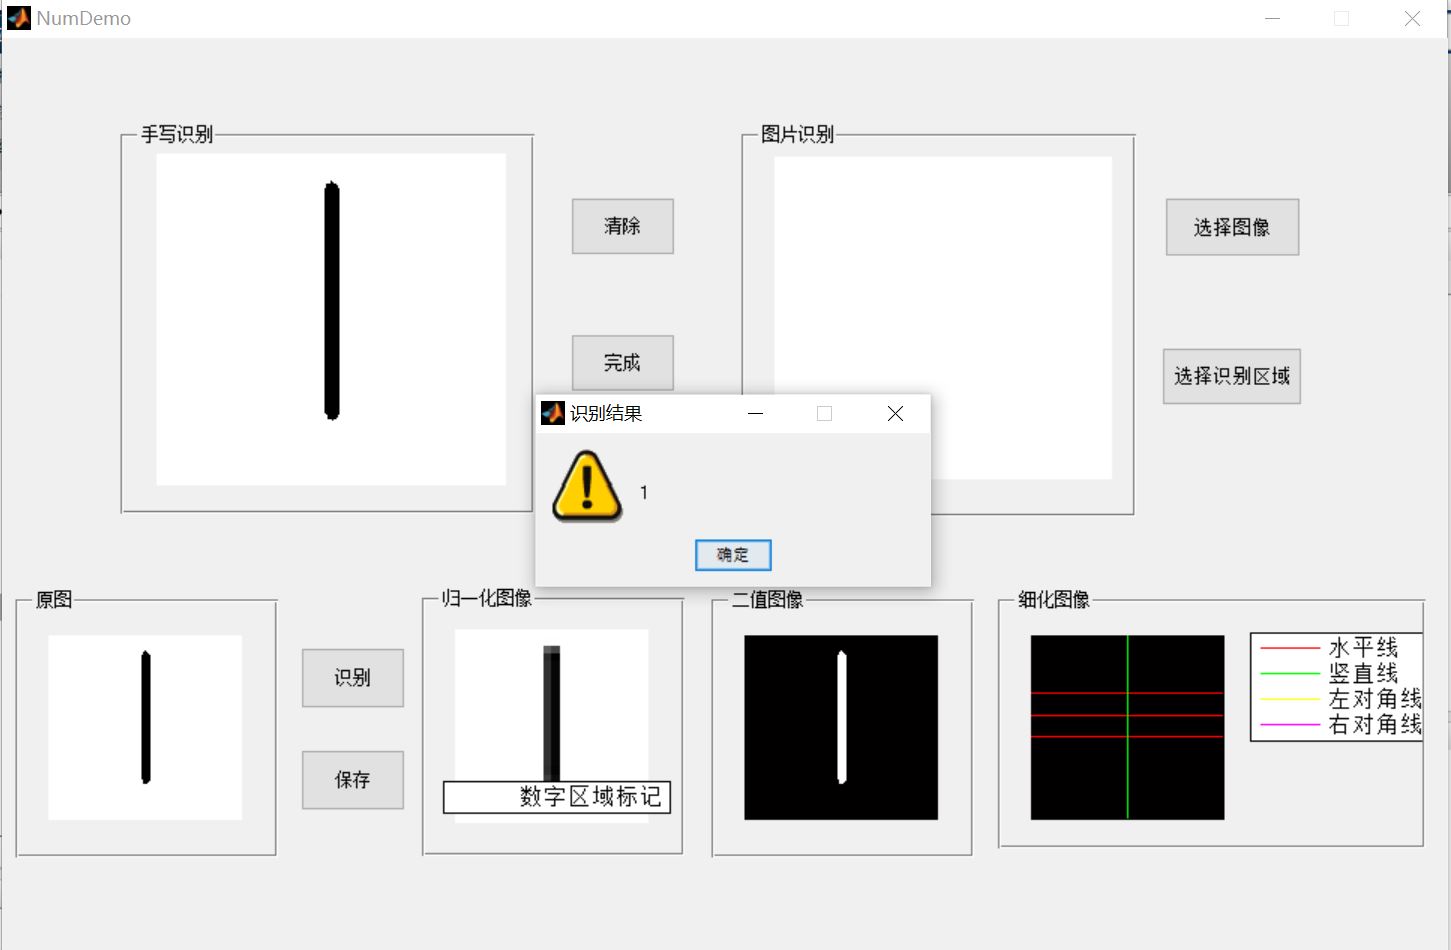
Firstly, read in the handwritten digital image for image normalization, unify the size, default to 24x24 image block, and binarize it by ostu algorithm; Secondly, morphological operations such as image thinning are carried out on the binary image, and the features are extracted according to the requirements of the algorithm; Finally, the template matrix is loaded for comparison, and the Euclidean distance measure is selected to obtain the recognition results. The algorithm flow chart is shown in the figure.

2.2 feature extraction
According to the structural characteristics of handwritten digital image itself, the number of intersection points of endpoint and specified direction line is calculated as the feature vector. The main steps are as follows.
(1) Vertical intersection
For the thinned handwritten digital image, three vertical lines are generated at 5 / 12, 1 / 2, 7 / 12 of its column width, and the intersection numbers of these three vertical lines and digital strokes are extracted and stored.
(2) Horizontal intersection
For the thinned handwritten digital image, three horizontal lines are generated at the number of column width, and the intersection number of the 1 / 3, 1 / 2, 2 / 3 horizontal lines and digital strokes is extracted and stored.
(3) Diagonal intersection
Take two diagonal lines from the thinned handwritten digital image, extract the intersection number between the two diagonal lines and the digital stroke and store it.
Because the above steps are applied to the refined digital image, the strokes are simple and the features are stable, the extracted basic intersections and structural endpoints can reflect the essential characteristics of the number, can quickly and effectively recognize the digital characters, and achieve a better recognition accuracy.
Among them, the algorithm for extracting the endpoint features of stroke structure is as follows.
① Target location
Scan the thinned handwritten digital image from top to bottom and from left to right by column, locate and select the black pixel P as the handwritten stroke target.
② Neighborhood statistics
Calculate the sum N of 8 neighborhoods of black pixel P. if N=1, pixel P is the endpoint, and the endpoint counter is increased by 1; Otherwise, discard the point.
③ Traversal image
Traverse the whole image, repeat the operation process of target location and neighborhood statistics, and extract endpoint features. According to the above feature extraction methods for intersection and endpoint of handwritten digital image, the feature vector VEC in this case is composed of 9 components, which are arranged as follows:
VEC = [vertical 5 / 12 intersection points, vertical midline intersection points, vertical 7 / 12 intersection points, horizontal 1 / 3 intersection points, horizontal midline intersection points, horizontal 2 / 3 intersection points, left diagonal intersection points, right diagonal intersection points, end points]
2.3 pattern recognition
This case adopts the recognition method based on pattern knowledge base, so the key step of system research is the analysis of the structural characteristics of digital characters and the construction of their models. Therefore, this case first analyzes and models the structure of the 10 digital characters 0 ~ 9, then extracts the relevant features, and finally constructs the template library. During the experiment, we select two groups of samples, standard handwriting and free handwriting, as training samples to adjust the parameters of the knowledge base. These training samples are composed of 200 standard handwriting samples and 200 free handwriting samples. Each component of the feature vector in the knowledge base is obtained by calculating the arithmetic mean of the corresponding components of the samples.
The knowledge base obtained through the above steps consists of two sets of templates. In this experiment, we choose the recognition method based on template matching, and measure the matching degree by calculating the Euclidean distance. The feature vector in the recognition system contains 9 components, and the calculation distance formula is European distance:
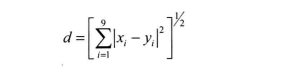
Therefore, in the recognition process, the Euclidean distance between the image to be recognized and each template feature vector in the knowledge base is calculated respectively, that is, compared with the 10 numbers 0 ~ 9 one by one, and the number corresponding to the minimum distance is selected as the final recognition result.
2, Partial source code
function varargout = NumDemo(varargin)
% NUMDEMO MATLAB code for NumDemo.fig
%      NUMDEMO, by itself, creates a new NUMDEMO or raises the existing
%      singleton*.
%
%      H = NUMDEMO returns the handle to a new NUMDEMO or the handle to
%      the existing singleton*.
%
%      NUMDEMO('CALLBACK',hObject,eventData,handles,...) calls the local
%      function named CALLBACK in NUMDEMO.M with the given input arguments.
%
%      NUMDEMO('Property','Value',...) creates a new NUMDEMO or raises the
%      existing singleton*.  Starting from the left, property value pairs are
%      applied to the GUI before NumDemo_OpeningFcn gets called.  An
%      unrecognized property name or invalid value makes property application
%      stop.  All inputs are passed to NumDemo_OpeningFcn via varargin.
%
%      *See GUI Options on GUIDE's Tools menu.  Choose "GUI allows only one
%      instance to run (singleton)".
%
% See also: GUIDE, GUIDATA, GUIHANDLES

% Edit the above text to modify the response to help NumDemo

% Last Modified by GUIDE v2.5 28-Jun-2021 11:22:33

% Begin initialization code - DO NOT EDIT
gui_Singleton = 1;
gui_State = struct('gui_Name',       mfilename, ...
                   'gui_Singleton',  gui_Singleton, ...
                   'gui_OpeningFcn', @NumDemo_OpeningFcn, ...
                   'gui_OutputFcn',  @NumDemo_OutputFcn, ...
                   'gui_LayoutFcn',  [] , ...
                   'gui_Callback',   []);
if nargin && ischar(varargin{1})
    gui_State.gui_Callback = str2func(varargin{1});
end

if nargout
    [varargout{1:nargout}] = gui_mainfcn(gui_State, varargin{:});
else
    gui_mainfcn(gui_State, varargin{:});
end
% End initialization code - DO NOT EDIT


% --- Executes just before NumDemo is made visible.
function NumDemo_OpeningFcn(hObject, ~, handles, varargin)
% This function has no output args, see OutputFcn.
% hObject    handle to figure
% eventdata  reserved - to be defined in a future version of MATLAB
% handles    structure with handles and user data (see GUIDATA)
% varargin   command line arguments to NumDemo (see VARARGIN)

% Choose default command line output for NumDemo
handles.output = hObject;

% Update handles structure
guidata(hObject, handles);

% UIWAIT makes NumDemo wait for user response (see UIRESUME)
% uiwait(handles.figure1);


% --- Outputs from this function are returned to the command line.
function varargout = NumDemo_OutputFcn(~, ~, handles)
% varargout  cell array for returning output args (see VARARGOUT);
% hObject    handle to figure
% eventdata  reserved - to be defined in a future version of MATLAB
% handles    structure with handles and user data (see GUIDATA)

% Get default command line output from handles structure
varargout{1} = handles.output;
axis([0 250 0 250]);
clc;

% --- Executes on mouse press over figure background, over a disabled or
% --- inactive control, or over an axes background.
function figure1_WindowButtonDownFcn(~, ~, handles)
% hObject    handle to figure1 (see GCBO)
% eventdata  reserved - to be defined in a future version of MATLAB
% handles    structure with handles and user data (see GUIDATA)

global ButtonDown pos1
if strcmp(get(gcf, 'SelectionType'), 'normal')
    ButtonDown = 1;
    pos1 = get(handles.axes1, 'CurrentPoint');
end

% --- Executes on mouse motion over figure - except title and menu.
function figure1_WindowButtonMotionFcn(~, ~, handles)
% hObject    handle to figure1 (see GCBO)
% eventdata  reserved - to be defined in a future version of MATLAB
% handles    structure with handles and user data (see GUIDATA)
global ButtonDown pos1
if(ButtonDown == 1)
    pos = get(handles.axes1,'CurrentPoint');
    line([pos1(1,1) pos(1,1)], [pos1(1,2) pos(1,2)], 'Color','Black','LineStyle','-', 'LineWidth',8,'Marker','.', 'MarkerSize',20);
    pos1 = pos;
end

% --- Executes on mouse press over figure background, over a disabled or
% --- inactive control, or over an axes background.
function figure1_WindowButtonUpFcn(~, ~, ~)
% hObject    handle to figure1 (see GCBO)
% eventdata  reserved - to be defined in a future version of MATLAB
% handles    structure with handles and user data (see GUIDATA)
global ButtonDown
ButtonDown = 0;


% --- Executes on button press in pushbutton_clear.
function pushbutton_clear_Callback(~, ~, handles)
% hObject    handle to pushbutton_clear (see GCBO)
% eventdata  reserved - to be defined in a future version of MATLAB
% handles    structure with handles and user data (see GUIDATA)
%cla;
cla(handles.axes1);

% --- Executes on button press in pushbutton_save.
function pushbutton_save_Callback(~, ~, handles)
% hObject    handle to pushbutton_save (see GCBO)
% eventdata  reserved - to be defined in a future version of MATLAB
% handles    structure with handles and user data (see GUIDATA)
[f, p] = uiputfile({'*.bmp'},'Save Image');
str = strcat(p, f);
px  = getframe(handles.axes3);
curImg = frame2im(px);
imwrite(curImg, str,'bmp');

% --- Executes on button press in pushbutton_classify.
function pushbutton_classify_Callback(~, ~, handles)
% hObject    handle to pushbutton_classify (see GCBO)
% eventdata  reserved - to be defined in a future version of MATLAB
% handles    structure with handles and user data (see GUIDATA)
%strSample = 'Data.mat';
cla(handles.axes4,handles.axes5,handles.axes6);
load 'Data.mat';
I1=handles.I1;
curFea = GetFeature(I1);
I2 = Normalize_Img(I1);
bw1 = Bw_Img(I1);
bw2 = Thin_Img(bw1);
bw = bw2;
sz = size(bw);
[r, c] = find(bw==1);
rect = [min(c) min(r) max(c)-min(c) max(r)-min(r)];
vs = rect(1)+rect(3)*[5/12 1/2 7/12];
hs = rect(2)+rect(4)*[1/3 1/2 2/3];
pt1 = [rect(1:2); rect(1:2)+rect(3:4)];
pt2 = [rect(1)+rect(3) rect(2); rect(1) rect(2)+rect(4)];
k1 = (pt1(1,2)-pt1(2,2)) / (pt1(1,1)-pt1(2,1));
x1 = 1:sz(2);
y1 = k1*(x1-pt1(1,1)) + pt1(1,2);
k2 = (pt2(1,2)-pt2(2,2)) / (pt2(1,1)-pt2(2,1));
x2 = 1:sz(2);
y2 = k2*(x2-pt2(1,1)) + pt2(1,2);
    axes(handles.axes4);
    imshow(I2,[]);
    handles.I2 = I2;
    hold on;
    h = rectangle('Position', [rect(1:2)-1 rect(3:4)+2], 'EdgeColor', 'r', 'LineWidth', 2);
    legend(h, 'Digital area marker', 'Location', 'South');
    axes(handles.axes5);
    imshow(bw1,[]);
    handles.bw1 = bw1;
    axes(handles.axes6);
    imshow(bw,[],'Border', 'Loose');
    handles.bw = bw;
    hold on;
    h = [];
    for i = 1 : length(hs)
        h = [h plot([1 sz(2)], [hs(i) hs(i)], 'r-')];
    end
    for i = 1 : length(vs)
        h = [h plot([vs(i) vs(i)], [1 sz(1)], 'g-')];
    end
    h = [h plot(x1, y1, 'y-')];
    h = [h plot(x2, y2, 'm-')];
    legend([h(1) h(4) h(7) h(8)], {'level', 'Vertical line', 'Left Diagonal ', 'right diagonal '}, 'Location', 'BestOutside');
    hold off;

%yLabel = euclid(curFea);
yLabel = MaskRecon(Data, curFea);
h = warndlg(num2str(yLabel),'Recognition results');


% --- Executes on mouse press over axes background.
function axes1_ButtonDownFcn(hObject, eventdata, handles)
% hObject    handle to axes1 (see GCBO)
% eventdata  reserved - to be defined in a future version of MATLAB
% handles    structure with handles and user data (see GUIDATA)


% --- If Enable == 'on', executes on mouse press in 5 pixel border.
% --- Otherwise, executes on mouse press in 5 pixel border or over pushbutton_clear.
function pushbutton_clear_ButtonDownFcn(hObject, eventdata, handles)
% hObject    handle to pushbutton_clear (see GCBO)
% eventdata  reserved - to be defined in a future version of MATLAB
% handles    structure with handles and user data (see GUIDATA)
function testsample = GetFeature(I)
clc;
testsample = zeros(1,9);  %1 Matrix of rows and 9 columns
%Extract features
I1 = Normalize_Img(I);
bw1 = Bw_Img(I1);
bw2 = Thin_Img(bw1);
bw = bw2;
sz = size(bw);
[r, c] = find(bw==1);
rect = [min(c) min(r) max(c)-min(c) max(r)-min(r)];
vs = rect(1)+rect(3)*[5/12 1/2 7/12];
hs = rect(2)+rect(4)*[1/3 1/2 2/3];
pt1 = [rect(1:2); rect(1:2)+rect(3:4)];
pt2 = [rect(1)+rect(3) rect(2); rect(1) rect(2)+rect(4)];
k1 = (pt1(1,2)-pt1(2,2)) / (pt1(1,1)-pt1(2,1));
x1 = 1:sz(2);
y1 = k1*(x1-pt1(1,1)) + pt1(1,2);
k2 = (pt2(1,2)-pt2(2,2)) / (pt2(1,1)-pt2(2,1));
x2 = 1:sz(2);
y2 = k2*(x2-pt2(1,1)) + pt2(1,2);
if flag
   % figure('Name', 'Digital recognition', 'NumberTitle', 'Off', 'Units', 'Normalized', 'Position', [0.2 0.45 0.5 0.3]);
    %subplot(2, 2, 1); imshow(I1, []); title('Original image', 'FontWeight', 'Bold');
    %subplot(2, 2, 2); imshow(I2, []); title('Normalized image', 'FontWeight', 'Bold');
    axes(handles.axes4);
    imshow(I2,[]); title('Normalized image', 'FontWeight', 'Bold');
    handles.I2 = I2;
    hold on;
    h = rectangle('Position', [rect(1:2)-1 rect(3:4)+2], 'EdgeColor', 'r', 'LineWidth', 2);


  %  subplot(2, 2, 3); imshow(bw1, []); title('Binary image', 'FontWeight', 'Bold');


 %   subplot(2, 2, 4); imshow(bw, [], 'Border', 'Loose'); title('Thinning image', 'FontWeight', 'Bold');
    hold on;
    h = [];
    for i = 1 : length(hs)
        h = [h plot([1 sz(2)], [hs(i) hs(i)], 'r-')];
    end
    for i = 1 : length(vs)
        h = [h plot([vs(i) vs(i)], [1 sz(1)], 'g-')];
    end

    hold off;
end
v{1} = [1:sz(2); repmat(hs(1), 1, sz(2))]';
v{2} = [1:sz(2); repmat(hs(2), 1, sz(2))]';
v{3} = [1:sz(2); repmat(hs(3), 1, sz(2))]';
v{4} = [repmat(vs(1), 1, sz(1)); 1:sz(1)]';
v{5} = [repmat(vs(2), 1, sz(1)); 1:sz(1)]';
v{6} = [repmat(vs(3), 1, sz(1)); 1:sz(1)]';
v{7} = [x1; y1]';
v{8} = [x2; y2]';

for i = 1 : 8
    num(i) = GetImgLinePts(bw, round(v{i})-1);
end
num(9) = sum(sum(endpoints(bw)));
testsample=num;
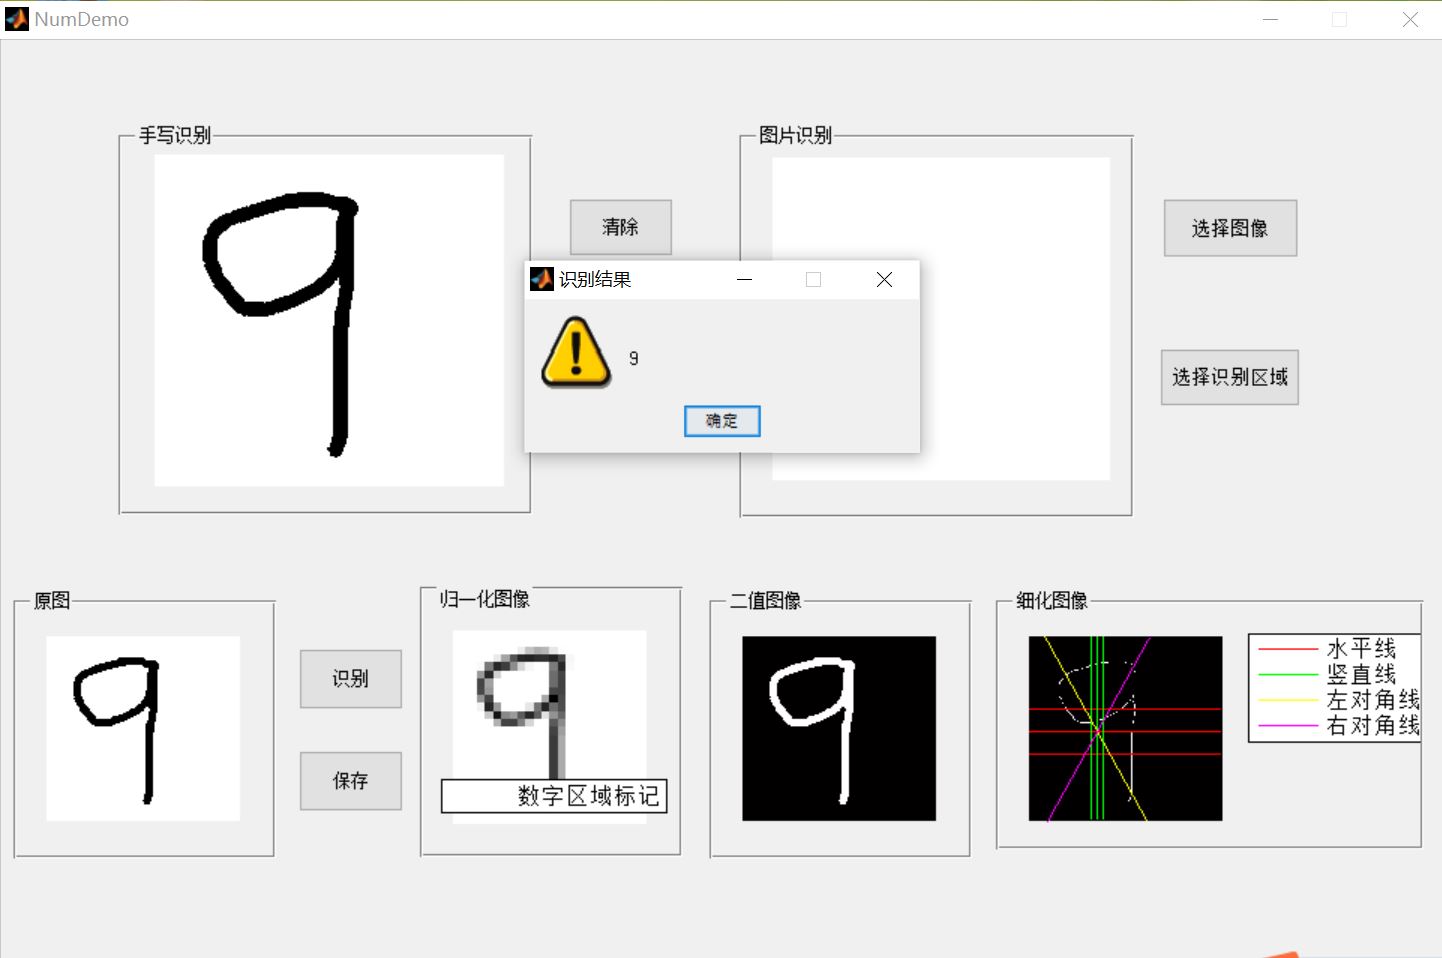
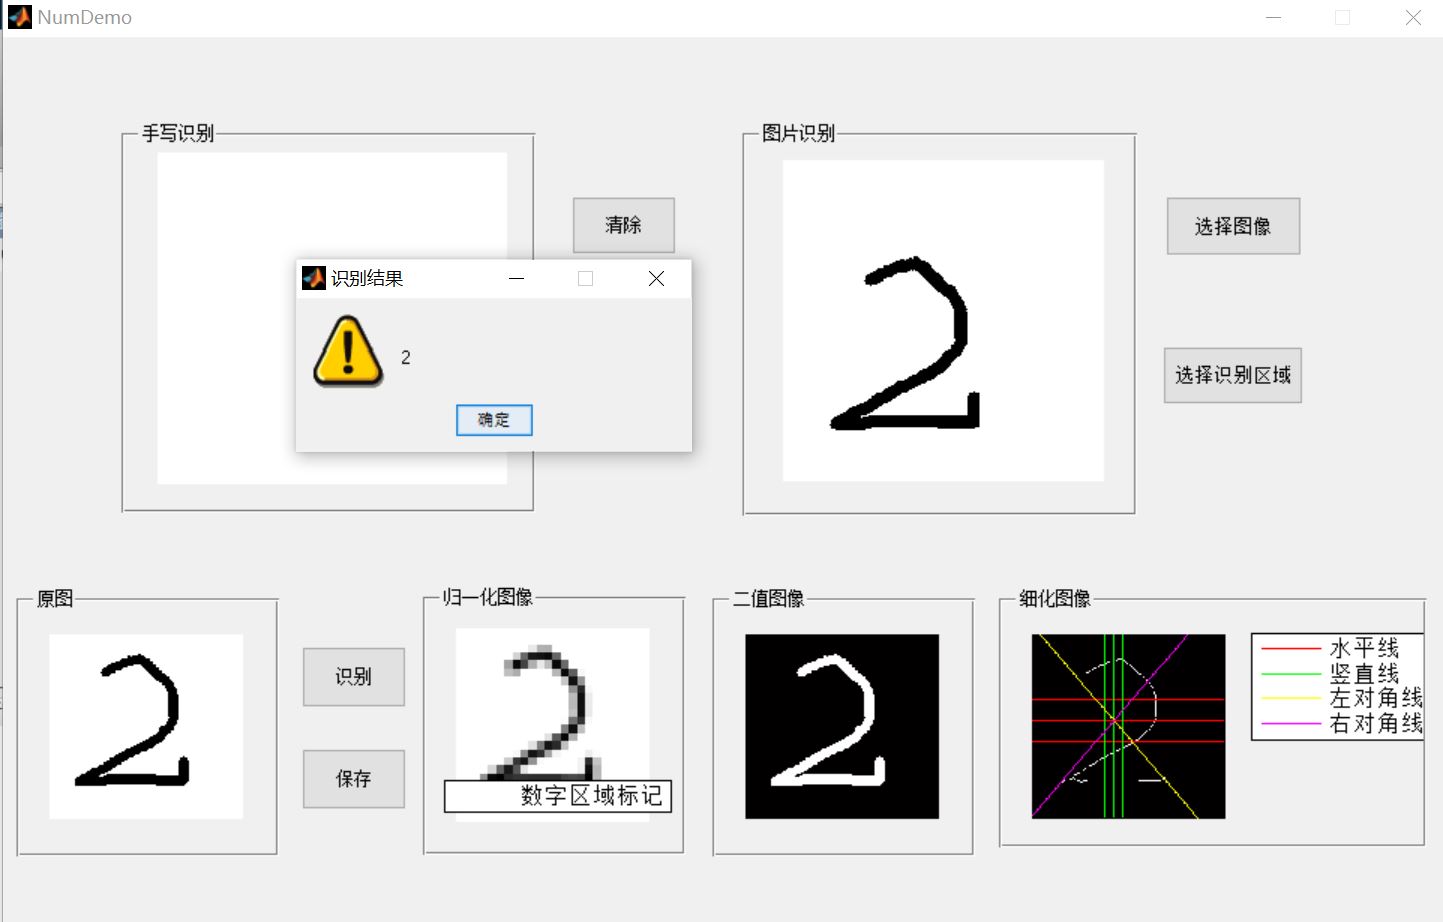
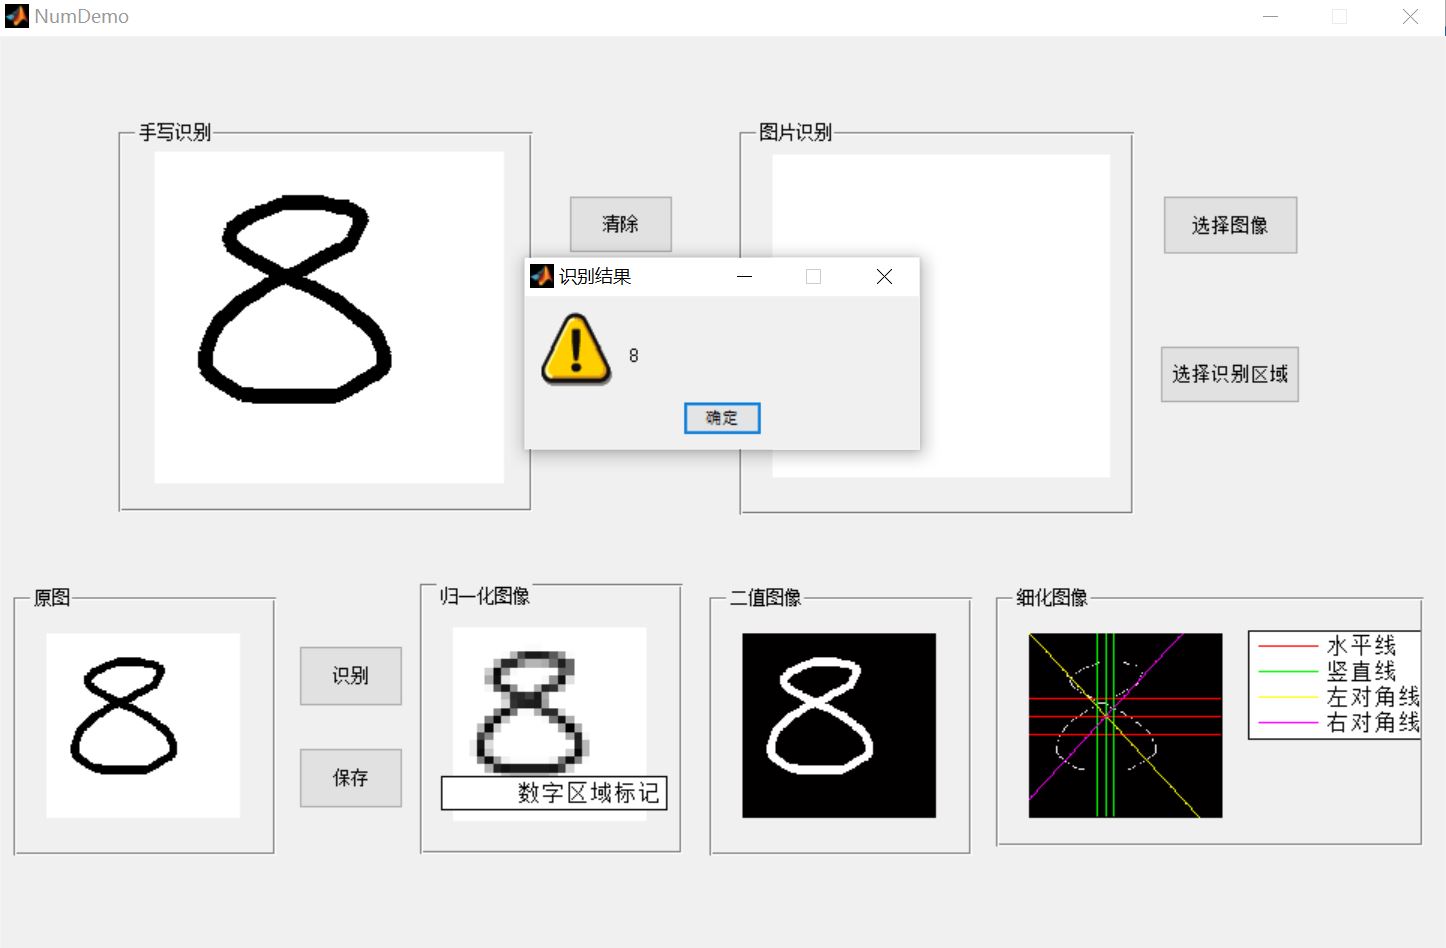
3, Operation results


4, matlab version and references
1 matlab version
2014a
2 references
[1] Cai Limei MATLAB image processing -- theory, algorithm and example analysis [M] Tsinghua University Press, 2020
[2] Yang Dan, Zhao Haibin, long Zhe Detailed explanation of MATLAB image processing example [M] Tsinghua University Press, 2013
[3] Zhou pin MATLAB image processing and graphical user interface design [M] Tsinghua University Press, 2013
[4] Liu Chenglong Proficient in MATLAB image processing [M] Tsinghua University Press, 2015