1, Install cuda10 0,CUDNN7. six point five
Please follow the blog post below for the installation tutorial
ubuntu16.04 installation of CUDA, cuDNN GTX 1660Ti
Note: the latest version of graphics card installation and computer graphics card adaptation
2, CUDA unloading steps
No need to uninstall the graphics card driver
sudo apt-get remove cuda*

sudo apt-get remove --purge cuda*

sudo apt-get update
After the above three steps, the CUDA folder cannot be deleted. You need to switch to the installation directory and delete it manually. The default location is: / usr/local /. Therefore, execute the following command:
cd /usr/local/
sudo rm -r cuda-10.0
Note: 10.0 is the version number. You can replace it with the version number you want to delete (Cudnn is installed in Cuda folder, so you need to delete it manually)
3, openpose installation process
Preparation before installation
Official tutorial: https://github.com/CMU-Perceptual-Computing-Lab/openpose/blob/master/doc/installation/prerequisites.md#general-tips
1. Clone openpose source code:
git clone https://github.com/CMU-Perceptual-Computing-Lab/openpose
Or directly in github Download, unzip and cd to the openpose source folder
Subsequent operations have been cd to the openpose source folder by default
2. Download the openpose pre training model in advance and put it into the specified folder (in fact, the source code comes with a small model, but it is better to replace it with this large pre training model), so as to avoid downloading too slowly in cmake (more than 800 M in total).
1,BODY_25 model: download in models/pose/body_25/.
http://posefs1.perception.cs.cmu.edu/OpenPose/models/pose/body_25/pose_iter_584000.caffemodel
2,COCO model: download in models/pose/coco/.
http://posefs1.perception.cs.cmu.edu/OpenPose/models/pose/coco/pose_iter_440000.caffemodel
3,MPI model: download in models/pose/mpi/.
http://posefs1.perception.cs.cmu.edu/OpenPose/models/pose/mpi/pose_iter_160000.caffemodel
4,Face model: download in models/face/.
http://posefs1.perception.cs.cmu.edu/OpenPose/models/face/pose_iter_116000.caffemodel
5,Hands model: download in models/hand/.
http://posefs1.perception.cs.cmu.edu/OpenPose/models/hand/pose_iter_102000.caffemodel
3. Install cmake GUI (not required, you can use the command line instead):
sudo apt-get install cmake-qt-gui
4. Dependencies for installing third-party libraries (not the third-party libraries themselves):
sudo bash ./scripts/ubuntu/install_deps.sh
5. Install Python: it is officially recommended that python3 and python2 can also be installed. The following Python components are required (it is OK not to install them)
(1)Python 3 (default and recommended)
sudo apt-get install python3-dev
sudo pip3 install numpy opencv-python
(2)Python 2
sudo apt-get install python-dev
sudo pip install numpy opencv-python
install
1. git pulls the third-party library to the local
git submodule update --init --recursive --remote
2. cmake configuration (the following commands are only applicable to installing opencv without caffe and apt. for other situations, please refer to the openpose official website)
Enter the openpose/build folder first, and then configure cmake
mkdir build/
cd build/
cmake-gui ..
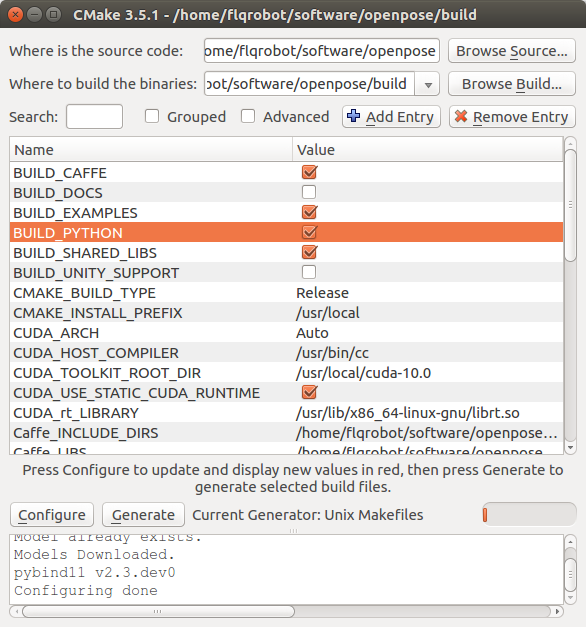
After entering the above command, the following dialog box pops up
Click configure in cmake GUI, and then click finish in the new window. Some options in the following figure will appear, and build_ Check python (if you want to use Python later), and click configure again (in addition, you can also set whether it is GPU mode or pure CPU). Then click generate to close the window.
 Note: this step may be wrong due to CUDA version change or cudnn version. It needs to be reconfigured. Please enter openpose/build to delete all contents before performing the above steps.
3. Compile
make -j8
If there is no error, it takes several minutes to compile. If there is an error, please refer to the solutions in part IV
4. Installation header file (required for connecting with ROS)
sudo make install
So far, the 2D openpose has been installed
Installation test
1. Official non ROS Demo test
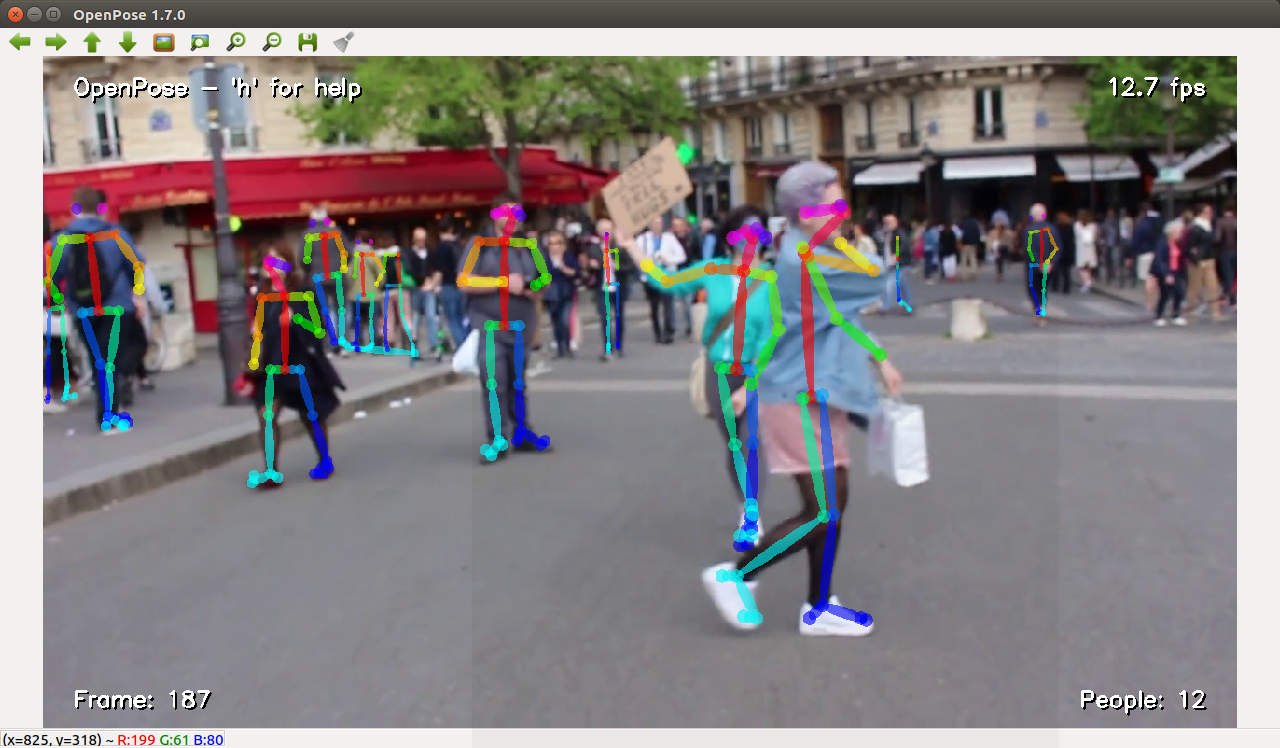
Test preset video skeleton point recognition
cd openpose
./build/examples/openpose/openpose.bin --video examples/media/video.avi
2. Skeleton point recognition of test image set
./build/examples/openpose/openpose.bin --image_dir examples/media/
3. Test real-time camera skeleton point recognition (without parameters, or specify the camera through parameters, ordinary camera)
./build/examples/openpose/openpose.bin
./build/examples/openpose/openpose.bin --camera 0
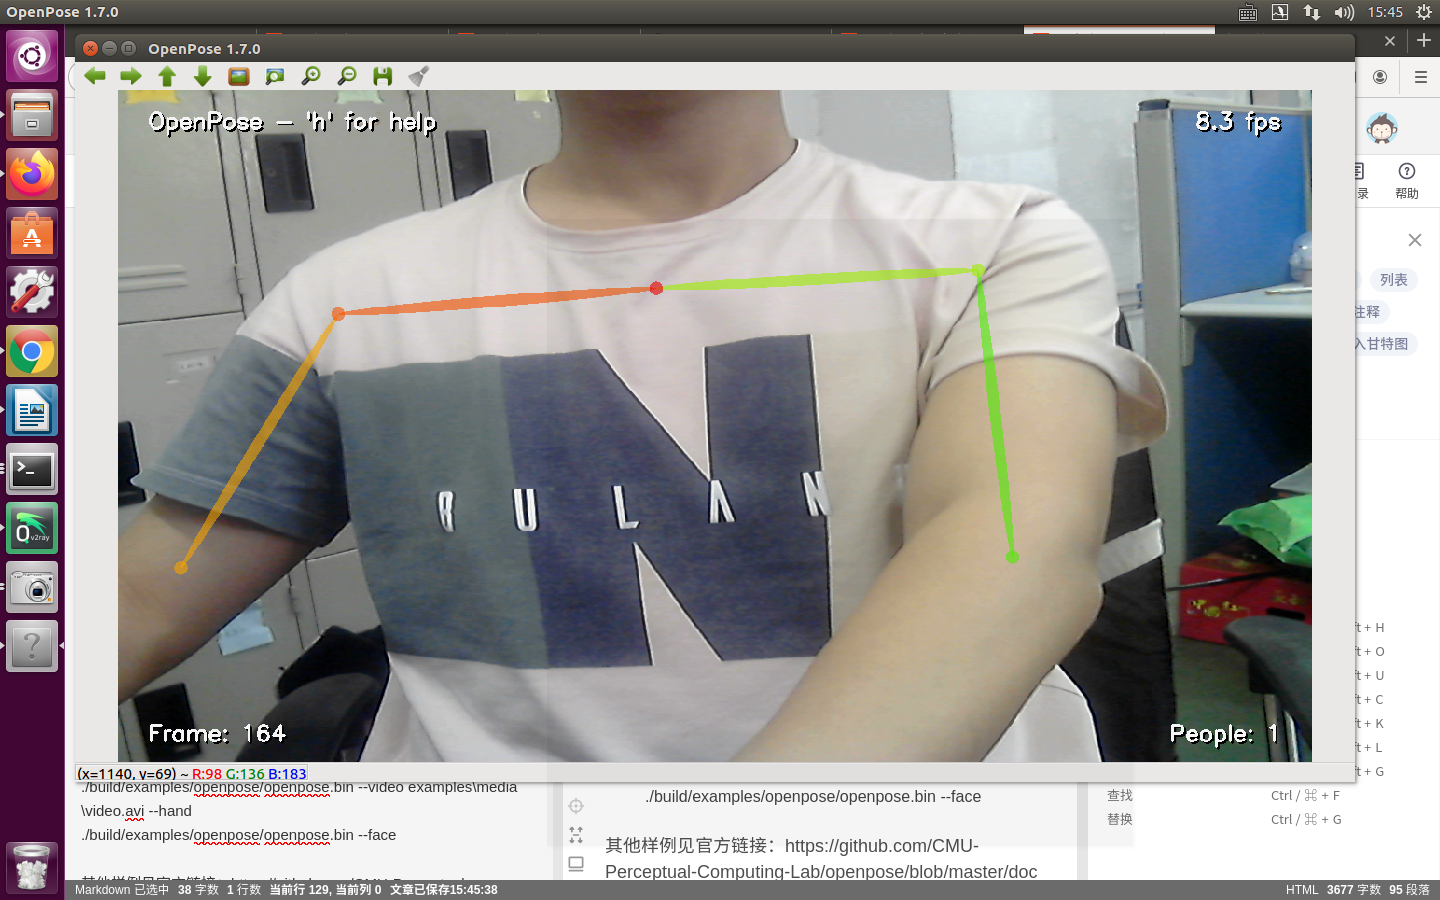
3. Test face or hand recognition (similar to above, distinguished by different parameters):
./build/examples/openpose/openpose.bin --image_dir examples\media\ --face
./build/examples/openpose/openpose.bin --video examples\media\video.avi --hand
./build/examples/openpose/openpose.bin --face
4. See for other examples Official link
5, OpenPose graphics card force table (required fq)
Connect to ROS
1. ROS Wrapper is not officially launched, but two unofficial ROS examples are recommended. They are:
https://github.com/ravijo/ros_openpose.git
https://github.com/firephinx/openpose_ros.git
2. Based on the comprehensive effect and ease of use, select the first ROS package (the Demo introduction supports up to 1.6.0, but there is no problem with the measured latest version of 1.7.0o penpose), which can directly solve the 3D bone points, avoid manual calculation, and can be integrated into the RVIZ display. The installation steps under 1.7.0 are as follows:
(1) Clone the package into the ros workspace / src
git clone https://github.com/ravijo/ros_openpose.git
(2) Compile
catkin_make
(3) Modify some parameters in the launch file to adapt to realsense cameras (assuming that realsense is used, other RGBD cameras are the same)
- Top level run In launch, change the openpose network model folder in line 31 to the corresponding folder on your computer
- run. Congfig called by luanch_ realsense. In the launch, the rgb and depth image topics in 10 and 13 lines are changed to the actual realsense topics. For our realsense, we need to change the camera name camera to rs (if the default launch of realsense camera is not changed), as shown in the following figure

(4) After running, the launch will automatically start the camera, openpose and RVIZ.
roslaunch ros_openpose run.launch
(5) Skeleton points can be observed in RVIZ, and 3D coordinates of skeleton points under camera coordinate system can also be echo ed (thus avoiding obtaining 3D coordinates of skeleton points by manually taking depth in depth image)
4, Errors during installation
After the nvidia driver is installed on the GTX1660 graphics card, the boot will always be in the login interface. Press ctrl+alt+F1 to display the following error
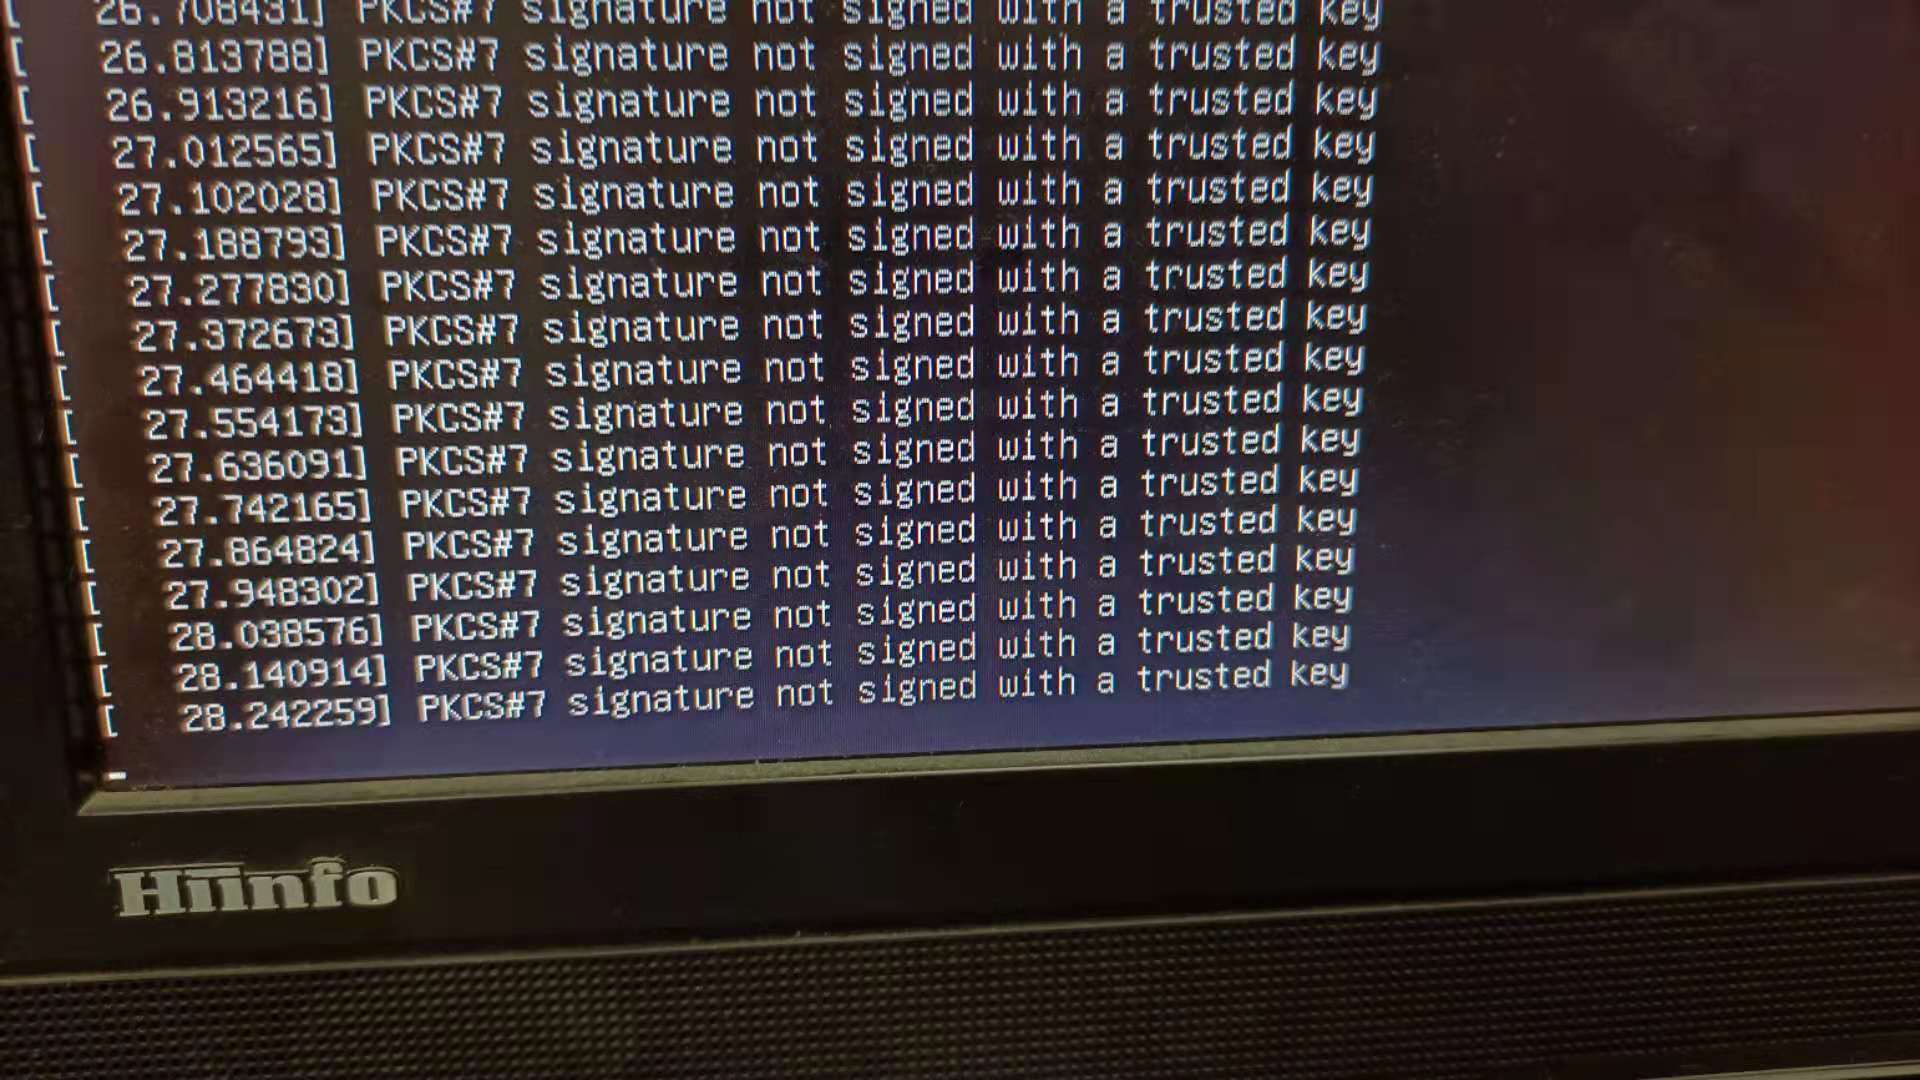
Problem Description: nvidia graphics card driver is incompatible with the system
resolvent:
1. Press CTRL+ALT+F1 in the boot login interface to # switch to the command line
2. Enter the user name and password to log in (even if the above figure is printed all the time, the wrong input is always valid and can be ignored)
3. Enter sudo service lightdm stop to close the desktop display manager
4. Enter sudo apt get remove -- purge nvidia * to uninstall all nvidia drivers
5. Enter reboot to restart
Note: when entering the user name and password in the second step, the user name is all lowercase letters, and the password should pay attention to whether NumLock is turned on)
If you don't know your user name or password, refer to the following steps to find the user name and modify the password.
-
Select the "recovery mode" mode in "Advanced startup" when starting up, and then press e to enter
-
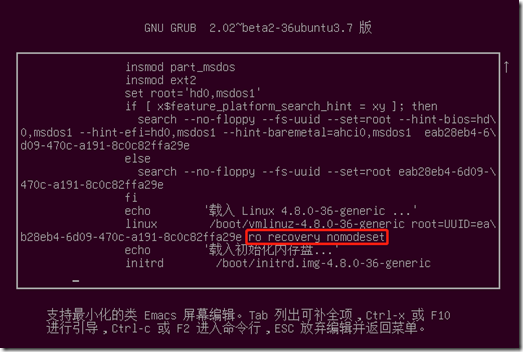
Enter the following interface, change ro (read only) in the red box to rw (read write), and then press F10
-
Enter the next selection interface. Select root drop to root shell prompt.
-
At this time, the computer will enter the shell from startup. When the command prompt appears, enter "passwd username". The username here is your user name. If you forget your user name, there is no hurry. You can enter ls /home to view the user name first, and then enter the above command.
-
After entering passwd username, you can enter your new password directly at the prompt and confirm it again.
-
reboot can be completed
Errors in the compilation step during installation
Error 1:
nvcc fatal : Value 'c++14' is not defined for option 'std'
 Error reason: in openpose cmakelists Line 508 of TXT file (maybe not after subsequent updates), c++14 is specified at the following position to compile the Thrust Library in CUDA11 or above (see note). However, in cuda8 c++14 is not supported under 0, so this option needs to be changed to: c++11. As shown below:
Before modification:

After modification:

After modification, reconfigure CMAKE to compile successfully.
Error 2:
nvcc fatal : Unsupported gpu architecture 'compute_75'
Error reason: cuda10 Versions below 0 do not support 75. If the graphics card updates with an error above 75, please use the updated CUDA version
CUDA_ARCH := -gencode arch=compute_30,code=sm_30 \
		-gencode arch=compute_35,code=sm_35 \
		-gencode arch=compute_50,code=sm_50 \
		-gencode arch=compute_52,code=sm_52 \
		-gencode arch=compute_60,code=sm_60 \
		-gencode arch=compute_61,code=sm_61 \
		-gencode arch=compute_62,code=sm_62 \
		-gencode arch=compute_70,code=sm_70 \
		-gencode arch=compute_72,code=sm_72 \
		-gencode arch=compute_75,code=sm_75 \
		-gencode arch=compute_75,code=compute_75