Previously on:
I also need PCL_ ROS and PCL, in which PCL is installed_ ROS is to supplement two packages after installing ROS: PCL conversions PCL_ ROS, and then install PCL separately.
If you use the classical method Ubuntu18.04 installing PCL (detailed tutorial) If PCL is installed, it will lead to the conflict of VTK package, that is, PCL needs a certain version of VTK to compile, while pcl_ros needs another version of VTK to pass through, resulting in conflict, which leads to the installation of VTK, the selection of PCL and VTK version, and the installation of PCL under the existing ROS. A series of bug s are generated in the process.
This article aims to solve such a problem: on the premise of installing ROS, install the appropriate version of VTK and PCL.
1.ROS INTSLL
Install ROS-Melodic on ubuntu18.04
PCL is required after installation_ ROS supplements two packages:
sudo apt install ros-melodic-pcl-conversions ros-melodic-pcl_ros
2.PCL INSTALL
Background: install PCL under the background of ROS already installed
Version adaptation: PCL 1.8.1 + VTK 7.1.1 (important: version adaptation is required)
1, Install PCL dependencies
sudo apt-get update
sudo apt-get install git build-essential linux-libc-dev
sudo apt-get install cmake cmake-gui
sudo apt-get install libusb-1.0-0-dev libusb-dev libudev-dev
sudo apt-get install mpi-default-dev openmpi-bin openmpi-common
sudo apt-get install libflann1.9 libflann-dev # Ubuntu 18 corresponds to 1.9
sudo apt-get install libeigen3-dev # You need to download the correct version and install it yourself
sudo apt-get install libboost-all-dev
sudo apt-get install libqhull* libgtest-dev
sudo apt-get install freeglut3-dev pkg-config
sudo apt-get install libxmu-dev libxi-dev
sudo apt-get install mono-complete
sudo apt-get install libopenni-dev
sudo apt-get install libopenni2-dev
sudo apt-get install openjdk-8-jdk openjdk-8-jre
2, VTK installation
1. First install the dependent X11 of VTK
# First, install the dependencies of VTK: X11, OpenGL;
# X11
sudo apt-get install libx11-dev libxext-dev libxtst-dev libxrender-dev libxmu-dev libxmuu-dev
# OpenGL
sudo apt-get install build-essential libgl1-mesa-dev libglu1-mesa-dev
2. Install VTK-7.1.1
Download vtk7 from the official website one point one
decompression
sudo tar -xzvf VTK-7.1.1.tar.gz
Open the terminal window.
cmake-gui . # Open the graphical interface of cmake
Error 1:
After opening cmake GUI, I found that my cmake GUI is version 3.10, while the cmake I installed is version 3.20. Therefore, cmake and cmake GUI are not compatible and will report an error
Solution: specify the version in bashrc
code ~/.bashrc
export CMAKE_ROOT=/usr/local/share/cmake-3.21
Error 2:
When configuring vtk-7.1.1, prompt: qt4 is required; Similar to "Found unsuitable Qt version" "from not found, this code requires QT 4 A hint like "X".
Solution:
Installation qt4: executed in the terminal
sudo apt-get install qt4-default
==========================================================================
Configure reference blog posts in cmake GUI: PCL1. 12+VTK7. 1.1 && Ubuntu20. 04.3 + latest version of vscode official website 2022.01
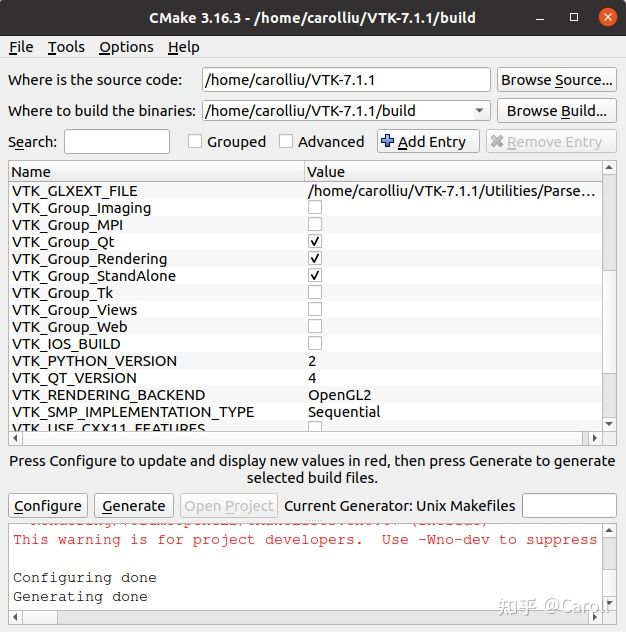
In cmake GUI:
Configure where is the source code as the directory of VTK-7.1.1; (create a new build folder under the directory of VTK-7.1.1);
Configure where to build the binaries as the build folder under VTK-7.1.1;
Click "Configure" (just use "Unix Makefiles"); When the configuration is complete, "Configuring done" is displayed.
Check "VTK group QT" and click "Configure"; After the configuration is completed, "Configuring done" is displayed;
Click "Generate"; Display "Generating done" and Generate project files in the build folder.
Switch to the build folder under the VTK-7.1.1 installation directory in the terminal and enter:
make -j8 # If the 8-core processor is still anxious to see the results, you can: make -j16
sudo make install
vtk installation is complete.
==========================================================================
3. Install pcl1 eight point one
Historical version selection of PCL official website
#Download the specified version of pcl source code
#Or select the specified version in the latest version of pcl source code. This paper adopts this method
git clone https://github.com/PointCloudLibrary/pcl.git
git checkout pcl-1.8.1
cd /path/to/your/pcl
mkdir release
cd release
cmake -DCMAKE_BUILD_TYPE=None -DCMAKE_INSTALL_PREFIX=/usr \       -DBUILD_GPU=OFF -DBUILD_apps=ON -DBUILD_examples=ON \       -DCMAKE_INSTALL_PREFIX=/usr /path/to/your/pcl
make
sudo make install
After installing PCL, copy the library file to / usr/lib/x86_64-linux-gnu/
sudo cp /usr/lib/libpcl* /usr/lib/x86_64-linux-gnu/
PCL installation completed
4. PCL test
In PCL_ test. Add the following to CPP
#include <iostream>
#include <pcl/io/pcd_io.h>
#include <pcl/point_types.h>

int
  main ()
{
  pcl::PointCloud<pcl::PointXYZ> cloud;

  // Fill in the cloud data
  cloud.width    = 5;
  cloud.height   = 1;
  cloud.is_dense = false;
  cloud.resize (cloud.width * cloud.height);

  for (auto& point: cloud)
  {
    point.x = 1024 * rand () / (RAND_MAX + 1.0f);
    point.y = 1024 * rand () / (RAND_MAX + 1.0f);
    point.z = 1024 * rand () / (RAND_MAX + 1.0f);
  }

  pcl::io::savePCDFileASCII ("test_pcd.pcd", cloud);
  std::cerr << "Saved " << cloud.size () << " data points to test_pcd.pcd." << std::endl;

  for (const auto& point: cloud)
    std::cerr << "    " << point.x << " " << point.y << " " << point.z << std::endl;

  return (0);
}
Copy the following to cmakelists txt
cmake_minimum_required(VERSION 2.6 FATAL_ERROR)
project(pcl_test)
find_package(PCL 1.3 REQUIRED COMPONENTS common io)
include_directories(${PCL_INCLUDE_DIRS})
link_directories(${PCL_LIBRARY_DIRS})
add_definitions(${PCL_DEFINITIONS})
add_executable(pcl_test src/pcl_test.cpp)
target_link_libraries(pcl_test ${PCL_COMMON_LIBRARIES} ${PCL_IO_LIBRARIES})
Operation results:
twilight@pc: ~/project/robot/test_pro/build$ ./pcl_test
Saved 5 data points to test_pcd.pcd.
    0.352222 -0.151883 -0.106395
    -0.397406 -0.473106 0.292602
    -0.731898 0.667105 0.441304
    -0.734766 0.854581 -0.0361733
    -0.4607 -0.277468 -0.916762
3.uninstall PCL
cd /path/to/your/pcl
cd release
sudo make uninstall
perhaps
sudo rm -r /usr/include/pcl-1.12 /usr/share/pcl-1.12 /usr/bin/pcl* /usr/lib/libpcl*
sudo rm -r /usr/lib/x86_64-linux-gnu/libpcl*
thank
PCL1. 12+VTK7. 1.1 && Ubuntu20. 04.3 + vscode (latest version 2022.01 on the official website)
Ubuntu18.04 installing PCL (detailed tutorial)
UBUNTu16.04 compiling and installing PCL-1.8 and VTK-7.1
Check the PCL version Linux and install PCL on Ubuntu 16
Ubuntu16.04 installation and compilation of pcl library and vtk
ubuntu16.04 installing pcl1 8.1 (clear and easy to understand, effective in personal testing, including the tutorial of installing pcl1.8.1 after installing ros)
PLC installation pit summary (Ubuntu 16.4+PCL1.8.1+VTK7.1+Qt5.9.9)
ubuntu 16 installing ETH elevation map ROS software package
Ubuntu18.04 error "unmet dependencies. Unable to correct problems, you have held broken packages" encountered while installing ROS