Operation requirements:
1. Three texture filtering methods are used to load textures (linear sampling, mipmap and nearest point sampling);
2. The image loaded with texture can be set by yourself;
3. The texture of each face is different;
4. The mouse or keyboard controls the switching of texture filtering methods.
Initialize OpenGL
Same as previous C-2 and C-3 reports.
Prepare data
Create a vertex array object. Register the vertex position attribute and texture coordinate attribute at the same time. The ordinal value of the attribute indicates where the data is stored to find the position and texture coordinate data through the corresponding position in the shader.
The position attribute of the vertex meets the cube requirements of the problem. In later rendering, glDrawArrays(GL_TRIANGLES, 0, 36) is used to draw each triangle, that is, vertex data is not reused between different triangular patches.
	float vertices[] = {
         // positions          // texture coords
        -0.5f, -0.5f, -0.5f,  1.0f, 0.0f,
         0.5f,  0.5f, -0.5f,  0.0f, 1.0f,
         0.5f, -0.5f, -0.5f,  0.0f, 0.0f,
        -0.5f, -0.5f, -0.5f,  1.0f, 0.0f,
        -0.5f,  0.5f, -0.5f,  1.0f, 1.0f,
         0.5f,  0.5f, -0.5f,  0.0f, 1.0f,

        -0.5f, -0.5f,  0.5f,  0.0f, 0.0f,
         0.5f, -0.5f,  0.5f,  1.0f, 0.0f,
         0.5f,  0.5f,  0.5f,  1.0f, 1.0f,
         0.5f,  0.5f,  0.5f,  1.0f, 1.0f,
        -0.5f,  0.5f,  0.5f,  0.0f, 1.0f,
        -0.5f, -0.5f,  0.5f,  0.0f, 0.0f,

        -0.5f,  0.5f,  0.5f,  1.0f, 1.0f,
        -0.5f,  0.5f, -0.5f,  0.0f, 1.0f,
        -0.5f, -0.5f,  0.5f,  1.0f, 0.0f,
        -0.5f,  0.5f, -0.5f,  0.0f, 1.0f,
        -0.5f, -0.5f, -0.5f,  0.0f, 0.0f,
        -0.5f, -0.5f,  0.5f,  1.0f, 0.0f,

        0.5f,  0.5f,  0.5f,  0.0f, 1.0f,
        0.5f, -0.5f, -0.5f,  1.0f, 0.0f,
        0.5f,  0.5f, -0.5f,  1.0f, 1.0f,
        0.5f,  0.5f,  0.5f,  0.0f, 1.0f,
        0.5f, -0.5f,  0.5f,  0.0f, 0.0f,
        0.5f, -0.5f, -0.5f,  1.0f, 0.0f,

        -0.5f, -0.5f,  0.5f, 0.0f, 1.0f,
        -0.5f, -0.5f, -0.5f, 0.0f, 0.0f,
         0.5f, -0.5f, -0.5f, 1.0f, 0.0f,
        -0.5f, -0.5f,  0.5f, 0.0f, 1.0f,
         0.5f, -0.5f, -0.5f, 1.0f, 0.0f,
         0.5f, -0.5f,  0.5f, 1.0f, 1.0f,

        -0.5f,  0.5f, -0.5f,  0.0f, 1.0f,
         0.5f,  0.5f, -0.5f,  1.0f, 1.0f,
         0.5f,  0.5f,  0.5f,  1.0f, 0.0f,
         0.5f,  0.5f,  0.5f,  1.0f, 0.0f,
        -0.5f,  0.5f,  0.5f,  0.0f, 0.0f,
        -0.5f,  0.5f, -0.5f,  0.0f, 1.0f
    };

    // first, configure the pyramid's VAO, VBO, EBO
    unsigned int VBO, VAO;
    glGenVertexArrays(1, &VAO);
    glGenBuffers(1, &VBO);

    glBindVertexArray(VAO);
    glBindBuffer(GL_ARRAY_BUFFER, VBO);
    glBufferData(GL_ARRAY_BUFFER, sizeof(vertices), vertices, GL_STATIC_DRAW);
    // position attribute
    glVertexAttribPointer(0, 3, GL_FLOAT, GL_FALSE, 5 * sizeof(float), (void*)0);
    glEnableVertexAttribArray(0);
    // texture attribute
    glVertexAttribPointer(1, 2, GL_FLOAT, GL_FALSE, 5 * sizeof(float), (void*)(3*sizeof(float)));
    glEnableVertexAttribArray(1);

    glBindVertexArray(0);//unbind
Texture image preparation
According to the author's preference, the following 6 maps are adopted.
 Figure 1 Figure 1
|
 Figure 2 Figure 2
|
 Figure 3 Figure 3
|
 Figure 4 Figure 4
|
 Figure 5 Figure 5
|
 Figure 6 Figure 6
|
Using stb_image.h library to load textures. Set the wrap and filter parameters of the texture through glTexParameteri. Wrap parameter selection GL_REPEAT makes the texture coordinates exceed the range of [0,1] and repeat sampling periodically. In addition, GL_ CLAMP_ TO_ The edge option extends out of range samples to the edge. When initializing the loading texture, the filter parameter adopts GL first_ Filter method of linear. Specifically, the control switched according to user input is placed in the rendering loop. stbi_ After loading the data of the picture, the texture is generated through glTexImage2D according to the number of component channels of the picture.
	GLuint textures[6];
    const char * textPaths[] = {
        "../resources/gantayipao.jpg",
        "../resources/jingrui.jpg",
        "../resources/kaipao.jpg",
        "../resources/kongerlengzi.jpg",
        "../resources/tiancai.jpg",
        "../resources/yidalipao.jpg"
    };
    // glGenTextures(6, textures);
    for (int i = 0; i < 6; i++) {//GL is used when initializing and loading textures_ Filter method of linear
        glGenTextures(1, &textures[i]);
        glBindTexture(GL_TEXTURE_2D, textures[i]);
        glTexParameteri(GL_TEXTURE_2D, GL_TEXTURE_WRAP_S, GL_REPEAT);
        glTexParameteri(GL_TEXTURE_2D, GL_TEXTURE_WRAP_T, GL_REPEAT);

        glTexParameteri(GL_TEXTURE_2D, GL_TEXTURE_MIN_FILTER, GL_LINEAR);
        glTexParameteri(GL_TEXTURE_2D, GL_TEXTURE_MAG_FILTER, GL_LINEAR);
        stbi_set_flip_vertically_on_load(true);
        int width, height, nrChannels;
        unsigned char *data = stbi_load(textPaths[i], &width, &height, &nrChannels, 0);
        if (data) {
            GLenum format;
            if (nrChannels == 1)
                format = GL_RED;
            else if (nrChannels == 3)
                format = GL_RGB;
            else if (nrChannels == 4)
                format = GL_RGBA;

            glTexImage2D(GL_TEXTURE_2D, 0, format, width, height, 0, format, GL_UNSIGNED_BYTE, data);
            glGenerateMipmap(GL_TEXTURE_2D);
            stbi_image_free(data);
        } else {
            std::cout << "Texture failed to load at path: " << textPaths[i] << std::endl;
            stbi_image_free(data);
        }
    }
Build shader
Because texture maps are used and no lighting is involved, vertex shaders and clip shaders are very simple. Just read in the texture coordinates in the vertex shader and transfer them to the clip shader.
Vertex Shader
#version 460 core
layout (location = 0) in vec3 aPos;
layout (location = 1) in vec2 aTexCoord;

out vec2 TexCoord;

uniform mat4 model;
uniform mat4 view;
uniform mat4 projection;

void main()
{
    gl_Position = projection * view * model * vec4(aPos, 1.0);
	TexCoord = vec2(aTexCoord.x, aTexCoord.y);
}
Fragment Shader
#version 460 core
out vec4 FragColor;

in vec2 TexCoord;

// texture samplers
uniform sampler2D texture;

void main()
{
	FragColor = texture(texture, TexCoord);
}
Switching of texture filtering mode
Through in process_ The input function accepts the input signal from the keyboard and changes the variable filter_ The value of mode,
void processInput(GLFWwindow *window) {
    ... ...
    if (glfwGetKey(window, GLFW_KEY_0) == GLFW_PRESS)
        filter_mode = LINEAR;
    else if (glfwGetKey(window, GLFW_KEY_1) == GLFW_PRESS)
        filter_mode = MIPMAP;
    else if (glfwGetKey(window, GLFW_KEY_2) == GLFW_PRESS)
        filter_mode = NEAREAST;
}
Then, in the rendering cycle, the filter parameters are modified for each texture map. It should be noted that when modifying with glTexParameteri, you need to bind glBindTexture to GL first_ TEXTURE_ The position of the 2D texture. It should be noted that, LearnOpenGL Points out that:
A common mistake is to set the option of zoom in filtering to one of the multi-level fade texture filtering options. This has no effect, because the multi-level fade texture is mainly used when the texture is reduced: the multi-level fade texture will not be used when the texture is enlarged, and the option of setting the multi-level fade texture for magnification filtering will produce a GL_INVALID_ENUM error code.
Therefore, when the MIPMAP option is selected, only the reduction filter is set to multi-level, while the amplification filter still adopts GL_LINEAR
	switch (filter_mode)
    {
    case LINEAR:
    for (int i = 0; i < 6; i++) {
        glBindTexture(GL_TEXTURE_2D, textures[i]);
        glTexParameteri(GL_TEXTURE_2D, GL_TEXTURE_MIN_FILTER, GL_LINEAR);
        glTexParameteri(GL_TEXTURE_2D, GL_TEXTURE_MAG_FILTER, GL_LINEAR);
    }
    break;
	case NEAREAST:
	    for (int i = 0; i < 6; i++) {
	        glBindTexture(GL_TEXTURE_2D, textures[i]);
	        glTexParameteri(GL_TEXTURE_2D, GL_TEXTURE_MIN_FILTER, GL_NEAREST);
	        glTexParameteri(GL_TEXTURE_2D, GL_TEXTURE_MAG_FILTER, GL_NEAREST);
	    }
	    break;
	case MIPMAP:
	    for (int i = 0; i < 6; i++) {
	        glBindTexture(GL_TEXTURE_2D, textures[i]);
	        glTexParameteri(GL_TEXTURE_2D, GL_TEXTURE_MIN_FILTER, GL_NEAREST_MIPMAP_NEAREST);
	        glTexParameteri(GL_TEXTURE_2D, GL_TEXTURE_MAG_FILTER, GL_LINEAR);
	    }
	    break;
    default:
        std::cout << "invalid filter_mode of " << filter_mode << std::endl;
        break;
    }
Render Texture
In the rendering cycle, in addition to setting the matrix of three coordinate transformations of the shader, set the sampler2D value in the fragment shader through setInt("texture", 0): uniform sampler2D texture. This number needs to be consistent with the texture unit number activated later. glActiveTexture(GL_TEXTURE0) (it is 0 by default when it is not explicitly activated), Clip shaders can sample to textures correctly.
ourShader.use();
ourShader.setInt("texture", 0);
ourShader.setMat4("model", glm::mat4(1.0f));
ourShader.setMat4("view", camera.GetViewMatrix());
ourShader.setMat4("projection", glm::perspective(glm::radians(camera.Zoom), (float)SCR_WIDTH / (float)SCR_HEIGHT, 0.1f, 100.0f));

glBindVertexArray(VAO);
//Draw two triangles (six vertices) in turn
for (int i = 0; i < 6; i++) {
    glActiveTexture(GL_TEXTURE0);
    glBindTexture(GL_TEXTURE_2D, textures[i]);// bind corresponding texture
    glDrawArrays(GL_TRIANGLES, 6*i, 6);
}
design sketch
The overall effect diagram is as follows.
 Figure 1 Figure 1
|
 Figure 2 Figure 2
|
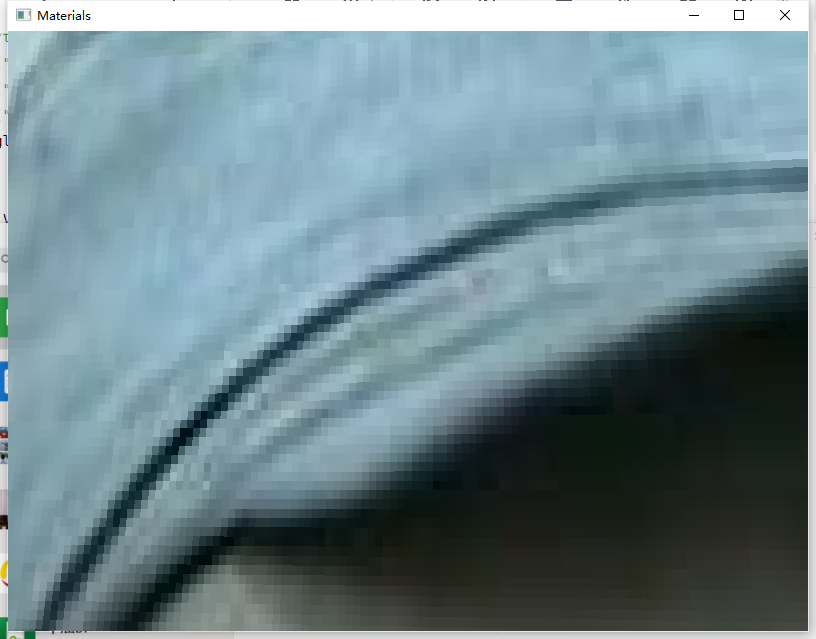
When zooming in beyond the original image resolution, observe the effects of different texture filtering methods, as shown in the following figure.
-
Linear sampling
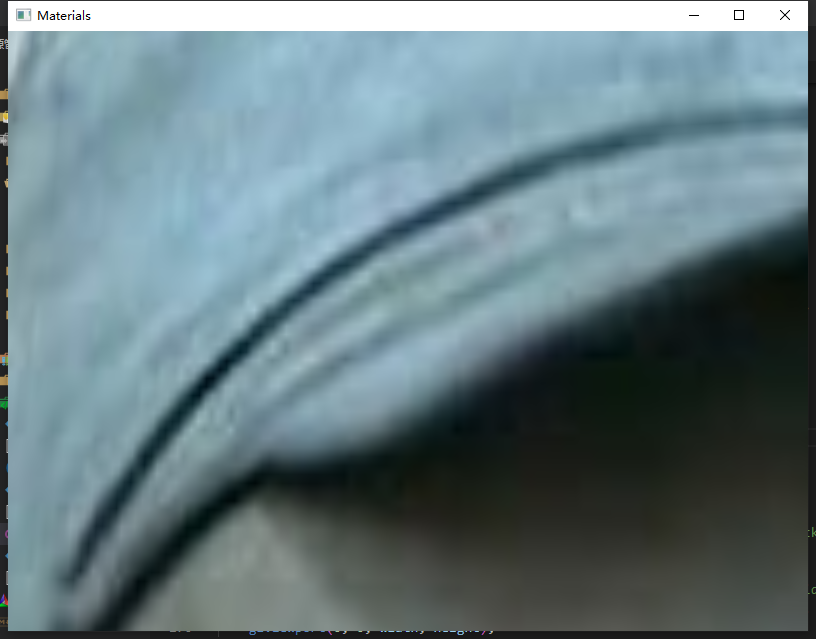
-
mipmap
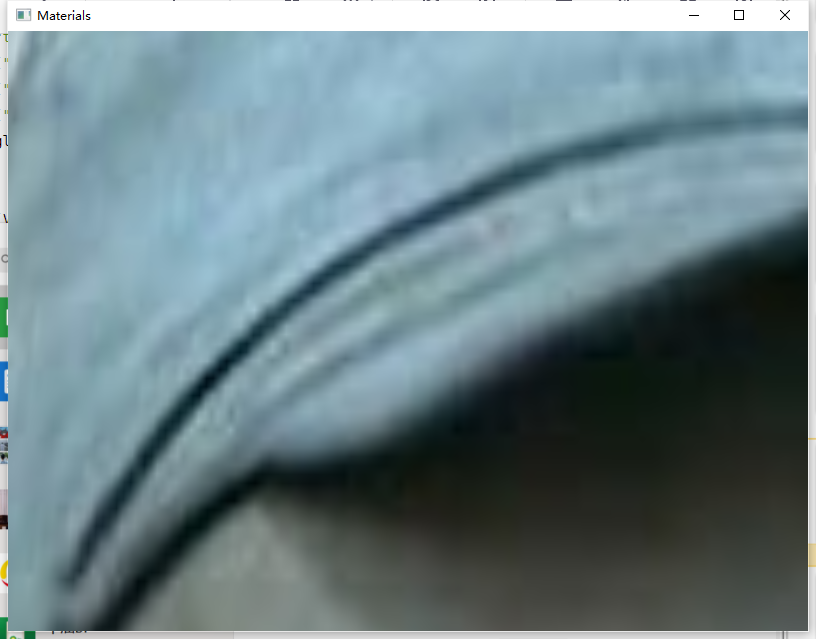
-
Nearest point sampling