catalogue
2) Message Interaction scenario
1, Foreword
To tell you the truth, I just had the idea of writing this thing last week. I thought it would be good to hang up the code and earn some points after writing it. After writing, I found that this thing is worth writing an article. It's better to teach people to fish than to teach people to fish (that's what this sentence says). By the way, it's even better to earn some worship from fresh student sisters. Then hang up a two-dimensional code for collection, one person pays 1 yuan, 10000 people pay a day, 300000 a month, 3.6 million a year... It's amazing. It's decades away from the small goal of 100 million.
I don't know if CSDN blog has any restrictions on dream talk. If so, please let me know. I will delete the above words as soon as possible.
Now back to reality, if this blog can have > 2 comments, I will publish another column related to Netty later. Otherwise, it won't go out. One wonders why the threshold is defined as > 2? Not why, because I will definitely leave a message with my daughter-in-law's number first, and then leave a message with my own number.
Well, no more nonsense. There are still many things to do later, such as washing vegetables, cooking, washing dishes, kneeling and rubbing clothes... All right, let's get down to business.
2, Final effect
Why look at the final effect first? Because the code is finished now. More importantly, we carry out follow-up analysis with sensory goals, which can be better understood. As mentioned in the title, the whole project consists of three parts:
1. Chat server
The responsibility of the chat server is explained in one sentence: it is responsible for receiving the messages sent by all users and forwarding the messages to the target users.
The chat server does not have any interface, but it is the most important role in IM. To show respect, we must put an effect picture on it:
2021-05-11 10:41:40.037  INFO 9392 --- [ntLoopGroup-3-1] c.e.o.s.netty.handler.HeartBeatHandler   : server Received heartbeat packet:{"time":1620700900029,"messageType":"99"}
2021-05-11 10:41:50.049  INFO 9392 --- [ntLoopGroup-3-1] c.e.o.s.n.handler.BussMessageHandler     : Message received:{"time":1620700910045,"messageType":"14","sendUserName":"guodegang","recvUserName":"yuqian","sendMessage":"Hello, Miss Yu"}
2021-05-11 10:41:50.055  INFO 9392 --- [ntLoopGroup-3-2] c.e.o.s.netty.executor.SendMsgExecutor   : Message forwarding succeeded:{"time":1620700910052,"messageType":"14","sendUserName":"guodegang","recvUserName":"yuqian","sendMessage":"Hello, Miss Yu"}
2021-05-11 10:41:54.068  INFO 9392 --- [ntLoopGroup-3-2] c.e.o.s.netty.handler.HeartBeatHandler   : server Received heartbeat packet:{"time":1620700914064,"messageType":"99"}
2021-05-11 10:41:57.302  INFO 9392 --- [ntLoopGroup-3-2] c.e.o.s.n.handler.BussMessageHandler     : Message received:{"time":1620700917301,"messageType":"14","sendUserName":"yuqian","recvUserName":"guodegang","sendMessage":"Hello, Miss Guo"}
2021-05-11 10:41:57.304  INFO 9392 --- [ntLoopGroup-3-1] c.e.o.s.netty.executor.SendMsgExecutor   : Message forwarded successfully:{"time":1620700917303,"messageType":"14","sendUserName":"yuqian","recvUserName":"guodegang","sendMessage":"Hello, Miss Guo"}
2021-05-11 10:42:05.050  INFO 9392 --- [ntLoopGroup-3-1] c.e.o.s.netty.handler.HeartBeatHandler   : server Received heartbeat packet:{"time":1620700925049,"messageType":"99"}
2021-05-11 10:42:12.309  INFO 9392 --- [ntLoopGroup-3-2] c.e.o.s.netty.handler.HeartBeatHandler   : server Received heartbeat packet:{"time":1620700932304,"messageType":"99"}
2021-05-11 10:42:20.066  INFO 9392 --- [ntLoopGroup-3-1] c.e.o.s.netty.handler.HeartBeatHandler   : server Received heartbeat packet:{"time":1620700940050,"messageType":"99"}
2021-05-11 10:42:27.311  INFO 9392 --- [ntLoopGroup-3-2] c.e.o.s.netty.handler.HeartBeatHandler   : server Received heartbeat packet:{"time":1620700947309,"messageType":"99"}
2021-05-11 10:42:35.070  INFO 9392 --- [ntLoopGroup-3-1] c.e.o.s.netty.handler.HeartBeatHandler   : server Received heartbeat packet:{"time":1620700955068,"messageType":"99"}
2021-05-11 10:42:42.316  INFO 9392 --- [ntLoopGroup-3-2] c.e.o.s.netty.handler.HeartBeatHandler   : server Received heartbeat packet:{"time":1620700962312,"messageType":"99"}
2021-05-11 10:42:50.072  INFO 9392 --- [ntLoopGroup-3-1] c.e.o.s.netty.handler.HeartBeatHandler   : server Received heartbeat packet:{"time":1620700970071,"messageType":"99"}
2021-05-11 10:42:57.316  INFO 9392 --- [ntLoopGroup-3-2] c.e.o.s.netty.handler.HeartBeatHandler   : server Received heartbeat packet:{"time":1620700977315,"messageType":"99"}
From the rendering, we can see some contents: receiving heartbeat packets, receiving messages and forwarding messages. These contents will be explained in detail later.
2. Chat client
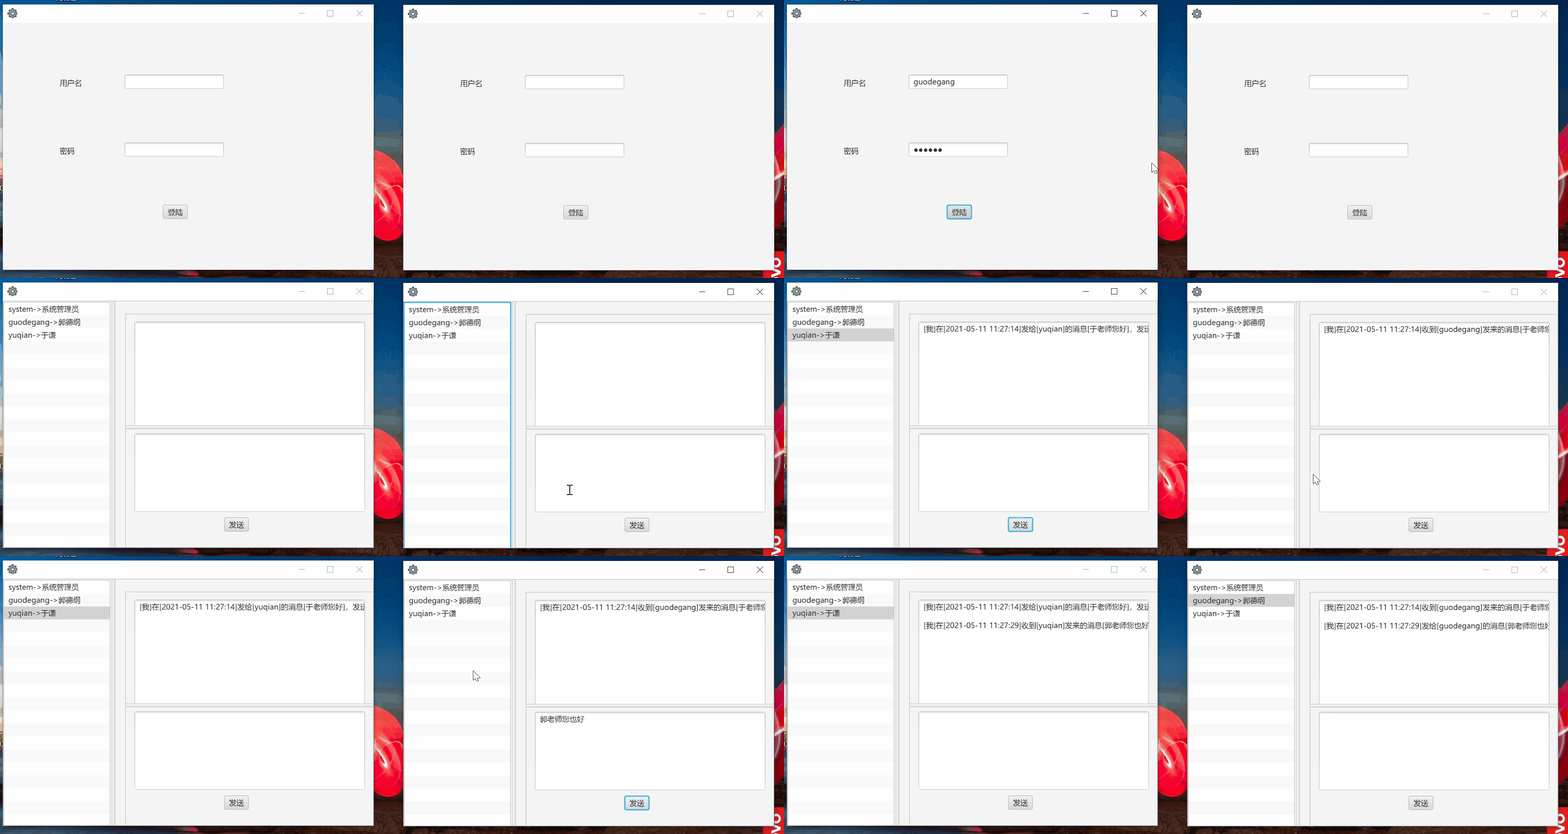
The responsibility of the chat client is explained in one sentence: log in, send chat content to others, and receive chat content sent by others.
Next, for the convenience of demonstration, I will open two clients, log in with two different users, and then send messages.
3. Web administration console
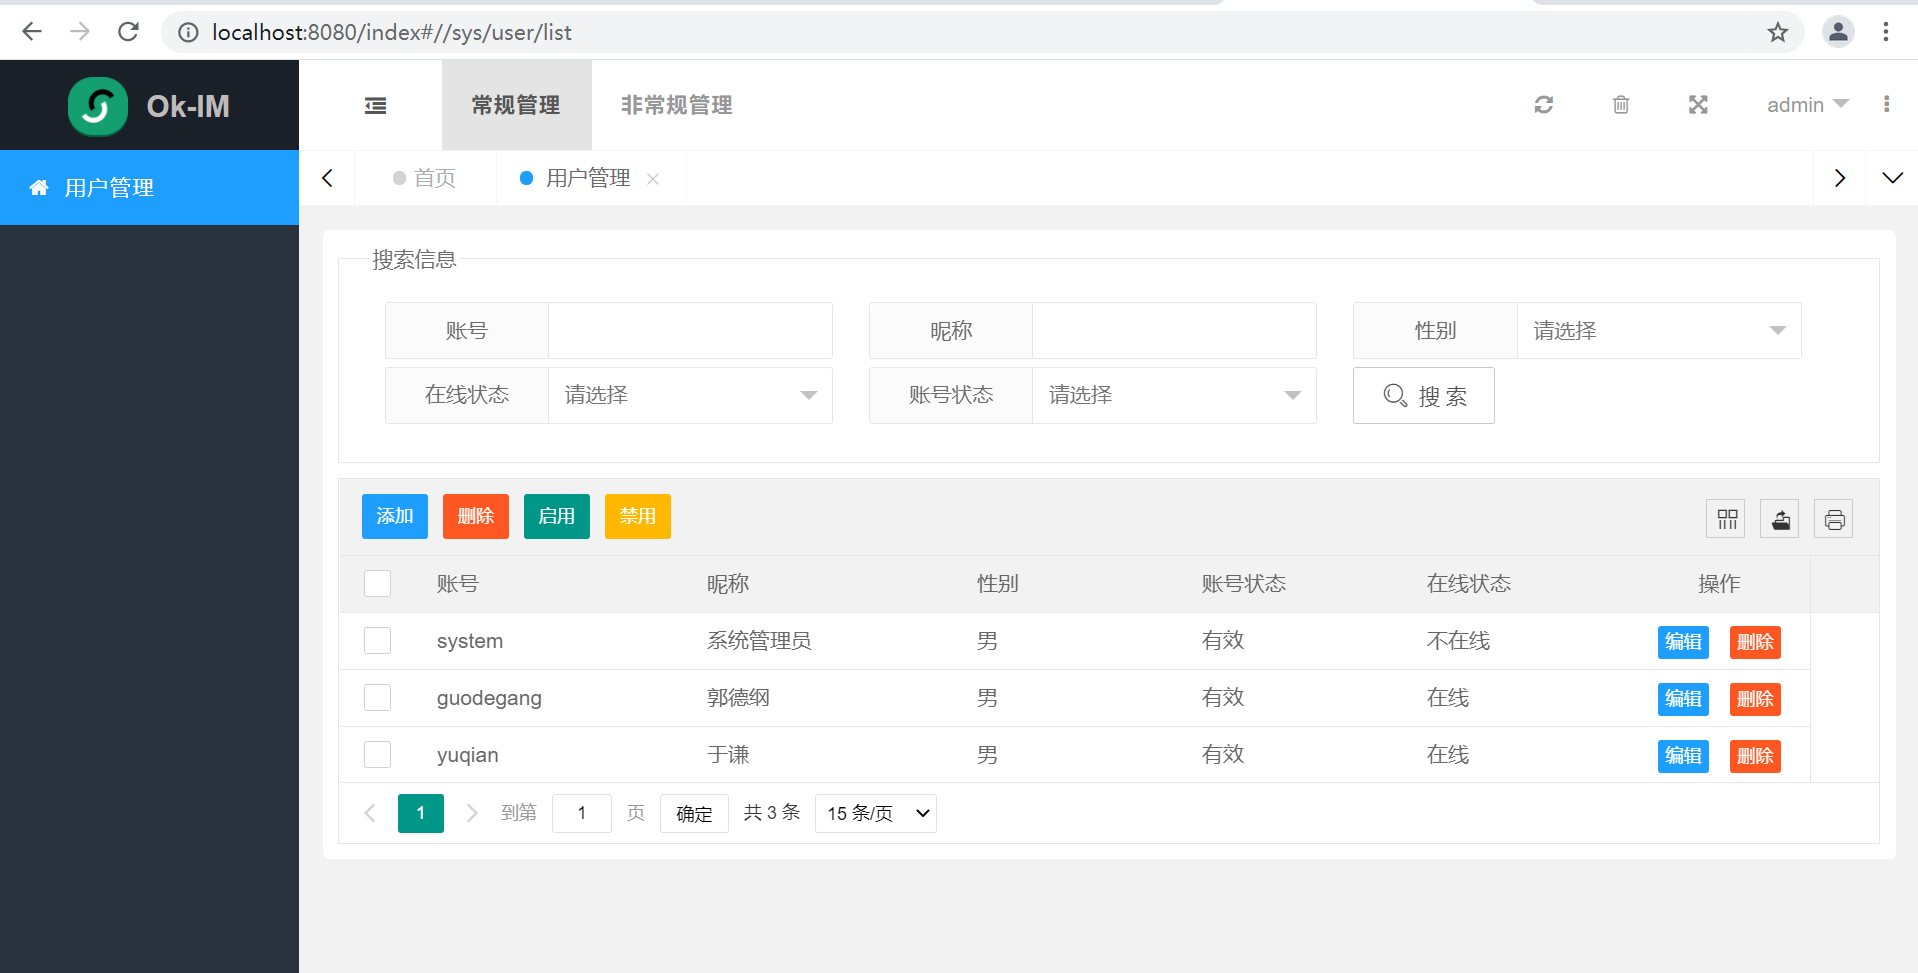
At present, only one account management has been done. See the figure for details:
3, Demand analysis
None (see Chapter II).
4, Outline design
1. Technology selection
1) Chat server
The chat server communicates with the client through TCP protocol, using long connection and full duplex communication mode, which is based on the classic communication framework Netty.
So what is a long connection? As the name suggests, after the client and server are connected, they will send and receive messages repeatedly on this connection, and the connection will not be disconnected. Of course, the short connection corresponds to the long connection. Each time a short connection sends a message, it needs to establish a connection, then send a message, and finally disconnect. Obviously, instant chat is suitable for long connections.
So what is full duplex? When a long connection is established, there are both uplink and downlink data on this connection, which is called full duplex. So for the corresponding half duplex and simplex, let's Baidu by ourselves.
2) Web administration console
The Web management end uses the SpringBoot scaffold, the front end uses Layuimini (a front-end framework encapsulated based on the Layui front-end framework), and the back end uses SpringMVC+Jpa+Shiro.
3) Chat client
Using SpringBoot+JavaFX, I made an extremely simple client. JavaFX is a framework for developing Java desktop programs. I used it for the first time. The writing methods in the code are checked online. This is not the focus of this article. If you are interested, please check Baidu carefully.
4)SpringBoot
The above three components are all developed with SpringBoot as the scaffold.
5) Code construction
Maven.
2. Database design
We only use one user table. It's relatively simple to paste the script directly:
CREATE TABLE `sys_user` (
  `id` bigint(20) NOT NULL AUTO_INCREMENT COMMENT 'Primary key',
  `user_name` varchar(64) DEFAULT NULL COMMENT 'User name: login account',
  `pass_word` varchar(128) DEFAULT NULL COMMENT 'password',
  `name` varchar(16) DEFAULT NULL COMMENT 'nickname',
  `sex` char(1) DEFAULT NULL COMMENT 'Gender:1-Male, 2 female',
  `status` bit(1) DEFAULT NULL COMMENT 'User status: 1-Valid, 0-invalid',
  `online` bit(1) DEFAULT NULL COMMENT 'Online status: 1-Online, 0-off-line',
  `salt` varchar(128) DEFAULT NULL COMMENT 'Password salt value',
  `admin` bit(1) DEFAULT NULL COMMENT 'Administrator (only administrators can log in) Web End): 1-Yes, 0-no',
  PRIMARY KEY (`id`)
) ENGINE=InnoDB AUTO_INCREMENT=1 DEFAULT CHARSET=utf8;
When is this form used?
1) When the Web management terminal logs in; 2) When the chat client sends the login request to the chat server, the chat server performs user authentication; 3) The friends list of the chat client is loaded.
3. Communication design
This section will be one of the core contents of this paper. It mainly describes the protocol format of communication message and the Interaction scenario of communication message.
1) Message protocol format
The following figure should illustrate 99%:
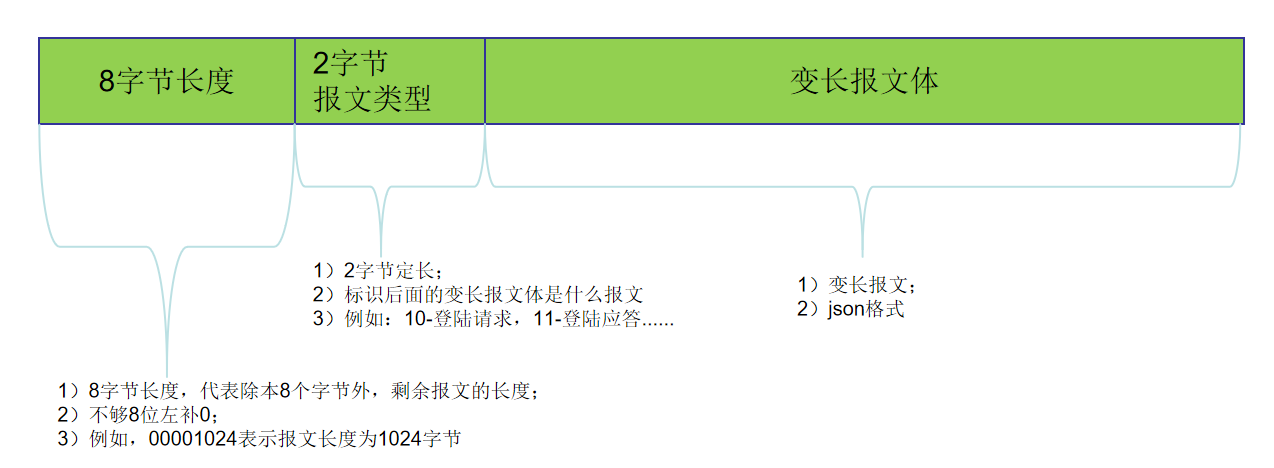
The remaining 1% said here:
a) Packet sticking problem. In TCP long connections, packet sticking is the first problem to be solved. Generally speaking, sticky packet means that the message receiver often receives not "the whole" message, sometimes a little more than "the whole" and sometimes a little less than "the whole", which makes the receiver unable to parse the message. In order to solve this problem, the first 8 bytes in the figure above, the receiver obtains the "whole" message according to the length of the first 8 bytes, so as to carry out normal business processing;
b) 2-byte message type, designed to facilitate message parsing. Convert the following json into corresponding entities according to these two bytes for subsequent processing;
c) Variable length message style is actually a string in json format. Of course, you can design the message format yourself. I put json directly here for convenience of processing;
d) Of course, you can design the message more complex and professional, such as encryption, signature, etc.
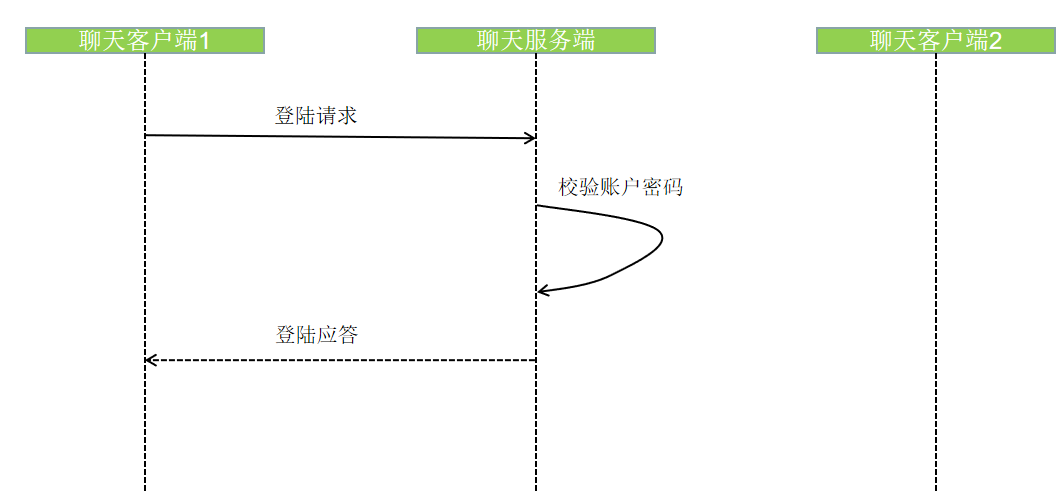
2) Message Interaction scenario
a) Landing
b) Send message - success
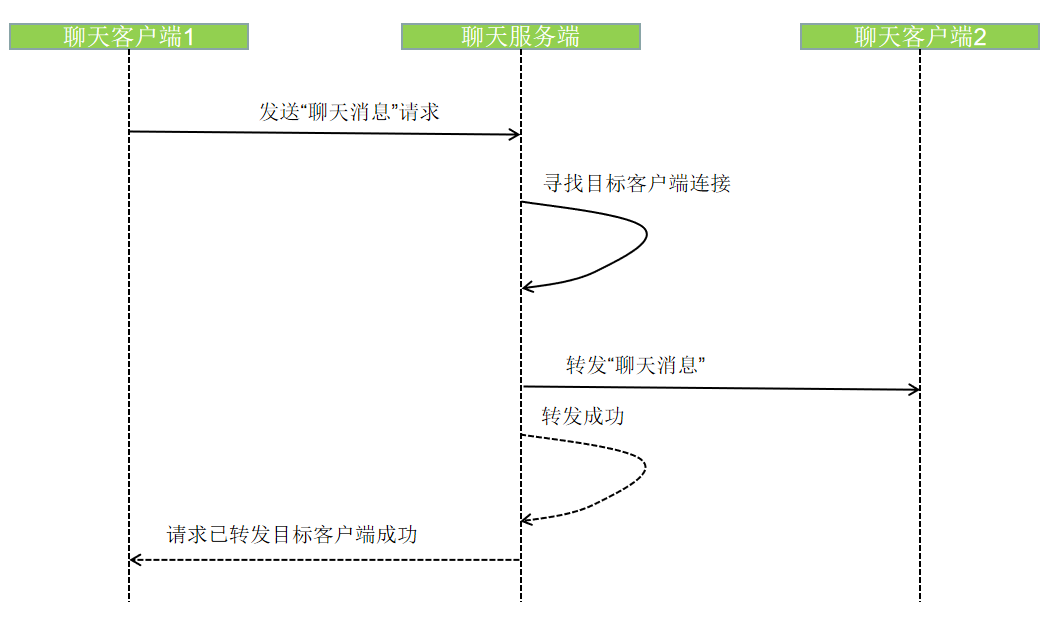
c) Send message - target client is not online
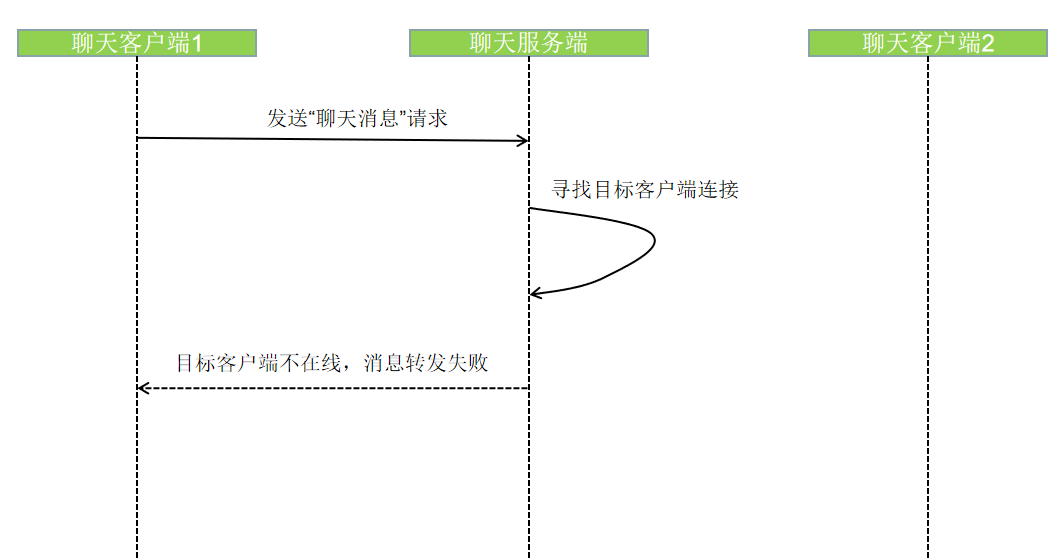
d) Send message - the target client is online, but the message forwarding failed
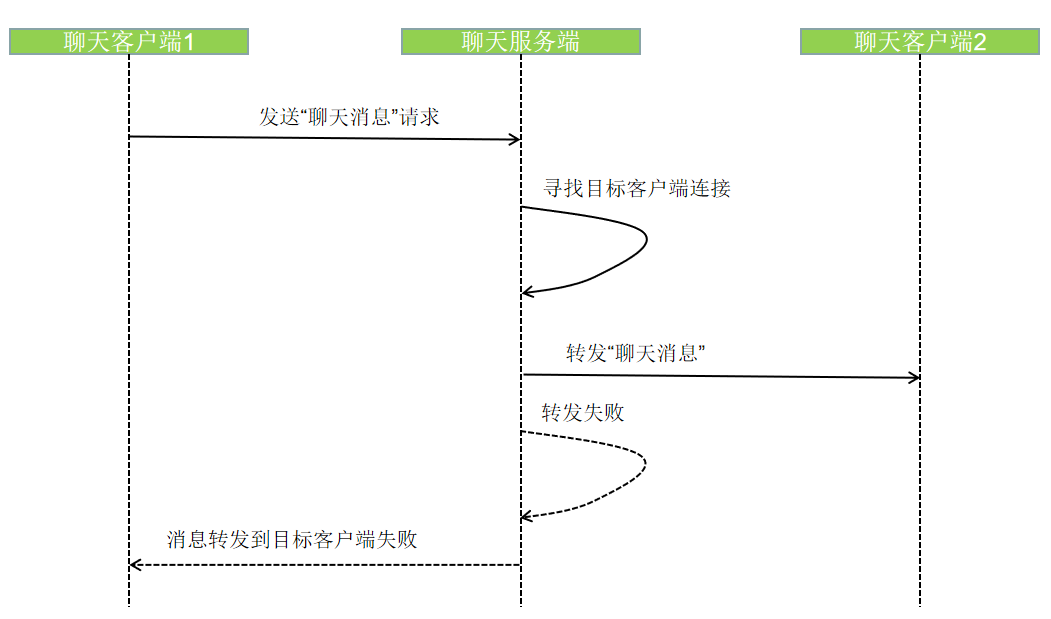
5, Coding implementation
Having said so much, I have to say something useful now.
1. Let's start with Netty
Netty is an excellent communication framework. Netty is found in most top open source frameworks. Specifically, how excellent it is, I suggest you Baidu by yourself. I'm not as good as Baidu. I'll just talk about netty in terms of application. In the process of application, its core thing is called handler. We can simply understand it as a message processor. The received messages and outgoing messages will be processed by a series of handlers. The received message is called inbound message, and the sent message is called outbound message. Therefore, the handler is divided into outbound handler and inbound handler. The received messages will only be processed by the inbound handler, and the sent messages will only be processed by the outbound handler.
For example, the message we receive from the network is binary bytecode. Our goal is to convert the message into java bean, which is convenient for our program processing. For this scenario, I design several inbound handler s:
1) A handler that converts bytes into strings;
2) Convert String into handler of java bean;
3) handler for business processing of Java beans.
For outgoing messages, I design several outbound handler s:
1) java bean to String handler;
2) String to byte handler.
The above is a description of handler.
Next, let's talk about Netty's asynchrony. Asynchrony means that after you finish an operation, you will not get the operation result immediately, but Netty will notify you of the result. This is illustrated by the following code:
channel.writeAndFlush(sendMsgRequest).addListener(new GenericFutureListener<Future<? super Void>>() {
                @Override
                public void operationComplete(Future<? super Void> future) throws Exception {
                    if (future.isSuccess()){
                        logger.info("Message sent successfully:{}",sendMsgRequest);
                    }else {
                        logger.info("Message sending failed:{}",sendMsgRequest);
                    }
                }
            });
The above writeAndFlush operation cannot return the result immediately. If you pay attention to the result, add a listener for it and respond in the listener when there is a result.
Here, you can basically understand the Netty related code found on Baidu.
2. Chat server
First look at the code of the main entry
public void start(){
        EventLoopGroup boss = new NioEventLoopGroup();
        EventLoopGroup worker = new NioEventLoopGroup();
        ServerBootstrap serverBootstrap = new ServerBootstrap();
        serverBootstrap.group(boss, worker)
                .channel(NioServerSocketChannel.class)
                .option(ChannelOption.SO_BACKLOG, 1024)
                .handler(new LoggingHandler(LogLevel.INFO))
                .childHandler(new ChannelInitializer<SocketChannel>() {
                    @Override
                    protected void initChannel(SocketChannel ch) throws Exception {
                        //heartbeat
                        ch.pipeline().addLast(new IdleStateHandler(25, 20, 0, TimeUnit.SECONDS));
                        //Receive the whole package
                        ch.pipeline().addLast(new StringLengthFieldDecoder());
                        //To string
                        ch.pipeline().addLast(new StringDecoder(Charset.forName("UTF-8")));
                        //json to object
                        ch.pipeline().addLast(new JsonDecoder());
                        //heartbeat
                        ch.pipeline().addLast(new HeartBeatHandler());
                        //Entity to json
                        ch.pipeline().addLast(new JsonEncoder());
                        //Message processing
                        ch.pipeline().addLast(bussMessageHandler);
                    }
                });
        try {
            ChannelFuture f = serverBootstrap.bind(port).sync();
            f.channel().closeFuture().sync();
        }catch (InterruptedException e) {
            logger.error("Service startup failed:{}", ExceptionUtils.getStackTrace(e));
        }finally {
            worker.shutdownGracefully();
            boss.shutdownGracefully();
        }
    }
In the code, except for the code in the initChannel method, other codes are written in a fixed way. So what is fixed writing? Generally speaking, you can Ctrl+c and Ctrl+v.
Let's focus on the code in the initChannel method. Here are the various handlers mentioned above. Let's talk about what these handlers do one by one.
1)IdleStateHandler. This is a handler built into Netty, which is both an outbound handler and an inbound handler. Its function is generally used to realize heartbeat monitoring. The so-called heartbeat means that after the client and the server establish a connection, the server should monitor the health status of the client in real time. If the client hangs up or hung up, the server will release the corresponding resources in time and do other processing, such as notifying the operation and maintenance. Therefore, in our scenario, the client needs to report its heartbeat regularly. If the server detects that it has not received the heartbeat reported by the client for a period of time, it will deal with it in time. Here, we simply disconnect it and modify the online status of the corresponding account in the database.
Now let's talk about IdleStateHandler. The first parameter is read timeout, the second parameter is write timeout, the third parameter is read-write timeout, and the fourth parameter is in seconds. This handler means that a timeout event will be generated when the message from the client is not read within 25 seconds or the message is not sent to the client within 20 seconds. So what should we do with this timeout event? Please look at the next one.
2)HeartBeatHandler. In combination with a), when a timeout event occurs, heartbeathandler will receive the event and handle it: first, disconnect the link; The second lesson: the corresponding account in the database is updated to offline status.
public class HeartBeatHandler extends ChannelInboundHandlerAdapter {
    private static Logger logger = LoggerFactory.getLogger(HeartBeatHandler.class);

    @Override
    public void userEventTriggered(ChannelHandlerContext ctx, Object evt) throws Exception {
        if (evt instanceof IdleStateEvent){
            IdleStateEvent event = (IdleStateEvent)evt;
            if (event.state() == IdleState.READER_IDLE) {
                //Read timeout, the connection should be disconnected
                InetSocketAddress socketAddress = (InetSocketAddress)ctx.channel().remoteAddress();
                String ip = socketAddress.getAddress().getHostAddress();
                ctx.channel().disconnect();
                logger.info("[{}]Connection timeout, disconnect",ip);
                String userName = SessionManager.removeSession(ctx.channel());
                SpringContextUtil.getBean(UserService.class).updateOnlineStatus(userName,Boolean.FALSE);
            }else {
                super.userEventTriggered(ctx, evt);
            }
        }else {
            super.userEventTriggered(ctx, evt);
        }

    }

    @Override
    public void channelRead(ChannelHandlerContext ctx, Object msg) throws Exception {
        if (msg instanceof HeartBeat){
            //Received heartbeat packet, no processing
            logger.info("server Received heartbeat packet:{}",msg);
            return;
        }
        super.channelRead(ctx, msg);
    }
}
3)StringLengthFieldDecoder. The function of the inbound handler is to solve the above problem:
public class StringLengthFieldDecoder extends LengthFieldBasedFrameDecoder {
    public StringLengthFieldDecoder() {
        super(10*1024*1024,0,8,0,8);
    }


    @Override
    protected long getUnadjustedFrameLength(ByteBuf buf, int offset, int length, ByteOrder order) {
        buf = buf.order(order);
        byte[] lenByte = new byte[length];
        buf.getBytes(offset, lenByte);
        String lenStr = new String(lenByte);
        Long len =  Long.valueOf(lenStr);
        return len;
    }
}
Just integrate the LengthFieldBasedFrameDecoder class provided by Netty and override the getUnadjustedFrameLength method.
First look at the five parameters in the construction method. The first represents the maximum length of the packet that can be processed; The second and third parameters should be understood together to indicate the length of the length field from the first bit, that is, the first 8 bytes in the above message format protocol; The fourth parameter indicates whether the length needs to be corrected. For example, if the length parsed from the first 8 bytes = the length of the envelope + the length of the first 8 bytes, then 8 bytes need to be corrected here. The length in our protocol only includes the message style, so this parameter is filled with 0; The last parameter indicates whether the received message should skip some bytes. In this example, it is set to 8, which means that it has skipped 8 bytes. Therefore, after passing through this handler, the data we receive is only the message itself, which no longer contains 8 bytes in length.
Let's look at the getUnadjustedFrameLength method. In fact, it is to convert the length of the first eight strings into long. After rewriting this method, Netty knows how to receive a "complete" packet.
4)StringDecoder. This is Netty's own inbound handler, which will parse the byte stream into a String with the specified encoding.
5)JsonDecoder. It is an inbound handler customized by us to convert json String into java bean for subsequent processing:
public class JsonDecoder extends MessageToMessageDecoder<String> {
    @Override
    protected void decode(ChannelHandlerContext channelHandlerContext, String o, List<Object> list) throws Exception {
        Message msg = MessageEnDeCoder.decode(o);
        list.add(msg);
    }

}
Here, we will call a self-defined codec help class for conversion:
public static Message decode(String message){
        if (StringUtils.isEmpty(message) || message.length() < 2){
            return null;
        }
        String type = message.substring(0,2);
        message = message.substring(2);
        if (type.equals(LoginRequest)){
            return JsonUtil.jsonToObject(message,LoginRequest.class);
        }else if (type.equals(LoginResponse)){
            return JsonUtil.jsonToObject(message,LoginResponse.class);
        }else if (type.equals(LogoutRequest)){
            return JsonUtil.jsonToObject(message,LogoutRequest.class);
        }else if (type.equals(LogoutResponse)){
            return JsonUtil.jsonToObject(message,LogoutResponse.class);
        }else if (type.equals(SendMsgRequest)){
            return JsonUtil.jsonToObject(message,SendMsgRequest.class);
        }else if (type.equals(SendMsgResponse)){
            return JsonUtil.jsonToObject(message,SendMsgResponse.class);
        }else if (type.equals(HeartBeat)){
            return JsonUtil.jsonToObject(message,HeartBeat.class);
        }
        return null;
    }
6)BussMessageHandler. Let's first look at the inbound handler, which is our main business processing entry. Its main work is to distribute messages to the thread pool for processing. In addition, it also loads a small scenario. When the client actively disconnects, it needs to update the status in the corresponding account database to be offline.
public class BussMessageHandler extends ChannelInboundHandlerAdapter {
    private static Logger logger = LoggerFactory.getLogger(BussMessageHandler.class);

    @Autowired
    private TaskDispatcher taskDispatcher;

    @Override
    public void channelRead(ChannelHandlerContext ctx, Object msg) throws Exception {
        logger.info("Message received:{}",msg);
        if (msg instanceof Message){
            taskDispatcher.submit(ctx.channel(),(Message)msg);
        }
    }

    @Override
    public void channelInactive(ChannelHandlerContext ctx) throws Exception {
        //Client disconnected
        InetSocketAddress socketAddress = (InetSocketAddress)ctx.channel().remoteAddress();
        String ip = socketAddress.getAddress().getHostAddress();
        logger.info("Client disconnect:{}",ip);
        String userName = SessionManager.removeSession(ctx.channel());
        SpringContextUtil.getBean(UserService.class).updateOnlineStatus(userName,Boolean.FALSE);
        super.channelInactive(ctx);
    }
}
Next, there is the processing logic of the thread pool, which is very simple, that is, encapsulating the task into an executor and then handing it to the thread pool for processing:
public class TaskDispatcher {
    private ThreadPoolExecutor threadPool;

    public TaskDispatcher(){
        int corePoolSize = 15;
        int maxPoolSize = 50;
        int keepAliveSeconds = 30;
        int queueCapacity = 1024;
        BlockingQueue<Runnable> queue = new LinkedBlockingQueue<>(queueCapacity);
        this.threadPool = new ThreadPoolExecutor(
                corePoolSize, maxPoolSize, keepAliveSeconds, TimeUnit.SECONDS,
                queue);
    }

    public void submit(Channel channel, Message msg){
        ExecutorBase executor = null;
        String messageType = msg.getMessageType();
        if (messageType.equals(MessageEnDeCoder.LoginRequest)){
            executor = new LoginExecutor(channel,msg);
        }
        if (messageType.equalsIgnoreCase(MessageEnDeCoder.SendMsgRequest)){
            executor = new SendMsgExecutor(channel,msg);
        }
        if (executor != null){
            this.threadPool.submit(executor);
        }
    }
}
Next, let's take a look at how the message forwarding executor does it:
public class SendMsgExecutor extends ExecutorBase {
    private static Logger logger = LoggerFactory.getLogger(SendMsgExecutor.class);

    public SendMsgExecutor(Channel channel, Message message) {
        super(channel, message);
    }

    @Override
    public void run() {
        SendMsgResponse response = new SendMsgResponse();
        response.setMessageType(MessageEnDeCoder.SendMsgResponse);
        response.setTime(new Date());
        SendMsgRequest request = (SendMsgRequest)message;
        String recvUserName = request.getRecvUserName();
        String sendContent = request.getSendMessage();
        Channel recvChannel = SessionManager.getSession(recvUserName);
        if (recvChannel != null){
            SendMsgRequest sendMsgRequest = new SendMsgRequest();
            sendMsgRequest.setTime(new Date());
            sendMsgRequest.setMessageType(MessageEnDeCoder.SendMsgRequest);
            sendMsgRequest.setRecvUserName(recvUserName);
            sendMsgRequest.setSendMessage(sendContent);
            sendMsgRequest.setSendUserName(request.getSendUserName());
            recvChannel.writeAndFlush(sendMsgRequest).addListener(new GenericFutureListener<Future<? super Void>>() {
                @Override
                public void operationComplete(Future<? super Void> future) throws Exception {
                    if (future.isSuccess()){
                        logger.info("Message forwarding succeeded:{}",sendMsgRequest);
                        response.setResultCode("0000");
                        response.setResultMessage(String.format("Send to user[%s]Message success",recvUserName));
                        channel.writeAndFlush(response);
                    }else {
                        logger.error(ExceptionUtils.getStackTrace(future.cause()));
                        logger.info("Message forwarding failed:{}",sendMsgRequest);
                        response.setResultCode("9999");
                        response.setResultMessage(String.format("Send to user[%s]Message failed",recvUserName));
                        channel.writeAndFlush(response);
                    }
                }
            });
        }else {
            logger.info("user{}Not online, message forwarding failed",recvUserName);
            response.setResultCode("9999");
            response.setResultMessage(String.format("user[%s]Not online",recvUserName));
            channel.writeAndFlush(response);
        }
    }
}
Overall logic: first, get the account to which you want to send the message; 2. Obtain the connection corresponding to the account; (III) sending messages on this connection; 4. Obtain the message sending result and send the result to the message "initiator".
The following is the executor of login processing:
public class LoginExecutor extends ExecutorBase {
    private static Logger logger = LoggerFactory.getLogger(LoginExecutor.class);

    public LoginExecutor(Channel channel, Message message) {
        super(channel, message);
    }
    @Override
    public void run() {
        LoginRequest request = (LoginRequest)message;
        String userName = request.getUserName();
        String password = request.getPassword();
        UserService userService = SpringContextUtil.getBean(UserService.class);
        boolean check = userService.checkLogin(userName,password);
        LoginResponse response = new LoginResponse();
        response.setUserName(userName);
        response.setMessageType(MessageEnDeCoder.LoginResponse);
        response.setTime(new Date());
        response.setResultCode(check?"0000":"9999");
        response.setResultMessage(check?"Login successful":"Login failed, wrong user name or password");
        if (check){
            userService.updateOnlineStatus(userName,Boolean.TRUE);
            SessionManager.addSession(userName,channel);
        }
        channel.writeAndFlush(response).addListener(new GenericFutureListener<Future<? super Void>>() {
            @Override
            public void operationComplete(Future<? super Void> future) throws Exception {
                //Login failed, disconnect
                if (!check){
                    logger.info("user{}Login failed, disconnect",((LoginRequest) message).getUserName());
                    channel.disconnect();
                }
            }
        });
    }
}
The login logic is not complex. If the login is successful, the user's online status will be updated, and a login response will be returned no matter whether the login is successful or failed. At the same time, if the login verification fails, the link needs to be disconnected after the return response is successful.
7)JsonEncoder. Finally, look at this unique outbound handler. All messages sent by the server will be processed by the outbound handler. His responsibility is to convert the java bean into the message protocol format defined earlier:
public class JsonEncoder extends MessageToByteEncoder<Message> {
    @Override
    protected void encode(ChannelHandlerContext channelHandlerContext, Message message, ByteBuf byteBuf) throws Exception {
        String msgStr = MessageEnDeCoder.encode(message);
        int length = msgStr.getBytes(Charset.forName("UTF-8")).length;
        String str = String.valueOf(length);
        String lenStr = StringUtils.leftPad(str,8,'0');
        msgStr = lenStr + msgStr;
        byteBuf.writeBytes(msgStr.getBytes("UTF-8"));
    }
}
8)SessionManager. The last thing left is not mentioned. This is used to save the link of each login successful account. At the bottom is a map, key is the user account, and value is the link:
public class SessionManager {
    private static ConcurrentHashMap<String,Channel> sessionMap = new ConcurrentHashMap<>();

    public static void addSession(String userName,Channel channel){
        sessionMap.put(userName,channel);
    }

    public static String removeSession(String userName){
        sessionMap.remove(userName);
        return userName;
    }

    public static String removeSession(Channel channel){
        for (String key:sessionMap.keySet()){
            if (channel.id().asLongText().equalsIgnoreCase(sessionMap.get(key).id().asLongText())){
                sessionMap.remove(key);
                return key;
            }
        }
        return null;
    }

    public static Channel getSession(String userName){
        return sessionMap.get(userName);
    }
}
Here, the logic of the whole server is finished. Isn't it very simple!
3. Chat client
The interface related things in the client are based on the JavaFX framework. This is the first time I use it, so I'm not going to talk about this for fear of misleading you. Mainly about how Netty communicates with the server as a client.
Installation practice, or stick out the main entrance first:
public void login(String userName,String password) throws Exception {
        Bootstrap clientBootstrap = new Bootstrap();
        EventLoopGroup clientGroup = new NioEventLoopGroup();
        try {
            clientBootstrap.group(clientGroup)
                    .channel(NioSocketChannel.class)
                    .option(ChannelOption.TCP_NODELAY, true)
                    .option(ChannelOption.CONNECT_TIMEOUT_MILLIS,10000);
            clientBootstrap.handler(new ChannelInitializer<SocketChannel>() {
                @Override
                protected void initChannel(SocketChannel ch) throws Exception {
                    ch.pipeline().addLast(new IdleStateHandler(20, 15, 0, TimeUnit.SECONDS));
                    ch.pipeline().addLast(new StringLengthFieldDecoder());
                    ch.pipeline().addLast(new StringDecoder(Charset.forName("UTF-8")));
                    ch.pipeline().addLast(new JsonDecoder());
                    ch.pipeline().addLast(new JsonEncoder());
                    ch.pipeline().addLast(bussMessageHandler);
                    ch.pipeline().addLast(new HeartBeatHandler());
                }
            });
            ChannelFuture future = clientBootstrap.connect(server,port).sync();
            if (future.isSuccess()){
                channel = (SocketChannel)future.channel();
                LoginRequest request = new LoginRequest();
                request.setTime(new Date());
                request.setUserName(userName);
                request.setPassword(password);
                request.setMessageType(MessageEnDeCoder.LoginRequest);
                channel.writeAndFlush(request).addListener(new GenericFutureListener<Future<? super Void>>() {
                    @Override
                    public void operationComplete(Future<? super Void> future) throws Exception {
                        if (future.isSuccess()){
                            logger.info("Login message sent successfully");
                        }else {
                            logger.info("Login message sending failed:{}", ExceptionUtils.getStackTrace(future.cause()));
                            Platform.runLater(new Runnable() {
                                @Override
                                public void run() {
                                    LoginController.setLoginResult("Network error, login message sending failed");
                                }
                            });
                        }
                    }
                });
            }else {
                clientGroup.shutdownGracefully();
                throw new RuntimeException("network error");
            }
        }catch (Exception e){
            clientGroup.shutdownGracefully();
            throw new RuntimeException("network error");
        }
    }
For this code, we mainly focus on the following points: 1. Initialization of all handler s; 2. connect server.
Among all handlers, except bussMessageHandler, which is unique to the client, other handlers have been described in the chapter on the server and will not be repeated.
1) Let's first look at the operation of connecting the server. First, initiate the connection and send the login message after the connection is successful. Initiating a connection requires handling success and failure. Sending login message also needs to deal with success and failure. Note that the success or failure here only represents the success or failure at the network level of the current operation. At this time, the success or failure at the business level in the response returned by the server cannot be obtained. If you don't understand this sentence, you can look at the related content of "asynchronous" mentioned earlier.
2)BussMessageHandler. The overall process is the same as that of the server. The received messages are thrown to the thread pool for processing. We can directly look at each executor processing the messages.
First, see how the client handles the login request after receiving the login response message (this code can be understood in combination with the content of 1):
public class LoginRespExecutor extends ExecutorBase {
    private static Logger logger = LoggerFactory.getLogger(LoginRespExecutor.class);

    public LoginRespExecutor(Channel channel, Message message) {
        super(channel, message);
    }

    @Override
    public void run() {
        LoginResponse response = (LoginResponse)message;
        logger.info("Login result:{}->{}",response.getResultCode(),response.getResultMessage());
        if (!response.getResultCode().equals("0000")){
            Platform.runLater(new Runnable() {
                @Override
                public void run() {
                    LoginController.setLoginResult("Login failed, user name or password error");
                }
            });
        }else {
            LoginController.setCurUserName(response.getUserName());
            ClientApplication.getScene().setRoot(SpringContextUtil.getBean(MainView.class).getView());
        }
    }
}
Next, let's look at how the client sends chat messages:
public void sendMessage(Message message) {
        channel.writeAndFlush(message).addListener(new GenericFutureListener<Future<? super Void>>() {
            @Override
            public void operationComplete(Future<? super Void> future) throws Exception {
                SendMsgRequest send = (SendMsgRequest)message;
                if (future.isSuccess()){
                    Platform.runLater(new Runnable() {
                        @Override
                        public void run() {
                            MainController.setMessageHistory(String.format("[I]stay[%s]issue[%s]News of[%s],Sent successfully",
                                    DateFormatUtils.format(send.getTime(),"yyyy-MM-dd HH:mm:ss"),send.getRecvUserName(),send.getSendMessage()));
                        }
                    });
                }else {
                    Platform.runLater(new Runnable() {
                        @Override
                        public void run() {
                            MainController.setMessageHistory(String.format("[I]stay[%s]issue[%s]News of[%s],fail in send",
                                    DateFormatUtils.format(send.getTime(),"yyyy-MM-dd HH:mm:ss"),send.getRecvUserName(),send.getSendMessage()));
                        }
                    });
                }
            }
        });
    }
In fact, the code related to communication here has been pasted. The rest is the code related to interface processing, which is no longer posted.
Client, isn't it? It's very simple!
4. Web management end
The Web management end can be said to have no technical content, that is, Shiro login authentication, list addition, deletion, modification and query. There's nothing to say about adding, deleting and changing. The following focuses on Shiro login and list query.
1) Shiro landing
First, define a Realm. As for what this concept is, baidu itself. This is not the focus of this article:
public class UserDbRealm extends AuthorizingRealm {
    @Override
    protected AuthorizationInfo doGetAuthorizationInfo(PrincipalCollection principalCollection) {
        return null;
    }

    @Override
    protected AuthenticationInfo doGetAuthenticationInfo(AuthenticationToken authenticationToken) throws AuthenticationException {
        RequestAttributes attributes = RequestContextHolder.getRequestAttributes();

        UsernamePasswordToken upToken = (UsernamePasswordToken) authenticationToken;
        String username = upToken.getUsername();
        String password = "";
        if (upToken.getPassword() != null)
        {
            password = new String(upToken.getPassword());
        }
        // Todo: verify the user name and password on May 13, 2021. If it fails, throw the authentication exception
        ShiroUser user = new ShiroUser();
        SimpleAuthenticationInfo info = new SimpleAuthenticationInfo(user, password, getName());
        return info;
    }
}
Next, register this Realm as a Spring Bean and define the filter chain:
    @Bean
    public Realm realm() {
        UserDbRealm realm = new UserDbRealm();
        realm.setAuthorizationCachingEnabled(true);
        realm.setCacheManager(cacheManager());
        return realm;
    }

    @Bean
    public ShiroFilterChainDefinition shiroFilterChainDefinition() {
        DefaultShiroFilterChainDefinition chainDefinition = new DefaultShiroFilterChainDefinition();
        chainDefinition.addPathDefinition("/css/**", "anon");
        chainDefinition.addPathDefinition("/img/**", "anon");
        chainDefinition.addPathDefinition("/js/**", "anon");
        chainDefinition.addPathDefinition("/logout", "logout");
        chainDefinition.addPathDefinition("/login", "anon");
        chainDefinition.addPathDefinition("/captchaImage", "anon");
        chainDefinition.addPathDefinition("/**", "authc");
        return chainDefinition;
    }
So far, Shiro has been configured. Let's see how to activate login:
    @PostMapping("/login")
    @ResponseBody
    public Result<String> login(String username, String password, Boolean rememberMe)
    {
        Result<String> ret = new Result<>();
        UsernamePasswordToken token = new UsernamePasswordToken(username, password);
        Subject subject = SecurityUtils.getSubject();
        try
        {
            subject.login(token);
            return ret;
        }
        catch (AuthenticationException e)
        {
            String msg = "User or password error";
            if (StringUtils.isNotEmpty(e.getMessage()))
            {
                msg = e.getMessage();
            }
            ret.setCode(Result.FAIL);
            ret.setMessage(msg);
            return ret;
        }
    }
The login code was completed so happily.
2) List query
Search is a very simple operation, but it is the most frequently used operation in all web systems. Therefore, it is very necessary to make a universal package. The following code will not be explained too much. From junior engineer to senior engineer, this code is needed (cover your face manually):
a)Controller
    @RequestMapping("/query")
    @ResponseBody
    public Result<Page<User>> query(@RequestParam Map<String,Object> params, String sort, String order, Integer pageIndex, Integer pageSize){
        Page<User> page = userService.query(params,sort,order,pageIndex,pageSize);
        Result<Page<User>> ret = new Result<>();
        ret.setData(page);
        return ret;
    }
b)Service
    @Autowired
    private UserDao userDao;
    @Autowired
    private QueryService queryService;

    public Page<User> query(Map<String,Object> params, String sort, String order, Integer pageIndex, Integer pageSize){
        return queryService.query(userDao,params,sort,order,pageIndex,pageSize);
    }
public class QueryService {
public <T> com.easy.okim.common.model.Page<T> query(JpaSpecificationExecutor<T> dao, Map<String,Object> filters, String sort, String order, Integer pageIndex, Integer pageSize){
com.easy.okim.common.model.Page<T> ret = new com.easy.okim.common.model.Page<T>();
Map<String,Object> params = new HashMap<>();
if (filters != null){
filters.remove("sort");
filters.remove("order");
filters.remove("pageIndex");
filters.remove("pageSize");
for (String key:filters.keySet()){
Object value = filters.get(key);
if (value != null && StringUtils.isNotEmpty(value.toString())){
params.put(key,value);
}
}
}
Pageable pageable = null;
pageIndex = pageIndex - 1;
if (StringUtils.isEmpty(sort)){
pageable = PageRequest.of(pageIndex,pageSize);
}else {
Sort s = Sort.by(Sort.Direction.ASC,sort);
if (StringUtils.isNotEmpty(order) && order.equalsIgnoreCase("desc")){
s = Sort.by(Sort.Direction.DESC,sort);
}
pageable = PageRequest.of(pageIndex,pageSize,s);
}
Page<T> page = null;
if (params.size() ==0){
page = dao.findAll(null,pageable);
}else {
Specification<T> specification = new Specification<T>() {
@Override
public Predicate toPredicate(Root<T> root, CriteriaQuery<?> criteriaQuery, CriteriaBuilder builder) {
List<Predicate> predicates = new ArrayList<>();
for (String filter : params.keySet()) {
Object value = params.get(filter);
if (value == null || StringUtils.isEmpty(value.toString())) {
continue;
}
String field = filter;
String operator = "=";
String[] arr = filter.split("\\|");
if (arr.length == 2) {
field = arr[0];
operator = arr[1];
}
if (arr.length == 3) {
field = arr[0];
operator = arr[1];
String type = arr[2];
if (type.equalsIgnoreCase("boolean")){
value = Boolean.parseBoolean(value.toString());
}else if (type.equalsIgnoreCase("integer")){
value = Integer.parseInt(value.toString());
}else if (type.equalsIgnoreCase("long")){
value = Long.parseLong(value.toString());
}
}
String[] names = StringUtils.split(field, ".");
Path expression = root.get(names[0]);
for (int i = 1; i < names.length; i++) {
expression = expression.get(names[i]);
}
// logic operator
switch (operator) {
case "=":
predicates.add(builder.equal(expression, value));
break;
case "!=":
predicates.add(builder.notEqual(expression, value));
break;
case "like":
predicates.add(builder.like(expression, "%" + value + "%"));
break;
case ">":
predicates.add(builder.greaterThan(expression, (Comparable) value));
break;
case "<":
predicates.add(builder.lessThan(expression, (Comparable) value));
break;
case ">=":
predicates.add(builder.greaterThanOrEqualTo(expression, (Comparable) value));
break;
case "<=":
predicates.add(builder.lessThanOrEqualTo(expression, (Comparable) value));
break;
case "isnull":
predicates.add(builder.isNull(expression));
break;
case "isnotnull":
predicates.add(builder.isNotNull(expression));
break;
case "in":
CriteriaBuilder.In in = builder.in(expression);
String[] arr1 = StringUtils.split(filter.toString(), ",");
for (String e : arr1) {
in.value(e);
}
predicates.add(in);
break;
}
}
// Combine all the conditions with and
if (!predicates.isEmpty()) {
return builder.and(predicates.toArray(new Predicate[predicates.size()]));
}
return builder.conjunction();
}
};
page = dao.findAll(specification,pageable);
}
ret.setTotal(page.getTotalElements());
ret.setRows(page.getContent());
return ret;
}
}c)Dao
public interface UserDao extends JpaRepository<User,Long>,JpaSpecificationExecutor<User> {
    //Don't write anything. Just inherit the classes provided by Spring Data Jpa
}
5, Conclusion
Although the title is somewhat sensational, the content is really dry goods. I hope this article can be of some help to you. I don't intend to post the source code project. I hope you can follow the article by yourself.
The collection QR code mentioned at the beginning is just a joke. If you really want to pay, please send me a private letter to ask for the collection QR code. There is no upper limit on the amount, ha ha.
Welcome to read, welcome to reprint, reprint, please indicate the source, please.