preparation:
- patience
- A cup of coffee
- A board and a serial port debugging line, at least 16G SD card of any brand
- A Linux distribution that can operate skillfully (Archlinux or Ubuntu is recommended)
- Learn about how to use qemu and binfmt to create RISC-V simulation running environment Recommended reading
- Get a general idea of how to create a block device (a recommended article) losetup create block device : or use zfs to create block devices. I'm more used to the latter. The following content will take zfs file system as an example, but in practice, it's just that creating block devices is different and mounting is the same)
- Learn about how to create a RISC-V cross compilation environment( Recommended reading)
- Get a general idea of how to use a simple system d-nspawn container( Recommended reading )Or chroot( Recommended reading)
- Get a general understanding of the startup process of StarFive VisionFive( )
Part I: compile and package the kernel and create deb source:
It is particularly important to create a RISC-V kernel of StarFive VisionFive V1. By the end of this article, the mainline kernel 5.16 has not provided support for dts and deconfig of StarFive VisionFive V1. It is expected that 5.17 will enter the mainline. Therefore, at present, we need to use the release candidate version of 5.17, namely RC version, for compilation and construction. The complete process is as follows:
#Debian or Ubuntu

#Debian installation dependency:
apt install libncurses-dev libssl-dev bc flex bison gcc-riscv64-linux-gnu build-essential ccache cpio fakeroot flex git kmod libelf-dev libncurses5-dev libssl-dev lz4 qtbase5-dev rsync schedtool wget zstd pahole dwarves -y

#Ubuntu installation dependencies:
apt install libncurses-dev libssl-dev bc flex bison gcc-riscv64-linux-gnu build-essential ccache cpio fakeroot flex git kmod libelf-dev libncurses5-dev libssl-dev lz4 qtbase5-dev rsync schedtool wget zstd dwarves -y

#Download source code:
#You can download the kernel from this address, but not from releases Download. You'd better download the latest commits,here#I provide a download address: https://github.com/starfive-tech/linux

mkdir -p linux-build
#Create compilation directory

cd linux-build
#Enter directory

wget https://github.com/starfive-tech/linux/archive/54fad564dc7a117704e99248c3984f907e1867d5.tar.gz
#Download the kernel source code of specific commits. You can download it according to your latest commits of the day.

tar -xpvf 54fad564dc7a117704e99248c3984f907e1867d5.tar.gz
#Decompression source code

mv linux-54fad564dc7a117704e99248c3984f907e1867d5 linux-5.17.0-rc5
#Change a simple name for the extracted source directory

cd linux-5.17.0-rc5
#Enter this directory

cp arch/riscv/configs/starfive_jh7100_fedora_defconfig .config
#Copy the kernel configuration file to the root directory of the kernel source code and name it as config

make ARCH=riscv CROSS_COMPILE=riscv64-linux-gnu- menuconfig
#The kernel is reconfigured by using the cross compilation tool chain

make ARCH=riscv CROSS_COMPILE=riscv64-linux-gnu- -jX bindeb-pkg LOCALVERSION=-starfive-xxx
#-How many threads can be used in jX? Finally, there is a name you like
#Wait for compilation to complete. After completion, four deb files will be generated in the upper directory, similar to the following figure:
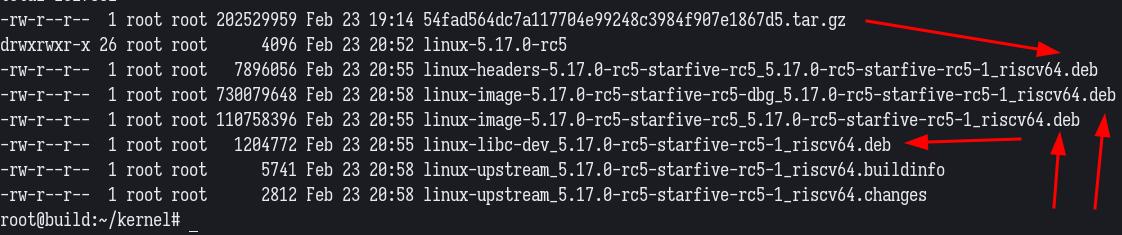
In fact, we only need three of the four deb files. One is Linux headers and the other is Linux image. We now know that these three files are placed in the Linux build directory of your home directory. Let's see how to build with Arch:
Archlinux or other distributions can use a similar method.
Here are some tips about file system:
1. Suppose you use btrfs file system, you can create a subvolume in / mnt / directory, compile it under the subvolume, and then take a snapshot for backup;
2. If you use zfs file system, it is recommended to use zvol block device, format it into ext4 file system, mount it to / mnt/xxx / directory, build and package it. The reason is also convenient for backup and cloning, or rapid deployment.
The reason for backup is that I have used three versions of Debian Sid/unstable gcc cross compilation tool chain to build before and after. The first time was successful, but the compilation failed after a week. Because a bug was introduced after gcc update and needs to be patched, at this time, if I have a backup of the previous version, I can directly rollback to build and package, which will not affect the subsequent operations. Therefore, it is important to develop the habit of backup and cloning. Let's assume that you already have subvolumes or block devices in / mnt/xxx / directory on Archlinux or other distributions. Start directly ~
#The following operations are performed with root permission by default

pacman -S yay #Install my favorite yay
pacman -S paru #Install your favorite paru

#Choose one of the above operations

yay -S debootstrap debian-archive-keyring ubuntu-keyring
#Install some important tools of debian system. debootstrap can install the base system of various architectures to the specified directory. The purpose of the following keyring is to provide a key to verify whether the deb package has been tampered with.

debootstrap unstable /mnt/xxx https://mirror.sjtu.edu.cn/debian/
#Download the latest debian sid base system from the debian image source of Shanghai Jiaotong University and install it in the / mnt/xxx directory
debootstrap impish /mnt/xxx https://mirror.sjtu.edu.cn/ubuntu/
#Download the latest ubuntu 21.10 base system from the ubuntu image source of Shanghai Jiaotong University and install it in the / mnt/xxx directory

systemd-nspawn -D /mnt/xxx/ -M kernel --bind-ro=/etc/resolv.conf
#Create Debian / Ubuntu x86 named kernel with SYSTEMd nspawn_ 64 base system container

#For subsequent operations, please refer to Debian and Ubuntu operations above. After completion, you need to remember the location of the packaged deb package. You may need to use root permission to copy these Debs to a directory convenient for you to operate and wait for the next operation.
Complete the kernel compilation and packaging. Don't be happy too early.
Complete the kernel compilation and packaging. Don't be happy too early.
Note that in the kernel source directory, copy the # dtb # file of StarFive VisionFive V1 to the directory you remember. The directory where the dtb is located is < kernel source code > / arch / riscv / boot / DTS / Starlive /. You must remember.
Let's continue. There are two operation methods for installing kernel DEB, and I recommend the second one. The first is simple but not halal. It is to copy the compiled and packaged riscv kernel to the future system and install it directly. The command is: dpkg - I XXX deb ; The second method, which I prefer to call "fundamentalism" of Debian/Ubuntu installation software, is to set up our private RISC-V deb source. The advantage is that you can let your friends who need it install your kernel and maintain this kernel version in full accordance with the tradition of Debian/Ubuntu system, To facilitate their subsequent updates. Let's talk about setting up DEB source.
Select the appropriate server:
If it is within the company, you can choose to create an Ubuntu virtual machine on NAS, and then map the network to your company's LAN so that everyone can access it normally;
If it is like me, I choose XX cloud to establish an Ubuntu VPS as the deb source server. OK, now assume that VPS or your virtual machine has been created. Start operating on VPS.
apt install reprepro --yes
#Install replo, deb publisher

ln -sf /usr/share/zoneinfo/Asia/Shanghai /etc/localtime
hwclock --systohc
apt install ntpdate
ntpdate -s time.nist.gov
#The purpose of the above operations is to synchronize the time of VPS or virtual machine to standard Beijing time to prevent time mismatch and failure to install and update software

gpg --gen-key
#Generate your key, and subsequent deb packages will be signed with this private key. Other machines need to download your public key for verification
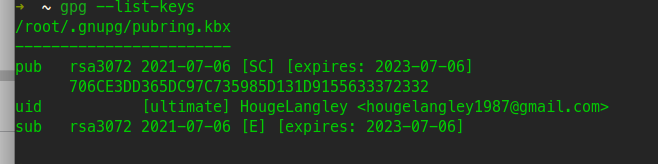
The above figure is the generated key, which can be displayed with GPG -- List keys. Pay attention to the long string of characters: 706CE3DD... And write down the last eight digits: 33372332. They play an important role. Don't ask me how I know, ha ha ha ~
apt install apache2 -y
#Install a web server that you can operate. I'm used to apache
Next, create a directory under the web server directory:
mkdir -p /var/www/html/ubuntu-impish
cd /var/www/html/ubuntu-impish
mkdir -p conf db dists pool
touch conf/distributions
#distributions descriptive file
touch conf/options
#Options describes some options for the warehouse

#Note that Ubuntu impish is a name. You can choose any name you like and deal with it freely according to your needs.
Here is how to configure distributions:
Origin: ubuntu
Suite: impish
Label: ubuntu
Codename: impish
Architectures: riscv64
Components: main
Description: Apt repository for StarFive VisionFive V1
SignWith: 33372332
Let me explain the above:
- Origin if you are Debian, write Debian. If you are Ubuntu, write Ubuntu
- Suite is written as the code name of your distribution
- Label # Origin
- Codename # is the release code
- Components this is a component, because we only meet the use of a small range of friends. main is enough. If it is strictly maintained, it is best to classify it in detail
- The description part is free to play
- SignWith # here is the signature. Do you remember your 8-digit key?
Now export our public key to the source directory:
The above figure is the general appearance after creation.
Now you can publish or revoke the kernel deb package you created:
If all goes well, your private deb warehouse will be created. Maintain it well ~
Part I subsection:
- Cross compilation is recommended for kernel compilation and packaging, which is fast;
- Remember to copy dtb to facilitate final processing;
- It is strongly recommended to use deb built by traditional server
Part II: create block devices, partitions, and create the Debian base system of RISC-V
Now it is very convenient to install zfs's out of tree kernel module in any distribution. Let's create block devices according to my own habits. If you can't use zfs file system, it doesn't matter. Use losetup to create it img files are the same as block devices. Although zfs is more "scientific", laugh to death ~
#The following contents are operated under root permission:

zfs create -V 10G root/Container/starfive-lxde
#Under the root/Container / pool, create a block device named starfve lxde with a size of 10G (10g is enough for Debian/Ubuntu, but not enough for Gentoo, which needs 120G)

cfdisk -z /dev/zvol/root/Container/starfive-lxde
#Partition this piece of equipment. The partition looks similar to the following figure:
Format the three partitions above:
- Note that the first partition is empty;
- The second partition is formatted as vfat without label name;
- The third partition is formatted as ext4, and the label is named:_/ boot ;
- The fourth partition is formatted as ext4, and the label is named:_/ ;
Create a directory under the / mnt directory, which I call Starfive here, that is, / mnt/Starfive
Start some column operations to mount the block device to the directory to / mnt/Starfive;
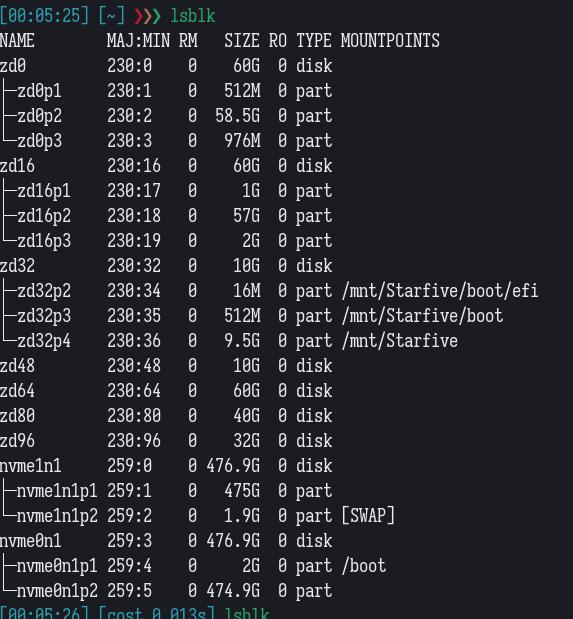
mount -t ext4 /dev/zvol/root/Container/starfive-lxde-part4 /mnt/Starfive
mkdir -p /mnt/Starfive/boot
mount -t ext4 /dev/zvol/root/Container/starfive-lxde-part3 /mnt/Starfive/boot
mkdir -p /mnt/Starfive/boot/efi
mount -t vfat /dev/zvol/root/Container/starfive-lxde-part2 /mnt/Starfive/boot/efi
After the mount is completed, you can run lsblk to view it. The structure is similar to the following figure:
Use debootstrap to install the Debian base system of RISC-V under / mnt/Starfive:
debootstrap --arch=riscv64 --keyring /usr/share/keyrings/debian-ports-archive-keyring.gpg --include=debian-ports-archive-keyring unstable /mnt/Starfive https://deb.debian.org/debian-ports/
Explain:
- – arch=riscv64 architecture is emphasized here, which is the of riscv64;
- – keyring here, you need to download a deb package separately. I don't remember whether debian and ubuntu sources contain it or not This bag After downloading, extract Debian ports archive keyring Gpg# this file is placed in the directory above me;
- – include take care in the base system and add a specific package. Debian ports archive Keyring package is a key package. Add it to avoid the trouble of missing a key in the future
- At present, the RISC-V architecture is not in the support of stable version Debian, for example, the stable version of Debian is now Debian 11. It does not support RISC-V, so we can only use the unstable version Sid/Unstable. If you see RISC-V is a stable branch on some websites, it is propaganda, not real.
- /mnt/Starfive is the directory. Now the devices have been mounted
- https://deb.debian.org/debian-ports/ Is the address to download the DEB package (this is the official source. It is recommended not to use the image. Occasionally, due to synchronization problems, there will be file verification mismatch)
According to your network speed, complete the deployment of base system.
Section II:
- Create block devices in the way you're used to;
- Be used to backup, avoid repeated work and save time;
- Master the command of debootstrap. You can see the output of help. There will be no mistake if you try more.
Part III: improve the basic system, prepare the necessary files of / boot directory, and prepare for the final startup of the development board
Creating RISC-V simulation environment for Debian/Ubuntu
#The following contents are completed under root permission

apt install qemu-user-static binfmt-support -y
#Install qemu binfmt to create simulation environment
Create RISC-V simulation environment for Archlinux or other distributions
Please refer to this paragraph Archlinux wiki That's it. I won't teach.
Then we can directly use system d-nspawn to enter the container and start subsequent operations.
#The following contents are completed under root permission

systemd-nspawn -D /mnt/Starfive -M starfive --bind-ro=/etc/resolv.conf
#Start the Debian RISC-V container with the name Starlive and the root directory in / mnt/Starfive.

apt update; apt dist-upgrade -y
#Update system

apt install curl gnupg2 gnupg vim nano initramfs-tools -y
#Install the necessary tools and editors to prepare for the subsequent generation of initramfs images.

curl -s http://< address of kernel private source > / xxx / GPG public key | apt-key add -
#Add the private public key of the kernel to apt key. I remember that ubuntu and debian are slightly different here. You can search the method according to different distributions.

deb http://< address of kernel private source > / xxx unstable main
#Add the private source address to / etc / apt / sources List

apt update; apt install <The name of the kernel in your private source, remember linux-headers linux-image All installed>
#Brush source, install private active core
At this time, your / boot directory should look like this:
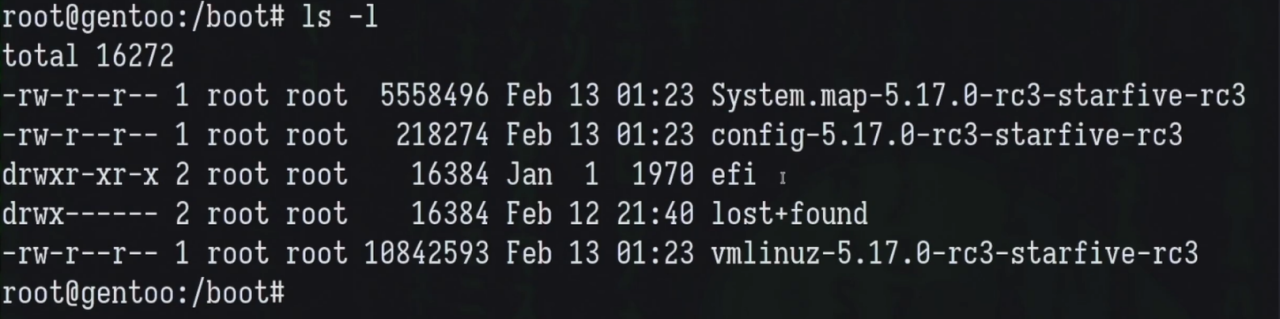
You can learn from Download here The files necessary for startup in the first created Fedora image, you may ask, why can't you create them according to your own distribution under Debian/Ubuntu? In fact, the reason is that the configuration file read by uboot of the development board is different from that at present As decided by efi document, we can go step by step.
Next, we need to copy the files in the original Fedora image to the / boot directory of Debian/Ubuntu and make appropriate modifications.
Copy the boot folder (you will see it after extracting the compressed package downloaded above) to Debian/Ubuntu boot directory.
At present, there is a boot folder in the / boot directory of Debian/Ubuntu, which is called uenv Txt file, you can open it with a common editor and modify Fedora to Debian. Similar to the following two figures:


After completion, we will copy the EFI folder (which can be seen in the compressed package), and copy the EFI folder completely to the / boot/efi / directory of Debian/Ubuntu. You can delete fedora in the EFI folder. Of course, you can keep it as a backup.
Copy the dtb generated by compiling the kernel to your Debian/Ubuntu / boot / directory.
Put the extlinux directory in the compressed package and grub CFG is also copied to the / boot directory of Debian/Ubuntu, and the configuration file and grub.exe in extlinux are edited with an editor CFG. The modified contents include the vmlinuz file name corresponding to the kernel, the dtb file corresponding to fdt, the initramfs image corresponding to initd, and the UUID value. You can reopen a terminal sudo lsblk to view the UUID of the root directory, copy and paste it. In the end, it looks like this:
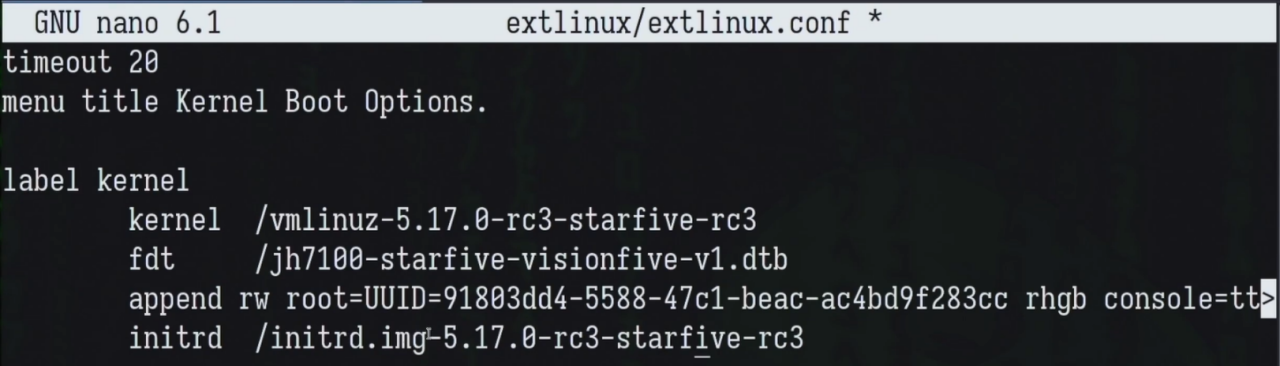
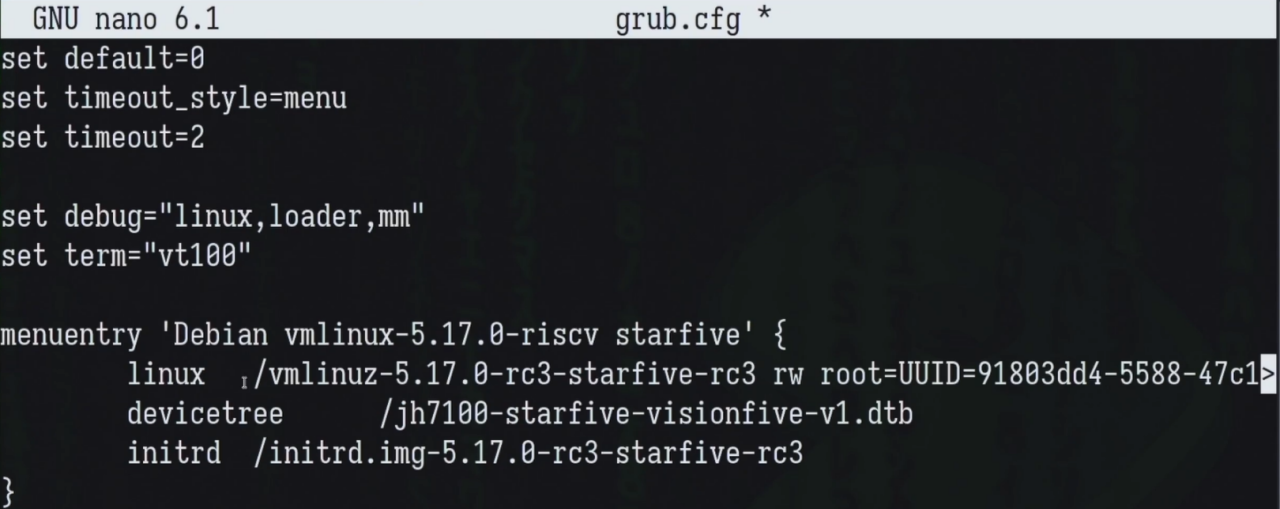
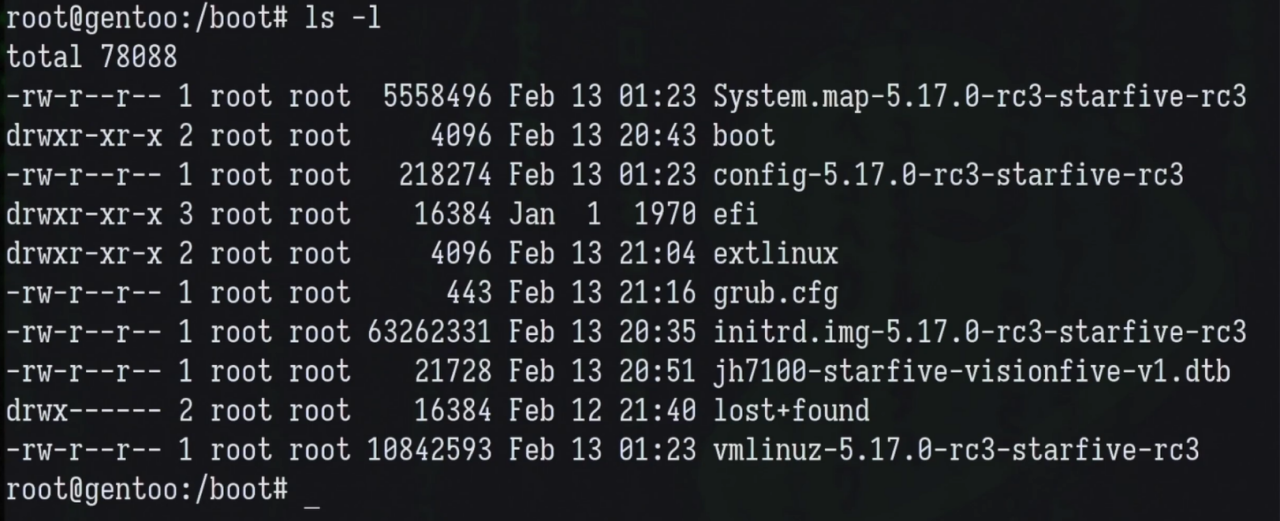
Finally, don't forget to ls-l look at the / boot directory and check the tree (if there is no tree, install apt).
Feel like it's done. Don't forget the final ending:
passwd root
#Create a password for root

sync
#Synchronous file system, write cache

exit
#Exit container

umount /dev/zvol/root/Container/starfive-lxde-*
#Uninstall the mounted block device

dd if=/dev/zvol/root/Container/starfive-lxde of=/dev/<Yours sdcard> status=progress bs=1M
#Burn the completed block equipment on your sdcard. Here, pay attention to make sure your block equipment. Don't write it wrong
Part III summary:
- According to the image distribution you make, the public key of debian and ubuntu importing your kernel private source will be slightly different. Check Google according to the situation
- Step by step, check more details