Deep learning based on Keras (II) -- construction and training of LeNet
LeNet is a very efficient convolutional neural network for handwritten character recognition. Although the network is small, it contains the basic modules of deep learning: convolution layer, pooling layer and full connection layer. It is also the basis of other deep learning models.
For the introduction of LeNet, please refer to the link: LeNet
While watching LeNet, let's learn how to use Keras to build a simple DCNN network.
Keras function introduction
1. Convolution
For the understanding of convolution, please refer to the link: Convolution layer
This paper mainly introduces the way Keras realizes convolution and the parameters that need to be paid attention to
keras.layers.Conv2D(filters, kernel_size, strides=(1, 1), padding='valid', data_format=None, dilation_rate=(1, 1), activation=None, use_bias=True, kernel_initializer='glorot_uniform', bias_initializer='zeros', kernel_regularizer=None, bias_regularizer=None, activity_regularizer=None, kernel_constraint=None, bias_constraint=None)
2D convolution layer (e.g. spatial convolution of image).
This layer creates a convolution kernel, and the convolution check layer convolutes the input to generate the output tensor. If use_bias is True, an offset vector is created and added to the output. Finally, if activation is not None, it is also applied to the output.
When using this layer as the first layer of the model, you need to provide input_shape parameter (integer tuple, excluding the axis represented by the sample), for example, input_shape=(128, 128, 3) represents 128x128 RGB image, which is displayed in data_ When format = "channels_last".
parameter
Filters: integer, the dimension of the output space (i.e. the output number of filters in convolution).
kernel_size: an integer, or a tuple or list represented by two integers, indicating the width and height of the 2D convolution window. Can be an integer that specifies the same value for all spatial dimensions.
Strings: an integer, or a tuple or list represented by two integers, indicating the step size of the convolution along the width and height direction. Can be an integer that specifies the same value for all spatial dimensions. Specify any string value= 1 and specified Division_ Rate value= 1 the two are incompatible.
padding: "valid" or "same" (case sensitive).
data_format: string, channels_last (default) or channels_ One of the first, indicating the order of dimensions in the input.
channels_ The corresponding input dimensions of last are (batch, height, width, channels), and channels_ The corresponding input size of the first is (batch, channels, height, width). It defaults to from the Keras configuration file ~ / Keras/keras. Image found in JSON_ data_ Format value. If you've never set it up, you'll use channels_last.
dilation_rate: a tuple or list of one integer or two integers, specifying the expansion rate of expansion convolution. Can be an integer that specifies the same value for all spatial dimensions. Currently, specify any dictionary_ Rate value= 1 and the specified string value= 1 the two are incompatible.
Activation: the activation function to use (see activations for details). If you do not specify, the activation function is not used (i.e. linear activation: a(x) = x).
use_bias: Boolean value, whether the layer uses offset vector.
kernel_ Initializer: initializer of kernel weight matrix (see initializers for details).
bias_initializer: initializer of offset vector (see initializers for details).
kernel_regularizer: the regularization function applied to the kernel weight matrix (see regularizer for details).
bias_regularizer: the regularization function applied to the offset vector (see regularizer for details).
activity_regularizer: the regularization function applied to the layer output (its activation value) (see regularizer for details).
kernel_constraint: the constraint function applied to the kernel weight matrix (see constraints for details).
bias_constraint: the constraint function applied to the offset vector (see constraints for details).
Enter size
If data_format=‘channels_first ', input 4D tensor with the size of (samples, channels, rows, cols).
If data_format=‘channels_last ', input 4D tensor with the size of (samples, rows, cols, channels).
Output size
If data_format=‘channels_first ', output 4D tensor with the size of (samples, filters, new_rows, new_cols).
If data_format=‘channels_last ', output 4D tensor with the size of (samples, new_rows, new_cols, filters).
The rows and cols values may have changed due to padding.
2. Activate function
The activation function can be realized by setting a separate activation layer, or by passing the activation parameter when constructing the layer object:
from keras.layers import Activation, Dense

model.add(Dense(64))
model.add(Activation('tanh'))
Equivalent to:
model.add(Dense(64, activation='tanh'))
You can also pass an element by element Theano/TensorFlow/CNTK function as the activation function:
from keras import backend as K

model.add(Dense(64, activation=K.tanh))
model.add(Activation(K.tanh))
3. Pooling
For the understanding of pooling layer, please refer to the link: Pooling
In addition, let's introduce the implementation method of pooling in Keras, mainly MaxPooling2D used for image data:
MaxPooling2D
keras.layers.MaxPooling2D(pool_size=(2, 2), strides=None, padding='valid', data_format=None)
parameter
pool_size: integer, or tuple represented by 2 integers, the factor that reduces the scale along the (vertical, horizontal) direction. (2, 2) will reduce both dimensions of the input tensor by half. If only one integer is used, both dimensions will use the same window length.
Strings: an integer, a tuple represented by two integers, or None. Represents the step value. If it is None, the default value is pool_size.
padding: "valid" or "same" (case sensitive).
data_format: string, channels_ Last (default) or channels_first one. Indicates the order in which dimensions are entered. channels_ Last stands for the input tensor whose size is (batch, height, width, channels), and channels_first represents the input tensor whose size is (batch, channels, height, width). The default value is based on the Keras configuration file ~ / Keras/keras. Image in JSON_ data_format value. If it has not been set, the default value is "channels_last".
Enter size
If data_format=‘channels_last ': 4D tensor whose dimension is (batch_size, rows, cols, channels)
If data_format=‘channels_first ': 4D tensor whose size is (batch_size, channels, rows, cols)
Output size
If data_format=‘channels_last ': 4D tensor whose dimension is (batch_size, pooled_rows, pooled_cols, channels)
If data_format=‘channels_first ': 4D tensor whose size is (batch_size, channels, pooled_rows, pooled_cols)
4.Flatten
The Flatten layer is implemented in keras layers. core. In the Flatten () class.
effect:
Flatten layer is used to "flatten" the input, that is, to make the multi-dimensional input one-dimensional. It is often used in the transition from convolution layer to full connection layer. Flatten does not affect the size of the batch.
keras.layers.Flatten(data_format=None)
parameter
data_format: a string whose value is channels_last (default) or channels_first. It indicates the order of the dimensions entered. The purpose of this parameter is to preserve the weight order when the model switches from one data format to another. channels_last corresponds to the input with size (batch,..., channels), and channels_first corresponds to an input with a size of (batch, channels,...). The default is image_ data_ The value of format can be found in the Keras configuration file ~ / keras/keras.json. If you have never set it up, it will be channels_last
For example:
model.add(Flatten())
model.add(Dense(500))
model.add(Activation('relu'))
5. Full connection layer
Each node of the whole connection layer is connected with all nodes of the previous layer to synthesize the features extracted from the front. Due to its fully connected characteristics, the parameters of the general fully connected layer are also the most.
fully connected layers (FC) play the role of "Classifier" in the whole convolutional neural network. If the operations of volume layer, pool layer and activation function layer are to map the original data to the hidden layer feature space, the full connection layer plays the role of mapping the learned "distributed feature representation" to the sample tag space.
keras.layers.Dense(units, activation=None, use_bias=True, kernel_initializer='glorot_uniform', bias_initializer='zeros', kernel_regularizer=None, bias_regularizer=None, activity_regularizer=None, kernel_constraint=None, bias_constraint=None)
It is the full connection layer you often use.
example
# As the first layer of Sequential model
model = Sequential()
model.add(Dense(32, input_shape=(16,)))
# Now the model will take the array with size (*, 16) as the input,
# The size of its output array is (*, 32)

# After the first layer, you no longer need to specify the entered size:
model.add(Dense(32))
parameter
units: positive integer, output spatial dimension.
Activation: activate the function (see activations for details). If not specified, the activation function is not used (i.e. "linear" activation: a(x) = x).
use_bias: Boolean value, whether the layer uses offset vector.
kernel_ Initializer: initializer of kernel weight matrix (see initializers for details).
bias_initializer: see initializers for offset vectors
kernel_regularizer: the regularization function applied to the kernel weight matrix (see regularizer for details).
bias_regularizer: regularization function applied to offset direction (see regularizer for details).
activity_regularizer: the regularization function (its "activation") applied to the output of the layer. (see regulator for details).
kernel_constraint: the constraint function applied to the kernel weight matrix (see constraints for details).
bias_constraint: the constraint function applied to the offset vector (see constraints for details).
Enter size
nD tensor, size: (batch_size,..., input_dim). The most common case is a 2D input with a size of (batch_size, input_dim).
Output size
nD tensor, size: (batch_size,..., units). For example, for a 2D input with a size of (batch_size, input_dim), the output size is (batch_size, units).
Set up LeNet
1. Model construction
# model
NB_classes = 10
optimizer = Adam()
dropout = 0.3
INPUT_SHAPE = (1,28, 28)
# Select channels_first: return (3256256)
# Select channels_last: return (256256,3)
model = Sequential()
# CONN->RELU->POOL
model.add(Conv2D(20, kernel_size=5, input_shape=INPUT_SHAPE, padding='same',data_format='channels_first'))
model.add(Activation('relu'))
model.add(MaxPooling2D(pool_size=(2, 2), strides=(2, 2), data_format='channels_first'))
# CONN->RELU->POOL
model.add(Conv2D(50, kernel_size=5, padding='same',data_format='channels_first'))
model.add(Activation('relu'))
model.add(MaxPooling2D(pool_size=(2, 2), strides=(2, 2), data_format='channels_first'))
# Flatten -> Dense ->RELU
# Flatten layer is used to "flatten" the input, and make the input mostly one-dimensional, which is used as the convolution layer to be the transition of the full connection layer
model.add(Flatten())
model.add(Dense(500))
model.add(Activation('relu'))
# Dense->softmax
model.add(Dense(NB_classes))
model.add(Activation('softmax'))
model.summary()
# Select appropriate loss function, objective function and evaluation function
model.compile(loss='categorical_crossentropy', optimizer=optimizer, metrics=['accuracy'])
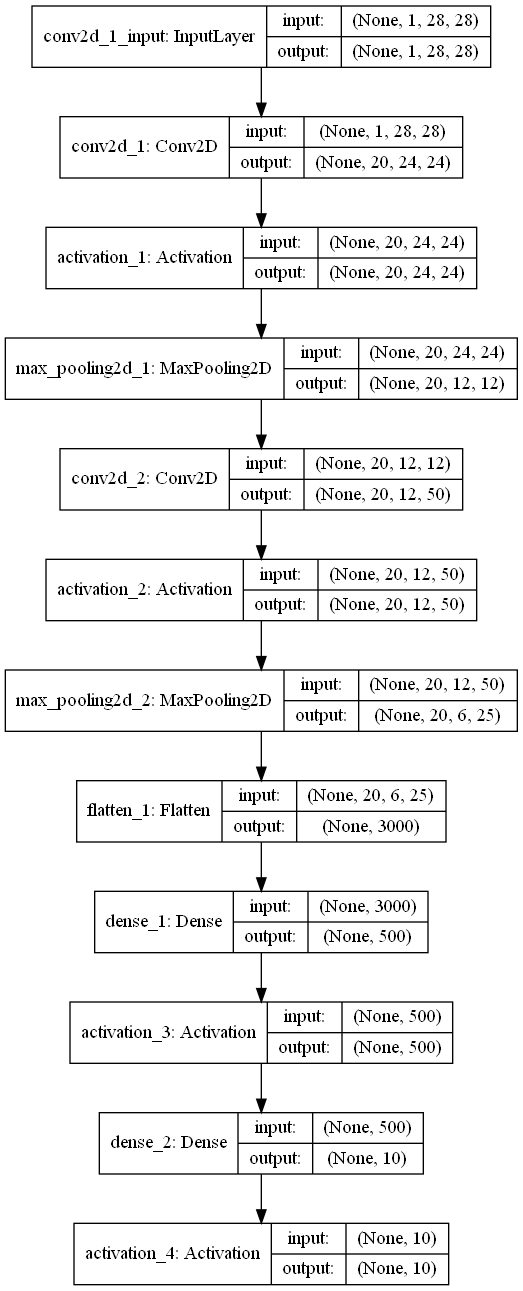
plot_model(model, to_file='./2-Lenet-model_1.png', show_shapes=True)
After building the above model, we can get the following model structure
2. Data acquisition and preprocessing
# data
(X_train, y_train), (X_test, y_test) = mnist.load_data()
X_train = X_train.astype('float32')
X_test = X_test.astype('float32')
# we need a 60K x [1 x 28 x 28] shape as input to the CONVNET
X_train = X_train[:, np.newaxis, :, :]
X_test = X_test[:, np.newaxis, :, :]
# nomalize
X_train /= 255
X_test /= 255
y_train = np_utils.to_categorical(y_train, NB_classes)
y_test = np_utils.to_categorical(y_test, NB_classes)
3. Training
Use model Fit training model
# train
batch_size = 128
NB_epoch = 20
history = model.fit(X_train, y_train, batch_size=batch_size, epochs=NB_epoch, validation_split=0.2, verbose=1)
score = model.evaluate(X_test, y_test, batch_size=batch_size, verbose=1)
print('score:', score[1], '    accuracy:', score[1])
print('history:', history.history.keys())
4. Evaluation model
Use plt to draw the loss and accuracy in the process of model training
# summarize history for accuracy
plt.plot(history.history['accuracy'])
plt.plot(history.history['val_accuracy'])
plt.title('model accuracy')
plt.ylabel('accuracy')
plt.xlabel('epoch')
plt.legend(['train', 'test'], loc='upper left')
plt.savefig('lenet_acc.png')
plt.show()
# summarize history for loss
plt.plot(history.history['loss'])
plt.plot(history.history['val_loss'])
plt.title('model loss')
plt.ylabel('loss')
plt.xlabel('epoch')
plt.legend(['train', 'test'], loc='upper left')
plt.savefig('lenet_loss.png')
plt.show()
Here we have completed the construction and training of LeNet. Through this process, we have further study on the convolution layer, activation function, pooling layer, full connection layer, model training and evaluation. Start your construction quickly.