Overview of 0x1
When I started ETF Intelligence Contract Development, I first faced a choice, Hardhat Vs Truffle Vs Remix, which development tool should I choose. I searched Google for a lot of comparisons, including Holliville Valdez's " Hardhat Vs Truffle Vs Remix - Which Is The Best For Blockchain Development?>
This article helped me in a timely manner, and OpenZeppelin, Aave, BitGo, 1inch and others are all using this development tool. I found the document to be clear and organized after learning more about the official documents, and I have some experience with front-end development, so I chose Hardhat as the choice of development tools. If you have no front-end experience and want to focus more on the contract itself in the early stages of your study, I would recommend Remix as a development tool for the early stages.
This is my first ETA contract and dApp development guide based on the official Hardhat s tutorial, and I will continue to share what I have learned in the future.
0x2 Build Environment
Hardhat s are written in JavaScript first, so we need to install Node first. JS environment.
Install Node.js
If you already have Node installed. JS You can skip this section. If not, the next section describes how to install it on Ubuntu, MacOS, and Windows.
Linux
Ubuntu
Copy and paste the following commands to the terminal:
sudo apt update
sudo apt install curl git
curl -sL https://deb.nodesource.com/setup_16.x | sudo -E bash -
sudo apt install nodejs
MacOS
Make sure you have git installed. If not, you can refer to atlassian's " Install Git>.
Install Node on MacOS. There are several ways to use js. I chose to use the Node version Manager ( nvm ). Copy and paste the following commands to the terminal:
curl -o- https://raw.githubusercontent.com/nvm-sh/nvm/v0.39.1/install.sh | bash
nvm install --lts
nvm use stable
nvm alias default stable
npm install npm --global # Upgrade npm to the latest version
Windows
Windows can go directly to Node.js Official Website , download the corresponding installation package to complete the installation.
0x3 Create a new project
We will use npm CLI to install Hardhat.
Open the terminal and run the following command:
mkdir hardhat-tutorial
cd hardhat-tutorial
npm init --yes
npm install --save-dev hardhat
Ethereum JavaScript dependencies are installed during the installation of Hardhat s, so be patient.
Run in the same directory where Hardhat is installed:
npx hardhat
Use the keyboard to select Create an empty hardhat.config.js and press Enter.
$ npx hardhat 888 888 888 888 888 888 888 888 888 888 888 888 888 888 888 8888888888 8888b. 888d888 .d88888 88888b. 8888b. 888888 888 888 "88b 888P" d88" 888 888 "88b "88b 888 888 888 .d888888 888 888 888 888 888 .d888888 888 888 888 888 888 888 Y88b 888 888 888 888 888 Y88b. 888 888 "Y888888 888 "Y88888 888 888 "Y888888 "Y888 👷 Welcome to Hardhat v2.9.1 👷 ? What do you want to do? ... Create a basic sample project Create an advanced sample project Create an advanced sample project that uses TypeScript ❯ Create an empty hardhat.config.js Quit
When Hardhat runs, it searches for the nearest hardhat from the current working directory. Config. JS file. This file is usually in the root directory of your project, an empty hardhat.config.js is enough for Hardhats to work. In the future, all our settings for Hardhats will be in this file.
Hardhat architecture
Hardhat is based on mission and plug-in concepts. Most of Hardhat's functionality comes from plug-ins, and as a developer, You have the freedom to choose Plug-in to use.
task
Every time you run Hardhat from the CLI, you are running a task. For example, the npx hardhat compile command is to run the compile task. To see what tasks are currently available for the project, just execute npx hardhat. You can also learn about other tasks npx hardhat help [task] through the help command.
Of course, we can also create custom tasks, refer to Create Task.
Plug-in unit
Hardhat doesn't limit you on what tools you ultimately use, but it does have some built-in defaults. All of these can also be rewritten.
In this article, we will use Ethers.js and Waffle plug-ins. They will allow you to interact with Taifang and test your contract. Later we will explain how they are used. To install them, you only need to run the following commands in the project directory:
npm install --save-dev @nomiclabs/hardhat-ethers ethers @nomiclabs/hardhat-waffle ethereum-waffle chai
We need to add the following code
require("@nomiclabs/hardhat-waffle");
At the following location, it looks like this:
require("@nomiclabs/hardhat-waffle");

/**
 * @type import('hardhat/config').HardhatUserConfig
 */
module.exports = {
  solidity: "0.7.3",
};
We just need to reference hardhat-waffle.
0x4 Writing and Compiling Contracts
We will create a simple smart contract for token transfer. Currency contracts are most commonly used for exchange and storage of value. We won't go into more detail about the Solidity code in the contract in this article, but we have implemented some logic that you should expect:
- The total supply of tokens is fixed and cannot be changed
- The entire supply is assigned to the address of the deployment contract
- Anyone can receive tokens
- Anyone who has at least one token can transfer it
- A token is inseparable. You can transfer 1, 2, 3 or 37 tokens, but you cannot transfer 2.5 tokens
You may have heard of ERC20, which is the token standard in Taifang. The DAI, USDC, MKR and ZRX tokens follow the ERC20 standard, which makes them compatible with any software that can handle ERC20 tokens. For simplicity, the currency we are building does not follow ERC20.
Write smart contracts
First create a new directory named contracts and create a Token in that directory. Sol.
Paste the code below into the file and take a moment to read it. It is simple and filled with notes explaining the fundamentals of Solidity.
For syntax highlighting, you should add Solidity language support to your text editor. Simply look for a Solidity or Ethereum plug-in. We recommend using Visual Studio Code or Sublime Text 3.
// The first line of code in the Solidity file will be pragma
// The Solidity compiler will use it to validate the corresponding version
pragma solidity ^0.7.0;


// This is the main component of a smart contract
contract Token {
    // Some string type variables identify tokens
    // `public` Modifier makes variables readable outside the contract
    string public name = "My Hardhat Token";
    string public symbol = "MHT";

    // Fixed number of tokens stored in unsigned integer variables
    uint256 public totalSupply = 1000000;

    // Address type variable is used to store Ethernet accounts
    address public owner;

    // `mapping` is a key/value mapping. We store each account balance here
    mapping(address => uint256) balances;

    /**
     * Contract Initialization
     *
     * `constructor` Execute only when contract is created
     */
    constructor() {
        // TotSupply is assigned to the transaction sender, the account for which the contract is deployed
        balances[msg.sender] = totalSupply;
        owner = msg.sender;
    }

    /**
     * Functions for passing tokens
     *
     * `external` Modifiers allow functions to be called only from outside the contract
     */
    function transfer(address to, uint256 amount) external {
        // Check if the transaction sender has enough tokens
        // If the first parameter of `require` evaluates to `false`, the entire transaction will resume
        require(balances[msg.sender] >= amount, "Not enough tokens");

        // Transfer amount
        balances[msg.sender] -= amount;
        balances[to] += amount;
    }

    /**
     * Read the currency balance for a given account
     *
     * `view` A modifier indicates that it does not modify the state of the contract, which allows us to call it without executing the transaction
     */
    function balanceOf(address account) external view returns (uint256) {
        return balances[account];
    }
}
*.sol is the file type of Solidity. It is common practice to suggest that the file name be matched to the contract it contains.
Compile Contract
Compile the contract and execute npx hardhat compile in your terminal. The compile task is one of the built-in tasks.
$ npx hardhat compile
Compiling 1 file with 0.7.3
Compilation finished successfully
The contract has been compiled successfully and you can use it now.
0x5 Test Contract
Writing automated tests is critical when building smart contracts because our code will directly manipulate the user's money! To do this, we will use the Hardhat network, a local Ethernet network designed for development, built into the Hardhat tool and the default network. You don't need to set anything to use it. In our tests, we'll use ethers.js interacts with the Ethernet contract we built in the previous section and uses Mocha as our test runtime.
Write tests
Create a directory named test in the root directory of our project and create a file named Token inside. JS file.
Let's start with the code below. We'll explain what that means next, but now you just need to paste it into Token.js:
const { expect } = require("chai");

describe("Token contract", function () {
  it("Deployment should assign the total supply of tokens to the owner", async function () {
    const [owner] = await ethers.getSigners();

    const Token = await ethers.getContractFactory("Token");

    const hardhatToken = await Token.deploy();

    const ownerBalance = await hardhatToken.balanceOf(owner.address);
    expect(await hardhatToken.totalSupply()).to.equal(ownerBalance);
  });
});
Run npx hardhat test on your terminal and you should see the following output:
npx hardhat test

  Token contract
    ✓ Deployment should assign the total supply of tokens to the owner (654ms)


  1 passing (663ms)
This means that the test passed. Now let's explain each line:
const [owner] = await ethers.getSigners();
Signer stands for ethers. The object of Taifang in js. It is used to send transactions to contracts and other accounts. Here, we get a list of accounts in the connected node, in this case the Hardhat network, and only the first one remains.
The ethers variable is available globally. You can add a line like this at the top:
const { ethers } = require("hardhat");
To learn more about Singer, you can view Signers Document.
const Token = await ethers.getContractFactory("Token");
In ethers. In js, ContractFactory is an abstraction for deploying new smart contracts, so Token here is an example of our token contract factory.
const hardhatToken = await Token.deploy();
Calling deploy() on ContractFactory will start the deployment and return the Promise parsed by ContractFactory. This is the object that provides the method for each of your smart Contract functions.
const ownerBalance = await hardhatToken.balanceOf(owner.address);
Once the contract is deployed, we can call our contract method on hardhatToken and get the balance of the corresponding owner's account by calling balanceOf().
Remember that the token owner who gets the entire supply is the account being deployed, and when using the hardhat-ethers plug-in, the ContractFactory and Contract instances connect by default to the first signer. This means that the account in the owner variable is deployed and balanceOf() should return the entire supply.
expect(await hardhatToken.totalSupply()).to.equal(ownerBalance);
Here, we use our Contract instance again to call the Smart Contract function in Solidity code. TotSupply() returns the supply of tokens, and we check if it equals ownerBalance, as it should.
To do this, we used Chai This is a library of assertions. These assertion functions are called "matchers", and the functions we use here actually come from Waffle . That's why we're using the hardhat-waffle plug-in, which makes it easier for us to assert values from the Ethereum. See the Waffle documentation This section To learn the entire list of ethernet-specific matchers.
Use another account
If you need to test your code by sending transactions from an account other than the default account (or Signer in ethers.js), you can use ethers. The connect() method in JS Contract connects it to a different account. Like this:
const { expect } = require("chai");

describe("Transactions", function() {
  it("Should transfer tokens between accounts", async function() {
    const [owner, addr1, addr2] = await ethers.getSigners();

    const Token = await ethers.getContractFactory("Token");

    const hardhatToken = await Token.deploy();

    //  Transfer 50 tokens from owner to addr1
    await hardhatToken.transfer(addr1.address, 50);
    expect(await hardhatToken.balanceOf(addr1.address)).to.equal(50);

    // Transfer 50 tokens from addr1 to addr2
    await hardhatToken.connect(addr1).transfer(addr2.address, 50);
    expect(await hardhatToken.balanceOf(addr2.address)).to.equal(50);
  });
});
Full coverage
Now that we've covered the basics of testing contracts, here's a complete token test suite with lots of additional information about Mocha and how to build tests. We recommend reading through.
// Here we import Chai to use its assertion function
const { expect } = require("chai");

// `describe` is a Mocha function that allows you to organize tests
// This is not really necessary, but organizing tests makes debugging easier. All Mocha functions can be used in global scope

// `describe` parameter is a test name and a callback function
// Callbacks must define tests for this section. This callback function cannot be an asynchronous function
describe("Token contract", function () {
  // Mocha has four functions that allow you to do different things throughout the test life cycle.
  // They are: `before`, `beforeEach`, `after`, `afterEach`

  // They are useful for setting up test environments and cleaning up after running

  // A common pattern is to declare variables and assign them in `before` and `beforeEach`callbacks

  let Token;
  let hardhatToken;
  let owner;
  let addr1;
  let addr2;
  let addrs;

  // `beforeEach` will run before each test and redeploy the contract each time. It receives callbacks and can be asynchronous
  beforeEach(async function () {
    // Get ContractFactory and Signer here
    Token = await ethers.getContractFactory("Token");
    [owner, addr1, addr2, ...addrs] = await ethers.getSigners();

    // To deploy our contract, just call Token.deploy() and wait for it to be deployed(), deployment occurs once its transactions are mined
    hardhatToken = await Token.deploy();
  });

  // You can nest describe calls to create summaries
  describe("Deployment", function () {
    // `it` is a MoCha function, which is a tool for defining tests. It receives test names and callback functions

    // If the callback function is one-step, Mocha will `await`
    it("Should set the right owner", async function () {
      // Expect receives a value and wraps it in an Assertion object. These objects have many useful ways to assert values

      // This test expects the owner variable stored in the contract to be equal to the owner when we deploy the contract
      expect(await hardhatToken.owner()).to.equal(owner.address);
    });

    it("Should assign the total supply of tokens to the owner", async function () {
      const ownerBalance = await hardhatToken.balanceOf(owner.address);
      expect(await hardhatToken.totalSupply()).to.equal(ownerBalance);
    });
  });

  describe("Transactions", function () {
    it("Should transfer tokens between accounts", async function () {
      // Transfer 50 tokens from owner to addr1
      await hardhatToken.transfer(addr1.address, 50);
      const addr1Balance = await hardhatToken.balanceOf(addr1.address);
      expect(addr1Balance).to.equal(50);

      // Transfer 50 tokens from addr1 to addr2
      // We use. Connect (signer) sends transactions from another account
      await hardhatToken.connect(addr1).transfer(addr2.address, 50);
      const addr2Balance = await hardhatToken.balanceOf(addr2.address);
      expect(addr2Balance).to.equal(50);
    });

    it("Should fail if sender doesn't have enough tokens", async function () {
      const initialOwnerBalance = await hardhatToken.balanceOf(owner.address);

      // Try sending a representative to the owner (1000000 tokens) from addr1.
      // `require`will count as false and resume the transaction
      await expect(
        hardhatToken.connect(addr1).transfer(owner.address, 1)
      ).to.be.revertedWith("Not enough tokens");

      // Owner balance should not change
      expect(await hardhatToken.balanceOf(owner.address)).to.equal(
        initialOwnerBalance
      );
    });

    it("Should update balances after transfers", async function () {
      const initialOwnerBalance = await hardhatToken.balanceOf(owner.address);

      // Transfer 100 tokens from owner to addr1
      await hardhatToken.transfer(addr1.address, 100);

      // Transfer another 50 tokens from owner to addr2
      await hardhatToken.transfer(addr2.address, 50);

      // Check balance
      const finalOwnerBalance = await hardhatToken.balanceOf(owner.address);
      expect(finalOwnerBalance).to.equal(initialOwnerBalance.sub(150));

      const addr1Balance = await hardhatToken.balanceOf(addr1.address);
      expect(addr1Balance).to.equal(100);

      const addr2Balance = await hardhatToken.balanceOf(addr2.address);
      expect(addr2Balance).to.equal(50);
    });
  });
});
This is the output of the npx hardhat test full test suite, and it looks like this:
$ npx hardhat test

  Token contract
    Deployment
      ✓ Should set the right owner
      ✓ Should assign the total supply of tokens to the owner
    Transactions
      ✓ Should transfer tokens between accounts (199ms)
      ✓ Should fail if sender doesn't have enough tokens
      ✓ Should update balances after transfers (111ms)


  5 passing (1s)
Keep in mind that when you run npx hardhat test, your contracts will be compiled if they have changed since the last time they were run.
0x6 debugging using Hardhat network
Hardhat has a built-in Hardhat network, a local Ethernet network designed for development. It allows you to deploy contracts, run tests, and debug code. This is the default network Hardhat connects to, so you don't have to set anything up to make it work. Just run your tests.
Solidity console.log
When running contracts and tests on the Hardhat network, you can use console in Soledity code. Log() to print log messages and contract variables. To use it, you must import hardhat/console into your contract code. Sol.
pragma solidity ^0.8.0;

import "hardhat/console.sol";

contract Token {
  //...
}
Like console in JavaScript. Log adds something to the transfer() function as follows:
function transfer(address to, uint256 amount) external {
    console.log("Sender balance is %s tokens", balances[msg.sender]);
    console.log("Trying to send %s tokens to %s", amount, to);

    require(balances[msg.sender] >= amount, "Not enough tokens");

    balances[msg.sender] -= amount;
    balances[to] += amount;
}
Log output is displayed when the test is run:
$ npx hardhat test

  Token contract
    Deployment
      ✓ Should set the right owner
      ✓ Should assign the total supply of tokens to the owner
    Transactions
Sender balance is 1000 tokens
Trying to send 50 tokens to 0xead9c93b79ae7c1591b1fb5323bd777e86e150d4
Sender balance is 50 tokens
Trying to send 50 tokens to 0xe5904695748fe4a84b40b3fc79de2277660bd1d3
      ✓ Should transfer tokens between accounts (373ms)
      ✓ Should fail if sender doesn't have enough tokens
Sender balance is 1000 tokens
Trying to send 100 tokens to 0xead9c93b79ae7c1591b1fb5323bd777e86e150d4
Sender balance is 900 tokens
Trying to send 100 tokens to 0xe5904695748fe4a84b40b3fc79de2277660bd1d3
      ✓ Should update balances after transfers (187ms)


  5 passing (2s)
See File To learn more about this feature.
0x7 deployed to real network
Once you're ready to share your dApp with others, all you might want to do is deploy it to a real network. That way, others can access your dApp.
The Ethernet network involved in real money transactions is called "mainnet". However, there are other networks that do not trade with real money, but they can simulate the real world scenarios very well. Others can also access the network called "testnets". Etaifang has several test networks: Ropsten, Kovan, Rinkeby and Goerli. We recommend deploying the contract to the Ropsten test network.
At the software level, deploying to the test network is the same as deploying to the main network. The only difference is which network you are connected to. Let's see using ether. What is the code for the JS deployment contract?
The main concepts used are Signer, ContractFactory, and Contract, which we explained in the Test section. There is nothing new to do compared to testing, because when you test a contract, you are actually deploying to your development network. This makes the code very similar.
Let's create a new directory scripts in the project root directory and paste the following into deploy.js file:
async function main() {
  const [deployer] = await ethers.getSigners();

  console.log("Deploying contracts with the account:", deployer.address);

  console.log("Account balance:", (await deployer.getBalance()).toString());

  const Token = await ethers.getContractFactory("Token");
  const token = await Token.deploy();

  console.log("Token address:", token.address);
}

main()
  .then(() => process.exit(0))
  .catch((error) => {
    console.error(error);
    process.exit(1);
To specify that Hardhat s are connected to a specific Ethernet network when running any task, use the --network parameter. Like this:
npx hardhat run scripts/deploy.js --network <network-name>
In this case, running without the--network parameter will cause the code pin to run on an embedded instance of the Hardhat network, so deployment will actually be lost when Hardhat is finished running, but it's still useful to test whether our deployment code is valid:
$ npx hardhat run scripts/deploy.js
Deploying contracts with the account: 0xf39Fd6e51aad88F6F4ce6aB8827279cffFb92266
Account balance: 10000000000000000000000
Token address: 0x5FbDB2315678afecb367f032d93F642f64180aa3
Deploy to a remote network
To deploy to a remote network (such as a primary network or any test network), you need to be in hardhat. Config. Add a network entry to the JS file. We'll use Ropsten in this example, but you can add any network in a similar way:
require("@nomiclabs/hardhat-waffle");

// Sign in https://www.alchemyapi.io , register,
// Create a new application in its dashboard and replace "KEY" with its key
const ALCHEMY_API_KEY = "KEY";

// Export your private key from Metamask, open Metamask, and enter Account Details > Export Private Key
// Note that you should never transfer the real Ether to the test account
const ROPSTEN_PRIVATE_KEY = "YOUR ROPSTEN PRIVATE KEY";

module.exports = {
  solidity: "0.7.3",
  networks: {
    ropsten: {
      url: `https://eth-ropsten.alchemyapi.io/v2/${ALCHEMY_API_KEY}`,
      accounts: [`${ROPSTEN_PRIVATE_KEY}`]
    }
  }
};
We're using it Alchemy But URLs pointing to any Ethernet node or gateway can work.
To deploy on a Ropsten network, you need to send Ropsten-ETH to the address where it will be deployed. You can get some ETH from the tap of the test network, which is a free distribution service for testing ETH. This is a tap in Ropsten You must change Metamask's network to Ropsten before trading.
Finally, run:
npx hardhat run scripts/deploy.js --network ropsten
If everything goes well, you should see the deployed contract address.
0x8 Template Project
If you want to quickly start using your dApp, or if you want to view the entire project from the front end, you can use the demo project library below.
https://github.com/nomiclabs/hardhat-hackathon-boilerplate
What's included
- The Solidity contract we used in this tutorial
- Use ethers. Test Suites for JS and Waffle
- Use ethers. Minimum front end for JS to interact with contracts
Solidity Contracts and Tests
In the root directory of repo, you'll find the Haardhat project that we built with the contract through this tutorial. Token refreshes your memory of how it was achieved:
- The total supply of tokens is fixed and cannot be changed
- The entire supply is assigned to the address of the deployment contract
- Anyone can receive tokens
- Anyone who has at least one token can transfer it
- A token is inseparable. You can transfer 1, 2, 3 or 37 tokens, but you cannot transfer 2.5 tokens
Front End Application
You'll find a simple application that frontend allows users to do two things:
- Check the balance of the connected Wallet
- Send token to address
This is a separate npm project that was created using create-react-app, so that means it uses webpack and babel.
Front End File Architecture
- `src/`Contains all code
- src/components contain reaction components
- Dapp.js is the only file with business logic. If you use it as a template, you can replace it here with your own code
- All other components render HTML without logic.
- src/contracts has contracted ABI s and addresses, which are automatically generated by deployment scripts
- src/components contain reaction components
How to use it
First clone the library, then deploy the contract:
cd hardhat-hackathon-boilerplate
npm install
npx hardhat node
Here, we only install the dependencies of the npm project and start a Hardhat network instance by running npx hardhat node, which you can connect to using MetaMask. In different terminals in the same directory, run:
npx hardhat --network localhost run scripts/deploy.js
This deploys the contract to the Hardhat network. Run when finished:
cd frontend
npm install
npm run start
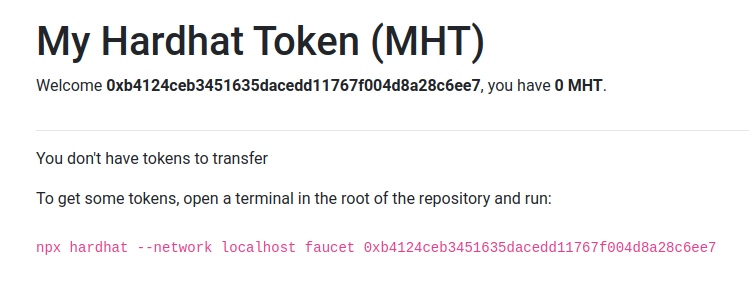
Start react web app. open http://localhost:3000/ You should see:

Set your network to localhost:8545 in MetaMask. You may then need to configure MetaMask to work with Hardhat s. To do so, go to Settings -> Networks -> Localhost 8545 and change the chain ID to 31337.
Now click the button in the Web application. Then you should see this:
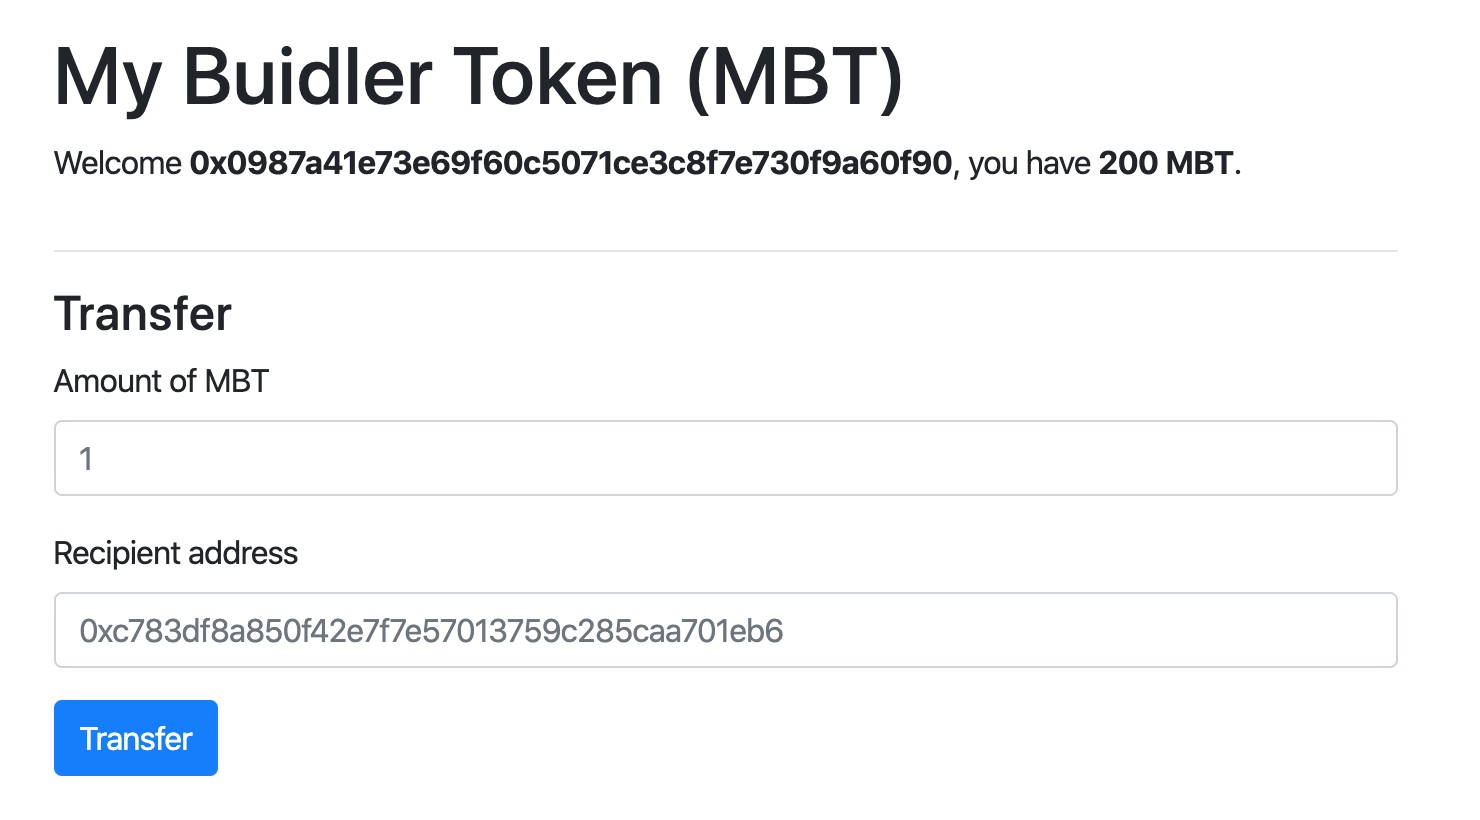
What happens here is that the front-end code that shows the current wallet balance detects that the balance is zero, so you will not be able to try the transfer function. By running:
npx hardhat --network localhost faucet <your address>
This will run our custom task included in Hardhat, which uses the balance of the deployment account to send 100 MBT and 1 ETH to your address. This will allow you to send your token to another address.
You can view/tasks/faucet. Task code in js.
$ npx hardhat --network localhost faucet 0x0987a41e73e69f60c5071ce3c8f7e730f9a60f90
Transferred 1 ETH and 100 tokens to 0x0987a41e73e69f60c5071ce3c8f7e730f9a60f90
In the terminal where you run npx hardhat node, you should also see:
eth_sendTransaction
  Contract call:       Token#transfer
  Transaction:         0x460526d98b86f7886cd0f218d6618c96d27de7c745462ff8141973253e89b7d4
  From:                0xc783df8a850f42e7f7e57013759c285caa701eb6
  To:                  0x7c2c195cd6d34b8f845992d380aadb2730bb9c6f
  Value:               0 ETH
  Gas used:            37098 of 185490
  Block #8:            0x6b6cd29029b31f30158bfbd12faf2c4ac4263068fd12b6130f5655e70d1bc257

  console.log:
    Transferring from 0xc783df8a850f42e7f7e57013759c285caa701eb6 to 0x0987a41e73e69f60c5071ce3c8f7e730f9a60f90 100 tokens
Show the console for the transfer() function in our contract. Log output, which is what the web application looks like after running the tap task:
Try debugging it and reading the code. It is full of comments explaining what is happening and clearly showing which codes are Taifang template codes and which are actually dApp logic. This will make the project easy to reuse for your project.
0x9 concluding remark
Congratulations on completing this tutorial!
Here are some additional links to get you closer: