1, Introduction
1 past and present life of Haar classifier
Face detection belongs to the category of computer vision. In the early stage, people's main research direction was face recognition, that is, to recognize the identity of people according to the face. Later, the demand for face detection in complex background is increasing, and face detection is gradually developed as a separate research direction.
1.1 at present, there are two main types of face detection methods: knowledge-based and statistics based.
Ø knowledge based method: it mainly uses a priori knowledge to treat the face as a combination of organ features, and detects the face according to the characteristics of eyes, eyebrows, mouth, nose and other organs and the geometric position relationship between them.
Ø statistical based method: regard the face as a whole pattern - two-dimensional pixel matrix, construct the face pattern space through a large number of face image samples from the statistical point of view, and judge whether the face exists according to the similarity measure.
1.2 face detection method based on Knowledge:
Template matching, face feature, shape and edge, texture feature, color feature
1.3 face detection method based on Statistics:
Principal component analysis and feature face, neural network method, support vector machine, hidden Markov model, Adaboost algorithm
The Haar classifier method introduced in this paper includes Adaboost algorithm, which will be introduced in detail later. The so-called classifier here refers to the algorithm for classifying faces and non faces. In the field of machine learning, many algorithms are the process of classifying and clustering things. The ml module in OpenCV provides many classification and clustering algorithms.
Note: what is the difference between clustering and classification?
Ø classification: generally, the recognition method of the total number of known object categories is called classification, and the training data is labeled, such as whether it is a face or a non-human face, which is a supervised learning.
Ø clustering: there are also methods that can deal with the uncertainty of the total number of categories or the training data is not labeled. This is clustering. It does not need the information about object categories in the learning stage. It is an unsupervised learning.
These include Mahalanobis distance, K-means, naive Bayesian classifier, decision tree, Boosting, random forest, Haar classifier, expectation maximization, k-nearest neighbor, neural network and support vector machine.
The Haar classifier we want to discuss is actually an application of the Boosting algorithm. The Haar classifier uses the AdaBoost algorithm in the Boosting algorithm, only cascades the strong classifiers trained by the AdaBoost algorithm, and adopts the efficient rectangular feature and integral graph method in the bottom feature extraction. Several terms involved here will be discussed in detail next.
In 2001, Viola and Jones published the classic "Rapid Object Detection using a Boosted Cascade of Simple Features" and "robust real time face detection". On the basis of AdaBoost algorithm, they used Haar like wavelet features and integral graph method for face detection. They were not the first to use the proposed wavelet features, However, they designed more effective features for face detection, and cascaded the strong classifiers trained by AdaBoost. This can be said to be a milestone in the history of face detection, so the algorithm proposed at that time was called Viola Jones detector. After a while, Rainer Lienhart and Jochen Maydt extended the detector [3] and finally formed the current Haar classifier of OpenCV.
AdaBoost is an algorithm proposed by Freund and Schapire in 1995, which is a great improvement on the traditional Boosting algorithm. The core idea of Boosting algorithm is to promote the weak learning method into a strong learning algorithm, that is, "three cobblers top one Zhuge Liang"
Haar classifier = Haar like feature + integral graph method + AdaBoost + cascade;
The key points of Haar classifier algorithm are as follows:
① Haar like feature is used for detection.
② The evaluation of Haar like features is accelerated by using Integral Image.
③ AdaBoost algorithm is used to train a strong classifier to distinguish face and non face.
④ Cascade classifier improves the accuracy of cascade classifier.
2 shallow in and shallow out of Haar classifier
2.1 Haar like feature who are you?
What is a feature? I will describe it in the following scenario. Suppose that in face detection, we need such a sub window to continuously shift and slide in the image window to be detected. Each time the sub window reaches a position, it will calculate the feature of the region, and then filter the feature with our trained cascade classifier, Once the feature passes the screening of all strong classifiers, the region is determined as a face.
So how does this feature represent? Well, that's what the Bulls did. Later generations said that these things they made were called Haar like features.
Here are the Haar like features proposed by Viola cattle.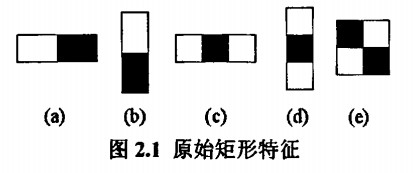
The following is the Haar like feature proposed by Lienhart and other cattle.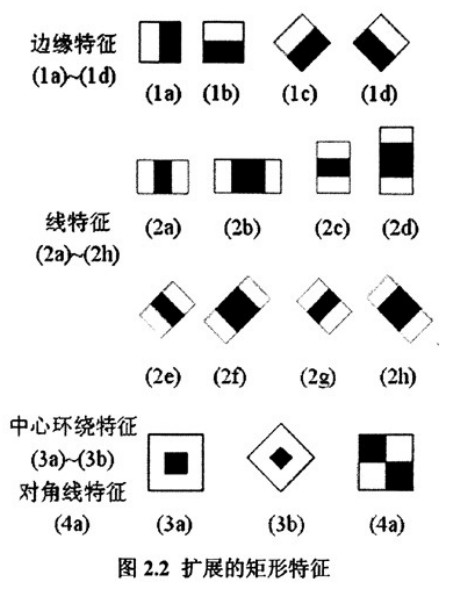
Aren't these so-called features just a bunch of striped rectangles? What are they for? Let me explain in this way. Put any rectangle on the face area, and then subtract the sum of pixels in the white area from the sum of pixels in the black area. The obtained value is temporarily called the face eigenvalue. If you put this rectangle on a non face area, the calculated eigenvalue should be different from the face eigenvalue, and the more different, the better, Therefore, the purpose of these blocks is to quantify face features to distinguish between face and non face.
In order to increase the discrimination, multiple rectangular features can be calculated to obtain a feature value with greater discrimination. Then what kind of rectangular features can be combined to better distinguish between human face and non human face? This is what AdaBoost algorithm needs to do. Here, let's put aside the concept of integral graph. In order to make our ideas coherent, I will directly introduce AdaBoost algorithm.
2, Source code
function varargout = gui(varargin)
% GUI MATLAB code for gui.fig
%      GUI, by itself, creates a new GUI or raises the existing
%      singleton*.
%
%      H = GUI returns the handle to a new GUI or the handle to
%      the existing singleton*.
%
%      GUI('CALLBACK',hObject,eventData,handles,...) calls the local
%      function named CALLBACK in GUI.M with the given input arguments.
%
%      GUI('Property','Value',...) creates a new GUI or raises the
%      existing singleton*.  Starting from the left, property value pairs are
%      applied to the GUI before gui_OpeningFcn gets called.  An
%      unrecognized property name or invalid value makes property application
%      stop.  All inputs are passed to gui_OpeningFcn via varargin.
%
%      *See GUI Options on GUIDE's Tools menu.  Choose "GUI allows only one
%      instance to run (singleton)".
%
% See also: GUIDE, GUIDATA, GUIHANDLES

% Edit the above text to modify the response to help gui

% Last Modified by GUIDE v2.5 19-Dec-2016 02:28:04

% Begin initialization code - DO NOT EDIT
gui_Singleton = 1;
gui_State = struct('gui_Name',       mfilename, ...
                   'gui_Singleton',  gui_Singleton, ...
                   'gui_OpeningFcn', @gui_OpeningFcn, ...
                   'gui_OutputFcn',  @gui_OutputFcn, ...
                   'gui_LayoutFcn',  [] , ...
                   'gui_Callback',   []);
if nargin && ischar(varargin{1})
    gui_State.gui_Callback = str2func(varargin{1});
end

if nargout
    [varargout{1:nargout}] = gui_mainfcn(gui_State, varargin{:});
else
    gui_mainfcn(gui_State, varargin{:});
end
% End initialization code - DO NOT EDIT


% --- Executes just before gui is made visible.
function gui_OpeningFcn(hObject, eventdata, handles, varargin)
% This function has no output args, see OutputFcn.
% hObject    handle to figure
% eventdata  reserved - to be defined in a future version of MATLAB
% handles    structure with handles and user data (see GUIDATA)
% varargin   command line arguments to gui (see VARARGIN)

% Choose default command line output for gui
handles.output = hObject;

% Update handles structure
guidata(hObject, handles);

% UIWAIT makes gui wait for user response (see UIRESUME)
% uiwait(handles.figure1);


% --- Outputs from this function are returned to the command line.
function varargout = gui_OutputFcn(hObject, eventdata, handles)
% varargout  cell array for returning output args (see VARARGOUT);
% hObject    handle to figure
% eventdata  reserved - to be defined in a future version of MATLAB
% handles    structure with handles and user data (see GUIDATA)

% Get default command line output from handles structure
varargout{1} = handles.output;


%%%%%%%%%%%%%%%%%%%%%%%%%%%%%%Button function realization%%%%%%%%%%%%%%%%%%%%%%%%%%%%%%%%%%%

% --- Executes on button press in pushbutton1.
function pushbutton1_Callback(hObject, eventdata, handles)
% Read picture button
[filename, pathname] = uigetfile( {'*.jpg;*.jpeg;*.tif;*.png;*.gif','All Image Files';'*.*','All Files' },'Please select a picture');
str=[pathname filename];
global im;
im = imread(str);
axes(handles.axes1);
imshow(im);
title(filename);
set(handles.edit1,'string',sprintf('%i × %i', size(im,1), size(im,2)));


% --- Executes on button press in pushbutton2.
function pushbutton2_Callback(hObject, eventdata, handles)
% Exit program button
close;


% --- Executes on button press in pushbutton3.
function pushbutton3_Callback(hObject, eventdata, handles)
% Face recognition button
mergeThreshole = str2num(get(handles.edit2,'String'));
maxS = str2num(get(handles.edit3,'String'));
minS = str2num(get(handles.edit4,'String'));
isPrint = 0;  % 0 Indicates that facial features are not printed
isTest = 0;  % 1 It means to carry out facial feature test
if get(handles.radiobutton1,'value')
    isPrint = 1;
end
if get(handles.radiobutton2,'value')
    isTest = 1;
end
detector = buildDetector(mergeThreshole,1,maxS, minS); % Build detector
global im;
[bbimg, faces] = detectFaceParts(detector,im,5,isPrint,isTest);
axes(handles.axes2);
imshow(bbimg);
title('Recognition results');
for i=1:7 % Empty original
    str = ['cla(handles.axes' num2str(i+2) ')'];
    eval(str);
end
for i=1:7
    if i > size(faces, 1)
        break;
    end
    str = ['axes(handles.axes' num2str(i+2) ')'];
    eval(str);
    imshow(faces{i});
    title(sprintf('Face%i', i));
end
%%%%%%%%%%%%%%%%%%%%%%%%%%%%%%%%%%%%%%%%%%%%%%%%%%%%%%%%%%%%%%%%%%%%%%%%%%%


% --- Executes during object creation, after setting all properties.
function axes1_CreateFcn(hObject, eventdata, handles)
% hObject    handle to axes1 (see GCBO)
% eventdata  reserved - to be defined in a future version of MATLAB
% handles    empty - handles not created until after all CreateFcns called
set(hObject,'xTick',[]); % Remove the coordinate axis
set(hObject,'ytick',[]); % Remove the coordinate axis
set(hObject,'box','on'); % Remove the coordinate axis
% Hint: place code in OpeningFcn to populate axes1


% --- Executes during object creation, after setting all properties.
function axes2_CreateFcn(hObject, eventdata, handles)
% hObject    handle to axes2 (see GCBO)
% eventdata  reserved - to be defined in a future version of MATLAB
% handles    empty - handles not created until after all CreateFcns called
set(hObject,'xTick',[]); % Remove the coordinate axis
set(hObject,'ytick',[]); % Remove the coordinate axis
set(hObject,'box','on'); % Remove the coordinate axis
% Hint: place code in OpeningFcn to populate axes2


% --- Executes during object creation, after setting all properties.
function axes3_CreateFcn(hObject, eventdata, handles)
% hObject    handle to axes3 (see GCBO)
% eventdata  reserved - to be defined in a future version of MATLAB
% handles    empty - handles not created until after all CreateFcns called
set(hObject,'xTick',[]); % Remove the coordinate axis
set(hObject,'ytick',[]); % Remove the coordinate axis
set(hObject,'box','on'); % Remove the coordinate axis
% Hint: place code in OpeningFcn to populate axes3

% --- Executes during object creation, after setting all properties.
function axes4_CreateFcn(hObject, eventdata, handles)
% hObject    handle to axes3 (see GCBO)
% eventdata  reserved - to be defined in a future version of MATLAB
% handles    empty - handles not created until after all CreateFcns called
set(hObject,'xTick',[]); % Remove the coordinate axis
set(hObject,'ytick',[]); % Remove the coordinate axis
set(hObject,'box','on'); % Remove the coordinate axis
% Hint: place code in OpeningFcn to populate axes3

% --- Executes during object creation, after setting all properties.
function axes5_CreateFcn(hObject, eventdata, handles)
% hObject    handle to axes3 (see GCBO)
% eventdata  reserved - to be defined in a future version of MATLAB
% handles    empty - handles not created until after all CreateFcns called
set(hObject,'xTick',[]); % Remove the coordinate axis
set(hObject,'ytick',[]); % Remove the coordinate axis
set(hObject,'box','on'); % Remove the coordinate axis
% Hint: place code in OpeningFcn to populate axes3

% --- Executes during object creation, after setting all properties.
function axes6_CreateFcn(hObject, eventdata, handles)
% hObject    handle to axes3 (see GCBO)
% eventdata  reserved - to be defined in a future version of MATLAB
% handles    empty - handles not created until after all CreateFcns called
set(hObject,'xTick',[]); % Remove the coordinate axis
set(hObject,'ytick',[]); % Remove the coordinate axis
set(hObject,'box','on'); % Remove the coordinate axis
% Hint: place code in OpeningFcn to populate axes3
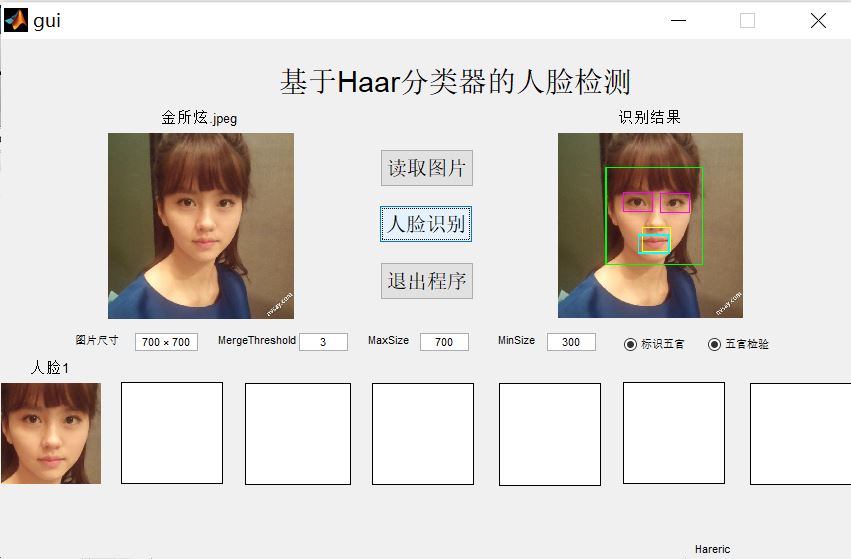
3, Operation results
4, Remarks
Complete code or write on behalf of QQ1575304183