Implementation of NPC Intelligent Robot by Behavior Designer
Created by miccall miccall.tech )
Realization of Object Following Camera Vision Motion
1. VR Realizes Robot Navigation
- In the project, a robot is required to follow the role and fly all the time, just like an elf, always around the protagonist, moving, turning, and moving to the right position. Let him face the protagonist, and realize this example today.
2. Thoughts on Problems
 - 1. The object moves to a given position (target)
 - 2. The object rotates to the camera
 - 3. Appear in the camera's field of vision
 - 4. Custom Object Location in the Screen of the Camera
3. Implementation and Method
- Moving, it could have been done with animation, because the animation has not been done, I use a cube as an example of that robot.
- First you have a cube and then you put him a mobile script. Here I named him Player Tank.
- Our goal is to get him to move to a target, so we have to assign him a followTransform. At the same time, he has the speed of movement and rotation.
- In order to make his movement not so abrupt, my idea is that he first rotates to the follow er object, and then moves to the object in a straight line. So the algorithm was written quickly.
        void LookTransform(Transform Mtransform)
            {
                Vector3 tarPos = Mtransform.position;
                Vector3 dirRot = tarPos - transform.position;
                Quaternion tarRot = Quaternion.LookRotation(dirRot);
                transform.rotation = Quaternion.Slerp(transform.rotation, tarRot, rotSpeed * Time.deltaTime);
            }
- To explain it briefly, we first determine the position of the object, then find out the direction pointing to it, and use the interpolation method.
Let the object rotate to the specified object.
Well, now that you have the direction of movement, it's easy to get there.
transform.Translate(new Vector3(0, 0, movementSpeed * Time.deltaTime));- So when did you stop moving? I thought for a moment and decided to judge by the difference in position.
Namely
Vector3.Distance(transform.position, followTransform.position);
- Well, now that there's a way to stop, the last thing to do is to turn to the camera.
Suddenly think, this is the problem, right, this is not the problem, haha, just wrote the algorithm, give a camera to solve it.
Then the concrete judgment logic is given.
        //The object stops when it approaches the designated position of the target to be reached.
        if (Vector3.Distance(transform.position, followTransform.position) < 3f)
        {
            //Make the object face the camera when it reaches its position
            LookTransform(Camre);
            return;
        }
        else
        {
            //Turn the object in the direction in which it will move.
            LookTransform(followTransform);
            transform.Translate(new Vector3(0, 0, movementSpeed * Time.deltaTime));
}- This solves the problem of moving the object to the target. The next step is to fix the position of the target and let him fix the position of the camera.
Create a new script file, CameraView, and hang it on the camera. In order to facilitate debugging, I used FPS script.
It's the first person perspective that follows the mouse's rotation, just like the game in cs (Baidu's big push code).
The second debugging algorithm is written by a foreign Daniel, who can give a distance and draw the field of view of the camera.
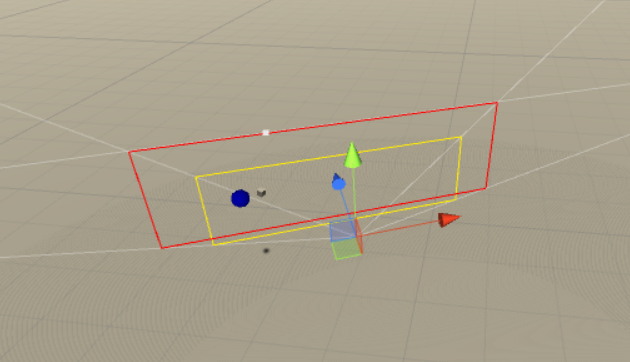
- Here I draw two sides, one is 8.5 meters away from the camera in yellow and 12 meters away from the camera in red.
It should be a question of length and detail. This algorithm is not explained much here. If you are interested in it, you can study it. Here we will quote it.
      Vector3[] GetCorners(float distance)
          {
        Vector3[] corners = new Vector3[4];

        float halfFOV = (theCamera.fieldOfView * 0.5f) * Mathf.Deg2Rad;
        float aspect = theCamera.aspect;

        float height = distance * Mathf.Tan(halfFOV);
        float width = height * aspect;

        // UpperLeft
        corners[0] = tx.position - (tx.right * width);
        corners[0] += tx.up * height;
        corners[0] += tx.forward * distance;

        // UpperRight
        corners[1] = tx.position + (tx.right * width);
        corners[1] += tx.up * height;
        corners[1] += tx.forward * distance;

        // LowerLeft
        corners[2] = tx.position - (tx.right * width);
        corners[2] -= tx.up * height;
        corners[2] += tx.forward * distance;

        // LowerRight
        corners[3] = tx.position + (tx.right * width);
        corners[3] -= tx.up * height;
        corners[3] += tx.forward * distance;

        return corners;
    }
void FindUpperCorners()
{
Vector3[] corners = GetCorners(upperDistance);
// for debugging
Debug.DrawLine(corners[0], corners[1], Color.yellow); // UpperLeft -> UpperRight
Debug.DrawLine(corners[1], corners[3], Color.yellow); // UpperRight -> LowerRight
Debug.DrawLine(corners[3], corners[2], Color.yellow); // LowerRight -> LowerLeft
Debug.DrawLine(corners[2], corners[0], Color.yellow); // LowerLeft -> UpperLeft
}- When debug, call FindUpperCorners() directly.
At the beginning, I used this debugging, gave a position, and then calculated his offset, debugging for a long time, did not have a good effect, I decided to change the way of thinking, for the general public, I still put this debugging method out, if necessary, you can try.
The second one I went to the api, because I seem to remember some ghost way to convert screen coordinates and world coordinates. As expected, this method is quite useful.
I tried the method of debugging given by the government and drew a dot.
        void OnDrawGizmosSelected()
        {
            Vector3 p = theCamera.ScreenToWorldPoint(new Vector3(100, 200, 8));
            Gizmos.color = Color.blue;
            //target.position = p;
            Gizmos.DrawSphere(p, 1F);
}- Well, even the location I finally decided to use is indicated.
Then I wrote a very simple way to achieve my goal.
          void maketarget()
          {
              Vector3 p = theCamera.ScreenToWorldPoint(new Vector3(RH, RV, upperDistance));
              target.position = p;
}- I was shocked when I finished writing. It was so simple. Or simply explain that RH is a horizontal offset, RV is a vertical offset, and upperDistance is a plane position from the camera.
Next is the operation to see the effect.
4. Small BUG appearing midway
-
   I do circular motion inexplicably, and then I analyze the relationship between linear velocity, angular velocity and radius.
   Then we conclude a basic rule that he should be satisfied when he moves to a certain position.
   The relationship between circular motion, and then we adjust the values of movementSpeed and rotSpeed so that they can do as much as possible.
   Eliminate the product relationship with Distance, so that the probability of occurrence is minimal.
   Feelings - In fact, unity and real physics, theoretical physics is still very different.
Behavior Designer Introduction and Use Method
Behavior Designer is a behavior tree plug-in. It provides a visual editor and powerful API to easily create tasks (tasks) to judge behavior by decision tree. It is more coupling and more convenient to build AI system.
This tutorial is not an introductory tutorial, but a guide to achieve our theme.
- Sequence queue node
- A node representing sequential execution. All nodes under this node execute sequentially until false is returned.
- Sequence queue node
- Selector Selects Nodes
- Indicates that a node under this node is selected to execute all of its subordinate nodes in turn until true is returned.
- Selector Selects Nodes
Let's use these two for a moment. For more information, please refer to other tutorials.
basic task
- Determine whether or not to arrive at the destination
- Move to destination (including take-off and stop animations)
- Determine whether the camera is facing
- Judge whether to hold the corresponding animation (floating in place)
- Determine whether to face UI objects
- If the action is animated after UI orientation (nodding, shaking, and shoving hands)
1. Judging whether to reach the destination
- This method has been introduced in the above tutorial, and the code implementation is simply reinterpreted. First, hang a script on the camera to measure the scope of the camera, draw a point in the scope, and let a target(transform) cover this point.
- In VR, the camera can rotate the first person view angle according to the sensor of the helmet. This target is fixed in one place of the view angle and can move freely.
- Then, the z-axis (forward) of the robot is always facing this target. Then use translate to move near the target.
- What we need to judge is the target and the robot's distance.
- We write a script ourselves to implement this small function (Task)
        using UnityEngine;

        namespace BehaviorDesigner.Runtime.Tasks.Basic.UnityVector3
        {
            [TaskCategory("Basic/Vector3")]
            [TaskDescription("Returns the distance between two Vector3s.")]

            public class dis_tance : Action
            {

                [Tooltip("target Vector3")]
                public SharedVector3 firstVector3;
                [Tooltip("The distance")]
                [RequiredField]
                public SharedFloat storeResult;
                public SharedGameObject action;
                //Looking at the code, you should see that we need a target location vector and an action GameObject
                //There is also a return value of the distance.


                public override TaskStatus OnUpdate()
                {
                    storeResult.Value = Vector3.Distance(firstVector3.Value, action.Value.transform.position);
                    return TaskStatus.Success;
                }

                public override void OnReset()
                {
                    storeResult = 0;
                }
            }
}- Then, we have to determine the value of the distance to determine whether the robot is moving or stationary.
- Let's write a custom Task to implement it.
        using System.Collections;
        using System.Collections.Generic;
        using UnityEngine;
        namespace BehaviorDesigner.Runtime.Tasks.Basic.UnityVector3 {
            public class comparedis : Action {

                public SharedFloat distance;
                public SharedFloat compare_dis ;
                /*compare_dis Represents a range subtracted by distance
                Draw a compare_dis ball with the center of the target as a circle. Once it enters the ball, it indicates that it has reached its destination.  */
                public SharedBool storeResult;
                /*We return a bool value, which means whether the robot is still or not.
                  If the distance between target and target is greater than 0, then it is not forbidden that he should move to target, otherwise he is still, he should make corresponding animation.
                */
                public override TaskStatus OnUpdate()
                {
                    storeResult.Value = distance.Value - compare_dis.Value > 0 ? false : true ;
                    return TaskStatus.Success;
                }

                public override void OnReset()
                {

                }
            }
}- Okay, we've written the two Task s and connected the two tasks with a Sequence.

- Having done this, we have to discuss one is mobile and the other is mobile termination.
2. Move to target
To move to target, we need to use a judgment to do the corresponding events. First, we judge the variable isstop of the first step to see if it is still. If it is false, we should perform the following steps or jump to the camera.
In the next layer, we use a selector node to select a node to execute.
Choose to play take-off animation or move?The first condition for playing the take-off animation is that the initial value of isfirstfly is true, then start executing the flight animation, and at the end of execution set the value false false FALSE false false FALSE false false, instead of entering the node, choose to execute the move node.
The animation is also a pit. Let me elaborate on it in a long paragraph. Received friends can skip this paragraph.

- looktarget also mentioned earlier that movetotarget is a translate after encapsulation that can be implemented by your own mind.
3. Stop Logic

4. Stop animation for the first time

5. Camera Oriented

- After facing the camera, we have to decide whether it is over or not. We have to decide the direction of the vector.
- First, the forward vector of the robot is computed, then the position of the robot is subtracted from the position of the camera, and a direction vector is obtained. Finally, the unit vector of the two vectors is judged to be the same.
6. UI Oriented
- I specify that when the external code controls the modification of a global variable, it is set to true and then a UI object is specified so that the next frame can be UI-oriented.

7. Action after UI
