Interpretation of UNet algorithm principle and implementation of pad
U-Net network is a very classic image segmentation network, which originates from medical image segmentation. It has the characteristics of few parameters, fast calculation and strong applicability. It has high adaptability to general scenes. U-Net was first proposed in 2015 and won the first place in ISBI 2015 Cell Tracking Challenge.
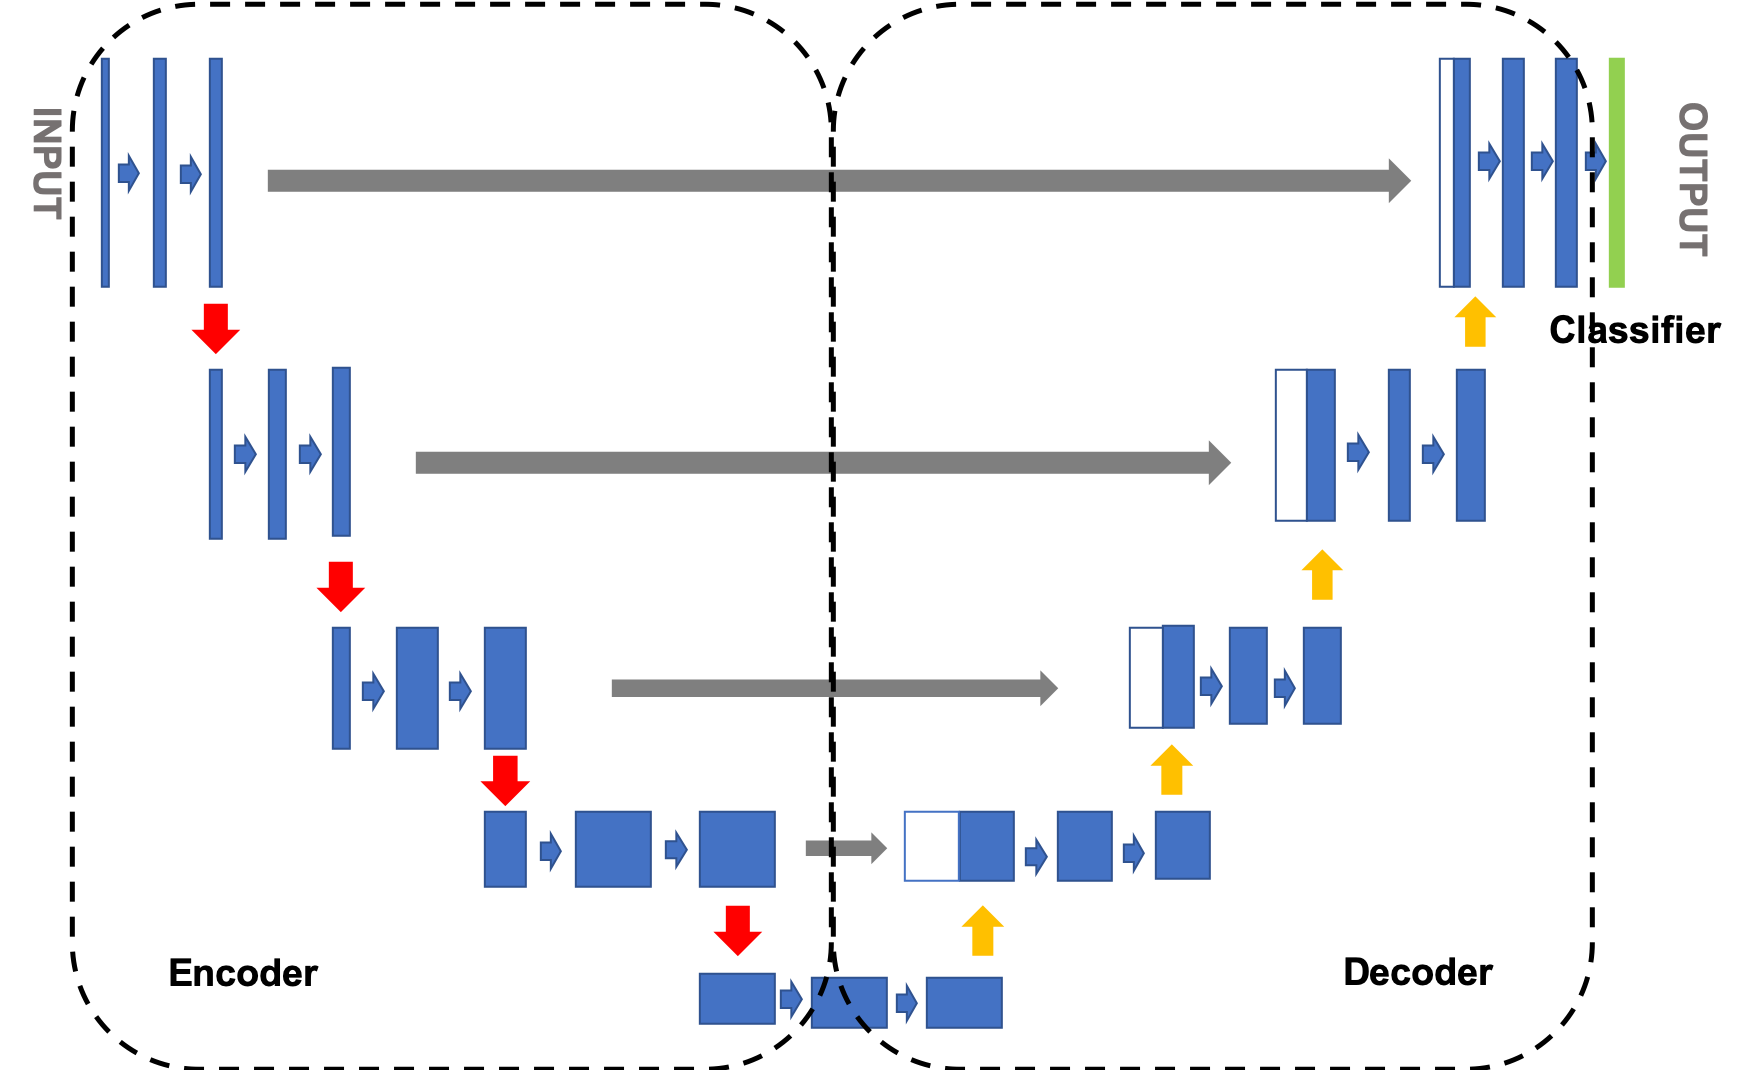
The structure of U-Net is a standard encoder decoder structure, as shown in Figure 1. The left side can be regarded as an encoder and the right side as a decoder. The image is first down sampled by the encoder to obtain the high-level semantic feature map, and then up sampled by the decoder to restore the feature map to the resolution of the original image. Jump connection is also used in the network, that is, every time the decoder samples up, the feature images corresponding to the same resolution in the decoder and encoder are fused in a splicing way to help the decoder better recover the details of the target.
 Figure 1 network structure diagram of UNET model
1) Encoder: the encoder presents a gradually shrinking structure as a whole, continuously reducing the resolution of the feature map to capture context information. The encoder is divided into four stages. In each stage, the maximum pool layer is used for down sampling, and then two convolution layers are used to extract features. The final feature map is reduced by 16 times;
2) Decoder: the decoder presents an expansion structure symmetrical to the encoder, gradually repairing the details and spatial dimensions of the segmented object to achieve accurate positioning. The decoder is divided into four stages. In each stage, after the input feature map is up sampled, it is spliced with the feature map of the corresponding scale in the encoder, and then two convolution layers are used to extract the features. The final feature map is enlarged by 16 times;
3) Classification module: use size 3 × 3, and classify the pixels;
explain:
Extended reading: U-Net: Convolutional Networks for Biomedical Image Segmentation
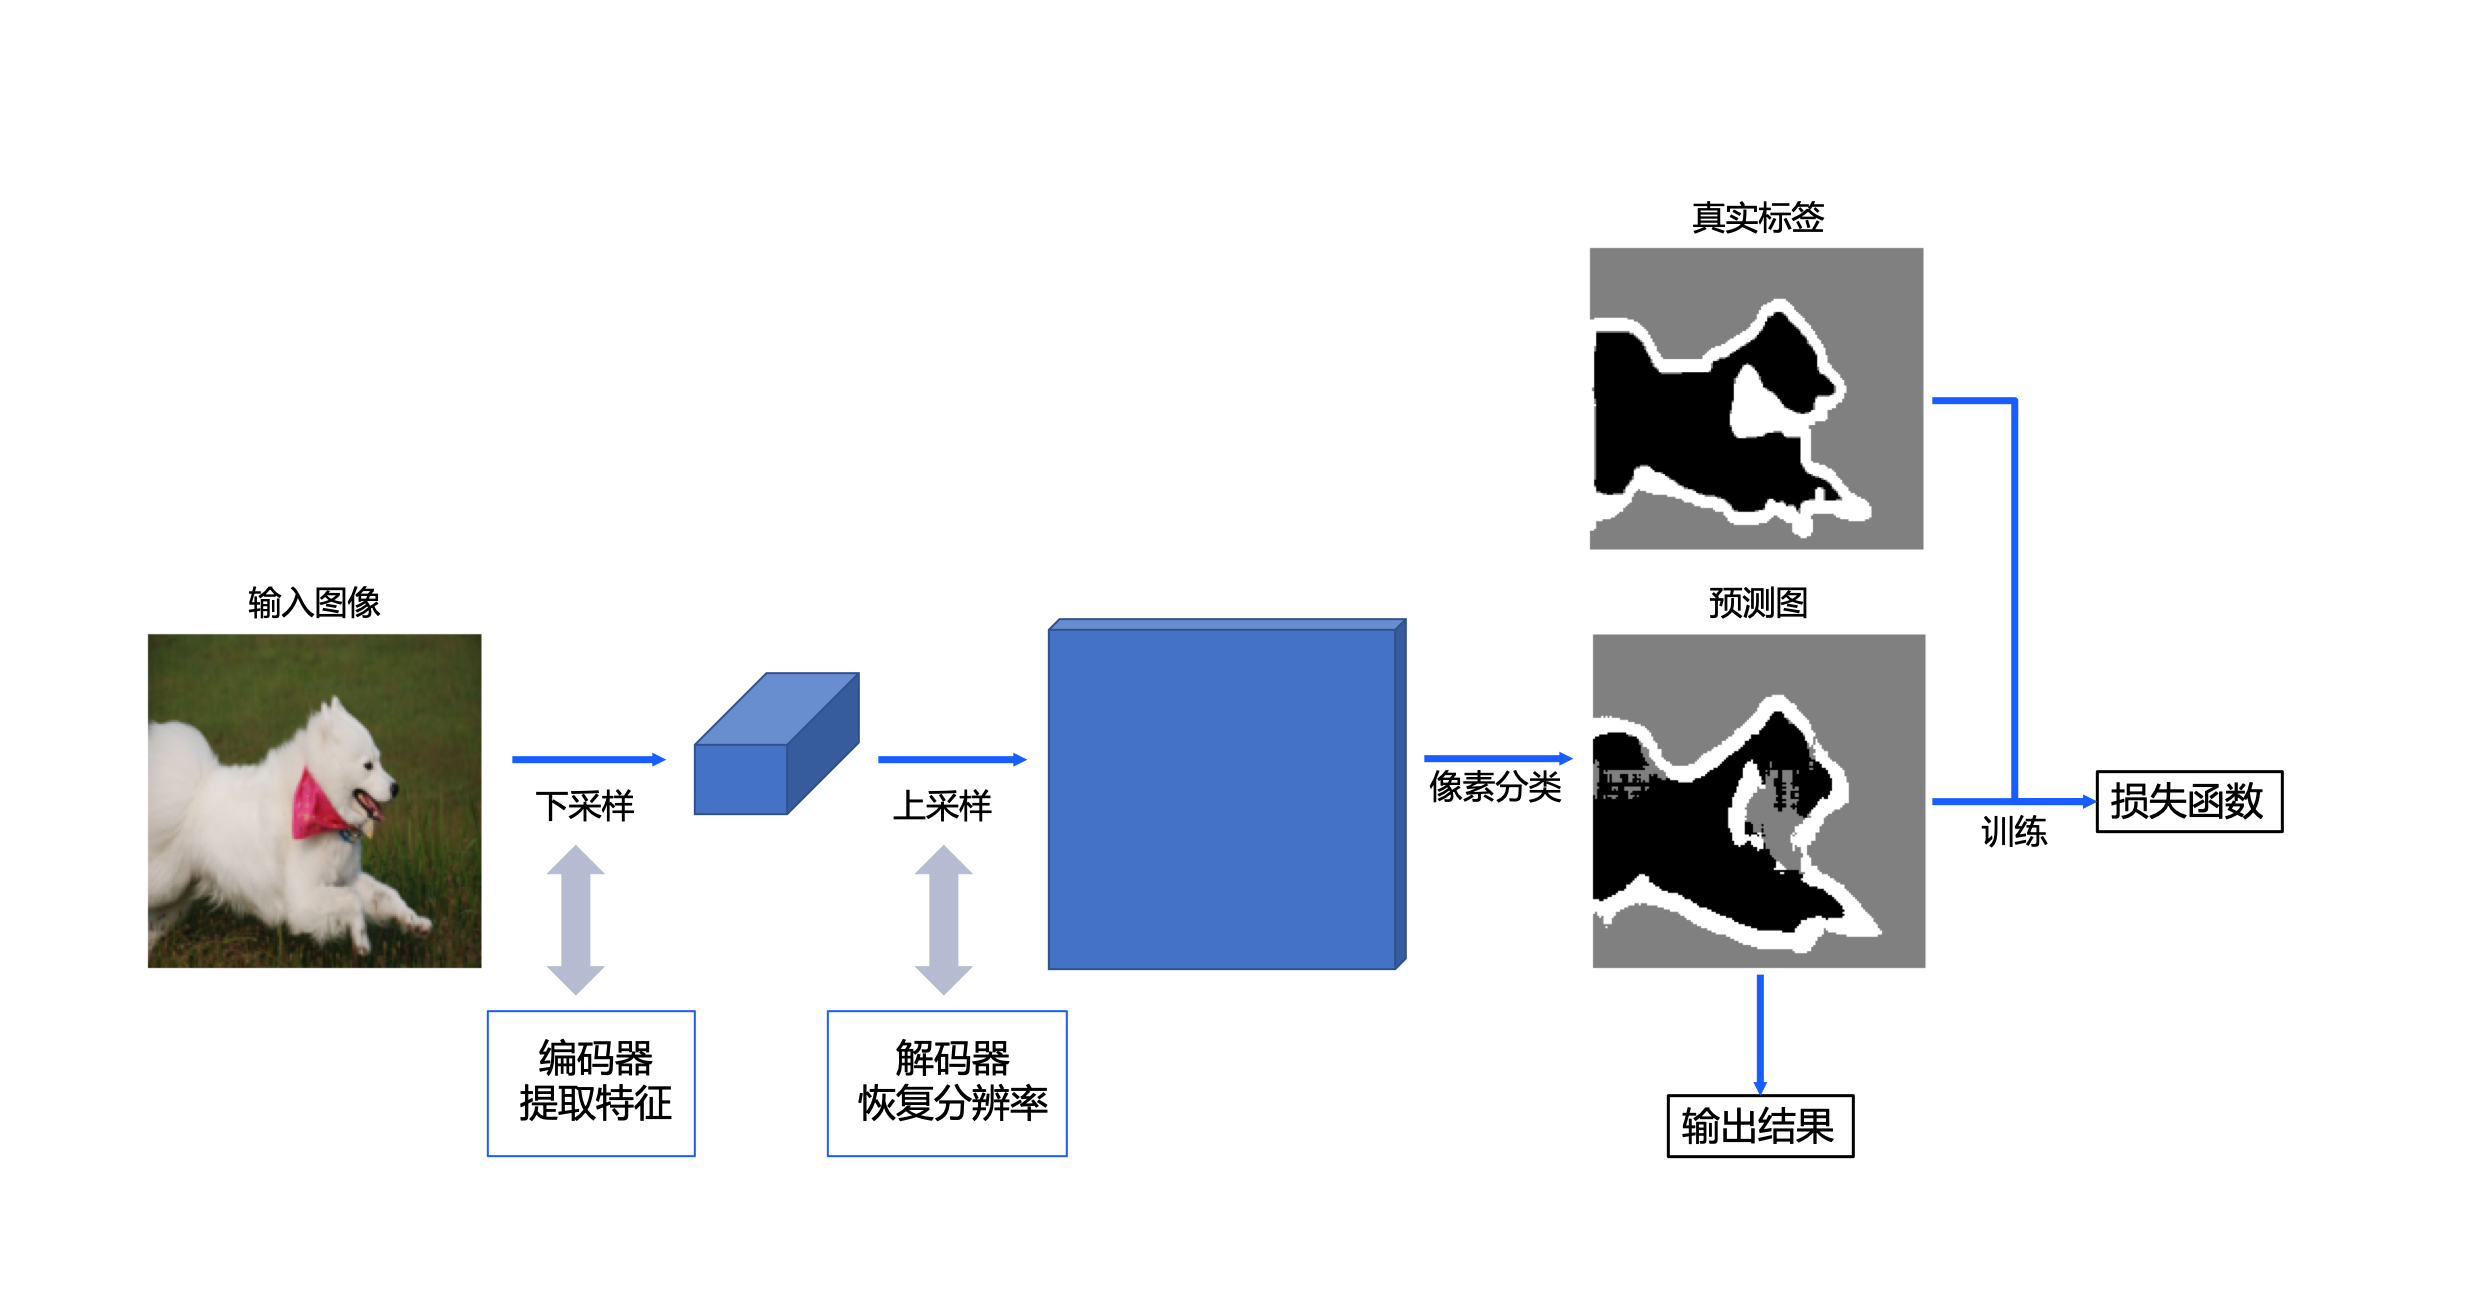
The implementation scheme of UNet is shown in Figure 2. For a PET image, firstly, the encoder in the convolutional neural network UNet network is used to extract features (including four down sampling stages) and obtain the high-level semantic feature map; Then, the decoder (including 4 up sampling stages) is used to restore the feature map to the original size. In the training stage, the loss function is constructed through the prediction map output by the model and the real label map of the sample, so as to carry out model training; In the reasoning stage, the prediction graph of the model is used as the final output.

Figure 2 PET image segmentation design scheme
The overall U-Net network framework code implementation is as follows:
# coding=utf-8
# Import environment
import os
import random
import cv2
import numpy as np
from PIL import Image
from paddle.io import Dataset
import matplotlib.pyplot as plt
# Use Matplotlib. In notebook When drawing with pyplot, you need to add this command to display
%matplotlib inline
import paddle
import paddle.nn.functional as F
import paddle.nn as nn

class UNet(nn.Layer):
    # Inherit padding nn. Define network structure layer
    def __init__(self, num_classes=3):
        # Initialization function
        super().__init__()
        # Define encoder
        self.encode = Encoder()
        # Define decoder
        self.decode = Decoder()
        # Classification module
        self.cls = nn.Conv2D(in_channels=64, out_channels=num_classes, kernel_size=3, stride=1, padding=1)

    def forward(self, x):
        # Forward calculation
        logit_list = []
        # Arithmetic coding
        x, short_cuts = self.encode(x)
        # Decoding operation
        x = self.decode(x, short_cuts)
        # Classification operation
        logit = self.cls(x)
        logit_list.append(logit)
        return logit_list
Define encoder
Above, we divide the model into three parts: encoder, decoder and classification module. The classification module has been implemented. Next, the encoder and decoder parts are defined respectively:
The first is the encoder. The encoder here increases the number of channels and reduces the size of the picture by constantly repeating a unit structure to obtain a high-level semantic feature map.
The code implementation is as follows:
class ConvBNReLU(nn.Layer):
    def __init__(self, in_channels, out_channels, kernel_size, padding='same'):
        # Initialization function
        super().__init__()
        # Define convolution
        self._conv = nn.Conv2D(in_channels, out_channels, kernel_size, padding=padding)
        # Define batch normalization layer
        self._batch_norm = nn.SyncBatchNorm(out_channels)

    def forward(self, x):
        # Forward calculation
        x = self._conv(x)
        x = self._batch_norm(x)
        x = F.relu(x)
        return x
class Encoder(nn.Layer):
    def __init__(self):
        # Initialization function
        super().__init__()
        # # Encapsulate two ConvBNReLU modules
        self.double_conv = nn.Sequential(ConvBNReLU(3, 64, 3), ConvBNReLU(64, 64, 3))
        # Define the number of sampling channels
        down_channels = [[64, 128], [128, 256], [256, 512], [512, 512]]
        # Encapsulated lower sampling module
        self.down_sample_list = nn.LayerList([self.down_sampling(channel[0], channel[1]) for channel in down_channels])

    # Define down sampling module
    def down_sampling(self, in_channels, out_channels):
        modules = []
        # Add maximum pooling layer
        modules.append(nn.MaxPool2D(kernel_size=2, stride=2))
        # Add two ConvBNReLU modules
        modules.append(ConvBNReLU(in_channels, out_channels, 3))
        modules.append(ConvBNReLU(out_channels, out_channels, 3))
        return nn.Sequential(*modules)

    def forward(self, x):
        # Forward calculation
        short_cuts = []
        # Convolution operation
        x = self.double_conv(x)
        # Down sampling operation
        for down_sample in self.down_sample_list:
            short_cuts.append(x)
            x = down_sample(x)
        return x, short_cuts
Define decoder
When the number of channels reaches the maximum and the high-level semantic feature map is obtained, the network structure will start decoding. The decoding here is to conduct up sampling, reduce the number of channels and gradually increase the corresponding picture size until it is restored to the original image size. In this experiment, the bilinear interpolation method is used to realize the up sampling of pictures.
The specific code is as follows:
# Define up sampling module
class UpSampling(nn.Layer):
    def __init__(self, in_channels, out_channels):
        # Initialization function
        super().__init__()
        in_channels *= 2
        # Encapsulate two ConvBNReLU modules
        self.double_conv = nn.Sequential(ConvBNReLU(in_channels, out_channels, 3), ConvBNReLU(out_channels, out_channels, 3))

    def forward(self, x, short_cut):
        # Forward calculation
        # Define bilinear interpolation module
        x = F.interpolate(x, paddle.shape(short_cut)[2:], mode='bilinear')
        # Feature map splicing
        x = paddle.concat([x, short_cut], axis=1)
        # Convolution calculation
        x = self.double_conv(x)
        return x
# Define decoder
class Decoder(nn.Layer):
    def __init__(self):
        # Initialization function
        super().__init__()
        # Define the number of upsampling channels
        up_channels = [[512, 256], [256, 128], [128, 64], [64, 64]]
        # Encapsulated upper sampling module
        self.up_sample_list = nn.LayerList([UpSampling(channel[0], channel[1]) for channel in up_channels])

    def forward(self, x, short_cuts):
        # Forward calculation
        for i in range(len(short_cuts)):
            # Up sampling calculation
            x = self.up_sample_list[i](x, short_cuts[-(i + 1)])
        return x