Thesis address: https://kpzhang93.github.io/MTCNN_face_detection_alignment/paper/spl.pdf
Take your own code. The debugging has been changed and the link can't be found.
Produced by the army, it is the most exquisite product
This is what I summarized according to the bottom of the code and understood little by little in combination with the translation of the paper. I have both the code and model files here. If there is a need for direct private chat, I may put a complete file of github later. I will further understand mtcnn and so on. If there is better, I will follow up the blog at any time. If there is any guidance, I will just chat directly. Thank you
1. Brief summary of mtcnn
Face detection and face alignment are the basis of face applications (face recognition, facial expression analysis)
Now the problems of face recognition and detection are as follows:
1. The application performance of traditional face recognition is very poor
2. A large number of face labels are required
3. The method of deep learning will have many data problems and equipment for calculating parameters
4. The performance of face alignment is too poor after some real-time detection
2.Joint Face Detection and Alignment using
Joint face detection and alignment, multi task cascade convolution network
Participants: Kaipeng Zhang, Zhanpeng Zhang, Zhifeng Li, Senior Member, IEEE, and Yu Qiao, Senior Member, IEEE
3. Summary:
Face detection and alignment in unconstrained environment is due to various postures, lighting and
Occlusion. Recent studies have shown that deep learning methods can achieve impressive performance on these two tasks. In this paper, a deep cascaded multitasking framework is proposed to improve their performance by using the internal correlation between detection and alignment. In particular, our framework uses the three stages of cascade architecture to carefully design the depth convolution network to predict the coarse to fine position of faces and landmarks. In addition, we propose a new online hard sample mining strategy to further improve the practice performance. Our method achieves extremely high accuracy, challenges the most advanced technology for face detection FDDB and WIDER FACE benchmark AFLW face calibration benchmark, while maintaining real-time performance
(about the data sets of FDDB and WIDERFACE, you can trust me privately)
Face detection, face alignment, cascade convolution, neural network
4. Introduction:
Now, many factors brought by face recognition have crucial conditions, such as face recognition and facial expression analysis. However, the visual changes of the face are very large, such as occlusion, large posture changes and extreme illumination. Imposing these tasks faces great challenges in practical application
For the previous cascaders, the effect has been poor and the accuracy is not high. Face alignment has aroused extensive research interest. The research in this field can be roughly divided into two categories: regression based method and template fitting method, which are proposed by the author and others
Face attribute recognition is used as an auxiliary task, and deep convolution is used to enhance the performance of face alignment neural network. However, in the past, most face detection and face alignment
The method ignores the inherent correlation between the two tasks. Although some existing works try to solve these problems together, these works still have limitations. On the other hand, mining hard samples in training is very important to enhance the ability of the detector. However, the traditional hard sample mining is usually performed offline, which significantly increases the manual operation. It is desirable to design an online hard sample mining face detection method to automatically adapt to the current training state
5. Training steps
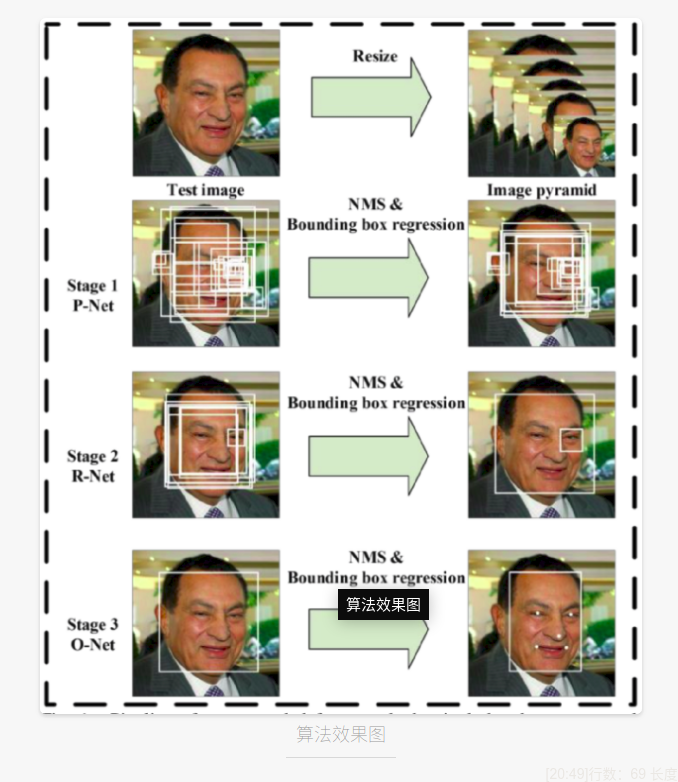
In this paper, we propose a new framework to integrate these two tasks by multi task learning and using a unified cascaded CNN. The proposed CNN consists of three phases. In the first stage, it quickly generates candidate windows through a shallow CNN. Then, it rejects a lot through a more complex CNN window. Finally, it uses more powerful CNN to refine the results and output five facial sign positions again. Thanks to this multitasking learning framework, the performance of the algorithm can be shown in Figure 1. Our cascaded framework pipeline includes a three-stage multitask deep convolution network. First, candidate windows are generated through a fast proposal network (P-Net). After that, we optimize these candidates, and the next stage is through refinement network (R-Net). In the third stage, the output network (O-Net) generates the final bounding box and facial landmark position
The main contributions of this paper are summarized as follows
(1) A new cascaded CNN framework is proposed to detect and align joint faces, and the real-time performance of lightweight CNN architecture is carefully designed
(2) An effective online implementation method is proposed to improve the performance of sample mining.
(3) Extensive experiments are carried out on challenging benchmarks? The significant performance improvement of the proposed method is compared with the most advanced face detection technology and face alignment task
6.5 code implementation of relevant steps (only part)
def adjust_input(in_data):#Adjust input
    """
        adjust the input from (h, w, c) to ( 1, c, h, w) for network input

    Parameters:
    ----------
        in_data: numpy array of shape (h, w, c)
            input data
    Returns:
    -------
        out_data: numpy array of shape (1, c, h, w)
            reshaped array
    """
    if in_data.dtype is not np.dtype('float32'):
        out_data = in_data.astype(np.float32)
    else:
        out_data = in_data

    out_data = out_data.transpose((2,0,1))
    out_data = np.expand_dims(out_data, 0)
    out_data = (out_data - 127.5)*0.0078125
    return out_data

def generate_bbox(map, reg, scale, threshold):#Generate bbox
     """
         generate bbox from feature map
     Parameters:
     ----------
         map: numpy array , n x m x 1
             detect score for each position
         reg: numpy array , n x m x 4
             bbox
         scale: float number
             scale of this detection
         threshold: float number
             detect threshold
     Returns:
     -------
         bbox array
     """
     stride = 2
     cellsize = 12

     t_index = np.where(map>threshold)

     # find nothing
     if t_index[0].size == 0:
         return np.array([])

     dx1, dy1, dx2, dy2 = [reg[0, i, t_index[0], t_index[1]] for i in range(4)]

     reg = np.array([dx1, dy1, dx2, dy2])
     score = map[t_index[0], t_index[1]]
     boundingbox = np.vstack([np.round((stride*t_index[1]+1)/scale),
                              np.round((stride*t_index[0]+1)/scale),
                              np.round((stride*t_index[1]+1+cellsize)/scale),
                              np.round((stride*t_index[0]+1+cellsize)/scale),
                              score,
                              reg])

     return boundingbox.T


def detect_first_stage(img, net, scale, threshold):#Test phase I
    """
        run PNet for first stage

    Parameters:
    ----------
        img: numpy array, bgr order
            input image
        scale: float number
            how much should the input image scale
        net: PNet
            worker
    Returns:
    -------
        total_boxes : bboxes
    """
    height, width, _ = img.shape
    hs = int(math.ceil(height * scale))
    ws = int(math.ceil(width * scale))

    im_data = cv2.resize(img, (ws,hs))

    # adjust for the network input
    input_buf = adjust_input(im_data)
    output = net.predict(input_buf)
    boxes = generate_bbox(output[1][0,1,:,:], output[0], scale, threshold)

    if boxes.size == 0:
        return None

    # nms
    pick = nms(boxes[:,0:5], 0.5, mode='Union')
    boxes = boxes[pick]
    return boxes

def detect_first_stage_warpper( args ):
    return detect_first_stage(*args)
7. Approaching the network
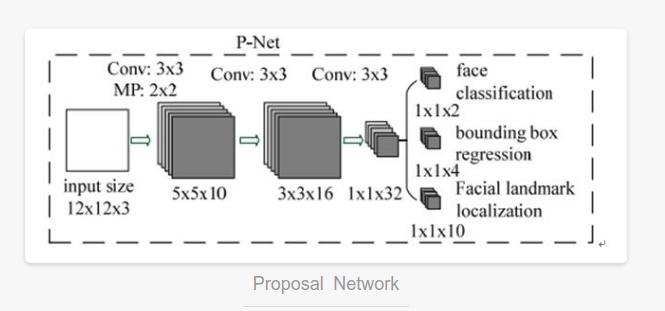
P-NET
The overall flow of our method is shown in Figure 1. Given an image, we first adjust its size to different proportions to build it
An image pyramid, which is the following three-level cascade framework of input: in the first stage, we use a fully convoluted network called proposal network (P-Net) to obtain candidate face windows and their boundary box regression vectors. Then the candidate is calibrated based on the estimated boundary box regression vector. After that, we used non maximum suppression (NMS) to merge highly overlapping candidates
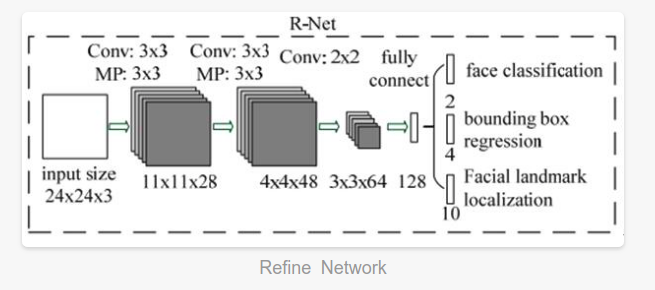
R-NET
Phase II: all candidates were sent to another CNN website network called Refine (R-Net), which further rejected a large number of false candidates, calibrated with boundary box regression, and NMS
O-NET
Stage 3: this stage is similar to stage 2, but at this stage, our goal is to identify more supervised face regions. stay
In particular, the network will output the positions of five facial landmarks.

Several CNN are designed for face detection. However, we note that its performance may be affected by the following facts: (1) the lack of diversity of some filters in the convolution layer may limit their discrimination ability. (2) Compared with other multi class targets, face detection is a challenging binary classification task, so each layer may need fewer filters. To this end, we reduce the number of filters to 5 × 5 filter changed to 3 × 3 filter to reduce the amount of calculation and increase the depth to get better performance. Compared with these improvements, in the previous architecture, we can get better performance and use less running time (the results of the training phase are shown in Table 1. For fair comparison, we use the same training and each group of validation data). Our CNN architecture is shown in Figure 2. We use PReLU as the convolution and complete connection layer after nonlinear activation function (except the output layer).
7.1 implementation of relevant network codes:
NMS
def nms(boxes, overlap_threshold, mode='Union'):
    """
        non max suppression(Non maximum suppression)

    Parameters:((parameter setting)
    ----------
        box: numpy array n x 5
            input bbox array
        overlap_threshold: float number(Overlapping threshold)
            threshold of overlap
        mode: float number
            how to compute overlap ratio, 'Union' or 'Min'How to calculate overlap, union, or minimum
    Returns:
    -------
        index array of the selected bbox
    """
    # if there are no boxes, return an empty list
    if len(boxes) == 0:
        return []

    # if the bounding boxes integers, convert them to floats
    if boxes.dtype.kind == "i":
        boxes = boxes.astype("float")

    # initialize the list of picked indexes
    pick = []

    # grab the coordinates of the bounding boxes
    x1, y1, x2, y2, score = [boxes[:, i] for i in range(5)]

    area = (x2 - x1 + 1) * (y2 - y1 + 1)
    idxs = np.argsort(score)

    # keep looping while some indexes still remain in the indexes list
    while len(idxs) > 0:
        # grab the last index in the indexes list and add the index value to the list of picked indexes
        last = len(idxs) - 1
        i = idxs[last]
        pick.append(i)

        xx1 = np.maximum(x1[i], x1[idxs[:last]])
        yy1 = np.maximum(y1[i], y1[idxs[:last]])
        xx2 = np.minimum(x2[i], x2[idxs[:last]])
        yy2 = np.minimum(y2[i], y2[idxs[:last]])

        # compute the width and height of the bounding box
        w = np.maximum(0, xx2 - xx1 + 1)
        h = np.maximum(0, yy2 - yy1 + 1)

        inter = w * h
        if mode == 'Min':
            overlap = inter / np.minimum(area[i], area[idxs[:last]])
        else:
            overlap = inter / (area[i] + area[idxs[:last]] - inter)

        # delete all indexes from the index list that have
        idxs = np.delete(idxs, np.concatenate(([last],
                                               np.where(overlap > overlap_threshold)[0])))

    return pick
P-NET
#############################################
        # first stage
        #############################################
        #for scale in scales:
        #    return_boxes = self.detect_first_stage(img, scale, 0)
        #    if return_boxes is not None:
        #        total_boxes.append(return_boxes)

        sliced_index = self.slice_index(len(scales))
        total_boxes = []
        for batch in sliced_index:
            local_boxes = self.Pool.map( detect_first_stage_warpper, \
                    zip(repeat(img), self.PNets[:len(batch)], [scales[i] for i in batch], repeat(self.threshold[0])) )
            total_boxes.extend(local_boxes)

        # remove the Nones
        total_boxes = [ i for i in total_boxes if i is not None]

        if len(total_boxes) == 0:
            return None

        total_boxes = np.vstack(total_boxes)

        if total_boxes.size == 0:
            return None

        # merge the detection from first stage
        pick = nms(total_boxes[:, 0:5], 0.7, 'Union')
        total_boxes = total_boxes[pick]

        bbw = total_boxes[:, 2] - total_boxes[:, 0] + 1
        bbh = total_boxes[:, 3] - total_boxes[:, 1] + 1

        # refine the bboxes
        total_boxes = np.vstack([total_boxes[:, 0]+total_boxes[:, 5] * bbw,
                                 total_boxes[:, 1]+total_boxes[:, 6] * bbh,
                                 total_boxes[:, 2]+total_boxes[:, 7] * bbw,
                                 total_boxes[:, 3]+total_boxes[:, 8] * bbh,
                                 total_boxes[:, 4]
                                 ])

        total_boxes = total_boxes.T
        total_boxes = self.convert_to_square(total_boxes)
        total_boxes[:, 0:4] = np.round(total_boxes[:, 0:4])
R-NET
 #############################################
        # second stage
        #############################################
        num_box = total_boxes.shape[0]

        # pad the bbox
        [dy, edy, dx, edx, y, ey, x, ex, tmpw, tmph] = self.pad(total_boxes, width, height)
        # (3, 24, 24) is the input shape for RNet
        input_buf = np.zeros((num_box, 3, 24, 24), dtype=np.float32)

        for i in range(num_box):
            tmp = np.zeros((tmph[i], tmpw[i], 3), dtype=np.uint8)
            tmp[dy[i]:edy[i]+1, dx[i]:edx[i]+1, :] = img[y[i]:ey[i]+1, x[i]:ex[i]+1, :]
            input_buf[i, :, :, :] = adjust_input(cv2.resize(tmp, (24, 24)))

        output = self.RNet.predict(input_buf)

        # filter the total_boxes with threshold
        passed = np.where(output[1][:, 1] > self.threshold[1])
        total_boxes = total_boxes[passed]

        if total_boxes.size == 0:
            return None

        total_boxes[:, 4] = output[1][passed, 1].reshape((-1,))
        reg = output[0][passed]

        # nms
        pick = nms(total_boxes, 0.7, 'Union')
        total_boxes = total_boxes[pick]
        total_boxes = self.calibrate_box(total_boxes, reg[pick])
        total_boxes = self.convert_to_square(total_boxes)
        total_boxes[:, 0:4] = np.round(total_boxes[:, 0:4])
O-NET
#############################################
        # third stage
        #############################################
        num_box = total_boxes.shape[0]

        # pad the bbox
        [dy, edy, dx, edx, y, ey, x, ex, tmpw, tmph] = self.pad(total_boxes, width, height)
        # (3, 48, 48) is the input shape for ONet
        input_buf = np.zeros((num_box, 3, 48, 48), dtype=np.float32)

        for i in range(num_box):
            tmp = np.zeros((tmph[i], tmpw[i], 3), dtype=np.float32)
            tmp[dy[i]:edy[i]+1, dx[i]:edx[i]+1, :] = img[y[i]:ey[i]+1, x[i]:ex[i]+1, :]
            input_buf[i, :, :, :] = adjust_input(cv2.resize(tmp, (48, 48)))

        output = self.ONet.predict(input_buf)

        # filter the total_boxes with threshold
        passed = np.where(output[2][:, 1] > self.threshold[2])
        total_boxes = total_boxes[passed]

        if total_boxes.size == 0:
            return None

        total_boxes[:, 4] = output[2][passed, 1].reshape((-1,))
        reg = output[1][passed]
        points = output[0][passed]

        # compute landmark points
        bbw = total_boxes[:, 2] - total_boxes[:, 0] + 1
        bbh = total_boxes[:, 3] - total_boxes[:, 1] + 1
        points[:, 0:5] = np.expand_dims(total_boxes[:, 0], 1) + np.expand_dims(bbw, 1) * points[:, 0:5]
        points[:, 5:10] = np.expand_dims(total_boxes[:, 1], 1) + np.expand_dims(bbh, 1) * points[:, 5:10]

        # nms
        total_boxes = self.calibrate_box(total_boxes, reg)
        pick = nms(total_boxes, 0.7, 'Min')
        total_boxes = total_boxes[pick]
        points = points[pick]

        if not self.accurate_landmark:
            return total_boxes, points
Extended network
#############################################
        # extended stage
        #############################################
        num_box = total_boxes.shape[0]
        patchw = np.maximum(total_boxes[:, 2]-total_boxes[:, 0]+1, total_boxes[:, 3]-total_boxes[:, 1]+1)
        patchw = np.round(patchw*0.25)

        # make it even
        patchw[np.where(np.mod(patchw,2) == 1)] += 1

        input_buf = np.zeros((num_box, 15, 24, 24), dtype=np.float32)
        for i in range(5):
            x, y = points[:, i], points[:, i+5]
            x, y = np.round(x-0.5*patchw), np.round(y-0.5*patchw)
            [dy, edy, dx, edx, y, ey, x, ex, tmpw, tmph] = self.pad(np.vstack([x, y, x+patchw-1, y+patchw-1]).T,
                                                                    width,
                                                                    height)
            for j in range(num_box):
                tmpim = np.zeros((tmpw[j], tmpw[j], 3), dtype=np.float32)
                tmpim[dy[j]:edy[j]+1, dx[j]:edx[j]+1, :] = img[y[j]:ey[j]+1, x[j]:ex[j]+1, :]
                input_buf[j, i*3:i*3+3, :, :] = adjust_input(cv2.resize(tmpim, (24, 24)))

        output = self.LNet.predict(input_buf)

        pointx = np.zeros((num_box, 5))
        pointy = np.zeros((num_box, 5))

        for k in range(5):
            # do not make a large movement
            tmp_index = np.where(np.abs(output[k]-0.5) > 0.35)
            output[k][tmp_index[0]] = 0.5

            pointx[:, k] = np.round(points[:, k] - 0.5*patchw) + output[k][:, 0]*patchw
            pointy[:, k] = np.round(points[:, k+5] - 0.5*patchw) + output[k][:, 1]*patchw

        points = np.hstack([pointx, pointy])
        points = points.astype(np.int32)

        return total_boxes, points
8. Details of mtcnn (theoretical point of view)
We use three tasks to train our CNN detector: face / non face classification, boundary box regression, and
Facial landmark localization.
Analysis of cost function
1. Face classification: the learning objectives are expressed as two types of classification problems. For each example, use the cross loss, where the network probability is generated, classify the probability value, and finally represent the ground truth label.

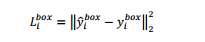
2. Bounding box regression: for each candidate window, we predict its closest real value to the ground (i.e. the left, top, height and width of the bounding box). The learning purpose is expressed as a regression problem. We use the Euclidean loss of each sample to obtain the loss of these targets from the network and predict the coordinate values of the prediction frame and the real frame.
3. Facial landmark location: similar to the bounding box, in the regression task, facial landmark detection is expressed as a regression problem to minimize Euclidean loss. For the ith sample. There are five facial signs, including left eye, right eye, nose, left corner of mouth and right corner of mouth, so this label belongs to this predicted value

4. Multi source training: because we use different tasks, each CNN has different types of training image learning processes, such as face, non face, partial alignment, etc. in this case, some loss functions (i.e. Eq. (1)-(3)) are not used to. For example, for the sample in the background area, we only calculate the target, and the other two losses are set to 0. This can be done directly through the example type indicator.
Random gradient descent is used to realize the training of multiple cnn.

Training call
Here, the theoretical part of the paper is almost summarized. The next training result evaluation can be viewed directly in the paper link. There are many visual results. Next, the training code and training results are displayed
Training code
# coding: utf-8
import mxnet as mx
from mtcnn_detector import MtcnnDetector
import cv2
import os
import time

if __name__ == '__main__':
    detector = MtcnnDetector(model_folder='model', ctx=mx.cpu(0), num_worker=4, accurate_landmark=False)

    img = cv2.imread('test2.jpg')
    # run detector
    results = detector.detect_face(img)

    if results is not None:

        total_boxes = results[0]
        points = results[1]

        # extract aligned face chips
        chips = detector.extract_image_chips(img, points, 144, 0.37)
        for i, chip in enumerate(chips):
            cv2.imshow('chip_'+str(i), chip)
            cv2.imwrite('chip_'+str(i)+'.png', chip)

        draw = img.copy()
        for b in total_boxes:
            cv2.rectangle(draw, (int(b[0]), int(b[1])), (int(b[2]), int(b[3])), (255, 255, 255))

        for p in points:
            for i in range(5):
                cv2.circle(draw, (int(p[i]), int(p[i + 5])), 1, (0, 0, 255), 2)

        cv2.imshow("detection result", draw)
        cv2.waitKey(0)

# --------------
# test on camera
# --------------

    # camera = cv2.VideoCapture(0)
    # while True:
    #     grab, frame = camera.read()
    #     img = cv2.resize(frame, (320,180))
    #
    #     t1 = time.time()
    #     results = detector.detect_face(img)
    #     print('time: ',time.time() - t1)
    #
    #     if results is None:
    #         continue
    #
    #     total_boxes = results[0]
    #     points = results[1]
    #
    #     draw = img.copy()
    #     for b in total_boxes:
    #         cv2.rectangle(draw, (int(b[0]), int(b[1])), (int(b[2]), int(b[3])), (255, 255, 255))
    #
    #     for p in points:
    #         for i in range(5):
    #             cv2.circle(draw, (int(p[i]), int(p[i + 5])), 1, (255, 0, 0), 2)
    #     cv2.imshow("detection result", draw)
    #     cv2.waitKey(30)
result:

ending:
The accuracy rate is very high. In the normal environment without any interference, the camera test can detect multiple faces, write it once, and you will be more impressed. If there is anything wrong or improved, welcome to communicate and thank you for your support.