ROS Basic Concepts File System Create some commands in ROS package ROS
- What is ROS
- ROS File System
- File system tools: rospack, roscd, rosls
- Create ROS Package
- What is catkin
- Create and build a catkin workspace:
- The structure of catkin package
- Structure for storing software packages in the catkin workspace
- Create catkin package-catkin_create_pkg
- Build a catkin workspace and validate the configuration file
- package.xml file content
- Some basic concepts of ROS
- Node:
- Client libraries:
- roscore:
- rosnode: ROS tool for getting node information
- rosrun: Run the node in the given package
- ROS Topic: Nodes communicate with each other through a ROS Topic
- rqt_graph: Displays currently running nodes and topics
- rostopic: Get information about ROS topics
- rostopic echo: Displays data published on a topic
- rostopic list: Lists all topics that are currently subscribed to and published.
- ROS message: The topic communicates by sending ROS messages between nodes
- rostopic type: View the message type of the published topic
- rostopic pub: Publish data on a topic that is currently being broadcast
- rostopic hz: rate of report data publishing
- rqt_plot: Display data published on a topic on a scrolling time map
- ROS services: another way of communicating between nodes
- rosservice: There are many commands available for services
- rosservice list: Displays the services provided by the node
- rosservice type: view the type of service
- rosservice call: invoke service
- rosparam: Store and manipulate data on the ROS parameter server
- rosparam list: See what parameters are on the parameter server
- rosparam set: Change the value of the parameter on the parameter server
- rosparam get: View the value of the parameter on the parameter server
- rqt_console: A log framework that connects ROS and displays output information from nodes
- rqt_logger_level: Change the level of detail of the output information when the node is running
- roslaunch: Start a node defined in the launch file
- Content of launch XML file
- Using roslaunch: Run launch file
What is ROS
Middleware, which connects real operating systems and programs, provides functionality similar to operating systems.
It provides the services that the operating system should provide, including hardware abstraction, underlying device control, implementation of common functions, inter-process messaging, and package management.
ROS includes: Framework + Tools + Functions + Community
Framework: Distributed, Process Management, Interprocess Communication
ros uses a distributed architecture that allows multiple processes to run simultaneously, each of which can be designed separately and combined.
ros uses Node to represent the process.
Robot control is a Node, and lidar laser is a node. ros provides a framework to manage these nodes and provide a bridge for them to communicate with each other.
Distributed architecture, good scalability, high software reuse rate. If you change to an advanced lidar, only modify the nodes, no communication modification is required.
Tools: simulation, data visualization, graphical interface, data recording
Some tools such as Gazebo, Rviz, and so on
Functions: Control, Planning, Visual, Mapping
There are some feature packs
Community: package management, documentation, tutorials
ROS File System
Packages: Packages are software organizational units of ROS code, and each package can contain libraries, executables, scripts, or other components.
Manifests (package.xml): Manifests are descriptions of packages. It defines dependencies between packages and records meta-information about packages, such as version, maintainer, license, and so on.
File system tools: rospack, roscd, rosls
1.rospack
Rospack gets information about the package, rospack find, and returns the path to the package.
Usage:
$ rospack find [package_name]
Example:
jym@ubuntu:~$ rospack find roscpp
/opt/ros/noetic/share/roscpp
2.roscd
roscd switches the directory to a package or package set.
Example:
jym@ubuntu:~$ roscd roscpp
jym@ubuntu:/opt/ros/noetic/share/roscpp$
roscd can only switch to those paths that are already included in ROS_ PACKAGE_ Packages in PATH environment variables.
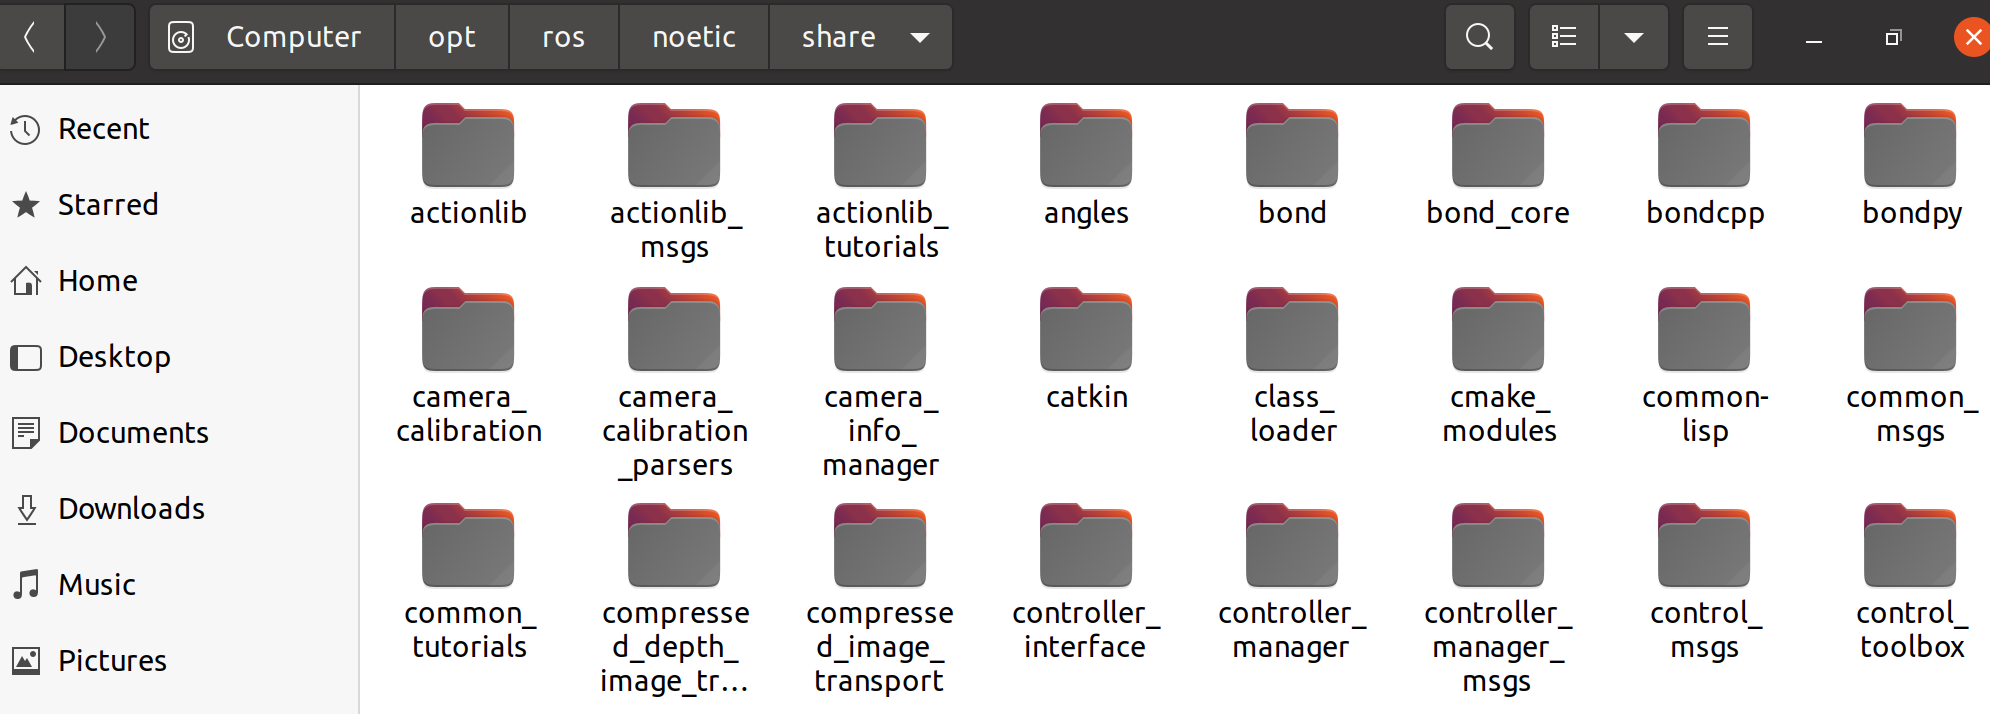
Use echo $ROS_PACKAGE_PATH View View ROS_ PACKAGE_ Paths included in the PATH.
jym@ubuntu:~$ echo $ROS_PACKAGE_PATH
/opt/ros/noetic/share
Open this folder to find these packages.
roscd can also switch to a subdirectory of a package or set of packages.
jym@ubuntu:~$ roscd roscpp/cmake
jym@ubuntu:/opt/ros/noetic/share/roscpp/cmake$ pwd
/opt/ros/noetic/share/roscpp/cmake
3.rosls
Allows ls commands to be executed directly by the name of the package (without entering an absolute path).
jym@ubuntu:~$ rosls roscpp_tutorials
cmake  launch  package.xml  srv
Create ROS Package
What is catkin
Code becomes executable, called compile; Whether to compile this or that first (that is, the arrangement for compilation) is called build.
catkin is a ros customized compilation and construction system.
The ros code is placed in the catkin workspace, which needs to be directed to catkin_make creation.
Create and build a catkin workspace:
jym@ubuntu:~$ source /opt/ros/noetic/setup.bash
jym@ubuntu:~$ mkdir -p ~/catkin_ws/src
jym@ubuntu:~$ cd ~/catkin_ws/
jym@ubuntu:~/catkin_ws$ catkin_make
Terminal:
jym@ubuntu:~$ source /opt/ros/noetic/setup.bash
jym@ubuntu:~$ mkdir -p ~/catkin_ws/src
jym@ubuntu:~$ cd ~/catkin_ws/
jym@ubuntu:~/catkin_ws$ catkin_make
Base path: /home/jym/catkin_ws
Source space: /home/jym/catkin_ws/src
Build space: /home/jym/catkin_ws/build
Devel space: /home/jym/catkin_ws/devel
Install space: /home/jym/catkin_ws/install
Creating symlink "/home/jym/catkin_ws/src/CMakeLists.txt" pointing to "/opt/ros/noetic/share/catkin/cmake/toplevel.cmake"
####
#### Running command: "cmake /home/jym/catkin_ws/src -DCATKIN_DEVEL_PREFIX=/home/jym/catkin_ws/devel -DCMAKE_INSTALL_PREFIX=/home/jym/catkin_ws/install -G Unix Makefiles" in "/home/jym/catkin_ws/build"
####
-- The C compiler identification is GNU 9.3.0
-- The CXX compiler identification is GNU 9.3.0
-- Check for working C compiler: /usr/bin/cc
-- Check for working C compiler: /usr/bin/cc -- works
-- Detecting C compiler ABI info
-- Detecting C compiler ABI info - done
-- Detecting C compile features
-- Detecting C compile features - done
-- Check for working CXX compiler: /usr/bin/c++
-- Check for working CXX compiler: /usr/bin/c++ -- works
-- Detecting CXX compiler ABI info
-- Detecting CXX compiler ABI info - done
-- Detecting CXX compile features
-- Detecting CXX compile features - done
-- Using CATKIN_DEVEL_PREFIX: /home/jym/catkin_ws/devel
-- Using CMAKE_PREFIX_PATH: /opt/ros/noetic
-- This workspace overlays: /opt/ros/noetic
-- Found PythonInterp: /usr/bin/python3 (found suitable version "3.8.10", minimum required is "3")
-- Using PYTHON_EXECUTABLE: /usr/bin/python3
-- Using Debian Python package layout
-- Found PY_em: /usr/lib/python3/dist-packages/em.py
-- Using empy: /usr/lib/python3/dist-packages/em.py
-- Using CATKIN_ENABLE_TESTING: ON
-- Call enable_testing()
-- Using CATKIN_TEST_RESULTS_DIR: /home/jym/catkin_ws/build/test_results
-- Forcing gtest/gmock from source, though one was otherwise available.
-- Found gtest sources under '/usr/src/googletest': gtests will be built
-- Found gmock sources under '/usr/src/googletest': gmock will be built
-- Found PythonInterp: /usr/bin/python3 (found version "3.8.10")
-- Found Threads: TRUE
-- Using Python nosetests: /usr/bin/nosetests3
-- catkin 0.8.10
-- BUILD_SHARED_LIBS is on
-- BUILD_SHARED_LIBS is on
-- Configuring done
-- Generating done
-- Build files have been written to: /home/jym/catkin_ws/build
####
#### Running command: "make -j2 -l2" in "/home/jym/catkin_ws/build"
####
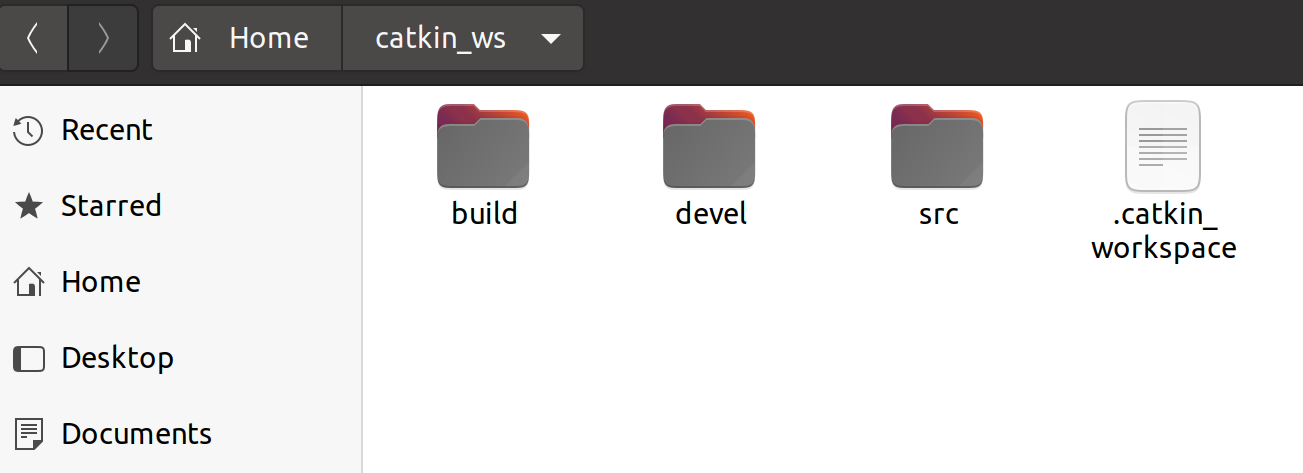
Ultimately in Home-catkin_ Found in ws:
Next, source takes a look at the newly generated setup.*sh file:
$ source devel/setup.bash
To ensure that the workspace is properly covered by the installation script, determine ROS_ PACKAGE_ The PATH environment variable contains the current workspace directory:
$ echo $ROS_PACKAGE_PATH
jym@ubuntu:~/catkin_ws$ source devel/setup.bash
jym@ubuntu:~/catkin_ws$ echo $ROS_PACKAGE_PATH
/home/jym/catkin_ws/src:/opt/ros/noetic/share
The structure of catkin package
To be called a catkin package, a package must meet the following requirements:
1. This package must have a catkin-compliant package.xml file
This package. The XML file provides meta-information about the package
2. This package must have a catkin version of MakeLists. Txt file
If it is a Catkin tuple, you need to have a CMakeList. Related templates for txt files
3. Each package must have its own directory
This means that no nested or multiple packages can exist in the same directory
my_package/
  CMakeLists.txt
  package.xml
Structure for storing software packages in the catkin workspace
workspace_folder/        -- WORKSPACE
  src/                   -- SOURCE SPACE
    CMakeLists.txt       -- 'Toplevel' CMake file, provided by catkin
    package_1/
      CMakeLists.txt     -- CMakeLists.txt file for package_1
      package.xml        -- Package manifest for package_1
    ...
    package_n/
      CMakeLists.txt     -- CMakeLists.txt file for package_n
      package.xml        -- Package manifest for package_n
Create catkin package-catkin_create_pkg
1. Switch to the source file space directory in the empty catkin workspace you just created
$ cd ~/catkin_ws/src
2. Use catkin_ Create_ The PKG command creates one named beginner_ New package for tutorials, which relies on std_msgs, roscpp, and rospy
$ catkin_create_pkg beginner_tutorials std_msgs rospy roscpp
Terminal:
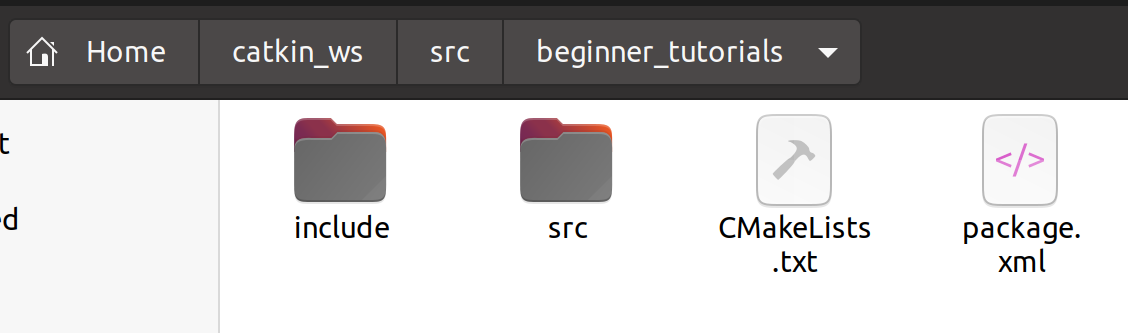
jym@ubuntu:~/catkin_ws$ cd ~/catkin_ws/src
jym@ubuntu:~/catkin_ws/src$ catkin_create_pkg beginner_tutorials std_msgs rospy roscpp
Created file beginner_tutorials/package.xml
Created file beginner_tutorials/CMakeLists.txt
Created folder beginner_tutorials/include/beginner_tutorials
Created folder beginner_tutorials/src
Successfully created files in /home/jym/catkin_ws/src/beginner_tutorials. Please adjust the values in package.xml.
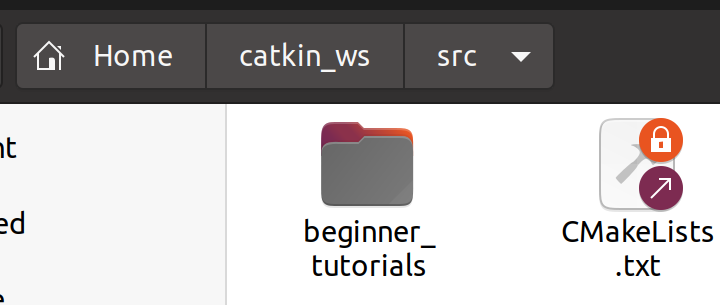
You can see the corresponding folder:
Build a catkin workspace and validate the configuration file
Creating and building a catkin workspace has already been described above, and the main purpose there is to create a blank catkin workspace.
The main purpose here is to build a catkin workspace.
1. Build packages in the catkin workspace
$ cd ~/catkin_ws
$ catkin_make
2. After the workspace is built, to add this workspace to the ROS environment, you need to source the generated configuration file
$ . ~/catkin_ws/devel/setup.bash
jym@ubuntu:~/catkin_ws/src$ cd ~/catkin_ws
jym@ubuntu:~/catkin_ws$ catkin_make
Base path: /home/jym/catkin_ws
Source space: /home/jym/catkin_ws/src
Build space: /home/jym/catkin_ws/build
Devel space: /home/jym/catkin_ws/devel
Install space: /home/jym/catkin_ws/install
####
#### Running command: "cmake /home/jym/catkin_ws/src -DCATKIN_DEVEL_PREFIX=/home/jym/catkin_ws/devel -DCMAKE_INSTALL_PREFIX=/home/jym/catkin_ws/install -G Unix Makefiles" in "/home/jym/catkin_ws/build"
####
-- Using CATKIN_DEVEL_PREFIX: /home/jym/catkin_ws/devel
-- Using CMAKE_PREFIX_PATH: /home/jym/catkin_ws/devel;/opt/ros/noetic
-- This workspace overlays: /home/jym/catkin_ws/devel;/opt/ros/noetic
-- Found PythonInterp: /usr/bin/python3 (found suitable version "3.8.10", minimum required is "3")
-- Using PYTHON_EXECUTABLE: /usr/bin/python3
-- Using Debian Python package layout
-- Using empy: /usr/lib/python3/dist-packages/em.py
-- Using CATKIN_ENABLE_TESTING: ON
-- Call enable_testing()
-- Using CATKIN_TEST_RESULTS_DIR: /home/jym/catkin_ws/build/test_results
-- Forcing gtest/gmock from source, though one was otherwise available.
-- Found gtest sources under '/usr/src/googletest': gtests will be built
-- Found gmock sources under '/usr/src/googletest': gmock will be built
-- Found PythonInterp: /usr/bin/python3 (found version "3.8.10")
-- Using Python nosetests: /usr/bin/nosetests3
-- catkin 0.8.10
-- BUILD_SHARED_LIBS is on
-- BUILD_SHARED_LIBS is on
-- ~~~~~~~~~~~~~~~~~~~~~~~~~~~~~~~~~~~~~~~~~~~~~~~~~
-- ~~  traversing 1 packages in topological order:
-- ~~  - beginner_tutorials
-- ~~~~~~~~~~~~~~~~~~~~~~~~~~~~~~~~~~~~~~~~~~~~~~~~~
-- +++ processing catkin package: 'beginner_tutorials'
-- ==> add_subdirectory(beginner_tutorials)
-- Configuring done
-- Generating done
-- Build files have been written to: /home/jym/catkin_ws/build
####
#### Running command: "make -j2 -l2" in "/home/jym/catkin_ws/build"
####
jym@ubuntu:~/catkin_ws$ . ~/catkin_ws/devel/setup.bash
package.xml file content
Description tag: Content is descriptive information.
<description>The beginner_tutorials package</description>
Maintainer tag: It enables others to contact the person who is responsible for the package.
  <!-- One maintainer tag required, multiple allowed, one person per tag -->
  <!-- Example:  -->
  <!-- <maintainer email="jane.doe@example.com">Jane Doe</maintainer> -->
  <maintainer email="jym@todo.todo">jym</maintainer>
License Label: Some common open source license agreements are BSD, MIT, Boost Software License, GPLv2, GPLv3, LGPLv2.1 and LGPLv3
  <!-- One license tag required, multiple allowed, one license per tag -->
  <!-- Commonly used license strings: -->
  <!--   BSD, MIT, Boost Software License, GPLv2, GPLv3, LGPLv2.1, LGPLv3 -->
  <license>TODO</license>
Dependency Label: Labels describe the dependencies of a package, which are divided into build_depend, buildtool_depend, run_depend, test_depend.
<?xml version="1.0"?>
<package format="2">
  <name>beginner_tutorials</name>
  <version>0.0.0</version>
  <description>The beginner_tutorials package</description>

  <!-- One maintainer tag required, multiple allowed, one person per tag -->
  <!-- Example:  -->
  <!-- <maintainer email="jane.doe@example.com">Jane Doe</maintainer> -->
  <maintainer email="jym@todo.todo">jym</maintainer>


  <!-- One license tag required, multiple allowed, one license per tag -->
  <!-- Commonly used license strings: -->
  <!--   BSD, MIT, Boost Software License, GPLv2, GPLv3, LGPLv2.1, LGPLv3 -->
  <license>TODO</license>


  <!-- Url tags are optional, but multiple are allowed, one per tag -->
  <!-- Optional attribute type can be: website, bugtracker, or repository -->
  <!-- Example: -->
  <!-- <url type="website">http://wiki.ros.org/beginner_tutorials</url> -->


  <!-- Author tags are optional, multiple are allowed, one per tag -->
  <!-- Authors do not have to be maintainers, but could be -->
  <!-- Example: -->
  <!-- <author email="jane.doe@example.com">Jane Doe</author> -->


  <!-- The *depend tags are used to specify dependencies -->
  <!-- Dependencies can be catkin packages or system dependencies -->
  <!-- Examples: -->
  <!-- Use depend as a shortcut for packages that are both build and exec dependencies -->
  <!--   <depend>roscpp</depend> -->
  <!--   Note that this is equivalent to the following: -->
  <!--   <build_depend>roscpp</build_depend> -->
  <!--   <exec_depend>roscpp</exec_depend> -->
  <!-- Use build_depend for packages you need at compile time: -->
  <!--   <build_depend>message_generation</build_depend> -->
  <!-- Use build_export_depend for packages you need in order to build against this package: -->
  <!--   <build_export_depend>message_generation</build_export_depend> -->
  <!-- Use buildtool_depend for build tool packages: -->
  <!--   <buildtool_depend>catkin</buildtool_depend> -->
  <!-- Use exec_depend for packages you need at runtime: -->
  <!--   <exec_depend>message_runtime</exec_depend> -->
  <!-- Use test_depend for packages you need only for testing: -->
  <!--   <test_depend>gtest</test_depend> -->
  <!-- Use doc_depend for packages you need only for building documentation: -->
  <!--   <doc_depend>doxygen</doc_depend> -->
  <buildtool_depend>catkin</buildtool_depend>
  <build_depend>roscpp</build_depend>
  <build_depend>rospy</build_depend>
  <build_depend>std_msgs</build_depend>
  <build_export_depend>roscpp</build_export_depend>
  <build_export_depend>rospy</build_export_depend>
  <build_export_depend>std_msgs</build_export_depend>
  <exec_depend>roscpp</exec_depend>
  <exec_depend>rospy</exec_depend>
  <exec_depend>std_msgs</exec_depend>


  <!-- The export tag contains other, unspecified, tags -->
  <export>
    <!-- Other tools can request additional information be placed here -->

  </export>
</package>
The package can be modified to suit your specific situation. XML
<?xml version="1.0"?>
<package format="2">
  <name>beginner_tutorials</name>
  <version>0.1.0</version>
  <description>The beginner_tutorials package</description>
  <maintainer email="jym@todo.todo">jym</maintainer>
  <license>BSD</license>
  <buildtool_depend>catkin</buildtool_depend>
  <build_depend>roscpp</build_depend>
  <build_depend>rospy</build_depend>
  <build_depend>std_msgs</build_depend>
  <build_export_depend>roscpp</build_export_depend>
  <build_export_depend>rospy</build_export_depend>
  <build_export_depend>std_msgs</build_export_depend>
  <exec_depend>roscpp</exec_depend>
  <exec_depend>rospy</exec_depend>
  <exec_depend>std_msgs</exec_depend>
  <!-- The export tag contains other, unspecified, tags -->
  <export>
    <!-- Other tools can request additional information be placed here -->
  </export>
</package>
Some basic concepts of ROS
Computation Graph is a point-to-point network of ROS processes that work together to process data.
The basic computing graph concepts of ROS are Nodes, Master, Parameter Server, Messages, Services, Topics, and Bags, which all provide data in different ways to Graph.
Nodes: A node is an executable file that can communicate with other nodes through ROS.
Messages: The ROS data type used when subscribing to or publishing a topic.
Topics: Nodes can post messages to topics or receive messages by subscribing to topics.
Master: A named service for ROS, such as helping nodes discover each other.
rosout: equivalent to stdout/stderr (standard output/standard error) in ROS.
roscore: primary node + rosout + parameter server.
Node:
A node is actually just an executable in a ROS package. ROS nodes use the ROS client library to communicate with other nodes. Nodes can publish or subscribe to topics, or provide or use services.
When the robot and remote control start working, they are two nodes. The robot is a node, and the remote control is also a node.
The remote control plays the role of issuing instructions; The robot is responsible for monitoring the instructions from the remote control and completing the corresponding actions.
Node is a unit of work that can perform specific tasks, and can communicate with each other to achieve the overall function of a robot system.
Client libraries:
ROS client libraries allow nodes written in different programming languages to communicate with each other:
- rospy = Python Client Library
- roscpp = C++ Client Library
roscore:
ROS core = ros+core: primary node (naming service for ROS) + rosout (stdout/stderr) + parameter server
roscore is the command that you first run before running all ROS programs.
rosnode: ROS tool for getting node information
Open a new terminal and use rosnode to see what the roscore is doing when it runs.
To keep the previous terminal open.
Rosnode displays information about the currently running ROS node. The rosnode list command lists the active nodes.
jym@ubuntu:~$ roscore
... logging to /home/jym/.ros/log/13b5ebe2-3581-11ec-8099-99fb076f9407/roslaunch-ubuntu-4683.log
Checking log directory for disk usage. This may take a while.
Press Ctrl-C to interrupt
Done checking log file disk usage. Usage is <1GB.

started roslaunch server http://ubuntu:41325/
ros_comm version 1.15.13


SUMMARY
========

PARAMETERS
 * /rosdistro: noetic
 * /rosversion: 1.15.13

NODES

auto-starting new master
process[master]: started with pid [4694]
ROS_MASTER_URI=http://ubuntu:11311/

setting /run_id to 13b5ebe2-3581-11ec-8099-99fb076f9407
process[rosout-1]: started with pid [4710]
started core service [/rosout]
jym@ubuntu:~$ rosnode list
/rosout
rosout This node collects and records debug output from the node, so it is always running.
The rosnode info command returns information about a specified node.
You can take a closer look at the rosout information, for example, it actually published a / rosout_agg topic.
jym@ubuntu:~$ rosnode info /rosout
--------------------------------------------------------------------------------
Node [/rosout]
Publications:
 * /rosout_agg [rosgraph_msgs/Log]

Subscriptions:
 * /rosout [unknown type]

Services:
 * /rosout/get_loggers
 * /rosout/set_logger_level


contacting node http://ubuntu:45389/ ...
Pid: 4710
rosrun: Run the node in the given package
rosrun can run the nodes in the package directly with the package name.
Open a new terminal and run turtlesim_in the turtlesim package Node.
rosrun turtlesim turtlesim_node
You will see the turtlesim window.
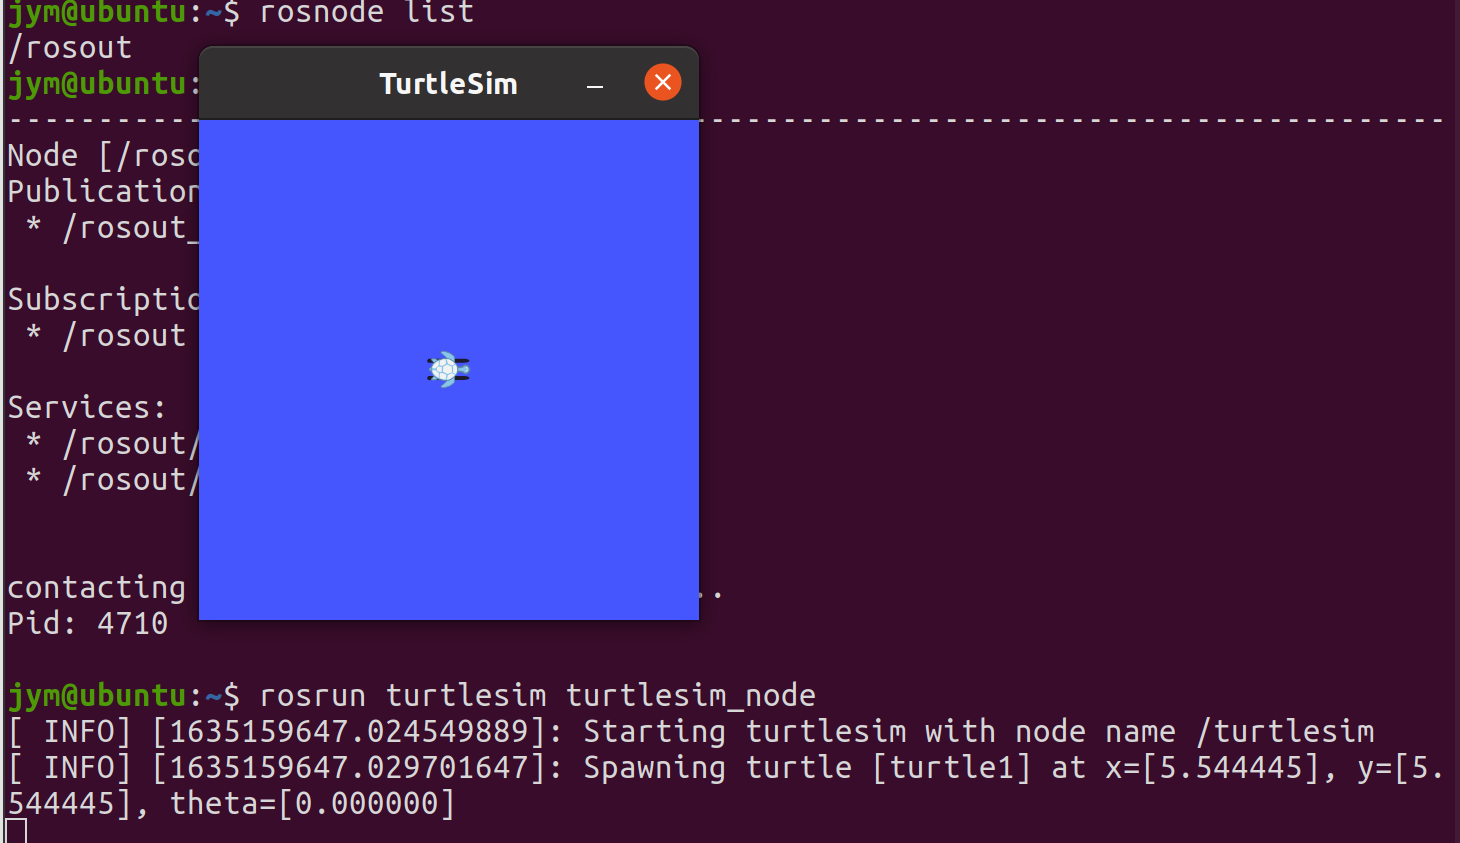
Open a new terminal, enter the rosnode list, and you will see the following output information:
jym@ubuntu:~$ rosnode list
/rosout
/turtlesim
Stop Node: Close the turtlesim window to stop the node (or go back to the rosrun turtlesim terminal and press Ctrl+C).
Change the node name: Use the remap parameter to change the node name:
$ rosrun turtlesim turtlesim_node __name:=my_turtle
Test whether the node is functioning properly: ping to test if it is functioning properly.
rosnode ping my_turtle
jym@ubuntu:~$ rosnode ping my_turtle
rosnode: node is [/my_turtle]
pinging /my_turtle with a timeout of 3.0s
xmlrpc reply from http://ubuntu:45307/	time=0.414848ms
xmlrpc reply from http://ubuntu:45307/	time=1.438141ms
xmlrpc reply from http://ubuntu:45307/	time=1.352310ms
xmlrpc reply from http://ubuntu:45307/	time=0.378132ms
xmlrpc reply from http://ubuntu:45307/	time=0.369549ms
xmlrpc reply from http://ubuntu:45307/	time=0.383854ms
xmlrpc reply from http://ubuntu:45307/	time=0.408173ms
^Cping average: 0.677858ms
ROS Topic: Nodes communicate with each other through a ROS Topic
Three terminal inputs:
$ roscore
$ rosrun turtlesim turtlesim_node
$ rosrun turtlesim turtle_teleop_key
Check turtle_ Teleop_ The terminal window of the key to ensure that the key input can be captured.
You can use the arrow keys on your keyboard to control the turtle movement.
turtlesim_node node and turtle_teleop_key nodes communicate with each other through an ROS topic.
turtle_teleop_key posts keyboard-pressed messages on a topic, and turtlesim subscribes to the topic to receive messages.
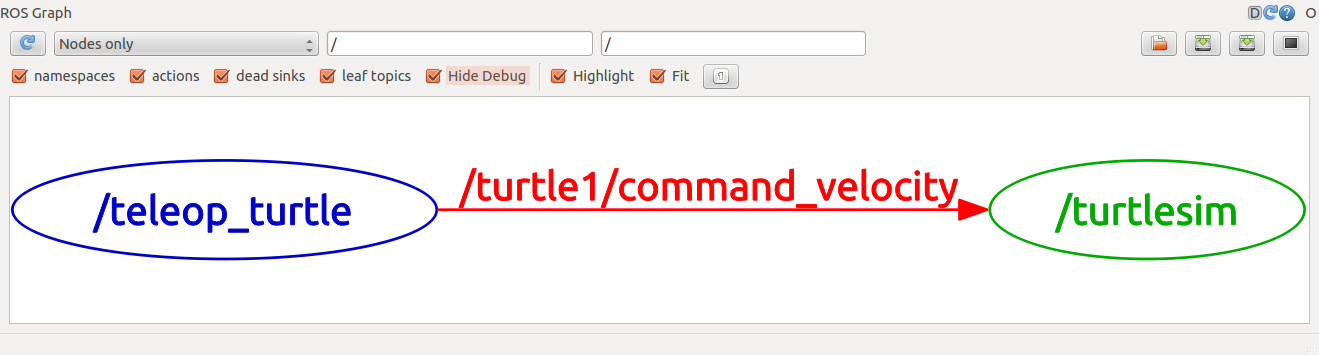
rqt_graph: Displays currently running nodes and topics
Use rqt_graph to display currently running nodes and topics.
Open a new terminal:
$ rosrun rqt_graph rqt_graph
You will see a window:
If you hover over/turtle1/command_ Above velocity, the corresponding ROS nodes (blue and green here) and topics (red here) are highlighted. As you can see, turtlesim_node and turtle_ Teleop_ The key node is passing through a named/turtle1/command_velocity's topics communicate with each other.
rostopic: Get information about ROS topics
The rostopic command tool allows you to get information about ROS topics.
Use help options to view available rostopic subcommands
rostopic -h
jym@ubuntu:~$ rostopic -h
rostopic is a command-line tool for printing information about ROS Topics.

Commands:
	rostopic bw	display bandwidth used by topic
	rostopic delay	display delay of topic from timestamp in header
	rostopic echo	print messages to screen
	rostopic find	find topics by type
	rostopic hz	display publishing rate of topic
	rostopic info	print information about active topic
	rostopic list	list active topics
	rostopic pub	publish data to topic
	rostopic type	print topic or field type

Type rostopic <command> -h for more detailed usage, e.g. 'rostopic echo -h'
Next, you'll use some of these subcommands to learn about turtlesim
rostopic echo: Displays data published on a topic
rostopic echo can display data published on a topic.
Open a new terminal input:
rostopic echo /turtle1/cmd_vel
Turtle_can be made by pressing the keyboard arrow key Teleop_ The key node publishes data.
You can then see when you press the up key:
jym@ubuntu:~$ rostopic echo /turtle1/cmd_vel
linear:
  x: 2.0
  y: 0.0
  z: 0.0
angular:
  x: 0.0
  y: 0.0
  z: 0.0
---
linear:
  x: 2.0
  y: 0.0
  z: 0.0
angular:
  x: 0.0
  y: 0.0
  z: 0.0
---
Now take a look at rqt_graph:
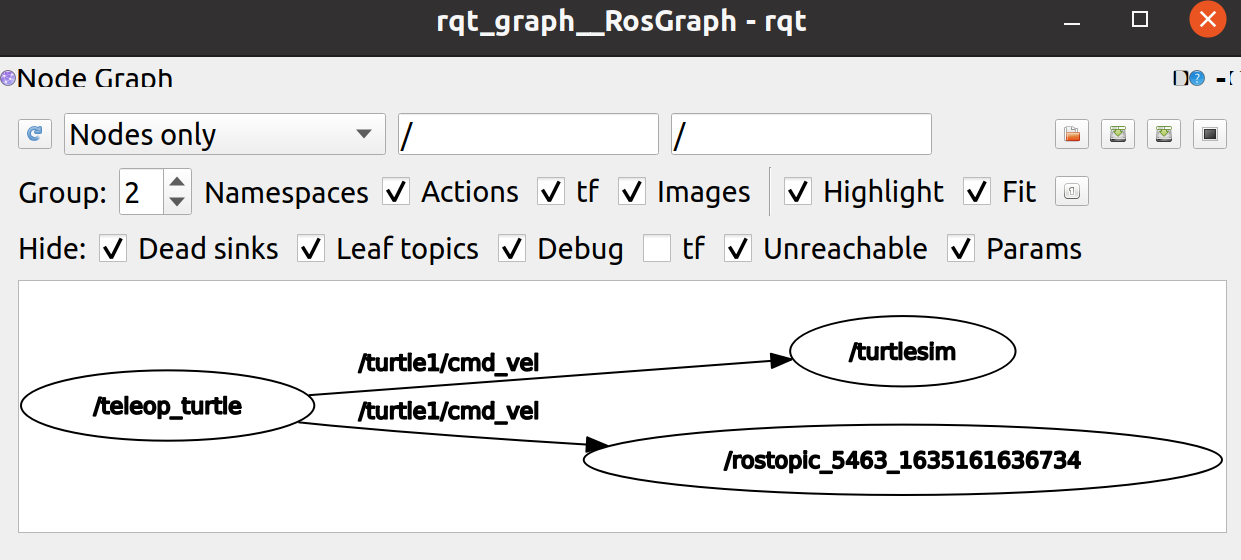
rostopic echo is now subscribed to turtle1/command_velocity topic.
rostopic list: Lists all topics that are currently subscribed to and published.
The rostopic list lists all topics that are currently subscribed to and published.
Open a new terminal: check the parameters required for the list subcommand
rostopic list -h
jym@ubuntu:~$ rostopic list -h
Usage: rostopic list [/namespace]

Options:
  -h, --help            show this help message and exit
  -b BAGFILE, --bag=BAGFILE
                        list topics in .bag file
  -v, --verbose         list full details about each topic
  -p                    list only publishers
  -s                    list only subscribers
  --host                group by host name
Use the verbose option in the rostopic list:
$ rostopic list -v
Details of all published and subscribed topics and their types are listed.
jym@ubuntu:~$ rostopic list -v

Published topics:
 * /rosout_agg [rosgraph_msgs/Log] 1 publisher
 * /rosout [rosgraph_msgs/Log] 4 publishers
 * /turtle1/pose [turtlesim/Pose] 1 publisher
 * /turtle1/color_sensor [turtlesim/Color] 1 publisher
 * /turtle1/cmd_vel [geometry_msgs/Twist] 1 publisher

Subscribed topics:
 * /rosout [rosgraph_msgs/Log] 1 subscriber
 * /turtle1/cmd_vel [geometry_msgs/Twist] 2 subscribers
 * /statistics [rosgraph_msgs/TopicStatistics] 1 subscriber
ROS message: The topic communicates by sending ROS messages between nodes
Topic communication is achieved by sending ROS messages between nodes. In order for the publisher (turtle_teleop_key) to communicate with the subscriber (turtulesim_node), the publisher and subscriber must send and receive the same type of message. This means that the type of topic is determined by the type of message published on it. Use the rostopic type command to see the type of message published on the topic.
rostopic type: View the message type of the published topic
The rostopic type command is used to view the message type of a published topic.
Function:
$ rostopic type /turtle1/cmd_vel
You can use rosmsg to view message details
$ rosmsg show geometry_msgs/Twist
jym@ubuntu:~$ rostopic type /turtle1/cmd_vel
geometry_msgs/Twist
jym@ubuntu:~$ rosmsg show geometry_msgs/Twist
geometry_msgs/Vector3 linear
  float64 x
  float64 y
  float64 z
geometry_msgs/Vector3 angular
  float64 x
  float64 y
  float64 z
Now that you know the type of message the turtlesim node wants, you can issue a command to the turtlesim.
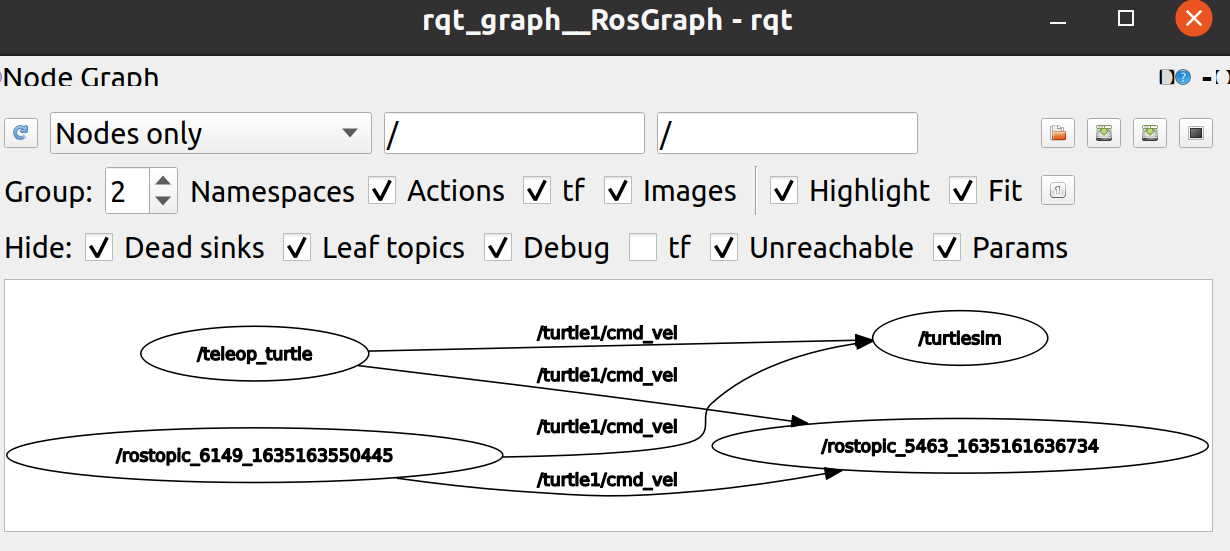
rostopic pub: Publish data on a topic that is currently being broadcast
rostopic pub can publish data to a topic that is currently being broadcast.
$ rostopic pub -1 /turtle1/cmd_vel geometry_msgs/Twist -- '[2.0, 0.0, 0.0]' '[0.0, 0.0, 1.8]'
The above command sends a message to turtlesim telling it to move at a linear speed of 2.0 and an angular speed of 1.8.
jym@ubuntu:~$ rostopic pub -1 /turtle1/cmd_vel geometry_msgs/Twist -- '[2.0, 0.0, 0.0]' '[0.0, 0.0, 1.8]'
publishing and latching message for 3.0 seconds
- The rostopic pub command publishes the message to the specified topic
- -1 This option causes rostopic to post only one message and exit
- /turtle1/cmd_ Velis the name of the topic to be published to
- geometry_msgs/Twist is the type of message to use when publishing to a topic
- - This option (two dashes) tells the option parser that none of the following parameters are options. This is required if the parameter is preceded by a dash (-) such as a negative number.
- As mentioned earlier, a turtlesim/Velocity message has two floating-point elements: linear and angular. In this example,'[2.0, 0.0, 0.0]'means that the value of linear is x=2.0, y=0.0, z=0.0, while'[0.0, 0.0, 1.8]' means that angular value is x=0.0, y=0.0, z=1.8
After the command was issued, the turtle moved a little and stopped. This is because turtles require a steady 1 Hz instruction stream to keep moving. We can use the rostopic pub-r command to issue a constant stream of commands:
$ rostopic pub /turtle1/cmd_vel geometry_msgs/Twist -r 1 -- '[2.0, 0.0, 0.0]' '[0.0, 0.0, -1.8]'
The velocity instructions will be issued to the velocity topic at 1 Hz.
rqt_graph. You can see that the rostopic pub node is communicating with the rostopic echo node:
View data published by turtlesim in the new terminal using the rostopic echo command: rostopic echo/turtle1/pose
---
linear:
  x: 2.0
  y: 0.0
  z: 0.0
angular:
  x: 0.0
  y: 0.0
  z: -1.8
---
linear:
  x: 2.0
  y: 0.0
  z: 0.0
angular:
  x: 0.0
  y: 0.0
  z: -1.8
---
rostopic hz: rate of report data publishing
rostopic hz reports the rate at which data is published.
Take a look at turtlesim_ How fast does node publish/turtle/pose:
$ rostopic hz /turtle1/pose
jym@ubuntu:~$ rostopic hz /turtle1/pose
subscribed to [/turtle1/pose]
average rate: 62.521
	min: 0.014s max: 0.018s std dev: 0.00067s window: 63
average rate: 62.479
	min: 0.014s max: 0.018s std dev: 0.00056s window: 125
average rate: 62.486
	min: 0.014s max: 0.018s std dev: 0.00057s window: 188
turtlesim is publishing tortoise data at a frequency of approximately 60Hz.
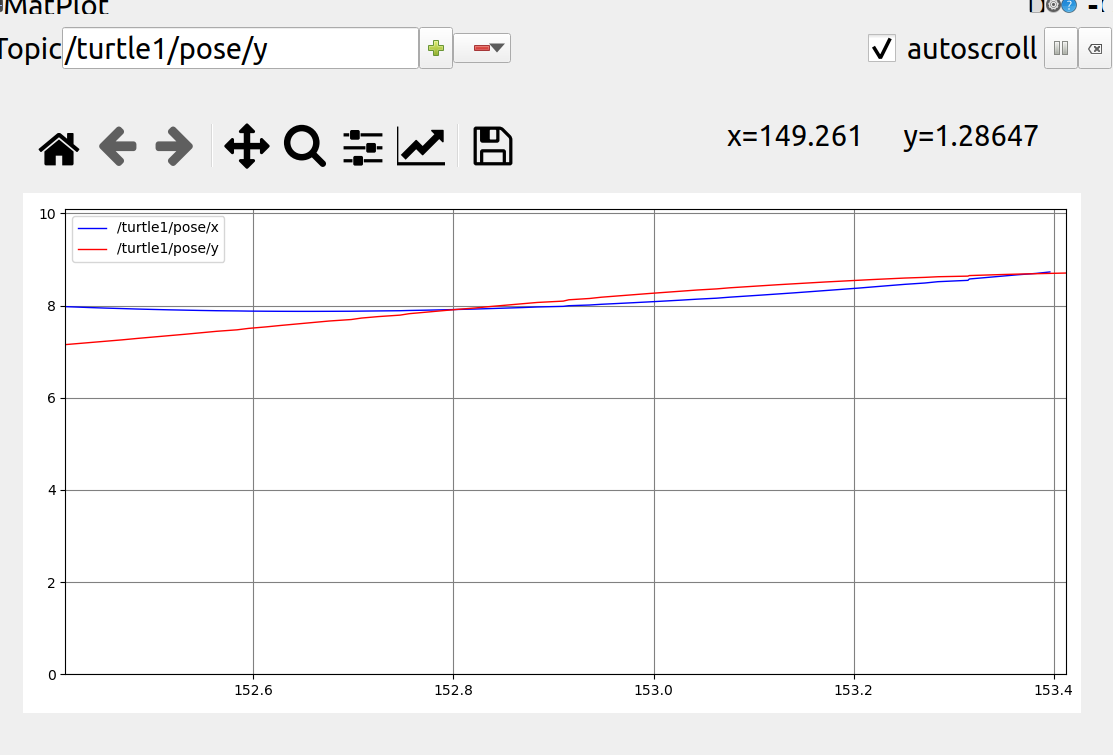
rqt_plot: Display data published on a topic on a scrolling time map
Rqt_ The plot command displays data published on a topic on a scrolling time map. Here we will use rqt_plot command to draw the data being published to / turtle1/pose topic.
New terminal input rosrun rqt_plot rqt_plot
You can add any topic you want to draw to the text box in the upper left corner. After entering/turtle1/pose/x inside, the plus button that you cannot press before will light up. Press the button once and repeat the same process for/turtle1/pose/y. Now you can see the x-y position of the turtle in the diagram.
ROS services: another way of communicating between nodes
Services are another way of communicating between nodes. The service allows a node to send a request and get a response.
rosservice: There are many commands available for services
rosservice can be easily attached to the ROS client/server framework through services. rosservice has many commands that can be used for services, as follows:
rosservice list         Output information for active services
rosservice call         Call service with given parameters
rosservice type         Type of output service
rosservice find         Find services by type of service
rosservice uri          Output Service ROSRPC uri
rosservice list: Displays the services provided by the node
jym@ubuntu:~$ rosservice list
/clear
/kill
/reset
/rosout/get_loggers
/rosout/set_logger_level
/spawn
/teleop_turtle/get_loggers
/teleop_turtle/set_logger_level
/turtle1/set_pen
/turtle1/teleport_absolute
/turtle1/teleport_relative
/turtlesim/get_loggers
/turtlesim/set_logger_level
rosservice type: view the type of service
Use the rosservice type command to further view the clear service:
jym@ubuntu:~$ rosservice type /clear
std_srvs/Empty
The type of service is empty, which indicates that no parameters are required to invoke the service (that is, it does not send data when making a request or receive data when receiving a response).
See the services available:
$ rosservice type /spawn | rossrv show
jym@ubuntu:~$ rosservice type /spawn | rossrv show
float32 x
float32 y
float32 theta
string name
---
string name
This service allows us to generate a new tortoise at a given position and angle. The name field is optional.
rosservice call: invoke service
Invoke parameterless service:
$ rosservice call /clear
Cleared turtlesim_ The track on the node background.
Invoke the participating service:
jym@ubuntu:~$ rosservice call /spawn 2 2 2 ""
name: "turtle2"
The call returns the name of the newly generated tortoise. Then a new tortoise appeared inside turtlesim.
rosparam: Store and manipulate data on the ROS parameter server
rosparam can store and manipulate data on the ROS Parameter Server. Parameter servers can store data types such as integer s, float s, boolean s, dictionaries, and list s.
rosparam uses the syntax of the YAML markup language. Generally speaking, YAML is expressed naturally: 1 is integer, 1.0 is floating point, one is string, true is Boolean, [1, 2, 3] is a list of integers, {a: b, c: d} is a dictionary.
rosparam has a number of commands that can be used to manipulate parameters, as follows:
rosparam set            Setting parameters
rosparam get            Get parameters
rosparam load           Load parameters from a file
rosparam dump           Dump parameters to file
rosparam delete         Delete parameters
rosparam list           List parameter names
rosparam list: See what parameters are on the parameter server
jym@ubuntu:~$ rosparam list
/rosdistro
/roslaunch/uris/host_ubuntu__36577
/rosversion
/run_id
/turtlesim/background_b
/turtlesim/background_g
/turtlesim/background_r
rosparam set: Change the value of the parameter on the parameter server
Modify the red channel value of the background color:
$ rosparam set /turtlesim/background_r 150
The above instructions modify the value of the parameter, and now we need to call the clear service to make the parameter modification work:
$ rosservice call /clear
rosparam get: View the value of the parameter on the parameter server
View the values of other parameters on the parameter server. Get the value of the green channel for the background:
$ rosparam get /turtlesim/background_g
You can also use rosparam get /to display everything on the parameter server:
$ rosparam get /
jym@ubuntu:~$ rosparam get /
rosdistro: 'noetic

  '
roslaunch:
  uris:
    host_ubuntu__36577: http://ubuntu:36577/
rosversion: '1.15.13

  '
run_id: 7f07518e-3585-11ec-8099-99fb076f9407
turtlesim:
  background_b: 255
  background_g: 86
  background_r: 150
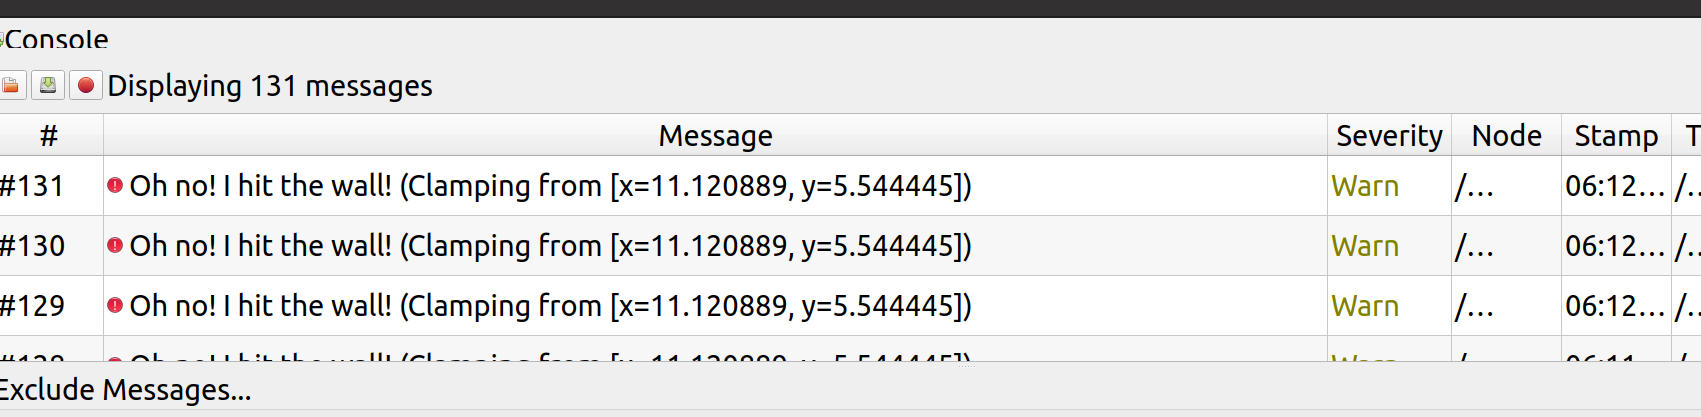
rqt_console: A log framework that connects ROS and displays output information from nodes
rqt_console is connected to the ROS logging framework to display the output information of the node.
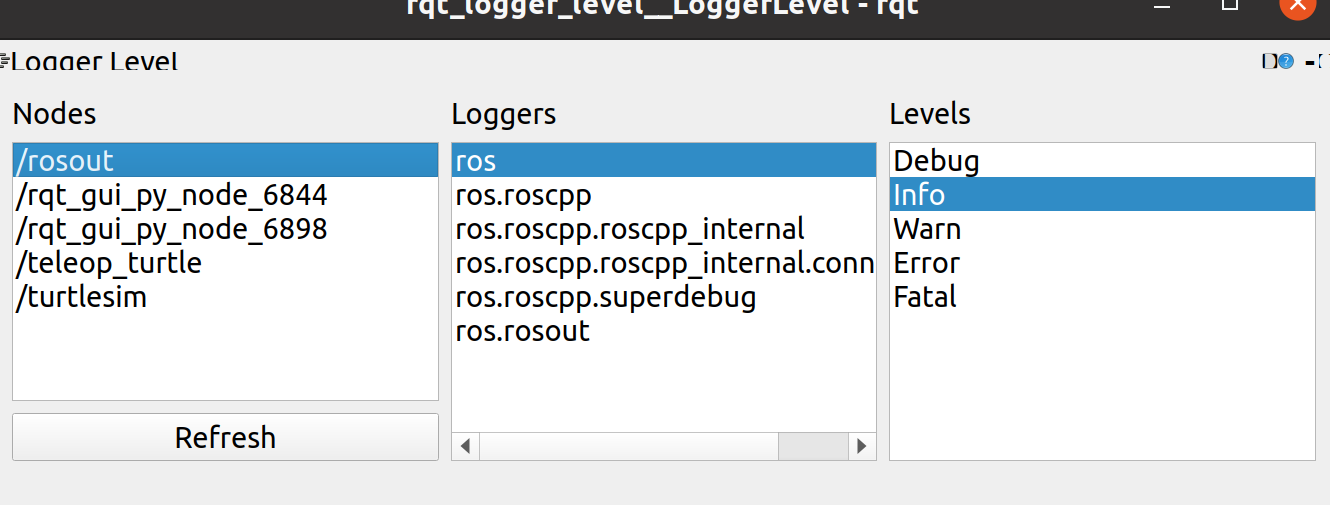
rqt_logger_level: Change the level of detail of the output information when the node is running
rqt_logger_level allows us to change the level of detail of output information when a node is running, including Debug, Info, Warn, and Error`.
Next, take a look at turtlesim at rqt_ Output information in console and switch rqt_when using turtlesim Logger_ Log level in level.
Run rqt_in two new terminals before starting turtlesim Console and rqt_logger_level:
$ rosrun rqt_console rqt_console
$ rosrun rqt_logger_level rqt_logger_level
Start turtlesim in another new terminal:
$ rosrun turtlesim turtlesim_node
Because the default log level is Info, you'll see all the information that turtlesim publishes when it starts.
Hit the tortoise against the wall, rqt_ The console displays:
Log level priorities are in the following order:
Fatal (Fatal)
Error (Error)
Warn  (Warning)
Info  (Information)
Debug (Debugging)
Fatal is the highest priority and Debug is the lowest. By setting the log level, you can get all the priority levels, or just higher-level messages. For example, when you set the log level to Warn, you get three levels of log messages: Warn, Error, and Fatal.
roslaunch: Start a node defined in the launch file
roslaunch can be used to start nodes defined in the launch file.
First, follow the steps after creating the catkin workspace to make the environment variable take effect
Then switch to beginner_created and built earlier Tutorials package directory
Then, create a launch directory
jym@ubuntu:~$ cd ~/catkin_ws
jym@ubuntu:~/catkin_ws$ source devel/setup.bash
jym@ubuntu:~/catkin_ws$ roscd beginner_tutorials
jym@ubuntu:~/catkin_ws/src/beginner_tutorials$ mkdir launch
jym@ubuntu:~/catkin_ws/src/beginner_tutorials$ cd launch
jym@ubuntu:~/catkin_ws/src/beginner_tutorials/launch$
Create a name called turtlemimic.launch file for launch
$ gedit turtlemimic.launch
Then paste it in
<launch>

  <group ns="turtlesim1">
    <node pkg="turtlesim" name="sim" type="turtlesim_node"/>
  </group>

  <group ns="turtlesim2">
    <node pkg="turtlesim" name="sim" type="turtlesim_node"/>
  </group>

  <node pkg="turtlesim" name="mimic" type="mimic">
    <remap from="input" to="turtlesim1/turtle1"/>
    <remap from="output" to="turtlesim2/turtle1"/>
  </node>

</launch>
Content of launch XML file
<launch>
Start with the launch tag to indicate that this is a launch file.
  <group ns="turtlesim1">
    <node pkg="turtlesim" name="sim" type="turtlesim_node"/>
  </group>

  <group ns="turtlesim2">
    <node pkg="turtlesim" name="sim" type="turtlesim_node"/>
  </group>
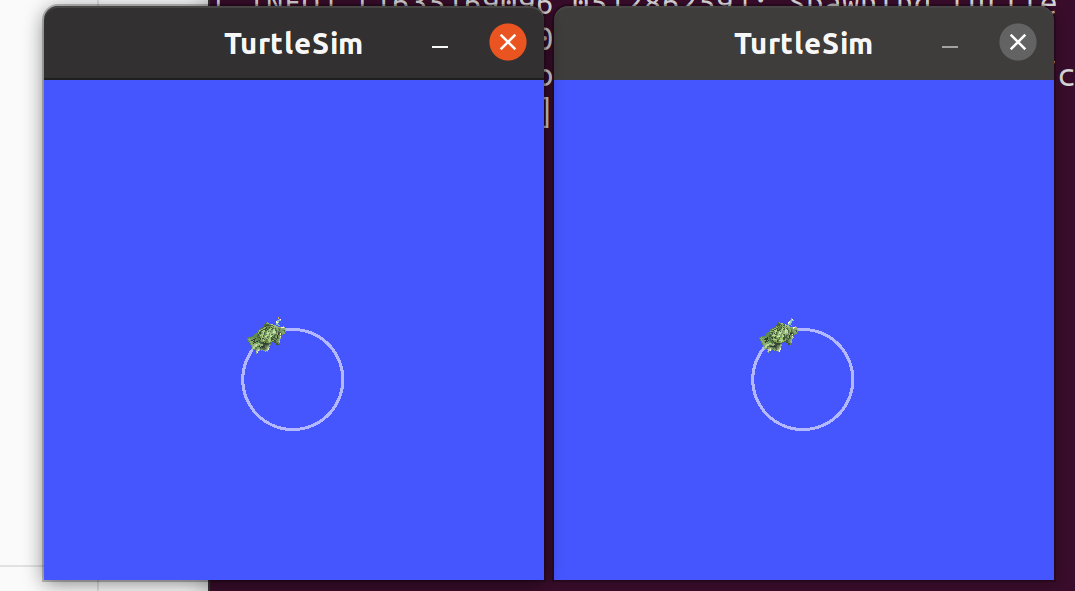
Here we create two groupings, distinguished by namespace tags, one named turtulesim1 and the other named turtlesim2, in which both groupings have the same turtlesim node named sim. This allows us to start two turtlesim simulators at the same time without naming conflicts.
  <node pkg="turtlesim" name="mimic" type="mimic">
    <remap from="input" to="turtlesim1/turtle1"/>
    <remap from="output" to="turtlesim2/turtle1"/>
  </node>
Here we start the simulation node, and the input and output of the topic are renamed turtlesim1 and turtlesim2, respectively, so that turtlesim2 can mimic turtlesim1.
</launch>
This line closes the XML tag of the launch file.
Using roslaunch: Run launch file
Run the launch file with the roslaunch command:
$ roslaunch beginner_tutorials turtlemimic.launch
Now there will be two turtlesim s started, and we will send them in a new terminal using the rostopic command:
$ rostopic pub /turtlesim1/turtle1/cmd_vel geometry_msgs/Twist -r 1 -- '[2.0, 0.0, 0.0]' '[0.0, 0.0, -1.8]'
The two turtlesims started moving at the same time, although the command issued was only sent to turtlesim1.
There are three terminals in the implementation process:
First: Enter roscore
jym@ubuntu:~$ roscore
... logging to /home/jym/.ros/log/bd42545e-3598-11ec-8099-99fb076f9407/roslaunch-ubuntu-10960.log
Checking log directory for disk usage. This may take a while.
Press Ctrl-C to interrupt
Done checking log file disk usage. Usage is <1GB.

started roslaunch server http://ubuntu:43275/
ros_comm version 1.15.13


SUMMARY
========

PARAMETERS
 * /rosdistro: noetic
 * /rosversion: 1.15.13

NODES

auto-starting new master
process[master]: started with pid [10968]
ROS_MASTER_URI=http://ubuntu:11311/
Second: Run the launch file
jym@ubuntu:~$ cd ~/catkin_ws
jym@ubuntu:~/catkin_ws$ source devel/setup.bash
jym@ubuntu:~/catkin_ws$ roscd beginner_tutorials
jym@ubuntu:~/catkin_ws/src/beginner_tutorials$ roslaunch beginner_tutorials turtlemimic.launch
... logging to /home/jym/.ros/log/bd42545e-3598-11ec-8099-99fb076f9407/roslaunch-ubuntu-11191.log
Checking log directory for disk usage. This may take a while.
Press Ctrl-C to interrupt
Done checking log file disk usage. Usage is <1GB.

started roslaunch server http://ubuntu:36829/

SUMMARY
========

PARAMETERS
 * /rosdistro: noetic
 * /rosversion: 1.15.13

NODES
  /
    mimic (turtlesim/mimic)
  /turtlesim1/
    sim (turtlesim/turtlesim_node)
  /turtlesim2/
    sim (turtlesim/turtlesim_node)

ROS_MASTER_URI=http://localhost:11311

process[turtlesim1/sim-1]: started with pid [11205]
process[turtlesim2/sim-2]: started with pid [11206]
process[mimic-3]: started with pid [11208]
Third Terminal: Send using the rostopic command
jym@ubuntu:~$ rostopic pub /turtlesim1/turtle1/cmd_vel geometry_msgs/Twist -r 1 -- '[2.0, 0.0, 0.0]' '[0.0, 0.0, -1.8]'