Let's talk about Spring Boot integration Freemarker today.
About Freemarker
This is a quite old and open source free template engine. With Freemarker template, we can render data into HTML web pages, e-mails, configuration files, source code, etc. Freemarker is not for end users, but a Java class library, which we can embed into our products as a common component.
Here's a picture from Freemarker's website:
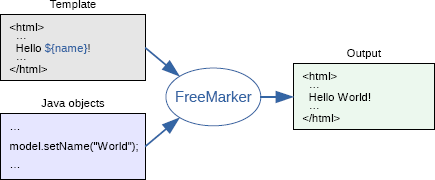
As you can see, Freemarker can render templates and data into HTML.
Freemarker template suffix is. ftl(FreeMarker Template Language). FTL is a simple, specialized language, it is not as mature as Java programming language. In the template, you can focus on how to present the data, and in addition to the template, you can focus on what data to present.
OK, this is a brief introduction. Let's take a look at the integration operation of Freemarker and Spring Boot.
practice
When integrating Freemarker in SSM, the total number of configuration files is about 50 lines. How many lines should be configured in Spring Boot? The 0 line!
1. Create project
First, create a Spring Boot project and introduce Freemarker dependency, as shown in the following figure:
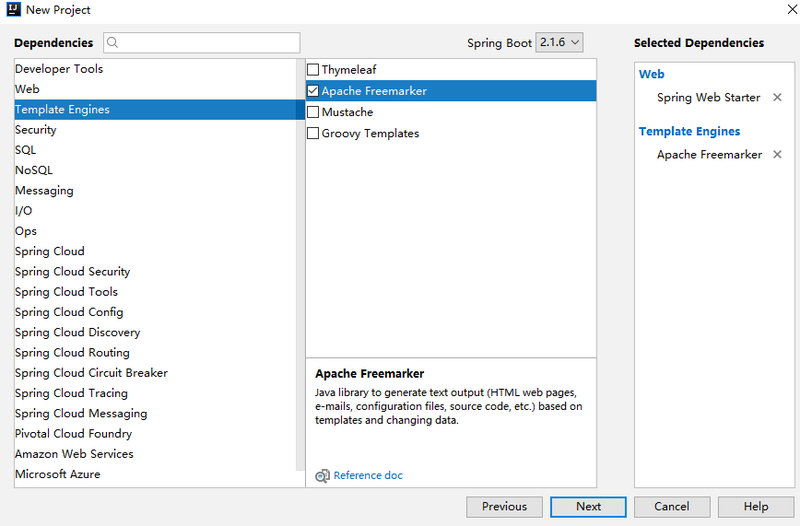
<dependency>
    <groupId>org.springframework.boot</groupId>
    <artifactId>spring-boot-starter-freemarker</artifactId>
</dependency>
<dependency>
    <groupId>org.springframework.boot</groupId>
    <artifactId>spring-boot-starter-web</artifactId>
</dependency>
After the project is created, you can see the automatic configuration of Freemarker in the org.springframework.boot.autoconfigure.freemarker.FreeMarkerAutoConfiguration class:
@Configuration
@ConditionalOnClass({ freemarker.template.Configuration.class, FreeMarkerConfigurationFactory.class })
@EnableConfigurationProperties(FreeMarkerProperties.class)
@Import({ FreeMarkerServletWebConfiguration.class, FreeMarkerReactiveWebConfiguration.class,
                FreeMarkerNonWebConfiguration.class })
public class FreeMarkerAutoConfiguration {
}
From here, we can see that the configuration will take effect when freemarker.template.Configuration and FreeMarkerConfigurationFactory exist in the classpath, that is to say, when Freemarker is introduced, the configuration will take effect. However, the automatic configuration here only checks the template location, and other configurations are completed in the imported Freemarker servlet web configuration. Then let's look at the FreeMarkerServletWebConfiguration class. Some of the source codes are as follows:
@Configuration
@ConditionalOnWebApplication(type = ConditionalOnWebApplication.Type.SERVLET)
@ConditionalOnClass({ Servlet.class, FreeMarkerConfigurer.class })
@AutoConfigureAfter(WebMvcAutoConfiguration.class)
class FreeMarkerServletWebConfiguration extends AbstractFreeMarkerConfiguration {
        protected FreeMarkerServletWebConfiguration(FreeMarkerProperties properties) {
                super(properties);
        }
        @Bean
        @ConditionalOnMissingBean(FreeMarkerConfig.class)
        public FreeMarkerConfigurer freeMarkerConfigurer() {
                FreeMarkerConfigurer configurer = new FreeMarkerConfigurer();
                applyProperties(configurer);
                return configurer;
        }
        @Bean
        @ConditionalOnMissingBean(name = "freeMarkerViewResolver")
        @ConditionalOnProperty(name = "spring.freemarker.enabled", matchIfMissing = true)
        public FreeMarkerViewResolver freeMarkerViewResolver() {
                FreeMarkerViewResolver resolver = new FreeMarkerViewResolver();
                getProperties().applyToMvcViewResolver(resolver);
                return resolver;
        }
}
Let's take a look at the source code:
- @ConditionalOnWebApplication indicates that the current configuration will not take effect in the web environment.
- ConditionalOnClass indicates that the current configuration will not take effect until the Servlet and FreeMarkerConfigurer are present.
- @AutoConfigureAfter indicates that the current automation configuration is completed after webmvcauautoconfiguration.
- In the code, FreeMarkerConfigurer and FreeMarkerViewResolver are mainly provided.
- FreeMarkerConfigurer is some basic configurations of Freemarker, such as templateLoaderPath, defaultEncoding, etc.
- FreeMarkerViewResolver is the basic configuration of view resolver, including viewClass, suffix, allowrequestroverride, allowSessionOverride and other attributes.
In addition, in the construction method of this class, FreeMarkerProperties is injected:
@ConfigurationProperties(prefix = "spring.freemarker")
public class FreeMarkerProperties extends AbstractTemplateViewResolverProperties {
        public static final String DEFAULT_TEMPLATE_LOADER_PATH = "classpath:/templates/";
        public static final String DEFAULT_PREFIX = "";
        public static final String DEFAULT_SUFFIX = ".ftl";
        /**
         * Well-known FreeMarker keys which are passed to FreeMarker's Configuration.
         */
        private Map<String, String> settings = new HashMap<>();
}
FreeMarkerProperties configures the basic information of Freemarker. For example, the template location is in classpath:/templates /, and the template suffix is. ftl. Then we can modify these configurations in application.properties later.
If we configure Freemarker in the XML file of SSM, we just configure these things. Now, these configurations are completed by FreeMarkerServletWebConfiguration.
2. create class
First, let's create a User class, as follows:
public class User {
    private Long id;
    private String username;
    private String address;
    //Omit getter/setter
}
To create a UserController:
@Controller
public class UserController {
    @GetMapping("/index")
    public String index(Model model) {
        List<User> users = new ArrayList<>();
        for (int i = 0; i < 10; i++) {
            User user = new User();
            user.setId((long) i);
            user.setUsername("javaboy>>>>" + i);
            user.setAddress("www.javaboy.org>>>>" + i);
            users.add(user);
        }
        model.addAttribute("users", users);
        return "index";
    }
}
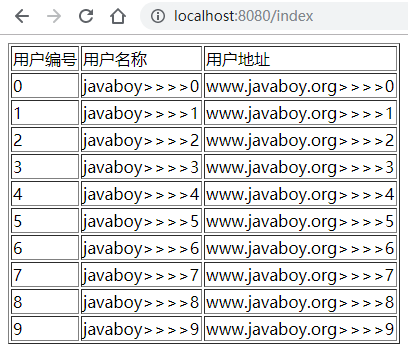
Finally, render the data in freemarker:
<!DOCTYPE html>
<html lang="en">
<head>
    <meta charset="UTF-8">
    <title>Title</title>
</head>
<body>
<table border="1">
    <tr>
        <td>User number</td>
        <td>User name</td>
        <td>User address</td>
    </tr>
    <#list users as user>
        <tr>
            <td>${user.id}</td>
            <td>${user.username}</td>
            <td>${user.address}</td>
        </tr>
    </#list>
</table>
</body>
</html>
The operation effect is as follows:
Other configurations
If we want to modify the template file location, we can configure it in application.properties.
spring.freemarker.allow-request-override=false
spring.freemarker.allow-session-override=false
spring.freemarker.cache=false
spring.freemarker.charset=UTF-8
spring.freemarker.check-template-location=true
spring.freemarker.content-type=text/html
spring.freemarker.expose-request-attributes=false
spring.freemarker.expose-session-attributes=false
spring.freemarker.suffix=.ftl
spring.freemarker.template-loader-path=classpath:/templates/
The configuration files are interpreted in order as follows:
- Whether the property of HttpServletRequest can override the item with the same name of the model in the controller
- Whether the property of HttpSession can override the item with the same name of the model in the controller
- Open cache or not
- Template file code
- Check template location
- Content type value
- Whether to add the properties in HttpServletRequest to the Model
- Whether to add the properties in HttpSession to the Model
- Template file suffix
- Template file location
Well, after the integration is completed, more uses of Freemarker will be the same as using Freemarker in SSM, and I will not repeat here.
epilogue
In this article, I'd like to talk with you about the Spring Boot integration of Freemarker, which is a supplement to the Spring Boot 2 tutorial (some will be added later). If you have any questions, please leave a message for discussion.
I have uploaded this project case to GitHub. Welcome to star: https://github.com/lenve/javaboy-code-samples
Pay attention to the public account [a little rain in the south of the Yangtze River], focus on Spring Boot + microservice, front and back end separation and other full stack technologies, share regular video tutorials, reply to Java after paying attention, and get the Java dry goods prepared by SongGe for you!