Overview and common data sets
0. General
- Have basic knowledge of classification network
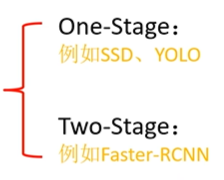
- Target detection is divided into two categories: one stage and two stage
1.Two-Stage: Faster R-CNN
1) generate candidate boxes (rpns) through special modules, find prospects and adjust bounding boxes (based on anchors)
2) further classify and adjust the bounding box based on the previously generated candidate box (based on proposals)
2.One-Stage: SSD,YOLO
Direct classification and adjustment of bounding box based on anchors
Comparison between one stage and two stage: the detection speed of one stage is faster and the detection accuracy of two stage is higher
1. API officially provided by TF
up video see https://www.bilibili.com/video/BV1KE411E7Ch?spm_id_from=333.999.0.0
2.PASCAL VOC2012 dataset
- Click * * Download the training/validation data (2GB tar file) * * Download
- There are mainly 20 categories, divided into 4 categories

- Dataset directory
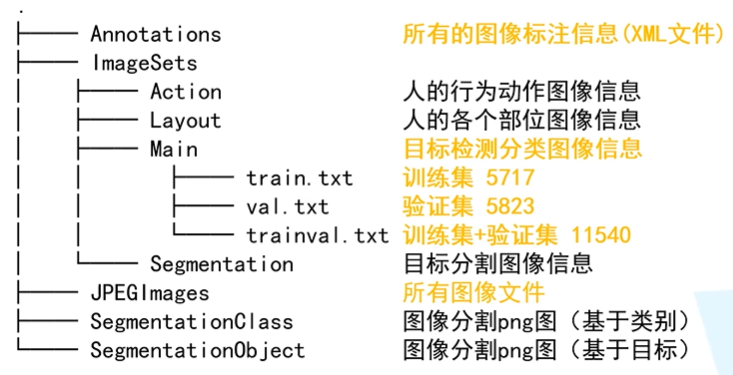
- usage method:
- Read train Txt file (picture name)
- Find the corresponding in the Annotations folder xml file
- Pass xml file can obtain picture information (width, height, target location, etc.)
- Find the corresponding image in the JPEGImages folder and load it into memory.
3. MS COCO data set and use

There are object80 class and stuff91 class in use. Object80 class is a subset of stuff91 class. Generally, only object80 class is needed for target detection. See the usage scenario for details.
Compared with Pascal, VOC pre training is better, but it takes more time.
Coco dataset official website: http://cocodataset.org/
Network disk address: link: https://pan.baidu.com/s/1_kQBJxB019cXpzfqNz7ANA Extraction code: m6s5

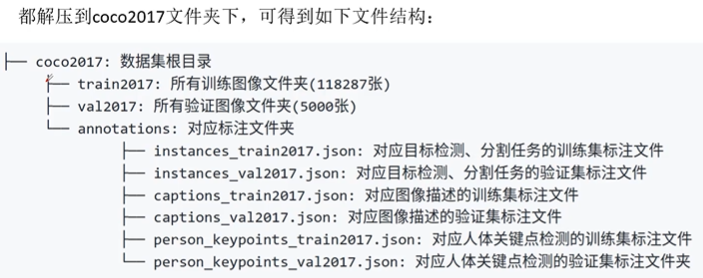
bilibili up explanation Video: https://www.bilibili.com/video/BV1TK4y1o78H?spm_id_from=333.999.0.0
Recommended blog links: https://blog.csdn.net/qq_37541097/article/details/112248194
github link: https://github.com/WZMIAOMIAO/deep-learning-for-image-processing
For more details, see the official website documents: http://cocodataset.org/#format-data
Ps: it is meaningless to divide the test set with your own data, because the data distribution is basically the same
import json
# View the data structure of the json file
json_path = "G:/coco2017/annotations/instances_val2017.json"
json_labels = json.load(open(json_path,"r"))
print(json_labels)
# >>>json_label
#      |-info: description file information
#      |-licenses: no impact information
#      |-image:5000 elements correspond to 5000 pictures, including picture information
#      |-Annotations: the 3w + element corresponds to the 3w + target
#      || - segmentation: segmentation information
#      || - area: Area
#      || - iscrowed: whether to overlap. Generally, only 0 training is selected
#      |    |-image_id: picture id
#      ||- bbox: marker box information (upper left coordinate, length and width)
#      |    |_ category_id: category name
#      |_ categories:80 elements correspond to 80 classes
# PS: the id in categories is discontinuous, which should be paid attention to during training.
# About the installation of coco official tool pycocotools
# liunx:pip install pycocotools
# windows:pip install pycocotools-windows
import os
from pycocotools.coco import COCO
from PIL import Image,ImageDraw
import matplotlib.pyplot as plt

json_path = "G:/coco2017/annotations/instances_val2017.json"
img_path = "G:/coco2017/val2017"
# Import coco data
coco = COCO(annotation_file=json_path)
# Get the index of all pictures
ids = list(sorted(coco.imgs.keys()))
print("number of image:%d"%len(ids))
# Get all coco classification labels
coco_classes = dict([(v["id"], v["name"]) for k,v in coco.cats.items()])
# Traverse the first three pictures
for img_id in ids[:3]:
    # Obtain all annotations ids information corresponding to the image id
    ann_ids = coco.getAnnIds(img_id)
    # Obtain all annotation information according to annotations idx information
    targets = coco.loadAnns(ann_ids)
    # Gets the name of the image file
    path = coco.loadImgs(img_id)[0]["file_name"]
    # Read the picture according to the path and convert it to RGB format
    img = Image.open(os.path.join(img_path,path)).convert('RGB')
    # Draw picture
    draw = ImageDraw.Draw(img)
    # Draw target box
    for target in targets:
        x,y,w,h = target["bbox"]  # Extract target box information
        x1,y1,x2,y2 = x,y,int(x+w),int(y+h)  # Calculate coordinates
        draw.rectangle((x1,y1,x2,y2))  # Draw target box
        draw.text((x1,y1),coco_classes[target["category_id"]])  # Draw class name
    # display picture
    plt.imshow(img)
    plt.show()
# File form of object detection results in coco
'''
[{
"image_id"      :int,  # Record the id of the image to which the target belongs
"category_id"   :int,  # Record the category index that predicts the target
"bbox"          :[x,y,w,h]  # Record the bounding box information that predicts the target
"score"         :float  # Record the probability of predicting the goal
}]
'''
# The output of the training results is saved as json and compared with the results on the verification set
from pycocotools.coco import COCO
from pycocotools.cocoeval import COCOeval
# Load dimension files for validation sets
coco_ture = COCO(annotation_file="./val_2017.json")
# Load the prediction results of the network on the coco2017 validation set
coco_pre = coco_ture.loadRes('./predict_results.json')
# See section 5 for the effect of output prediction, indicator mAP
coco_evaluator = COCOeval(cocoGt=coco_ture, cocoDt=coco_pre, iouType="bbox")
coco_evaluator.evaluate()
coco_evaluator.accumulate()
coco_evaluator.summarize()
4. Create your own dataset labelimg & labelme
The xml file generated by LabelImg is consistent with VOC2012
Labelme can not only label the samples of target detection, but also label other samples such as semantic segmentation.
- Download and install: pip install labelImg
- Enter labelImg to open the software

5. Common indicators of target detection coco
TP (true positive): the number of detection frames with IOU > 0.5 (the same Ground Truth is calculated only once).
FP (flame positive): the number of detection frames with IOU < = 0.5 (or redundant detection frames with the same Ground Truth detected).
FN(False Negative): the number of ground truths not detected.
Precision: the correct proportion of all targets predicted by TP/(TP+FP) model.
Recall: TP/(TP+FN) among all real targets, the model predicts the correct target proportion.
AP (average precision): area under P-R (precision recall) curve.
mAP(mean Average Precision): that is, the average value of AP of each category