I didn't expect that it took so long to use k8s to build https version of wordpress, and I also caught up with my friend Mr. slash. Since it's so troublesome, let's record it. Welcome to reprint, please indicate the source, thank you. As for why our website has hidden the server version, but this article generously gives the actual version. The reason: willful, ha ha.
Firstly, kubedm is selected to start a single node k8s, and containerd is used in the runtime, which is lighter. As k8s further decouples docker, I also drift with the tide, and docker is selected for the initialized image warehouse IO / gotok8s, the update is still very timely. Alibaba cloud image acceleration is adopted this time. The following is the general architecture diagram of this deployment. The picture is from slash. nginx at the website entrance is also a container deployment, using hostnetwork.
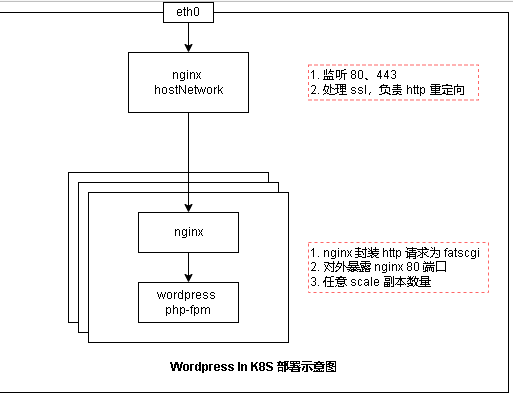
The wordpress image is docker IO / library / wordpress: 5.8.3-fpm. By default, the image does not come with nginx. Here, the nginx image is added manually. wordpress uses the database. Here, mysql is selected and the image is docker IO / library / mysql: 5.7. pvc used in the service comes from self built nfs, and stroageclass is made. The certificate of the website is directly applied for in Tencent cloud. The process is simple and easy to use for free (white whoring is the most fragrant). The disadvantage is that it is valid for one year and needs to apply again after one year. Let's go!
1, The first is mysql, which adopts the headless method, single node deployment deployment, and password env to mount secret. There are many ways to create secret, such as command line
kubectl create secret mysql-pass --password='xxxxxx'
apiVersion: v1

kind: Service

metadata:

name: mysql

labels:

app: mysql

spec:

ports:

- port: 3306

selector:

app: mysql

clusterIP: None
apiVersion: v1
kind: Service
metadata:
name: mysql
labels:
app: mysql
spec:
ports:
- port: 3306
selector:
app: mysql
clusterIP: None
apiVersion: v1
kind: PersistentVolumeClaim
metadata:
name: mysql-pv-claim
annotations:
volume.beta.kubernetes.io/storage-class: "nfs-storage"
labels:
app: mysql
spec:
accessModes:
- ReadWriteOnce
resources:
requests:
storage: 5Gi
apiVersion: apps/v1
kind: Deployment
metadata:
name: mysql
labels:
app: mysql
spec:
selector:
matchLabels:
app: mysql
strategy:
type: Recreate
template:
metadata:
labels:
app: mysql
spec:
containers:
- image: docker.io/library/mysql:5.7
imagePullPolicy: IfNotPresent
name: mysql
env:
- name: MYSQL_ROOT_PASSWORD
valueFrom:
secretKeyRef:
name: mysql-pass
key: password
ports:
- containerPort: 3306
name: mysql
volumeMounts:
- name: mysql-storage
mountPath: /var/lib/mysql
volumes:
- name: mysql-storage
persistentVolumeClaim:
claimName: mysql-pv-claim
After apply ing, enter the mysql pod to create the database wordpress
2, yaml related to wordpress
The nginx container is added to the pod of wordpress, and the configmap is mounted to replace the default The configmap of conf and nginx is as follows
apiVersion: v1
kind: ConfigMap
metadata:
  name: wordpress-configs
data:
  default.conf: |
    server {
      listen 80 default_server;

      client_max_body_size 20m;

      root /var/www/html;
      index index.php index.html index.htm;

      location ~ \.php$ {
          fastcgi_pass   127.0.0.1:9000;
          fastcgi_index  index.php;
          fastcgi_param  SCRIPT_FILENAME  $document_root$fastcgi_script_name;
          include        fastcgi_params;
      }
    }
The environment variables in wordpress are mounted in the form of secret. The yaml file of secret is as follows. Modify the user and password by yourself
apiVersion: v1
kind: Secret
metadata:
  name: wordpress-secrets
stringData:
  WORDPRESS_DB_HOST: "wordpress-mysql"
  WORDPRESS_DB_USER: "xxxxx"
  WORDPRESS_DB_PASSWORD: "xxxxx"
The following are svc, pvc and deployment related to wordpress
apiVersion: v1

kind: Service

metadata:

name: wordpress

labels:

app: wordpress

spec:

ports:

- name: http

port: 80

targetPort: http

selector:

app: wordpress

type: ClusterIP
apiVersion: v1
kind: Service
metadata:
name: wordpress
labels:
app: wordpress
spec:
ports:
- name: http
port: 80
targetPort: http
selector:
app: wordpress
type: ClusterIP
apiVersion: v1
kind: PersistentVolumeClaim
metadata:
name: wp-pv-claim
annotations:
volume.beta.kubernetes.io/storage-class: "nfs-storage"
labels:
app: wordpress
spec:
accessModes:
- ReadWriteOnce
resources:
requests:
storage: 5Gi
apiVersion: apps/v1
kind: Deployment
metadata:
name: wordpress
labels:
app: wordpress
spec:
selector:
matchLabels:
app: wordpress
strategy:
type: Recreate
template:
metadata:
labels:
app: wordpress
spec:
containers:
- image: docker.io/library/wordpress:5.8.3-fpm
name: wordpress
envFrom:
- secretRef:
name: wordpress-secrets
volumeMounts:
- mountPath: /var/www/html
name: storage
- image: docker.io/nginx:1.21.0
name: nginx
ports:
- containerPort: 80
name: http
volumeMounts:
- mountPath: /etc/nginx/conf.d
name: configs
- mountPath: /var/www/html
name: storage
volumes:
- name: storage
persistentVolumeClaim:
claimName: wp-pv-claim
- name: configs
configMap:
name: wordpress-configs
3, The nginx configuration file for reverse proxy is also mounted with configmap, including the main configuration file nginx Conf and virtual host configuration file haifeihai com. conf.
Note that when WordPress uses HTTPS after proxy, static resources are still requested in the way of http, which will lead to infinite jump, so you can add proxy at nginx of the proxy_set_header X-Forwarded-Proto $scheme; To solve this problem, this feature is also mentioned in the official document of WordPress https://wordpress.org/support/article/administration-over-ssl/#using-a-reverse-proxy
apiVersion: v1
kind: ConfigMap
metadata:
  name: nginx-configs
data:
  nginx.conf: |
    user www-data;
    worker_processes auto;
    #error_log /var/log/nginx/error.log;
    pid /run/nginx.pid;

    # Load dynamic modules. See /usr/share/doc/nginx/README.dynamic.
    include /usr/share/nginx/modules/*.conf;

    events {
        worker_connections 10240;
        use epoll;
    }

    http {
        log_format  main  '$remote_addr - $remote_user [$time_local] "$request" '
                          '$status $body_bytes_sent "$http_referer" '
                          '"$http_user_agent" "$http_x_forwarded_for"';

        access_log  /var/log/nginx/access.log  main;

        server_names_hash_bucket_size 512;
        server_tokens       off;
        sendfile            on;
        tcp_nopush          on;
        keepalive_timeout   65;
        types_hash_max_size 4096;

        gzip  on;
        gzip_min_length 1k;
        gzip_buffers 16 8k;
        gzip_comp_level 4;
        gzip_proxied any;
        gzip_types
          text/xml application/xml application/atom+xml application/rss+xml application/xhtml+xml
          text/javascript application/javascript application/x-javascript
          text/x-json application/json application/x-web-app-manifest+json
          text/css text/plain text/x-component
          font/opentype application/x-font-ttf application/vnd.ms-fontobject
          image/x-icon image/svg+xml;
        gzip_disable "MSIE [1-6]\.(?!.*SV1)";


        include             /etc/nginx/mime.types;
        default_type        application/octet-stream;

        ssl_protocols TLSv1 TLSv1.1 TLSv1.2;
        ssl_session_cache shared:SSL:1m;
        ssl_session_timeout  10m;
        ssl_ciphers HIGH:!aNULL:!MD5;
        ssl_prefer_server_ciphers on;

        proxy_set_header Host $http_host;
        proxy_set_header X-Real-IP $remote_addr;
        proxy_set_header X-Forwarded-For $remote_addr;
        proxy_set_header X-Forwarded-Proto $scheme;

        include /etc/nginx/conf.d/*.conf;
    }

  haifeihai.com.conf: |
    server {
      listen 80;
      listen 443 ssl;
      server_name  www.haifeihai.com haifeihai.com;

      ssl_certificate   ssl/tls.crt;
      ssl_certificate_key  ssl/tls.key;

      resolver 10.2.0.10;

      location /favicon.ico {
          return 204;
      }

      location / {
          if ($host ~ "^hai") {
              return 301 https://www.$http_host$request_uri;
          }
          if ($ssl_protocol = "") {
              return 301 https://$http_host$request_uri;
          }
          set $upstream_name wordpress.default.svc.cluster.local;
          proxy_pass   http://$upstream_name;
      }
    }
https is used this time, so the applied free certificate is mounted in the form of secret, a tls type secret is created, and the obtained certificate path and private key path are modified by yourself. When a tls type secret is created, the key will be automatically modified to tls Key and tls CRT.
kubectl create secret tls haifeihai-secret --cert=haifeihai.com_bundle.crt --key=haifeihai.com.key
The deployment of the reverse proxy ngixn was also mentioned earlier. In order to facilitate parsing, the host network is used.
apiVersion: apps/v1
kind: Deployment
metadata:
  name: nginx
spec:
  selector:
    matchLabels:
      app: nginx
  strategy:
    type: Recreate
  template:
    metadata:
      labels:
        app: nginx
    spec:
      hostNetwork: true
      dnsPolicy: ClusterFirstWithHostNet
      containers:
      - image: docker.io/nginx:1.21.0
        name: nginx
        volumeMounts:
        - mountPath: /etc/nginx/nginx.conf
          name: configs
          subPath: nginx.conf
        - mountPath: /etc/nginx/conf.d/default.conf
          name: configs
          subPath: haifeihai.com.conf
        - mountPath: /etc/nginx/ssl/tls.crt
          name: certs
          subPath: tls.crt
        - mountPath: /etc/nginx/ssl/tls.key
          name: certs
          subPath: tls.key
      volumes:
      - name: configs
        configMap:
          name: nginx-configs
      - name: certs
        secret:
          secretName: haifeihai-secrets
This completes the wordpress deployment using k8s https.